Transcript
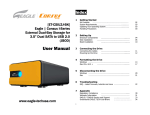
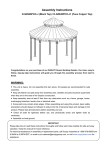
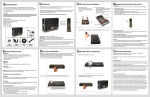
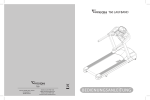
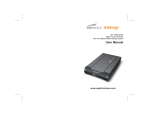
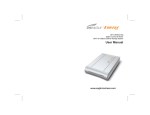
1 Getting Started
This user manual provides step-by-step installation instructions and other
important information regarding your Eagle Consus product. For the latest Eagle
Consus product information, software downloads and news, please visit us at
www.eagletechusa.com
Attention:
Remember to run the included Resource CD for FREE software that protects your
data! We understand how important your data is and strive to provide you with
excellent storage solutions on both hardware and software levels.
3 Setting Up
5 SATA Hard Drive Installation
You will need a 3.5 inch SATA Hard Drive. Carefully follow the procedure to install
the hard drive into the enclosure.
3. Slide the hard drive into the disk mounting tray.
7 Connecting the External Hard Drive
Attention:
Make sure the power switch is OFF before you connect the AC power adapter.
Connecting the cables:
1. Connect the AC power adapter cord to the power input located at the rear of the
external storage system.
2. Connect the AC power adapter cord to an electric outlet.
3. Connect the USB 2.0 HI-Speed cable to the USB port located at the rear of the
external storage system.
4. Connect the USB 2.0 HI-Speed cable to an available USB port on your computer.
Note: If you purchased an Eagle Consus External Hard Drive, you do not need to install
a hard drive and should skip this Quick Installation Guide. Your external hard drive
should be pre-installed and ready to use.
EAGLE | CONSUS M-SERIES ET-CSMSU2-BK Front and Rear View
Package Contents
Eagle Consus M-Series External Storage System
USB 2.0 HI-Speed certified cable
Resource CD
AC power adapter
Quick user guide
4. Push the hard drive to the end.
Powering Up the Drive
Press the power switch to turn on the unit. During this time, your PC will do one of
the following depending on your OS system:
Windows 2000/XP/2003/Vista
You do not need to install any drivers. Windows will automatically detect the external
storage system and display the message “Found New Hardware”. Then it will display
the message “Your New Hardware Is Ready to Use”.
Power Switch – Turns the M-SERIES on / off
USB 2.0 port – Connects to a computer USB port or USB hub
Power Input – Connects to the AC/DC power adapter
Mac OS X
You do not need to install any drivers. Mac OS will automatically detect the external
storage system and display the new hard drive icon on the desktop.
Attention:
Eagle Tech Computers, Inc. is not responsible for consequential damages, including
loss or recovery of data from your hard drive. If you are installing with a hard drive
that has data inside, we suggest you backup your data before proceed to
installation process.
2 System Requirements
4 SATA Hard Drive Installation
Hardware
NOTE: If you purchased an Eagle Consus External Hard Drive, you do not need to install
a hard drive and should skip this Quick Installation Guide. Your external hard drive
should be pre-installed and ready to use. Do NOT attempt to open the external storage
system or VOID warranty if the warranty seal is damaged.
1. Inseart the pin-key into the hole to open the drive tray
Pentium® II, 200 MHz equivalent or newer for IBM compatible PC
PowerPC G4, 350 MHz or newer for PowerPC-based Apple Computer
Core® or newer for Intel-based Apple Computer
Available High Speed USB 2.0 port
SATA Hard Drive
Depending on the hard drive you just installed, you may need to partition, format and
assign new drive letter to it before you can use it. You may visit our FAQ at
http://www.eagletechusa.com/FAQ.htm or run the Resource CD for step by step
instructions on how to do so.
6 SATA Hard Drive Installation
5. Cover the disk mounting tray.
This product contains no user-serviceable parts. Refer servicing only to Eagle Tech
personnel.
Obtaining Service
Software
Eagle Tech Computers values your business and always attempts to provide you the very best of
service. If the product requires maintenance, please contact the retailer from who you originally
purchased the product or visit our tech support online at
http://www.eagletechusa.com/Support.asp to request a RMA number and instructions on how
to return the product for an exchange. Any unauthorized returns will be rejected. All returns must
be shipped in appropriate shipping container, prepaid and insured to the address provided on
your return paperwork. All returns must include the original box, packaging materials, cables, CD
and accessories. Eagle Tech Computers, Inc. is not responsible for damages caused during
shipping.
Windows®
Windows 2000 Pro / Server 2000 / Server 2003 / XP / Vista
Macintosh®
Mac® OS X v.10.2+
Note: For highest performance and reliability, EAGLE | CONSUS recommends that
you install the latest service pack (SP) and updates.
One Year Limited Warranty
Updating Your Operating System
Windows
Go to the Start menu and select Windows updates. For more information regarding
updating your system, visit windowsupdate.microsoft.com.
Macintosh
Go to the Apple menu and select Software Update. For more information regarding
updating your system, visit apple.com/macosx.
Handling Precautions
EAGLE | CONSUS products are precision instruments and must be handled with care
during unpacking and installation. Drives may be damaged by rough handling,
shock, or vibration. Be aware of the following precautions when unpacking your
Eagle | Consus external storage system:
Do not unpack the product until you are ready to install it.
Do not drop or jolt the product.
Do not move the external storage when it is powered up.
8 Warranty Information
Attention: Eagle Tech Computers, Inc. is not responsible for consequential
damages, including loss or recovery of data.
2. Place the SATA hard drive into the enclosure. Make sure the SATA interface is
face into the SATA controller board.
6. Installation process completed!
Eagle Tech Computers warrants its products to be free from defects in manufacturing and
workmanship under normal use for one (1) year. The warranty is non-transferable and is only
valid for the original owner of the product. Invoice clearly showing purchase date and model, is
required for warranty service. All products are warranted for one (1) year from the date of
purchase. Products that have been repaired or replaced by Eagle Tech Computers will be under
warranty for the remainder of the warranty period or thirty (30) days, whichever is longer.
Eagle Tech Computers is not responsible for incidental, or consequential damages resulting from
any breach of warranty or under any other legal theory including, but not limited to, lost profits,
downtime, goodwill, damage to or replacement of equipment and property, and any costs of
recovering, reprogramming, or reproducing any program or data stored in or used with a system
containing your product. Items purchased at clearances, flea markets, garage sales, or through
unauthorized distributors are not covered. For a list of our partner websites and authorized
resellers, please see http://www.eagletechusa.com/Wheretobuy.asp.