1
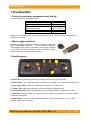
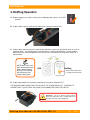
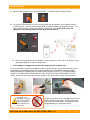
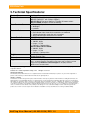
HotPlug™ LT
USER’S MANUAL
Revised June 20, 2011
With HotPlug, you can seize and move a computer without powering down the computer!
HotPlug LT keeps power flowing to the computer while transferring the computer's power input
from one A/C source (such as a wall outlet or power strip) to another (such as a portable UPS).
Features
•
Allows you to move a computer (or
other electronic device) without
shutting it down
•
Smartly and instantly reroutes power of
a target device to a UPS for transport
•
Use the same HotPlug to seize more
than one computer at a scene
Table of Contents
Accessories
Mouse Jiggler
HotPlug Control Panel
HotPlug Operation
2
2
2
3
Outlet Seizure Method
Wire Splitting Method
Warnings & Dangers
Frequently Asked Questions
Technical Specifications
6
7
7
8
9
WARNING: Risk of lethal electric shock.
Live terminals exposed during normal usage
can carry sufficient voltage to be harmful or
deadly to particularly sensitive persons or
those wearing a pacemaker.
Read this
manual in full before using HotPlug. Care
should be taken while using this product;
Product training is recommended.
H o t P l u g U s e r M a n u a l ( A9 - 0 0 0 - 0 0 3 4 ) R E V 1 . 0
-1-
CRU-WiebeTech
1. Pre-Operation
1.1 Check the accessories packaged with your HotPlug.
The box should contain the following items:
HotPlug LT
Input line cord
Output line cord
Mouse Jiggler™
(Mouse activity dongle)
Plug Capture Device
User Manual
1
1
1
1
(HP-LT5 contains 5)
1
1
HotPlug LT is contained inside a sturdy, waterproof carrying case. There is a built-in compartment for
storing the accessories.
1.2 Mouse Jiggler installation
Before using HotPlug to move a computer, plug Mouse Jiggler into
one of the computer’s USB ports. This will prevent the computer
from entering screen saver or sleep modes, which may be protected
by passwords. For more information on the use of Mouse Jiggler,
see the instructions accompanying that product.
1.3 Identifying parts
A Input Power – power coming from the new power source, such as a portable UPS.
B Power Switch – Turns HotPlug unit on & off. Glows when HotPlug is connected to new power source.
C Power Status LED – Glows when HotPlug power switch is in the ON position.
D “Ready” LED – Glows when HotPlug is armed and ready for the power transfer.
E Power Output LED – Glows when HotPlug is connected to the computer’s original power source.
F Arm Switch – When the cables are properly connected, pushing this switch will arm HotPlug so that it
is ready to transfer power.
G Output Power – power line connected to the computer’s original power source, such as a surge
protector, power strip, or wall plug.
H o t P l u g U s e r M a n u a l ( A9 - 0 0 0 - 0 0 3 4 ) R E V 1 . 0
-2-
CRU-WiebeTech
2. HotPlug Operation
A. Before plugging in any cables, make sure the HotPlug power switch is in the OFF
position.
B. Plug the black input line cord into the HotPlug unit (receptacle labeled “IN”).
C. Plug the other end of the input line cord into the new power source that you want to switch to (such as
a portable UPS). The HotPlug power switch will light up, indicating that HotPlug is receiving power.
Make sure that a second receptacle on the same circuit is available on the new power source (i.e. a
duplex outlet).
NOTE: Many UPSs have
both surge-protected and
battery-powered outlets.
Be sure to use HotPlug
with UPS outlets that
supply battery power.
UPS
HotPlug
(Power switch glows when
receiving power from UPS)
D. Plug the gray output line cord into the HotPlug unit (receptacle labeled “OUT”).
YOU SHOULD NOW ASSUME THAT THE PLUG AT THE OTHER END IS HOT. CONTINUE TO
ASSUME THAT IT IS HOT UNTIL HOTPLUG IS DISCONNECTED FROM THE CIRCUIT.
WARNING: The user should assume that the
plug on the output line cord is energized whenever
the other end of the cord is plugged in.
H o t P l u g U s e r M a n u a l ( A9 - 0 0 0 - 0 0 3 4 ) R E V 1 . 0
-3-
CRU-WiebeTech
E. You will now establish a connection between HotPlug’s gray output line cord and the computer’s
original source of power. This is done one of two ways, depending on how the computer is
plugged in.
•
If the computer is plugged into a multi-outlet surge protector or power strip:
This is by far the most common configuration you will encounter. First, unplug any unneeded devices
from the power strip from which the computer is currently receiving power. This will reduce power draw
and ensure there is a receptacle available for use with HotPlug. Next, connect the gray output line cord
into the power strip. After you have plugged the output line cord into the power strip, HotPlug’s red LED
(output power indicator) will light.
(Red color indicates path of computer’s power)
out
HotPlug
in
UPS
•
If the computer is plugged directly to a wall outlet
This is less common. You will need to use the Plug Capture Device (PCD) to create the connection.
a. Install the PCD on the free plug end of the output line cord.
b. Next, carefully pull the computer’s A/C plug about 1/8-inch out from the wall.
Do not pull it more than 1/8-inch or the power connection may be broken.
c.
Slide the PCD’s end tab between the two power conductors in the plug and
between the wall outlet and the plug. Push down on the PCD until it makes
electrical connection and mechanically seats on the plug. HotPlug’s red LED should light, indicating
that a solid electrical connection is established.
NOTE: You will not be able to
use PCD with European plugs
that have insulated prongs.
H o t P l u g U s e r M a n u a l ( A9 - 0 0 0 - 0 0 3 4 ) R E V 1 . 0
-4-
1/8”
CRU-WiebeTech
F. Move the HotPlug power switch to the ON position. The power indicator (yellow) will light.
G. The cabling should now all be in place, and the yellow and red indicators on the HotPlug console
should both be lit. Push the button labeled “ARM” to ready the HotPlug for the power transfer. The
green indicator will light, showing that HotPlug is armed and ready. Note: At this point, the
computer is still receiving power from the original power source.
out
in
H. You are now ready to transfer the computer’s source of power. As with step E, this process varies
slightly depending on the specific configuration.
•
If the computer is plugged into a multi-outlet surge protector or power strip
Be very careful when performing the following action: Unplug the power strip from the wall outlet in one
quick motion, and immediately plug it into an open receptacle on the new power source (e.g. UPS).
WHILE MOVING THE POWER STRIP’S PLUG FROM THE WALL OUTLET TO THE NEW POWER
SOURCE, THE EXPOSED PRONGS WILL BE “HOT” (ELECTRICITY WILL BE PRESENT AT THE
PLUG). Be careful not to touch yourself, other people, or any objects with the plug while you move it.
2
1
WARNING: After
unplugging the original
power source from the
wall outlet, DO NOT
replug it back into the
same outlet.
3
As soon as the power strip is unplugged from the wall
outlet, HotPlug instantly begins supplying the power
strip with a new flow of power. The computer is now
being powered by the new power source.
H o t P l u g U s e r M a n u a l ( A9 - 0 0 0 - 0 0 3 4 ) R E V 1 . 0
-5-
CRU-WiebeTech
•
If the computer is plugged directly to a wall outlet
Make sure Plug Capture Device (see step E) has a solid electrical connection with the metal prongs on
the wall plug. HotPlug’s red LED should be lit.
Be very careful when performing the following action: Using PCD, pull the power plug from the wall in one
quick motion, and immediately insert it into the second receptacle on the new power source (e.g. UPS).
WHILE MOVING THE PLUG FROM THE WALL OUTLET TO THE NEW POWER SOURCE, THE
EXPOSED PRONGS WILL BE “HOT” (ELECTRICITY WILL BE PRESENT AT THE PLUG). Be careful
not to touch yourself, other people, or any objects with the plug while you move it. After establishing
electrical contact between the plug and the receptacle on the UPS, you may disconnect PCD from the
plug.
1
2
WARNING:
After disconnecting
Plug Capture Device from the plug,
the metal leads on PCD will still be
electrified until HotPlug is turned off.
I.
4
3
WARNING: After
unplugging the original
power source from the
wall outlet, DO NOT
replug it back into the
same outlet.
After the power plug has been connected to its new power source, HotPlug can be turned OFF.
J. Unplug the end of the (gray) output line cord NOT connected to HotPlug first.
K. Unplug HotPlug’s black input line cord from the new power source.
L. The operation is now complete. Unplug both the input and output line cords from HotPlug and stow
them within the HotPlug case.
3. Usage with Wire Capture Accessory Kit
Use the tools from the Wire Capture Accessory Kit together with HotPlug to capture a computer that can
not be seized with the standard capturing method. It is recommended that you watch the video for a
visual demonstration of how to use this kit. The video, along with additional product information, is
available for viewing on the HotPlug product page at www.wiebetech.com/products/HotPlug.php .
3.1 Using Wire Capture Kit for Outlet Seizure Method
A.
Plug the 3 prong outlet tester into the desired outlet. Check the indicator lights and make sure the lights that
are showing indicate that wiring was done correctly. If that is not the case, skip to step E.
B.
Plug HotPlug into a UPS and then into the outlet. Turn HotPlug on.
C.
Disassemble the outlet by unscrewing the face plate. Slide the face plate out of the way and remove the
screws to pull out the outlet. If the outlet registered correctly with the 3 prong outlet tester, the red wire should be
hot (could be black), the white wire should be neutral, and the green wire should be ground.
H o t P l u g U s e r M a n u a l ( A9 - 0 0 0 - 0 0 3 4 ) R E V 1 . 0
-6-
CRU-WiebeTech
D.
Arm HotPlug. After HotPlug is armed, use insulated wire cutters to cut the ground wire first, and then the hot
and neutral wires. Use electrical tape to secure the ends of the cut wires. Install the outlet in the plastic outlet
box provided in kit. You are now free to take HotPlug and your UPS away from the capture site.
E.
If the neutral and hot wires are inverted use the non polarized 3-prong to 2-prong adapter. If the outlet
has been wired completely wrong and you are not confident of the connections, STOP. Abandon the outlet
capture and proceed to the wire splitting method.
3.2 Using Wire Capture Kit for Wire Splitting Method
A. If the plug or outlet is inaccessible through conventional capture then you must slit the cable
with the cable sheath slitter. After you have carefully cut the sheath back enough to where the wires are
exposed, use the non-contact voltage tester to identify the hot wire. Pierce the neutral (typically white) wire with
the red piercer. Then pierce the hot (typically black) wire with the black piercer. Use electrical tape to secure the
piercers in place.
B.
Turn on HotPlug and then arm it. Cut the hot wire between the outlet and the piercers. After that, cut the
neutral and ground wires in the same spot. We suggest using the electrical tape again to secure the ends of the
cut wires. You can now unplug the unit and take it and HotPlug away from the capture site.
NOTE: These instructions for Wire Capture Kit do not
cover all instances one might encounter in the field. We
strongly recommend taking training from WiebeTech.
Warnings & Dangers
• Misuse of this product could result in lethal electric shock. Always assume that the plug on the output
line cord is electrified whenever either end is plugged in.
• Be careful not to touch yourself, other people, or any objects with the power plug while transferring it
from one power source to another.
• During the power transfer process, remove the power plug with one quick motion. Do not use slow or
stuttering motions when removing the power plug.
• After removing the power plug from the original power source, DO NOT REINSERT THE PLUG INTO
THE SAME OUTLET.
• Do not use HotPlug in a wet environment.
H o t P l u g U s e r M a n u a l ( A9 - 0 0 0 - 0 0 3 4 ) R E V 1 . 0
-7-
CRU-WiebeTech
4. Frequently Asked Questions (FAQs)
Q: This sounds like magic! How does it work?
A: First, you provide a new power source for the computer, such as an Uninterruptable Power Supply
(UPS). Plug the UPS into HotPlug, then plug HotPlug into the same power strip the computer is using.
Unplug the power strip from the wall. The instant this occurs, HotPlug detects the loss of power and
reroutes the power source from the wall to the UPS. The transfer of power occurs in a few milliseconds,
so the computer never loses power. Now that the UPS is providing power, you can transport the
computer wherever you need it.
Q: What do you do if the computer’s not plugged into a power strip?
A: Use Plug Capture Device to capture the power plug directly from the wall outlet. See user’s manuals
for details.
Q: How long does HotPlug power the computer?
A: HotPlug doesn’t power the computer directly. You must provide a UPS to power the computer.
HotPlug handles the transfer of power from the wall outlet to the UPS. You should use a UPS that is
robust enough to power the computer as long as it takes to transport it to its destination.
Q: Will HotPlug work in the UK or mainland Europe?
A: We have special UK and Euro versions of HotPlug available. These versions include the appropriate
power plug types and handle 220V power.
Q: Will Plug Capture Device work on UK/Euro power plugs?
A: No, UK and Euro power plugs will not fit into PCD. Additionally, these plugs have insulated prongs
that would prevent PCD from establishing electrical contact even if the plugs did fit. To capture a UK or
Euro power cable plugged directly into a wall, you will need to split the cable and capture the wires
directly. CRU-DataPort offers HotPlug accessory kits that include the necessary tools. You can also see
a demonstration video on the HotPlug webpage: http://www.wiebetech.com/products/HotPlug.php.
Q: Has CRU patented this technology?
A: Yes, we have a provisional patent on HotPlug, and plan to seek a full patent.
Q: Is training available for HotPlug?
A: HotPlug training seminars with an instructor from CRU-DataPort are available. Training is
recommended – although HotPlug is easy to use, there are bare terminals exposed during normal
operation of HotPlug which are potentially dangerous with misuse, or without proper care.
H o t P l u g U s e r M a n u a l ( A9 - 0 0 0 - 0 0 3 4 ) R E V 1 . 0
-8-
CRU-WiebeTech
5. Technical Specifications:
Product Name
Product Codes
Case Construction
Status Indicators
Power Control
Power
Weight
Dimensions
Support
HotPlug LT
HP-LT1 (HotPlug LT with 1 Mouse Jiggler)
HP-LT5 (HotPlug LT with 5 Mouse Jigglers)
HP-LT1-UK (UK version of HotPlug – includes UK power cables)
HP-LT1-EURO (European version of HotPlug)
• Tough, high impact case material
• Watertight
• Lockable
• Power on and armed indicators are discernible at a glance.
• Red indicator lights show which receptacles are powered
• Yellow indicator light shows the unit is turned on
• Green indicator light shows the unit is armed
ON/OFF switch on front panel
HP-LT1 or HP-LT5:
• 120VAC, 60 Hz
• Usage – 3.5 VA
• Capacity - 5.0 Amps Max.
HP-LT1-UK or HP-LT1-EURO:
• 240VAC, 50 Hz
• Usage – 3.5 VA
• Capacity - 5.0 Amps Max.
Unit weight 3.5 lbs
Shipping weight 5 lbs.
9.12" x 7.56" x 4.37" 23.2 x 19.2 x 11.1 cm)
We don’t want anything to go wrong with your CRU-Dataport product. But if it
does, Technical Support is standing by and ready to help. Contact Technical
Support through wiebetech.com/techsupport or call (866) 744-8722.
WiebeTech is a brand of CRU.
HotPlug and Mouse Jiggler are trademarks of CRU Acquisitions Group, LLC. Other marks are the property of their
respective owners.
© 2008, 2011 CRU Acquisitions Group, LLC.
All rights reserved.
Limited Product Warranty
CRU-DataPort (CRU) warrants RTX to be free of significant defects in material and workmanship for a period of one year from the original date of
purchase. CRU’s warranty is nontransferable and is limited to the original purchaser.
Limitation of Liability
The warranties set forth in this agreement replace all other warranties. CRU expressly disclaims all other warranties, including but not limited to, the
implied warranties of merchantability and fitness for a particular purpose and non-infringement of third-party rights with respect to the documentation
and hardware. No CRU dealer, agent or employee is authorized to make any modification, extension, or addition to this warranty. In no event will CRU
or its suppliers be liable for any costs of procurement of substitute products or services, lost profits, loss of information or data, computer malfunction,
or any other special, indirect, consequential, or incidental damages arising in any way out of the sale of, use of, or inability to use any CRU product or
service, even if CRU has been advised of the possibility of such damages. In no case shall CRU’s liability exceed the actual money paid for the
products at issue. CRU reserves the right to make modifications and additions to this product without notice or taking on additional liability.
H o t P l u g U s e r M a n u a l ( A9 - 0 0 0 - 0 0 3 4 ) R E V 1 . 0
-9-