1
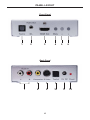
®
Composite To HDMI Scaler
GTV-COMPSVID-2-HDMIS
User Manual
www.gefentv.com
ASKING FOR ASSISTANCE
Technical Support:
Telephone
Fax
(818) 772-9100
(800) 545-6900
(818) 772-9120
Technical Support Hours:
8:00 AM to 5:00 PM Monday thru Friday PST.
Write To:
Gefen, LLC
c/o Customer Service
20600 Nordhoff St
Chatsworth, CA 91311
www.gefentv.com
[email protected]
Notice
Gefen, LLC reserves the right to make changes in the hardware, packaging and
any accompanying documentation without prior written notice.
Composite & S-Video To HDMI Scaler is a trademark of Gefen, LLC
© 2010 Gefen, LLC, All Rights Reserved
All trademarks are the property of their respective companies
Rev X5
CONTENTS
1
Introduction
2
Operation Notes
3
Features
4
Panel Layout
5
Panel Description
6
Connecting And Operating The Composite & S-Video To Hdmi Scaler
7
Configuring The Composite & S-Video To Hdmi Scaler
12 Specifications
13 Warranty
INTRODUCTION
Congratulations on your purchase of the Composite & S-Video To HDMI Scaler.
Your complete satisfaction is very important to us.
Gefen TV
Gefen TV is a unique product line catering to the growing needs for innovative
home theater solutions. We specialize in total integration for your home theater,
while also focusing on going above and beyond customer expectations to ensure
you get the most from your hardware. We invite you to explore our distinct
product line and hope you find your solutions. Don’t see what you are looking for
here? Please call us so we can better assist you with your particular needs.
The Gefen TV Composite & S-Video To HDMI Scaler
The new GefenTV Composite to HDMI Scaler takes either Composite Video
or S-Video as input and converts it to digital HDMI video, then scales it up to a
maximum output of 1080p resolution (or 1920x1200 when used with a computer
monitor).
How It Works
Simply plug in your Composite or S-Video video source to its input jack on the
rear of the Scaler. The Scaler will automatically detect the video frequency and
resolution of the source signal, then convert that picture to a digital HDMI video
signal. You will then choose the best output resolution and viewing format of
the picture on your HDTV via the on-screen menu system (using the optional IR
remote) or using the buttons on the front of the Scaler.
1
OPERATION NOTES
READ THESE NOTES BEFORE INSTALLING OR
OPERATING THE COMPOSITE & S-VIDEO TO HDMI SCALER
•
The Composite & S-video to HDMI Scaler will cross convert between some
digital and audio formats. All audio outputs (HDMI, digital TOSLINK, and
analog stereo mini-jack) will be active. The Composite & S-video to HDMI
Scaler will not, however, down-mix multi-channel audio formats to 2 channel
analog stereo. Please see the chart on page 6 for more information.
•
To switch between Composite and S-Video inputs, press the “+” button
•
Compatible with all HDMI and DVI* displays.
2
FEATURES
Features
•
Inputs S-Video or Composite Video at 480i or 576i resolutions
•
Outputs HDMI video at resolutions of up to 1080p
•
Input resolution is automatically detected while the output resolution and
refresh rate can be selected via the on-screen display (OSD) menu system
and front panel push-buttons
•
48MB frame buffer for frame rate conversion
•
Scales Composite Video and S-Video to HDMI with embedded audio
•
Supports video output resolutions for computer equipment at up to
1920x1200
Package Includes
1 - Composite To HDMI Scaler
1 - 6 ft 3 RCA Composite Cable (M-M)
1 - 5V DC Power Supply
1 - User’s Manual
3
PANEL LAYOUT
Front Panel
1
2
3
4
5
6
Back Panel
7
8
9
4
10
11
12
PANEL DESCRIPTION
1
TOSLINK Audio Output
Digital TOSLINK audio output. This port is constantly active. It will output 2 channel
PCM, Dolby Digital, and DTS formats. Output format is dependant on the chosen input
format which can be selected through the on-screen GUI.
2
R/L Analog Audio
Stereo analog mini-jack output for analog audio. It will only output a stereo analog
signal when the selected input is either from digital or analog stereo source. Multichannel TOSLINK tracks will not be converted to stereo.
3
HDMI Output
This connector will accept a standard 19 pin HDMI male cable. Video output is scalable
to a maximum resolution of 1080p 60Hz. The output resolution is selected through the
on-screen GUI. Audio is permanently active through this connection. Both stereo and
multi-channel audio is supported, based on the selected audio input.
4
Menu Button
Pressing this button will activate the on-screen GUI. It is also the confirmation button for
all sub menus. Use this button to enter sub menus and to begin adjustment for selected
menu items.
5
Down / - Button
This button will scroll down through menu selections and will decrease the selected
adjustment value.
6
Up / + Button
This button will scroll up through the menu system and will increase the selected
adjustment value. This button will also switch between the composite and s-video input
sources.
7
Analog Audio Inputs
Stereo RCA right and left analog audio inputs. Input a stereo analog audio source
which will be translated to the digital and analog output ports on the front panel.
8
Composite Video Input
Standard composite RCA input. This input will accept a composite input of 480i and
576i for the conversion to HDMI. This source is selectable by the Up / + button located
on the front panel.
9
S-Video Video Input
Standard 4 pin s-video input. This input will accept a s-video input of 480i and 576i for
the conversion to HDMI. This source is selectable This source is selectable by the Up /
+ button located on the front panel.
10
TOSLINK Audio Input
Digital TOSLINK audio input. This port will accept multiple audio formats for translation
to the digital and analog audio output ports on the front panel. Multiple audio formats
are supported, including 2 channel PCM, multi channel PCM, Dolby Digital, and DTS.
11
Power Input
Input for the included 5V DC power supply. Please only use the included power supply.
12
Power LED Indicator
This LED indicator will become active once the power supply is properly connected.
If the light is not active, the power supply may not be the correct one, or the unit may
have a fault. Please contact GefenTV technical support.
5
CONNECTING AND OPERATING THE
COMPOSITE & S-VIDEO TO HDMI SCALER
How to Connect the Composite & S-Video To HDMI Scaler
1.
Connect the composite or s-video source to the scaler using user supplied
cables.
2.
Connect the audio source (digital or analog) to the scaler using user supplied
cables.
NOTE: The Composite & S-video to HDMI Scaler will cross convert between
some digital and audio formats. All audio outputs (HDMI, digital TOSLINK, and
analog stereo mini-jack) will be active. Composite & S-video to HDMI Scaler will
not, however, down-mix multi-channel audio formats to 2 channel analog stereo.
Please see the chart below to see if audio will be heard out of a particular output
based on the audio input format.
OUTPUT ▼
TOSLINK
2 CHANNEL
LPCM
TOSLINK
DOLBY DIGITAL
& DTS
ANALOG
STEREO
2 CHANNEL
HDMI
YES
YES
YES
TOSLINK
YES
YES
YES
ANALOG
STEREO
MINI-JACK
YES
NO
YES
INPUT ►
3.
Connect the HDMI display to the scaler using a user supplied HDMI cable.
4.
Connect the desired audio output to the desired audio device using user
supplied cables.
5.
Connect the included 5V DC power supply to the scaler.
NOTE: Once the unit is connected and powered, the displays native resolution
will be detected and set as the output on the Composite & S-video to HDMI
Scaler.
OPERATING THE COMPOSITE & S-VIDEO TO HDMI SCALER
Both the Composite and S-Video inputs can be connected at the same time but
only one source can be viewed at one time. To switch between the Composite and
S-Video inputs, press the - button located on the front panel of the unit.
The Composite & S-video to HDMI Scaler has a built in GUI for navigating the
various functions. The GUI is navigated by the front panel buttons or the optional
GTV-SR-IR remote control (sold separately).
6
CONFIGURING THE COMPOSITE & S-VIDEO TO HDMI SCALER
Entering the Menu System
Pressing the Menu button on the front panel will display the GUI (graphical user
interface) for adjustment options.
The GUI is overlaid onto the outgoing video to the display. Therefore, the source
must be outputting a compatible resolution for viewing on the display. If video is not
visible on the display, the GUI will also fail to be displayed. To correct this, please
reset the unit by following the steps below follow the steps below.
Reset
1.
Verify that the source is on and outputting a video signal.
2.
Verify that the display is connected and powered on.
3.
Press and hold the menu button, located on the front panel.
4.
While holding the menu button, remove the power supply connector from the
unit and wait 5 seconds.
5.
While continuing to hold the menu button, re-insert the power supply into the unit
and then release the menu button.
This will reset the unit and allow it to detect the display’s native resolution based on
its EDID. If an image is still not being displayed, it is possible that either the display’s
EDID is corrupt or the Composite & S-video to HDMI Scaler cannot output the
display’s native resolution. Please call Gefen’s technical support line.
Navigation
Navigation of the GUI is accomplished using the front panel buttons. Please see the
chart below for the functions of each panel button.
Button
MENU
Function
Shows the On Screen Menu and acts as the
confirmation button in all menus
+
Moves menu cursor DOWN the menu /
Increases adjustment values
(Also Switches between the Composite and
S-Video Inputs)
Moves menu cursor UP the menu /
Decreases adjustment values
-
7
CONFIGURING THE COMPOSITE & S-VIDEO TO HDMI SCALER
MAIN MENU
The following are the main menu options. Use the - and + buttons to choose your
desired subcategory and press Menu to enter it.
CONTRAST
BRIGHTNESS
FINE TUNE
COLOR
OUTPUT
OSD
AUDIO
INFORMATION
CONTRAST
Press the - and + buttons to select the CONTRAST option and press the MENU
button to select it. Use the - and + buttons to adjust the CONTRAST setting. When
you are finished adjusting the CONTRAST press the MENU button to return to the
previous menu.
BRIGHTNESS
Press the - and + buttons to select the BRIGHTNESS option and press the MENU
button to select it.. Use the - and + buttons to adjust the BRIGHTNESS setting.
When you are finished adjusting the BRIGHTNESS press the MENU button to return
to the previous menu.
FINE TUNE
Press the - and + buttons to select the FINE TUNE option and press the
MENU button to select it.. There are several sub-categories that are available for
adjustment. Select the desired option using the - and + buttons and press the
MENU button to begin adjustment. Use the - and + buttons to adjust the selected
option and press the MENU button when you are finished. The following options are
available:
HUE
Use this option to adjust the image HUE.
SATURATION
Use this option to adjust the color SATURATION.
SHARPNESS
Use this options to adjust the image SHARPNESS.
NR
Use this option to adjust the amount of NOISE REDUCTION to be
applied to the video signal.
EXIT
Pressing the MENU button when this option is selected will return
you to the MAIN MENU.
COLOR
Press the MENU button to select the COLOR option. There are several subcategories that are available for adjustment. Select the desired option using the
- and + buttons and press the MENU button to begin adjustment. Use the - and
+ buttons to adjust the selected option and press the MENU button when you are
finished. The following options are available:
8
CONFIGURING THE COMPOSITE & S-VIDEO TO HDMI SCALER
COLOR
Press the MENU button to select the COLOR option. There are several subcategories that are available for adjustment. Select the desired option using the
- and + buttons and press the MENU button to begin adjustment. Use the - and
+ buttons to adjust the selected option and press the MENU button when you are
finished. The following options are available:
RED
Use this option to adjust the amount or RED in the video signal.
GREEN Use this option to adjust the amount or GREEN in the video signal.
BLUE
Use this option to adjust the amount or BLUE in the video signal.
EXIT
Pressing the MENU button when this option is selected will return you to
the MAIN MENU.
SIZE
Press the - and + buttons to select the SIZE option and press the MENU button to
select it.. There are several sub-categories that are available for adjustment. Select
the desired option using the - and + buttons and press the MENU button to begin
adjustment. Use the - and + buttons to adjust the selected option and press the
MENU button when you are finished. The following options are available:
4:3 Source
Full - Stretches the image to fill the screen
Pan Scan - Stretches the image to 4:3 aspect ratio without underscan
Letterbox - Stretches the image to 16:9 aspect ratio without underscan
Underscan - Stretches the image to fullscreen and just within the border of the screen
Overscan - Stretches the image to fullscreen and just beyond the border of the display
9
CONFIGURING THE COMPOSITE & S-VIDEO TO HDMI SCALER
OUTPUT
Press the - and + buttons to select the OUTPUT option and press the MENU
button to select it.. There are several sub-options that are available for selection.
Select the desired option using the - and + buttons and press the MENU button to
select it and exit. The following options are available:
VGA
UXGA
1080i 60
720p 50
WSXGA
SVGA
480i
1080p 60
1080i 50
WUXGA
Native
XGA
480p
576i
1080p 50
SXGA
720p 60
576p
WXGA
AUDIO
Press the MENU button to select the AUDIO option. There are several subcategories that are available for adjustment. Select the desired option using the
- and + buttons and press the MENU button to begin adjustment. Use the - and
+ buttons to adjust the selected option and press the MENU button when you are
finished. The following options are available:
SOURCE
Use this option to select the audio SOURCE. Options are L/R
(analog stereo input) and OPTICAL (digital audio input).
DELAY
Use this option to adjust the audio DELAY. Options are 40, 110,
and 150 milliseconds of DELAY.
SOUND
Use this options to mute all SOUND from the output.
EXIT
Pressing the MENU button when this option is selected will return
you to the MAIN MENU.
OSD
Press the MENU button to select the OSD option. There are several sub-categories
that are available for adjustment. Select the desired option using the - and +
buttons and press the MENU button to begin adjustment. Use the - and + buttons
to adjust the selected option and press the MENU button when you are finished. The
following options are available:
H-POS
Use this option to select the HORIZONTAL POSITION of the onscreen display.
V-POS
Use this option to select the VERTICAL POSITION of the onscreen display.
TIMER
Use this options to adjust how long the on-screen display will
remain on the display, in seconds, when there is no user input.
After this time period the menu will automatically close.
BACKGROUND Use this options to adjust the opacity of the on-screen display’s
background.
EXIT
Pressing the MENU button when this option is selected will return
you to the MAIN MENU.
10
CONFIGURING THE COMPOSITE & S-VIDEO TO HDMI SCALER
FACTORY RESET
This option will reset the entire unit to factory settings.
Press the MENU button to select the FACTORY RESET option. Press the MENU
button once and a confirmation will appear with the word YES. Press the MENU
button once more to confirm a FACTORY RESET.
INFORMATION
Press the MENU button to view information on the current status of the unit. The
following categories are displayed:
SOURCE
This will display the currently selected source.
INPUT
This will display the resolution of the currently selected source.
OUTPUT
This will display the current output resolution.
VERSION
This will display the current firmware revision.
Pressing the MENU button will return you to the MAIN MENU.
11
SPECIFICATIONS
Digital Video Amplifier Bandwidth ............................................................ 165 MHz
VGA Amplifier Bandwidth ........................................................................... 10 MHz
Input DDC Signal ......................................................................... 5 Volts p-p (TTL)
S-Video Connector ................................................................................... Mini-DIN
Composite Connector ............................................................................. RCA Jack
Power Consumption ....................................................................... 10 Watts (max)
Power Supply .............................................................................................. 5V DC
Dimensions ................................................................................ 5”W x 1”H x 3.5”D
Shipping Weight ............................................................................................ 2 lbs.
12