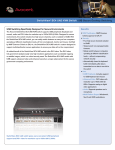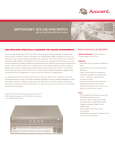
1
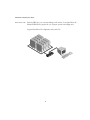
®
SWITCHVIEW SC
Installer/User Guide
Avocent Corporation
4991 Corporate Drive
Huntsville, Alabama 35805-6201 • USA
(Tel) 256-430-4000 (Fax) 256-430-4030
http://www.avocent.com
®
SwitchView SC
Installer/User Guide
Avocent Corporation
4991 Corporate Drive
Huntsville, Alabama 35805-6201 • USA
(Tel) 256-430-4000 (Fax) 256-430-4030
http://www.avocent.com
©2003 Avocent Corporation. All rights reserved.
Avocent, Cybex, the Cybex logo, AutoBoot and SwitchView are trademarks or registered trademarks of Avocent Corporation
or its affiliates. IBM, PC, PC/AT and PS/2 are registered trademarks of International Business Machines Corporation.
IntelliMouse is a trademark of Microsoft Corporation. All other marks are the property of their respective owners.
SwitchView SC Installer/User Guide
FCC Notification
Warning: Changes or modifications to this unit not expressly approved by the party
responsible for compliance could void the user's authority to operate the equipment.
Note: This equipment has been tested and found to comply with the limits for a Class
B digital device, pursuant to Part 15 of the FCC Rules. These limits are designed to
provide reasonable protection against harmful interference in a residential installation.
This equipment generates, uses and can radiate radio frequency energy and, if not
installed and used in accordance with the instructions, may cause harmful interference
to radio communications. However, there is no guarantee that interference will not
occur in a particular installation. If this equipment does cause harmful interference
to radio or television reception, which can be determined by turning the equipment
off and on, the user is encouraged to try to correct the interference by one or more
of the following measures:
- Reorient or relocate the receiving antenna.
- Increase the separation between the equipment and the receiver.
- Connect the equipment into an outlet on a circuit different from that to which
the receiver is connected.
- Consult the dealer or an experienced radio/TV technician for help.
Canadian Notification
This digital apparatus does not exceed the Class B limits for radio noise emissions
from digital apparatus set out in the Radio Interference Regulations of the Canadian
Department of Communications.
Le présent appareil numérique n'émet pas de bruits radioélectriques les limites
applicables aux appareils numériques de la class B prescrites dans le Règlement sur le
brouillage radioélectrique édicté par le Ministère des Communications du Canada.
NSA Notification
This appliance complies with NSA certification requirements to EAL 4.
NIAP Notification
The SwitchView SC is the only KVM switch evaluated by NIAP to meet EAL 4 Common
Criteria security requirements.
Table of Contents
Chapter 1 - Product Overview
Feature Overview....................................................................................................................................... 1
Compatibility .............................................................................................................................................. 3
Chapter 2 - Installation
Basic Install................................................................................................................................................. 5
Chapter 3 - Operations
Overview....................................................................................................................................................... 9
Chapter 4 - Appendices
A: Specifications ...................................................................................................................................... 11
B: Troubleshooting.................................................................................................................................. 12
SwitchView SC Installer/User Guide
INSTRUCTIONS: This symbol is intended to alert the user to the presence
of important operating and maintenance instructions in the literature
accompanying the appliance.
DANGEROUS VOLTAGE: This symbol is intended to alert the user to the presence
of uninsulated “dangerous voltage” within the product's enclosure that may be
of sufficient magnitude to constitute a risk of electric shock to persons.
PROTECTIVE GROUNDING TERMINAL: This symbol indicates a terminal
which must be connected to earth ground prior to making any other connections
to the equipment.
POWER ON: This symbol indicates the principal on/off switch is in the
on position.
POWER OFF: This symbol indicates the principal on/off switch is in the
off position.
1
Product Overview
Feature Overview
The SwitchView SC is specifically designed to make data transfer between connected
computers virtually impossible. Users who access secure and unsecure networks
from one set of peripherals can rely on the unique architecture of the SwitchView
SC to keep their private data completely separate and secure at all times. With no
software to install or boards to configure, installation is simple.
Support for up to
eight computers
The SwitchView SC allows you to control up to eight PCs with one keyboard, monitor
and mouse. Each computer can be up to 30 feet away from the SwitchView SC unit.
The unit works with IBM PC/AT and PS/2 systems, and 100% compatible machines
with support for VGA, SVGA, XGA and XGA-II video. PS/2 keyboard and PS/2 mouse
peripherals are supported through the rear of the unit. A SwitchView SC will support
from one to eight attached PCs, or channels.
AutoBoot technology
The AutoBoot feature boots all attached servers during initial power up or after a
power failure. PCs are booted transparently without operator intervention, and may
be powered up one at a time or all at once. When the power stabilizes, a channel
may be selected. The first available channel is automatically selected upon power
up of the SwitchView SC unit.
IntelliMouse support
The SwitchView SC offers full support for the Microsoft IntelliMouse.
Push-buttons
Switch computer channels quickly and easily via the SwitchView SC
push-buttons.
“Keep Alive” feature
The unit's “Keep Alive” feature allows attached servers to power the unit in the
event of a power failure. This prevents attached PCs from locking up and keeps
you from losing time and data.
1
SwitchView SC Installer/User Guide
Status indicator LEDs
Indicator LEDs give you constant readings on the status of your SwitchView SC.
Channel LEDs take the guesswork out of system operation and diagnostics.
A typical SwitchView SC configuration is shown below.
2
Product Overview
Compatibility
PS/2 peripherals
The SwitchView SC requires a PS/2 mouse and keyboard. The following mice are
known to be compatible:
IBM PS/2-style
Kensington
Logitech Mouseman (PS/2)
Logitech Trackman
Microsoft Serial-PS/2 mouse
Microsoft IntelliMouse
Other manufacturers' mice may operate with the SwitchView SC. If you experience
problems using an untested mouse, contact Avocent Technical Support with the
manufacturer and model number of the mouse.
3
SwitchView SC Installer/User Guide
4
2
Installation
Basic Install
Getting started
Before installing your SwitchView SC, refer to the following list to ensure you
have all items that shipped with the unit, as well as other items necessary for
proper installation.
Supplied with the SwitchView SC
• SwitchView SC unit
• Power cord
• SwitchView SC Installer/User Guide
• SwitchView SC Quick Installation Guide
Additional items needed
• Input cables
• Rack mounting kit (optional)
Connecting peripherals to the SwitchView SC
1.
Power down all computers that will be part of your SwitchView SC system.
Do not use the SwitchView SC unit if the two tamper evident security
stickers are not in place on the top of the unit.
5
SwitchView SC Installer/User Guide
TAMPER EVIDENT STICKER
TAMPER EVIDENT STICKER
PS/2 MOUSE CABLE
VGA MONITOR CABLE
PS/2 KEYBOARD CABLE
2. Locate your PS/2 keyboard and mouse, as well as your VGA video monitor.
3. Plug your VGA monitor cable into the port labeled “VIDEO” on the back of your
SwitchView SC. Plug your PS/2 keyboard cable and your PS/2 mouse cable into
the ports labeled “KBD” and “MSE” respectively.
Connecting computers to the SwitchView SC
1. Locate your first input cable. It will have a 25-pin “D” connector at one
end. Plug this cable into any available lettered channel port on the rear
of the SwitchView SC. The other end of the input cable will have three
connectors: a 15-pin “HDD” connector for your video, a 6-pin miniDIN
connector for a PS/2 keyboard connection and a 6-pin miniDIN connector
for a PS/2 mouse connection. The PS/2 mouse connector is green and
marked with a mouse icon.
Plug these connectors into the matching ports on your computer.
6
Installation
MOUSE PORT
VIDEO PORT
KEYBOARD PORT
2. Locate your next input cable. Repeat step 1 until all computers are properly
attached to the SwitchView SC.
3. Locate the power cord that came with your SwitchView SC unit. Plug it into the
IEC power connector on the unit and make sure that the power switch is off.
Then, plug the other end of the power cord into an appropriate AC wall outlet.
4. Power up your SwitchView SC first, then all attached computers.
7
SwitchView SC Installer/User Guide
8
3
Operations
Overview
PCs may be powered up one at a time or all at once. No operator intervention is
required during booting. As the system stabilizes, the green LEDs over each channel
will light, indicating that the attached computer is powered. The amber LED will
light at the active computer. A PC may now be selected via channel push-buttons.
There are two status LEDs. The red LED lights if an internal failure occurs. The
green LED will blink for several seconds during power up while the system
performs a self-diagnostic. After initialization, the green LED remains lit during
normal operation.
9
SwitchView SC Installer/User Guide
10
4
Appendices
A: Specifications
Mechanical
Height: 1.7" (4.5 cm)
Width: 17.2" (43.7 cm)
Depth: 8.5" (21.6 cm)
Weight: 6.3 lbs (2.9 kg)
Environmental/Power
Operating Temperature: 41° (5°C) to 104° (40°C)
Storage Temperature: -4° (-20°C) to 122° (50°C)
Input Power: 8.0 W
Operating Voltage: 100 - 230 VAC
Power Frequency: 50 - 60 Hz
Supported Hardware
Computer: IBM PC/AT, PS/2 and 100% compatibles
Video Modes: VGA, SVGA, (XGA, XGA-II with adaptor)
Maximum Resolution: 1280 x 1024 @ 60 Hz
Peripherals: PS/2 keyboard, PS/2 mouse, IntelliMouse
(PS/2 only)
Agency Approvals
UL , cUL, FCC, IC and CE
11
SwitchView SC Installer/User Guide
B: Troubleshooting
Our Technical Support staff is ready to assist you with any installation or hardware
issues you encounter with your product. If an issue should develop, check the
Troubleshooting table below to see if the issue can be resolved by following the
procedures outlined, or call Avocent Technical Support at (888) 793-8763.
Symptom
Action
Green channel LED not lit
Verify unit is turned on. Check the cabling between your
computer and the SwitchView SC. Verify that a keyboard
works when plugged directly into your PC.
Unable to switch channels
Verify that all attached PCs are powered and correctly
connected to the unit.
No video
Verify that the video cable between the computer and the
SwitchView SC is connected to the selected port. Verify that
the monitor cable is correctly connected to the SwitchView
SC. Power down the computer, connect the monitor directly
to the computer, and then power up again. If the monitor
does not operate correctly direct to the computer, try
another monitor.
Mouse jumps or "hugs" screen
If the mouse has been hot-plugged while running in
Windows, you may need to close and restart Windows.
Verify that the cables from the computer to the
SwitchView SC are connected properly. Verify that the
mouse is plugged into the mouse port in the User
Console area on the rear panel of the unit. Verify that the
computer works properly with a mouse connected directly
to it. If not, try another mouse.
Keyboard is inoperable on one
or more channels
Verify that the cables from the PC to the SwitchView SC
are connected properly. Verify that the keyboard is plugged
into the keyboard port in the User Console area on the rear
panel of the unit.
12
LIMITED WARRANTY
Avocent Corporation warrants to the original retail purchaser that this product is and will be free from defects
in materials and workmanship for a period of 24 months from the date of purchase.
Additionally, all Avocent products carry an unconditional thirty-day satisfaction guarantee. If, for any reason,
you are dissatisfied with the performance of this product, you may return it to the point of purchase for a refund
of the purchase price (excluding shipping charges). This guarantee does not apply to special order products,
and may not be available through all resellers. During the warranty period, purchaser must promptly call
Avocent for a RETURN MATERIALS AUTHORIZATION (RMA) number. Make sure that the RMA number
appears on the packing slip, proof of purchase, AND ON THE OUTSIDE OF EACH SHIPPING CARTON.
Unauthorized returns or collect shipments will be refused.
Ship prepaid to:
Avocent Corporation
4991 Corporate Drive
Huntsville, AL 35805 U.S.A.
Telephone: (256) 430-4000
The above limited warranty is voided by occurrence of any of the following events, upon which the product
is provided as is, with all faults, and with all disclaimers of warranty identified below:
1.
2.
3.
4.
5.
6.
7.
8.
If non-Avocent approved cabling is attached to the unit. Poorly constructed and miswired cabling can
diminish video quality and damage equipment. Avocent manufactured cabling is built to high quality
standards utilizing overall braided shield to comply with FCC emission standards, and each cable is
individually tested under load.
If defect or malfunction was caused by abuse, mishandling, unauthorized repair, or use other than intended.
If unauthorized modifications were made to product.
If unreported damages occurred in any shipment of the product.
If damages were due to or caused by equipment or software not provided by Avocent.
If the unit is used with non-grounded or incorrectly polarized AC power.
If the product is used in contradiction to any instruction provided by any User Guide or Instruction Sheet
provided to you or with the product.
If the product is damaged due to power surges, water exposure or act of God including lightning.
EXCEPT AS SPECIFICALLY PROVIDED ABOVE AND TO THE MAXIMUM EXTENT ALLOWED BY LAW,
AVOCENT CORPORATION DISCLAIMS ALL WARRANTIES AND CONDITIONS WHETHER EXPRESS,
IMPLIED, OR STATUTORY AS TO ANY MATTER WHATSOEVER INCLUDING, WITHOUT LIMITATION,
TITLE, NON-INFRINGEMENT, CONDITION, MERCHANTABILITY OR FITNESS FOR ANY PARTICULAR
OR INTENDED PURPOSE.
EXCEPT AS EXPRESSLY PROVIDED ABOVE AND TO THE MAXIMUM EXTENT ALLOWED BY LAW, AVOCENT
CORPORATION SHALL NOT BE LIABLE FOR ANY SPECIAL, INDIRECT OR CONSEQUENTIAL DAMAGES
(INCLUDING WITHOUT LIMITATION, LOSS OF PROFIT, LOSS OF BUSINESS, LOSS OF INFORMATION,
FINANCIAL LOSS, PERSONAL INJURY, LOSS OF PRIVACY OR NEGLIGENCE) WHICH MAY BE CAUSED BY
OR RELATED TO, DIRECTLY OR INDIRECTLY, THE USE OF A PRODUCT OR SERVICE, THE INABILITY
TO USE A PRODUCT OR SERVICE, INADEQUACY OF A PRODUCT OR SERVICE FOR ANY PURPOSE OR
USE THEREOF OR BY ANY DEFECT OR DEFICIENCY THEREIN EVEN IF AVOCENT CORPORATION OR
AN AUTHORIZED AVOCENT DEALER HAS BEEN ADVISED OF THE POSSIBILITY OF SUCH DAMAGES
OR LOSSES.
©2003 Avocent Corporation. All rights reserved.
590-378-001A