1
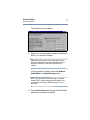
Targus Low Power
Ethernet Card
TM
Mobile Computer
Low Power Ethernet Card™
®
User’s Guide
2
Chapter 1 - Quick Start
Overview
This chapter summarizes how to install the LP-E Card
software for Pocket PCs and Windows CE-based Palm-size
PCs, Handheld Pros, or pen tablets. It assumes you are
familiar with network settings and the devices you are using.
For more detailed instructions, refer to Pocket PC Setup, on
page 10, or Windows CE Setup, on page 21.
Pocket PCs
This procedure applies only to Pocket PCs.
To install software for Windows CE-based mobile
computers, refer to the section titled Windows CE, on page
4.
NOTE: Complete the software installation steps before
inserting the LP-E Card.
1
Connect your Pocket PC to the host PC using the
synchronizing cradle and cable.
2
Create an active partnership between your Pocket PC
and the host PC.
3
Insert the LP-E Card Installation CD into the host PC.
3
Quick Start
Pocket PCs
4
Run SETUP from the CD-ROM.
NOTE: If asked to confirm file replacing, choose Yes to All.
5
When downloading is complete, click OK.
6
Reset your Pocket PC to load the new software.
7
When Setup is complete, click OK and remove your
Pocket PC from its cradle.
8
Plug the LP-E Card into an active Ethernet connection.
9
Insert the LP-E Card into your Pocket PC’s
CompactFlash I/O card slot.
When your Pocket PC displays the following message,
tap OK.
10 Use the IP Address screen to configure your network
settings, then tap OK.
11 Remove the LP-E Card, then reinsert it and connect the
cable to your network.
CAUTION: The new IP settings will not take effect until you
reinsert the card.
4
Quick Start
Windows CE
12 On the ActiveSync screen, choose Network
Connection and the name of the host PC, then tap
Connect….
By default, ActiveSync starts whenever you insert the LP-E
Card. To prevent this, or to run a different program when you
insert the card, use Targus’ LP-E Card Applet. This applet
enables you to:
❖ Specify which program (if any) to launch automatically
upon card insertion
❖ Enable/disable network status icons in the task tray
❖ Determine the frequency with which the system checks
network status
❖ View a summary of IP information
❖ Specify a delay before the driver attempts to connect to
the network or launch a program.
For more information, refer to LP-E Card Applet, on page
17.
Windows CE
This procedure applies only to Windows CE-based mobile
computers.
To install software for Pocket PCs, refer to the section titled
Pocket PCs, on page 2.
The Windows CE screens you see may differ from the
examples given depending on the type of mobile computer
you use.
NOTE: Complete the software installation steps before
inserting the LP-E Card.
5
Quick Start
Windows CE
1
Connect your mobile computer to a host PC using the
serial cable that came with the device.
2
Create an active partnership between your mobile
computer and the host PC.
3
Insert the LP-E Card Installation CD into the host PC.
4
Run SETUP from the CD-ROM.
5
When your mobile computer displays the ActiveSync
screen, set your configuration options then tap Finish.
NOTE: For instructions on how to configure ActiveSync,
refer to LP-E Card Applet, on page 27.
6
When the Setup Complete screen appears, tap OK,
then reset your mobile computer to load the new
software.
7
Remove the serial cable from your mobile computer,
then plug the LP-E Card into an active Ethernet
connection.
8
Insert the LP-E Card into your mobile computer.
NOTE: For instructions on card insertion, refer to
Connecting the LP-E Card to Your Computer, on
page 36.
9
When the Targus LP-E Driver message appears, tap
OK.
10 Use the IP Address screen to configure your network
settings, then tap OK.
6
Quick Start
Windows CE
11 Remove the LP-E Card, then reinsert it and plug the
LP-E cable into the network.
CAUTION: The new IP settings will not take effect until you
reinsert the card.
12 In the ActiveSync screen, select Network Connection
and the name of the host PC, then tap Connect.
By default, ActiveSync will be initiated every time you insert
the LP-E Card. To prevent this, or to run a different program
when you insert the card, you can use Targus’ LP-E Card
Applet. This applet also allows you to control other unique
features of Targus’ Ethernet software.
For more information, refer to LP-E Card Applet, on page
27.
7
Chapter 2 - Introduction
How This Manual Is Organized
This manual is designed to help you install and operate the
CompactFlash version of Targus’ Low Power Ethernet
(LP-E) Card on a Windows Powered Pocket PC or a
Windows CE-based Palm-size PC, Handheld Pro or pen
tablet.
This chapter explains where to find information about your
LP-E Card and describes the product’s key features. This
chapter also identifies the parts included in the package.
Chapter 3 - Pocket PC Setup, on page 10, describes how to
install the LP-E Card software, configure network settings,
and use the LP-E Card Applet for a Windows Powered
Pocket PC.
Chapter 4 - Windows CE Setup, on page 21, describes how
to install the LP-E Card software, configure network
settings, and use the LP-E Card Applet for a Windows CEbased mobile computer.
Chapter 5 - Hardware Setup, on page 36, explains how to
connect the LP-E Card to your Ethernet network, and how
to insert and remove the card.
Chapter 6 - Troubleshooting, on page 39, gives advice for
correcting the most common problems you may encounter,
explains how to obtain technical assistance, and tells you
what information to have before contacting Targus.
Appendix - Specifications, on page 42, provides technical
data about the LP-E Card.
Introduction
Features
8
Features
Targus’ Low Power Ethernet Card is the first Ethernet
adapter compatible with Windows Powered Pocket PCs and
Windows CE-based mobile computers, including Palm-size
PCs, Handheld Pros, and pen tablets.
You can use the LP-E Card with Microsoft’s ActiveSync™
software to connect your mobile computer to a partner PC
and perform fast, location-independent synchronization of
files, contacts, appointments, tasks, email or channel
content. You can also use the LP-E Card to backup files and
install software.
Targus’ Ethernet software saves time by launching
ActiveSync, or any other program, automatically and saves
power by displaying network activity status icons on the
Windows taskbar instead of using hardware LEDs.
Key Features
❖ 10 megabit-per-second performance via 10BaseT
twisted pair Ethernet
❖ Location-independent operation means you can use
the LP-E Card to stay connected to your data from any
port on your local area network
❖ Battery Friendly™ card conserves energy and reduces
the need to carry and connect AC adapters or replace/
recharge batteries
❖ Plugs into the CompactFlash I/O card slot
❖ Targus’ Ethernet software can launch ActiveSync, or
any other program you specify, automatically on card
insertion
Introduction
Key Features
9
❖ Targus’ LP-E Card Applet for mobile computers
includes icons that display GoodLink and Activity on the
Windows status bar. You can use the applet to enable
or disable automatic program launching. This applet
also shows consolidated network data such as the LP-E
Card’s IP Address, MAC address, gateway address,
etc.
❖ The Ruggedized LP-E Card has a fixed cable with
integrated strain relief
❖ Lifetime warranty on the CompactFlash CF Card and
non-removable cable
10
Chapter 3 - Pocket PC
Setup
Overview
This chapter describes how to install the LP-E Card
software, configure network settings, and manage the LP-E
Card Applet for a Windows Powered Pocket PC.
After installing the LP-E Card, you will no longer require a
serial connection for tasks such as synchronization, backup,
program installation, email or web browsing.
If you have a Windows CE-based Palm-size PC, Handheld
Pro or pen tablet, refer to Windows CE Setup, on page 21,
for installation instructions.
What You Need to Know
Before installing the LP-E Card make sure you:
❖ Know how to reset and restart your Pocket PC.
❖ Know how to establish a partnership with a Windows
9x/2000/NT computer.
❖ Consult your network administrator regarding proper
TCP/IP protocols to avoid conflicts with other network
devices.
❖ Back up all important data.
HINT: For more detailed information on resetting, restarting,
and establishing a partnership for your Pocket PC, refer to
Microsoft’s Pocket PC documentation.
Pocket PC Setup
What You Need to Know
11
Make a copy of the Network Information Form and ask your
network administrator to fill it out so that you can complete
this installation.
Network Information Form
1
Dialup number: ______-_______-___________
User name: ____________________________
Password: _____________________________
2
Does your LAN support DHCP (Dynamic Host
Configuration Protocol)?
❏ Yes (DHCP is supported)
❏ No (DHCP is not supported)
3
If DHCP is not supported by your LAN, what are the IP
addresses for:
Pocket PC IP Address: _____.______.______.______
Subnet Mask: ______.______.______.______
Default Gateway: ______.______.______.______
4
If name servers are not assigned automatically by your
network's DHCP server, what are the IP addresses for
these name servers:
Primary DNS: ______.______.______.______
Secondary DNS: ______.______.______.______
Primary WINS: ______.______.______.______
Secondary WINS: ______.______.______.______
(If you don't run DHCP, you may have to use the IP
address of your partner PC as the Primary WINS
address to run ActiveSync)
Pocket PC Setup
Software Installation
12
Software Installation
This procedure applies only to Pocket PCs.
NOTE: Install the software BEFORE inserting the LP-E Card.
1
Connect your Pocket PC to a host PC using the
synchronizing cradle and cable that came with your
Pocket PC.
2
Insert the LP-E Card Installation CD into the host PC.
WARNING: The host PC must already be actively connected
to your Pocket PC and have an established partnership.
3
Click Start/Run on the host PC, then type D:\SETUP (use
the drive letter of your CD-ROM drive in the place of D:).
Follow the instructions on your host PC.
NOTE: If your Pocket PC prompts you to confirm file
replacing, tap Yes to All to continue.
4
When the message “Application Downloading
Complete” appears, click OK.
5
Reset your Pocket PC to load the new software.
6
When the Setup Complete screen appears, click OK.
7
Remove your Pocket PC from its cradle.
Pocket PC Setup
Software Installation
8
Plug the LP-E Card into an active Ethernet connection.
HINT: The host PC must be connected and currently logged
into the same network as your Pocket PC.
9
13
Insert the LP-E Card into your Pocket PC’s
CompactFlash I/O card slot.
NOTE: For instructions on card insertion, refer to
Connecting the LP-E Card to Your Computer, on
page 36.
The following message appears:
10 Tap OK.
When the IP Address screen appears, proceed to
step 5 on page 15 to enter the network settings from
your Network Information Form (on page 11).
To enter the network setting at any time, refer to
Configure Network Settings, on page 14.
Pocket PC Setup
Software Installation
14
Configure Network Settings
You can change the network configuration at any time using
the IP Address screen on your Pocket PC.
NOTE: Before configuring network settings, check that the
LP-E Card is connected to an active Ethernet connection and
inserted into your Pocket PC.
1
Tap Start, then Settings.
2
Tap the bottom Connections tab.
3
Tap the Network icon.
You should see the Network Connections screen.
Pocket PC Setup
Software Installation
4
15
Tap Targus LP-E Driver.
The IP Address screen appears.
5
Select if you are using a server-assigned IP address (or
DHCP), or a specific IP address.
DEFINITION: DHCP (Dynamic Host Configuration Protocol) the protocol that enables a network to automatically assign a
temporary IP address to a host when it connects to the
network.
If using a specific IP address, enter the IP Address,
Subnet Mask and Default Gateway values.
Pocket PC Setup
Software Installation
16
NOTE: If you use a specific (also called “static”) IP address
instead of DHCP, you may need to enter the IP address of the
host computer in the Primary WINS field (step 6) to use
ActiveSync.
6
Tap the Name Servers tab and enter DNS and WINS
addresses (if needed), then tap OK.
7
Remove the LP-E Card from your Pocket PC. (For
instructions, refer to Removing the LP-E Card, on page
37.)
8
Reinsert the LP-E Card into your Pocket PC and plug
the LP-E cable into the network.
CAUTION: The new IP settings will not take effect until you
reinsert the card. Resetting or power cycling your Pocket PC
will not make it accept the new IP settings.
The ActiveSync screen appears.
9
Choose Network Connection and the name of the
host computer, then tap the Connect… button.
Pocket PC Setup
LP-E Card Applet
17
Your Pocket PC begins the synchronizing process.
When synchronizing is complete, the following screen
appears.
NOTE: By default, ActiveSync starts whenever you plug in
your LP-E Card. If you do not want to run ActiveSync
automatically, or you want to run a different program, you
can use Targus’ LP-E Card Applet. This applet also allows
you to control other unique features of Targus’ Ethernet
software.
If you get a message that no IP address has been set,
please contact your network administrator.
LP-E Card Applet
Targus’ Ethernet driver displays the network icon on the
Pocket PC task tray when you insert the LP-E Card. You
can see the task tray from the Today window.
Targus’ LP-E Card Applet lets you manage the network
status icons, and specify what program (if any) to autolaunch during card insertion.
18
Pocket PC Setup
LP-E Card Applet
To open the LP-E Card Applet, tap the LP-E icon in the task
tray.
To control the network indicators in the task tray, tap the
Indicators tab. The Taskbar indicators screen appears.
If you check the box labeled Enable good link indicator,
the network icon will display a square when GoodLink is
detected:
(GoodLink detected)
If you check the box labeled Enable activity indicator, the
network icon will display a dot when Activity is detected:
(LP-E network Activity detected)
The two slide switches under each option box let you
determine how often the Targus Ethernet driver checks
network status. If you drag a gauge needle towards Slow,
the corresponding indicator will remain longer in its most
recent state. If you drag a gauge needle towards Fast, the
corresponding indicator will change states more rapidly.
Pocket PC Setup
LP-E Card Applet
19
To control auto-launching, tap the Auto-Launch tab.
By default, ActiveSync will run automatically when you
insert the LP-E Card. You can specify a different program to
run at card insertion by selecting the program from the
menu in the Choose a program to run… box. If the
program needs arguments, you can enter them into the
Program arguments: box. If you do not want to autolaunch any program, select <do not run a program> from
the menu in the Choose a program to run… box.
The number in the delay before launch box controls how
many seconds the Targus Ethernet driver will wait after card
insertion before attempting to make a network connection
or launch a program. Usually you can leave this number at
its default value but, if you are having difficulty attaching to
your network, you can try increasing the delay. You should
rarely have to insert a delay longer than 10 seconds to
make a network connection.
You can also open the control panel by tapping Start,
Settings, and the Connections tab.
Pocket PC Setup
LP-E Card Applet
20
In the Settings window, tap the Targus LP-E icon.
You will see the IP Info tab of the Targus LP-E Settings
window.
To change any of the IP addresses, follow the instructions in
Configure Network Settings, on page 14.
NOTE: The MAC address is a unique identification number
programmed permanently into the LP-E Card.
21
Chapter 4 - Windows CE
Setup
Overview
This chapter describes how to install the LP-E Card
software, configure network settings, and manage the LP-E
Card Applet for a Palm-size PC, Handheld Pro, or pen tablet
mobile computer running Windows CE Version 2.11 or
greater.
If you have a Windows Powered Pocket PC, refer to Pocket
PC Setup, on page 10, for installation instructions.
What You Need to Know
Before installing the LP-E Card make sure you:
❖ Know how to reset and restart your mobile computer.
❖ Know how to establish a partnership with a Windows
9x/2000/NT computer using a serial connection.
❖ Consult your network administrator regarding proper
TCP/IP protocols to avoid conflicts with other network
devices.
❖ Back up all important data.
HINT: For more detailed information on resetting, restarting,
and establishing a partnership for your mobile computer,
refer to Microsoft’s Windows CE documentation.
Windows CE Setup
What You Need to Know
22
Make a copy of the Network Information Form and ask your
network administrator to fill it out so that you can complete
this installation.
Network Information Form
1
Dialup number: ______-_______-___________
User name: ____________________________
Password: _____________________________
2
Does your LAN support DHCP (Dynamic Host
Configuration Protocol)?
❏ Yes (DHCP is supported)
❏ No (DHCP is not supported)
3
If DHCP is not supported by your LAN, what are the IP
addresses for:
P/PC or H/PC IP Address: ______._____._____._____
Subnet Mask: ______.______.______.______
Default Gateway: ______.______.______.______
4
If name servers are not assigned automatically by your
network’s DHCP server, what are the IP addresses for
these name servers:
Primary DNS: ______.______.______.______
Secondary DNS: ______.______.______.______
Primary WINS: ______.______.______.______
Secondary WINS: ______.______.______.______
(If you don’t run DHCP, you may have to use the IP
address of your partner PC as the Primary WINS
address to run ActiveSync)
Windows CE Setup
Software Installation
23
Software Installation
This procedure applies only to Windows CE-based mobile
computers. The Windows CE screens you see may differ
from the examples given depending on the type of mobile
computer you use. Targus’ SETUP program automatically
detects the type of device you have and installs the
appropriate software.
HINT: Some mobile computers support a touch pad and not
a pen, so whenever these instructions say tap, substitute
click, as needed.
NOTE: Install the software BEFORE inserting the LP-E Card.
1
Connect your mobile computer to a host PC using the
serial cable that came with the device.
2
Insert the LP-E Card Installation CD into the host PC.
WARNING: The host PC must already be actively connected
to your mobile computer and have an established
partnership.
3
Click Start/Run on the host PC and type D:\SETUP (use
the drive letter of your CD-ROM drive in the place of D:).
Follow the instructions on the host PC.
4
When your mobile computer displays the ActiveSync
screen, enter your configuration settings, then tap
Finish.
Windows CE Setup
Software Installation
24
NOTE: For instructions on how to configure ActiveSync,
refer to LP-E Card Applet, on page 27.
5
When the Setup Complete screen appears, tap OK,
then reset your mobile computer to load the new
software.
6
Remove the serial cable from your mobile computer,
then connect the LP-E Card to an active Ethernet
connection.
7
Insert the LP-E Card into your mobile computer.
NOTE: For instructions on card insertion, refer to
Connecting the LP-E Card to Your Computer, on
page 36.
Targus’ Ethernet driver displays the network icon on the
Windows CE status line and launches ActiveSync
automatically.
8
When your mobile computer displays the Targus LP-E
Driver message, tap OK.
CAUTION: To avoid conflicts with other devices on the
network, consult your network administrator for the proper
settings.
Windows CE Setup
Software Installation
25
The IP Address screen appears.
9
Select if you are using a server-assigned IP address (or
DHCP), or a specific IP address.
DEFINITION: DHCP (Dynamic Host Configuration Protocol) the protocol that enables a network to automatically assign a
temporary IP address to a host when it connects to the
network.
If using a specific IP address, enter the IP Address,
Subnet Mask and Default Gateway values.
NOTE: If you use a specific (also called “static”) IP address
instead of DHCP, you may need to enter the IP address of the
host computer in the Primary WINS field (steps 10) to use
ActiveSync.
10 Tap the Name Servers tab and enter DNS and WINS
addresses (if needed), then tap OK.
Windows CE Setup
Software Installation
26
11 Remove the LP-E Card from your mobile computer.
12 Reinsert the LP-E Card into your mobile computer and
plug the LP-E cable into the network.
CAUTION: The new IP settings will not take effect until you
reinsert the card. Simply resetting or power cycling your
mobile computer will not make it accept the new IP settings.
The ActiveSync screen appears.
13 Select Network Connection (usually at the bottom of
the list) and the name of the host PC.
14 Tap the Connect.... button.
Windows CE Setup
LP-E Card Applet
27
Your mobile computer begins synchronization to the
host PC already on the network.
NOTE: By default, ActiveSync will be initiated every time you
plug in your LP-E Card. If you do not want to run ActiveSync
automatically, or if you want to run a different program when
you insert the card, you can use Targus’ LP-E Card Applet.
This applet also allows you to control other unique features
of Targus’ Ethernet software.
If you get a message saying that no IP address has been
set, please contact your network administrator.
LP-E Card Applet
The LP-E Card Applet allows you to view the LP-E card
configuration, manage network status indicators and
specify what program, if any, to auto-launch. To open the
applet, double-tap the LP-E icon in the task tray.
NOTE: The LP-E Card Applet performs the same functions
on any Windows CE-based mobile computer. The example
screens in this section are from a Palm-size PC. The screens
you see will vary depending of the type of mobile computer
you are using.
Windows CE Setup
LP-E Card Applet
28
To open the applet on a Palm-size PC, tap Start/Settings,
then tap the Targus LP-E icon.
To open the applet on a Handheld Pro or pen tablet, tap
Start/Settings/Control Panel, then double-tap the Targus
LP-E icon.
When you open the applet, you will see the Targus LP-E
screen.
The IP Info tab displays a convenient layout of important IP
addresses plus the MAC address of the card.
Windows CE Setup
LP-E Card Applet
29
NOTE: The MAC address is a unique identification number
programmed permanently into the LP-E Card.
To change any of the IP addresses, refer to Changing IP
Addresses, on page 33.
Tapping on the Indicators tab displays the network status
indicators.
NOTE: By default, Targus’ driver shows the network icon in
the Windows CE status bar to indicate GoodLink (10BaseT
only) and Activity.
If you check the box labeled Turn on good link taskbar
indicator, the network icon will display a square when
GoodLink is detected:
(GoodLink detected)
Windows CE Setup
LP-E Card Applet
30
If you check the box labeled Turn on activity taskbar
indicator, the network icon will display a dot when Activity is
detected:
(Activity detected)
The two slide switches under each option box let you
determine how often the Targus Ethernet driver checks
network status. If you drag a gauge needle towards Check
less often, the corresponding indicator will remain longer in
its most recent state. If you drag a gauge needle towards
more often, the corresponding indicator will change states
more rapidly.
Tapping the Auto-Launch tab displays which program runs
automatically when you insert the LP-E Card (if any).
NOTE: By default, ActiveSync will run automatically when
you insert the LP-E Card.
Windows CE Setup
LP-E Card Applet
31
You can specify any program to run at card insertion by
selecting Run other program: and then using the
Browse… button to select any program on your mobile
computer.
If you do not want any program to run automatically at card
insertion, tap the Run program at card insertion? box so
that it is not checked.
The number in the second delay before launch box
controls how many seconds the Targus Ethernet driver will
wait after card insertion before attempting to make a
network connection or launch a program. Usually you can
leave this number at its default value but, if you are having
difficulty attaching to your network, you can try a higher
value. You should rarely have to insert a delay longer than
10 seconds to make a network connection.
Windows CE Setup
Launching ActiveSync Manually
32
Launching ActiveSync Manually
To launch ActiveSync manually on your mobile computer,
follow these steps:
1
Tap Start/Programs/Communication/ActiveSync.
You should see:
2
Tap the Connect… button.
Your host PC should display a series of synchronization
status screens similar to:
In a few seconds, your mobile computer should display the
Connection Status screen and report that the connection is
up-to-date.
Windows CE Setup
Changing IP Addresses
33
If you have trouble making the LP-E Card synchronize with
the host, try removing the card and reinserting it or try
resetting your mobile computer. If you have to change any
IP addresses associated with the LP-E Card, use the
Network program from the Settings option of the Start
menu. This procedure is described in the next section.
Remember that you must remove and reinsert the LP-E
Card before any IP address changes will take effect. If you
have problems installing the card, refer to Troubleshooting,
on page 39.
Changing IP Addresses
Targus’ LP-E Card Applet allows you to view IP settings but
not to modify them. To modify any IP addresses used to set
up the LP-E, you must run the Windows CE Network applet.
NOTE: Remember that, after you modify IP address settings,
you must remove and reinsert the LP-E Card before any IP
address changes will take effect.
On a Palm-size PC, you can run the Windows CE Network
applet by tapping Start/Settings/Network.
Windows CE Setup
Changing IP Addresses
34
On an Handheld Pro or pen tablet, you can run the
Windows CE Network applet by tapping Start/Settings/
Control Panel and double-tapping the Network icon:
On a Palm-size PC, the Network Configuration screen looks
like this:
Windows CE Setup
Changing IP Addresses
35
Tap Targus LP-E Driver to see the IP Settings screen.
Follow the instructions under Software Installation, steps 7
through 11.
36
Chapter 5 - Hardware
Setup
Overview
This chapter explains how to connect the LP-E Card to your
computer and to your Ethernet network, how to insert and
remove the card, and the effects of leaving the LP-E Card in
your computer.
Connecting the LP-E Card to Your Computer
The LP-E Card fits in the CompactFlash I/O card slot on
your Palm-size PC, Handheld Pro or pen tablet. The user’s
manual for your computer explains how to access the
CompactFlash I/O card slot.
Inserting the LP-E Card into the CompactFlash I/O card slot
Hardware Setup
Connecting an RJ-45 Ethernet Cable
37
The LP-E Card should fit easily into the CompactFlash I/O
card slot. If you encounter resistance, make sure the card is
aligned right-side up. Do not force the card into the slot.
Connecting an RJ-45 Ethernet Cable
To connect the LP-E Card to your network, plug the
Ethernet adapter module into an active Ethernet port or hub
via an RJ-45 cable (cable not included).
Connecting an RJ-45 cable to the Ethernet adapter module
Removing the LP-E Card
If your computer does not have a card eject button, you can
remove the LP-E Card from its slot by gripping the inner
edge of the black plastic bezel that runs across the end of
the card on either side of the cable connector. The plastic
bezel extends slightly beyond the metal surface on the base
38
Hardware Setup
Leaving the LP-E Card in Your Computer
of the card. This side view of the card shows how to pull it
from the slot.
LP-E CompactFlash Card
Black Bezel
Pull Here
Leaving the LP-E Card in Your Computer
While your computer is on, the LP-E Card draws current
even when it is not connected to an Ethernet network.
Targus recommends that you remove the LP-E Card, when
you are not using it, to conserve battery power.
39
Chapter 6 Troubleshooting
Overview
This chapter discusses some of the problems you may
encounter using the LP-E Card with Windows CE V2.11
and higher.
My New IP Addresses Don't Work
After you run the Network program to change IP addresses
for your LP-E Card, you must remove and reinsert the card
before the changes will take effect.
I Get a “DHCP Lease Has Expired” Message
If you are using DHCP and have not used your LP-E Card
for a long time, you may get a message saying that your
DHCP Lease has expired. Tap OK and continue.
My DHCP Server Is Out of IP Addresses
If your network DHCP Server runs out of IP addresses, your
DHCP server will continually report that it is busy and you
will not be able to connect to your network. If this happens,
inform your network administrator.
Troubleshooting
ActiveSync Shows No Network Connection
40
ActiveSync Shows No Network Connection
This could occur if your mobile computer is using DHCP
and is unable to get its TCP/IP information. Your mobile
computer may have trouble communicating with your
network's DHCP server or your DHCP server may be
unavailable.
Try removing the LP-E Card and reinserting it. If this doesn't
fix the problem, wait for a few minutes. If you see the
message “Unable to contact DHCP server, using cached
information,” the LP-E Card is probably working properly. If
after a few minutes ActiveSync still shows no network
connection, ask your network administrator to verify that the
DHCP server is working properly.
You can also try increasing the delay before launch setting
in the Auto-Launch tab of the LP-E Applet. This is
described in the LP-E Applet sections on page 17 for
Pocket PCs and on page 27 for Windows CE-based mobile
computers. If you have to set the delay to longer than 20
seconds, you should consult your network administrator.
NOTE: If you use a static IP address instead of DHCP, you
may have to put the IP address of the host computer in the
Primary WINS: field in order to use ActiveSync.
I Get an “Error Starting Program” Message
When you install the LP-E Card or other Targus product and
you get a message similar to “Error starting program, a
required dll file PPCLOAD.DLL not found,” you probably
tried to perform the installation without first establishing a
Partnership or Guest relationship between your Windows
CE-based Handheld Pro and your host desktop PC or
notebook.
Troubleshooting
If You Still Have Problems
41
If You Still Have Problems
If you cannot resolve a technical problem with the LP-E
Card, contact Targus' technical support department. Before
contacting Targus, have the following information available:
❖ Serial number of your LP-E Card
❖ Operating system information for your:
•
Mobile computer (e.g., Windows CE v2.11)
•
Partner PC, if any (e.g., Windows 98)
❖ Brand name and model number of your mobile
computer
❖ The CPU type and speed of your host PC, if any
❖ How you know that your LP-E Card is not working
properly and what you did to try to correct the problem
To contact Targus:
❖ Visit Targus’ web site at www.targus.com
❖ Email questions to [email protected]
❖ Phone Targus’ Technical Support department. Refer to
Technical Support, on page 46 for the appropriate
phone numbers.
42
Appendix Specifications
Physical Characteristics
CompactFlash CF Card:
Dimensions:
1.43 x 1.69 x 0.13 inches
(36.4 x 42.8 x 3.3 mm)
Weight:
0.32 oz. (9 g)
Cable with RJ-45 Ethernet
Module:
Module Dimensions:
1.65 x 0.89 x 1.02 inches
(42 x 22.5 x 26 mm)
Interconnect Cable:
10 in long (254 mm)
Weight:
1.5 oz. (42 g)
Power Consumption (supplied by PC host)
Active
With 3.3V Supply:
19 mA (63 mW)
43
Ethernet Interface
Ethernet Interface
Protocol:
10BaseT (IEEE 802.3) Twisted Pair
Module Connector:
RJ-45 female connector
Software Included
LP-E Driver Setup:
Runs on Windows CE 2.11 or Pocket PC
Windows CE LP-E Card
Applet
Compatibility
Network Interface Card:
NE2000
Performance
Ethernet Transfer Rate:
10 megabits per second
44
Certification
Certification
FCC:
Part 15, Class B
CE:
EN55022
C-Tick:
N2953
Warranty
CompactFlash CF Card:
Lifetime
Non-removable Cable:
Lifetime
45
Copyright Notice
Copyright © 2000 Targus Group International, Inc. All rights reserved.
Targus and the Targus logo are registered trademarks of Targus Group
International.
Battery Friendly is a trademark of Socket Communications, Inc.
Windows CE and Windows Powered Pocket PC are registered
trademarks of Microsoft Corp.
All other trademarks, registered trademarks, brand, and product names
are the property of their respective owners.
Reproduction of the contents of this manual without the permission of
Targus is expressly prohibited.
Regulatory Compliance
This equipment has been tested and found to comply with the limits for a
Class B digital device, pursuant to Part 15 of the FCC rules. This
equipment is also CE EN55022 and C-TICK compliant. These limits are
designed to provide reasonable protection against harmful interference
when the equipment is operated in a commercial environment.
This equipment generates, uses, and can radiate radio frequency energy
and, if not installed and used in accordance with the instruction manual,
may cause harmful interference to radio communications. Operation of
this equipment in a residential area is likely to cause harmful interference
in which case the user will be required to correct the interference at his or
her own expense.
If this equipment does cause harmful interference to radio or television
reception, which can be determined by turning the equipment off and on,
the user may try to correct the interference by one or more of the
following measures:
❖
Reorient or relocate the receiving antenna of the radio or television.
❖
Increase the distance separating the equipment and the receiver.
❖
Connect the equipment to an outlet on a different branch circuit than
that of the receiver.
❖
Consult the dealer or an experienced radio/TV technician for help.
46
You may find the following booklet helpful:
How to Identify and Resolve Radio-TV Interference Problems
This booklet is available from the U.S. Government Printing Office,
Washington, D.C. 20402.
Warranty
Targus warrants this product to be free from defects in materials and
workmanship for its lifetime. If your Targus Low Power Ethernet Card is
found to be defective within that time, we will promptly repair or replace it.
This warranty does not cover accidental damage, wear and tear, or
consequential or incidental loss. Under no conditions is Targus liable for
loss or damage to a computer or handheld device, nor loss of, or damage
to, programs, records, or data; nor any consequential or incidental
damages, even if Targus has been informed of their possibility. This
warranty does not affect your statutory right.
Register your Targus Low Power Ethernet Card online at:
http://www.targus.com/product_registration.asp
Technical Support
If you encounter a problem with your Targus accessory, contact our
technical support team at:
Email:
[email protected]
Internet: www.targus.com/support
Our knowledgeable staff is also available to answer your questions
through one of the following numbers:
North America
Monday through Friday, 8:00 a.m. (08:00) to 6:00 p.m. (18:00) Eastern
time:
US & Canada:
800-283-6325
47
Euorpe
Belgium
+32 (0) 02-717-2451
Denmark
+45 (0) 35-25-8751
France
+33 (0) 1-64-53-9151
Germany
+49 (0) 21-16-579-1151
Italy
+39 (0) 24-827-1151
Netherlands
+31 (0) 53-484-9470
Spain
+34 (0) 91-745-6221
Sweden
+46 (0) 8-751-4058
Switzerland
+41 (0) 1-212-0007
UK
+44 (0) 20-7744-0330
Eastern Europe
and Others
+31 (0) 53-484-9479
The Leading Global Supplier of Portable Solutions
Visit our Web site at www.targus.com
NEW YORK • LOS ANGELES • TORONTO • TOKYO • HONG KONG
SINGAPORE • SYDNEY • LONDON • PARIS • BRUSSELS • HANNOVER
MILANO •BARCELONA •AMSTERDAM
Features and specifications are subject to change without notice. ©2000 Targus Corp.
400-0016-001A