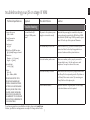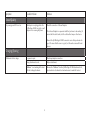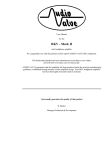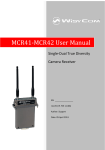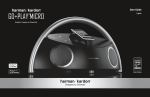
1
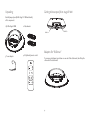
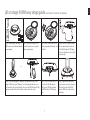
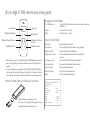
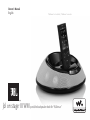
Owner’s Manual
English
“Walkman” not included / “Walkman” non inclus
jbl on stage III WM portable loudspeaker dock for “Walkman”
®*
fcc regulations
®
Please read the following precautions before use:
1. Read these instructions.
2. Keep these instructions.
3. Heed all warnings.
4. Follow all instructions.
5. Do not use this apparatus near water.
6. Clean only with a dry cloth.
14. Refer all servicing to qualified service personnel.
Servicing is required when the apparatus has been
damaged in any way, such as power supply cord or plug
is damaged, liquid has been spilled or objects have fallen
into the apparatus, the apparatus has been exposed
to rain or moisture, does not operate normally, or has
been dropped.
7. Do not block any ventilation openings. Install in
accordance with the manufacturer’s instructions.
15. Do not expose this apparatus to dripping or splashing
and ensure that no objects filled with liquids, such as
vases, are placed on the apparatus.
8. Do not install near any heat sources such as radiators,
heat registers, stoves or other apparatus (including
amplifiers) that produce heat.
16. To completely disconnect this apparatus from the
AC Mains, disconnect the power supply cord plug from
the AC receptacle.
9. Do not defeat the safety purpose of the polarized or
grounding-type plug. A polarized plug has two blades
with one wider than the other. A grounding-type plug
has two blades and a third grounding prong. The wide
blade or the third prong is provided for your safety. If the
provided plug does not fit into your outlet, consult an
electrician for replacement of the obsolete outlet.
17. The mains plug of the power supply cord shall remain
readily operable.
10. Protect the power cord from being walked on or pinched,
particularly at plugs, convenience receptacles and the
point where they exit from the apparatus.
11. Only use attachments/accessories specified by the
manufacturer.
12. Use only with the cart, stand, tripod, bracket or table
specified by the manufacturer or sold with the
apparatus. When a cart is used, use caution
when moving the cart/apparatus combination
to avoid injury from tip-over.
13. U
nplug this apparatus during lightning storms or when
unused for long periods of time.
FCC Information For Users
This device complies with Part 15 of the FCC Rules. Operation is subject to the following two conditions: (1) This
device may not cause harmful interference; and (2) this device must accept any interference received, including
interference that may cause undesired operation.
Radio and Television Interference
This equipment has been tested and found to comply with the limits for a Class B digital device, pursuant to Part
15 of the FCC Rules. These limits are designed to provide reasonable protection against harmful interference in a
residential installation. This equipment generates, uses and can radiate radio frequency energy and, if not installed
and used in accordance with the instructions, may cause harmful interference to radio communications. However,
there is no guarantee that interference will not occur in a particular installation. If this equipment does cause
interference to radio or television reception, which can be determined by turning the equipment off and then on,
the user is encouraged to try to correct the interference by one or more of the following measures:
• Increase the separation between the equipment and receiver.
• Connect the equipment to a different outlet so that the equipment and receiver are on different branch circuits.
• Consult the dealer or an experienced radio/TV technician for help.
Changes or modifications not expressly approved by JBL could void the user’s authority to operate the equipment.
18. Do not expose batteries to excessive heat such as
sunshine, fire or the like.
IC Statement and Warning
The lightning flash with arrowhead symbol,
within an equilateral triangle, is intended to
alert the user to the presence of uninsulated
“dangerous voltage” within the product’s
enclosure that may be of sufficient magnitude to constitute
a risk of electric shock to persons.
This Class B digital apparatus complies with Canadian ICES-003. Cet appareil numérique de la classe B est
conforme à la norme NMB-003 du CanadaIC Statement and Warning
Battery Disposal
The exclamation point within an equilateral
triangle is intended to alert the user to
the presence of important operating and
maintenance (servicing) instructions in
the literature accompanying the product.
Alkaline batteries are considered non-hazardous. Rechargeable batteries (i.e., nickel cadmium, nickel metalhydride, lithium and lithium-ion) are considered hazardous household materials and may pose an unnecessary
health and safety risk.
In the European Union and other locations, it is illegal to dispose of any battery with household trash. All batteries
must be disposed of in an environmentally sound manner. Contact your local waste management officials for
information regarding the environmentally sound collection, recycling and disposal of used batteries.
WARNING: To reduce the risk of fire or electric shock,
do not expose this apparatus to rain or moisture.
Important Note for All Electronic Products:
Before inserting or unplugging audio cables from the source device’s
headphones or line-level output jacks, it is good practice to turn off
the device first. This will prolong the life of your unit, help protect
your device from static electricity and prevent potential damage.
3
English
jbl on stage * III WM Important Safety Instructions
Unpacking
Getting to know your jbl on stage III wm
®*
Carefully unpack your JBL On Stage III WM and identify
all its components:
1. JBL On Stage III WM
2. Attachments
Audio In
12VDC In
Adapters for “Walkman”
3. Power adapter
4. IR (infrared) remote control
To remove an attachment, push down on one end of the attachment, then lift up the
other end of the attachment.
4
English
jbl on stage III WM easy setup guide read these instructions completely
— +
Step 1. Unpack the JBL On Stage III
WM, remote control attachmentsand
power adapter.
Step 2. Rotate the battery door to
the unlocked position to open the
battery compartment.
Step 3. Place 6 AA batteries in the
battery compartment. Batteries not
included.
or
Step 5. Place the appropriate “Walkman” attachment onto the JBL On
Stage III WM. Place your “Walkman” on the docking attachment or connect an audio cable (not included) to the rear of the JBL On Stage III WM,
and connect the other end of the audio cable to the audio source.
Step 6. Press the Power button on
the back of the JBL On Stage III
WM. A green LED will light when
the JBL On Stage III WM system
is on.
5
Step 4. Connect the power adapter
into the input marked on the rear
of the JBL On Stage III WM; plug
the power adapter into a wall outlet
or power strip.
HOME
PWR OFF
BACK
OPTION
Step 7. Adjust the volume using
(+) to increase and (–) to decrease.
Press both to mute the JBL On
Stage III WM. Press either button
to unmute.
jbl on stage III WM remote easy setup guide
Navigation Control Mode
Turn “Walkman” on:
Volume Down
“Walkman” Play/Pause
“Walkman” Rewind/ Previous
“Walkman” Folder +
Volume Up
Mute/Unmute
“Walkman” Next/Fast
Forward
“Walkman” Folder –
1. In the battery-only mode, the JBL On Stage III WM loudspeaker dock will
turn off to save battery power when muted or paused for longer than 10
minutes.
2. In the wall adapter power supply mode, the JBL On Stage III WM will go
into standby mode if no audio signal is detected for 10 minutes. Once an
audio signal is detected, the speaker will return to normal playing mode.
Press the Play/Pause button on the remote control to wake the
“Walkman”.
Press the Folder + button.
Press the Folder – button.
Folder +
Folder –
Music Control Mode
Play a track:
Pause a track:
Skip to next track:
Skip to previous track:
Press the Play/Pause button.
Press the Play/Pause button while a song is playing.
Press the Next/Fast Forward button.
Press the Rewind/Previous button twice within two
seconds.
Press and hold the Next/Fast Forward button.
Press and hold the Rewind/Previous button.
Press the Volume Up button.
Press the Volume Down button.
Press the Mute/Unmute button.
Fast-advance track:
Fast-reverse track:
Increase volume:
Decrease volume:
Mute:
Remote Control Battery Installation Instructions
JBL Remote Control Technical
Specifications
Transmission:
Frequency:
Operating Range:
Battery Type:
Dimensions:
Width:
Height:
Depth:
Weight (including battery):
1. Remove battery-compartment cover.
2. Insert a 3-volt 2032 type battery, positive side up.
3. Replace battery-compartment cover.
6
IR
38kHz
20 feet(6 meters)
CR2025 3V
1.29"(33mm)
3.38" (86mm)
0.23" (6mm)
1.2 oz.
English
troubleshooting your jbl on stage III WM
Technical Specifications
Symptom
Possible Problem
Solution
No power to the system or power
supply is not inserted correctly
Ensure that the power supply is connected to a live power
source and properly connected to the JBL On Stage III WM.
Note: When the JBL On Stage III WM is powered, a green
power LED on the top of the system will illuminate.
The volume may be set too low
Touch the volume “Up” (+) button to increase system
volume level. Note: See the Easy Setup guides for an
overview of volume and other system functions.
Issue with auxiliary audio source
Make sure an auxiliary cable is properly connected to
a known reliable source. Test the audio source with
headphones. Turn up the volume of the source.
Issue with iPhone/iPod source
Make sure that the iPhone/iPod is properly docked. Make
sure iPhone/iPod is not paused; press the Play button on
the iPhone/iPod or remote control. Try connecting your
iPhone/iPod from it’s heaphone jack.
Low or drained batteries
Replace the batteries. The green power LED will change
to red when batteries need to be replaced.
Troubleshooting
Frequency Response:
70Hz – 20kHz
Power Consumption:
20W Maximum
Power Input:
12V/1.5A
No sound from the JBL
On Stage III WM speaker
system
JBL On Stage III WM Transducer:
(4)1”(25mm)full range per channel
Dimensions:
Diameter – 7 1/2”(190mm) Height – 2” (51mm)
System Weight:
1.12 lb (0.51kg)
Battery:
Size – AA
Type – Alkaline, NiMh
DO NOT MIX BATTERY TYPES.
DO NOT MIX CHARGED AND
PARTIALLY CHARGED BATTERIES.
BATTERIES WILL NOT RECHARGE
WHILE IN JBL On Stage III WM.
CAUTION: RISK OF EXPLOSION
OF BAT-TERY IF REPLACED WITH
AN INCORRECT TYPE. DISPOSE OF
USED BATTERIES ACCORDING TO
THE INSTRUCTIONS.
If you have any questions or need further assistance, please visit www.jbl.com.
Features, specifications and appearance are subject to change without notice
7
Symptom
Possible Problem
Solution
Wall adapter is not plugged into the
JBL On Stage III WM correctly, or wall
adapter is not receiving AC power.
Check the connection of the wall adapter.
Sound Quality
No power; green LED is not on.
Place the wall adapter in a powered outlet that you know to be working. To
ensure that the outlet works, test the outlet with a lamp or other device.
Connect the JBL On Stage III WM to an audio source that you knowto be
good. To ensure that the source is good, test the audio source with headphones.
Charging/Syncing
“Walkman” will not charge.
No power to input.
Check input adapter connection.
Wrong attachment is used.
Replace attachment.
“Walkman” is not making full contact
with the docking attachment.
Remove the “Walkman” from the JBL On Stage III WM attachment dock,
place back into attachment dock and make sure it makes full contact.
8
* JBL is a trademark of Harman International Industries, Incorporated, registered in the United States and/or other countries.
The trademark On Stage is used with permission of OSA International, Inc.
* “Walkman” and the “Walkman” logo are trademarks or registered trademarks of Sony Corporation.
JBL est une marque commerciale de Harman International Industries, Incorporated, déposée aux États-Unis et/ou dans d’autres pays.
La marque commerciale On Stage est employée avec la permission d’OSA International, Inc.
“Walkman” et le logo “Walkman” Heart sont des marques déposées de Sony Corporation.
Harman Consumer, Inc.
8500 Balboa Boulevard, Northridge, CA 91329 USA
www.jbl.com
© 2010 Harman International Industries, Incorporated. All rights reserved. Tous droits réservés.
Part Number: 950-0287-001 Rev. A