1
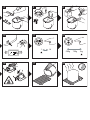
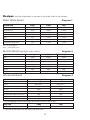
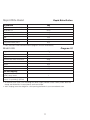
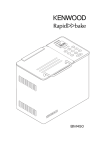
Kenwood Limited, New Lane, Havant, Hampshire PO9 2NH, UK
www.kenwoodworld.com
19123/2
BM450
27
21
22
23
26
25
24
1
2
3
7
8
9
13
14
15
19
20
4
5
6
10
11
12
1
16
17
14
500g
18
750g
1kg
●
●
●
before using your Kenwood appliance
Read these instructions carefully and retain for future
reference.
Remove all packaging and any labels.
safety
●
●
●
●
●
●
●
●
●
●
●
●
●
●
●
●
●
Do not touch hot surfaces. Accessible surfaces are
liable to get hot during use. Always use oven gloves to
remove the hot bread pan.
To prevent spillages inside the oven chamber, always
remove the bread pan from the machine before adding
the ingredients. Ingredients that splash onto the heating
element can burn and cause smoke.
Do not use this appliance if there is any visible sign of
damage to the supply cord or if it has been accidentally
dropped.
Do not immerse this appliance, the supply cord or the
plug in water or any other liquid.
Always unplug this appliance after use, before fitting or
removing parts or before cleaning.
Do not let the electrical supply cord hang over the edge
of a work surface or allow it to touch hot surfaces such
as a gas or electric hob.
This appliance should only be used on a flat heat
resistant surface.
Do not place your hand inside the oven chamber after
the bread pan has been removed as it will be very hot.
Do not touch moving parts within the Bread Maker.
Do not exceed the maximum flour and raising agent
quantities specified in the recipes supplied.
Do not place the Bread Maker in direct sun light, near
hot appliances or in a draught. All these things can
affect the internal temperature of the oven, which could
spoil the results.
Do not use this appliance outdoors.
Do not operate the Bread Maker when it is empty as
this could cause it serious damage.
Do not use the oven chamber for any type of storage.
Do not cover the vents on the side of the machine and
ensure there is adequate ventilation around the bread
maker during operation.
This appliance is not intended to be operated by
means of an external timer or separate remote-control
system.
●
●
●
●
●
●
●
2
This appliance is not intended for use by persons
(including children) with reduced physical, sensory or
mental capabilities, or lack of experience and
knowledge, unless they have been given supervision or
instruction concerning use of the appliance by a person
responsible for their safety.
Children should be supervised to ensure that they do
not play with the appliance.
Only use the appliance for its intended domestic use.
Kenwood will not accept any liability if the appliance is
subject to improper use, or failure to comply with these
instructions.
before plugging in
Make sure your electricity supply is the same as the
one shown on the underside of your Bread Maker.
IMPORTANT: UK only – The wires in the cord are
coloured as follows:
Green & Yellow = Earth
Blue = Neutral
Brown = Live
This appliance conforms to EC directive 2004/108/EC
on Electromagnetic Compatibility and EC regulation no.
1935/2004 of 27/10/2004 on materials intended for
contact with food.
before using your bread maker for the first
time
Wash all parts (see care and cleaning).
Fit the lid (see care & cleaning).
Fit the automatic dispenser to the underside of the lid
(see automatic dispenser).
on/off switch
key
lid handle
viewing window
automatic dispenser
heating element
bread pan handle
kneader
drive shaft
drive coupling
on/off switch
measuring cup
dual measuring spoon 1tsp & 1tbsp
control panel
display window
program status indicator
crust colour indicators (light, medium, dark)
delay timer buttons
menu button
loaf size button
program button
confirm button
viewing light
favourite button
start/stop button
rapid bake button
cancel button
crust colour button
loaf size indicators
●
●
●
Your Kenwood breadmaker is fitted with an ON/OFF
switch and will not operate until the “on” switch is
pressed.
●
●
Plug in and press the ON/OFF switch situated at the
back of the breadmaker - the unit will beep and 1 (3:15)
will appear in the display window.
Always switch off and unplug your breadmaker after
use.
program status indicator
The program status indicator is situated in the display
window and the indicator arrow will point to the stage
of the cycle the breadmaker has reached as follows: Pre-heat
– The pre-heat feature only operates at the
start of the wholewheat (30 minutes), wholewheat rapid
(5 minutes) and gluten free (8 minutes) settings to warm
the ingredients before the first kneading stage begins.
There is no kneader action during this
period.
Knead
– The dough is either in the first or 2nd
kneading stage or being knocked back between the
rising cycles. During the last 20 minutes of the 2nd
Kneading cycle on setting (1), (2), (3). (4). (5). (6). (9),
(10), (11) and (13) the automatic dispenser will operate
and an alert will sound to tell you to add any additional
ingredients manually.
Rise
– the dough is in either the 1st, 2nd or 3rd
rising cycle.
how to measure ingredients (refer to
illustrations 3 to 7)
It is extremely important to use the exact measure of
ingredients for best results.
Always measure liquid ingredients in the see-through
measuring cup with graduated markings provided.
Liquid should just reach marking on cup at eye level,
not above or below (see 3).
Always use liquids at room temperature, 20ºC/68ºF,
unless making bread using the rapid 1 hour cycle.
Follow the instructions given in the recipe section.
Always use the measuring spoon provided to measure
smaller quantities of dry and liquid ingredients. Use the
slider to select between the following measure - 1⁄2 tsp,
1 tsp, 1⁄2 tbsp or 1 tbsp. Fill to the top and level off the
spoon (see 6).
Bake
– The loaf is in the final baking cycle.
Keep Warm
– The bread maker automatically goes
into the Keep warm mode at the end of the baking
cycle. It will stay on the keep warm mode for up to
1hour or until the machine is turned off, which ever is
soonest. Please note: the heating element will
switch on and off and will glow intermittently
during the keep warm cycle.
3
using your Bread Maker
viewing light
(refer to illustration panel)
1
2
3
4
7
8
9
10
11
12
13
14
15
16
17
18
19
●
Remove the bread pan by holding the handle and
turning the pan to the back of the baking chamber.
Fit the kneader.
Pour the water into the bread pan.
Add the rest of the ingredients to the pan in the order
listed in the recipes.
Ensure that all the ingredients are weighed accurately
as incorrect measures will produce poor results.
Insert the bread pan into the oven chamber by
positioning the bread pan at an angle towards the
back of the unit. Then lock the pan by turning it
towards the front.
Lower the handle and close the lid.
Plug in and switch on - the unit will beep and default
to setting 1 (3:15).
Press the MENU button until the required program
is selected. The breadmaker will default to 1Kg &
medium crust colour. Note: If using the “RAPID
BAKE”
, just press the button and the program will
start automatically.
Select the loaf size by pressing the LOAF SIZE
button until the indicator moves to the required
loaf size.
Select the crust colour by pressing the CRUST button
until the indicator moves to the required crust
colour (light, medium or dark).
Press the START/STOP button . To stop or cancel
the program press the START/STOP button
for
2 -3 seconds.
At the end of the baking cycle unplug the breadmaker.
Remove the bread pan by holding the handle and
turning the pan to the back of the baking chamber.
Always use oven gloves as the pan handle
will be hot and take care not to touch the
automatic dispenser on the underside of
the lid as this will also be hot.
Then turn out onto a wire rack to cool.
Leave the bread to cool for at least 30 minutes before
slicing, to allow the steam to escape. The bread will
be difficult to slice if hot.
Clean the bread pan and kneader immediately after
use (see care and cleaning).
●
●
The LIGHT button can be pressed at any time to view
the program status in the display window or to check
the progress of the dough inside the baking chamber.
The baking chamber viewing light will automatically
switch off after 60 seconds..
If the light bulb stops working it must be replaced by
KENWOOD or an authorised KENWOOD repairer (see
service and customer care).
automatic dispenser
Your BM450 breadmaker is fitted with an automatic
dispenser for releasing additional ingredients directly
into the dough during the kneading cycle. This ensures
that the ingredients are not overprocessed or crushed
and are evenly distributed.
to fit and use the automatic dispenser
1 Fit the dispenser to the lid using the alignment
arrows
.
● The dispenser will not locate and lock into position
unless fitted the correct way round.
● The breadmaker can be used without the dispenser
fitted if required but the manual alert will still sound.
2 Fill the dispenser with the required ingredients.
3 The Automatic dispenser operates after approx. 15-20
minutes of kneading and an audible alert sounds as
well in case you need to add ingredients manually.
hints & tips
Not all ingredients are suitable for use with the
automatic dispenser and for best results follow the
guidelines below: ●
●
●
4
Do not overfill the dispenser – follow the recommended
quantities specified in the recipes supplied.
Keep the dispenser clean and dry to prevent
ingredients sticking.
Cut ingredients roughly or lightly dust with flour to
reduce stickiness, which may prevent the ingredients
from being released.
automatic dispenser usage chart
ingredients
suitable for use with
the automatic dispenser
comments
Dried Fruit i.e Sultanas, Raisins,
Mixed Peel & Glace Cherries
Yes
Roughly chop and do not chop too small.
Do not use fruit soaked in syrup or alcohol.
Lightly dust with flour to stop fruit sticking.
Pieces cut too small may stick to the
dispenser and may not be added to the
dough.
Nuts
Yes
Roughly chop and do not chop too small.
Large Seeds i.e. Sunflower &
Pumpkin Seeds
Yes
Small Seeds i.e. Poppy &
Sesame Seeds
No
Very small seeds may fall out through the gap
around the dispenser door.
Best added manually or with other
ingredients.
Herbs – Fresh & Dried
No
Due to the small chopped size may fall out of
the dispenser.
Herbs are very light in weight and may not be
released from the dispenser.
Best added manually or with other
ingredients.
Fruit/Vegetables in
Oil/Tomatoes/Olives
No
Oil may cause the ingredients to stick to
the dispenser.
May be used if well drained and dried
thoroughly before adding to the dispenser.
Ingredients with a high water
content i.e. raw fruit
No
May stick to the dispenser.
Cheese
No
May melt in dispenser.
Add with other ingredients directly into the
pan.
Chocolate/Chocolate Chips
No
May melt in the dispenser.
Added manually when alert sounds.
5
6
For making jams
12 jam
Bake only feature. Can also be
used to rewarm or crisp loaves
already baked and cooled. Use
timer buttons to change time required.
-
3:19
3:32
2:34
4:25
2:40
3:05
500g
0:10 - 1:30
1:30
1:25
5:15
1:30
2:54
1:22
2:08
3:22
3:36
2:39
4:30
2:45
3:10
750g
2:59
3:25
3:40
2:44
4:35
2:50
3:15
1Kg
Total Program Time
Medium Crust Colour
-
2:59
3:13
2:15
3:39
2:20
2:45
-
1:14
-
4:39
1:14
2:37
-
-
3:02
3:17
2:20
3:44
2:25
2:50
2:42
3:05
3:21
2:25
3:49
2:30
2:55
Automatic Dispenser operates &
manual alert for adding ingredients
✬
500g
750g
1Kg
60
-
20
-
-
60
22
22
60
60
60
60
60
60
Keep Warm
✬✬
Produces loaves of bread in under
0:58
60
1 hour. Loaves require warm water,
extra yeast and less salt.
✬ An alert will sound before the end of the 2nd kneading cycle to add ingredients if the recipe recommends doing so.
✬✬ The Bread maker will automatically go in to the keep warm mode at the end of the baking cycle. It will stay in the keep warm mode
for up to 1hour or until the machine is turned off, which ever is soonest.
rapid bake
button
14 bake
13 pizza dough Pizza dough recipes
Long dough cycle for preparation
of Artisan doughs
11 Artisan
dough
Non-yeast batter breads - 1Kg mix
7 quick bread
Dough for hand shaping and
baking in your own oven.
High sugar bread recipes
6 sweet
10 dough
Produces a crisper crust and suited
to loaves low in fat and sugar
5 french
For use with gluten free flours
and gluten free bread mixes.
Max 500g flour wt: 8 minute preheat
For use with granary flour and for a
quicker wholewheat loaf. Not
suitable for 100% wholemeal loaves
5 minute preheat
4 wholewheat
rapid
Cake mixes - 500g mix
Wholewheat or wholemeal flour
recipes: 30 minute preheat
3 wholewheat
9 gluten free
Reduces the white cycle by
approx. 25 minutes
2 white rapid
8 cake
White or Brown Bread Flour recipes
1 basic
program
bread/dough program chart
delay timer
The Delay timer allows you to delay the bread making
process up to 15 hours. The delayed start cannot be
used with the “RAPID BAKE” program or programs (7)
to (13).
IMPORTANT: When using this delayed start function
you must not use perishable ingredients – things that
‘go off’ easily at room temperature or above, such as
milk, egg, cheese and yoghurt etc.
To use the DELAY TIMER simply place the ingredients
in the bread pan and lock the pan into the bread
maker. Then:
●
●
●
●
Press the MENU button
to choose the required
program – the program cycle time is displayed.
Select the crust colour and size required.
Then set the delay timer.
Press the (+) TIMER button and keep pressing until the
total time required is displayed. If you go past the
required time press the (-) TIMER button to go back.
The timer button when pressed, moves in 10 minute
increments. You do not need to work out the difference
between the program time selected and the total hours
required as the bread maker will automatically include
the setting cycle time.
Example: Finished loaf required at 7am. If the
breadmaker is set up with the required recipe
ingredients at 10pm the evening before, total time to be
set on the delayed timer is 9 hours.
●
●
●
Press the MENU button to
choose your program e.g. 1
and use the (+) TIMER
button to scroll the time in 10
minute increments to display
‘9:00’. If you go past ‘9:00’,
simply press the (-) TIMER
button until you return to
‘9:00’.
Press the START/STOP
button and the display colon
(:) will flash. The timer will
start to count down.
If you make a mistake or wish
to change the time set, press
the START/STOP button until
the screen clears. You can
then reset the time.
7
7 When the CONFIRM button is pressed for the last time
after the keep warm stage a beep will sound and the
program will be automatically saved.
8 If you want to move back to the previous stage press
the CANCEL button to change the time.
favourite program
The Favourite program allows you to create and store
up to 5 of your own programs.
to Create/Modify Own Program
1 Plug in and switch on.
2 Press the FAVOURITE button to select the program you
wish to change from P1 to P5.
3 Press the (P) PROGRAM button to start modifying the
program.
4 Use the DELAY TIMER buttons (-) & (+) to change the
time required for each stage.
5 Press the CONFIRM button to save the change and
move to the next stage of the program.
6 Repeat stage 3 to 5 until all stages have been
programmed as required. The program status indicator
shows what stage of the program you have reached.
to use the favourite program
1 Plug in and switch on.
2 Press the FAVOURITE button to choose the required
program P1 to P5.
3 Press the START/STOP button or select the delay timer
function.
P1 – P5 Favourite Pad Program Stages
Stage
Default Setting
1
Pre-Heat
2
Knead 1
3
Knead 2
4
Rise 1
5
Knead 3
6
Rise 2
7
Knead 4
8
Rise 3
9
Baking
10
Keep Warm
Min and Max Time Change Available
0mins
0 – 60mins
3mins
0 – 10mins
22mins
0 – 30mins
20mins
20 – 60mins
15secs
Non changeable
Kneader will not operate if Rise 2 set to 0
30mins
0 – 2hrs
15secs
Non changeable
Kneader will not operate if Rise 3 set to 0
50mins
0 – 2hrs
60mins
0 – 1hr 30mins
60mins
0 – 60mins
8
power interruption protection
Your Bread Maker has an 8 minute power interruption
protection in case the unit is accidentally unplugged
during operation. The unit will continue the program if
plugged back in straight away.
care and cleaning
●
●
●
●
●
●
●
●
●
●
Unplug the bread maker and allow to cool
completely before cleaning.
Do not immerse either the bread maker body or the
outside base of the bread pan in water.
Do not use abrasive scouring pads or metal
implements.
Use a soft damp cloth to clean the outside and inside
surfaces of the bread maker if necessary.
bread pan
Do not dishwash the bread pan.
Clean the bread pan and the kneader immediately
after each use by partially filling the pan with warm
soapy water. Leave to soak for 5 to 10 minutes. To
remove the kneader, turn clockwise and lift off. Finish
cleaning with a soft cloth, rinse and dry.
If the kneader cannot be removed after 10 minutes,
hold the shaft from underneath the pan and twist back
and forth until the kneader is released.
glass lid
Lift off the glass lid and clean with warm soapy water.
Do not dishwash the lid.
Ensure the lid is completely dry before refitting to the
bread maker.
automatic dispenser
Remove the automatic dispenser from the lid and wash
in warm soapy water and if required use a soft brush to
clean. Ensure the dispenser is completely dry before
refitting to the lid.
9
Recipes
(add the ingredients to the pan in the order listed in the recipes)
Basic White Bread
Program 1
Ingredients
500g
750g
1Kg
Water
245ml
300ml
380ml
Vegetable oil
1tbsp
11⁄2tbsp
11⁄2tbsp
Unbleached white bread flour
350g
450g
600g
Skimmed milk powder
1tbsp
4tsp
5tsp
Salt
1tsp
11⁄2tsp
11⁄2tsp
Sugar
2tsp
1tbsp
4tsp
Easy blend dried yeast
1tsp
11⁄2tsp
11⁄2tsp
tsp = 5 ml teaspoon
tbsp = 15ml tablespoon
Brioche Bread (use light crust colour)
Program 6
Ingredients
500g
750g
1Kg
Milk
130ml
200ml
280ml
Eggs
1
2
2
Butter, melted
80g
120g
150g
Unbleached white bread flour
350g
500g
600g
Salt
1tsp
11⁄2tsp
11⁄2tsp
Sugar
30g
60g
80g
Easy blend dried yeast
1tsp
2tsp
21⁄2tsp
Wholemeal Bread
Ingredients
Egg
Program 3
750g
1Kg
1 plus 1 egg yolk
2
See point 1
See point 1
Lemon juice
1tbsp
1tbsp
Honey
2tbsp
2tbsp
Wholemeal bread flour
450g
540g
Unbleached white bread flour
50g
60g
Salt
2tsp
2tsp
Easy blend dried yeast
1tsp
11⁄2tsp
Water
1 Put the egg/eggs into the measuring cup and add sufficient water to give: Loaf size
750g
1Kg
Liquid up to
310 mls
380 mls
2 Pour into the bread pan with the honey and lemon juice.
10
Rapid White Bread
Rapid Bake Button
Ingredients
1Kg
Water, lukewarm (32-35°C)
350ml
Vegetable oil
1tbsp
Unbleached white bread flour
600g
Skimmed milk powder
2tbsp
Salt
1tsp
Sugar
4tsp
Easy blend dried yeast
4tsp
1 Press the RAPID BAKE button and the program will start automatically.
Bread rolls
Program 10
Ingredients
1Kg
Water
240ml
Egg
1
Unbleached white bread flour
450g
Salt
1tsp
Sugar
2tsp
Butter
25g
Easy blend dried yeast
11⁄2tsp
For the topping:
Egg yolk beaten with
15ml (1tbsp) water
1
Sesame seeds and poppy
seeds, for sprinkling, optional
1 At the end of the cycle, turn the dough out onto a lightly floured surface. Gently knock back the
dough and divide into 12 equal pieces and hand shape.
2 After shaping, leave the dough for a final proving then bake in your conventional oven.
11
granary bread flour
A combination of white, wholemeal and rye flours mixed
with malted whole wheat grains, which adds both texture
and flavour. Use on its own or in combination with strong
white flour.
ingredients
The major ingredient in bread making is flour, so selecting
the right one is the key to a successful loaf.
wheat flours
Wheat flours make the best loaves. Wheat consists of an
outer husk, often referred to as bran, and an inner kernel,
which contains the wheat germ and endosperm. It is the
protein within the endosperm which, when mixed with
water, forms gluten. Gluten stretches like elastic and the
gases given off by the yeast during fermentation are
trapped, making the dough rise.
non-wheat flours
Other flours such as rye can be used with white and
wholemeal bread flours to make traditional breads like
pumpernickel or rye bread. Adding even a small amount
adds a distinctive tang. Do not use on its own, as it will
produce a sticky dough, which will produce a dense
heavy loaf. Other grains such as millet, barley, buckwheat,
cornmeal and oatmeal are low in protein and therefore do
not develop sufficient gluten to produce a traditional loaf.
white flours
These flours have the outer bran and wheat germ
removed, leaving the endosperm which is milled into a
white flour. It is essential to use strong white flour or white
bread flour, because this has a higher protein level,
necessary for gluten development. Do not use plain white
flour or self-raising flour for making yeast risen breads in
your bread maker, as inferior loaves will be produced.
There are several brands of white bread flour available,
use a good quality one, preferably unbleached, for the
best results.
These flours can be used successfully in small quantities.
Try replacing 10-20% of white bread flour with any of
these alternatives.
salt
A small quantity of salt is essential in bread making for
dough development and flavour. Use fine table salt or sea
salt, not coarsely ground salt which is best kept for
sprinkling on top of hand-shaped rolls, to give a crunchy
texture. Low-salt substitutes are best avoided as most do
not contain sodium.
wholemeal flours
Wholemeal flours include the bran and wheat germ, which
gives the flour a nutty flavour and produces a coarser
textured bread. Again strong wholemeal or wholemeal
bread flour must be used. Loaves made with 100%
wholemeal flour will be more dense than white loaves. The
bran present in the flour inhibits the release of gluten, so
wholemeal doughs rise more slowly. Use the special
wholewheat programs to allow time for the bread to rise.
For a lighter loaf, replace part of the wholemeal flour with
white bread flour. You can make a quick wholemeal loaf
using the rapid whole wheat setting.
●
●
●
Salt strengthens the gluten structure and makes the
dough more elastic.
Salt inhibits yeast growth to prevent over-rising and
stops the dough collapsing.
Too much salt will prevent the dough rising sufficiently.
sweeteners
Use white or brown sugars, honey, malt extract, golden
syrup, maple syrup, molasses or treacle.
● Sugar and liquid sweeteners contribute to the colour of
bread, helping to add a golden finish to the crust.
● Sugar attracts moisture, so improving the keeping
qualities.
● Sugar provides food for the yeast, although not
essential, as modern types of dried yeast are able to
feed on the natural sugars and starches found in the
flour, it will make the dough more active.
● Sweet breads have a moderate level of sugar with the
fruit, glaze or icing adding extra sweetness. Use the
sweet bread cycle for these breads.
● If substituting a liquid sweetener for sugar then the total
liquid content of the recipe will need to be reduced
slightly.
strong brown flour
This can be used in combination with white flour, or on its
own. It contains about 80-90% of the wheat kernel and
so it produces a lighter loaf, which is still full of flavour. Try
using this flour on the basic white cycle, replacing 50% of
the strong white flour with strong brown flour. You may
need to add a little extra liquid.
12
fats and oils
A small amount of fat or oil is often added to bread to
give a softer crumb. It also helps to extend the freshness
of the loaf. Use butter, margarine or even lard in small
quantities up to 25 g (1 oz) or 22ml (11⁄2 tbsp.) vegetable
oil. Where a recipe uses larger amounts so the flavour is
more noticeable, butter will provide the best result.
●
●
●
Olive oil or sunflower oil can be used instead of butter,
adjust the liquid content for amounts over 15ml (3 tsp)
accordingly. Sunflower oil is a good alternative if you
are concerned about the cholesterol level.
Do not use low fat spreads as they contain up to 40%
water so do not have the same properties as butter.
●
liquid
Some form of liquid is essential; usually water or milk is
used. Water produces a crisper crust than milk. Water is
often combined with skimmed milk powder. This is
essential if using the time delay as fresh milk will
deteriorate. For most programs water straight from the
tap is fine, however on the rapid one-hour cycle it needs
to be lukewarm.
●
●
●
●
●
On very cold days measure the water and leave to
stand at room temperature for 30 minutes before use. If
using milk straight from the fridge do likewise.
Buttermilk, yoghurt, soured cream and soft cheeses
such as ricotta, cottage and fromage frais can all be
used as part of the liquid content to produce a more
moist, tender crumb. Buttermilk adds a pleasant,
slightly sour note, not unlike that found in country style
breads and sour doughs.
Eggs may be added to enrich the dough, improve the
colour of the bread and help to add structure and
stability to the gluten during rising. If using eggs reduce
the liquid content accordingly. Place the egg in a
measuring cup and top up with liquid to the correct
level for the recipe.
yeast
Yeast is available both fresh and dried. All the recipes in
this book have been tested using easy blend, fast action
dried yeast which does not require dissolving in water
first. It is placed in a well in the flour where it is kept dry
and separate from the liquid until mixing commences.
●
For best results use dried yeast. The use of fresh yeast
is not recommended as tends to give more variable
results than dried yeast. Do not use fresh yeast with
the delay timer.
13
If you wish to use fresh yeast note the following:
6g fresh yeast = 1tsp dried yeast
Mix the fresh yeast with 1tsp sugar and 2tbsp of the
water (warm). Leave for 5 minutes until frothy.
Then add to the rest of the ingredients in the pan.
To get the best results the yeast quantity may need to
be adjusted.
Use the amounts stated in the recipes; too much could
cause the bread to over-rise and spill over the top of
the bread pan.
Once a sachet of yeast is opened, it should be used
within 48 hours, unless stated otherwise by the
manufacturer. Re-seal after use. Resealed opened
sachets can be stored in the freezer until required.
Use dried yeast before its use by date, as the potency
gradually deteriorates with time.
You may find dried yeast, which has been
manufactured especially for use in bread machines.
This will also produce good results, though you may
need to adjust the quantities recommended.
adapting your own recipes
removing, slicing and storing bread
After you have baked some of the recipes,supplied you
may wish to adapt a few of your own favourites, which
previously have been mixed and kneaded by hand. Start
by selecting one of the recipes in this booklet, which is
similar to your recipe, and use it as a guide.
●
●
Read through the following guidelines to help you, and be
prepared to make adjustments as you go along.
●
●
●
●
●
●
●
Make sure you use the correct quantities for the bread
maker. Do not exceed the recommended maximum. If
necessary, reduce the recipe to match the flour and
liquid quantities in the breadmaker recipes.
Always add the liquid to the bread pan first. Separate
the yeast from the liquid by adding after the flour.
Replace fresh yeast with easy blend dried yeast. Note:
6g fresh yeast = 1tsp (5ml) dried yeast.
Use skimmed milk powder and water instead of fresh
milk, if using the timer delay setting.
If your conventional recipe uses egg, add the egg as
part of the total liquid measurement.
Keep the yeast separate from the other ingredients in
the pan until mixing commences.
Check the consistency of the dough during the first few
minutes of mixing. Bread machines require a slightly
softer dough, so you may need to add extra liquid. The
dough should be wet enough to gradually relax back.
●
●
For best results, once your loaf is baked, remove it
from the machine and turn out of the bread pan
immediately, although your bread maker will keep it
warm for up to 1 hour if you are not around.
Remove the bread pan from the machine using oven
gloves, even if it is during the keep warm cycle. Turn
the pan upside-down and shake several times to
release the cooked bread. If the bread is difficult to
remove, try gently knocking the corner of the bread
pan on a wooden board, or rotate the base of the shaft
underneath the bread pan.
The kneader should remain inside the bread pan when
the bread is released, however occasionally it may
remain inside the loaf of bread. If so, remove it before
slicing the bread, using a heat resistant plastic utensil
to prise it out. Do not use a metal implement as this
may scratch the non-stick coating on the kneader.
Leave the bread to cool for at least 30 minutes on a
wire rack, to allow the steam to escape. The bread will
be difficult to slice if cut hot.
storing
Home-made bread does not contain any preservatives so
should be eaten within 2-3 days of baking. If not eating
immediately, wrap in foil or place in a plastic bag and seal.
●
●
14
Crispy French-style bread will soften on storage, so is
best left uncovered until sliced.
If you wish to keep your bread for a few days, store in
the freezer. Slice the bread before freezing, for easy
removal of the amount required.
●
general hints and tips
The results of your bread making are dependent on a
number of different factors, such as the quality of
ingredients, careful measuring, temperature and humidity.
To help ensure successful results, there are a few hints
and tips worth noting.
●
The bread machine is not a sealed unit and will be
affected by temperature. If it is a very hot day or the
machine is used in a hot kitchen, then the bread is likely
to rise more, than if it is cold. The optimum room
temperature is between 20°C /68°F and 24°C/75°F.
●
●
●
●
●
●
●
●
●
●
On very cold days let the water from the tap stand at
room temperature for 30 minutes before use. Likewise
with ingredients from the fridge.
Use all ingredients at room temperature unless stated
otherwise in the recipe eg. for the rapid 1 hour cycle
you will need to warm the liquid.
Add ingredients to the bread pan in the order
suggested in the recipe. Keep the yeast dry and
separate from any other liquids added to the pan, until
mixing commences.
Accurate measuring is probably the most crucial factor
for a successful loaf. Most problems are due to
inaccurate measuring or omitting an ingredient. Follow
either metric or imperial measurements; they are not
interchangeable. Use the measuring cup and spoon
provided.
Always use fresh ingredients, within their use by date.
Perishable ingredients such as milk, cheese, vegetables
and fresh fruits may deteriorate, especially in warm
conditions. These should only be used in breads, which
are made immediately.
Do not add too much fat as it forms a barrier between
the yeast and flour, slowing down the action of the
yeast, which could result in a heavy compact loaf.
Cut butter and other fats into small pieces before
adding to the bread pan.
Replace part of the water with fruit juices such as
orange, apple or pineapple when making fruit flavoured
breads.
Vegetable cooking juices can be added as part of the
liquid. Water from cooking potatoes contains starch,
which is an additional source of food for the yeast, and
helps to produce a well-risen, softer, longer lasting loaf.
●
●
15
Vegetables such as grated carrot, courgette or cooked
mashed potato can be added for flavour. You will need
to reduce the liquid content of the recipe as these
foods contain water. Start with less water and check
the dough as it begins to mix and adjust if it is
necessary.
Do not exceed the quantities given in recipes as you
may damage your bread machine.
If the bread does not rise well try replacing the tap
water with bottled water or boiled and cooled water. If
your tap water is heavily chlorinated and fluorinated it
may affect the bread rising. Hard water can also have
this effect.
It is worth checking the dough after about 5 minutes of
continuous kneading. Keep a flexible rubber spatula
next to the machine, so you can scrape down the
sides of the pan if some of the ingredients stick to the
corners. Do not place near the kneader, or impede its
movement. Also check the dough to see if it is the
correct consistency. If the dough is crumbly or the
machine seems to be labouring, add a little extra water.
If the dough is sticking to the sides of the pan and
doesn’t form a ball, add a little extra flour.
Do not open the lid during the proving or baking cycle
as this may cause the bread to collapse.
troubleshooting guide
Following are some typical problems that can occur when making bread in your bread maker. Please review the
problems, their possible cause and the corrective action that should be taken to ensure successful bread making.
PROBLEM
POSSIBLE CAUSE
SOLUTION
LOAF SIZE AND SHAPE
1. Bread does not rise
enough
• Wholemeal breads will be lower than
white breads due to less gluten
forming protein in whole wheat flour.
• Not enough liquid.
• Sugar omitted or not enough added.
• Wrong type of flour used.
• Wrong type of yeast used.
• Not enough yeast added or too old.
• Rapid bread cycle chosen.
• Yeast and sugar came into contact
with each other before kneading cycle.
2. Flat loaves,
no rising.
• Yeast omitted.
• Yeast too old.
• Liquid too hot.
• Too much salt added.
• If using timer, yeast got wet before
bread making process started.
3. Top inflated mushroom-like in
appearance.
•
•
•
•
Too
Too
Too
Not
• Assemble ingredients as listed in recipe.
• Check expiry date.
• Use liquid at correct temperature for
bread setting being used.
• Use amount recommended.
• Place dry ingredients into corners of pan
and make slight well in centre of dry
ingredients for yeast to protect it from
liquids.
•
•
•
•
• Too much liquid.
• Too much yeast.
• High humidity and warm weather may
have caused the dough to rise too fast.
5. Gnarly, knotted top not smooth.
• Increase liquid by 15ml/3tsp.
• Assemble ingredients as listed in recipe.
• You may have used plain white flour
instead of strong bread flour which has
a higher gluten content.
• Do not use all-purpose flour.
• For best results use only fast action
“easy blend” yeast.
• Measure amount recommended and
check expiry date on package.
• This cycle produces shorter loaves. This
is normal.
• Make sure they remain separate
when added to the bread pan.
Reduce yeast by 1/4tsp.
Reduce sugar by 1tsp.
Reduce flour by 6 to 9tsp.
Use amount of salt recommended in
recipe.
• Reduce liquid by 15ml/3 tsp and yeast
by 1/4 tsp.
much yeast.
much sugar.
much flour.
enough salt.
• Warm, humid weather.
4. Top and sides cave in.
• Normal situation, no solution.
• Not enough liquid.
• Too much flour.
• Tops of loaves may not all be perfectly
shaped, however, this does not affect
wonderful flavour of bread.
16
• Reduce liquid by 15ml/3tsp next time or
add a little extra flour.
• Use amount recommended in recipe or
try a quicker cycle next time.
• Chill the water or add milk straight from
the fridge
• Increase liquid by 15ml/3tsp.
• Measure flour acurately.
• Make sure dough is made under the
best possible conditions.
troubleshooting guide (continued)
PROBLEM
POSSIBLE CAUSE
SOLUTION
LOAF SIZE AND SHAPE
6. Collapsed
while baking.
• Machine was placed in a draught or
may have been knocked or jolted
during rising.
• Exceeding capacity of bread pan.
• Not enough salt used or omitted. (salt
helps prevent the dough over proving)
• Too much yeast.
• Warm, humid weather.
7. Loaves uneven
shorter on one end.
• Dough too dry and not allowed to rise
evenly in pan.
• Reposition bread maker.
• Do not use more ingredients than
recommended for large loaf (max. 1Kg).
• Use amount of salt recommended in
recipe.
• Measure yeast acurately.
• Reduce liquid by 15ml/3tsp and
reduce yeast by 1/4tsp.
• Increase liquid by 15ml/3 tsp.
BREAD TEXTURE
8. Heavy dense texture.
• Measure accurately.
• Measure right amount of
recommended yeast.
• Measure accurately.
• Too much flour.
• Not enough yeast.
• Not enough sugar.
9. Open, course, holey
texture.
• Assemble ingredients as listed in recipe.
• Measure right amount of recommended
yeast.
• Reduce liquid by 15ml/3tsp.
• Salt omitted.
• Too much yeast.
• Too much liquid.
10. Centre of loaf is raw,
not baked enough.
• Too much liquid.
• Power cut during operation.
• Quantities were too large and machine
could not cope.
11. Bread doesn’t slice
well, very sticky.
• Reduce liquid by 15ml/3tsp.
• If power is cut during operation for more
than 8 minutes you will need to remove the
unbaked loaf from the pan and start again
with fresh ingredients.
• Reduce amounts to maximum
quantities allowed.
• Allow bread to cool on rack at least
30 minutes to release steam, before
slicing.
• Use a good bread knife.
• Sliced while too hot.
• Not using proper knife.
CRUST COLOUR AND THICKNESS
12. Dark crust colour/
too thick.
• DARK crust setting used.
• Use medium or light setting the
next time.
13. Loaf of bread is burnt.
• Bread maker malfunctioning.
• Refer to “Service and customer care”
section.
14. Crust too light.
• Bread not baked long enough.
• No milk powder or fresh milk in recipe.
• Extend baking time.
• Add 15ml/3tsp skimmed milk powder
or replace 50% of water with milk to
encourage browning.
17
troubleshooting guide (continued)
PROBLEM
POSSIBLE CAUSE
SOLUTION
PAN PROBLEMS
15. Kneader cannot
be removed.
• You must add water to bread pan and
allow kneader to soak before it can
be removed.
• Follow cleaning instructions after use.
You may need to twist kneader slightly
after soaking to loosen.
16. Bread sticks to pan/
difficult to shake out.
• Can happen over prolonged use.
• Lightly wipe the inside of bread pan
with vegetable oil.
• Refer to “Service and customer care”
section.
MACHINE MECHANICS
17. Breadmaker not
operating/Kneader not
moving.
• Breadmaker not switched on
• Check on/off switch is in the ON position.
• Pan not correctly located.
• Delay timer selected.
• Check the pan is locked in place.
• Breadmaker will not start until the
countdown reaches the program start
time.
18. Ingredients not mixed.
• Did not start bread maker.
• After programming control panel, press
start button to turn bread maker on.
• Always make sure kneader is on shaft
in bottom of pan before adding
ingredients.
• Forgot to put kneader in pan.
19. Burning odour noted
during operation.
• Ingredients spilled inside oven.
• Pan leaks.
• Exceeding capacity of bread pan.
• Be careful not to spill ingredients when
adding to pan. Ingredients can burn on
heating unit and cause smoke.
• See “Service and Customer care”
section.
• Do not use more ingredients than
recommended in recipe and always
measure ingredients accurately.
20. Machine unplugged
by mistake or power
lost during use.
How can I save
the bread?.
• If machine is in knead cycle, discard ingredients and start again.
• If machine is in rise cycle, remove dough from bread pan, shape and place in
greased 23 x 12.5cm/9 x 5 in. loaf tin, cover and allow to rise until doubled in size.
Use bake only setting 13 or bake in pre-heated conventional oven at
200ºC/400ºF/Gas mark 6 for 30-35 minutes or until golden brown.
• If machine is in bake cycle, use the bake only setting 14 or bake in pre-heated
conventional oven at 200ºC/400ºF/Gas mark 6 and remove top rack. Carefully
remove pan from machine and place on bottom rack in oven. Bake until golden brown.
21. E:01 appears on
display and machine
cannot be turned on.
• Oven chamber too hot.
• Unplug and allow to cool down for 30
minutes.
22. H:HH & E:EE
• Bread machine is malfunctioning.
appears in display and
Temperature sensor error
machine does not operate.
18
• See “Service and Customer care”
section.
service and customer care
●
If the cord is damaged it must, for safety reasons, be
replaced by KENWOOD or an authorised KENWOOD
repairer.
IMPORTANT INFORMATION FOR CORRECT
DISPOSAL OF THE PRODUCT IN ACCORDANCE
WITH EC DIRECTIVE 2002/96/EC.
At the end of its working life, the product must not be
disposed of as urban waste.
It must be taken to a special local authority differentiated
waste collection centre or to a dealer providing this service.
Disposing of a household appliance separately avoids
possible negative consequences for the environment and
health deriving from inappropriate disposal and enables
the constituent materials to be recovered to obtain
significant savings in energy and resources. As a reminder
of the need to dispose of household appliances
separately, the product is marked with a crossed-out
wheeled dustbin.
If you need help with:
● using your machine or
● servicing or repairs (in or out of guarantee)
call Kenwood customer care on 023 9239 2333.
Have your model number ready - it is located on
the base of your Bread Maker.
● spares and attachments
call 0870 2413653.
other countries
● Contact the shop where you bought your Bread Maker.
●
●
●
●
●
●
UK only Guarantee
If your Bread Maker goes wrong within one year from
the date you bought it, we will repair it (or replace it if
necessary) free of charge provided:
You have not misused, neglected or damaged it
It has not been modified (unless by Kenwood)
It is not second hand
It has not been used commercially
You have not fitted a plug incorrectly
You supply your receipt to show when you bought it
This guarantee does not affect your statutory rights.
19