1
SyncMaster LD190G
SyncMaster LD220
SyncMaster LD220G
English
USB MONITOR
INSTALLATION GUIDE
▷ Before connecting the monitor,
please refer to the User Guide and install the USB Monitor Driver first.
中国语
USB显示器安装指南
▷ 连接显示器之前,
请您先参阅《用户指南》并安装 USB 显示器驱动程序。
▷ ご使用前に本インストールガイドをご参照いただき、
日本語
USBモニターインストールガイド
USBモニタードライバをインストールしてください。
USB 모니터 드라이버를 반드시 설치한 후 사용하세요.
BN68-02216B-00.indb 1
한국어
USB 모니터 설치 안내서
▷ 사용전에 본 안내서를 참조하여
2009-03-05 �� 3:49:53
BN68-02216B-00.indb 2
2009-03-05 �� 3:49:53
USB MONITOR INSTALLATION GUIDE
The monitor can be operated with USB cable connection only. The monitor can be operated with D-sub cable connection as well.
N Before connecting the monitor with USB cable, please install the USB Monitor Driver first.
The USB Monitor Diver software can be found on the supplied CD.
1. Installation Requirements................................. 1
Recommended System Requirements
Supported OS (Operating Systems)
English
Contents
2. Connections......................................................... 2
Monitor connection with USB cable
Monitor connection with D-SUB cable
3. USB Monitor Driver Installation......................... 3
4. Using the Monitor................................................ 4
Multi-monitor Configuration
Display Information Setup for USB Monitor
5. Q & A..................................................................... 6
1. Installation Requirements
▒ Recommended System Requirements
- CPU: Higher than Dual-Core 2.0 GHz
- RAM: Higher than 1GB
- Higher than USB 2.0
▒ Supported OS (Operating Systems)
- Windows XP Service Pack 2 or later
- Windows 2000 Service Pack 4 or later
- Windows Vista
W
N To find out the PC operating system information, Right click 'My
Computer' and choose 'Properties' and select 'General' tab.
M
리
English - BN68-02216B-00.indb 1
2009-03-05 �� 3:49:53
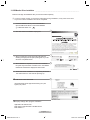
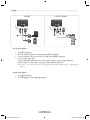
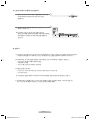
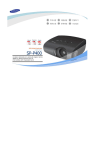
2. Connections
LD220 / LD220G
LD190G
OUT
IN
C
B
A
A
IN
C
B
D
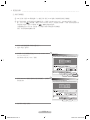
▒ Monitor connection with USB cable
1
2
3
Connect the power cord ( A ) to your monitor as shown above.
C
onnect the USB cable ( C ) to monitor and PC as shown above.
M
ore than 2 monitors connection with USB cable.
Connect the USB cable ( D ) to two different monitors as shown above.
(LD220/LD220G models only)
M
aximum of 4 monitors can be used at a same time with a serial USB connection.
Maximum of 6 monitors can be used at a same time with a parallel USB connection.
For more information, please refer to "User Manual" on the supplied CD.
OUT
IN
NM
ouse, keyboard and other external devices (DSC, MP3, external storage device and etc) can be connected
to monitor USB port as well.
▒ Monitor connection with D-SUB cable
1 Connect the power cord ( A ) to your monitor as shown above.
2 Connect the D-SUB cable ( B ) to monitor and PC as shown above.
English - BN68-02216B-00.indb 2
2009-03-05 �� 3:49:56
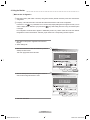
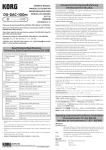
3. USB Monitor Driver Installation
Make sure to begin the installation after your PC has booted completely.
N If you turn off the monitor or remove the USB cable during installation, it may cause some error
to your PC and the installation will not be completed.
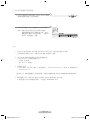
Insert the installation CD into your PC CD-ROM drive.
Click the USB Monitor Driver icon and start installation.
N USB Monitor Driver Icon :
1
2 Click "OK" button and installation will progress.
Install
Install DisplayLink
DisplayLink Software
Software for
for Samsung
Samsung UbiSync
UbiSync Monitor
Monitor
English
This is a legal agreement between you, the end user, ("You") and DisplayLink
(UK) Limited ("DisplayLink"). BY INSTALLING THIS SOFTWARE, YOU ARE
AGREEING TO BE BOUND BY THE TERMS OF THIS AGREEMENT.
Some versions of this software, once installed, will check for updated system
software at least once and then again at regular intervals unless you specifically
disabled this feature when given this option. No personal information or
information about your PC or the software installed on your PC is sent to our
update servers during this process. Accepting the End-User License Agreement
means that you accept this product feature.
Automatically check for updates
3 W
hen connecting the monitor to PC with USB cable, the
following message (as shown picture) will appear on your PC
window in a sequential manner.
I Accept
Found New Hardware
Found New Hardware
USB Human Interface Device
Found New Hardware
USB Human Interface Device
USB Human Interface Device
Found New Hardware
AM
USB Human Interface Device
AM
AM
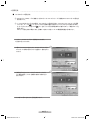
4 W
hen installation is completed, a monitor icon is created in
the system tray at the bottom of window screen. The installed
USB Monitor information is displayed as shown below.
Cancel
AM
New display found: Samsung UbiSync Monitor
3. Samsung UbiSync Monitor (USB_0101-000000H4J800004)
New display found: Samsung UbiSync Monitor
Use the icon here to control the new display.
3. Samsung UbiSync Monitor (USB_0101-000000H4J800004)
Use the icon here to control the new display.
AM
AM
5
W
hen the Driver installation is completed, please set
the USB monitor to multi-monitor.(► Page 4)
▀ USB Driver online download
isit the Download Center (http://www.samsung.com) and
V
register your product.
LD190G
▀ Display settings after program installation
Applicable mode: Extend mode
Mode position: Right hand side of the Main Screen
Mode rotation: 0°
English - BN68-02216B-00.indb 3
2009-03-05 �� 3:49:57
4. Using the Monitor
▒ Multi-monitor Configuration
N Both USB monitor (USB Cable connection) and general monitor (D-SUB connection) have same multi-monitor
configuration.
N For laptop, "LCD+CRT Dual View" mode must be selected first before the multi-monitor configuration.
Press the Fn + F4(
) key combination once. Then the 'Easy Display Manager'screen appears in which you can
select a display device. Whenever you press the F4(
) key while holding down the Fn key, the selected option
is changed.
The configuration mentioned above applies to SAMSUNG product only. Please aware that it will have different
configurations for other manufacturers. Therefore, proper reference to a corresponding manual is required.
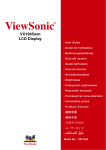
1 Click 'Start >Control panel > Appearance and Themes >
Display'.
2 Select 'Settings' tab.
3 Click second monitor icon and check 'Extend my windows
desktop onto this monitor'.
Then click 'Apply' button shown as below.
Display Properties
Display Properties
Themes Desktop Screen Saver Appearance Settıngs
Themes Desktop Screen Saver Appearance Settıngs
Drag the monitor icons to match the physical arrangement of your monitors.
Drag the monitor icons to match the physical arrangement of your monitors.
Display :
Display :
Screen resolution
Screen resolution
Less
Less
Color quality
Color quality
More
Highest (32bit)
More
Highest (32bit)
pixels
pixels
Use this device as the primary monitor.
Use this device as the primary monitor.
Extend my Windows desktop onto this monitor.
Extend my Windows desktop onto this monitor.
Identify
Trobleshoot...
Identify
Trobleshoot...
OK
OK
4 Click the 'Identify' button and check the given number for
each monitor. Arrange the monitor in order.
Cancel
Cancel
Advanced
Advanced
Apply
Apply
Display Properties
Display Properties
Themes Desktop Screen Saver Appearance Settıngs
Themes Desktop Screen Saver Appearance Settıngs
Drag the monitor icons to match the physical arrangement of your monitors.
Drag the monitor icons to match the physical arrangement of your monitors.
Display :
Display :
Screen resolution
Screen resolution
Less
Less
More
Highest (32bit)
More
Highest (32bit)
pixels
pixels
Use this device as the primary monitor.
Use this device as the primary monitor.
Extend my Windows desktop onto this monitor.
Extend my Windows desktop onto this monitor.
Identify
Trobleshoot...
Identify
Trobleshoot...
OK
OK
Cancel
Cancel
Advanced
Advanced
Apply
Apply
5 Then click "OK" button.
English - BN68-02216B-00.indb 4
2009-03-05 �� 3:49:57
▒ Display Information Setup for USB Monitor
1 W
hen USB Monitor Driver installation is completed, a
monitor icon is created in the system tray at the bottom of
the window screen.
2 C
lick the monitor icon to display a list of connected USB
monitors.
e.g.,) The following figure shows when two USB monitors are
connected.
Select the monitor for which you want to configure
the display settings. You can configure the "Screen
Resolution" , "Color Quality" and "Screen Rotation"
settings for your monitor.
AM
Screen Resolution
Color Quality
Screen Rotation
Extend To
Extend
Mirror
Off
Advance...
AM
▒ Note
1 B
ecause this USB monitor is recognized as a USB device, the DOS screen that appears for general monitors
when a PC is booting up is not displayed.
- In order to view booting information (DOS), use D-SUB cable (Analog Signal) connection.
2 USB monitor is not compatible to any software that requires 3D hardware acceleration.
- Real Player (Expansion mode is not supported.)
- Most 3D games
- Programs based on DirectX
3 Video Programs Support
- Power DVD : Win DVD(Version 5 or later), Windows Media Player (Version 10 or later)
- VLC Media Player
N Depending on PC interface or incompatible codec packs, it can cause serious playback issues, such as flickering
or choppy video on the screen.
4 If you connect more than one USB monitor, a blank screen will appear until PC recognizes the USB device.
Screen will be displayed after PC recognizes the USB device. (LD220/LD220G models only)
English - BN68-02216B-00.indb 5
2009-03-05 �� 3:49:58
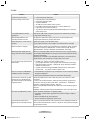
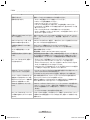
5. Q & A
Question
Answer
I cannot turn on the monitor.
▷ Connect the power cable again.
There is no image on the screen.
▷
▷
▷
▷
▷
▷
▷
I can't install USB Driver with the
supplied CD.
Download USB driver at Samsung Electronics website and install it.
[ http://www.samsung.com ]
After installing USB Driver, The
computer performance is slow.
As USB Driver takes more memory than the use of general graphic card,
computer performance may be lower than before.
After booting the PC, screen order is
changed.
Update your graphic card to the latest version.
NF
or graphic card driver, refer to graphic card manufacturer's home page.
Monitor resolution is changed.
Please make a reference to [USB Monitor Installation guide]- 'Display
Information Setup for USB Monitor' for best resolution (► Page 5).
[Best Resolution - LD190G: 1360X768, LD220/LD220G: 1920x1080]
While playing high quality video file,
choppy video can be seen repeatedly.
When you watch high quality video file in full screen mode, it may play properly
due to limited USB bandwidth. It is strongly recommend to decrease the window
size of the movie player.
Depending on PC interface or incompatible codec packs, it can cause serious
playback issues, such as flickering or choppy video on the screen.
I can use Clone mode, but can't set to
extend mode.
▷ Update your graphic card to the latest version.
N For graphic card driver, refer to graphic card manufacturer's home page.
▷ R
ight click 'Desktop' -'Property' - 'Settings' tab. Check 'Extend my windows
desktop onto this monitor'.
▷ If graphic card does not support WDDM, Extend mode can not be used in
windows Vista. e.g.,) Some versions in Matrox Card
How can I remove the “USB Monitor
Installation Program” completely?
1. Click ‘Add/Remove Programs’ in the ‘Control Panel’. A list of ‘Currently Installed
Programs’ is displayed.
2. Select ‘Samsung UbiSync Monitor’ from the list and click ‘Remove’.
I disconnected or turned off my USB
monitor but my PC still displays the
old monitor information in the Display
Properties window.
Deactivated USB monitor is due to either the power is off or there is no USB
connection.
In order to remove this information, 'Samsung Ubisync Monitor' program must
be removed. This can be done by click 'Start' - 'Control Panel' - 'Add/Remove
Programs' - 'Samsung Ubisync Monitor' - 'Remove'.
All the connected USB monitors will not be able to use if the software program is
removed.
Installation software program must be installed again in ordr to use USB monitor.
The screen of USB monitor is frozen.
Check "Hardware Acceleration" on desktop property.
1. Click 'Start > Control Panel> Appearance and Themes> Display> Settings >
Advanced'.
2. Select 'Troubleshoot' tab, when displayed.
Set the ‘Hardware acceleration(H)’ value to ‘Full’.
Icons and photos are broken or
jagged in Clone mode (USB monitor).
This occurs because Windows does not send the screen updating information to
Clone mode if Extended mode is active on a single PC. We recommend using the
monitor in Extend mode.
U
nplug the power code and replug in.
C
onnect the USB cable again.
Install the USB driver.
A
s USB port can be unstable, reboot your PC.
P
C's USB port may be faulty. Please try to connect different port.
USB monitor may not work on USB 1.0.
Any input from mouse or keyboard will activate the display if it is under the
power saving mode.
English - BN68-02216B-00.indb 6
2009-03-05 �� 3:49:58
USB 显示器安装指南
本显示器可仅通过 USB 缆线连接进行使用,也可通过 D-sub 缆线连接进行使用。
N 使用 USB 缆线连接显示器之前,请先安装 USB 显示器驱动程序。 可在随附的光盘中找到 USB 显示器驱动程序软件。
目录
1. 安装要求...................................1
推荐系统配置
支持的操作系统
2. 连接.......................................2
使用 USB 缆线连接显示器
使用 D-SUB 缆线连接显示器
3. 安装 USB 显示器驱动程序....................3
4. 使用显示器.................................4
5. 问答.......................................6
中国语
多显示器配置
USB 显示器的显示信息设置
注
1. 安装要求
░ 推荐系统配置
- CPU: 双核 2.0 GHz 以上
- 内存: 1GB 以上
- USB 2.0 以上
░ 支持的操作系统
- Windows XP Service Pack 2 或更高版本
- Windows 2000 Service Pack 4 或更高版本
- Windows Vista
N 要查看 PC 操作系统信息,
右键单击“我的电脑”,选择“属性”,再选择“常规”选项卡。
中国语 - BN68-02216B-00.indb 1
2009-03-05 �� 3:49:58
2. 连接
LD220 / LD220G
LD190G
OUT
IN
C
B
IN
C
A
A
B
D
░ 使用 USB 缆线连接显示器
1
2
3
如上图所示,将电源线 ( A ) 连接到显示器。
如上图所示,将 USB 缆线 ( C ) 连接到显示器和 PC。
使用 USB 缆线连接两台以上的显示器。
如上图所示,将 USB 缆线 ( D ) 连接到两台不同的显示器。
(仅适用于 LD220/LD220G 型号)
通过串行的 USB 连接一次最多只可连接 4 台显示器。
通过并行的 USB 连接一次最多只可连接 6 台显示器。
OUT
IN
有关更多信息,请参阅随附光盘中的《用户手册》。
N也
可将鼠标、键盘和其他外部设备(DSC、MP3 和外部存储设备等)连接到显示器的 USB 端口。
░ 使用 D-SUB 缆线连接显示器
1
2
如上图所示,将电源线 ( A ) 连接到显示器。
如上图所示,将 D-SUB 缆线 ( B ) 连接到显示器和 PC。
中国语 - BN68-02216B-00.indb 2
2009-03-05 �� 3:50:01
3. 安装 USB 显示器驱动程序
确保 PC 完全启动后再开始安装。
N在
安装过程中,如果您关闭了显示器或移除了 USB 缆线,都可能会导致 PC 出现故障,并且将无法
完成安装。
1
2
将安装光盘插入 PC 的 CD-ROM 驱动器中。
单击 USB 显示器驱动程序图标,开始安装。
N USB 显示器驱动程序图标:
单击“I Accept”按钮进行安装。
Install
Install DisplayLink
DisplayLink Software
Software for
for Samsung
Samsung UbiSync
UbiSync Monitor
Monitor
English
This is a legal agreement between you, the end user, ("You") and DisplayLink
(UK) Limited ("DisplayLink"). BY INSTALLING THIS SOFTWARE, YOU ARE
AGREEING TO BE BOUND BY THE TERMS OF THIS AGREEMENT.
Some versions of this software, once installed, will check for updated system
software at least once and then again at regular intervals unless you specifically
disabled this feature when given this option. No personal information or
information about your PC or the software installed on your PC is sent to our
update servers during this process. Accepting the End-User License Agreement
means that you accept this product feature.
Automatically check for updates
3
4
用 USB 缆线将显示器连接到 PC 时,PC 窗口中
使
将按顺序显示如下消息(如图所示)。
装完成后,将会在 Window 画面底部的系统托盘中创建一
安
个显示器图标。 已安装的 USB 显示器信息将显示如下。
I Accept
Found New Hardware
Cancel
Found New Hardware
USB Found
HumanNew
Interface
Device
Hardware
USB Found
Human New
Interface
Device
Hardware
USB Human Interface Device
USB Human Interface Device
AM
AM
AM
AM
New display found: Samsung UbiSync Monitor
New display
found:
Samsung
UbiSync Monitor
3. Samsung
UbiSync
Monitor
(USB_0101-000000H4J800004)
Use the icon here to control the new display.
3. Samsung UbiSync Monitor (USB_0101-000000H4J800004)
Use the icon here to control the new display.
AM
AM
5
动程序安装完成后,请将 USB 显示器设置为多显
驱
示器。(► 第 4 页)
▀ 在线下载 USB 驱动程序
访问下载中心 (http://www.samsung.com) 并注册
请
您的产品。
LD190G
▀ 程序安装完成后的显示设置
适用模式: 扩展模式
模式位置: 主画面右侧
模式旋转: 0°
中国语 - BN68-02216B-00.indb 3
2009-03-05 �� 3:50:01
4. 使用显示器
░ 多显示器配置
N USB 显示器(使用 USB 缆线连接)与一般显示器(使用 D-SUB 连接)都有相同的多显示器配置。
N 对
于笔记本电脑,必须在进行多显示器配置之前,先选择“LCD+CRT Dual View”(LCD+CRT 双屏显示)模式。
按一下 Fn + F4(
) 组合键。 将显示“Easy Display Manager(快捷显示管理器)”画面,您可以在此画 面
中选择显示设备。 按住 Fn 键后按 F4(
) 键将更改选定的选项。
上述配置仅适用于三星产品。请注意,对于其他厂商的产品将会有不同的配置。
因此,必须参考相应的操作手册。
1 单击“开始>控制面板>外观和主题>显示”。
2 选择“设置”选项卡。
3 单
击第二个显示器图标并勾选“Extend my windows desktop
onto this monitor”。
然后单击如下所示的“Apply”按钮。
Display Properties
Display Properties
Themes Desktop Screen Saver Appearance Settıngs
Themes Desktop Screen Saver Appearance Settıngs
Drag the monitor icons to match the physical arrangement of your monitors.
Drag the monitor icons to match the physical arrangement of your monitors.
Display :
Display :
Screen resolution
Screen resolution
Less
Less
Color quality
Color quality
Highest (32bit)
Highest (32bit)
More
More
pixels
pixels
Use this device as the primary monitor.
Use this device as the primary monitor.
Extend my Windows desktop onto this monitor.
Extend my Windows desktop onto this monitor.
Identify
Trobleshoot...
Identify
Trobleshoot...
OK
OK
4 单
击“Identify”按钮并检查每个显示器的编号。 按顺序
排列显示器。
Cancel
Cancel
Advanced
Advanced
Apply
Apply
Display Properties
Display Properties
Themes Desktop Screen Saver Appearance Settıngs
Themes Desktop Screen Saver Appearance Settıngs
Drag the monitor icons to match the physical arrangement of your monitors.
Drag the monitor icons to match the physical arrangement of your monitors.
Display :
Display :
Screen resolution
Screen resolution
Less
Less
More
Highest (32bit)
More
Highest (32bit)
pixels
pixels
Use this device as the primary monitor.
Use this device as the primary monitor.
Extend my Windows desktop onto this monitor.
Extend my Windows desktop onto this monitor.
Identify
Trobleshoot...
Identify
Trobleshoot...
OK
OK
Cancel
Cancel
Advanced
Advanced
Apply
Apply
5 然后单击“确定”按钮。
中国语 - BN68-02216B-00.indb 4
2009-03-05 �� 3:50:02
░ USB 显示器的显示信息设置
1 USB 显示器驱动程序安装完成后,将会在 Window 画面底
部的系统托盘中创建一个显示器图标。
2 单击此显示器图标,以显示已连接的 USB 显示器列表。
例如,连接了两台显示器时会出现下图所示的情况。
选择您要配置其显示设置的显示器。 您可
以配置显示器的“屏幕分辨率”、“颜色质
量”和“屏幕旋转”设置。
AM
Screen Resolution
Color Quality
Screen Rotation
Extend To
Extend
Mirror
Off
Advance...
AM
░ 注
1 由
于此 USB 显示器识别为 USB 设备,所以启动 PC 时不会显示一般显示器出现的 DOS 画面。
- 如果要查看启动信息 (DOS),请使用 D-SUB 缆线(模拟信号)连接。
2
USB 显示器不兼容任何需要 3D 硬件加速的软件。
- Real Player(不支持扩展模式。)
- 大多数 3D 游戏
- 基于 DirectX 的程序
3
视频程序支持
- Power DVD: Win DVD(版本 5 或更新版本)、Windows Media Player(版本 10 或更新版本)
- VLC Media Player
N 取决于 PC 界面或视频编码工具包的兼容性,可能会出现播放问题,如屏幕上的视频画面出现闪烁或波纹。
4 如果您连接了多个 USB 显示器,将显示空白画面,直到 PC 将其识别为 USB 设备。
PC 将其识别为 USB 设备后将显示画面。 (仅适用于 LD220/LD220G 型号)
中国语 - BN68-02216B-00.indb 5
2009-03-05 �� 3:50:02
5. 问答
问题
答案
无法开启显示器。
▷ 请重新连接电源线。
屏幕上没有图像。
▷
▷
▷
▷
▷
▷
▷
使用随附的光盘安装不了 USB 驱
动程序。
请访问 Samsung Electronics 网站,下载 USB 驱动程序并安装该程
序。[ http://www.samsung.com ]
安装 USB 驱动程序后,计算机的性能
有所降低。
由于 USB 驱动程序比普通显卡所占用的内存更大,所以计算机的性能可能会比
以前有所降低。
启动 PC 后,屏幕的次序发生了改
变。
请将您的显卡更新到最新版本。
N 有关显卡驱动程序,请参阅该显卡制造商主页上的内容。
显示器的分辨率发生更改。
请参阅《USB 显示器用户指南》的“USB 显示器的显示信息设置 ”部分调整最
佳分辨率。
(► 第 5 页)。[最佳分辨率 - LD190G:1360X768;LD220/LD220G:1920x1080]
播放高品质视频文件时,视频画面重
复出现波纹。
使用全屏模式播放高品质视频文件时,由于 USB 带宽有限,可能无法正常播放。
强烈建议缩小视频播放器的窗口。
N 取决于 PC 界面或视频编码工具包的兼容性,可能会出现播放问题,如屏幕上
的视频画面出现闪烁或波纹。
我可以使用“克隆”模式,但无法设
置为“扩展”模式。
▷ 请将您的显卡更新到最新版本。
N 有关显卡驱动程序,请参阅该显卡制造商主页上的内容。
▷右
键单击“桌面”-“属性”-设置”选项卡。 勾选“将 Windows 桌面扩展
到该监视器上”。
▷ 如果显卡不支持 WDDM(显示器驱动程序模型),那么在 Windows Vista 中将
无法使用“扩展”模式。
例如,某些 Matrox 卡版本
我如何才能彻底删除 USB 显示器安
装程序?
1. 单
击“控制面板”中的“添加/删除程序”。 系统将显示“当前安装的程
序”列表。
2. 从列表中选择“Samsung UbiSync Monitor”,然后单击“更改/删除”。
断开或关闭 USB 显示器后,PC 上
的“显示属性”窗口中仍显示先前显
示器的信息。
如果 USB 显示器无法正常工作,可能出现的情况是:电源关闭,或 USB 缆线断
开。
必须删除“Samsung Ubisync Monitor”程序后才能删除此信息。 可通过
单击“开始”-“控制面板”-“添加/删除程序”-“Samsung Ubisync
Monitor”-“删除”将该程序删除。
如果删除该软件程序,所有已连接的 USB 显示器将无法使用。
要使用 USB 显示器,必须重新安装该软件程序。
USB 显示器出现死屏。
检查桌面属性中的“硬件加速”。
1. 单击“开始>控制面板>外观和主题>显示>设置>高级”。
2. 在显示的窗口中选择“疑难解答”选项卡。
将“硬件加速(H)”值设置为“全”。
“克隆”模式(USB 显示器)中的图
标和图片显示损坏或参差不齐。
这是因为只在一台 PC 上激活“扩展”模式时,Windows 不会将画面更新信息发
送到“克隆”模式中。 我们建议使用显示器时采用“扩展”模式。
拔
下电源线,再重新插上。
重
新连接 USB 缆线。
安装 USB 驱动程序。
U SB 端口不稳定时,请重新启动 PC。
P C 的 USB 端口可能出现故障。 请尝试连接其他的 USB 端口。
使
用 USB 1.0 时,USB 显示器可能无法工作。
处于省电模式时可通过单击鼠标或按任意键激活显示器。
中国语 - BN68-02216B-00.indb 6
2009-03-05 �� 3:50:02
USBモニターインストールガイド
本製品は、USBケーブルでも、D-Sub 15ピンケーブルでも、かんたんにデュアルディスプレイ環境が構築できます。
N USBケーブルで接続する場合は、付属のCD内にあるUSBドライバをインストールして下さい。
目次
1. 設置環境...............................................................................................1
ハードウェアの推奨環境
対応OS
2. 接続方法...............................................................................................2
USBモニターとして接続する
一般モニターとして接続する
3. USBモニタードライバのインストール.........................................3
4. 使用方法...............................................................................................4
マルチモニターの設定方法
USBモニターからディスプレー情報を設定する
制限事項
5. Q&A.........................................................................................................6
1. 設置環境
■ ハードウェアの推奨環境
日本語
- CPU : Dual-Core 2.0 GHz 以上
- RAM : 1 GB 以上
- USB 2.0以上
■ 対応OS
- Windows XP Service Pack 2以上
- Windows 2000 Service Pack 4以上
- Windows Vista
NP
CのOS仕様は 'デスクトップ→マイコンピュータ'を右クリックし、'プロパテ
ィ'を選択。 '全般'タブから確認できます。
日本語- BN68-02216B-00.indb 1
2009-03-05 �� 3:50:02
2. 接続方法
LD220 / LD220G
LD190G
OUT
IN
C
B
A
A
IN
C
B
D
■ USBモニターとして接続する
1 電源ケーブル( A )をつないで下さい。
2 モニターのUSBポートとPCのUSBポートをUSBケーブル( C )で接続して下さい。
3 モニターのUSBポートと他のUSBモニターのUSBポートをUSBケーブル( D )で接続して下さい。 (LD220/
LD220Gのみ)
(USBモニターを直列に接続する場合、最大4台まで接続可能。また、並列に接続する場合は最大6台まで可
能です。詳細は付属のCD-ROM内、'取扱説明書'をご参考下さい。)
N マウスやキーボード、外部記憶装置(DSC、MP3、外付けメモリデバイス等)USBを使用する機器を接
続することができます。
OUT
IN
■ 一般モニターとして接続する
1 電源ケーブル( A )をつないで下さい。
2 D-Sub15ピンケーブル( B )でモニターとPCを接続します。
日本語- BN68-02216B-00.indb 2
2009-03-05 �� 3:50:05
3. USBモニタードライバのインストール
インストール中にPCやモニター電源を切ったり、USBケーブルを外さないでください。
N PC及びOSに問題が発生するおそれがあります。
ド
ライバインストール用CD-ROMをCD-ROMドライブに挿
入して下さい。
USB Monitor Driverアイコンをクリックしてインストールを開始し
ます。
N USB Monitor Driver アイコン :
1
2
"I Accept"をクリックするとインストールが開始されます。
3
U
SBモニターをPCに接続すると下の図のようにUSBモニター
をPCが認識し、新しいハードウェアの追加ウィザードが表示
されます。
4 セ
ットアップが終了すると、モニター画面下部のシステムトレイにモ
ニターアイコンが追加され、インストールしたUSBモニターの情報
が表示されます。
5 ド
ライバのインストールが終了しましたら、マルチモニターに設定
して下さい。(▶ 4ページ)
▀ ウェブサイトからのUSBドライバ ダウンロード方法
日本サムスンのホームページ(http://www.samsung.com/jp/)内
にある製品情報→製品サポート→ダウンロードセンターで該当
製品のモデル名を入力して下さい。
LD190G
▀ インストール後の画面設定
適用モード : 拡張 (Extend) モード
モード位置 : メイン画面の右
モード回転:0°
日本語- BN68-02216B-00.indb 3
2009-03-05 �� 3:50:06
4. 使用方法
■ マルチモニターの設定方法
NU
SB モニター(USBケーブル接続)と一般モニター(D-Sub 15ピンケーブル接続)のマルチモニターの設定方
法は同じです。
Nノ
ートPC(またはネットブック)の場合、マルチモニターに設定する前に 'LCD+CRT Dual View'モードを選択
して下さい。Fn + F4(
) キーをクリックすると画面が選択できるEasy Display Managerが表示されます。
F
n キーをクリックした状態で F4(
)キーをクリックすると順次画面が切り替わるので、ご希望のモードを
選択します。
P
Cによって設定方法が異なります。詳細につきましては各メーカーの取扱説明書をご参考下さい。
1 'スタート > コントロールパネル > 画面'をクリックします。
2 '設定'タブをクリックします。
3 2 番モニターのアイコンをクリックし、 'Windows デスクトップをこ
のモニター上で移動できるようにする'を選択して '適用'をクリッ
クします。
4 '識別(I)'ボタンをクリックして
それぞれのモニターに与えら
れた番号を確認し、モニターを実際に使用する順序に並べ
替えて下さい。
5 その後’OK'ボタンをクリックし、設定を終了します。
日本語- BN68-02216B-00.indb 4
2009-03-05 �� 3:50:06
■ USBモニターからディスプレー情報を設定する
1 U
SBモニターのドライバのセットアップが終了すると、モニ
ター画面のシステムトレイにモニターのアイコンが作成され
ます。
AM
2 モ
ニターアイコンをクリックすると接続されているUSBモニタ
ーのリストが表示されます。
例) 右の図は2台のUSBモニターが接続されている場合。
表示設定を行うモニターを選択し、マウスを動かすと 画面
の’解像度'、’色'及び ’回転'などの設定を行うことができ
ます。
■ 制限事項
1 マ
ルチモニターとして使用時、USBデバイスとして認識されるため、PC起動時のDOS画面は表示されません。
起動(DOS)画面を表示するためにはD-Sub 15ピンケーブル(Analog信号)を接続して下さい。
2 3
Dハードウェアアクセラレーションを使用するソフトウェアにはUSBモニターは使用できません。
- Real Player (拡張モードはサポートされていません。)
- ほとんどの3Dゲーム
- Direct Xをベースに実行されるプログラム
3 サポートする動画プログラム
- Power DVD : Win DVD(5 Version以上), Windows Media Player (10 Version以上)
- VLC Media Player
N PC環境または動画プレーコーデックによっては、動画画面が途切れる可能性があります。
4 複
数のモニターを接続し、PCがUSB装置を認識している間は、画面に何も表示されません。 USBを認識した後に画面
が表示されます。 (LD220/LD220G モデルのみ)
日本語- BN68-02216B-00.indb 5
2009-03-05 �� 3:50:06
5. Q&A
Q
A
電源が入りません。
電源ケーブルがしっかりと接続されているか確認してください。
画面が表示されません。
▷
▷
▷
▷
▷
付属のCD-ROMからUSBドライバをイン
ストールできません。
日本サムスンのホームページからUSBドライバをダウンロードしてインストールしてく
ださい。 [ http://www.samsung.com/jp/ → 製品情報 → 製品サポート → ダウンロー
ドセンター ]
USBドライバのインストール後、 PC起
動及びPCの動作が遅くなりました。
USBドライバの占めるメモリー容量が、一般のグラフィックカードを使用するより大きい
ので、スピードが低下する可能性があります。
PC起動後、画面のポジションが変わ
りました。
グラフィックカードを最新のドライバにアップデートしてみてください。
N グラフィックカードのドライバはメーカーのホームページをご参考下さい。
モニターの解像度が変わってしまい
ました。
最適の解像度に設定してください。
[最適解像度- LD190G :1360x768, LD220/LD220G :1920x1080]
高画質動画を再生時、画面がよく途切
れます。
高画質動画を全画面で視聴した場合、USB帯域幅の問題によりスムーズに再生でき
ないことがあるので、動画再生ウィンドウのサイズを小さくして視聴してみてください。
PC環境や動画プレーコーデックによっては動画画面が途切れる可能性があります。
クローンモードはできますが、拡張モー
ドに設定できません。
▷ グラフィックカードを最新のドライバにアップデートしてみてください。
N グラフィックカードのドライバはメーカーのホームページをご参考下さい。
▷ デスクトップ上で右クリックし、プロパティ→設定タブで 'Windows デスクトップをこの
モニター上で移動できるようにする(E)'をチェックします。
▷ PCのグラフィックカードがWDDMをサポートしていない場合、Windows Vistaで拡張モ
ードが使えないこともあります。 例) Matrox Card 一部Version
USBモニター"インストールプログラ
ム”をアンインストールする方法は?
1. 'コントロールパネル'からプログラムの追加と削除’を選択すると '現在インストール
されているプログラム'のリストが表示されます。
2. リストの中 'Samsung UbiSync Monitor'を選択し、'削除'をクリックして削除します。
インストールされているUSBモニターの
接続を外したり使用中のモニターの電
源をオフにしてもディスプレー情報に既
定のモニター情報が残っています。
完全に情報を削除するには 'コントロールパネル’のプログラムの追加と削除'から
'Samsung Ubisync Monitor'プログラムを削除してください。
削除すると接続されている全てのUSBモニターが使用できなくなり、再度使用するに
はもう一度USBモニタードライバをインストールする必要があります。
USBモニター画面がフリーズしてしま
います。
USBモニターのデスクトップのプロパティで 'ハードウェアアクセラレータ'を確認します。
1. 'スタート > コントロールパネル > 画面 >設定 > 詳細設定'をクリックします。
2.モニターの登録情報ウィンドウが表示されたら、 'トラブルシューティング'タブを選
択します。
'ハードウェアアクセラレータ'(H)'を'最大'に設定します。
クローンモード(USBモニター)で、アイコ
ンや写真が途切れたりギザついて表示
されます。
これは一台のPCで拡張モードが有効になっている場合に、Windowsがクローンモード
に画面のUpdate情報を送信していないため発生します。拡張モードで使用することを
お勧めします。
モニターの電源をオフにして再度オンにしてください。
USBケーブルを再度接続してください。
USBドライバをインストールしてください。
USB ポートが不安定なこともあるので、PCを再起動してみてください。
PCのUSBポートが故障している可能性もあるので、他のUSBポートに接
続してみてください。
▷ USB 1.0 ではUSBモニターが正常動作しないこともあります。
▷ モニターが節電モードになっていませんか。マウスを動かすかキーボード
のどれかキーを押してください。
日本語- BN68-02216B-00.indb 6
2009-03-05 �� 3:50:06
USB 모니터 설치 안내서
본 제품은 USB 케이블만을 연결하여 모니터로 사용할 수 있으며, D-Sub 케이블로 연결하여 사용도 가능합니다.
N USB 케이블로 연결하여 사용할 경우에는 반드시 제공된 CD의 USB 모니터 드라이버를 설치하세요.
차례
1. 설치 환경.......................................................................1
권장사양
지원 운영 체제
2. 연결하기....................................................................... 2
USB 모니터 연결하기
일반 모니터 연결하기
3. USB 모니터 드라이버 설치......................................... 3
4. 사용하기....................................................................... 4
다중 모니터 설정 방법
USB 모니터에서 디스플레이 정보 설정하기
알아두기
5. 문제해결.........................................................................................6
1. 설치 환경
▒ 권장사양
- CPU : Dual-Core 2.0 GHz 이상
- RAM : 1 GB 이상
- USB 2.0 이상
▒ 지원 운영 체제
한국어
- Windows XP Service Pack 2 이상
- Windows 2000 Service Pack 4 이상
- Windows Vista
N PC 의 OS사양은 '바탕화면> 내 컴퓨터'에서 마우스 오른쪽 버튼을 눌러 '속성'을
선택하면 '시스템 등록정보' 창의 '일반' 탭에서 확인할 수 있습니다.
한국어 - BN68-02216B-00.indb 1
2009-03-05 �� 3:50:06
2. 연결하기
LD220 / LD220G
LD190G
OUT
IN
C
B
A
A
IN
C
B
D
▒ USB 모니터 연결하기
1 전원선( A )을 연결하세요.
2모니터의 USB포트와 컴퓨터의 USB포트를 USB케이블( C )로 연결하세요.
3모니터의 USB포트와 다른 USB 모니터의 USB 포트를 USB케이블( D )로 연결하세요.
(LD220/LD220G 모델만 해당)
(USB 모니터를 직렬로 연결할 경우 최대 4대까지 연결하여 사용할 수 있으며, 병렬로 연결할 때는
6대까지 가능합니다. 자세한 사항은 CD로 제공된 '사용자 설명서'를 참조하세요.)
N 마우스나 키보드, 외부 입력 장치(DSC, MP3, 외장형 저장 장치 등)등 USB를 사용하는 기기를 연결할 수
있습니다.
OUT
IN
▒ 일반 모니터 연결하기
1 전원선( A )을 연결하세요.
2D-Sub케이블( B )로 모니터와 컴퓨터를 연결합니다.
한국어 - BN68-02216B-00.indb 2
2009-03-05 �� 3:50:09
3. USB 모니터 드라이버 설치
반드시 PC 의 부팅이 완료된 상태에서 설치를 시작하세요.
N설
치를 진행하는 동안 모니터의 전원을 끄거나 USB 케이블을 제거하면 PC 및 운영체제(OS)에 오류가
발생할 수 있습니다.
1 드라이버 설치용 CD를 CD-ROM 드라이브에 넣으세요.
"USB Monitor Driver"아이콘을 클릭하여 설치를
시작합니다.
N USB Monitor Driver 아이콘 :
2
"승락함"을 클릭하면 설치가 진행됩니다.
3USB 모니터를 PC 에 연결하면 아래 그림과 같이 USB
모니터를 PC 에서 인식하여 "새 하드웨어 발견" 이라는 메
시지가 순차적으로 나타납니다.
4 설
치가 완료되면 모니터 화면 하단 트레이(Tray)에 모니터
모양의 아이콘이 생성되며 설치된 USB 모니터 정보가
나타납니다.
5드라이버 설치가 완료되면 USB 모니터를 다중 모니터로
설정하세요. (▶4쪽)
▀ 웹싸이트를 통한 USB 드라이버 다운로드 방법
삼성전자 홈페이지(http://www.sec.co.kr)의 다운로드 센터를
방문하여 구입한 제품의 모델명을 입력하세요.
LD190G
▀ 프로그램 설치 후 화면 설정 상태
적용 모드 : 확장 (Extend) 모드
모드 위치 : 주 화면의 오른쪽
모드 회전 : 0 도
한국어 - BN68-02216B-00.indb 3
2009-03-05 �� 3:50:10
4. 사용하기
▒ 다중 모니터 설정 방법
N USB 모니터(USB 케이블 연결) 및 일반 모니터(D-Sub 케이블 연결)의 다중 모니터 설정 방법은 동일합니다.
N 노트북(넷북)의 경우 다중 모니터로 설정하기 전에 LCD+CRT Dual View 모드로 선택하세요.
Fn + F4(
) 키를 한 번 누르면 화면을 선택할 수 있는 Easy Display Manager 화면이 나타납니다.
Fn 키를 누른 상태에서 F4(
) 키를 누를 때 마다 한 칸씩 이동되므로, 원하는 모드로 선택하세요.
위의 설정 방법은 삼성 제품에 대한 설명으로 제조사별로 다를 수 있으니, 해당 제조사의 사용자 설명서를
참조하세요.
1 '시작 > 제어판 > 모양 및 테마 > 디스플레이'를 클릭합니다.
2 '설정' 탭을 누르세요.
3 2번 모니터 아이콘을 클릭하여 '내 Windows 바탕화면을
이 모니터에 맞게 확장'을 체크하고 '적용'을 클릭합니다.
4 '확인(I)'버튼을
눌러 각각의 모니터에 부여된 번호를 확인
한 후 모니터를 실제 사용하는 순서대로 정렬하세요.
5 '확인'버튼을 눌러 설정을 종료하세요.
한국어 - BN68-02216B-00.indb 4
2009-03-05 �� 3:50:11
▒ USB 모니터에서 디스플레이 정보 설정하기
1 U
SB 모니터의 드라이버 설치가 완료되면 모니터 화면
시스템 트레이(Tray)에 모니터 모양의 아이콘이
생성됩니다.
2 모
니터 모양의 아이콘을 클릭하면 연결된 USB 모니터의
목록이 나타납니다.
예) 이미지는 USB 모니터 두 대가 연결된 경우임
원하는 모니터를 선택하여 화살표로 마우스를 이동하면
'화면 해상도','색 품질' 및 '화면 회전' 등을 설정할 수
있습니다.
▒ 알아두기
1 본 모니터는 USB 디바이스로 인식되는 USB 모니터이므로 PC 부팅시 나타나는 DOS 화면은 나타나지 않습니다.
- 부팅(DOS) 화면을 보기 위해서는 D-Sub 케이블(Analog 신호)을 연결하여 사용하시기 바랍니다.
2 하드웨어적인 3D 가속기능을 이용하는 소프트웨어는 USB 모니터에서는 사용할 수 없습니다.
- Real Player (확장 모드를 지원하지 않음)
- 대부분의 3D 게임
- Direct X 를 기반으로 구동되는 프로그램
3 지원하는 동영상 프로그램
- Power DVD : Win DVD(5 버전 이상), Windows Media Player (10 버전 이상)
- VLC Media Player
N PC환경 또는 동영상 플레이어 코덱 등의 차이에 의해 동영상 화면의 끊김 현상이 발생할 수 있습니다.
4 모니터를 여러 대 연결할 경우, PC 에서 USB 장치를 인식하는 동안에는 화면이 나타나지 않습니다.
USB 가 인식된 후 화면이 보입니다. (LD220/LD220G 모델만 해당)
한국어 - BN68-02216B-00.indb 5
2009-03-05 �� 3:50:11
5. 문제해결
문제
해결
전원이 안 켜져요.
▷ 전원선을 다시 연결해 보세요.
화면이 안 나와요.
▷ 모니터 전원을 분리한 후 다시 연결해 보세요.
▷ USB 케이블을 다시 연결하세요.
▷ USB 드라이버를 설치하세요.
▷ USB 포트가 불안정 할 수 있으니 PC를 재부팅 하세요.
▷P
C의 USB 포트가 불량일 수 있으니 USB 단자를 PC의 다른 USB
포트에 연결하세요.
▷U
SB 1.0 에서는 USB 모니터가 정상적으로 동작하지 않을 수 있습니다.
▷모
니터가 절전기능으로 동작하고 있는지 확인한 다음,
마우스나 키보드의 임의의 버튼을 누르면 다시 화면이 켜집니다.
제공된 CD로 USB 드라이버
파일이 설치가안 되요.
삼성전자 홈페이지에서 USB 드라이버를 Download 받아 설치하세요.
[ http://www.sec.co.kr -> 다운로드 센터 ]
USB 드라이버를 설치한 후 PC
부팅 및 PC속도가 느려진 것
같아요.
USB 드라이버가 차지하는 메모리 용량이 일반 그래픽 카드 사용때보다
높기 때문에 약간의 속도 저하가 발생할 수 있습니다.
PC 부팅 후 화면 위치가
바뀌었어요.
해당 그래픽 카드를 최신 드라이버로 업데이트 하세요.
N그
래픽 카드의 드라이버는 해당 제조사의 홈페이지를 참조하세요.
모니터의 해상도가 바뀌었어요.
[USB 모니터 설치 안내서]의 디스플레이 정보 설정하기 편을 참조하여 최적해
상도로 설정하세요. (▶5쪽) [LD190G :1360x768, LD220/LD220G :1920x1080]
고화질 동영상 실행시 화면이
자주 끊겨요.
고화질 동영상을 전체 화면으로 시청할 때에는 USB 대역폭 문제로 화면이
부자연스러울 수 있으니 동영상 플레이어의 창을 줄여서 시청하기를 권장합니다.
PC 환경 및 동영상 플레이어 코덱 등의 차이에 의해 동영상 화면의 끊김 현상이 발생
할 수 있습니다.
복제모드는 되는데 확장모드로
설정이 안 되요.
▷ 해당 그래픽 카드를 최신 드라이버로 업데이트 하세요.
N그
래픽 카드의 드라이버는 해당 제조사의 홈페이지를 참조하세요.
▷바
탕화면 > 속성 > 디스플레이 등록정보 > 설정 창에서
"내 Windows 바탕 화면을 이 모니터에 맞게 확장(E)" 를 체크하세요.
▷P
C 의 그래픽 카드가 WDDM 을 지원하지 않으면 Windows Vista
에서 확장 모드를 사용하지 못할 수도 있습니다.
예)Matrox Card 일부 Version
USB 모니터의 "설치 프로그램”을
완전히 제거하려면 어떻게 해야하
나요?
1. '제어판'에서 '프로그램 추가/제거'를 선택하면 '현재 설치된 프로그램'의 목록
이 나타납니다.
2. 목록 중 'Samsung UbiSync Monitor'를 선택하고 '제거'를 클릭하여 삭제하
세요.
설치되어 있던 USB 모니터의
연결을 제거하거나 사용 중인
모니터의 전원을 꺼도 디스플레이
등록 정보에는 기존 모니터 정보가
남아있습니다.
USB 모니터 중 비활성화되어 있는 모니터는, 전원이 꺼져 있거나 USB
연결이 되어 있지 않은 상태입니다 .
이 정보를 삭제하기 위해서는 '제어판-프로그램추가/제거'에서 'Samsung
Ubisync Monitor' 항목을 삭제하여야 합니다 .
삭제한 경우 연결된 USB 모니터는 모두 사용할 수 없으며, 사용을 원할 경우
설치프로그램을 다시 설치하여야 합니다
USB 모니터 화면이 움직이지 않고
멈춰 있어요
USB 모니터의 바탕화면의 속성에서 '하드웨어 가속'을 확인하세요.
1.'시작 > 제어판 > 모양 및 테마 > 디스플레이 > 설정 > 고급'을누르세요.
2. 모니터의 등록정보 창이 뜨면 '문제해결'탭을 선택하세요.
'하드웨어 가속(H)'을 '최대'로 설정해 주세요.
복제 모드(USB 모니터)에서
아이콘이나 그림이 깨져 보여요.
이는 Windows에서 확장 모드가 한 대의 PC에 함께 존재하면 화면 Update
정보를 복제 모드로 전송해 주지 않아 발생되는 현상입니다.
확장모드로의 사용을 권장합니다 .
한국어 - BN68-02216B-00.indb 6
2009-03-05 �� 3:50:11
Memo
BN68-02216B-00.indb 7
2009-03-05 �� 3:50:11
BN68-02216B-00
BN68-02216B-00.indb 8
2009-03-05 �� 3:50:11