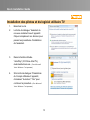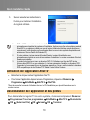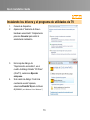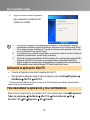
1
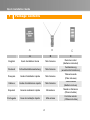
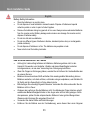
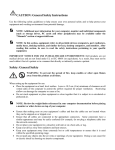
®
AVerTV PLUG & WATCH
A820
English
Deutsch
Francais
Italiano
Espanol
Portugue
Quick Guide
European Community Compliance Statement
Class B
This product is herewith confirmed to comply with the requirements set out in the Council Directives on
the Approximation of the laws of the Member States relating to Electromagnetic Compatibility Directive
2004/108/EC.
Disclaimer
All the screen shots in this documentation are only example images. The images may vary depending on the product and
software version. Information presented in this documentation has been carefully checked for reliability; however, no
responsibility is assumed for inaccuracies. The information contained in this documentation is subject to change without
notice.
Copyright
©2010 by AVerMedia Technologies, Inc. All right reserved.
No part of this document may be reproduced or transmitted in any form, or by any means without the prior written
permission of AVerMedia Technologies Inc. AVerMedia Technologies Inc. reserves the right to modify its models,
including their characteristics, specifications, accessories and any other information stated herein without notice. The
official printout of any information shall prevail should there be any discrepancy between the information contained herein
and the information contained in that printout.
"AVerMedia" is a trademark (or registered trademark) of AVerMedia Technologies, Inc. Other trademarks used herein for
description purpose only belong to each of their companies.
The mark of Crossed-out wheeled bin indicates that this product must not be disposed of with your other
household waste. Instead, you need to dispose of the waste equipment by handing it over to a designated
collection point for the recycling of waste electrical and electronic equipment. For more information about
where to drop off your waste equipment for recycling, please contact your household waste disposal service or the
shop where you purchased the product.
IMPORTANT SAFETY INSTRUCTIONS
z
z
z
z
z
z
z
z
z
z
Read Instructions - Read all the safety and operating instructions before connecting and operating your TV tuner to help
ensure your own personal safety and to protect your product from potential damage.
Retain Instructions - Retain all the safety and operating instructions for future reference.
Heed Warnings - Adhere to all warnings on the product and the operating instructions.
Grounding - For continued protection against risk of electric shock and fire, this accessory should be installed/connected
only to the products, such as a computer, equipped with a three-wire grounding plug, a plug having a third (grounding) pin.
This plug will only fit into a grounding-type power outlet. This is a safety feature. If you are unable to insert the plug into the
outlet, contact your electrician to replace the obsolete outlet. Do not defeat the safety purpose of the grounding-type plug.
Lightning - For added protection and to prevent damage due to lightning and power-line surges, unplug the host system,
such as a computer, from the wall power outlet and disconnect the antenna or cable system. Unplug the host system from
the wall power outlet when left unattended or unused for long periods of time.
Never insert anything metallic into the TV tuner openings. Doing so may create the danger of electric shock.
Openings in the TV tuner cabinet are provided for ventilation. To prevent overheating, these openings should not be
blocked or covered. Avoid using the TV tuner on a bed, sofa, rug, or other soft surface, as doing so may block the
ventilation openings in the cabinet. If you place the TV tuner in a bookcase or an enclosed space, be sure to provide
adequate ventilation and air flow.
Power Lines - An outside antenna system should not be located in the vicinity of overhead power lines or other light or
power circuits, or where it can fall into such power lines or circuits.
Antenna Installation - When installing an outside antenna system, extreme care should be taken to prevent it from
touching such power lines or circuits, as contact with them may be fatal.
Outdoor Antenna Grounding - If an outside antenna is connected to the product, ensure that the antenna system is
grounded so as to provide some protection against voltage surges and built up static charges. Article 810.21 of the
National Electric Code, ANSI/NFPA No.70, provides information with regard to proper grounding of the mast and
supporting structure, grounding of the lead-in wire to the antenna discharge unit, size of grounding conductors, location of
antenna-discharge unit, connection of grounding electrodes, and requirements for the grounding electrode.
(for CATV system installer) This reminder is provided to call the CATV systems installer's attention to Section
820.93 of the National Electric Code, ANSI/NFPA 70:2005 (for US/Canada) and/or EN60728-11:2005 standard
(for Europe), which provide guidelines for proper grounding and, in particular, specify that the coaxial cable
shield shall be connected to the grounding system of the building, as close to the point of cable entry as
practical.
Quick Installation Guide
Table of Contents
Package Contents..................................................................................... 2
Making Connections................................................................................. 3
®
Installation ~ For Windows ..................................................................... 5
English.......................................................................................................................................5
Deutsch......................................................................................................................................7
Français .....................................................................................................................................9
Italiano .....................................................................................................................................11
Español....................................................................................................................................13
Português ................................................................................................................................15
®
Installation ~ For Mac ........................................................................... 17
English.....................................................................................................................................17
Deutsch....................................................................................................................................19
Français ...................................................................................................................................21
Italiano .....................................................................................................................................23
Español....................................................................................................................................25
Português ................................................................................................................................27
Remote Control (for Windows) .............................................................. 29
1
Quick Installation Guide
1
Package Contents
A
B
A
C
B
C
English
Quick Installation Guide
Mini Antenna
Remote control
(Batteries included)
Deutsch
Schnellinstallationsanleitung
Mini-Antenne
Fernbedienung
(einschließlich Batterien)
Français
Guide d’installation rapide
Mini Antenne
Télécommande
(Piles incluses)
Italiano
Guida di installazione rapida
Mini Antenna
Telecomando
(Batterie incluse)
Español
Guía de instalación rápida
Miniantena
Mando a Distancia
(Pilas incluidas)
Português
Guia de instalação rápida
Mini-antena
Controle remoto
(Pilhas incluídas)
2
Quick Installation Guide
2
Making Connections
3
Quick Installation Guide
English
PC
Notebook
USB Port
Deutsch
PC
Notebook
USB-Anschluß
Ordinateur portable
Port USB
Français
Ordinateur de
bureau
Italiano
PC
Notebook
Porta USB
Español
PC
Ordenador Portátil
Puerto USB
Português
PC
Portátil
Porto USB
English
OR
Mini Antenna
TV Antenna (75Ω)
TV-Antenne (75Ω)
Deutsch
ODER
Mini-Antenne
Français
OU
Mini Antenne
Antenne TV (75Ω)
Italiano
O
Mini Antenna
Antenna TV (75Ω)
Español
O
Miniantena
Antena de TV (75Ω)
Português
OU
Mini-antena
Antena de TV (75Ω)
4
Quick Installation Guide
3
Installation ~ For Windows®
English
Installing Drivers and the TV Software Utility
1.
2.
Plug in the device.
The “Found New Hardware
Wizard” dialog box appears. Just
click Cancel to skip it.
3.
In the “AutoPlay” dialog box
entitled “CD Drive” (AVerTV),
select Run Autorun.exe. (for
Windows 7 / Vista only)
4.
If the “User Account Control”
dialog box appears, select
Allow/Yes to continue the
process. (for Windows 7 / Vista only)
5
Quick Installation Guide
5.
Follow the on-screen instructions
to complete the software utility
installation.
1. If DirectX 9.0c or above is not installed in your system, usually the device will automatically install it
during the process of installation. Make sure your system has DirectX 9.0c or above installed so that
the TV software utility can function properly (This may occur on Windows XP below Service Pack 2).
2. If your system is not equipped with Acrobat Reader, the installation wizard will automatically be
called up during the process of installation. The Acrobat Reader of English version will be installed.
3. The product does not come with a software DVD decoder. If users can playback DVD or MPEG-2
video files on the computer, there is no need to install a DVD decoder. However, if the Decoded
Error message appears on the screen, please install the compatible DVD decoder via the Windows®
XP Media Center Edition Partners site.
Activating the AVerTV Application
z
z
Plug in the device to activate the AVerTV application.
To run the application from the Programs menu, choose Start ÆPrograms/All Programs
Æ AVerMedia Æ AVerTV 6 Æ AVerTV 6.
*Please refer to the User’s Manual in the installation CD for more information on operation instructions.
Uninstalling Application and Drivers
Choose Start Æ Programs/All Programs Æ AVerMedia Æ AVerTV 6 Æ Uninstaller Æ OK
Æ (Allow/Yes) Æ OK Æ NextÆ OK Æ Finish.
6
Quick Installation Guide
Deutsch
Installieren von Treibern und dem TV-Anwenderprogramm
1.
Stecken Sie den A820 an den
USB-Port.
2.
Die Dialogbox “Assistent für das
Suchen neuer Hardware” erscheint.
Klicken Sie auf „Abbrechen“, um
den Installationsassistenten zu
beenden.
3.
Im „AutoPlay“ Modus erscheint ein
„Laufwerk“ (AVerTV), wählen Sie
hier die „Autorun.exe“ aus. (nur für
Microsoft Vista / Windows 7)
4.
Wenn das Fenster
“Benutzerdefiniert” erscheint,
wählen Sie „Zulassen“ und
klicken „Ja“ um fortzufahren. (nur
für Microsoft Vista / Windows 7)
7
Quick Installation Guide
5.
Folgen Sie den Informationen für
die Installation der TV-Applikation.
1.
Falls DirectX 9.0c oder eine neuere Version nicht auf Ihrem System installiert ist, wird dieses Programm in der
Regel während des Installationsvorgangs automatisch von der Installations-CD aus installiert. Stellen Sie
sicher, dass in Ihrem System DirectX 9.0c oder eine neuere Version installiert ist, sodass das
TV-Software-Utility korrekt funktionieren kann. (Voraussetzung für die Installation ist ein Windows XP SP 2)
2. Wenn kein Acrobat Reader installiert ist, werden Sie während der Installation gefragt, ob dieser
automatisch installiert werden soll. Es wird der Acrobat Reader in englischer Sprache installiert.
3. Dieses Produkt wird ohne DVD Decoder geliefert. Wenn Sie DVD oder MPEG-2 Filme auf Ihrem
Rechner abspielen können, müssen Sie keinen DVD Decoder installieren. Wenn jedoch ein Decoder
Fehler in der Windows® Media Center Edition erscheint, dann überprüfen Sie bitte auf der MCE
Partnerseite, ob Ihr DVD Decoder Windows® Media Center Edition kompatibel ist.
Aufrufen des AVerTV-Anwenderprogramms
z
z
Stecken Sie den A820 an den Computer um die AVerTV Applikation zu starten.
Um die TV-Applikation aus dem Programm Menü heraus zu starten, klicken Sie auf Start
Æ Programme Æ AVerMedia Æ AVerTV 6 Æ AVerTV 6.
*Bitte beachten Sie die Bedienungsanleitung auf der Installations-CD, um weitere Informationen zu erhalten.
Deinstallation von Anwendung und Treibern
Um das installierte Programm von Ihrem System zu entfernen, wählen Sie Start Æ Programme Æ
AVerMedia Æ AVerTV 6 Æ Uninstaller Æ OK Æ( Zulassen /Ja)ÆOK ÆWeiter Æ OK Æ Beenden.
8
Quick Installation Guide
Français
Installation des pilotes et du logiciel utilitaire TV
1.
Branchez la clé.
2.
La boîte de dialogue “Assistant du
nouveau matériel trouvé” apparaît.
Cliquez simplement sur Annuler pour
passer les procédures d’installation
de l’assistant.
3.
Dans la fenêtre intitulée
“AutoPlay” (CD Drive AVerTV),
éxécutezAutorun.exe. (Pour Microsoft
Vista / Windows 7 uniquement)
4.
Si la boîte de dialogue “Paramètres
du Compte Utilisateur” apparaît,
choissisez “Autoriser”/ “Oui” pour
continuer la procedure. (Pour Microsoft
Vista / Windows 7 uniquement)
9
Quick Installation Guide
5.
Suivez ensuite les instructions à
l'écran pour terminer l'installation
du logiciel utilitaire.
1.
2.
3.
Si DirectX 9.0c ou supérieur n’est pas installé sur votre système, le logiciel l’installera
automatiquement pendant le processus d’installation. Assurez-vous que votre système possède
DirectX 9.0c ou supérieur installé pour que le logiciel utilitaire de télévision puisse fonctionner
correctement. (cette situation peut se présenter dans le cas où votre système d'exploitation est
antérieur au Service Pack2 de Windows XP)
Si votre système n’est pas équipé d’Acrobat Reader, le wizard d’installation sera
automatiquement activé au cours de la procédure d’installation. La version en anglais d'Acrobat
Reader sera installée.
Le produit n’est pas fourni avec un décodeur DVD. Si l’utilisateur peut lire des DVD et des
fichiers vidéo MPEG-2 sur son ordinateur, il n’est pas nécessaire d’installer un décodeur DVD.
Cependant, si le message Erreur de ®décodage apparaît sur l’écran, veuillez installer le décodeur
DVD compatible par le site Windows XP Media Center Edition Partners.
Activation de l’Application AVerTV
z
z
Branchez la clé pour activer l'application AVerTV.
Pour lancer l’application depuis le menu Programmes, cliquez sur Démarrez Æ
Programmes Æ AVerMedia Æ AVerTV 6 Æ AVerTV 6.
*Merci de consulter le manuel d'utilisation situé sur le CD d'installation pour plus d'informations sur la
marche à suivre.
Désinstallation de l’application et des pilotes
Pour désinstaller le logiciel TV de votre système, choisissez simplement Démarrer
Æ Programmes/ Tous les programmes ÆAVerMedia Æ AVerTV 6 Æ Désinstaller
Æ OK Æ (Autoriser/Oui) ÆOK ÆSuivantÆ OK Æ Terminer.
10
Quick Installation Guide
Italiano
Installazione dei driver e delle utility TV
1.
2.
Collegare il dispositivo.
Appare la finestra di dialogo
“Installazione guidata nuovo
hardware”. Basta fare clic su
Annulla per ignorare le procedure di
installazione guidate.
3.
Nella finestra di dialogo "AutoPlay"
intitolata "CD Drive" (AVerTV),
selezionare Esegui Autorun.exe.
(solo per Microsoft Vista / Windows 7)
4.
Se appare la finestra di dialogo
“User Account Control” (Controllo
account utente), selezionare Allow
(Consenti) / Yes (Sì) per
continuare la procedura. (solo per
Microsoft Vista / Windows 7)
11
Quick Installation Guide
5.
Seguire le istruzioni sullo schermo
per completare l'installazione del
software di utilità.
1.
2.
3.
Generalmente DirectX 9.0c o le versioni successive vengono installati automaticamente durante il
processo di installazione se non vengono trovati sul computer. Per il corretto funzionamento dell’utilità
software TV, accertarsi che sul sistema sia installato DirectX 9.0c o versione successiva. (Questo può
verificarsi in Windows XP sotto Service Pack 22)
Se nel vostro sistema non è installato Acrobat Reader, l’installazione verrà annullata. Verrà installato
Acrobat Reader nella versione in lingua inglese.
Il prodotto non viene fornito con un software per decoder DVD. Se gli utenti possono presincronizzare
un DVD o dei file video MPEG-2 sul computer non c’è alcuna necessità di installare un decoder DVD.
Comunque se sullo schermo compare un messaggio
di Errore Decodificazione si prega di installare un
decoder DVD compatibile attraverso il sito Windows® XP Media Center Edition Partners.
Come lanciare l’applicazione AVerTV
z
z
Collegare il dispositivo per attivare l'applicazione AVerTV.
Per eseguire l’applicazione dal menu Programmi, fare clic su Start Æ Programs
(Programmi) Æ AVerMedia, AVerTV 6 Æ AVerTV 6.
* Fare riferimento al manuale dell'utente nel CD di installazione per ogni ulteriore informazione sulle istruzioni
operative.
Disinstallazione della applicazione
Per rimuovere dal sistema l’utilità software TV installata, scegliere Start Æ
Programs (Programmi)/ All Programs (Tutti i programmi) Æ AVerMedia Æ
AVerTV 6 Æ Uninstaller (Rimozione) Æ OK Æ (Allow (Consenti) / Yes (Sì)) ÆOK
Æ Next (Avanti) Æ OK Æ Finish (Fine).
12
Quick Installation Guide
Español
Instalando los drivers y el programa de utilidades de TV
1.
2.
Conecte el dispositivo.
Aparecerá el “Asistente de Nuevo
Hardware encontrado”. Simplemente
presione Cancelar para omitir el
asistente de instalación.
3.
En la caja de dialogo de
“Reproducción automática”, en el
cuadro de diálogo titulado “CD Drive”
(AVerTV), seleccione Ejecutar
setup.exe.
Si el cuadro de diálogo “Control de
cuentas de usuario” aparece,
seleccione Permitir/ Sí para continuar
el proceso. (solo Windows Vista / Windows 7)
4.
13
Quick Installation Guide
5.
Siga las instrucciones de pantalla
para completar la instalación del
software de utilidad.
1.
2.
3.
Si DirectX 9.0c o superior no está instalado en su sistema, el CD de instalación lo instalará
automáticamente durante el proceso de instalación. Asegúrese de que el sistema tiene DirectX
9.0c o superior para que el software de TV pueda funcionar de manera apropiada. (Esto puede
ocurrir en Windows XP bajo Service Pack 2)
Si su sistema no tiene instalado Acrobat Reader, el proceso de instalación le abrirá el diálogo de
instalación automáticamente. Acrobat Reader se instalará.
El producto no incluye un descodificador de DVD de software. Si los usuarios pueden reproducir DVD o
archivos de vídeo MPEG-2 en el equipo, no es necesario instalar un descodificador de DVD. No
obstante, si aparece el mensaje de error de descodificación
en la pantalla, instale el descodificador de
DVD compatible a través del sitio de Windows® XP Media Center Edition Partners.
Activando la aplicación AVerTV
z
z
Conecte el Dispositivo para activar la aplicación AVerTV.
Para ejecutar la aplicación desde el menú programas, pulse en InicioÆ Programas Æ
AVerMedia Æ AVerTV 6 Æ AVerTV 6.
* Por favor, consulte el Manual de Usuario incluido en el CD de instalación para obtener más información
sobre las instrucciones de operación.
Para desinstalar la aplicación y los controladores
Para eliminar la aplicación de software de TV del sistema elija, InicioÆProgramas/
Todos los programas ÆAVerMediaÆ AVerTV 6 Æ Desinstalación Æ OK Æ
(Permitir / Sí) ÆOK ÆSiguiente Æ OK ÆFinalizar.
14
Quick Installation Guide
Português
Instalação dos controladores e do software de TV
1.
2.
Fazer ligação elétrica no aparelho.
Aparecerá a caixa de diálogo
“Assistente para adicionar novo
hardware”. Clique em Cancelar para
ignorar o assistente de instalação.
3.
Na caixa de diálogo “AutoPlay” com
o título de “Unidade de Disco CD”
(AVerTV), seleciona Run
Autorun.exe. (só para Vista / Windows 7
4.
Caso surja a caixa de diálogo
“User Account Control” (“Controlar
Conta de Utilizador”), seleccione
Allow (Permitir) / Yes (Sim) para
continuar o processo. (só para Vista /
da Microsoft)
Windows 7 da Microsoft)
15
Quick Installation Guide
5.
Siga as instruções da tela para
completar a instalação de utilidade
do software.
1.
2.
3.
Se o DirectX 9.0c ou superior não estiver instalado em seu sistema, normalmente o CD de
instalação o fará automaticamente durante processo de instalação. Certifique-se de que seu
sistema tenha o DirectX 9.0c ou superior instalado para que o software utilitário de TV possa
funcionar corretamente. (Isto ocorreria no Windows XP no Pacote de Serviço 2)
Caso o seu sistema não esteja equipado com Acrobat Reader, o assistente de instalação será
activado automaticamente durante o processo de instalação. O Acrobat Reader da versão em
inglês terá instalado.
Este produto não é fornecido com um software de descodificador de DVD. Se o utilizador
conseguir reproduzir DVD ou ficheiros de vídeo MPEG-2 no computador, não haverá
necessidade de instalar um descodificador de DVD. No entanto, caso apareça no ecrã a
mensagem de Erro de Descodificação, deverá instalar o descodificador de DVD compatível no
site dos parceiros do Windows® XP Media Center Edition.
Activação da aplicação AVerTV
z
z
Fazer ligação elétrica no aparelho para ativar a aplicação AVerTV.
Para executar a aplicação a partir do menu Programas, clique em Início Æ
Programas Æ AVerMedia Æ AVerTV 6 Æ AVerTV 6.
* Por favor consulte o Manual do Usuário no CD de instalação para mais informações sobre instruções de operação.
Desinstalação do aplicativo e dos drivers
Para remover do sistema o software utilitário de TV instalado, basta escolher Início Æ
Programas/Todos os Programas ÆAVerMedia Æ AVerTV 6Æ Desinstalador Æ OK
Æ( Permitir (Allow) / Sim (Yes)) Æ OK ÆSeguinteÆ OK Æ Terminar.
16
Quick Installation Guide
4
Installation ~ For Mac®
English
Installing Drivers and the TV Software Utility
During installation process, if the “Authenticate” dialog box appears, enter your password and
click OK.
1.
2.
Plug in the device.
Double-click the “AVerTV(Mac)”
icon.
3.
Double-click the “AVerTV” icon
to begin the installation.
4.
Follow the on-screen instructions
to complete the software utility
installation.
17
Quick Installation Guide
Activating the Application
Plug in the device to activate the AVerTV application.
After installation, every time when you plug the device into your computer, the AVerTV application
will be launched automatically (To activate the AVerTV application right after the installation is done,
please unplug the device and re-plug it).
If the Launch AVerTV for Mac checkbox is selected during the installation, the AVerTV for
Mac will be launched as soon as the installation finishes.
Or just click the AVerTV icon on the Mac dock.
Uninstalling Application and Drivers
To remove the installed TV software utility and drivers from the system, please do the following.
During uninstallation process, if the “Authenticate” dialog box appears, enter your
password and click OK.
1.
Open the “AVerTV” folder located in the “Applications” folder.
2.
Double-click the “Uninstall” icon.
3.
Click Uninstall.
4.
Click OK.
18
Quick Installation Guide
Deutsch
Installieren von Treibern und dem TV-Anwenderprogramm
1.
2.
Stecken Sie den A820 an den
USB-Port.
Doppelklick auf „AVerTV(Mac).“
3.
Doppelklick auf „AVerTV“ um die
Installation zu starten.
4.
Folgen Sie den Informationen für
die Installation der TV-Applikation.
19
Quick Installation Guide
Starten der Anwendung
Stecken Sie den A820 an den Computer um die AVerTV Applikation zu starten.
Nach erfolgreicher Installation, startet die AVerTV Applikation automatisch (jedes Mal
wenn Sie den A820 an den Computer anstecken). Beachten Sie, dass Sie nach der
Erstinstallation zuerst den A820 vom Gerät entfernen und diesen wieder anstecken um
AVerTV korrekt zu nutzen.
Wenn der Haken bei „AVerTV für Mac starten“ gesetzt ist, wird das Programm direkt nach der
Installation gestartet.
Oder einfach das Symbol „AVerTV“ im Dock anklicken.
Deinstallation von Anwendung und Treibern
Um die installierte Software und Treiber wieder zu entfernen gehen Sie bitte wie folgt vor.
Wenn während des Installationsvorgangs ein Fenster zur Benutzeranmeldung erscheint,
geben Sie bitte ihr Passwort ein und klicken Sie „OK“.
1.
Öffnen Sie den „AVerTV“ Ordner im „Programme“ Ordner.
2.
Machen Sie einen Doppelklick auf das „Uninstall“ Icon.
3.
Klicken Sie auf Deinstallieren.
4.
Klicken Sie auf OK.
20
Quick Installation Guide
Français
Installation des pilotes et du logiciel utilitaire TV
1.
2.
Branchez la clé.
Double-cliquez sur l’icône
“ AVerTV(Mac).”
3.
Double-cliquez sur l’icône
“AVerTV” pour démarrer
l’installation.
4.
Seguire le istruzioni sullo schermo
per completare l'installazione del
software di utilità.
21
Quick Installation Guide
Activation de l’Application
Branchez la clé pour activer l'application AVerTV.
Après l'installation, l'application AVerTV se lancera automatiquement à chaque fois que vous
brancherez la clé sur votre ordinateur (Pour activer AVerTV pour la première fois à l'issue de
l'application, vous devez débrancher et rebrancher la clé).
Si “Lancer AVerTV for Mac” est coché pendant l’installation, l’application démarrera dès que
l’installation se termine.
Ensuite, merci de double cliquez sur “AVerTV”. Ou cliquez simplement sur l’icône AVerTV sur le
Mac Dock.
Désinstallation de l’application et des pilotes
Pour désinstaller le logiciel et les pilotes du système, merci de suivre la procedure
suivante. Pendant le processus d’installation, si la boîte de dialogue
« Authentification » apparaît, veuillez entrer votre mot de passe et cliquer sur OK.
1.
Ouvrez le dossier “AVerTV” situé dans le répertoire “Applications”.
2. Double-cliquez ensuite sur l'icône Désinstaller.
3. Cliquez sur Désinstallez.
4. Cliquez sur OK.
22
Quick Installation Guide
Italiano
Installazione dei driver e delle utility TV
1.
2.
Collegare il dispositivo.
Fare doppio clic sull'icona
"AVerTV(Mac).”
3.
Fare doppio clic sull'icona
"AVerTV" per iniziare
l'installazione.
4.
Seguire le istruzioni sullo schermo
per completare l'installazione del
software di utilità.
23
Quick Installation Guide
Come lanciare l’applicazione
Collegare il dispositivo per attivare l'applicazione AVerTV.
Dopo l'installazione, ogni volta quando si collega il dispositivo al computer, l'applicazione
AVerTV verrà avviata automaticamente (Per attivare il diritto all'applicazione AVerTV dopo
l'installazione, si prega di scollegare il dispositivo e di re-inserirlo).
Se la casella di controllo AVerTV di lancio per Mac è stata selezionata durante l'installazione, il
programma AVerTV per Mac sarà avviato non appena terminata l'installazione. O
semplicemente fare clic sull'icona di AVerTV sulla dock Mac.
Désinstallation de l’application et des pilotes
Per rimuovere dal sistema l’utilità software TV installata, Vi preghiamo di effettuare
le seguenti operazioni. Durante il processo di disinstallazione, se viene visualizzata
la finestra di dialogo "Autentica", immettere la password e fare clic su OK.
1.
Aprire la cartella "AVerTV" che si trova nella cartella "Applicazioni".
2.
Quindi, fare doppio clic su Disinstalla.
3. Fare clic su Disinstalla.
4. Clic su OK.
24
Quick Installation Guide
Español
Instalando los drivers y el programa de utilidades de TV
1.
2.
Conecte el dispositivo.
Hacer Doble click sobre el icono
“AVerTV(Mac).”
3.
Hacer Doble click sobre el icono
“AVerTV” para comenzar la
instalación.
4.
Siga las instrucciones en pantalla
para completar la instalación del
software de utilidad.
25
Quick Installation Guide
Activación del Programa
Conecte el Dispositivo para activar la aplicación AVerTV.
Después de la Instalación, cada vez que conecte el dispositivo a su ordenador, la aplicación
AVerTV se pondrá en marcha automáticamente (Para activar correctamente la aplicación
AVerTV, después de realizar la instalación, desconecte el dispositivo y vuelva a conectarlo).
Si usted selecciona la casilla comienzo durante el proceso de instalación, AVerTV Mac
comenzará al terminar la instalación.
O click sobre el icono AVerTV en el dock.
Para desinstalar la aplicación y los controladores
Para eliminar de su sistema el programa de TV y los drivers, por favor siga las
instrucciones. Si durante el proceso de desinstalación aparece el cuadro de
autentificación, introduzca su contraseña y pulse OK.
1.
Abra la carpeta “AVerTV” localizada en la carpeta Aplicaciones.
2.
A continuación, haga doble click en el icono Desinstalar.
3.
Haga clic en Desinstalar.
4.
Haga clic en OK.
26
Quick Installation Guide
Português
Instalação dos controladores e do software de TV
1.
2.
Fazer ligação elétrica no
aparelho.
Clique duas vezes no ícone
“AVerTV(Mac)”.
3.
Clique duas vezes no ícone
“AVerTV” para inicializar a
instalação.
4.
Siga as instruções da tela para
completar a instalação de
utilidade do software.
27
Quick Installation Guide
Ativando a Aplicação
Fazer ligação elétrica no aparelho para ativar a aplicação AVerTV.
Logo da instalação, cada vez você faze ligação elétrica do aparelho no seu computador, a
aplicação AVerTV será lançada automáticamente (Para ativar a aplicação AVerTV
imediatamente depois da instalação, favor fazer a desligação elétrica do aparelho e fazer
ligação elétrica novamente).
Se a caixa de diálogos “Launch AVerTV for Mac” for instalada durante a instalação, o AVerTV
para Mac será iniciado assim que a instalação finalize.
Ou somente clique no ícone AVerTV localizado no Mac dock.
Desinstalação do aplicativo e dos driver
Para remover do sistema a utilidade do software de TV e os controladores, basta
fazer o seguinte. Durante o processo de instalação, caso surja a caixa de diálogo
“Authenticate”, digite o seu password e seleccione OK.
1.
Abra a pasta “AVerTV” localizado na pasta “Applications (Aplicações)”.
2.
Logo, fazer duplo clique no icone Uninstall.
3.
Clique em Desinstalar.
4.
Clique em OK.
28
Quick Installation Guide
5
Remote Control (for Windows)
English
1
Switch between available signal sources.
2
Turn on/off the application
3
Display TV in full screen.
4
Switch between available audio modes.
5
Switch to PVR mode and record the current
program or video into your hard drive.
6
Rewind the playback.
7
Advance the playback.
8
End the Playback or recording.
End the TimeShift mode and return to real-time TV
or Radio mode.
9
Play the last recorded or played file. / Freeze the
playback.
10
Display information.
11
Launch the Electronic Program Guide.
12
Volume up/down.
13
Go up or down to the next active channel.
14
Select a TV channel.
Under the 16-Channel preview mode, use 2 4 6 8
to highlight the intended channel.
15
Go to the previously selected channel.
16
Turn on/off the sound.
29
Quick Installation Guide
Deutsch
1
2
3
4
5
6
7
8
9
10
11
12
13
14
15
16
Français
Umschalten zwischen verschiedenen
Signalquellen.
Anwendung Ein-/Ausschalten
Commutez entre les sources de signal
disponibles.
Activer/Désactiver l’application
Zeigen Sie TV- oder Video-Vollbildschirm an.
Affichage de la télévision ou de la vidéo en plein
écran.
Basculer entre les langues disponibles.
Wechseln Sie zwischen den verfügbaren
Sprachen.
Wechseln Sie zum PVR-Modus und nehmen Sie
das aktuelle Programm oder Video auf Ihre
Festplatte auf.
Spulen Sie die Wiedergabe zurück.
Basculer en mode PVR et enregistrer le
programme ou la vidéo courante sur votre disque
dur.
Reculer la lecture.
Spulen Sie die Wiedergabe vor.
Avancer la lecture.
Beenden Sie die Wiedergabe oder Aufnahme.
Beenden Sie den TimeShift-Modus und kehren
Sie zum Echtzeit-TV- oder Radio-Modus zurück
Geben Sie die zuletzt aufgenommene oder
wiedergegebene Datei wieder. / Halten Sie die
Wiedergabe an.
Zeigt Ihnen Informationen an.
Terminer la lecture ou l’enregistrement.
Terminer le mode TimeShift et retourner en mode
Télévision ou Radio en temps réel.
Lecture du dernier fichier enregistré ou lu. / Figer
la lecture
Afficher les informations.
Starten Sie den elektronischen Programmführer.
Lancer le Guide électronique des programmes.
Lautstärke - Lauter/leiser.
Augmenter/baisser le volume.
TV-Sender - Kanalwechsel
Monter ou descendre vers la chaîne active
suivante.
Sélectionner une chaîne de TV
Avec le mode prévisualisation de 16 Chaînes,
utilisez 2 4 6 8 pour préselectionner la chaîne de
votre choix.
Aller à la chaîne précédemment sélectionnée.
Wählen Sie einen TV-Sender.
Wenn Sie sich im 16fachen TV-Sender-Vorschau
Modus befinden, verwenden Sie 2-4-6-8, um den
gewünschten Sender auszuwählen.
Gehen Sie zum zuvor ausgewählten Sender
zurück.
Ton ein/aus.
30
Activer/Désactiver le son.
Quick Installation Guide
Italiano
Español
1
Eseguire la commutazione tra le sorgenti di
segnale disponibili.
Cambia entre las fuentes de señal disponibles.
2
Attivazione/Disattivazione dell’applicazione
Activa/Desactiva la aplicación
3
Visualizza i programmi televisivi o il video a
schermo intero.
Visualización de la televisión o el video a pantalla
completa.
4
Cambia tra le modalità audio disponibili.
Cambia entre los modos de sonido disponibles.
5
Attiva la modalità PVR per registrare il
programma o il video corrente nell’unità disco
rigido.
Alterna al modo PVR y graba el programa o el
vídeo actual en el disco duro.
6
Riavvolge la riproduzione.
Retroceder la reproducción.
7
Va avanti ad intervalli
Avanzar la reproducción.
8
Termina la riproduzione o la registrazione.
Disattiva la modalità Differita e torna alla modalità
Radio o TV in tempo reale.
Terminar la reproducción o la grabación.
Finalizar el modo TimeShift y volver al modo TV o
radio en tiempo real.
9
Riproduce l’ultimo file riprodotto o registrato. /
Sospende la riproduzione.
Reproduce el último archivo grabado o
reproducido. / Congela la reproducción.
10
Visualizza le informazioni.
Muestra la información.
11
Avvia la Guida ai programmi elettronica. (solo
DVB-T)
Va al canal activo anterior o siguiente.
12
Volume up/down. (Volume su/giù.)
Subir/bajar el volumen.
13
Passa al canale attivo successivo verso l’alto o
verso il basso.
Avanza o retrocede un canal.
14
Seleziona un canale TV.
In modalità di anteprima a 16 canali, utilizzare 2 4
6 8 per evidenziare il canale desiderato.
Seleccionar un canal de TV.
Bajo el modo de vista previa de 16 canales, use 2
4 6 8 para resaltar el canal deseado.
15
Va al canale precedentemente selezionato.
Ir al canal seleccionado anteriormente.
16
Spegne/accende il suono.
Anula/Activa el sonido.
31
Quick Installation Guide
Português
1
Mudar entre fontes de sinais disponíveis.
2
Ligar/desligar a aplicação.
3
Exibe informações.
4
Alternar entre os línguas disponíveis.
5
6
7
Alterna para o modo PVR e grava o programa ou
vídeo atual em seu disco rígido.
Retrocede a reprodução.
Avança a reprodução.
Para a reprodução ou a gravação.
8
Para o modo TimeShift e retorna ao modo TV ou
rádio em tempo real.
9
10
Reproduz o último arquivo reproduzido ou gravado.
/ Congela a reprodução.
Exibe informações.
11
Inicia o Guia Eletrônico de Programação.
12
Subir volume / Descer volume.
13
Sobe ou desce para o próximo canal ativo.
Selecionar um canal de TV.
14
No modo de visualização de 16 canais, use as
15
Ir ao canal selecionado anteriormente.
16
Desligar/ligar o som.
teclas 2 4 6 8 para realçar o canal desejado.
32
Quick Installation Guide
English
Battery Safety Information
z
Store the batteries in a cool dry place.
z
Do not dispose of used batteries in domestic waste. Dispose of batteries at special
collection points or return to point of sale if applies.
z
Remove the batteries during long periods of non-use. Always remove exhausted batteries
from the remote control. Battery leakage and corrosion can damage this remote control,
dispose of batteries safely.
z
Do not mix old and new batteries.
z
Do not mix different types of batteries: alkaline, standard (carbon-zinc) or rechargeable
(nickel-cadmium).
z
Do not dispose of batteries in a fire. The batteries may explode or leak.
z
Never short circuit the battery terminals.
Deutsch
DER SICHERE UMGANG MIT BATTERIEN
z
Achtung! Im Lieferumfang befinden sich Batterien. Batterien gehören nicht in den
Hausmüll. Sie werden vom Hersteller, Händler oder deren Beauftragten kostenlos
zurückgenommen, um sie einer Verwertung bzw. Entsorgung zuzuführen.
z
Wenn Sie Fragen zur Entsorgung haben, wenden Sie sich bitte an Ihre Verkaufsstelle oder
an unseren Service.
z
Batterien können brennbare Stoffe enthalten. Bei unsachgemäßer Behandlung können
Batterien auslaufen, sich stark erhitzen, entzünden oder gar explodieren, was Schäden für
Ihr Gerät und ihre Gesundheit zur Folge haben könnte.
z
Bitte befolgen Sie unbedingt folgende Hinweise: Vermeiden Sie Hitze und werfen Sie die
Batterien nicht ins Feuer.
z
Zerlegen oder verformen Sie die Batterien nicht. Ihre Hände oder Finger könnten verletzt
werden oder Batterieflüssigkeit könnte in Ihre Augen oder auf Ihre Haut gelangen. Sollte
dies passieren, spülen Sie die entsprechenden Stellen mit einer großen Menge klaren
Wassers und informieren Sie umgehend Ihren Arzt.
z
Vermeiden Sie starke Stöße und Erschütterungen.
z
Entfernen Sie die Batterie aus der Fernbedienung, wenn dieses über einen längeren
33
Quick Installation Guide
Zeitraum nicht benutzt wird.
Français
Informations sur la sécurité des piles
z
Stockez les piles dans un endroit frais et sec.
z
Ne jetez pas les piles avec les ordures ménagères. Mettez les piles au rebut dans les
points de récupération des piles ou, éventuellement, ramenez-les chez le détaillant.
z
En cas de non utilisation prolongée, sortez les piles. Sortez toujours les piles épuisées de
la télécommande. Les fuites des piles et la corrosion risqueraient d'endommager la
télécommande, mettez les piles au rebut en toute sécurité.
z
Ne pas mélanger piles usagées et neuves.
z
Ne pas mélanger des piles de types différents : alcaline, standard (carbone-zinc) ou
rechargeables (nickel-cadmium).
z
Ne pas jeter les piles au feu. Les piles risquent d'exploser ou de fuir.
z
Ne jamais court-circuiter les terminaux des piles.
Italiano
Informazioni sulla sicurezza della batteria
z
Conservare le batterie in un luogo fresco asciutto.
z
Non gettare le batterie usate tra i rifiuti domestici. Gettare le batterie nei punti di raccolta
predisposta o riportarle, se possibile, al luogo di vendita.
z
Rimuovere le batterie in caso di inutilizzo prolungato. Ricordarsi di rimuovere le batterie
scariche dal telecomando. Fuoriuscite o corrosione delle batterie potrebbero danneggiare
il telecomando, procedere correttamente allo smaltimento.
z
Non utilizzare congiuntamente batterie nuove e usate.
z
Non utilizzare congiuntamente batterie di tipo diverso: alcaline, standard (zinco-carbonio)
o ricaricabili (nickel-cadmio).
z
Non gettare le batterie nel fuoco. Le batterie potrebbero esplodere o causare fuoriuscite.
z
Non mettere in corto circuito i terminali della batteria.
34
Quick Installation Guide
Español
Información acerca de la seguridad de las pilas
z
Almacene las pilas en un lugar fresco y seco.
z
No tire las pilas usadas junto a los desperdicios domésticos. Tire las pilas en lugares
especiales acondicionados para ello o devuélvalas al lugar donde las compró si procede.
z
Quite las pilas en periodos largos en los que no utilice el mando a distancia. Quite siempre
las pilas gastadas del mando a distancia. Si las pilas gotean, la corrosión puede dañar el
mando a distancia, guárdelas en lugar seguro.
z
No mezcle pilas viejas y nuevas
z
No mezcle diferentes tipos de pilas: alcalinas, estándar (carbono-zinc) o recargables
(níquel-cadmio).
z
No tire las pilas al fuego. Las pilas podrías explotar o derramar líquidos.
z
Nunca haga cortocircuitos en los terminales de las pilas.
Português
Informação de segurança relativa às pilhas
z
Guarde as pilhas num local fresco e seco.
z
Não deposite as pilhas gastas juntamente com o lixo doméstico. Deposite as pilhas nos
pontos de recolha próprios para o efeito ou entregue-as nos pontos de venda, se for o
caso.
z
Retire as pilhas quando se prevejam períodos longos de não utilização. Retire sempre as
pilhas gastas do comando a distância. O derramamento a corrosão das pilhas poderão
danificar o comando a distância.
z
Não misture pilhas novas com pilhas já gastas.
z
Não misture tipos de pilhas diferentes: alcalinas, standard (carvão-zinco) ou recarregáveis
(níquel-cádmio).
z
Não lance as pilhas nas chamas, pois poderão ocorrer explosões ou derramamentos.
z
Nunca provoque curto-circuitos nos terminais da pilha.
35
Model No.: A820
P/N 300AA820-DE7
Made in Taiwan