1
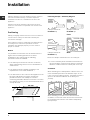
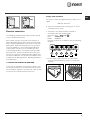
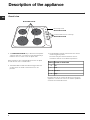
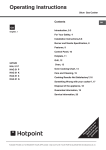
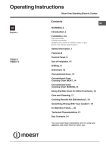
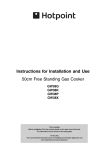
Operating Instructions HOB Contents GB English, 1 Installation, 2-3 Positioning Electrical connections Description of the appliance, 4 Overall view Precautions and tips, 5 General safety Disposal Practical Advice on Using the Electric Hot Plates Maintenance and care, 6 Switching the appliance off Cleaning the appliance Technical data PI 604GB Assistance, 7 GB Installation Fastening Clamps - Assembly Diagram 20 Please keep these operating instructions for future reference. Pass them on to possible new owners of the appliance. 30 Before operating your new appliance please read this instruction booklet carefully. It contains important information for safe use, installation and care of the appliance. Clamp Position for H=20mm top Positioning Clamp Position for H=30mm top Front Keep packaging material out of the reach of children. It can become a choking or suffocation hazard (see Precautions and tips). 40 The appliance must be installed by a qualified person according to the instructions provided. Incorrect installation may damage property or cause harm to people or animals. Built-in It is possible to instal them next to furniture which is higher than the working board. For a correct installation of the cooking top the following precautions must be followed: The hob may be located in a kitchen, a kitonen/ diner or bed sitting room, but no in a bathroom or shower room. The hoods must be installed according to the requirements in the hood handbook. The dimensions of the cutout for the appliance must be those indicated in the figure. Clamps are provided to fasten the cooktop to counters measuring from 20 to 40 mm in thickness. To fasten the cooktop securely, it is recommended that all the clamps be used. Use the clamps contained in the "accessory kit." In case a wooden panel should be fitted under the top for insulation, it will have be fitted at a minimum distance of 20 mm from the inferior part of the top. Ventilation When installing the cooktop above a built-in oven, the oven should be placed on two wooden strips; in the case of a joining cabinet surface, remember to leave a space of at least 45 x 560 mm at the back (see picture). 560 mm 45 m m. mm m m Back . 555 mm 55 Clamp Position for H=40mm top 475 GB When installing on a built-in oven without forced ventilation, ensure that there are air inlets and outlets for ventilating the interior of the cabinet adequately (see picture). 2 Supply cable installation GB The electrcic hobs are supplied without cable. Use a cable: H05 VV-F 3x2.5mm Open the terminal box by removing the "V" screw and taking off the cover. Electrical connection The following installation procedure must be carried out by a qualified electrician. the cooker must be connected to the mains by a switched (double pole) cooker outlet correctly fused with a capacity appropriate to that shown on the hob Rating Plate. All electrical wiring from the consumer unit to the appliance, via the switched double pole cooker outlet, must be of an acceptable type and current rating as above. The supply cord, type H05 VV-F 3x2.5mm , must be positioned so that it never reaches at any point a temperature 50°C higher than the room temperature. The electrical installation must comply with the IEE Regulations, Building Regulation & local By-Lays. THIS APPLIANCE MUST BE EARTHED. In the case of installation over a built-in electric oven the electrical hook-up of the stove top and that of the oven should be separate, for reasons of safety as well as for ease of eventual removal of the oven. The wires in the mains lead are coloured in accordance with the following code: Green & Yellow - Earth E Blue - Neutral N Brown - Live L Connect the wires in accordance with the following diagram 1 2 3 L 4 5 N Fix the cable in place with the "F" cable clamp, close the lid and fasten it with the "V" screw (see picture). V 1 2 3 4 5 F 3 Description of the appliance GB Overall view ELECTRIC PLATE Pilot lamp of the ELECTRIC PLATE Control knobs for the cook-top ELECTRIC PLATE The ELECTRIC PLATE vary in diameter and power: "normal" and "fast". The latter can be identified by a red boss in the center of the hot plate itself. The position of the corresponding electric hot plate is indicated on each control knob. The ELECTRIC PLATE ON indicator light switches on whenever the knob is moved from the 'off' position. The ELECTRIC PLATE control knob is a device used to regulate power. The knob may be turned clockwise or anticlockwise and set to six different positions: Setting Normal or Fast Plate 0 Off 1 Low 2-5 6 Medium High Please refer to the "Practical advice on using the appliance" section for a list of the relative positions and their recommended uses. 4 Precautions and tips This appliance has been designed and manufactured in compliance with international safety standards. The following warnings are provided for safety reasons and must be read carefully. General safety This manual is for a class 3 built-in cooktop. These instructions are only valid for the countries the symbols for which appear on the manual and the serial plate. Do not leave the electric plate switched on without a pan placed on it. GB Do not use cookware with uneven or deformed bottoms. Disposal When disposing of packaging material: observe local legislation so that the packaging may be reused. The appliance must be used by adults only, to cook food according to the instructions in this manual. Do not use the hob as a worktop or chopping board. The European Directive 2002/96/EC on Waste Electrical and Electronic Equipment (WEEE), requires that old household electrical appliances must not be disposed of in the normal unsorted municipal waste stream. Old appliances must be collected separately in order to optimise the recovery and recycling of the materials they contain and reduce the impact on human health and the environment. The crossed out wheeled bin symbol on the product reminds you of your obligation, that when you dispose of the appliance it must be separately collected. Consumers should contact their local authority or retailer for information concerning the correct disposal of their old appliance. Ensure that power supply cables of other electrical appliances do not come into contact with the hot parts of the hob. Practical Advice on Using the Electric Hot Plates This appliance is designed for non-professional use in the home. This appliance was designed for domestic use inside the home and is not intended for commercial or industrial use. Do not touch the appliance with bare feet or with wet or damp hands and feet. The openings and slots used for ventilation and heat dispersion must never be covered. Make sure the knobs are in the •/¡ position when the appliance is not in use. When unplugging the appliance always pull the plug from the mains socket, do not pull on the cable. Never carry out any cleaning or maintenance work without having unplugged the plug from the mains. In the case of a malfunction, under no circumstances should you attempt to repair the appliance yourself. Repairs carried out by inexperienced persons may cause injury or further malfunctioning of the appliance. Contact a Service Centre (see Assistance). Always make sure pan handles are turned towards the centre of the hob in order to avoid accidental burns. In order to avoid heat loss and damage to the hot plate, use cookware with a flat bottom the diameter of which is not less than that of the hot plate. Setting Normal or Fast Plate 0 Off 1 Cooking vegetables, fish 2 Cooking potatoes (using steam) soups, chickpeas, beans. 3 Continuing the cooking of large quantities of food, minestrone 4 For roasting (average) 5 For roasting (above average) 6 For browning and reaching a boil in a short time. Before using the hot plates for the first time, you should heat them at maximum temperature for approximately 4 minutes, without any pans. During this initial stage, their protective coating hardens and reaches its maximum resistance. 5 Maintenance and care GB Switching the appliance off Disconnect your appliance from the electricity supply before carrying out any work on it. Technical characteristic DATA PLATE Electrical section Cleaning the appliance Do not use abrasive or corrosive detergents, stain removers, anti-rust products, powder detergents or sponges with abrasive surfaces: these may scratch the surface. Never use steam cleaners or pressure cleaners on the appliance. It is usually enough to wash the hob with a damp sponge and dry it with absorbent kitchen roll. The electric hobs should be cleaned using a damp cloth and then rubbed with oil while still warm. Stainless steel may become marked if it comes into contact with very hard water or harsh detergents (containing phosphorous) for long periods of time. After cleaning, it is advisable to rinse thoroughly and dry. It is also recommended that drops of water be dried. 6 voltage: 230V ~ 50/60Hz Max power 7000 W This appliance conforms to the following European Economic Community directives: - 73/23/EEC of 19/02/73 (Low Voltage) and subsequent amendments; - 89/336/EEC of 03/05/89 (Electromagnetic Compatibility) and subsequent amendments; - 93/68/EEC of 22/07/93 and subsequent amendments. - 2002/96/EC Assistance Communicating: appliance model (Mod.) serial number (S/N) This information is found on the data plate located on the appliance and/or on the packaging. GB 7 09/2006 - 195045861.02 XEROX BUSINESS SERVICES GB 8