1
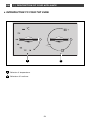
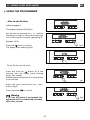
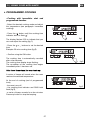
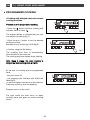
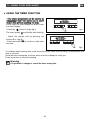
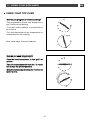
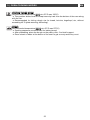
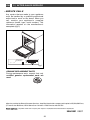
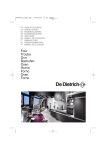
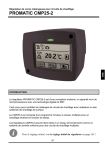
FR GUIDE D'UTILISATION
EN USER GUIDE
Four
Oven
FR 02
Dear Customer,
EN 20
You have just acquired a DE DIETRICH oven and we would like to
thank you.
Our research teams have created this new generation of appliances
for you. Their quality, appearance, functions and technological
advances make them exceptional products, showcases of our unique
know-how.
Your new DE DIETRICH oven will blend harmoniously into your
kitchen and perfectly combine cooking performance and ease of use.
We wanted to offer you a product of excellence.
In the line of DE DIETRICH products, you will also find a wide range of
cookers, hobs, ventilation hoods, dishwashers, and refrigerators, all of
which can be built in and coordinated with your new DE DIETRICH
oven.
Of course, in an ongoing effort to better satisfy your demands with
regard to our products, our after-sales service department is at your
disposal and ready to listen in order to respond to all of your questions
and suggestions (contact information at the end of this booklet).
You can also log onto our site:
www.dedietrich-electromenager.com where you will find our latest
new ideas and useful additional information.
DE DIETRICH
Setting New Values
As part of our commitment to constantly improving our products, we reserve the right to make
changes to them based on advances to their technical, functional and/or aesthetic properties.
Important:
Before installing and using your appliance, please read this Installation and Usage
Guide carefully, as it will allow you to quickly familiarise yourself with its operation.
20
EN
TABLE OF CONTENTS
1 / DESCRIPTION OF YOUR APPLIANCE
• Introduction to your oven ____________________________________
• Accessories _______________________________________________
• Introduction to the programmer ______________________________
• Introduction to your top oven ________________________________
2 / USING YOUR APPLIANCE
• Using the programmer
º How to set the time _____________________________________
º Immediate cooking _____________________________________
• Programmed cooking
º Immediate start ________________________________________
º Delayed start __________________________________________
• Using the timer function _____________________________________
• Customising the recommended temperature ___________________
• Locking the controls ________________________________________
• Using your top oven
º Immediate start ________________________________________
º Using the grillt _________________________________________
22
22
23
24
25
26
27
28
29
30
30
31
31
3 / OVEN COOKING MODES _______________________________________
32
4 / CARING FOR AND CLEANING YOUR OVEN _______________________
34
5 / AFTER-SALES SERVICE
• Service calls ______________________________________________
36
21
EN
1 / DESCRIPTION OF YOUR APPLIANCE
• INTRODUCTION TO YOUR OVEN
A
B
c
D
C
5
3
1
A
Programmer
B
Controls
C
Lamp
D
Wire shelf supports
•Accessories
Your appliance has two safety grids with handles, one with handles for a 45 mm dish, a Lissium
pastry dish and a 45 mm dish.
22
EN
1 / DESCRIPTION OF YOUR APPLIANCE
• INTRODUCTION TO THE PROGRAMMER
Q
A
R
C
B
P
O
N
M
D
L
G
H
K
J
F
E
I
A
Cooking modes display
J
Control panel lock indicator (child safety device).
B
Oven temperature display
K
Setting the temperature
C
Shelf support indicator and
selected cooking mode indicator.
L
D
E
Temperature rise indicator
Adjustment buttons
F
Buttons for confirming settings
G
Clock and timer display
H
Setting cooking time / cooking end
time and clock
I
Start/Stop
M
Cooking end time display
N
Cooking end time indicator
O
P
Cooking time indicator
Q
Cooking time display
R
Cleaning indicator
Timer display
23
EN
1 / DESCRIPTION OF YOUR APPLIANCE
• INTRODUCTION TO YOUR TOP OVEN
A
A
Selector of temperature.
B
Selecteur of functions.
B
24
2 / USING YOUR APPLIANCE
EN
• USING THE PROGRAMMER
•How to set the time
- When plugged in
The displays flashes 12:00 (fig.1).
fig.1
Set the time by pressing the + or - buttons
(holding your finger on the button allows you
to scroll through the numbers rapidly) (fig.2).
Example: 12:30
Press the
button to confirm.
The display stops flashing (fig.3).
fig.2
fig.3
- To set the time on the clock
Press and hold the
button for a few
seconds until the display starts flashing
(fig.2), then release.
Audible beeps indicate that it is now possible
to set the time.
fig.1
Adjust the clock setting with the + and buttons (fig.2).
Press the button OK to confirm.
Warning
If the OK button is not pressed, the
adjustment will be automatically recorded
after a few seconds.
fig.2
25
EN
2 / USING YOUR APPLIANCE
•Immediate cooking
— The programmer should display only the
time. It should not be flashing.
Press the
button (fig.1) then select your
cooking program using the + or - buttons
(fig.2).
fig.1
Example:
—> shelf support two recommended.
— Confirm using the OK button.
Cooking indicator self-selects. The shelf
support indicator and functions appear.
The oven begins heating.
Place your dish in the oven based on the
recommendation shown in the display.
fig.2
Your oven recommends the optimal
temperature for the chosen cooking mode.
You can still adjust the temperature using the
button under the display (fig.3).
“C” flashes in the display and indicates that
you can adjust the temperature by pressing
the + or - buttons (fig.4).
fig.3
Example:
—> set to 220°C.
— Confirm using the OK button.
The temperature rise indicator displays the
temperature
rise in the oven.
A series of beeps will sound when the oven
reaches the selected temperature.
fig.4
To stop cooking, press and hold the
button for a few seconds.
Warning
After a cooking cycle, the cooling fan continues to operate for a period of time in order
to guarantee optimal oven reliability.
Warning
All types of cooking are done with the door closed.
26
2 / USING YOUR APPLIANCE
EN
• PROGRAMMED COOKING
- Cooking with immediate start and
programmed duration
- Select the desired cooking mode and adjust
the temperature (see paragraph: immediate
cooking).
- Press the
button until“ the cooking time
indicator starts to flash .
fig.1
The display flashes 0:00 to indicate that you
can now adjust the setting (fig.1).
- Press the + or - buttons to set the desired
time.
Example: 30 mins cooking time (fig.2).
— Confirm using the OK button.
The cooking time is automatically recorded
after a few seconds.
The cooking time display stops flashing.
The countdown of the cooking time begins
immediately after it has been set.
fig.2
After these three steps, the oven heats up:
A series of beeps will sound when the oven
reaches the selected temperature.
At the end of cooking (end of programmed
time),
- the oven turns off,
- the cooking time indicator and 00:00 both
flash (fig.3),
- a series of beeps sounds for a few minutes.
Press any button to stop the beeping.
fig.3
27
EN
2 / USING YOUR APPLIANCE
• PROGRAMMED COOKING
- Cooking with delayed start and chosen
cooking end time
Proceed as with programmed cooking.
- Press the
button until“ the cooking end
indicator starts to flash .
fig.1
The display flashes to indicate that you can
now adjust the setting (fig. 1).
- Press the + or - button to set the desired
cooking end time.
Example: end of cooking at 16:00 (fig.2).
— Confirm using the OK button.
fig.2
The cooking end time is automatically
recorded after a few seconds.
The cooking end time display stops flashing.
A fte r th e s e 3 s te ps , th e o ve n h e ati n g i s
delayed so that cooking ends at 16:00.
At the end of cooking (end of programmed
time),
- the oven turns off,
- the cooking time indicator and 0:00 both
flash (fig.3),
- a series of beeps sounds for a few minutes.
Press any button to stop the beeping.
fig.3
Displays returns to the clock.
The light inside the oven turns on when
cooking starts and goes out when cooking
stops.
28
2 / USING YOUR APPLIANCE
EN
• USING THE TIMER FUNCTION
- Your oven’s programmer can be used as an
independent timer that allows you to count
down a time without operating the oven.
In this case, the timer display has priority over
the clock display.
- Press the
button 3 times (fig.1)
The timer symbol
fig.1
and 0m00s start flashing.
- Adjust the chosen time by pressing the
buttons + or - (fig.2).
- Press the button OK to confirm or wait a few
seconds.
fig.2
The display stops flashing after a few seconds and the timer starts working, counting down the
time in seconds.
Once the time has expired, the timer emits a series of beeps to notify you.
Press any button to stop the beeping.
Warning
It is possible to change or cancel the timer at any time.
29
EN
2 / USING YOUR APPLIANCE
• CUSTOMISING THE RECOMMENDED TEMPERATURE
Select the cooking function:
- Press the button OK.
If you wish to customise the recommended temperature:
- Press the
button until the temperature starts flashing.
- Press the + or - button until the desired temperature appears.
- Press OK to confirm.
• LOCKING THE CONTROLS (CHILD SAFETY)
OVEN OFF
You have the option of preventing access to
the oven controls by taking the following
steps:
when the oven is off, hold down the button
OK for a few seconds; a “key” will then be
displayed on the screen -> access to the oven
controls is now blocked (fig.1).
fig.1
To unlock access, hold down the OK button
for a few seconds.
The oven controls are once again accessible.
Warning
You cannot lock the oven if you have programmed a cooking cycle.
30
EN
2 / USING YOUR APPLIANCE
• USING YOUR TOP OVEN
-How do you program for instant cooking?
-The programmer should only display the time; it must not be flashing.
- Turn the function selector to the position of
your choice.
-Turn the thermostat to the temperature recommended for the cooking.
After these steps, the oven heats up.
-How do you cook using the grill?
-Turn the function selector to the “grill” se quence.
-Turn the thermostat knob from the - to + position to vary the grill temperature.
Augmentati
on
de
l
a
-Stop the cooking by returning the function selector to zero.
31
pu
a
iss
nce
du gril
EN
*
3 / OVEN COOKING MODES
CIRCULATING HEAT
(recommended temperature 180°C min 35°C max 235°C)
•Cooking is by a heating element at the bottom of the oven and the oven fan.
•Rapid temperature increase: Some dishes can be placed in the oven while it is still
cold.
•Recommended to retain moisture in white meat, fish, vegetables.
For cooking multiple items on up to 3 levels.
COMBINED HEAT
(recommended temperature 205°C min 35°C max 275°C)
•Cooking controlled by the upper and lower heating elements and by the fans.
•Three combined sources of heat: a lot of heat from the bottom, a little circulating heat
and a bit from the grill.
•Recommended for quiches, tarts, wet fruit tarts, placed preferebly in a terracotta
dish.
*
ECO
(recommended temperature 200°C min 35°C max 275°C)
•Cooking controlled by the upper and lower heating elements.
•This position allows for energy savings while preserving the quality of the cooking.
•The ECO position is used for energy label performance.
•All cooking is done without preheating.
FAN GRILL + ROTISSERIE
(recommended temperature 200°C min 180°C max 230°C)
•Cooking controlled, alternately, by the upper element and by oven fan.
•Preheating is unnecessary. Roasts and poultry are juicy and crispy all over.
•The spit keeps turning until the door is opened.
•Slide the drip tray onto the bottom shelf support.
•Recommended for all poultry and spit roasts, to thoroughly cook legs and large cuts
of beef. To keep fish steaks moist.
VARIABLE GRILL, MEDIUM AND HIGH + ROTISSERIE
(recommended positions 2 or 4 - min 1 - max 4)
•Cooking done by the upper element.
•The grill on high setting covers the entire grid surface. The medium grill setting is as
effective as the high setting, for smaller quantities.
•Recommended for grilling chops, sausages, toast or prawns, placed on the grid.
* Program(s) used to obtain the results indicated on the energy label in accordance with European
standard EN 50304 and European Directive 2002/40/CE.
32
EN
3 / OVEN COOKING MODES
KEEPING THINGS WARM
(recommended temperature 80°C min 35°C max 100°C)
•This position allows food to be kept warm by heat from the bottom of the oven along
with the fan.
•Recommended for letting dough rise for bread, brioche, kugelhopf, etc, without
exceeding 40°C (plate warming, defrosting).
BREAD
(recommended temperature 205°C min 35°C max 275°C)
•Cooking sequence recommended for baking bread.
•After preheating, place the dough on the pastry dish - 2nd shelf support.
•Place a bowl of water at the botom of the oven to get a crusty and shiny crust.
33
EN
4 / CARING FOR AND CLEANING YOUR OVEN
• PERFORM A PYROLYSIS (PYROLYSIS MODEL: DOP740*)
•Immediate pyrolysis
Warning
Remove the grids and trays from the
oven and clean any major spill residue.
- Check that the programmer is displaying the
time of day and that it is not flashing.
You can choose 3 durations of pyrolysis:
pyrolysis lasting 1 hour 30 minutes.
fig.1
pyrolysis lasting 1 hour 45 minutes.
pyrolysis lasting 2 hours.
Press the
touch button (fig.1).
Then press once on the button - to get the
P” flashing in the display (fig.2).
symbol “P
Confirm by pressing the button OK.
fig.2
The pyrolysis cycle display shows a duration
of 2:00 hours, but you can change this
duration.
Example: pyrolysis cycle 1h45.
Press the + or - button to get the desired
duration (fig.3).
Confirm by pressing the button OK.
fig.3
Pyrolysis starts and the symbol
stops
flashing, becomes steady. The countdown of
the cooking time begins immediately after it
has been set.
During the pyrolysis, the symbol
displays
in the programmer indicating that the door is
locked (fig.4).
At the end of pyrolysis, 0:00 starts flashing as
well as the symbol
.
fig.4
- When the oven is cool, use a damp cloth to
remove the white ashes.
The oven is clean and once again ready for
the cooking cycle of your choice.
34
4 / CARING FOR AND CLEANING YOUR OVEN
EN
• PERFORM A PYROLYSIS (PYROLYSIS MODEL: DOP740*)
•Delayed pyrolysis
- Follow the instructions described in the
section “Immediate pyrolysis”
After validating the pyrolysis cycle by pressing
the button OK:
- Press the
button.
The end of cooking symbol flashes to indicate
that it is now possible to set it (fig.1).
fig.1
- Press the + or - button to set the desired end
time (fig.2).
Example: end of cooking at 18:00.
Confirm by pressing the button OK.
- After these steps, the beginning of pyrolysis is
delayed so that it finishes at 18:00.
fig.2
• SELF-DEGREASING CATALYTIC (enamelled oven)
(CATALYTIC MODEL: DOC740*)
- This oven is composed of an enclosure fitted with detachable walls covered with a special
microporous enamel (catalytic enamel), which provides its self-degreasing properties. As soon
as dirt appears, it spreads out and is dispersed into the microporous holes. It is oxidised on
both sides and gradually disappears. The self-degreasing enamel is mainly suited for fatty, rather
than sugary substances. This is why the oven floor, which is more subject to sugary overflow, is
not covered with this enamel.
We strongly recommend:
- That you do not scrub these catalytic walls with metallic brushes, pointed or sharp instruments.
- That you do not try to clean them with commercial scouring products.
- When grilling food, the temperature of the walls is not always sufficient to eliminate major
spattering of fat.
CLEANING
•After cooking, select the cleaning sequence.
If traces of spatter remain, they will be reduced during subsequent cooking operations.
35
EN
5 / AFTER-SALES SERVICE
•SERVICE CALLS
Any repairs that are made to your appliance
must be handled by a qualified professional
authorised to work on the brand. When you
call, mention your appliance’s complete
reference (model, type, serial number). This
information appears on the manufacturer’s
nameplate (fig.1).
BRANDT APPLIANCES SAS
7 rue Henri Becquerel
92500 RUEIL MALMAISON
MADE IN FRANCE
230V ~ 50 Hz
fig.1
GENUINE REPLACEMENT PARTS
During maintenance work, request that only
certified genuine replacement parts are
used.
* Service provided by Brandt Customer Services, simplified shareholder company with capital of 25,000,000 Euros,
5/7 avenue des Béthunes, 95310 Saint Ouen l’Aumône - RCS Pontoise 440 303 303
Brandt Appliances - simplified shareholder company with capital of 10,000,000 Euros RCS Nanterre 440,302,347.
99643991 08/07
36