1
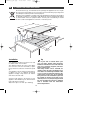
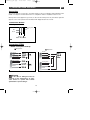
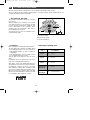
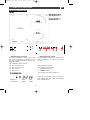
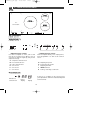
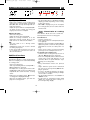
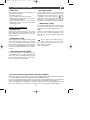
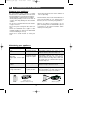
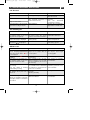
99642293_A_ML.qxp
FR
EN
PT
ES
17/09/2007
14:31
Page 1
GUIDE D’INSTALLATION ET D’UTILISATION
GUIDE TO INSTALLATION AND USE
MANUAL DE INSTALAÇÃO E UTILIZAÇÃO
MANUAL DE INSTALACIÓ Y UTILIZACIÓN
Table de cuisson
Cooking Hob
Placa de cozinha
Placa de cocción
99642293_A_ML.qxp
17/09/2007
14:31
Page 16
Dear Customer,
You have just acquired a DE DIETRICH hob and we would like to thank you.
In order to offer you an excellent product, our research teams have created this new generation of appliances for you. Their quality, appearance,
functions and technological advances make them exceptional products,
showcases of our unique know-how.
In the line of DE DIETRICH products, you will also find a wide range of
ovens, microwaves, ventilation hoods, hoods, dishwashers, and refrigerators, all of which can be integrated and all of which can be coordinated
with your new DE DIETRICH hob.
Of course, in our ongoing desire to ensure our products satisfy your needs
in the best possible way, our customer service department is always at
your disposal at our site.
DE DIETRICH
Setting New Values
We are constantly improving our products; for this reason we reserve the right to make all
modifications to their technical, functional or aesthetic characteristics, originating from technical developments.
Warning
Before installing and using your appliance please read this installation and use the guide
carefully - it will help you familiarise yourself very rapidly with its operation.
16
99642293_A_ML.qxp
EN
17/09/2007
14:31
Page 18
1 / INSTALLING YOUR APPLIANCE
As shown in this logo, the materials used to package this appliance are not recyclable. Recycle them and play a role in protecting the environment by depositing them
in municipal containers provided for this purpose.
Recycling of the appliances organised by your manufacturer will thus be undertaken
in optimum conditions, in accordance with European directive 2002/96/CE relating
to electrical and electronic equipment waste. Contact your local authority or retailer
for how to have used appliances collected or collection points.
L
l
6,4
Sortie d'air
Entrée d'air
L’
l’
4c
4c
m
4c
m
m
4c
m
Installation
Tip
If your hob is located above your
oven, the hob’s thermal safety measures
forbid the simultaneous use of the hob and
your oven’s pyrolysis program (self-cleaning by extreme heat).
This safety feature can be activated, for
example, when the hob is installed over an
oven that is not sufficiently insulated. If this
occurs, a series of small lines appear in the
control panel. In this case, we recommend
that you increase the ventilation of your hob
by creating an opening in the side of your
cabinet (8 cm x 5 cm) and/or that you install
the oven insulation kit (reference 75X1652)
that is available from the After-Sales
Service Department.
Your appliance should be positioned so that
the mains switch is accessible.
The distance between the edge of your appliance and the side and rear walls (or partitions) must be at least four centimetres (area
A).
Your appliance can be easily integrated above
a cabinet, an oven or a build-in household
appliance. Simply verify that the air intakes
and outlets are well clear.
Stick the foam gasket to the bottom of your
appliance. This will allow you to achieve an airtight seal with the worktop.
Attach the clips to the hob. (See drawing)
18
99642293_A_ML.qxp
17/09/2007
14:31
Page 19
1 / INSTALLING YOUR APPLIANCE
EN
Connection
These hobs must be connected to the mains using a socket in compliance with publication CEI
60083 or an all-pole circuit-breaker device in compliance with the installation rules in force.
When power is first supplied to your hob, or after an extended power cut, an indicator light will
appear on the control panel. This information will disappear after 30 seconds.
Connection DTI743
•Hook-up of 220-240V
~
Green/yellow
Blue
Brown
N L
Neutral Phase Earth
32A
Connection DTI749
• 220-240 V monophase hook-up
32 amp fuses.
63 amp fuse.
Brown
Phase
L
Blue
Neutral
N
Green/yellow
Green/yellow
Brown
32 A
Blue
Green/yellow
Ground
Ground
Green/yellow
Blue
Neutral
N
Phase
L
32 A
Blue
Brown
Brown
Warning
If the cable is damaged it must be
replaced by the manufacturer, its aftersales service or a person with a similar
qualification to prevent danger.
19
Phase
L
Neutre
N
Terre
99642293_A_ML.qxp
EN
17/09/2007
14:31
Page 20
2 / USING YOUR APPLIANCE
We have designed this cooking hob for use by private individuals in their homes.
These cooking hobs are intended exclusively for cooking beverages and foodstuffs and do not
contain any asbestos-based materials.
• The induction principle
The principle of induction is based on a magnetic effect.
When you place your cookware on a cooking
zone and you turn it on, the electronic circuits
in your cooking hob produce “induced” currents in the bottom of the cookware which
instantly raise its temperature. This heat is
then transmitted to the food
To help you choose, a list of cookware is provided with this guide.
C
B
A
+
-
A - Induction plate
B - Electronic circuit
C - Induced currents
• Cookware
•Choosing a cooking area
Most cookware is compatible with induction.
To verify that your cookware is suitable, place
it on a heating area (16 or 23 cm) on power 4.
- If the display remains on, your cookware is
compatible.
- If the display flashes, your cookware cannot
be used with induction cooking.
You can also use a magnet to test the cookware.
If a magnet “sticks” to the bottom of the cookware, it is compatible with induction.
Cooking
area
Only glass, terra cotta, aluminium without a
special finish on the bottom, copper and some
non-magnetic stainless steels do not work
with induction cooking. We recommend that
you select cookware with a thick, flat bottom.
When you buy your cookware, make sure that
this logo is on the package; it assures you that
it is compatible with induction cooking.
16 cm
10 ..... 18 cm
23 cm
12 ..... 26 cm
28 cm
12 ..... 32 cm
Front or rear
CONTINUUM
12 .....20 cm
Complete
CONTINUUM
20
Diameter of base
of cookware
18 ..... oval, fish kettle
99642293_A_ML.qxp
17/09/2007
14:31
Page 21
2 / USING YOUR APPLIANCE
EN
Description of your top
DTI743
Total dimensions (L x l)) DTI743X : 65 x 52
Recess cut-out (L’ x l’’)
DTI743X : 56 x 49
23 cm
50 W à 3200 W
50 W à 4600 W
16 cm
50 W à 2200 W
E
F
A B C
G
G
H
I
J
K
For a selected zone
Power
display
I
J
K
•Adjustment touch controls
These touchpads allow you to adjust power,
timer, programmer... for each of the selected
zones.
•Adjustment touch controls
Use these touchpads to select, turn on and
turn off the cooking zones. When a zone is
selected, you will see it light up, and you can
adjust its settings.
A complete CONTINUUM zone
B front CONTINUUM zone
C rear CONTINUUM zone
E zone 23 cm.
F zone 16 cm
Indicator for
selected zone
H
adjusting the power
preselecting the power
adjusting the timer
MEMO function
locking - unlocking - Clean lock
If there is no cookware on the selected zone,
your adjustments will delete automatically
after a few moments.
Timer
display
21
99642293_A_ML.qxp
EN
17/09/2007
14:31
Page 22
2 / USING YOUR APPLIANCE
DTI749
16 cm
50 W à 2200 W
28 cm
50 W à 4600 W
50 W à 4600 W
23 cm
50 W à 3200 W
Total dimensions(L x l )
DTI749X : 93.1 x 52
DTI749V : 92.9 x 51
Recess cut-out (L’ x l’’)
DTI749X/V : 90 x 49
L
E
F
A B C
G
H
I
J
K
•Adjustment touch controls
These touchpads allow you to adjust power,
timer, programmer... for each of the selected
zones.
•Adjustment touch controls
Use these touchpads to select, turn on and
turn off the cooking zones. When a zone is
selected, you will see it light up, and you can
adjust its settings.
A complete CONTINUUM zone
B front CONTINUUM zone
C rear CONTINUUM zone
E zone 23 cm.
F zone 16 cm
L zone 28 cm
G
H
I
J
K
adjusting the power
preselecting the power
adjusting the timer
MEMO function
locking - unlocking - Clean lock
For a selected zone
Indicator for
selected zone
Power
display
If there is no cookware on the selected zone,
your adjustments will delete automatically after
a few moments.
Timer
display
22
99642293_A_ML.qxp
17/09/2007
14:32
Page 23
2 / USING YOUR APPLIANCE
EN
E
F
A B C
G
Using a cooking zone
H
I
J
K
N.B.:
- The pre-heating time is calculated automatically by your hob depending on the cooking
power level chosen.
- When HU is displayed, if you do not adjust
the cooking power, the zone turns off after a
few moments.
Adjusting the power level:
- Place your cookware on the cooking zone
and press the corresponding touchpad A,
B, C, E, F, or L. A beep and a light will confirm your selection.
- Adjust the power with the touchpads G, H.
- To switch off the cooking zone keep your
finger pressed on the touchpad.
•MEMO - Memorisation of a cooking
setting
Adjusting the timer:
- Select a cooking zone.
- Adjust the timer using touchpad I.
- When the cooking is finished, “0” is displayed and a beep sounds. Press on the
main selector to delete this information.
N.B.:
- The first touch on I “–” directly selects
99 minutes.
- Simultaneous touch on I “+” and “–” annuls
the timing in progress.
- If you do not make a selection or if there is
no cookware, the selected zone turns off
after a few moments.
This function allows the hob to memorise
and reproduce an entire cooking cycle.
To memorise it:
- Select a cooking zone.
- Keep your finger on the touchpad J, until you
see it light up.
- Adjust the first power with touchpad G, then
adjust this power to reach the time you want
(minimum 10 seconds for each power setting).
- At the end of cooking, record it by keeping
your finger on the touchpad of the zone.
To reproduce the cooking cycle:
- Select the same cooking zone (if the zone is
different, NO will light up on your hob).
- Press on touchpad J, and the different memorised power levels will appear in a few
moments. When the power indicator stops
flashing, the cooking starts.
N.B.:
- Every memorisation deletes the previous
one.
- Only 5 different cycles can be memorised
per cycle. If you go beyond that, NO will display on your hob.
- In order to accurately reproduce the memorised cycle, we recommend that you always
use the same cookware.
- The pre-heating function is not available in
“MEMO” mode
- If your hob is off, touching the button J will
display the memorised power settings on
the corresponding display.
Additional functions
•Preheating
This function allows it to reach a high temperature more rapidly, then return automatically
to cooking power.
- Select a cooking zone
- Turn on preheating with the touchpad G “-”,
HU is displayed on your hob.
- Pre-adjust the cooking power with touchpad G (higher than 7). A beep confirms your
adjustment after a few moments. Cooking
starts.
- During the pre-heating stage, HU and the
cooking power display alternately.
- After the pre-heating stage, your hob displays the cooking power.
23
99642293_A_ML.qxp
EN
17/09/2007
14:32
Page 24
2 / USING YOUR APPLIANCE
E
F
A B C
G
H
I
J
K
•Delayed cooking
•Preselected power settings
This function allows you to delay your cooking
(available only for “Start Control”zone).
Program delayed cooking in 6 steps:
1 - Select the cooking zone dedicated to this
function.
2 - Press simultaneously on touchpads I “+”
and “–” to adjust the current time of your
hob. When the numbers flash, you can
adjust the hour with the touchpad I, then
wait a few moments. If the hour displayed
is correct, wait a few moments. The display
will stop flashing and a beep will confirm
the setting.
3 - Set the end of cooking time by pressing on
touchpad I. Wait a few moments. A beep
will confirm your setting.
4 - Set the duration of cooking time by pressing on touchpad I. Wait a few moments. A
beep will confirm your setting.
5 - Set the power of your cooking by pressing
on touchpad G, 4 is displayed by default
(maximum 6). Wait a few moments. A beep
will confirm your setting and SC is displayed on your hob.
6 - After a few moments, SC goes out and a
flashing point appears to indicate that
delayed cooking has been engaged.
This function allows you to modify the power
levels defined in the preselections (except for
the boost).
- Your cooking hob must be turned off.
- Select the preselection H to modify, by keeping your finger on it.
- Set the new power setting by pressing on
touchpad G.
- A beep will confirm your action after a few
moments.
N.B.:
The power levels must be between:
- 1 and 5 for the first touch.
- 6 and 10 for the second.
- 11 and 15 for the third.
•Child safety
This functioin allows you to lock your hob
when it is shut off or when it is cooking.
To lock:
- Keep your finger on touchpad K. A beep
sounds and an indicator appears. The indicator will go out automatically after a few
moments.
To unlock:
- Keep your finger on touchpad K. A beep
sounds and the indicator goes out.
Note:
- In locked mode, any action will produce a
key symbol on the display. You must unlock
your hob before using it.
- If you activate the lock while cooking, the
stop display will be prioritised on the lock.
•Independent timer
This function allows you to time an event, without cooking.
- Select a cooking zone you are not using.
- Set the time with touchpad I. A “t” flashes in
the display.
- At the end of your adjustment “t” becomes
becomes fixed and the count begins.
Note:
You can stop a count in progress by keeping
your finger on the touchpad of the selection
on the display.
24
99642293_A_ML.qxp
17/09/2007
14:32
Page 25
2 / USING YOUR APPLIANCE
EN
•Clean lock
•Auto-Stop system
This function allows you to temporarily lock
your hob while cleaning.
To activate Clean lock:
- Your cooking hob must be turned off.
- Briefly press touchpad K. A beep sounds
and an indicator appears.
- After a predefined time, the lock will automatically disengage. A beep sounds and the
indicator goes out.
If you forget cooking is in progress, after a
predefined time, this safety function will automatically turn off your hob (from 1 to 10 hours
AS” disdepending on the power setting). “A
plays and a beep sounds after about 2 minutes. Press on the main selector to delete this
information. A beep will confirm your setting.
• “Small Items” safety
If you place a small object on the area (a ring,
a fork, etc), the hob will detect it and not deliver any power. The power display flashes.
Note:
However, several small objects at the same
time on a zone could be identified as cookware. In that case, power will be delivered by
the hob.
Safety when operating
•Residual heat
After a long cooking period, the zone used
can remain hot for several minutes. An ‘’H’’
flashes during this period. Do not put your
hand on the zone.
•Temperature limiter
Do not place any utensils (spoons,
forks, covers, etc) on the cooking
zone being used. They will heat up in the
same way as cookware:
Risk of combustion.
Each cooking zone is equipped with a safety
sensor that constantly monitors the temperature of the bottom of the cookware. If you
leave empty cookware on a zone which is
turned on, it will automatically limit the power
in order to prevent damage to the cookware
or hob.
• Protection against overflows
In case of overflow, or of a metallic object or
wet cloth placed on the control areas, the hob
turns itself off, the displays light up and a
beep sounds. Clean the hob or remove the
object, then begin cooking again.
•For users with heart pacemakers and active implants.
The functioning of the hob conforms to current electromagnetic interference standards and thus
is in total compliance with legal requirements (89/336/EEC directives).
In order to avoid interference between your cooking hob and a pacemaker, your pacemaker
must be designed and programmed in compliance with the regulations that apply to it.
As we can guarantee the compliance only of our own products, we strongly recommend that
you refer to the maker of your device or to your doctor to avoid possible incompatibilities.
25
99642293_A_ML.qxp
EN
17/09/2007
14:32
Page 26
3 / MAINTAINING YOUR APPLIANCE
Preserve your appliance
The vitroceramic glass surface is highly
resistant, but not unbreakable. Here are some
recommendations for increasing its lifetime:
- Avoid banging or clattering the cookware.
- Avoid putting heating covers on the hob. A
suction effect may damage the vitroceramic
surface.
- Do not use cookware with bottoms that are
rough or dented.
- Do not use your cooking hob as a work surface.
- Never use aluminium foil or paper or aluminium scrubber to clean it. The aluminium
melts and damages the top.
- Never use a steam cleaner to clean your
hob.
- Never directly reheat a tin can. It will have a
risk of exploding.
Aesthetic faults, as a result of mistreatment of
your hob and which do not entail a lack of
function, are not covered by our guarantee.
And for the safety of your kitchen, do not
place cleaning items or inflammable objects
or products in the kitchen furniture underneath your cooking hob.
Maintaining your appliance
TYPES OF STAINS/SPOTS
USE
WHAT TO DO?
Cleaning sponges
Thoroughly moisten the zone to be
cleaned with hot water, then wipe off.
Accumulation of baked-on Cleaning sponges
stains/dirt.
Scraper for glass.
Sugar spills, melted plastics.
Thoroughly moisten the zone to be
cleaned with hot water. Use a scraper for
glass to remove the large bits, follow with
the rough side of a disinfectant sponge,
and then wipe off.
Rings and hard water White vinegar.
residue.
Apply warm white vinegar to the stain, let
stand, then wipe with a soft cloth.
Shiny metal colourings.
Weekly maintenance.
Apply a cleaning agent for vitroceramic
glass (preferable one with silicon for its
protective properties) to the surface.
Light.
cream
Special vitroceramic glass product.
cleaning sponge
special for delicate crockery
powder
26
abrasive sponge
99642293_A_ML.qxp
17/09/2007
14:32
Page 27
4 / SPECIAL MESSAGES, DIFFICULTIES
EN
•On first use
POSSIBLE CAUSES:
A special lamp appears.
Your installation blows a fuse.
Only one side works.
Working normally.
The electrical connection of
your hob is incorrect.
The hob produces an odour dur- New appliance.
ing the first cooking sessions.
WHAT SHOULD YOU DO?
Nothing, the light disappears
after 30 seconds.
Check that it is set up
properly.
See
the
“Electrical
Connection” section.
Nothing. The smell will disappear after several uses.
•On switching on
YOU OBSERVE THAT:
POSSIBLE CAUSES:
WHAT SHOULD YOU DO?
The hob does not operate and
the indicator lights on the control panel do not light up.
The hob is not working and
another message is displayed.
The hob does not function, the
information
is displayed.
The machine is not connected to
the power source. The power
source or connection is defective.
The electronic board is functioning poorly.
The hob is locked
Inspect the electrical circuit breaker and fuses.
POSSIBLE CAUSES:
WHAT SHOULD YOU DO?
Call
the
After-Sales
Service Department.
See chapter on using the
child safety system
•While in use
YOU OBSERVE THAT:
The hob has stopped operating
and is beeping approximately
every 10 seconds and a
or
F7 is displayed.
A series of small
or F7 is
displayed.
After turning on a heating zone,
the indicator lights on the control panel continue to flash.
There was an overflow or an Clean the hob or remove
object is in contact with the the object, then begin
control panel.
cooking again.
The saucepans make noise during cooking.
Your hob makes a clicking
sound during cooking.
The fan continues to function a
few minutes after your hob is
turned off.
Nothing. There is no risk,
neither to your hob nor to
your cookware.
The electronic circuits have
overheated.
The cookware used is not suitable for induction or is less than
12 cm in diameter (10 cm on a
16 cm area).
This is normal with some types
of cookware. This is caused by
the transfer of energy from the
hob to the cookware.
Cooling of the electronic components.
Working normally.
See “Inserting” section.
See section on cookware
for induction.
Nothing.
When a cooking zone has been The cookware used is not suit- See section on cookware
for induction.
turned on, the lights on the key- able for induction
pad stay lit, but the cookware is
not heated.
27
99642293_A_ML.qxp
EN
17/09/2007
14:32
Page 28
5 / AFTER-SALES SERVICE
Any maintenance on your equipment should be undertaken by:
- either your dealer,
- or another qualified mechanic who is an authorized agent for the brand appliances.
When making an appointment, state the full reference of your equipment (model, type and serial
number). This information appears on the manufacturer's nameplate attached to your equipment.
For UK after sales service information please contact:www.dedietrich.co.uk
De Dietrich UK office – tel: 01256 308000
In case of breakage, cracks or even light fissures in the vitroceramic glass, take out the
fuses or turn off the circuit breaker for your hob to avoid the risk of electrical shock.
Contact the After-Sales Service Department.
FagorBrandt SAS, Management company – SAS: social capital of 20,000,000 euros RCS Nanterre 440 303 196.
28