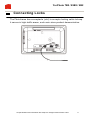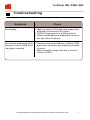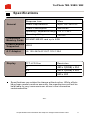
1
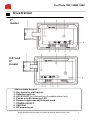
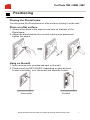
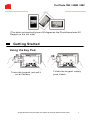
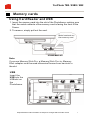
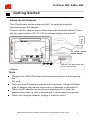
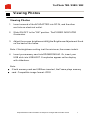
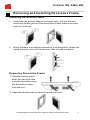
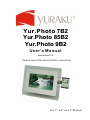
Y u r . P h o t o 7B2
Yur.Photo 85B2
Yur.Photo 9B2
User's Manual
version1.5
Please read this manual before operating
For 7", 8.5” and 9" Models
Yur.Photo 7B2 / 85B2 / 9B2
Important Safety Instructions
WARNING:
Do not expose this device to water or moisture.
The device should be situated away from sources of high heat such as
radiators or stoves.
The device should be connected to a power supply only of the type
described in the operating instructions or as marked on the unit.
Care should be taken so that objects are not placed on, nor liquids spilled
on or inside the device.
The user should not attempt to service the device beyond those means
described in these operating instructions. All other servicing should be
referred to qualified service personnel.
Note: Photos and illustrations in the manual might differ from the actual
product due the changeable frame designs.
All specifications and information are subject to changes without further notice
2
Yur.Photo 7B2 / 85B2 / 9B2
Getting Started
Locating Controls and Connections
1. LCD screen
2. SD/MMC/MS/XD memory slot
3. Power DC IN Jack
4. SKIP-BACKWARD( )
5. SKIP-FORWARD( )
6. ROTATE: Use to rotate the photo .
7. 16:9/4:3: Use to switch among Wide Screen 16:9, Auto Zoom
Regular Screen 4:3.
8. SLIDE SHOW ON/OFF
9. Stand
All specifications and information are subject to changes without further notice
3
Yur.Photo 7B2 / 85B2 / 9B2
Illustration
7"
model
8.5”and
9"
model
1.Retractable keypad
2. Key holes for wall mount.
3. Stand screw hole
4. LOCK SLOT: for connection of lockable chain lock.
5. Power on/off indicating LED
6. Screen brightness adjustment knob
7. POWER ON/OFF
8. USB Slot
9. DC power input
All specifications and information are subject to changes without further notice
4
Yur.Photo 7B2 / 85B2 / 9B2
Positioning
Placing the Photo Frame
You can place this Photoframe on a flat surface or hang it on the wall.
Place on a flat surface
1. Screw in the stand to the stand screw hole on the back of the
Photoframe.
2. Adjust the stand position for vertical or horizontal placement,
tighten the screw.
Hang on the wall
1. Insert a screw into your desired spot on the wall.
2. Place one of the KEY HOLES, depending on your desired
Frame orientation, over the screw and hang the Frame.
Horizontal
Vertical
All specifications and information are subject to changes without further notice
5
Yur.Photo 7B2 / 85B2 / 9B2
(The photo automatically turns 90 degree as the Photoframe turns 90
Degree on the left side)
Getting Started
Using the Key Pad
To use the key pad, just pull it
out all the way.
To hide the key pad, simply
push it back.
All specifications and information are subject to changes without further notice
6
Yur.Photo 7B2 / 85B2 / 9B2
Memory cards
Using Card Reader and USB
1. Insert the memory card into the slot of the Photoframe, making sure
that the metal contacts of the memory card is facing the front of the
Frame.
2. To remove, simply pull out the card.
Metal contacts on
the memory card
SD/MS/MMC/XD
Note:
If you use Memory Stick Pro, a Memory Stick Pro-to- Memory
Stick adaptor must be used otherwise the card can be stuck in
the slot.
USB
Insert the
USB into the
USB slot on
the
Photoframe.
All specifications and information are subject to changes without further notice
7
Yur.Photo 7B2 / 85B2 / 9B2
Getting Started
Using the AC Adaptor
This Photoframe can be powered by AC through the supplied
switching power AC adaptor.
Connect the AC adaptor to your Photoframe as illustrated below, There
are two input sockets (DC 12V IN) for accepting the plug from AC
DC input 12V
To home power
output source
DC input 12V
Use this DC input when the
frame in wall-mounted
adaptor.
Note
Always turn off the Photoframe before connecting or disconnecting
the
AC cord.
Only use the AC adaptor supplied with this player. Using a different
type of adaptor may cause malfunction or damage to the product.
When the AC adaptor is used for prolonged period of time, the
adaptor may heat up, this is normal and is not a cause for concern.
When not using the adaptor, unplug it from the outlet.
All specifications and information are subject to changes without further notice
8
Yur.Photo 7B2 / 85B2 / 9B2
Viewing Photos
Viewing Photos
1.
Insert one end of the AC ADAPTER into DC IN, and the other
end into an electrical outlet.
2.
Slide ON /OFF to the "ON" position. The POWER INDICATOR
illuminates.
3.
Adjust the screen brightness using the Brightness Adjustment Knob
on the back of the frame.
Note: if the brightness setting is at the minimum, the screen is dark.
4.
Insert your memory card into SD/MMC/MS/xD. Or, insert your
USB stick into USB HOST. Your photos appear on the display
with slideshow.
Note:
If both memory card and USB are inserted, the Frame plays memory
card. Compatible image format: JPEG
All specifications and information are subject to changes without further notice
9
Yur.Photo 7B2 / 85B2 / 9B2
Viewing Photos
Turning Off/On Slideshow
Press
, to turn off and turn on slide show. With the Slideshow
turned off, you can browse the photo manually by pressing
view the next photo and
to
to view the previous photo. With the
Slideshow turned on, the photos display automatically.
Viewing in 4:3, Automatic Zoom and 16:9 Mode
You can view the photo in three modes in sequence : 4:3, automatic
zoom and 16:9 (widescreen) modes by repeatedly pressing
.
4:3 mode: the photo is displayed in original size.
Automatic Zoom: the photo is zoomed to fill the whole screen. Portion
(top and bottom) of the original photo will be cut off from the
screen. If the original photo is too small, the automatic zoom will
have no or little effect.
16:9 mode: the photo is stretched to fill 16:9 widescreen, this
results in image distortion. Some newer digital camera can shoot
16:9 format, viewing in 16:9 mode will appear normal.
Rotating Your Photos
You can rotate your photos to view them at different angles.
1. Select your desired photo.
2. Repeatedly press
to rotate the photo to your desired angle.
All specifications and information are subject to changes without further notice
10
Yur.Photo 7B2 / 85B2 / 9B2
Removing and Installing Decorative Frame
Installing Decorative Frame
1.
Insert the two anchor tabs on the top of main unit into the two
matching holding slots of the decorative frame, make sure tabs
are fully inserted.
Anchor
Tab
Anchor
Tab
2.
Bring the main unit and the decorative frame together, and press
down the main unit until the two lock tabs clicked into place.
Lock
Tab
Lock
Tab
Press down
Removing Decorative Frame
1. Simultaneously press
down the two lock tabs
meanwhile pushes away
the decorative frame
from the unit.
Press down
2. Separate the decorative frame from the main unit.
All specifications and information are subject to changes without further notice
11
Yur.Photo 7B2 / 85B2 / 9B2
Connecting Locks
The Photoframe has a receptacle (slot) to accept a locking cable to keep
it secure in high-traffic areas, such as in-store product demonstration.
All specifications and information are subject to changes without further notice
12
Yur.Photo 7B2 / 85B2 / 9B2
Troubleshooting
Symptom
No display
Check
1. Make sure the AC Power cord is securely
plugged into an active AC outlet.
2. Check Power switch is at ON position.
3. Check the Brightness Adjustment knob is
not set at the minimum.
No photos displayed while 1. Remove and insert Memory Card or USB
Memory Card or USB stick
and make sure they are properly inserted
has been inserted.
in place.
2. Make sure the image files are in correct
format (JPEG).
All specifications and information are subject to changes without further notice
13
Yur.Photo 7B2 / 85B2 / 9B2
Specifications
General
Response time
30ms
Power Requirements
Input:100~240V AC
Power Consumption
Max 8Watt
Operating Temperature Range +10 oC~ +40oC
Operating Voltage
Compatible
Memory Cards
12V DC
SD/MMC/MS/XD card up to 4GB
Photo Formats
JPEG
Supported
A.C Adaptor
IN: 100~240V AC OUT: 12V/1.25A
Display
TFT-LCD Size
Resolution
7”
8.5”
480 x 3(RGB) x 234
480 x 3(RGB) x 234
9”
640 x 220
Specifications are subject to change without notice. While efforts
have been made to ensure accuracy, the manufacturer will not be
held liable for any inaccuracies or errors in the information
contained within.
- end -
All specifications and information are subject to changes without further notice
14