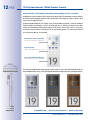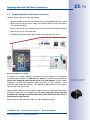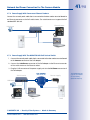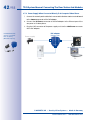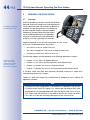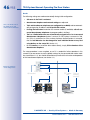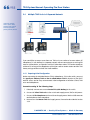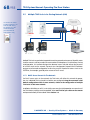
1
EN
T24S System Manual
The HiRes Video Company
Hemispheric IP Video Door Station
Hemispheric 3MEGA camera for use in combination with Siedle Vario modules.
Complete coverage of the entire scene at the house door. From wall to wall, from
top to bottom – no blind spots and no gaps in security.
www.mobotix.com
5/2010
180°
Complete Panorama view from wall to wall and from floor to ceiling
HiRes Video Innovations
The German company MOBOTIX AG is known as the leading pioneer in network camera technology
and
its
decentralized
concept
has
made
high-resolution
video
systems
cost
efficient.
MOBOTIX AG • 67722 Langmeil • Tel.: +49-6302-9816-103 • Fax:+49-6302-9816-190• [email protected]
2/98
T24S System Manual: T24S Details
Enter The Details Of Your T24S Here
T24S Camera Name:
T24S IP Address:
Grandstream IP Address:
MicroSD Card Last Changed:
Default User Name: admin
Password: meinsm
Admin User Name:
Admin Password:
Note
MOBOTIX offers inexpensive seminars that include a workshop and practical exercises: Basic 3 days, Advanced 2 days and Sales/Project 1 day.
For more information, please visit www.mobotix.com
© MOBOTIX AG • Security-Vision-Systems • Made in Germany
www.mobotix.com • [email protected]
3/98
Contents
The Hemispheric IP Video Door Station
6
All-Round View With No Blind Spots
10
T24MX Product Preview
12
T24MX System Overview
14
1
Overview Of Modules And Components
16
1.1
T24 Camera Module
16
1.2
Siedle Modules And Grandstream
18
1.2.1 Siedle Modules
1.2.2 Grandstream GXV3140 IP Multimedia Phone
18
21
1.3
T24S Web Configurator
22
2
Connecting The Door Station And Modules
24
2.1
Selecting The Mounting Position
24
2.2 Preparing Network And Power Connections
25
2.3 Terminal Board And Terminal Connectors
26
2.4 Connections In The Door Station
28
2.4.1 Networking
2.4.2 Terminal Board Configuration
2.4.3 Circuit Overview Diagram – Modules And Power Supply 2.4.4 Siedle Bell Button Module (1 To 4)
2.4.5 Siedle Fingerprint Module And Electronic Key
2.4.6 Siedle Motion Detector Module 2.4.7 Siedle Info Module
2.4.8 Siedle LED Spotlight
2.4.9 External Light (Via 230 V Relay)
2.4.10Floor Call
2.4.11 Door Opener 2.4.12Door Switch And Door Lock Switch
2.4.13Siedle Anti-Theft Protection
28
29
30
31
31
32
32
33
33
34
34
35
35
2.5 Finishing The Installation
36
2.5.1 Connecting And Retaining Modules
2.5.2 Removing Modules
36
37
2.6 Replacing The MicroSD Card
38
2.6.1 Removing The MicroSD Card
2.6.2 Inserting The MicroSD Card
38
39
© MOBOTIX AG • Security-Vision-Systems • Made in Germany
www.mobotix.com • [email protected]
4/98
T24S System Manual: Contents
2.7
Network And Power Connection For The Camera Module
40
2.7.1
2.7.2
2.7.3
2.7.4
2.7.5
Notes On Cable Lengths And Power Supply
Power Supply With Power-over-Ethernet Products
Power Supply With The MOBOTIX NPA-PoE Set And Switch
Power Supply When Connected Directly To A Computer/Video Phone
Starting The T24S 40
41
41
42
43
3
Operating The Door Station
44
3.1
Overview
44
3.2 One T24S In A Separate Network
45
3.2.1 Automatic Initial Configuration 3.2.2 Configuring MxEasy (Optional)
3.2.3 Using MxEasy
3.2.4 Module Configuration (Optional)
45
47
55
58
3.3 One T24S In An Existing Network (LAN)
60
3.3.1 DHCP Server Present On The Network
3.3.2 No DHCP Server On The LAN (Static IP Addresses)
60
61
3.4 Multiple T24S Units In A Separate Network 66
3.4.1 Preparing Initial Configuration
3.4.2 Automatic Initial Configuration With Master T24S
3.4.3 Using MxEasy, Configuration Modules (Optional)
66
67
67
3.5 Multiple T24S Units In An Existing Network (LAN) 68
3.5.1 DHCP Server Present On The Network
3.5.2 No DHCP Server On The LAN (Static IP Addresses)
68
69
3.6 Starting And Operating IP Videophones
72
3.6.1 Establishing A Connection To The Camera Or To An IP Videophone
3.6.2 Grandstream Display With The T24S User Menu
72
73
4
Special T24S Camera Functions
80
4.1
Video And Sound Recording Of Events
80
4.1.1
4.1.2
4.1.3
4.1.4
Automatic Event Recording
PTZ And Full Image Storage Independent Of Live Image
Camera-Internal Memory Up To 32 GB
Formatting A New MicroSD Card Using A Web Browser
80
82
84
85
4.2 Additional Camera Settings 86
4.3 Final Notes
88
4.3.1 Weatherproofness
4.3.2 Password For The Administration Menu
88
88
© MOBOTIX AG • Security-Vision-Systems • Made in Germany
www.mobotix.com • [email protected]
5/98

4.3.3 Permanently Deactivating The Microphone
4.3.4 Starting The Camera With Factory Defaults
4.3.5 Resetting The Camera To Factory Settings (By Web Browser)
4.3.6 Activating Event Control And Video Motion Detection (By Web Browser)
4.3.7 Deactivating The Daily Restart Of The Camera (By Web Browser)
4.3.11 Online Help And Camera Status
88
89
90
90
90
91
Notes and Copyright Information
The enclosed Camera Software Manual contains detailed information about
MOBOTIX camera software. Download the latest version of this manual, MxEasy
and MxControlCenter manuals as PDF files from www.mobotix.com (Support >
Manuals). All Rights Reserved. MOBOTIX, MxControlCenter, MxEasy, ExtIO and CamIO
are internationally protected trademarks of MOBOTIX AG. Microsoft, Windows and
Windows Server are registered trademarks of the Microsoft Corporation. Apple, the
Apple logo, Macintosh, OS X and Bonjour are trademarks of Apple Inc. Linux is a
trademark of Linus Torvalds. All other brandnames mentioned herein may be trademarks or registered trademarks of the respective owners. Copyright © 1999–2010
MOBOTIX AG, Langmeil, Germany. Information subject to change without notice.
Third-Party Licenses
AVC Video/H.264
THIS PRODUCT IS LICENSED UNDER THE AVC PATENT PORTFOLIO LICENSE FOR THE
PERSONAL AND NON-COMMERCIAL USE OF A CONSUMER TO (I) ENCODE VIDEO
IN COMPLIANCE WITH THE AVC STANDARD (“AVC VIDEO”) AND/OR (II) DECODE AVC
VIDEO THAT WAS ENCODED BY A CONSUMER ENGAGED IN A PERSONAL AND NONCOMMERCIAL ACTIVITY AND/OR WAS OBTAINED FROM A VIDEO PROVIDER LICENSED
TO PROVIDE AVC VIDEO. NO LICENSE IS GRANTED OR SHALL BE IMPLIED FOR ANY
OTHER USE. ADDITIONAL INFORMATION MAY BE OBTAINED FROM MPEG LA, L.L.C.
SEE HTTP://WWW.MPEGLA.COM.
© MOBOTIX AG • Security-Vision-Systems • Made in Germany
www.mobotix.com • [email protected]
For more information:
www.mobotix.com
6/98
T24S System Manual: The Hemispheric IP Video Door Station
MOBOTIX T24 – THE HEMISPHERIC IP VIDEO DOOR STATION
Why Choose A Digital IP Video Door Station?
Door stations with integrated video cameras have been on the market for years. In most
cases, they are based on analog TV technology that is over 60 years old and, because of
the system involved, can only provide relatively modest image and sound quality. Such
systems, which do not feature parallel sound channels, only enable limited two-way
communication. The connection to the camera and other components (doorbell buttons,
door opener, speaker, etc.) is generally over highly elaborate cabling and power supply
systems. It is not normally possible to record video and audio data without expensive
add-on devices.
While video door stations were previously reserved for limited clientele, the arrival of digital
network technology and the Internet Protocol (IP) has drastically changed the market situation. This technical platform for rapid and secure exchange of even large amounts of
data is well suited to provide a future-oriented, appealing and affordable access control
system with real added value and unbeatable advantages:
• simple and inexpensive installation with only a few system components (door
station, switch, PC/VoIP video phone)
• easy to integrate into existing home and company networks
• data and power may be transmitted simultaneously over a single Ethernet cable (PoE
technology) or, in old buildings, over existing two-wire cabling (Mx2wire technology)
• digital technology provides the basis for superior image and sound quality and
new function and control elements (for example, transponder, VoIP/SIP phone as
receiving device)
• simple recording of video and audio clips to low-cost digital data storage
• suitable for systems of all sizes, from single-family homes to corporate complexes
• simple to plan and expand without limitation to the number of participants
• increased building security through encrypted data and tamper-proof door opener
© MOBOTIX AG • Security-Vision-Systems • Made in Germany
www.mobotix.com • [email protected]
7/98
HiRes 180° Panorama - from wall to wall
HiRes 360° Full Image – view the whole scene
© MOBOTIX AG • Security-Vision-Systems • Made in Germany
www.mobotix.com • [email protected]
8/98
T24S System Manual: The Hemispheric IP Video Door Station
What Are The Specific Advantages Of A MOBOTIX IP Video Door Station?
As the global leader for high-resolution network cameras and the developer of Hemispheric
Video Technology for security cameras, MOBOTIX brings the highest level of expertise and
commitment to innovation in the IP video field. The new MOBOTIX IP video door stations
reinforce this position with intelligent, detailed solutions and unique advantages:
• hemispheric HiRes camera, providing an all-round view with no blind spots through
a high resolution panorama image
• automatic integrated recording (video and sound) of all relevant events occurring in front
of the door, for example, someone ringing the doorbell, movement in the image, etc.
• video intercom from anywhere around the world through simple Internet connectivity
• integrated message function – messages can be left at the door station and played
back by authorized recipients
• individual control over access rights (for example, time-controlled)
• simple operation from a VoIP video phone or any standard PC
• MxEasy, the intuitive graphical user interface software is free with every door station
MOBOTIX offers two basic versions of the system for hemispheric IP video door stations,
the T24MX and the T24S.
T24MX door station
T24S door station
MOBOTIX integrates hemispheric technology into the
Siedle Vario System – for added security through superior overview images and event-controlled recording of
video and sound.
© MOBOTIX AG • Security-Vision-Systems • Made in Germany
www.mobotix.com • [email protected]
9/98
What Advantages Does MOBOTIX Offer Over Other Video Door Stations?
Through HiRes image quality, distributed technology and a wide range of features, MOBOTIX
can offer not only an outstanding door camera, but also a professional security camera in a single device. MOBOTIX
Hemispheric Video Technology
was introduced to the network
video market with great success
in 2008. This technology is also an
important component of MOBOTIX
video door stations, which provide
perfect, high-resolution overview
images through a fisheye lens
with a 180° image angle. This
allows the camera to cover the
long-range view of the entrance
area from wall to wall and from
floor to ceiling without any blind
spots, and without ever needing
to mechanically tilt or pan.
But the camera, with its unrivaled
image quality and panorama view,
provides more than just incorruptible access control. The camera
has an integrated high-speed
processor that provides a range of
functions similar to that available
in MOBOTIX security cameras used in banks and airports. This means
that the camera can register movement in the image through integrated
Video Motion Detection or automatically record smooth video with
sound when suspicious noises are detected, all while simultaneously
sending an e-mail or text message to residents or a security company.
HiRes 180° panorama – the entire entrance area in one view
© MOBOTIX AG • Security-Vision-Systems • Made in Germany
www.mobotix.com • [email protected]
Fisheye view
Captures the entire
hemispherical area in
front of the camera
lens and displays it in
a user-friendly format
as a corrected image
or image section
10/98
T24S System Manual: All-Round View With No Blind Spots
Hemispheric HiRes Camera
Standard 90°
Seeing the big picture with the T24
Thanks to the fisheye lens with its 180° image
angle, the camera records the entire entrance
area without having to be mechanically panned
or tilted – without any blind spots, from wall
to wall, floor to ceiling. It is not possible to "slip
by" this camera. The operator can change the
current image section in seconds on the monitor
located at the remote station: from a close-up of
the visitor all the way to an overview panorama.
The T24 has an integrated high-performance
computer, just like the MOBOTIX security cameras
used in banks and airports. This enables the IP
video door station to start recording video and
sound automatically when motion is detected while sending a message to the property
owner or security company via text message or e-mail.
A Superior Overview Increases Security
T24 360° Full Image
HiRes 180° Panorama
For this reason, the camera uses its integrated software to correct the images in the live
view so that it can deliver user-friendly images at the remote video station. The operator
can now digitally tilt, pan and zoom the image from the comfort of the remote station.
© MOBOTIX AG • Security-Vision-Systems • Made in Germany
www.mobotix.com • [email protected]
Original MOBOTIX T24 Image – 1280 x 480
The fisheye lens of the camera records the entire hemisphere of the scene without any
blind spots and displays this image as the first part of the 360° full image. Here, there
are technical limitations, above all at the edges of the image, where the geometric shape
of the objects is heavily distorted, making them difficult to for the human eye to evaluate.
11/98
180° Field Of View With No Blind Spots
Conventional door cameras have a standard 90° lens, meaning that they are only able to
record visitors standing directly in front of the lens. However, much of the time, the door station
is mounted next to the door, so the camera's perspective is at an angle to the visitor (see
image). Even in this case, thanks to its 180° image angle, the T24 delivers perfect pictures.
Right: Original
MOBOTIX T24 image
Standard 90°
Door Intercom
(located next to the door)
HiRes 180° Panorama
Door
Direct Views Up And Down
And the hemispheric camera can do much,
much more: it can record the area on the
floor in front of the door, for example, even
the often overlooked area directly underneath
the door station. And the T24 does all of this
using only its software – without the need
for moving parts or motors. This camera is
silent, discreet and unobtrusive.
Also, this quick look down is incredibly practical when checking, for example, whether the
daily paper is already in front of the door. In addition, it is also possible to look upwards
under the ceiling also.
© MOBOTIX AG • Security-Vision-Systems • Made in Germany
www.mobotix.com • [email protected]
Original MOBOTIX
T24 vPTZ Image
12/98
T24S System Manual: T24MX Product Preview
Product Preview: The T24MX IP Video Door Station (Market Launch: July 2010)
In addition to the hemispheric HiRes camera, the latest MOBOTIX development also includes
a multifunctional keypad module with transponder technology for keyless access and
control of message functions.
A particular advantage of the T24MX is the minimal cabling involved – either a standard
Ethernet cable (for example, CAT7) or existing bell wire is sufficient to connect the door
station to the building network and supply it with power. Only a PoE switch is necessary
to connect remote stations (VoIP phone or PC) and supply power. This may be positioned
in an electrical cabinet, for example.
Hemispheric camera (with LEDs)
All-round view with no blind spots
Keypad (backlit)
Keyless entry (RFID & PIN), message box
Info module & Mx2wire (backlit)
Data & power over two-wire cable
327 x 126 mm/12,9 x 4,96 in
327 x 126 mm/12.9 x 4.96 in
331 x 131 mm/ 13.03 x 5.16 in
131 mm/5.16 in
The robust and absolutely weatherproof system matches every style of building through the
four available colors (white, silver, dark gray and amber) and the discreet, yet elegant design.
27 mm/1.06 in
45 mm/1.77 in
85 mm/ 3.35 in
© MOBOTIX AG • Security-Vision-Systems • Made in Germany
www.mobotix.com • [email protected]
13/98
Security Door Opener With Battery Back Up Power Supply.
The door station may be coupled with a MOBOTIX security door opener with internal access
code storage, making it impossible to open the door by forcibly removing the system and
bypassing the connecting cable. A built-in rechargeable battery
powers both the door lock and the keypad in the outdoor station
and guarantees that the door can be locked and unlocked even in
the case of complete power failure. For indoor installations, the door
opener also functions as a door bell with its built-in speaker. The
device features two status LEDs and two function buttons.
Keypad With RFID Technology
This MOBOTIX-developed module can be used for several functions.
Outdoors, it functions as the access control interface – either by
entering a code on the keypad or for keyless access using a PIN
code or transponder (for example, as a check card). The module
can also be used by authenticated visitors and residents to leave
and play back messages. The keypad may be installed individually to secure adjacent spaces such as warehouses or VIP areas.
Info Module With/Without Mx2wire Technology
The info module features a backlit house number field and may also
include an Mx2wire unit as an option. This unit is needed if the T24MX
is to be connected to the PoE switch with an existing bell wire via
a second Mx2wire unit instead of directly using an Ethernet cable.
Remote Stations
VoIP phones or PCs with free MOBOTIX user interface software may be used as remote
video stations. Encrypted remote access is also possible using an Internet browser with
full live image transmission and intercom. The system may be controlled by a standard
Internet device from any location worldwide.
Grandstream VoIP telephone
MxEasy user interface software
IP device PC/smartphone
© MOBOTIX AG • Security-Vision-Systems • Made in Germany
www.mobotix.com • [email protected]
T24S System Manual: T24MX System Overview
SySTEM OVERVIEW: ACCESS CONTROL
What does a typical system look like and what components are included? This section
describes the setup for an access control system with the video door station including a
security door opener, add-on keypad and info module with Mx2wire technology to connect the door station using existing two-wire cabling. In newer buildings, it is preferable
to use Ethernet cable.
Lights
Hemispheric camera (with LEDs)
•
•
•
•
Full intercom
Lip-synchronous sound
Event-controlled recording
Outdoor light and doorbell button
Keypad (integrated)
• Open/lock door
• Keyless entry with transponder
• Check/leave messages
Mx2wire
14/98
Info module (backlit)
• With M2xwire unit (optional)
• Data and power over two-wire
cable
Existing two-wire cable
for existing installations
OR
CAT cable
for first-time installations
Keypad (stand-alone module)
•
•
•
•
Access functionality
For securing side doors, storage areas, etc.
Connection and control of door opener
24 V power supply
© MOBOTIX AG • Security-Vision-Systems • Made in Germany
www.mobotix.com • [email protected]
15/98
Standard PC (internal remote station)
•
•
•
•
With free MxEasy software
T24 configuration and operation
All functions including intercom
Connection via Ethernet without other devices
Security door opener with doorbell
Door switch
•
•
•
•
12 V, 12 W
Opens door, doorbell on/off
Status LEDs for door and messages
Backup power supply with battery
Connects to door opener and sensors
Door opener
Mute
Inside lock
Mx2wire unit
• Remote station for unit in info module
• Data and power over two-wire cable
• Alternative to standard Ethernet cable
Network connection
Connection to switch, router
Standard PoE switch
Network connection
Connection to switch, router
Internet connection
Global access
VoIP video phone (reception remote station)
•
•
•
•
Intercom, open door, turn light on/off
Operate camera (including recording)
Monitor door status (open/closed/locked)
Event search
© MOBOTIX AG • Security-Vision-Systems • Made in Germany
www.mobotix.com • [email protected]
Global access over
Internet connection
16/98
T24S System Manual: Overview Of Modules And Components
1
Overview Of Modules And Components
1.1
T24 Camera Module
The hemispheric camera with its fisheye lens (for 360° panorama view) and integrated live
image correction boasts a high-resolution 3.1 megapixel color sensor, speaker, microphone
and 4 GB data storage for around 250 one-minute video clips or 60,000 VGA images.
99 mm/3.90 in
Dimensions of camera module:
99 x 99 x 38 mm/
3.9 x 3.9 x 1.5 in (W x H x D)
LEDs
99 mm/3.90 in
Weight of camera module:
240 g/8.47 oz
Light button
Doorbell
Lens
Microphone
MxBus connector
Mini USB (for future
expansion modules)
Network connection
Bayonet catch
Notes
Only the Siedle Vario modules shown on the following pages can be used for system
installation. The Siedle modules are connected to the Ethernet via the MOBOTIX
camera module through the T24S terminal board only.
© MOBOTIX AG • Security-Vision-Systems • Made in Germany
www.mobotix.com • [email protected]
T24 Camera Module
© MOBOTIX AG • Security-Vision-Systems • Made in Germany
www.mobotix.com • [email protected]
17/98
18/98
T24S-System Manual: Overview Of Modules And Components
1.2
Siedle Modules And Grandstream
1.2.1 Siedle Modules
The MOBOTIX T24S IP video door station includes the T24S camera module with a special
IO terminal board, which can be used to integrate the existing Siedle modules. Siedle
products (modules, frames, network devices, etc.) cannot be ordered from MOBOTIX.
Call Buttons TM 612-1, -2, -3, -4
These modules differ by the number of call buttons (4 max.).
The label fields also have different sizes. The call buttons
are offset from the illuminated label field and marked by an
illuminated bell symbol. Polycarbonate front panel and transparent name labels can be replaced from the front without
tools. 99 x 99 mm/ 3.9 x 3.9 in (W x H)
Information IM 612-0
Individually printable, 91 x 84 mm (3.58 x 3.30 in) LED backlit
(operating current: 25 mA) label field with insert for house number,
company logo, business hours, etc. 99 x 99 mm/3.9 x 3.9 in
(W x H)
LED Spot LEDS 600-0
The 36 mm/1.4-inch
protruding casing of the
spotlight can slightly
limit the peripheral area
recorded by the camera.
The spotlight highlights accents, brings out contrasts and
sharpens contours. For use with house numbers or call buttons,
for example. Featuring an energy-saving and long-lasting
LED bulb. IP54 weatherproof. The spotlight may not be positioned directly above the camera module. 99 x 99 x 36 mm/
3.9 x 3.9 x 1.4 in (W x H x D)
© MOBOTIX AG • Security-Vision-Systems • Made in Germany
www.mobotix.com • [email protected]
Siedle Modules And Grandstream
19/98
Motion Sensor BMM 611-0
Detects, within a terminable range (max. horizontal detection angle: 180°), infrared rays as emitted by people and
can activate the light, for example. The system contains a
highly-sensitive infrared sensor. The horizontal detection area
and the detection range may be adjusted as necessary.
99 x 99 x 25 mm/3.9 x 3.9 x 0.98 in (W x H x D)
Electronic Key Reader ELM 611-01 (With EK 601-0 Or EKC 601-0)
Contactless access control system with function LED. For use as
a reader unit for (a maximum of 9) electronic keys (EK 601-0)
or key cards (EKC 601-0) to open doors, gates, etc. Keys and
cards do not require a battery. 99 x 99 mm/3.9 x 3.9 in (W x H)
Fingerprint Reader FPM 611-01
In this system the unique biometric features of the human
finger are used to gain keyless access. Never worry about
lost, misplaced, forgotten or stolen keys again. Several fingers
may be read from each person. A maximum of five groups
may be configured. With function LED. 99 x 99 x 17 mm/
3.9 x 3.9 x 0.67 in (W x H x D)
Placeholder BM 611-0
Blind module to cover empty fields or placeholder for later
expansion. 99 x 99 mm/3.9 x 3.9 in (W x H)
Note
MOBOTIX recommends using the T24S web configurator (see Section 1.3) to plan
the individual door stations in the desired color.
© MOBOTIX AG • Security-Vision-Systems • Made in Germany
www.mobotix.com • [email protected]
The illumination switch
function is adopted
directly by the T24S
camera module
20/98
T24S-System Manual: Overview Of Modules And Components
Transformer TR 602-01
For power supply to supported Siedle modules. Transformer
in switchboard casing. Voltage: 230 V AC +/-10%, 50/60 Hz,
Output voltage: 12 V AC, Output current: max. 2.5 A, Protection:
secondary short-circuit proof, Protection class: IP20, Ambient
temperature: 0°C to +40°C (32°F to 104°F).
Electronic Anti-Theft Protection DSC 602-0 With ZDS 601-0
Additional protection against unauthorized removal of modules. The module consists of the Anti-Theft Protection ZDS
and the Controller DSC. The ZDS is fitted to the bar(s) of the
installation frame and securely seals off access to the opening
mechanism. The anti-theft protection controller is located in
the distribution box, inaccessible from outside.
On-wall Casing GA 612-XX With Installation Frame MR 611-XX
Siedle Vario on-wall casing made from extruded aluminum
sheath with diecast zinc corner connectors and steel base
plate for a maximum of six function modules. Completely
powder-coated or painted, suitable for vertical or horizontal
installation. Matching installation frame included.
The integrated on-wall
casing has a depth
of 36.5 mm/1.44 in
Flush-mounted Casing GU 611-XX With Installation And Combination Frame MR/KR 611-XX
Siedle Vario casing for flush-mounted installation. The system
includes a flush-mounted casing constructed from robust
plastic for a maximum of six function modules, a matching
installation frame made from diecast zinc and a combination
frame including a circumferential seal made from extruded
aluminum sheathing.
The combination
frame located above
the wall has a depth
of 15 mm/0.59 in
Frame dimensions in mm
332
232 132
132
132
162
232
232
332
332
Frame dimensions (in mm) can be arranged vertically (right) for one to four modules or arranged
in a grid horizontally and vertically (left).
432
© MOBOTIX AG • Security-Vision-Systems • Made in Germany
www.mobotix.com • [email protected]
Siedle Modules And Grandstream
1.2.2 Grandstream GXV3140 IP Multimedia Phone
The Grandstream GXV3140 is available as a potential remote video station for the
T24S door station. The powerful IP video phone features high quality images delivered
on a large color LCD display. The phone has a comprehensive set of important features
such as transfer, hold and conference calling for use in a professional environment, in
addition to numerous multimedia functions. The full duplex speaker phone is equipped
with an acoustic echo canceller for noise suppression.
The integrated 1.3 megapixel camera can be switched on and off at the touch of a button.
The additional multimedia features include: a multimedia player for data from a USB stick
or SD card, display of RSS feeds, and access to Internet radio.
The video phone offers an intuitive menu, so that configuration and operation of both, the
phone and the T24S door station, are no trouble at all.
The device also includes two Fast Ethernet connectors, two USB ports (for example, for
external keyboards), and an SD card slot, so you can easily transfer and use your own
data with the phone. The integrated 2.5 mm (0.1 in) connector lets you attach a headset
and the video image, which can be displayed on an external monitor using the A/V jack.
© MOBOTIX AG • Security-Vision-Systems • Made in Germany
www.mobotix.com • [email protected]
21/98
Standard PCs with
MxEasy, SIP softphones
or other SIP video
phones (with H.264)
are suitable as remote
video stations.
22/98
T24S-System Manual: Overview Of Modules And Components
1.3
T24S Web Configurator
On the MOBOTIX website (www.mobotix.com), we are pleased
to be able to offer the practical T24S web configurator to
plan your personal T24S door station with a MOBOTIX hemispheric camera, Siedle Vario modules and a Grandstream
IP video phone.
You can choose the individual components step-by-step so
that no individual component is forgotten. Accessories required
for your selected components are automatically added by
the configuration tool.
After you have finished the configuration, the system creates
a preview image of the system as well as a parts list at the
click of a button so that a request for a concrete offer can be
sent to the electronics specialist contracted to install the system.
www.mobotix.com >
Products > IP Video Door
Station > Configurator
The web configurator can be found under Products > Video IP Door Station > Configurator.
Use the web configurator as your ideal planning tool to:
• quickly and easily configure a personal T24S
• suitably prepare for both planners/installers and end customers
• automatically prepare preparation of a printable list of all necessary components
• provide an ideal basis for quote preparation
• automatically generate a preview image of the selected configuration
• avoid misplanning or misordering
© MOBOTIX AG • Security-Vision-Systems • Made in Germany
www.mobotix.com • [email protected]

© MOBOTIX AG • Security-Vision-Systems • Made in Germany
www.mobotix.com • [email protected]
23/98
24/98
T24S System Manual: Connecting The Door Station And Modules
2
Connecting The Door Station And Modules
2.1
Selecting The Mounting Position
You must select the exact mounting position before installing the door station. The system
is generally installed such that the height from the ground to the upper edge of the frame
is at least 1.60 m. Depending on the frame size and orientation, the camera module must
always be placed in the top left position in the Siedle Vario frame.
Always install the
camera module in the
upper left position
1.6 m/ 63 in
The system offers options for both on-wall and flush-mounted installation. Different
mounting sets are available for the two different options. The T24S camera module can
be used universally for both mounting options.
In addition to the (most popular) vertical mounting option,
horizontal installation of the Vario frame is also possible by
rotating the camera module correspondingly when placing
it into the installation frame.
Detailed instructions for flush-mounted and on-wall installation of the Vario system are
included in the Siedle packaging.
© MOBOTIX AG • Security-Vision-Systems • Made in Germany
www.mobotix.com • [email protected]
Preparing Network And Power Connections
2.2
25/98
Preparing Network And Power Connections
The door station requires the following cabling:
• (A) Ethernet cable from the PoE switch (or from a router with additional PoE power supply)
• (B) Two wires for the the power supply to the Siedle modules from the transformer
in the electrical cabinet
• (C) Two wires for the anti-theft protection controller in the electrical cabinet (optional)
• (D) Two wires for the 230 V light relay
• (E) Cables to the external door opener, door switch and door lock switch
Recommendation For Cabling
For cable line A (network), MOBOTIX recommends using a category 5 (CAT5) Ethernet
installation cable or higher. For cable lines B, C and D, we recommend laying an 8- or
10-wire ySTy (telephone) cable with 0.8 mm (0.26 in) core diameter, even for smaller
installations, to make future expansion more convenient. As a rule, however – when
maximum cable lengths are kept low – YSTY (telephone) cable with only 0.6 mm (0.02 in)
core diameter may also be used.
When laying the cable, ensure that sufficient length remains in reserve on the door station
end for later extensions or for swapping modules (lay a cable loop). All two-wire lines
should be fed in through a flush-mounted socket on the inside of the door with sufficient space for cable reserves.
Both the Ethernet cable and other cables must be stripped at the ends.
© MOBOTIX AG • Security-Vision-Systems • Made in Germany
www.mobotix.com • [email protected]
CAT 7 cable is designed
for 10 Gbit Ethernet
26/98
T24S System Manual: Connecting The Door Station And Modules
2.3
Terminal Board And Terminal Connectors
MOBOTIX Terminal Board
The central connection unit for the door contains a:
• bridge from Ethernet installation cable to camera patch cable
• connection to Siedle transformer (contact b and c)
• connection to Siedle modules (for example, call buttons)
• connection for a door opener
• connection to the door and door lock switches
• connection for external light
Ethernet connector
with PoE supply
Cable sheath
contact
Camera connector
(RJ45)
Terminal connector for: Siedle modules, power, door opener, door and
door lock switches, floor call and
external light
Module retainer (on
Siedle Vario casing)
© MOBOTIX AG • Security-Vision-Systems • Made in Germany
www.mobotix.com • [email protected]
Terminal Board And Terminal Connectors
27/98
Mounting The Terminal Board And Terminal Connectors
After installing the on-wall or flush-mounted frame (note the
"Top/Oben" indicator), the individual module terminal connectors are retained in place by positioning and simultaneously
rotating them by hand (from approx. 10 to 12 o'clock).
The terminal board, which must always be placed behind
the camera module, is retained in the same manner.
To simplify installation, we recommend connecting the
terminal board to the Ethernet cable first (see following
section).
The figures show the correct final position of the connector terminals and terminal
board for both vertical and horizontal installation of the door station.
© MOBOTIX AG • Security-Vision-Systems • Made in Germany
www.mobotix.com • [email protected]
Note: Connect the
Ethernet cable to
the terminal board
before positioning
28/98
T24S System Manual: Connecting The Door Station And Modules
2.4
Connections In The Door Station
2.4.1 Networking
The eight wires with stripped ends in the Ethernet cable are to be connected to the corresponding contacts on the terminal board (here: standardized color coding according to
TIA-568B) according to the following table. The Ethernet cable is fastened on the terminal
board contact field with a network cable retainer (see below).
The Ethernet cable
connects the terminal
board to the network
directly (e.g., PoE switch)
Network cable retainer
The table shows the corresponding contacts on the terminal board for the Ethernet cable
(standardized color coding according to TIA-568B).
Terminal
TIA-568B (AT&T 258A) Color
RJ45 Standard
OR/WT
White/orange stripe
1 (Tx+)
OR
Orange/white stripe or orange
2 (Tx-)
GN/WT
White/green stripe
3 (Rx+)
GN
Green/white stripe or green
6 (Rx-)
BL
Blue/white stripe or blue
4
BL/WT
White/blue stripe
5
BR/WT
White/brown stripe
7
BR
Brown/white stripe or brown
8
The white wires marked with a thin stripe of any color may be used as pure white in
practice; however, they are always twisted together with the associated full color wire.
© MOBOTIX AG • Security-Vision-Systems • Made in Germany
www.mobotix.com • [email protected]
29/98
Connections In The Door Station
2.4.2 Terminal Board Configuration
The table shows the layout of the 16-wire terminal connector on the MOBOTIX terminal
board, which is used to connect the individual modules with the camera and the network.
The boards have 8 inputs (7.1 to Bpc) and 3 outputs (eLi to Do), which are all galvanically
separated. Output eLi with eLi/c is isolated and iLi and Do each use the potential at b. For
more information, see the Inputs and Outputs column to the far right.
The connector labels in the Board (Siedle) column and on the board stickers serve as an
installation aid for the original Siedle modules.
Board
(Siedle)
Function
Comment
MxBus
Direct connection to
camera module
MxBusMxBus+
MxBus+
Reference potential
Gnd
ERT
Half-wave of the signal to eLi/c
Floor call when c fits
eLi/c
HW
Do
Door opener
Relay switches b (door
opener still connected
to c)
iLi
Internal lights of Siedle modules
Relay switches b (modules each still connected
to c)
Control for external light (e.g., over the
entrance door)
Isolated relay (NO type)
Bpc
Door lock switch (Bolt Position Contact)
Contact switches c
Dpc
Door switch (Door Position Contact)
Contact switches c
Auth/S2
Transponder/Fingerprint
Module switches c
PIR
PIR module
Module switches c,
Siedle terminal B
(motion)
7.4
Bell button 4
7.3
Bell button 3
7.2
Bell button 2
7.1
Bell button 1
eLi/c
Bell switches c (fullwave); floor call switches
ERT (half-wave)
© MOBOTIX AG • Security-Vision-Systems • Made in Germany
www.mobotix.com • [email protected]
Max. switching voltage: 50 V AC,
50 V DC Max. current: 2 A, Max.
load: 60 W
Ground
eLi
8 x signal inputs
MxBus-
Max. input voltage: 12 V AC, 20 V DC,
Min. input voltage: 5 V AC, 5 V DC, Min.
current: 2 mA
3 x signal outputs
b
Inputs and
outputs
30/98
T24S System Manual: Connecting The Door Station And Modules
2.4.3 Circuit Overview Diagram – Modules And Power Supply
This diagram shows the cabling for all described modules. For external 12 V AC power
supply, b and c are first connected in parallel from the Siedle transformer to the module
terminal connectors, and finally b to b on the terminal board.
MxBus push terminal for
connection to rear housing
of the camera
Only when eLi/c is connected to c
A larger circuit overview
diagram can be found at
the end of this manual
The b signal is not always switched to the terminal marked as b on the Siedle
terminal connectors. For modules with an activated internal light, the iLi signal must
be connected to terminal b.
© MOBOTIX AG • Security-Vision-Systems • Made in Germany
www.mobotix.com • [email protected]
31/98
Connections In The Door Station
2.4.4 Siedle Bell Button Module (1 To 4)
1 to 4 buttons
Connect module terminals c and 6 (bell button base voltage) to c; connect module terminal
b to terminal board iLi; connect module terminals 7.1 to 7.4 to terminal board 7.1 to 7.4.
2.4.5 Siedle Fingerprint Module And Electronic Key
Board
Module
iLi
b
7.1
7.1
7.2
7.2
7.3
7.3
7.4
7.4
Fingerprint/Electronic Key
Connection for both modules is identical: connect module terminal bv to b; connect module terminals cv and S1 to c; connect module terminal S2 to terminal board Auth/S2.
© MOBOTIX AG • Security-Vision-Systems • Made in Germany
www.mobotix.com • [email protected]
Board
Module
Auth/S2
S2
32/98
T24S System Manual: Connecting The Door Station And Modules
2.4.6 Siedle Motion Detector Module
The module here is used as a motion sensor, and no longer as an illumination sensor,
while the system uses the illumination sensor feature built into the camera (see Section
7.6.1 in the Software Camera Manual, "Illumination").
Motion detector
Connect module terminal b to b; connect module terminals c and G (ground) to c; connect
module terminal B (motion) to terminal board PIR.
Board
Module
PIR
B
2.4.7 Siedle Info Module
For switchable internal module lighting (iLi), connect module terminal c to c; connect
module terminal b to terminal board iLi.
Info module
Board
Module
iLi
b
© MOBOTIX AG • Security-Vision-Systems • Made in Germany
www.mobotix.com • [email protected]
33/98
Connections In The Door Station
2.4.8 Siedle LED Spotlight
For switchable internal module lighting (iLi), connect module terminal c to c; connect
module terminal b to the terminal board iLi.
LED spotlight
Board
Module
iLi
b
Board
Transformer/
Signal
eLi/c
c
Board
Relay
eLi
A2
Relay
Transformer/
Signal
A1
b
Note
The protruding casing of the spotlight can slightly limit the maximum area recorded
by the camera.
2.4.9 External Light (Via 230 V Relay)
For switching an external lamp at the entrance above the door station, for example,
you need a connection from c to the terminal board (isolated output); connect relay
input A1 to b; connect terminal board eLi/c to c (control voltage); connect relay input
A2 to terminal board eLi.
© MOBOTIX AG • Security-Vision-Systems • Made in Germany
www.mobotix.com • [email protected]
34/98
T24S System Manual: Connecting The Door Station And Modules
2.4.10Floor Call
Board
Module
7.4
Bell button 4
7.3
Bell button 3
7.2
Bell button 2
7.1
Bell button 1
ERT (optional)
Bell button x
The integrated floor call function presents a convenient option to assign each of the bell
buttons at the building door to an additional bell button (floor call button) directly at the
apartment door.
To connect the floor call buttons, first connect eLi/c to c; connect one contact of the floor
call button with ERT – in order to reloop ERT from party to party – and the other contact
with the terminal belonging to the apartment, 7.1, 7.2, 7.3 or 7.4.
Note
If the terminal board relay between eLi/c and eLi is to be isolated and simultaneously
used for the floor call function, an external accessories diode (for example, Siedle ZD
061-10) will be needed: c is connected to the anode of the diode, while the cathode
is connected to the floor call button (diode-conduction direction from c to the floor
call buttons); the other contact of the floor call button is connected to the terminal
associated with the apartment, 7.1, 7.2, 7.3 or 7.4.
2.4.11 Door Opener
Board
Module
Do
Door opener
Connect the electromagnetic door-switch opener to terminal board Do; connect second
connector to c.
© MOBOTIX AG • Security-Vision-Systems • Made in Germany
www.mobotix.com • [email protected]
35/98
Connections In The Door Station
2.4.12Door Switch And Door Lock Switch
Connect both switch connectors with one connection each each to c; connect the
second connector of the door switch to terminal board, Dpc (Door Position Contact);
connect the second connector of the door lock switch to terminal board, Bpc (Bolt
Position Contact).
Note
The contacts can generally also be installed in existing doors. To do so, use a long drill
bit to drill a conduit in the door frame leading directly to a flush-mounted socket on the
secure inside facing wall of the door; then lay a cable from here to the door station.
2.4.13Siedle Anti-Theft Protection
The Siedle Anti-Theft Protection module (DSC 602-0 with ZDS
601-0) - available separately, provides additional protection by
electromagnetically locking the installation frame, so that the
individual modules can no longer be mechanically removed
from the door station (using the supplied Siedle key).
The lock (ZDS 601-0) mounted in the installation frame is
connected to the associated controller (DSC 602-0) in the
electrical cabinet. Anti-theft protection can only be activated
or deactivated using this controller.
Installation instructions are included in the Siedle Anti-Theft
Protection package.
© MOBOTIX AG • Security-Vision-Systems • Made in Germany
www.mobotix.com • [email protected]
Board
Module
Dpc
Door switch
Board
Module
Bpc
Door lock
switch
36/98
T24S System Manual: Connecting The Door Station And Modules
2.5 Finishing The Installation
Before placing the camera module in the frame, we recommend first connecting the camera
directly to the switch/router to carry out the automatic initial configuration (see chapter 3,
Operating the Door Station). Afterwards, disconnect the preconfigured camera module from
the switch/router and install it as described.
2.5.1 Connecting And Retaining Modules
For detailed installation instructions of Siedle products, refer to documents provided by
Siedle directly.
1. Mount the Siedle installation frame: Position the
Siedle installation frame and snap it into place.
Ensure that the two-wire cable with the MxBus
push terminal is routed through and not jammed.
2. Connect cables: Connect the camera patch cable
to the RJ45 connector on the terminal board.
Connect the MxBus push terminal with the camera module.
Ensure that the camera patch cable is positioned
under the middle bar of the brass installation frame.
3. Mount the camera module: Place the camera module on the installation frame and snap it into place.
© MOBOTIX AG • Security-Vision-Systems • Made in Germany
www.mobotix.com • [email protected]
Finishing The Installation
37/98
4. Mount the Siedle module: Connect the module
with the associated terminal connector.
Place the module onto the installation frame.
2.5.2 Removing Modules
For detailed installation instructions for Siedle products, see the documents provided by
Siedle directly.
1. Deactivating Siedle anti-theft protection: If the
anti-theft protection accessory has been installed,
first switch off the anti-theft protection at the controller before removing the module.
2. Removing the camera module and Siedle modules: Take the special key, which was included
with the Siedle installation frame.
Insert the key into the small opening between
the modules and release the modules from
the installation frame by pushing
the key in.
© MOBOTIX AG • Security-Vision-Systems • Made in Germany
www.mobotix.com • [email protected]
The special Siedle key
is included with the
installation frame
38/98
T24S System Manual: Connecting The Door Station And Modules
2.6
Replacing The MicroSD Card
The camera module is factory-fitted with a ready-to-use 4 GB MicroSD card. However, the
system also supports other MicroSD cards with up to 32 GB storage capacity. To remove,
insert or replace a MicroSD card, separate first the camera module from the door station.
To avoid data loss, be sure to deactivate MicroSD card recording in the camera software
and reboot the MOBOTIX camera before removing the card.
Caution
A MicroSD card may only be removed from the camera after you have deactivated
Recording to SD Card and rebooted the camera. Failing to do so may lead to loss
of data!
2.6.1 Removing The MicroSD Card
1. Deactivate recording: Recording to the MicroSD card must be deactivated (Admin
Menu > Storage on External File Server / Flash Device). If the MicroSD card recording
is still active, deactivate recording, and reboot
the camera. For more information, see the
MicroSD Card Recording section in chapter 3.
The special Siedle key
is included with the
installation frame
2. Remove the camera from the Vario frame:
Insert the special key included with the Siedle
installation frame into the small opening
under the camera module and release
the camera from the installation frame by
pushing the key in.
If the anti-theft protection accessory has
been installed, it must first be switched off
at the controller before the camera module
may be removed as described.
3. Remove the cable: Release the RJ45 connector on the black camera patch cable
from the terminal board.
Remove the MxBus connector: Pull the
MxBus connector from the back of the
camera housing.
© MOBOTIX AG • Security-Vision-Systems • Made in Germany
www.mobotix.com • [email protected]
39/98
Replacing The MicroSD Card
4. Remove the back of the camera and take
out the MicroSD card: Remove the four screws
and carefully lift the back plate from the housing.
5. Remove the MicroSD card: Gently push on
the MicroSD card in the card slot of the camera. The card will be released from the slot
and can then be removed from the camera.
2.6.2 Inserting The MicroSD Card
1. The MicroSD card must slide into place with an audible and perceptible click. Then,
screw the back plate of the camera back into place, connect the MxBus and patch
cable connectors, and snap the camera module back into place in the Vario frame.
2. Activate recording: If you have inserted a MicroSD card that has already been
MxFFS formatted, you can activate recording under Admin Menu > Storage on
External File Server / Flash Device. Once the camera has been rebooted, it automatically activates recording.
3. If a new MicroSD card is used, it must be formatted before use (for instructions,
see chapter 4).
Note
When inserting the card, ensure that no small cables are jammed and that the back
plate is replaced in the correct position (MxBus connector at the top).
© MOBOTIX AG • Security-Vision-Systems • Made in Germany
www.mobotix.com • [email protected]
Push-push function:
The MicroSD card can
only be removed after
pushing it in gently
40/98
T24S System Manual: Connecting The Door Station And Modules
2.7 Network And Power Connection For The Camera Module
2.7.1 Notes On Cable Lengths And Power Supply
The T24 camera module can only be powered using the Ethernet connector of the camera.
We recommend using a MOBOTIX PoE adapter, or another similar high-quality PoE product
to loop-in the power supply:
• a camera/door station: with the PoE adapter (MX-NPA-PoE)
• multiple cameras/door stations: with PoE products conforming to IEEE 802.3af (PoE
switch)
The maximum length of the network cable for power supply over an Ethernet cable is 100 m.
Make sure that you only use switches or routers that support the 10/100 Mbps Ethernet
interface of the camera. Check the LED activity of the corresponding port at the switch
or router.
It is highly recommended to use uninterruptible power supplies (UPS) to provide backup power.
If you are using IEEE 802.3af Power over Ethernet network components to supply power to
MOBOTIX cameras, make sure, if possible, that these components do not have a fan. Since
the power consumption of MOBOTIX cameras is very low compared to other products, the
reliability of the entire system is increased, thus extending the life of these components.
Note
Connect the Siedle modules according to the circuit diagram using Siedle power
supplies in the electrical cabinet.
Caution
This chapter offers you a overview of the different options. Make sure to familiarize
yourself with chapter 3 before connecting the T24S.
© MOBOTIX AG • Security-Vision-Systems • Made in Germany
www.mobotix.com • [email protected]
Network And Power Connection For The Camera Module
41/98
2.7.2 Power Supply With Power-over-Ethernet Products
Connect the network patch cable that is connected to the door station terminal board to
an Ethernet connector on the PoE switch/router. The switch/router must support the PoE
standard IEEE 802.3af.
LAN/www
Grandstream
PoE switch/router
T24S
PC
2.7.3 Power Supply With The MOBOTIX NPA-PoE Set And Switch
1. Connect the network patch cable that is connected to the door station terminal board
to the Camera connector of the PoE adapter.
2. Connect the LAN/Power connector of the PoE adapter to the Ethernet connector
of the switch/router or the Ethernet socket.
3. Plug the RJ45 connector of the power supply unit into the PC/Power connector of
the PoE adapter.
PoE adapter
(MX-NPA-PoE)
Power supply
RJ45
RJ45
LAN/Power
LAN/www
PC/Power
Switch/router
Camera
RJ45
Grandstream
PC
© MOBOTIX AG • Security-Vision-Systems • Made in Germany
www.mobotix.com • [email protected]
T24S
The MOBOTIX PoE
injector is available
as an accessory
(MX-NPA-PoE set)
42/98
T24S System Manual: Connecting The Door Station And Modules
2.7.4 Power Supply When Connected Directly To A Computer/Video Phone
1. Connect the network patch cable that is connected to the door station terminal board
to the Camera connector of the PoE adapter.
2. Connect the PC/Power connector of the PoE adapter to the Ethernet port of the
computer or IP video phone.
3. Plug the RJ45 connector of the power supply unit into the LAN/Power connector
of the PoE adapter.
PoE adapter
(MX-NPA-PoE)
Grandstream
RJ45
RJ45
PC/Power
Power supply
LAN/Power
The MOBOTIX PoE
injector is available
as an accessory
(MX-NPA-PoE set)
Camera
RJ45
T24S
PC
© MOBOTIX AG • Security-Vision-Systems • Made in Germany
www.mobotix.com • [email protected]
Network And Power Connection For The Camera Module
43/98
2.7.5 Starting The T24S
The T24S starts after the power supply is connected.
• Booting: A camera self-test is executed and the entire system is started. In case of
an error, the camera will start using the backup system.
• Waiting for button to be pressed: The light button (top) and bell button light up for 4
seconds. Pressing the light button (upper button) during this time resets the camera
to factory settings; pressing the bell button (lower button) during this time starts an
automatic initial configuration.
• Ready: The camera can now be accessed over the network.
Top button (light)
factory settings
Bottom button (bell)
initial configuration
Note
The switch has a rocker function in the camera version with only a single button
(light). Pressing in the upper area starts factory settings, pressing in the lower area
starts initial configuration.
© MOBOTIX AG • Security-Vision-Systems • Made in Germany
www.mobotix.com • [email protected]
For more information,
see sections 3.1
and below.
44/98
Free MXEasy download
at www.mobotix.com
T24S System Manual: Operating The Door Station
3
OPERATING THE DOOR STATION
3.1
Overview
MOBOTIX provides the MxEasy software (for Windows,
Mac and Linux) free of charge to set up and operate the
T24S IP Video Door Station with a network-enabled PC or
notebook. For special requirements, the camera may
also be configured using any JavaScript-capable
web browser. However, because the door station
can be installed quite easily for most application
scenarios using automatic initial configuration
or MxEasy, this step is generally not necessary.
Operation depends on the desired configuration for your system
as a whole. Fundamental factors are whether:
• you want to use one or several T24S units,
• you want to integrate the T24S into an existing network or not,
• the existing network has a DHCP server or not.
The following chapters describe operation in the following application scenarios:
Separate network:
One or more T24S
modules with remote
stations (PC/videophone) and PoE switch
• Chapter 3.2: One T24S In A Separate Network
• Chapter 3.3: One T24S In An Existing Network (With/Without DHCP)
• Chapter 3.4: Multiple T24S Units In A Separate Network
• Chapter 3.5: Multiple T24S Units In An Existing Network (With/Without DHCP)
In scenarios where steps have been previously described a reference is made to the
corresponding section of this chapter.
Chapter 3.6 deals with usage of the Grandstream IP videophone, and is valid for all
application scenarios.
Note
If your desired system configuration is not listed here or if operation is not successful, please contact MOBOTIX Support. Our support and international sales staffs
are available at [email protected] from Monday to Friday, 8 a.m. to 6 p.m.
(CET). Please note that MOBOTIX is only able to process your request by phone
(+49-6302-9816-102) after receiving a description of your case by email.
© MOBOTIX AG • Security-Vision-Systems • Made in Germany
www.mobotix.com • [email protected]
45/98
One T24S In A Separate Network
3.2
One T24S In A Separate Network
Separate
network
Separate network:
One or more T24S
modules with remote
stations (PC/videophone) and PoE switch
T24 (*201)
Free MXEasy download
at www.mobotix.com
GS 1 (*101)
GS 2 (*102)
PC (optional)
3.2.1 Automatic Initial Configuration
Starting Initial Configuration
Start the automatic initial configuration by carrying out the following steps:
1. Unpack the Grandstream telephone and attach the handset.
2. Connect the PoE switch/router or the NPA-PoE set and connect the power supply.
3. Connect the Grandstream telephone to the switch/router or the NPA-PoE set (using
patch cable), connect the power adapter and wait for the telephone to start. The
display shows the note "NO IP" (no IP address). The time and date have not been
updated. The preconfigured menu language is English.
4. Connect the T24S Door Station to the switch/router (using patch cable).
The buttons will light up for four seconds. During this time, press the doorbell button
(bottom button) until this button flashes. This starts automatic initial configuration,
which will take around 5 minutes:
• The T24S lights blink as the camera starts up.
•
The current T24S IP address and network data are announced automatically.
•
Each Grandstream telephone is contacted and configured by the camera.
•
Each Grandstream telephone restarts automatically each time the MOBOTIX configuration is updated.
• Each Grandstream telephone displays its newly assigned IP address (e.g. 192.168.0.20)
and SIP quick-dial number (e.g. MX_SIP *101) on the display.
• *101 is the new SIP quick-dial number for the first IP telephone, while the T24S
has the *201 SIP quick-dial number.
5. The T24S Door Station and Grandstream telephone are now ready for use.
© MOBOTIX AG • Security-Vision-Systems • Made in Germany
www.mobotix.com • [email protected]
Important: T24S
must first be disconnected from the
power source (PoE)
46/98
T24S System Manual: Operating The Door Station
Results
The following settings are made automatically during initial configuration:
• SIP server in the T24S is activated.
• Grandstream telephone and network settings are adjusted.
Here, the T24S acts as
the DHCP server and
distributes IP addresses
• T24S and Grandstream telephones are configured to use DHCP, and are automatically assigned an IP address and SIP quick-dial number.
• Pushing the bell button located on the camera module (if available) calls all connected Grandstream telephones (reprogrammable in MxEasy).
• The 1 to 4 Siedle bell buttons are automatically assigned to the 1 to 4 connected
Grandstream videophones (button 1 connects to *101, button 2 connects to *102,
etc.). If this is not desired, or if the number of phones and bell buttons is not equal,
then the bell behavior can be changed for each individual button at any time
using MxEasy on the control PC (Section 3.3).
• For an intercom, or to call the door station directly, simply lift the handset of the
Grandstream telephone.
The setup procedure is now complete, as no PC is needed for further operation in this
scenario if you are content to use the default settings for the connected door station modules (see Section 3.2.3). You should still familiarize yourself with the functions and operation
of the Grandstream telephone (see Section 3.6).
Result of automatic
initial configuration
T24 (*201)
Lift handset
GS 1 (*101)
VoIP video
call
TCP video
call
GS 2 (*102)
PC (optional)
Pick up
MxEasy
“receiver”
© MOBOTIX AG • Security-Vision-Systems • Made in Germany
www.mobotix.com • [email protected]
One T24S In A Separate Network
47/98
3.2.2 Configuring MxEasy (Optional)
The current version of MxEasy is available for download on the MOBOTIX
website (www.mobotix.com under Support > Software Downloads >
MxEasy).
Installing MxEasy
Installation on Windows computers: Run the file for automatic installation (MxEasy_*_Setup.
exe). You can obtain this file by:
• Downloading the file MxEasy_*_Setup.exe from the MOBOTIX website (release: MxEasy
Windows), and saving it to your computer (for example, on the Desktop).
• If you have received installation media (CD, DVD, USB stick), you can launch the
installation file directly from the storage device. The installation file may be opened
automatically after you have inserted the storage device.
• Follow the instructions provided by the installation wizard.
Installation on Mac OS X computers: Run the file for automatic installation (MxEasy *.
mpkg). You can obtain this file by:
• Downloading the file MxEasy *.mpkg.zip from the MOBOTIX website (release: MxEasy
Macintosh), and saving it to your computer (for example, on the Desktop). Unpack
the file by double-clicking on it.
• If you have received installation media (CD, DVD, USB stick), you can launch the
installation file directly from the storage device.
• Follow the instructions provided by the installation wizard.
Note
Only registered users are permitted to download MOBOTIX software from the website.
If you are not yet a registered user with MOBOTIX, why not register now? Registered
users enjoy the following benefits:
• Access to the entire range of the freely available MOBOTIX software
• Automatic subscription to the newsletter (if desired) to inform you about the
latest MOBOTIX products
© MOBOTIX AG • Security-Vision-Systems • Made in Germany
www.mobotix.com • [email protected]
Free MXEasy download
at www.mobotix.com
48/98
T24S System Manual: Operating The Door Station
MxEasy Assistant: Select A Camera
When you start MxEasy for the first time on a computer, the MxEasy Assistant automatically begins to search for MOBOTIX cameras, and displays all cameras found in a list.
The camera list will be updated automatically as soon as new MOBOTIX cameras are
connected to, or removed from the network.
Note
If MxEasy does not find any cameras, i.e. the camera selection list contains no entries
in this case, check the firewall settings of your computer. If necessary, customize
the settings for MxEasy to allow connections to, and from MxEasy. If you do not
have permission to modify these settings on your computer, contact your system
administrator for assistance.
© MOBOTIX AG • Security-Vision-Systems • Made in Germany
www.mobotix.com • [email protected]
One T24S In A Separate Network
49/98
Integrating Cameras With The Status "Accessible"
Once have you selected the desired cameras,
click on Continue, and confirm the security
prompt by clicking on OK.
If some of the selected cameras are passwordprotected (status: Authentication required), MxEasy
will prompt you to enter the corresponding user
name and password.
In this step, the MxEasy Assistant also saves the
entire configuration for all selected cameras. As
a result, this configuration can be easily restored
at a later time.
This dialog will NOT
appear after automatic
initial configuration
Integrating Cameras With The Status “Invalid Network”
Network configuration for MxEasy Assistant will only be carried out if one of the selected
cameras displays the status "Invalid network". This status always occurs if more than one
T24S must be integrated in a network without a DHCP server, for example.
If the control PC obtains its IP address automatically from a DHCP server (e.g. a DSL router), the
Get IP address automatically option should be
selected for this camera and all other discovered cameras.
If no DHCP server is available on the network
and you have previously assigned a static IP
address to the control PC (10.0.0.20), you must
now also assign a static IP address to each camera using the 10.x.x.x notation. Select the
Use this IP address option and enter an IP address of your choice. We recommend, for
example, the addresses in the range from 10.0.0.1 to 10.0.0.254; the subnet mask must
be configured as on the PC and Grandstream telephone to 255.0.0.0. Ensure that the
selected address is not already in use by another device on the network.
Once you click on OK, the selected cameras will be reconfigured automatically. The cameras
are now in the same subnet as your computer. These cameras will now be displayed as
"Accessible" in the camera list.
© MOBOTIX AG • Security-Vision-Systems • Made in Germany
www.mobotix.com • [email protected]
This dialog will NOT
appear after automatic
initial configuration
50/98
T24S System Manual: Operating The Door Station
Resetting The Configuration
The option "Reset all selected cameras to the MxEasy factory defaults" is only relevant
once you have carried out the automatic initial default configuration. This option can only
be selected with a T24S.
Resetting the cameras to the MxEasy factory defaults means restoring the MOBOTIX
camera to the default configuration, but this does not change the current network settings;
for example, the IP address set in the previous step. You must select this option when at
least one T24S is to be integrated into an existing network without a DHCP server, meaning that no automatic initial default configuration can be carried out (see Sections 3.3.2
and 3.5.2).
Note
After an automatic initial default configuration has been be carried out by pressing
the bottom button on the T24S door camera (see Section 3.2.1), you must select the
option "Keep automatic configuration".
© MOBOTIX AG • Security-Vision-Systems • Made in Germany
www.mobotix.com • [email protected]
One T24S In A Separate Network
Camera Access
You can specify a user name and password for all cameras here to prevent general access
to the cameras. Leave the fields empty if you would like to skip this step.
Caution
For security reasons, we urgently recommend assigning a user name and password to protect the cameras from unauthorized access.
Make sure that you store information on user names and passwords in a secure
location. If the administrator password is lost, the passwords for the cameras must
be reset at the factory. This service is subject to a fee!
If no user name and password have been entered, MxEasy uses the factory defaults
(user admin, password meinsm). This also automatically enables public access to
the Guest screen via a browser window.
© MOBOTIX AG • Security-Vision-Systems • Made in Germany
www.mobotix.com • [email protected]
51/98
52/98
T24S System Manual: Operating The Door Station
Camera Configuration
In the next step, the integrated cameras are displayed in the following dialog. Click on the
Next button and then on Finish in the following dialog to close the Assistant and display
the selected cameras in MxEasy.
Because MxEasy saves the configuration of the cameras before they are initially integrated
into the system, and each time the program is lauched, this allows you the possibility to
safely modify the camera settings when integrating the cameras into MxEasy. The Backup
Configuration button offers you the option to undo changes you have made, and rollback
your configuration to previous settings.
© MOBOTIX AG • Security-Vision-Systems • Made in Germany
www.mobotix.com • [email protected]
One T24S In A Separate Network
Camera Installation
You can configure the initial image view of the respective door cameras here. You may select
one of the following views from the listbox: "Normal" (= 4:3 full image, corrected in the
camera) and "Panorama" (= corrected 180° high-resolution image from wall to wall, standard with T24S).
© MOBOTIX AG • Security-Vision-Systems • Made in Germany
www.mobotix.com • [email protected]
53/98
54/98
T24S System Manual: Operating The Door Station
Door Bell Setup
In addition to the optional bell button on the camera module itself, the system supports
up to four Siedle doorbell buttons, which can be configured to trigger a VoIP call to an IP
videophone and a MxEasy message to a PC as an action when pressed. If multiple actions
are desired when the door station bell button is pressed, these can be configured to be
carried out simultaneously, sequentially or even with a delay. Simply click through the
individual dialogs to configure behavior.
For each bell (camera doorbell, Siedle doorbells), multiple actions (message MxEasy or Voice
Over IP call) and the remote party associated with the action, i.e. a PC or IP videophone,
may be selected in the dialog. Actions can be added and removed by selecting "+" or "-".
Voice Over IP call: A connection to an IP videophone on the network is automatically
established when the bell button is pressed. The telephone can be selected using its IP
address or, even more easily, using its SIP quick-dial number (e.g. *101, shown on the
telephone's display). The current IP address and quick-dial number are assigned to each
telephone during automatic initial configuration.
Message MxEasy: A connection to a PC on the network with MxEasy installed and running is automatically established when the bell button is pressed. The PC to be messaged
is selected by its IP address. The selection dialog displays all IP addresses found on the
network by MxEasy. If in doubt, you can find the IP address of a PC in its system network
configuration.
Note
By selecting "Edit remote station" you can enter a new name to replace the IP
number (e.g. Office PC).
© MOBOTIX AG • Security-Vision-Systems • Made in Germany
www.mobotix.com • [email protected]
One T24S In A Separate Network
55/98
3.2.3 Using MxEasy
After the Assistant is finished and all preparations have been completed, MxEasy displays
the live image. Up to four integrated cameras are displayed simultaneously.
The picture can be displayed in the Normal or Panorama view of the MxEasy program window.
MxEasy panorama mode
When the doorbell button is pressed, a visual prompt in the form of a large doorbell icon
appears in the image. The individual MxEasy program icons are used to activate a range
of functions on the T24S Door Stations or MOBOTIX cameras connected on the network.
The following lists some of the important icons on the left side:
Telephone Handset Icon (Off-hook/On-hook)
• Begins/ends live intercom to the door station, the image of which is currently
displayed in MxEasy. The volume can be changed using the +/- slider.
Lightbulb Icon
• Switches the external light on/off.
© MOBOTIX AG • Security-Vision-Systems • Made in Germany
www.mobotix.com • [email protected]
56/98
T24S System Manual: Operating The Door Station
Door Icon
• Operates the door opener for a few seconds.
Wrench Icon
• Opens the camera options dialog. Here, you can make changes to
important settings such as the door-station sound settings (microphone
and speaker).
Note
After the Assistant has finished, the display will always be in panorama mode if at
least half of the integrated cameras are hemispheric models, for which the Panorama
image view has been additionally selected.
Convenient Mini-Viewer
Under the menu item "View" and the item "Mini Viewer", you can select a smaller
preview window with a live camera image and set basic functions and status displays
on the monitor. Above all, this is useful if the control PC is used primarily for other applications (e.g. office programs, Internet, etc.), yet the user should still remain constantly informed
of door activity without having to switch back and forth between program windows.
MxEasy Mini-Viewer
panorama mode
Status display is identical
to the status display on
the Grandstream display
(see Section 3.6.2)
The mini viewer can be scaled by dragging the frame of the window with the mouse until
it has the desired size. The last view that is used (full program window or Mini-Viewer) is
applied each time the program is started.
© MOBOTIX AG • Security-Vision-Systems • Made in Germany
www.mobotix.com • [email protected]
57/98
One T24S In A Separate Network
When someone rings the door bell, a large bell symbol is displayed. The telephone
handset icon (off-hook/on-hook) facilitates control of the live intercom function. The
volume can be changed using the slider, and the door opener and lighting may also be
controlled simply by clicking on the corresponding icons.
MxEasy Mini-Viewer
4:3 standard format,
bell icon in image
When MxEasy is hidden
(minimized application), a
call automatically displays
the program window again
Three more function icons appear to the right of the lamp icon. These are used to open
a second image window below. The second image window lets you: view images from
other connected cameras (Live image with camera switch), pan, tilt and zoom the current
camera image (Live image with Live PTZ), or replay the scenes immediately preceding
the live image since the bell event (Live image with Live search).
Live standard view
Full Image
Live PTZ
© MOBOTIX AG • Security-Vision-Systems • Made in Germany
www.mobotix.com • [email protected]
This functionality
will be available in
the next upcoming
software release.
Using PTZ, each area
of the recorded full
image can be zoomed
and enlarged
58/98
T24S System Manual: Operating The Door Station
3.2.4 Module Configuration (Optional)
The T24S camera module can be combined with a range of Siedle
Vario modules, as described in Chapter 1. These modules can be used
to trigger various actions, for example, unlocking the door or switching
an external light.
The following table shows which signal inputs and actions are automatically configured as
a factory default in the camera software (D), and which must be set up during automatic
initial configuration (A) or MxEasy (M). Both these actions and other actions not listed
in this table, such as email messaging and the like, can or must be manually set up or
configured using the browser-based T24 camera configuration interface.
External light on/
off Signal Output
2 (eLi)
Grandstream
IP telephone
PC with MxEasy
Module switches
light (D)
Light status display *1XX (D)
Light status
display (D)
T24 Module
Button Bell: Left
Button
VoIP video call
*1XX (A, M)
TCP video call
(M)
Siedle Module
Bell Button 1:
Signal Input
1 (7.1)
VoIP video call
*101 (A, M)
TCP video call
(M)
Siedle Module
Bell Button 2:
Signal Input 2
(7.2)
VoIP video call
*102 (A, M)
TCP video call
(M)
Siedle Module
Bell Button 3:
Signal Input 3
(7.3)
VoIP video call
*103 (A, M)
TCP video call
(M)
Siedle Module
Bell Button 4:
Signal Input 4
(7.3)
VoIP video call
*104 (A, M)
TCP video call
(M)
Light status display *1XX (D)
Light status
display (D)
Open door signal
output 1 (Do)
T24 Module
Button Light:
Right Button
Siedle Module
PIR Signal: Signal
Input 5 (PIR)
Siedle Module
Transponder/
Fingerprint
Signal: Signal
Input 6 (Auth/S2)
Module switches
light (D)
Module switches
door opener (D)
Door status dis- Door status
play *1XX (D)
display (D)
Door Contact:
Signal Input 7
(Dpc)
Door status dis- Door status
play *1XX (D)
display (D)
Door Latch
Contact: Signal
Input 8 (Bpc)
Door status dis- Door status
play *1XX (D)
display (D)
© MOBOTIX AG • Security-Vision-Systems • Made in Germany
www.mobotix.com • [email protected]
One T24S In A Separate Network
59/98
Table Notes
In the columns "Grandstream IP telephone" and "PC with MxEasy", the program displays
the events/modules for which either a call is triggered (VoIP to telephone, TCP to PC) or
for which a change in the status is triggered (a T24S connected external light is on/off,
a T24S connected door is open/closed locked). The SIP quick-dial number of the concerned Grandstream telephone is also shown in the table. *1XX stands for all connected
Grandstream telephones.
The designations "Button Right", "Button Left", "Signal Input 1 (7.1)" etc. in the column to
the left stand for the input signals that can be activated or reprogrammed using the web
browser in the camera software (Signal Input 1-8).
Configuration Using A Web Browser
Like every MOBOTIX camera, the T24S Door Camera can also be
reached directly by entering the camera's IP address in the address
bar of a standard web browser (e.g. Internet Explorer). This allows
you to make changes to the camera configuration.
Download the Software
Camera Manual that is in the
same sub-net as the T24S
at www.mobotix.com
Support > Manuals
For details, see the MOBOTIX Camera Software Manual, which
can be downloaded free of charge from the MOBOTIX website
under the Support > Manuals.
Notes
The signal inputs (Signal Input 1–8) may be modified under the Setup > Event
Settings menu.
The configurable signal outputs (Signal Output 1/2) can be set up using the menu
Setup > Enhanced Signal Out Options.
However, first, the related Action Profiles for Phone Call, Short Message, FTP, E-Mail,
IP Notify, Sound or Signal Out events must be configured. The actions are then linked
with these profiles: Setup > Action Groups.
© MOBOTIX AG • Security-Vision-Systems • Made in Germany
www.mobotix.com • [email protected]
See the table "Circuit
Assignment" in
Section 2.4.2
60/98
T24S System Manual: Operating The Door Station
3.3
To connect the T24S
to phone systems or an
external SIP server,
see Chapter 9 in the
Software Manual
(free download at
www.mobotix.com)
One T24S In An Existing Network (LAN)
Existing
network
T24 (*201)
GS 1 (*101)
DSL router
GS 2 (*102)
PC
A T24S can also be integrated into existing network environments like a DSL router for
internet access with any number of remote stations (IP videophone, PC with MxEasy).
During initial operation, this scenario distinguishes between cases with and without the
presence of a DHCP server on the network. Dynamic Host Configuration Protocol (DHCP)
facilitates assignment of network configuration to clients by a server. Popular DSL routers
such as the FRITZ!Box, for example, generally also serve as a DHCP server.
3.3.1 DHCP Server Present On The Network
If there is an existing DHCP server in the network, this is used by the T24S. The operation of the T24S and its remote stations is carried out using the initial automatic default
configuration, similiar to a T24S in a separate network. Installation of MxEasy on a PC
is not strictly necessary for initial operation, or normal use, if the T24S factory settings are
to be used. Proceed exactly as described under Section 3.2.
© MOBOTIX AG • Security-Vision-Systems • Made in Germany
www.mobotix.com • [email protected]
One T24S In An Existing Network (LAN)
61/98
3.3.2 No DHCP Server On The LAN (Static IP Addresses)
If there is no existing DHCP server on the network, and no DHCP server is required, then
all network devices must have an IP address in the same range of addresses and use the
same subnet mask in order to communicate with one another. This is also true for the T24S
and its remote stations, which are to be integrated into the existing network (LAN). For this
reason, you must know the IP addresses and subnet mask currently in use on the network.
LAN - Local Area
Network
A PC already configured to work on the network is necessary for configuration. The MOBOTIX
software MxEasy must be installed on this PC (free download at www.mobotix.com). Operation
of the IP video door station comprises the following steps:
1. Connect the T24S and remote stations to the LAN and to the power supply
2. Assign static IP addresses to videophones
3. Assign static IP address to operation PC (optional)
4. Install MxEasy on the operation PC and assign a static IP address to the T24S
5. Search and configure Grandstream IP telephones using MxEasy
6. Set up door bell behavior using MxEasy
7. Configure modules (optional)
Step 1: Connect The T24S And Remote Stations To The LAN And To The Power Supply
Connect the T24S, the IP videophone and a PC, if it has not already been done, with the
router/switch in the network. Ensure that the T24S has a PoE power supply. If the switch
or router does not feature PoE, use the MOBOTIX NPA-PoE Set to supply the T24S with
power. In this configuration, the NPA-PoE Set is placed between the switch/router and
the T24S (see Section 2.7.4).
Step 2: Assign Static IP Addresses To Grandstream Videophones
When first operating the Grandstream telephone, we recommend configuring the desired
menu language on the display first:
• Menu > Personalize > Language > Select Language
Use the arrow keys on
the Grandstream for navigation; push the middle
key to confirm input
To simplify operation,
a USB keyboard can
be directly connected
to the Grandstream.
The application does
not require a restart.
© MOBOTIX AG • Security-Vision-Systems • Made in Germany
www.mobotix.com • [email protected]
62/98
T24S System Manual: Operating The Door Station
Next, change the configuration of each Grandstream telephone from the DHCP factory
settings to a user-defined static IP address appropriate for the existing LAN. For example,
here, the address range can be from 10.0.0.1 to 10.0.0.254 with the subnet mask 255.0.0.0.
• Menu > Settings > Network
• Activate "Static IP"
• Enter "IP address" 10.0.0.10
• "Subnet mask" 255.0.0.0 (here, enter only 255 as the first value) > Save
Sample Grandstream
configuration: IP
address: 10.0.0.10
Subnet mask: 255.0.0.0
Restart the Grandstream telephone:
• Menu > Settings > Maintenance
nnnnnnnnnn
• Select and activate "Reboot"
The new static IP address of the Grandstream telephone (10.0.0.10) will appear on the
Display and is ready for use.
Note
You can connect a USB keyboard directly to the Grandstream to simplify operation.
© MOBOTIX AG • Security-Vision-Systems • Made in Germany
www.mobotix.com • [email protected]
One T24S In An Existing Network (LAN)
63/98
Step 3: Assign Static IP Address To Operation PC (Optional)
Step 3 may be omitted if you are using a PC already working on the network to set up the
T24S. In this case, proceed directly to Step 4.
When the MOBOTIX T24S and the Grandstream telephone are brought into service via a
PC, the network parameters of the PC must be set in the IP address range 10.x.x.x, from
10.0.0.1 to 10.0.0.254 with the subnet mask 255.0.0.0. The computer's network parameters
usually have to be changed for this purpose.
Windows
1. Open Start > Settings > Control Panel
> Network Connections. Click on the
Properties button to open the shown
dialog.
2. Double-click on Internet Protocol
(TCP/IP). Select the option "Use the following IP address" under "General" and
enter a static IP address (e.g. 10.0.0.20)
with the subnet mask 255.0.0.0.
3. After closing all dialogs, the PC will now
use the 10.0.0.20 IP address.
Mac OS X
1. Open System Properties > Network.
2. Select Ethernet. Select the option
"Manual" under "Configuration" and
enter a static IP address (e.g. 10.0.0.20)
with the subnet mask 255.0.0.0.
3. After you have clicked on "Apply", the
PC will use the IP address 10.0.0.20.
© MOBOTIX AG • Security-Vision-Systems • Made in Germany
www.mobotix.com • [email protected]
PC sample
configuration:IP address:
10.0.0.20 Subnet
mask: 255.0.0.0
64/98
T24S System Manual: Operating The Door Station
Step 4: Install MxEasy On The Host PC And Assign A Static IP Address To The T24S
Install MxEasy on the host PC as described in Section 3.2.2 and use the MxEasy Assistant
to integrate the T24S into the network. Under the heading Integrating cameras with
the status "Invalid network", enter a static IP address intended for the T24S in the LAN.
Step 5: Search And Configure Grandstream IP Telephones Using MxEasy
After assigning the T24S with an appropriate static IP address, you are able to access the
camera over the network using MxEasy for further configuration. To do so, work through
the additional options in the Assistant as described in Section 3.2.2. In this case, the
"Reset configuration" dialog appears. Here you can select the option "Reset all selected
cameras to the MxEasy factory defaults".
Once you reach the option to configure the bell, you must first search for and complete
configuration of the Grandstream telephones with static IP addresses that have been
integrated into the network. Proceed as follows:
For example, select the action "Voice over IP call" in the drop-down list to the left for the
first door bell. Next, in the drop-down list to the right, select the item "Search Grandstream
IP telephones". This triggers an automatic initial configuration of the Grandstream telephones by the T24S. The videophones will automatically switch off and restart with the
new configuration.
Step 6: Set Up Door Bell Behavior Using MxEasy
Wait until every Grandstream telephone has started up and the SIP quick-dial number
that was assigned to each phone (*101, *102, etc.) appears on the display (MX-SIP). The
T24S Door Station is assigned *201 as a SIP quick-dial number.
© MOBOTIX AG • Security-Vision-Systems • Made in Germany
www.mobotix.com • [email protected]
One T24S In An Existing Network (LAN)
Using these parameters, you can now set up the desired door bell behavior as described
in Section 3.2.2 under Door Bell Setup.
Step 7: Configuration Modules (Optional)
If, in addition to the T24S camera module and up to 4 Siedle door
bells, you plan to use additional Siedle modules and an electrical door
opener, perform the following actions in accordance with the factory
settings of the T24S (door contact, door opener and external light must
be connected to the T24S):
• PIR Module switches external light
• Fingerprint and transponder module switches the door opener
when activated
• The status of the door and the door-latch contacts appear on the
videophone, and in MxEasy
See Section 3.2.4 for information on how to reprogram the modules.
© MOBOTIX AG • Security-Vision-Systems • Made in Germany
www.mobotix.com • [email protected]
65/98
66/98
T24S System Manual: Operating The Door Station
3.4
Multiple T24S Units In A Separate Network
Separate
network
Separate network:
One or more T24S
modules with remote
stations (PC/videophone) and PoE switch
T24 Master
(*201)
GS 1 (*101)
T24 Client
(*202)
GS 2 (*102)
PC (optional)
If you would like to connect more than one T24S unit to a number of remote stations (IP
videophone, PC with MxEasy) in a separate network without connecting to an existing DSL
router or similar device, set up and use of the IP video door station. This can be carried out
without a PC so long as the videophones will only be used as remote stations and the T24S
factory settings can be used with the Siedle modules.
3.4.1 Preparing Initial Configuration
Before connecting the individual devices (T24S, videophones, PCs) to the switch, you must
first specify an arbitrary T24S as the so-called Master T24S to function as the DHCP
and SIP server, and to carry out automatic initial configuration of all other (Client) T24S
units and videophones.
Proceed According To The Following Steps:
1. If desired, connect one or more Control PCs (with MxEasy) to the switch.
2. Connect all Client T24S units to the switch and supply power (PoE) or MX power.
3. Connect all IP videophones to the switch and supply power. Wait until all cameras
and telephones have started up.
4. Now connect the Master T24S and supply power. Proceed as described in Section
3.4.2.
© MOBOTIX AG • Security-Vision-Systems • Made in Germany
www.mobotix.com • [email protected]
Multiple T24S Units In A Separate Network
3.4.2 Automatic Initial Configuration With Master T24S
Start the automatic initial configuration using the Master T24S (which was
connected last). Shortly after the power supply is connected, the button
lights will illuminate for four seconds.
Push the bell button (lower button) once during this time. This starts automatic initial configuration, which will take around 5 minutes: This concludes
the configuration of all T24S units and videophones (see Section 3.2.2).
Note
When the telephone receiver is picked up, a connection to the master T24S is
established automatically via the SIP quick-dial number *201. In order to establish a
connection to another T24S (*202, *203, *204 etc.), you must enter the SIP quick-dial
number of the client T24S using the telephone keypad and press the send key (green
phone) before picking up the receiver.
3.4.3 Using MxEasy, Configuration Modules (Optional)
Using MxEasy
If you want to use a PC as the remote station, MxEasy must first be installed on the system.
See Sections 3.2.2 and 3.2.3.
Configuration Modules
If, in addition to the T24S camera module and up to 4 Siedle door
bells, you plan to use additional Siedle modules and an electrical door
opener, perform the following actions in accordance with the factory
settings of the T24S (door contact, door opener and external light must
be connected to the T24S):
• PIR Module switches external light
• Fingerprint and transponder module switches the door opener
when activated
• The status of the door and door latch contacts appear on the
videophone and in MxEasy
See Section 3.2.4 for information on how to reprogram the modules.
© MOBOTIX AG • Security-Vision-Systems • Made in Germany
www.mobotix.com • [email protected]
67/98
68/98
T24S System Manual: Operating The Door Station
3.5
To connect the T24S
to phone systems or an
external SIP server,
see Chapter 9 in the
Software Manual
(free download at
www.mobotix.com)
Multiple T24S Units In An Existing Network (LAN)
Separate
network
T24 Master
(*201)
GS 1 (*101)
T24 Client
(*202)
DSL router
GS 2 (*102)
PC
Multiple T24S units may also be integrated into existing network environments like a DSL router
for Internet access with any number of remote stations (IP videophone, PC with MxEasy). During
initial operation, this scenario distinguishes between cases with and without the presence
of a DHCP server on the network. Dynamic Host Configuration Protocol (DHCP) facilitates
assignment of network configuration to clients by a server. Popular DSL routers such as the
FRITZ!Box, for example, generally also serve as a DHCP server.
3.5.1 DHCP Server Present On The Network
If a DHCP server exists in the network, the T24S units will utilize this network for operation. An individual T24S unit and its modules are configured using the automatic initial
default configuration within its own network, similar to the configuration of multiple
T24S units in their own network.
Installation of MxEasy on a PC is not strictly necessary for initial operation or normal use if
the T24S factory settings are to be applied. Select one T24S of your choice as the master
and proceed exactly as described under Section 3.4.
© MOBOTIX AG • Security-Vision-Systems • Made in Germany
www.mobotix.com • [email protected]
Multiple T24S Units In An Existing Network (LAN)
3.5.2 No DHCP Server On The LAN (Static IP Addresses)
If there is no existing DHCP server in the network and no DHCP server is required, then
all network devices must have an IP address in the same range of addresses and use
the same subnet mask in order to communicate with one another. This also applies to
for the individual T24S units and their remote stations, which are to be integrated into
the existing network (LAN). For this reason, you must know the IP addresses and subnet
mask currently in use on the network.
A PC that is already configured to work on the network is necessary for configuration. The
MOBOTIX software MxEasy must be installed on this PC (free download from www.mobotix.
com). The initial configurationof the IP video door stations comprises the following steps:
1. Connect the T24S and remote stations to the LAN and to the power supply
2. Assign static IP addresses to videophones
3. Assign static IP address to operation PC (optional)
4. Install MxEasy on the host PC and assign static IP addresses to all T24S units
5. Select the Master T24S
6. Search and configure Grandstream IP telephones using MxEasy and the Master T24S
7. Set up door bell behavior using MxEasy – for each individual T24S
8. Configure modules (optional)
Step 1: Connect The T24S And Remote Stations To The LAN And To The Power Supply
Connect the T24S, the IP videophone and a PC, if not already done, with the router/switch
in the network. Ensure that the T24S units have a PoE power supply. If the switch or router
does not feature PoE, use MOBOTIX NPA-PoE Sets to supply the T24S units with power.
With this configuration, the NPA-PoE Sets are placed between the switch/router and each
T24S unit (see Section 2.7.4).
Step 2: Assign Static IP Addresses To Grandstream Videophones
Proceed as described under Step 2 in Section 3.3.2.
Step 3: Assign Static IP Address To Operation PC (Optional)
If this PC has not yet been added to the LAN, proceed as described under Step 3 in
Section 3.3.2.
Step 4: Install MxEasy On The Operation PC And Assign Static IP Addresses To All T24S Units
Install MxEasy on a PC and start the program. The MxEasy Assistant appears. Assign
all T24S units on the LAN with a static IP address one after the other (see Section 3.2.2).
© MOBOTIX AG • Security-Vision-Systems • Made in Germany
www.mobotix.com • [email protected]
69/98
70/98
T24S System Manual: Operating The Door Station
Step 5: Select The Master T24S
After you have assigned a static IP address to each T24S (see Section 3.2.2), you must
designate one T24S as the master T24S - meaning one T24S serves as the main entrance.
A SIP server is activated later on the designated master to establish VOIP/SIP connections.
Step 6: Search And Configure Grandstream IP Telephones Using MxEasy And The Master T24S
Now, run through the remaining Assistant dialogs for the Master T24S as described in
Section 3.2.2. In addition, in the dialog "Select camera", select only the master T24S to
add to the system. In the "Reset configuration" dialog, select the option "Reset all selected
cameras to the MxEasy factory defaults". With the master T24S, you must search for the
Grandstream telephone and configure it in the "Door Bell Setup" dialog. Proceed as follows:
Hint: Also applies to
existing Grandstream
IP videophone
For example, select the action "Voice over IP call" in the drop-down list to the left for the
first door bell. Next, in the drop-down list to the right, select the item "Search Grandstream
IP telephones". This triggers an automatic initial default configuration for all Grandstream
telephones by the master T24S. The videophones will automatically switch off and restart
with the appropriate new configuration.
Wait until every Grandstream telephone has started up and the SIP quick-dial number that
was assigned to each phone (*101, *102, etc.) appears on the display (MX_SIP). The Master
T24S Door Station was assigned *201 as a SIP quick-dial number. Now, close the MxEasy
Assistant. The MxEasy user interface will appear with the live image from the Master T24S.
© MOBOTIX AG • Security-Vision-Systems • Made in Germany
www.mobotix.com • [email protected]
Multiple T24S Units In An Existing Network (LAN)
71/98
Step 7: Set Up Door Bell Behavior Using MxEasy – For Each Individual T24S
To now add all other T24S door cameras to the system, select the menu item Camera >
Add Cameras in the MxEasy menu bar at the top of the screen, select all remaining door
cameras, and run through the remaining Assistant dialogs, including configuration of the
bell behavior, as described under Section 3.2.2.
Step 8: Configure Modules (Optional)
If, in addition to the T24S camera modules with up to four Siedle doorbells
each, you are also using additional Siedle modules and an electronic
door opener, the following actions are carried out by default according
to the T24S factory settings (door, door opener and external light must
all be connected to the T24S):
• PIR Module switches external light
• Fingerprint and transponder module switches the door opener
when activated
• The status of the door and door latch contacts appear on the
videophone and in MxEasy
© MOBOTIX AG • Security-Vision-Systems • Made in Germany
www.mobotix.com • [email protected]
See Section 3.2.4 for
information on how to
reprogram the modules
72/98
T24S System Manual: Operating The Door Station
3.6 Starting And Operating IP Videophones
3.6.1 Establishing A Connection To The Camera Or To An IP Videophone
When you want to establish a connection to a T24S, or to another IP telephone from your
remote station videophone, proceed as follows:
Automatic Connection To The T24S When Lifting The Handset
If you are only using one T24S, and if the configuration has been carried out as described
in sections 3.2 to 3.5, a videophone connection with the door station is established
automatically and an image is displayed using the preset view, when you pick up the
receiver or press the “letter” key.
Manual Connection To Other T24S Units Or IP Telephones
If you have integrated multiple T24S modules in the network, you can reach the master
T24S (*201) by picking up the receiver. If you want to call a different T24S or IP telephone,
you must first establish the connection. To do this, you must know the SIP quick-dial
number or the IP address:
SIP quick-dial number
• First enter "*" and then enter the quick-dial number of the door station or the other
IP telephone using the keypad (e.g. *202). Then press the send key (green phone).
• Important: Now pick up the telephone receiver to establish the connection.
Note
In order to change or deactivate the preset quick-dial to the T24S using the quickdial *201, open the administration interface of the videophone in a web browser
(enter the Grandstream IP displayed on the screen as the web address). Then enter
"admin" and the quick-dial for the user name and the password under Advanced
Settings > Call Features > Offhook Auto Dial.
IP call
Enter the IP address
of the T24S and establish the connection
by pressing "Send"
• Menu > Applications > IP Call
• Enter the IP address of the desired camera or the other IP telephone (e.g. 10.0.0.30)
> Send
An image is now displayed with the view set in the MxEasy Assistant when a door station calls; and when your call is answered, a remote connection is established with the
selected IP telephone.
© MOBOTIX AG • Security-Vision-Systems • Made in Germany
www.mobotix.com • [email protected]
73/98
Starting And Operating IP Videophones
3.6.2 Grandstream Display With The T24S User Menu
In addition to displaying the current live camera image, the Grandstream VoIP videophone
also offers certain T24S-specific functions for easy operation of the MOBOTIX Video Door
Station using the Grandstream keypad. Please note that due to software updates, some of the
functions or the scope of the functions in the following examples may be subject to change.
Start View/Main Menu
Once communication has been established between the camera and Grandstream (e.g.
using the door bell), the camera image appears automatically along with the user menu.
A main menu appears on the left side with the first main menu item (start) already selected,
and the associated submenu visible on the right side. In order to hide the user menu,
press the # key twice.
Show and hide user
menu with the # key
Both menus are controlled using the 12 keys (0-9 * and #) and using the circular arrangement of arrow keys on the Grandstream telephone (these functions correspond to keys 2,
6, 8, 4 and 5). The currently usable keys are displayed as icons on the display. The main
menu items are selected exclusively using the lowermost row of keys (*, 0, #). The exact
meanings of the icons in the submenu are displayed by pushing the # key once (for Help).
Note
All actions are triggered by the corresponding keys even when the menu is hidden.
This is also valid for Key #1 to open the door. The menu can be configured to be
hidden/shown automatically using the Configuration menu item.
© MOBOTIX AG • Security-Vision-Systems • Made in Germany
www.mobotix.com • [email protected]
2
4
6
8
5
74/98
T24S System Manual: Operating The Door Station
The status display appears at the top left. In this example, the door is closed and locked,
the external light is on and the camera's record function is active.
Info icon
Description
Function
Open door
The door is open
Closed door
The door is closed, but not locked
Lock
The door is closed and locked
Red lock
Door sensor error: Check door status!
Incandescent lamp
The external light is on (e.g. the lamp above the
door)
Microphone
The telephone microphone is disabled.
Buzzer
The one-minute record function is active.
Main Menu: 0 Start
By default, when someone rings the bell (or by pushing the 0 key), the most important
basic functions of the door station appear in the main menu on the right.
Key 1 operates the electric door opener, 3 operates the light, 7 mutes the telephone microphone, and 9 starts one minute of video and sound recording in the camera. Use the keys
2, 6, 8 and 4 or the corresponding arrow keys to move left/right up/down digitally through
the image. Key 5 activates the zoom function of the camera (zoom +/- using keys 2/8).
8
Function
1
Operate electric door opener
3
Operate light
7
Mute telephone microphone
9
Start one minute video and sound recording in the camera
Pan-Tilt-Zoom (Digital PTZ):
2
4
Key
Key 2 or 8 (push 1x, 2x, 3x): Camera digitally pans by 1//, 2/3 and 3/3 of a
step (maximum) up or down;
6
Key 0: Display the main menu and return to panorama image (initial view);
5
Key 4 or 6: Switch to zoomed 4:3 image with simultaneous pan to left or
right; after pushing key 5 (digital zoom) 1x, you can zoom in or out on the
displayed image segment using keys 2 or 8; pushing key 5 again returns
you to tilt mode (keys 2 and 8);
Key 5: Switches to 4:3
mode and 1x zoom and
changes the control options
© MOBOTIX AG • Security-Vision-Systems • Made in Germany
www.mobotix.com • [email protected]
Starting And Operating IP Videophones
Main Menu: * Player
Pushing the * key once opens the submenu associated with the integrated player function.
You can use the player to play back all event videos recorded by the camera, including
sound and a still image function. Play/Pause (key 1) allows you to play back the latest
event. Keys 2 to 6 are used to play back and forth between the saved events.
Key
Function
1
Play Back Event (available in future software versions)
2 to 6
Skip back and forth between the saved events
9
Event search
Key 9 (binoculars icon) opens a submenu to quickly and easily search for
events. Here, you can constrain the
search timeframe (only new events,
start date, search period) or select the
type of event (e.g. bell, door opened,
somebody in front of door).
The arrow keys allow you to switch
between pages of search result lists
and select an event to play.
© MOBOTIX AG • Security-Vision-Systems • Made in Germany
www.mobotix.com • [email protected]
75/98
76/98
T24S System Manual: Operating The Door Station
Main Menu: * Configuration
Press the "*" key twice to open the configuration submenu. This menu includes the functions "Language", "Door Bell", "Automatic Recording On" and "Hide Automatic Menus",
which can be selected using keys 1 through 4. The functions are self-explanatory and help
texts are integrated. These can be called up using the # key.
“8” key: Confirm
changes and close
“9” key: Close without saving changes
Language
Use the "1" key (English) or the "2" key (German) to change the language in the user menu.
The language is changed
by the next SIP call
and this change is carried out automatically
for all Grandstream
remote stations
© MOBOTIX AG • Security-Vision-Systems • Made in Germany
www.mobotix.com • [email protected]
Starting And Operating IP Videophones
77/98
Door Bell
Press and hold the "8" key until the number of door bells appears in the image. Then use
the "1" key to select up to 5 of the door bells that will trigger a call to this telephone (VoIP
call).
Available in future
software versions
© MOBOTIX AG • Security-Vision-Systems • Made in Germany
www.mobotix.com • [email protected]
78/98
T24S System Manual: Operating The Door Station
Automatic Recording On/Off
The "3" key activates/deactivates the automatic recording function of the door camera. The
factory default setting records sound for 1 minute when one of the door bell buttons is pressed.
“8” key: Confirm
changes and close
“9” key: Close without saving changes
Show/Hide Automatic Menus
The "4" key activates/deactivates the function so that displayed menus are automatically
hidden again after 10 seconds. Even when the menus are hidden, the keys are activated
and correspond to the current menu.
Menu hidden automatically:
> each key displays
the menu again
Menu hidden automatically by pressing "#":
> only the "#" key displays the menu again
© MOBOTIX AG • Security-Vision-Systems • Made in Germany
www.mobotix.com • [email protected]
Starting And Operating IP Videophones
Main Menu: # Help
Pushing the # key once opens help for the currently selected main menu item. The help
text describes briefly the exact meaning of the key symbols located in the submenu.
Main Menu: # Show And Hide Menu
The "#" key shows/hides the user menu. The actions of the corresponding keys are triggered even when the menu is hidden.
© MOBOTIX AG • Security-Vision-Systems • Made in Germany
www.mobotix.com • [email protected]
79/98
80/98
T24S System Manual: Special T24S Camera Functions
4
SPECIAL T24S CAMERA FUNCTIONS
4.1
Video And Sound Recording Of Events
4.1.1
Automatic Event Recording
As the leading manufacturer of high-resolution IP security cameras, MOBOTIX has also
integrated all of the necessary security features into the T24S door camera. While standard
cameras require the recording function to be switched on and off manually, MOBOTIX
cameras work with intelligent sensor technology and store data efficiently. An automatic
recording is started only when, for example:
• someone rings the doorbell
The property owner knows who was at the door in his or her absence.
This includes the exact recorded time of the visit.
• someone was at the door
Who put the package in front of the door and when? A look at the list of
recorded events is all that is needed. The motion detector in the camera
starts the recording automatically.
• when the outdoor light goes on
The recording is triggered by external switch contacts or light sensors or
by illumination sensors and external PIR motion detectors. The coupling
to the light enables the camera to deliver high-quality images – even
in the dark.
IR motion detector
T24S Door Camera Factory Defaults
By default, the door camera is so configured when recording is activated that a 60-second
recording of the current live image at the maximum frame rate with lip-synchronous sound
begins every time one of the door bells ( up to 5 allowed) is triggered.
The settings: triggering event, recording duration, frame rate, resolution, sound may be
changed at any time using MxEasy or a web browser. Please see the current software
manuals for more information on these settings:
• Software Camera Manual Chapters 7 (Events) and 8 (Recording)
• MxEasy User Manual Section 3.6 (Setting Up Alarms And Recordings)
Triggering The Manual Alarm And Recording Using MxEasy Or Grandstream
Independent of automatic event recording, you can also use MxEasy or the keypad of the
IP video phone to start a one minute (video phone) or 1/5 minute, continuous immediate
recording at any time. To do so, simply click on the "Buzzer" icon (on the Grandstream
display or at the top of the MxEasy menu bar).
© MOBOTIX AG • Security-Vision-Systems • Made in Germany
www.mobotix.com • [email protected]
Video And Sound Recording Of Events
Activating Recording With MxEasy And Video Phone
The recording mode of your T24S can be activated via a Grandstream video phone or
MxEasy. Please see the relevant legal guidelines for video surveillance.
You can activate the recording on the Grandstream by selecting the Automatic Recording
On option (see also section 3.6.2) in the Configuration menu using the "3" key.
On a PC with the MxEasy software, click on the recording mode icon at the top (rectangle
with a red dot) and select the "Normal Mode" setting. This "arms" the camera and triggers
recording according to the factory defaults on doorbell or motion (Siedle module) events.
Note
Clicking on the active icon for Alarm configuration (red dot with wrench) opens a range
of new icons that may be used to configure numerous additional settings for recording
and alarm forwarding, for example, calling a mobile phone.
Playing Saved Events Using MxEasy Or Grandstream
You can use an IP video phone or a computer to retrieve events from the camera memory.
It is not necessary to install any additional software with a video phone. The camera
displays a basic operating menu created specifically for telephone keypads directly in
the camera image.
• Switch to Player mode (click on the "Audio cassette" icon) in the video phone or
MxEasy menu to play back the recordings.
• For more information, see the descriptions in section 3.6.2 (video phone) or in the
MxEasy User Manual.
© MOBOTIX AG • Security-Vision-Systems • Made in Germany
www.mobotix.com • [email protected]
81/98
82/98
T24S System Manual: Special T24S Camera Functions
4.1.2 PTZ And Full Image Storage Independent Of Live Image
The hemispheric T24 has a virtual PTZ feature (pan/tilt/zoom). The image captured by
the hemispheric camera can be zoomed smoothly, and you can move to any section
of the image using the Grandstream keyboard or a mouse/joystick in MxEasy, for
example. This is similar to a mechanical PTZ camera, but without the maintenance and
wear.
Live image
Integrated PTZ functions allow the complete
stored full image to
be analyzed at a later
point in time (on the
Grandstream telephone
or a PC with MxEasy)
Recorded full image
Examining rec. full image
All standard motorized PTZ cameras only store the image sequence that is currently
viewed in the live image (live image recording). This has one serious disadvantage as the
recording can only show what has happened in the "visible" portion of the image. The
rest is lost and cannot be examined later on.
For this reason, the MOBOTIX T24S also offers an optional full image recording feature.
This will not store the currently viewed image that reflects the pan/tilt position and the
zoom setting chosen by the user, but the full sensor image – without PTZ settings. By
the evaluation of the recorded images, every corner of the recorded full image can be
examined using the PTZ features: zooming, panning and tilt.
This is not possible with any motorized door camera in the world. But it is extremely
important for a later analysis in the recorded events ("Look, there was someone below
by the door as well!")
© MOBOTIX AG • Security-Vision-Systems • Made in Germany
www.mobotix.com • [email protected]
Video And Sound Recording Of Events
Activating/Deactivating Full Image Storage In MxEasy
To activate full image storage, click on the Image formats and views icon (two overlapping
right angles) on the right of the MxEasy toolbar. This opens a new toolbar at the lower
edge of the image. In this toolbar, click on the PTZ icon (2nd from right) and select the
"Full image storage" or "Record shown image" option.
Note
Post-event search in the full image: When using full image storage, the images should
at least be saved in the MEGA format to facilitate post-event search in MxEasy. Otherwise
the zoom function will not be able to deliver satisfactory image quality.
Full Image Recording On: Due to the increased processing time, full image recording
reduces the data rate of the live image stream, which may drop from around 10 to 30
percent. We therefore recommend a reduction of the frame rate for storage as much
as possible, so as to affect the live image stream as little as possible.
Full Image Recording Off: The event that triggered a video motion (VideoMotion VM)
window may not be in the recorded sequences while the window was not displayed
at the time.
© MOBOTIX AG • Security-Vision-Systems • Made in Germany
www.mobotix.com • [email protected]
83/98
84/98
T24S System Manual: Special T24S Camera Functions
4.1.3 Camera-Internal Memory Up To 32 GB
Every T24S door camera has a high-speed processor with an integrated
digital flash device (MicroSD card with 4 GB card as standard, and up
to a 32 GB replacement card). Flash storage is a mature semiconductor memory technology without any moving parts. Its reliability, simple
operation and low costs have made it the storage medium of the future.
On request, the T24S saves high-resolution video with lip-synchronous
sound directly to the integrated MicroSD flash card without requiring an
external storage device or PC. This requires no additional network load.
Old recordings may be overwritten automatically or automatically deleted
after a specified period of time. The storage capacity is sufficient for around 400,000
Panorama images or 33 hours of film (32 GB MicroSD).
Power failures are not an issue while the video and image sequences remain safely stored
on the MicroSD card. Access to stored video sequences is possible at any time using a
video phone or MxEasy. If you would like to archive complete sequences or extracts of
sequences, you can export the data to any PC or USB stick.
Advantages Of MicroSD Card Recording
• No PC/network is required for continuous operations and there is no network load
• Use of additional storage media possible, for example, PC hard drive
• Greater reliability while no mechanical hard drive is required
• Ring buffer: Old images can be overwritten automatically or automatically deleted
after a specified period of time
Note
MOBOTIX recordings are not just reliable, but also secure. The special MOBOTIX FlashFile
system (MxFFS) prevents unauthorized persons from reading or transferring the internally
stored data, even if the card is stolen.
Storage Requirements And Life Expectancy Of MicroSD Cards
The life expectancy of a MicroSD card increases proportionally to the storage capacity,
since the camera software executes fewer write/delete cycles on each storage cell. The
first delete operation starts once the SD card has been filled to capacity (first full cycle).
The theoretical life expectancy of a good quality 16 GB MicroSD card is between 10 and
35 years, depending on the degree of use.
© MOBOTIX AG • Security-Vision-Systems • Made in Germany
www.mobotix.com • [email protected]
Video And Sound Recording Of Events
85/98
4.1.4 Formatting A New MicroSD Card Using A Web Browser
Before a MOBOTIX camera can store image and video sequences on a new MicroSD
card (besides the one delivered with the camera), the new card must first be formatted
as MxFFS (MicroSD cards delivered with MOBOTIX cameras are already MxFFS-formatted).
The following steps are necessary to format a storage device (Admin Menu > Storage
on External File Server / Flash Device):
Formatting the card:
Admin Menu > Storage
on External File
Server / Flash Device
1. Make sure that the MicroSD card is in the card slot of the MOBOTIX camera.
2. Click on the Format button under SD
Flash Card.
3. Select the Quick Format option and
confirm by clicking on OK.
Hint: In contrast to the Quick Format
option, the Safe Format option will make
sure that the data on the MicroSD card
is overwritten completely so that the data
cannot be recovered in any way. However,
keep in mind that the Safe Format takes
considerably more time.
4. Enter the user name and the password of
a user of the admins group in the dialog
that opens and click on OK to confirm.
The MOBOTIX camera now starts formatting
the card. It usually takes between 5 and
12 minutes to format an 8 GB MicroSD
card using the Quick Format option and 3
to 14 hours using the Safe Format option.
Caution
Make sure that you always wait until the formatting process has been completed
before accessing the camera again. This usually takes only a few minutes when
using the Quick Format option. You can only access the MicroSD card once MxFFS
formatting has been completed.
The Safe Format option takes several hours. You can also use suitable applications
on Windows or Mac OS X computers to safely erase data from the MicroSD card.
© MOBOTIX AG • Security-Vision-Systems • Made in Germany
www.mobotix.com • [email protected]
The Safe Format option
takes several hours. You
can also use suitable
applications on Windows
or Mac OS X computers to safely erase data
from the MicroSD card.
86/98
T24S System Manual: Special T24S Camera Functions
4.2 Additional Camera Settings
The configuration options presented thus far in this T24S System Manual have not yet
exhausted the entire range of functions offered by the door camera.
The T24S camera, like any other MOBOTIX security camera, can also be operated and
reconfigured by any computer in the same network as the camera. All you need is a
network-ready computer with a standard web browser. This, in turn, means that a
network connection to the camera can be established from any location worldwide, even
from Internet-enabled mobile devices.
Open a web browser on the control PC (for example, Internet Explorer or Firefox).
• Enter the current IP address of the desired T24S in the browser address bar.
• The MOBOTIX T24S camera page opens and provides (password-protected) access
to the hardware and software settings.
• We omit a detailed description here, referring you instead to the material available
in the current Camera Software Manual, which is available free of charge from
www.mobotix.com as a downloadable PDF (See the Support > Manuals section).
• The MxEasy User Manual is also available as a free download from the same location.
Overview Of Additional Camera Functions (Configurable By Web Browser)
• True software scaling generates smaller image formats easily for PDAs (such as
320 x 240, 160 x 120, etc..
• Audio-video recording has three different recording modes: event recording with
audio, continuous recording with variable frame rate and audio, and event-controlled
snapshot recording of JPEG images.
• Storage failure detection can monitor a file server (or a flash device), and can use
one or more of the defined messaging options for error notification.
• Player of recorded images/video sequences includes audio in the integrated video
management system.
• Multiwatcher screen can display and monitor several cameras over the Internet
with only one camera requiring access from the outside. This "proxy" camera uses
very little bandwidth, making it an ideal solution for low-bandwidth connections.
• MultiView screen for displaying multiple cameras or events appears in one browser
window.
• Event notification via e-mail, text messaging (using a service provider), voice notification (phone call-out), sounds, and by visual means (for example, red frame in live
image) using two separate messaging paths
• Object tracing for analyzing the paths of objects that are moving in the image
© MOBOTIX AG • Security-Vision-Systems • Made in Germany
www.mobotix.com • [email protected]
Additional Camera Settings
87/98
• Time Tables that handle customized holidays and vacations are used to control
the camera's arming, image recording, messaging, logos, and the obscure image
function as well as other features.
• Remote signaling for master/slave cameras, where the master camera controls
the arming status of the slave cameras, allows all slave cameras to be armed using
a key switch connected to the master camera for example.
• Transfer profiles allow easy control of transmissions via FTP, e-mail, phone calls,
and network messages.
• Speakerphone* with speak, listen and intercom modes is enabled using the camera's
microphone and speaker.
• Phone Call-In* remotely controls the camera using a touchtone telephone (retrieve
camera information, establish an Internet connection, announce the retrieved IP
address, intercom feature, etc.).
* Telephony features
using VoIP connections
(Internet telephony)
• MxPEG video compression uses MxControlCenter. The ActiveX plug-in for Internet
Explorer users brings all advantages of MxPEG to the browser-based user interface,
including the audio stream to and from the camera.
• Routing allows use of other network connections besides the standard route.
• DynDNS client can access the camera via the Internet using a symbolic name like
mymobotixcam.dyndns.org), despite the provider assigning a new dynamic IP address
every time the camera connects to the Internet.
• Non-voidable backup system starts the cameras in the original operating state
if a software update fails, allowing the user to easily restart the update process.
• Notifications upon errors or when rebooting provide a method for executing one
or more notifications like blinking of the camera LEDs, audio message, FTP, e-mail,
phone call, network message.
• Extended security features protect the pages and features of the camera and prohibit
unauthorized access (IP-level access control, intrusion detection). They also provide
SSL-protected transmission of the video sequences and the data (using SSL encryption and X.509 certificates).
Free Software Updates (www.mobotix.com)
MOBOTIX provides software updates free of charge at regular intervals that improve and
expand the camera’s functionalities. Chapter 6, Software Update, in the Software Manual
provides more information on the process.
© MOBOTIX AG • Security-Vision-Systems • Made in Germany
www.mobotix.com • [email protected]
Free software updates
at www.mobotix.com
88/98
T24S System Manual: Special T24S Camera Functions
4.3 Final Notes
4.3.1 Weatherproofness
The MOBOTIX T24S Secure model has been certified weatherproof according to IP65 meaning absolutely dustproof and resistant to water jets, and can be installed outdoors
without accessories.
4.3.2 Password For The Administration Menu
Accessing the Administration menu of the camera (web browser: Admin menu) is only
possible after entering a user name and password.
• Factory default user name is admin.
• Factory default password is meinsm.
The Quick Installation assistant automatically appears when the Administration menu is
accessed for the first time. It provides an easy method to adjust the basic camera settings to the current application scenario. For security reasons, it is highly recommended to
change the default administrator password after the camera has been configured properly.
Enter the user name and password exactly as shown above. Note that all entries are
case-sensitive.
Caution
Make sure that you store information on user names and passwords in a secure
place. If you lose the administrator password and cannot access the administration
menu, the password can only be reset at the factory. This service is subject to a fee!
4.3.3 Permanently Deactivating The Microphone
The microphone can be
irreversibly deactivated!
Deactivating a camera's microphone may be necessary in order to protect the privacy
of persons at a workplace or for other reasons. You can permanently and irreversibly
deactivate the microphone in the Admin Menu > Loudspeaker and Microphone dialog.
Caution
This deactivation is permanent and cannot be reversed, even by MOBOTIX engineers. Deactivating the microphone will also deactivate all features that use the
camera’s microphone.
© MOBOTIX AG • Security-Vision-Systems • Made in Germany
www.mobotix.com • [email protected]
89/98
Final Notes
4.3.4 Starting The Camera With Factory Defaults
Under certain circumstances, you may have to reset the camera to its factory settings.
This could be the case, for example, if the IP address has been lost or the camera does
not respond to the last known IP address.
1. Disconnect the camera's power supply (disconnect the cable).
2. Reconnect the power supply of the camera.
3. Wait until the buttons light up.
4. Press the upper button (light) on the camera within four seconds.
Press top button (light)
5. After about two seconds, the camera will play a sound ("boing"). The camera is
now configured as a DHCP client again and is additionally accessible using its
factory IP address (see label on the camera housing).
Notes
If you use the upper key on the camera to load the factory configuration, this configuration is not automatically saved in the camera's flash memory. When the camera
is next rebooted without using the upper key, the last stored network configuration
will be used. To permanently store the new network configuration in the camera's
flash memory, open Admin Menu > Store.
Caution
In contrast to resetting the camera using Admin Menu > Reset configuration to
factory defaults, the user information will not be reset if the camera is booted using
the factory configuration.
© MOBOTIX AG • Security-Vision-Systems • Made in Germany
www.mobotix.com • [email protected]
The T24S with only one
button (light) features
a rocker switch, of
which the upper area
must be pressed
90/98
T24S System Manual: Special T24S Camera Functions
4.3.5 Resetting The Camera To Factory Settings (By Web Browser)
The configuration can
also be reset partially
All settings of the MOBOTIX camera can be reset permanently to the factory default settings.
This makes sense if you have, for example, obtained a camera without any information
or you would like to reset all settings after testing the camera. In order to perform this
procedure, you need to have access to the Administration menu of the camera (admins
group). Open Admin Menu > Reset to reset the camera to factory defaults.
Note: All defined users are deleted and the admin password is reset to the factory default
when you reset the camera using Admin Menu > Reset.
4.3.6 Activating Event Control And Video Motion Detection (By Web Browser)
If the dotted rectangle
in the live image is visible, the camera is armed
By default, the camera's event control and video motion detection features are not enabled.
In order to activate event-controlled recording, open Setup Menu > General Event Settings
and activate the Arming switch. Another method is to click on the Arm & Record soft key
in the browser's user interface. The camera displays the video motion detection window
in the live image (dotted frame in the center) and the camera automatically stores images
as soon as the video motion window detects movements.
4.3.7 Deactivating The Daily Restart Of The Camera (By Web Browser)
By factory default, the MOBOTIX camera automatically reboots every morning at 3:36 a.m.
The reason for this is that in some rare cases external influences (for example, atmospheric
radiation) can lead to camera malfunctions. The automatic reboot will refresh the camera's
memory and will ensure proper operation without requiring any interaction on the part of
the user. If desired, you can deactivate the automatic reboot of the camera in the Admin
Menu > Time Tasks dialog.
4.3.8 Browser
Current Internet browsers (Internet Explorer, Netscape, Firefox, Safari, Camino, Konqueror,
Opera, etc.) with enabled JavaScript can display the camera's live images with their standard settings. Text-based browsers, however, cannot display the user interface and are
not suitable for operating the camera.
Section 4.1.3 Browser Settings in the Camera Software Manual contains more detailed
information on possible browser problems.
4.3.9 T24S Maintenance
If the lens is dirty from the installation process, clean the lens using a lint-free cotton cloth.
© MOBOTIX AG • Security-Vision-Systems • Made in Germany
www.mobotix.com • [email protected]
Final Notes
4.3.10 Safety Warnings
Electrical surges can be induced by other electrical appliances, improper wiring or also
externally (for example, lightning strikes to phone or power lines).
MOBOTIX cameras are protected against the effects of small electrical surges by numerous
measures. These measures, however, cannot prevent the camera from being damaged
when stronger electrical surges occur. Particular care should be taken when installing the
camera outside to ensure proper protection against lightning, as this also protects the
building and the entire network infrastructure.
MOBOTIX recommends having MOBOTIX cameras installed only by specialists accustomed
to installing network devices and who have proper respect for the pertinent regulations
regarding lightning and fire prevention, as well as the current technology for preventing
damage from electrical surges.
4.3.11 Online Help And Camera Status
For more information, see the News and Functional Overview pages in the online help of
the camera's browser interface. Click on the yellow "question mark" icon in the top right
corner to open the camera's online help.
Furthermore, detailed information on the camera and its current configuration is displayed
in the Camera Status dialog. Click on the "Info" icon to open the relevant page.
© MOBOTIX AG • Security-Vision-Systems • Made in Germany
www.mobotix.com • [email protected]
91/98
92/98
T24S Camera Manual: MOBOTIX Glossary
MOBOTIX Glossary
ActiveX: Control element on Windows computers that may also be used in other programs (including
Internet Explorer) to run special tasks. The MxPEG ActiveX control element allows video and audio
data from MOBOTIX cameras to be displayed in other applications (including Internet Explorer).
Arming: This refers to the process of activating an alarm system so that events trigger the appropriate alarms. Traditional alarm systems can be armed using a key switch or by entering a code
on a keyboard. MOBOTIX cameras can be armed using a “software switch.”
Assistant: Refers to a software component that helps the user install or set up a particular program
and guides the user through the configuration process by means of simple questions.
CCTV: Abbreviation for Closed-Circuit Television. A television system in which the analog video
signal is only transmitted to monitors (for example, within a building). The term CCTV is often
used for video surveillance systems.
CIF, 2CIF, 4CIF (according to the PAL television standard): Common Intermediate Format. Corresponds
to 1/4 TV image with 288 rows and 352 pixels (0.1 megapixel). 2CIF (1/2 TV image) has the same
small number of rows (288), but 704 pixels (0.2 megapixel). 4CIF corresponds to the image quality
of a traditional TV image with 576 rows and 704 pixels (0.4 megapixel).
CMOS sensor: Abbreviation for Complementary Metal Oxide Semiconductor sensor. Sensor for
energy-efficient digitalization of image information. CMOS sensors are used as image sensors
in digital cameras.
DHCP: Abbreviation for Dynamic Host Configuration Protocol. Allows a server to automatically
assign devices in the network with the appropriate configuration (including the IP address, DNS
server and gateway), as opposed to static IP addresses on the individual network devices.
DNS: Abbreviation for Domain Name Service. Allows the domain names of servers on the Internet
(for example, www.mobotix.com) to be linked ("resolved") to their corresponding IP addresses
(for example, 212.89.150.84).
DSL: Abbreviation for Digital Subscriber Line. Denotes a fast Internet connection capable of providing bandwidth of up to 500 Mbps.
DynDNS: Abbreviation for Dynamic DNS (or DDNS, Dynamic Domain Name Service). Similar to DNS,
this links domain names (e.g. mydomain.com) with IP addresses, whereby the IP addresses may
change at any time. This service provides a convenient method to access your MOBOTIX cameras
from home or work if the camera Internet connection is not through a router that assigns a fixed
IP address, but instead over a DSL connection with a dynamically assigned IP address from the
provider. A well-known provider of this (free-of-charge) service is www.dyndns.org.
DVR: Abbreviation for Digital Video Recorder.
Events: An event refers to a situation when something happens or changes. In terms of video
surveillance, this means a change in the status of an area that is being monitored. This may be
movement of a person, a change in brightness, a drop in ambient temperature, the detection of a
noise via a microphone, an electrical signal at a signal input, the manual operation of a button, etc.
© MOBOTIX AG • Security-Vision-Systems • Made in Germany
www.mobotix.com • [email protected]

Ethernet: The most common technology for communication within a wired network. It facilitates
data exchange between all devices (computers, printers, IP cameras, IP video phones, etc.) connected in a local network (LAN).
Flash memory: See MicroSD card.
fps: Abbreviation for frames per second. See Frame rate.
Frame rate: The frame rate specifies how many frames per second (fps) are generated and
sent by the camera. 16 fps and higher is perceived by the human eye as a fluid video sequence.
G.711: G.711 refers to the process by which analog audio signals are encoded and decoded. This
codec (= enCOder-DECoder) is used in classic telephone systems and IP telephony.
H.264: H.264 is the process by which the video image is encoded/compressed and decoded.
HDTV: Abbreviation for High Definition TV.
HiRes: Abbreviation for High Resolution. Refers to high-resolution images (above 1 megapixel).
Image compression: Image compression reduces the file size of an image. This is particularly
important when transferring and saving files.
Image processing: Digital image processing. The goal is to correct errors made during image
generation (caused by overexposure, underexposure, blurring, weak contrast, image noise, etc.)
in order to create a “better” image.
IP network: Data network based on the Internet protocol (TCP/IP).
IP telephone: See VoIP.
JPEG: Abbreviation for Joint Photographic Experts Group, responsible for the development of the
JPEG standard method for image compression. JPEG is the most common lossy image format
for photos on the Internet. Loss in image quality is barely noticeable at compression rates lying
between 60% and 99%.
Latency: Time interval elapsed between the time an image is captured by a camera and when
that same image is displayed on the monitor.
Layout: Describes the layout of video sources on a screen in MxControlCenter. The layout determines the positions and resolutions of the images displayed on the monitor when displaying
images from network cameras. In addition to the actual video images, you can also incorporate
graphic elements such as the location of the cameras, etc.
LED: Abbreviation for Light Emitting Diode. An electronic semiconductor component built into
MOBOTIX cameras and add-on modules that emits light when a current flows through the component in the correct direction.
Megapixel: Images that have more than 1 million pixels.
MicroSD card: SD Memory Card (Secure Digital Memory Card). A digital storage medium based
on flash storage modules.
© MOBOTIX AG • Security-Vision-Systems • Made in Germany
www.mobotix.com • [email protected]
93/98
94/98
T24S Camera Manual: MOBOTIX Glossary
Motion detection: Action of detecting a movement within a particular area. MOBOTIX cameras
use algorithmic methods to detect changes from image to image in predefined areas, while
taking preset conditions into account. If a camera detects a movement, it signals an event and
triggers an alarm.
Motion-JPEG (M-JPEG): A video compression method where each individual image is compressed
separately as a JPEG image. Unlike MPEG, the quality of M-JPEG recordings is not dependent
on movement within the image.
MPEG: Motion Pictures Expert Group. Standard for compressing and saving image and video
data, resulting in quality loss. Originally created for playing entertainment content on PCs, MPEG
concentrates on displaying still image material and lowers the quality of moving image material
in order to increase the transmission speed.
MxControlCenter: MOBOTIX video management software for professional control of mediumsized and large camera networks.
MxEasy: Free MOBOTIX video management software for small and compact camera networks
of up to 16 cameras/door stations.
MxPEG: Method developed by MOBOTIX to compress and store image and video data with low
network load and high image quality. The MxPEG ActiveX control element allows video and audio
data from MOBOTIX cameras to be displayed in other applications (including Internet Explorer).
NAS: Abbreviation for Network Attached Storage, a storage system connected via an Ethernet
cable. All network devices (cameras) have access to this storage system.
Network: A group of end devices, such as computers, that are connected via various cables and
share access to data and devices such as printers and IP cameras.
PIR sensor: Passive infrared sensor for motion detection.
PoE: Power over Ethernet. A technology for supplying network-enabled devices (for example, IP
cameras) with power via an Ethernet cable.
PTZ: Abbreviation for Pan/Tilt/Zoom. Refers to the movement of a video camera to the left and
right, up and down, and to the camera's ability to enlarge an image.
Quad display: Layout in which the images from four cameras are displayed in one window.
Resolution: Indicates the number of pixels used to produce an image. The more pixels an image
has, the more recognizable the details remain when the image is enlarged. The resolution is
expressed as the number of pixel columns by pixel rows or as a total number of pixels. A VGA
image has 640 columns and 480 rows (640 × 480), which equals 307,200 pixels or approximately
0.3 megapixels. The T24 has 3.1 megapixels.
RFID: Radio frequency identification.
RoHS: Abbreviation for Restriction of Hazardous Substances Directive and refers to EC Directive
2002/95/EC, which prohibits the use of certain hazardous substances when manufacturing products
© MOBOTIX AG • Security-Vision-Systems • Made in Germany
www.mobotix.com • [email protected]

and components. The goal of this directive is to prevent these substances from harming the
environment when the products are disposed of later.
Router: Network device that connects multiple networks with one another. The router establishes
a physical connection between the devices in different networks (like a hub), analyzes the relevant
data packets and forwards ("routes") these packets to the correct target network.
Search: Monitoring of recordings or searching for a particular event.
SIP: Session Initiation Protocol. Network protocol for setting up, controlling and terminating a
communication connection via a computer network. SIP is frequently used in conjunction with
IP telephony.
Snapshot: Photograph of a situation created spontaneously and directly with a mouse click.
Switch: Hardware used to connect multiple network devices (computers, cameras, printers, etc.)
within a network. A PoE switch can also supply the (door) cameras with power over an Ethernet cable.
Transponder: A transponder is a device used for wireless communication (for example, as a key
fob or a check card). The device detects the incoming signal and automatically responds to it or
forwards it. The term "transponder" is made up of the terms "transmitter" and "responder." Passive
transponders do not require their own power source, but they only work over short distances.
UPS: Uninterruptible Power Supply. Refers to devices that continue to supply power in the event
of a sudden power failure. These devices usually operate using a battery. UPS is installed on
the power lines of devices and systems in order to protect them in the event of a power failure.
VoIP: Voice over IP. Telephony using computer networks.
WLAN: Wireless local area network connection.
© MOBOTIX AG • Security-Vision-Systems • Made in Germany
www.mobotix.com • [email protected]
95/98
96/98
T24S-Camera Manual: Notes
© MOBOTIX AG • Security-Vision-Systems • Made in Germany
www.mobotix.com • [email protected]

© MOBOTIX AG • Security-Vision-Systems • Made in Germany
www.mobotix.com • [email protected]
97/98
98/98
T24S System Manual: Declaration Of Conformity
Declaration Of Conformity
© MOBOTIX AG • Security-Vision-Systems • Made in Germany
www.mobotix.com • [email protected]
MOBOTIX – The HiRes Video Company
To demonstrate our confidence in the quality of our products,
MOBOTIX cameras were used to capture all the images that
appear in this manual.
Manufacturer
Executive Board
MOBOTIX AG
Dr. Ralf Hinkel
Kaiserstrasse
D-67722 Langmeil
Registration Office: Kaiserslautern Local Court
Germany
Registration Number: HRB 3724
Tel : +49 6302 9816-103
Tax Code: 44/676/0700/4
Fax: +49 6302 9816-190
Tax Office: Worms-Kirchheimbolanden, Germany
http://www.mobotix.com
VAT ID:
[email protected]
DE202203501
You can find the latest version of this document
at www.mobotix.com under Support.
Technical specifications subject to change without notice!
© MOBOTIX AG • Security-Vision-Systems • Made in Germany
www.mobotix.com • [email protected]
EN
T24S System Manual
The HiRes Video Company
Hemispheric IP Video Door Station
Hemispheric 3MEGA camera for use in combination with Siedle Vario modules.
Complete coverage of the entire scene at the house door. From wall to wall, from
top to bottom – no blind spots and no gaps in security.
www.mobotix.com
2010-06-14
Complete Panorama view from wall to wall and from floor to ceiling
HiRes Video Innovations
The German company MOBOTIX AG is known as the leading pioneer in network camera technology
and
its
decentralized
concept
has
made
high-resolution
video
systems
cost
efficient.
MOBOTIX AG • 67722 Langmeil • Tel.: +49-6302-9816-103 • Fax:+49-6302-9816-190• [email protected]
MX-SM-T24S-EN-01
5/2010
180°