1
Displaying Your Favorite Pictures is Easy and Fun
3 in cha
Digital Picture Frame
User's Manual
Table of Contents
Table of Contents....................cceererrrrccerrrerreceararereaceererreaceseeseceeaearrreeaserreroaecaserertearerrerooeen ez 2
Important Safety Precautions... ooo errr teen rm" 4
Cleaning the LCD Seren... reer eer nee ne 4
Cleaning the Digital Picture Frame... rare eas 5
|{ГоаусИоп........ннееенныеееыыыеесеыесссекыеесеыессекыеескыессекеесскыесееыессекыеесккыесскыесскыесккееккнекенее. 5
What's п {Пе EEE 6
Setting Up the Digital Picture Frame... era, 6
Locating the Digital Picture Frame's Features... cree a 6
Using the Control Buttons and Remote Control..........cooooiiiii ii rae 7
Use the Control BUtlONS. .....c.oi EEE 7
Use the Remote Control... coo dee reer eee aaa ranean 8
Install and Replace the Remote Control Battery... eee 8
Setting Up the SlidesNow......................eccreee eee ee crea ae caen eee eee ee ee eee ee aa ee ea ee ee ea eee eee eee nee en nana en anne nee 9
Card Sele iON SC EN. iii i dea 9
Mode Selection Screen..…............….......ssersrenee nes s ea ne rence sense ane n ane e nana mena e nana nana ane nana nec sn 10
Thumbnail Screen...............e..eeeeeeeeserrresrrereecaaereceraseeeaseeasrrasorraearenertasrraroeresroreseremartme ree CENT 10
Display a Single Photo onthe Full Screen... rece 11
Controlling the Slide Show and Photo... rere ea, 11
Manually Change the Displayed Photo... cree eran 11
Rotate the Photo... dr detrei NE rrTNe NENA 11
Enlarge the PRot0.. cod rd reer CTD 11
Copy the Displayed Photo to the Built-In Memory... cc. ae 12
Delete the Displayed Photo... eee rere aaa ean 12
Fo TUE G84 = 30 S010 J 0 oo RAR RR ERERRRRRRRRRRRRRRRRRRRREEERRRRRRERERRRRRREREEREEERREREREEEERKKEG 12
Add Music tothe Slide SHOW... ee eee eens 12
How to copy pictures from Flash Card into Built-in memory....................…..crscrseesecce ren ner ae na ce ncnn 13
Listening to MUSIC..............22sssesae ecran ares anna eee ea ana na a eee eee ea en eee eee eee eee n nee TT TENA EE NrVrTE ECT ENECEATOTE—O 14
Control the Volume..................eeer.eeeerereccrrcaaaereaeareoasereaesereassrsaeaerrararoraerretaaoreaeer reee CEE NATI 14
Watching a Video................—_.—._ee..reesrsrecrerreeeereeeerreeserreeersreerr CTA A TEE rrTETETTTOTECEEVTrrFOTECEOCECFENTETICO 14
Setting Viewing Options................e——e—-e—erereeíeeererreeeereerereeeeeeneeeereereereeretresretTEtTATEETEECEECEETERFVETCTO 15
Advanced Operations... i ieee eerie eee aaa. 16
Frequently Asked Question Seren reer eee eee ee enee ea 17
Technical SPE CIfiCalONS. .. coo tr ede eee eee eaters 18
Assembly INS rUCH ONS... eee eee 19
Important Safety Instruction
WARNING: To reduce the risk of fire
or electric shock, DO NOT expose
this product to rain or moisture.
CAUTION
RISK QF €
DO NT OPEN
The lighting flash with arrowhead symbol, within an triangle,
alerts the user to “ dangerous voltage” which could cause electric shock.
The exclamation point within a triangle indicates to the user to read 1m portant
operating and maintenance instructions in the manual.
Notes
1) Read these instructions.
2) Keep these instructions.
3) Heed all warnings.
4) Follow all instructions.
5) Do not use this apparatus near water.
6) Clean only with dry cloth.
7) Do not block any ventilation openings. Install in accordance with the manufacturer’s
instructions.
8) Do not install near any heat sources such as radiators, heat registers, stoves, or other
apparatus (including amplifiers) that produce heat.
9) Do not defeat the safety purpose of the polarized or grounding-type plug. A polarized plug
has two blades with one wider than the other. A grounding type plug has two blades and a
third grounding prong. The wide blade or the third prong are provided for your safety. If
the provided plug does not fit into your outlet, consult an electrician for replacement of
the obsolete outlet.
10) Protect the power cord from being walked on or pinched particularly at plugs, convenience
receptacles, and the point where they exit from the apparatus.
11) Only use attachments/accessories specified by the manufacturer.
12) Use only with the cart, stand, tripod, bracket, or table specified by the manufacturer, or sold
with the apparatus. When a cart is used, use caution when moving the cart/apparatus
combination to avoid injury from tip-over
13) Unplug this apparatus during lightning storms or when unused for long periods of time.
14) Refer all servicing to qualified service personnel. Servicing is required when the apparatus
has been damaged in any way, such as power-supply cord or plug is damaged, liquid has
been spilled or objects have fallen into the apparatus, the apparatus has been exposed to
rain or moisture, does not operate normally, or has been dropped.
15) Apparatus shall not be exposed to dripping or splashing and no objects filled with liquids,
such as vases, shall be placed on the apparatus.
Important Safety Precautions
Read these instructions, keep these structions, Heed all warnings.
Always follow these basic safety precautions when using your Digital Picture Frame. This will
reduce the risk of fire, electric shock, and injury.
Warning: To reduce the risk of fire or shock hazard, do not expose this product to rain or moisture.
Warning: To prevent the risk of electric shock, do not remove the cover. There are no
user-serviceable parts inside. Refer all servicing to qualified personnel.
© The Digital Picture Frame is for indoor use only.
e Unplug the Digital Picture Frame before performing care and maintenance.
e Do not block the ventilation holes on the back of the Digital Picture Frame at any time.
© Keep your Multimedia Digital Picture Frame out of direct sunlight and heat sources.
© Please connect the apparatus with class | construction to a mains socket outlet with
aprotective earthing connection.
© Please securely the apparatus attached to the floor/wall in accordance with the installation
instructions.
° Please state that where the mains plug or an appliance coupler is used as the disconnect
device in the instructions and the disconnect device shall remain readily operable.
e The apparatus with CLASS | construction shall be connected to a MAINS socket outlet with
a protective earthing connection.
e Unplug the power cord from the outlet when the unitis notin use.
© Only use attachments/accessories specified by the manufacturer.
Cleaning the LCD Screen
Treat the screen gently.
To clean fingerprints or dust from the LCD screen, we recommend using a soft,
non-abrasive cloth such as a camera lens cloth to clean the LCD screen.
If you use a commercial LCD Cleaning Kit, do not apply the cleaning liquid directly to the
LCD screen. Clean the LCD screen with cleaning cloth moistened with the liquid.
Cleaning the Digital Picture Frame
Clean the outer surface of the Digital Picture Frame (excluding the screen) with a soft cloth
dampened with water.
Introduction
Welcome to the Digital Picture Frame! Now you can display your digital photos directly from your
memory card. No computer is necessary. Simply insert a memory card into the Digital Picture Frame,
and press the power. You'll be treated to a slideshow of your photos. It's as easy as that. You can
also display individual photos, play video clips, and play background music with your slide show.
The Digital Picture Frame includes these key features:
o Displays digital photos (JPEG) without a computer.
© Simply insert a compatible memory card into the digital picture frame to show photos,
play music or supported video files (memory card not included).
o Compatible memory cards include Secure Digital™, MultiMedia Card™, Compact Flash™,
Memory Stick™, MemoryStick Pro™, Memory Stick Duo™, Memory Stick Pro Duo™ and xD
Card.
e Instantly plays music with the integrated speakers.
© Digital photo slide Show with Music background.
o Displays JPEG images and motion JPEG files (AVI) stored on digital cameras.
О Supports up to 12 megapixel image files (JPEG format).
o Control the main functions with buttons on the frame or with the included infrared remote
control.
Bright TFT LCD screen.
© USB2.0 (Host)
© Built-In Memory.
To learn more about your new Digital Picture Frame's features, and take full advantage of them,
please take a few minutes to read this User's Guide.
What's In the Box
Digital Picture Frame
AC Power Cable
This User's Guide
Remote Control
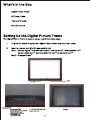
Setting Up the Digital Picture Frame
The Digital Picture Frame is easy to set up. Just follow these steps:
1. Plug the AC Power Plug into the Digital Picture Frame and into a wall outlet.
2. Insert a memory card into the appropriate slot.
Slot 1 - Secure Digital™ or MultiMedia Cardt",Memory Stick™, MemoryStick Pro™,
Memory Stick Duo™ ,Memory Stick Pro Duo™ xD Memory Card™
Slot 2 - Compact Flash™
Keypad
Power Button
PowerAdapter Input
xD-Picture Card™ Slot USB Port for USB Flash Drives Card Slot
Memory Stick“ ‚Memory Stick PRO”, Compact Flash" Slot
Memory Stick Duo'“,and
Memory Stick PRO Duo" Slot
Secure Digital “and
Multi Media Card™Slot 6
Note: The card will only fit in one direction; do not force it. The card should fit snugly when
properly inserted.
3. Press the power button on the back of the Digital Picture Frame ON and holding 2 Seconds.
until the LED light is on beside the Digital Picture Frame. It will automatically start a slide
show of the photos on the card.
4. To display photos individually, press the Exit button to open the Thumbnails Screen. Use
the Left and Right arrows to choose a photo. Press the Play button (>/11) on the top of the
Digital Picture Frame, or the Enter button on the remote control.
Note: Pull the plastic tab sticking out of the remote control. It protects the battery, and the
remote control will not work unless itis removed.
Locating the Digital Picture Frame s Features
Photo and description of buttons on picture frame.
Using the Control Buttons and Remote Control
You can use all of the Digital Picture Frame's features with either the buttons on bottom of the
frame or using the remote control.
Use the Control Buttons
The control buttons are located on bottom of the Digital Picture Frame. Their basic functions are the
same no matter when you press them.
Note:You can open the Setup Menu at any time by pressing the MENU button.
Exceptin the SlideShow Mode.
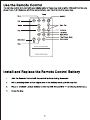
Use the Remote Control
The remote control included with your digital picture frame may look slightly different from the one
shown here, but it includes all of the same buttons, and functions in the same way.
Setup
Zoom
D
EXIT
Exit
©
OH
ON/OFF
Rotate
©
<
o
=
af
Dr
Play
Slide Show
©
STOP
QO
©
0 QUO Or
A
SLIDE
SHOW
Stop
DIGITAL PICTURE FRAME
INFRARED REMOTE CONTROL
,—— ON/OFF
© |
Vol+ , Vol-
Up Arrow
Left Arrow
Right Arrow
Play / Pause / Enter
Down Arrow
Install and Replace the Remote Control Battery
1. Hold the Remote Control with the control buttons facing downward.
2. While pressing down on the ridged area of the battery cover, pull the tray out.
3. Place a "CR2025" Lithium battery on the tray with the positive "+" end facing toward you.
4. Close the tray.
Setting Up the Slideshow
You can control all of the Digital PictureFrame functions with the buttons on the bottom of the frame
or with the remote control. To display the setup screen, simply hold down the Exit button for 2
seconds, or press the Setup button on the remote control.
Card Selection Screen
Use the Card Selection menu to choose between memory cards and the build-in memory.
Select Card
1. To open the card select menu, either insert a new card, or press the Exit button repeatedly
to back through the screens until you see it.
2. Press the Left and Right arrows to select the desired memory card, or built-in memory.
3. Press Enter to make the selection. The Mode Selection Screen opens.
Mode Selection Screen
The Mode Selection Screen shows after you choose the memory source. Use itto choose the type
of files you wish to display.
3.
Select Made
= ip
Slide Show Display slide show
Photo Display JPEG still photo slide shows.
Music Play audio files.
Video Show motion JPEG AVI movies.
Clock Clock & Calendar
Press the Left and Right arrows on the Remote Control or the Digital Picture Frame to
select the mode.
Press Enter to make the selection. If you selected PHOTO, the Thumbnail Screen opens.
It is described below.
If you selected any of the other file types, a screen listing all of the files with the chosen
type. You can select one in the same manner as a photo.
To go back to the Mode Selection Screen, press Exit.
Thumbnail Screen
This screen shows thumbnail versions of all photos on the selected memory source; up to 15 photos
are displayed at a time. Use this screen to select a single photo to display, or to start a Slide Show
of all of the photos.
1.
Press the Arrow Buttons on the Remote Control or the Digital Picture Frame until the
desired photo is highlighted. The photo's filename is displayed at the top of the screen.
The notations at the top of the screen also indicate if there is
Press the Slide Show button to start a slideshow.
To stop the Slide Show and return to the Thumbnail screen, press the Exit button.
10
Display a Single Photo on the Full Screen
You can choose a single photo to display, without a Slide show.
1. With the Thumbnails screen displayed, press Enter to display the selected photo on the
full screen.
2. Press the Left Arrow to return to the previous photo.
3. Press the Right Arrow to display the next photo.
4. To stop the display and return to the Thumbnail screen, press the Exit button.
Controlling the Slide Show and Photo
The digital Photo Frame provides many options for customizing the display, and managing files.
These options are available when viewing photos only.
Manually Change the Displayed Photo
During a Slide Show, each photo replaces the previous one at a selected rate (See Slide Show
Speed).
You can also change the displayed photo at any time during a slide show.
© Press the Left Arrow to return to the previous photo.
© Press the Right Arrow to display the next photo.
Rotate the Photo
You can rotate a photo displayed full-screen using the Remote Control.
Press the rotate button to rotate the photo 90 counterclockwise.
Enlarge the Photo
To magnify a photo displayed full-screen, press the Zoom button.
© The photo doubles in size each time you press the button until it is 4x normal size.
Thenit will return to normal size.
© While the photo is in enlarged, use the Arrow buttons to move the photo so you can see
the portions that aren't currently visible.
11
Copy the Displayed Photo to the Built-In Memory
Use the Remote control to copy the displayed photo from the memory card to the built-in memory.
1. Press the Setup button. A setup menu opens.
2. Press the Up or Down arrow to select Copy Photo.
3. Press Enter. A confirmation message is displayed.
4. Press Exit to close the menu.
Delete the Displayed Photo
Use the Remote control to a photo from the built-in memory.
1. Press the Setup button. Asetup menu opens.
2. Press the Up or Down arrow to select Delete Photo.
3. Press Enter. A confirmation message is displayed.
Caution: The photo will be deleted immediately; you will not be able to change your mind.
4, Press Exit to close the menu.
Adjust the LCD Color
Choose this option to adjust the Brightness, Contrast, Tint, and Color of the display.
1. Press the Setup button. A setup menu opens.
2. Press the Up or Down arrow to select Adjust LCD Color.
3. Press Enter. A second menu opens.
4. Use the Arrow buttons to select an option to adjust.
5. Use the Right and Left arrows to adjust the option. The display changes.
6. Use the Arrow buttons to select another option to adjust.
7. When the display looks the way you want it to, press Exit to close the menu.
Add Music to the Slide Show
To play background music with a slideshow, copy audio files onto the same memory card as your
photos. The music will play as the slide show runs.
You can also choose a music file to play without a Slideshow. Just select it from the Music screen.
Note: Music files must be standard MP3 format and not from licensed music download services.
12
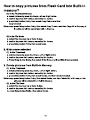
How to copy pictures from Flash Card into Built-in
memory?
(1) In the Thumbnail Screen
a. select pictures by press Up.Down.Left and Right button.
b. confirm by press Vol+ button; cancel by Vol- button.
c. press Setup button firstly, then select Copy Picture and then
copy selected.
Other way: press Setup button firstly, then select Copy Picture, and then Copy All, in this way, all
the pictures will be copied into built-in Memory.
(2) In the File Mode
a. select files by press Up or Down button.
b. confirm by press Vol+ button; cancel by Vol- button.
c. press Setup button firstly, then select Copy.
2. Slide show selected
(1) Inthe Thumbnail
a. select pictures by press Up, Down, Left or Right button
b. confirm by press Vol+ button; cancel by Vol- button.
c. Press Setup button firstly, then select Slide Show, and then Slide Show selected.
3. Delete pictures from Built-in Memory
(1) Inthe Thumbnail
a. select pictures by press Up, Down, Left or Right button.
b. confirm by press Vol+ button; cancel by Vol- button.
c. press Setup button firstly, then select Delete, and then Delete Selected.
Other way: press Setup button firstly, then select Delete, and then Delete All, in this way, all the
pictures will be deleted from Built-in Memory.
(2) Inthe File Mode
a. select files by press Up or Down button.
b. confirm by press Vol+ button; cancel by Vol- button.
C. press Setup button firstly , then select Delete.
13
Listening to Music
If there are Music files on a memory card or in the built-in memory, you can play them on the Digital
Picture Frame.
1.
2.
3.
4.
Use the Remote Control to open the Select Mode screen (described above) and select
Music. Anew screen opens listing all of the music files on the selected card.
Use the left and right arrows to choose a file.
Press the Enter button to play the file.
To stop the music and return to the Music screen, press the Exit button.
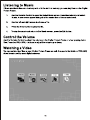
Control the Volume
Use the Remote Control to adjust the volume on the Digital Picture Frame or when playing Audio
files.Press the VOL+/VOL - buttons to adjust the volume up or down.
Watching a Video
You can watch video files on your Digital Picture Frame as well. It supports the Motion JPEG (AVI)
video format used by most digital cameras.
Select Mode
14
To watch a video, there need to be video files on the memory card.
1.
Insert a memory card with video files on it. The Card Selection Screen opens. Choose the
desired card.
Press Enter. The Mode Selection screen opens.
Use the Arrow keys to choose Video and press Enter. À screen listing all of the video files
opens.
Use the Arrow buttons to choose the desired file and press Enter. The Digital Picture
Frame plays the video.
Adjust the volume by using VOL+/VOL buttons on the Remote Control.
Press direction buttons 4 vd) to select a different video file.
Setting Clock and Calendar
The digital photo frame supports the functions of clock and calendar. Entering Clock mode and
select Set up, you will see the options: Set Current Time.
Notice: please press Left/Right key to choose the hh-mm-MM-DD-YY, and press Up/Down key to
modify the number of time , and press Enter to save the time.
Setting Viewing Options
You can control all of the viewing options in the Setup Menu using the buttons on the bottom of the
frame or the remote control. You can display the on-screen Setup Menu any time the Digital Picture
Frame is not displaying Photos or Videos, by pressing the Setup button.
1.
To show the Setup menu during a photo or video, press the Exit button, then the
Setup button.
With the Setup menu open, use the Up and Down arrows to choose a display option.
Press Enter to select the option. A second menu opens, listing the available settings.
A white square shows the current setting.
Use the Up and Down arrows to choose the desired setting.
Press Enter to select the setting. The second menucloses.
You can make as many changes as you wish in the same manner. When you are finished,
press the Exit button to close the Settings Menu and return to the Thumbnails screen.
The following table lists the display options in the Setup Menu, their options, anda
description of their actions.
15
Display Option
Settings Description
Display Image Size
The Digital Picture Frame can optimize your
Original/Optimal photos to display on the screen.
Normal
Random
Fad Special effects shown to transition from
Slide Show Transition ade one photo to the next in a Slide Show.
Curtain
Open_Door
Cross_Comb
Fast
| Determines how quicklIy the next photo is
Slide Show Speed Medium displayed.
Slow
. The selected music file will repeat
Slide Show Music On/Off continuously, or play once.
Slide Show Shuffle On/Off Displays photos randomly.
Video Playback Repeat
Repeat Single
Choose to repeat a single video playback,
Repeat All all videos, or none.
No Repeat
Repeat Single
Choose to repeata single audio file, all
Audio Playback Repeat! Repeat All audio files, or none.
No Repeat
2 Hours
Power Saving 4 Hours The Digital Photo Frame will turn itselfoff
8 Hours after the specified amount of time.
No Power Saving
Factory Default
Immediately returns all settings to the
factory defaults. There is no warning
message.
Copy File
This allows a file to be copied from a memory card into the internal
flash memory.
Delete File
This allows an image to be deleted from the internal flash memory.
Rotate
This allows a file to be rotated 90 degrees clock-wise
Zoom
This allows you to zoom into a picture.
Brightness/ Contrast
This function allows you to adjust the brightness of the screen and
adjust the contrast
Color/ Tint
This function allows you to adjust the color and adjust the tint
Set Current Time
Clock & Calendar setting
Delete Build in Memeory
Delete all files from internal memory
16
Frequently Asked Questions
Q: How dol set up my Digital Picture Frame?
A:
> ©
70 ZO
It is very simple to get your Digital Picture Frame out of the box and running in just a few minutes.
Just plug the power adapter into the Digital Picture Frame and into a standard Wall Socket.
Insert a memory card into the appropriate card slot on the side of the Digital Picture Frame, and
turniton. Your first slide show will automatically start to play.
What memory cards can the Digital Picture Frame Read?
Compatible memory cards include Secure Digital™, MultiMedia Card™, Compact Flash™,
Memory Stick™, MemoryStick Pro™, Memory Stick Duo™, Memory Stick Pro Duo™, and xD card.
| set up the Digital Picture Frame; why won't it turn on?
The Adapter is not securely connected to the Picture Frame or the Power Switch is not on.
| have a memory card in the Digital Picture Frame; why can't | view my photos?
First, make sure that thememory card is one of the formats listed above and that the files on the
card are JPEG images files. Second, turn the Digital Picture Frame Off and make sure that the
memory card is inserted all the way into the card slot and is facing the correction. Third, turn
the Frame On. After a couple of seconds, you should see your first photo. Press Exit to open the
Card Selection screen and select the card. Then select Photos. You should see the Thumbnails
screen listing all photos on the card. If you don't, you may want to try another card.
Note: Some digital cameras save images in other formats. Please refer to your camera's manual if
Q:
A:
> ©
70 ZO
your photos are not JPEG files.
Why is the picture display slower with some pictures and faster with others?
Higher resolution pictures load more slowly. Try using lower resolution pictures or down
sampling your images. See your camera's operating manual for details on downsampling your
photos.
Can | insert multiple memory cards?
Yes. Turn on the unit before inserting any card. The Card Selection Screen lets you choose
between all available memory cards.
Does the Dgital Picture Frame have built-in memory?
Yes. It has built-in of memory. The volume depends on your model.
Does the Digital Picture Frame support all JPEG and Motion JPEG files?
No, it supports JEPG and Motion JPEG files taken from a digital camera. The Digital Picture
Frame may notread all images or video files downloaded from the Internet or from other
software graphic applciations. Some video formats downloaded from the Internet are not
supported either.
17
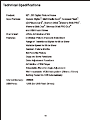
Technical Specifications
Product:
Input Formats:
File Format:
Features:
Internal Memory:
USB Ports:
32" LCD Digital Picture Frame
Secure Digital”, Multi Media Card”, Compact Flash”,
xD-Picture Card”, Memory Stick “Memory Stick PRO”,
Memory Stick Duo, Memory Stick PRO Duo”
and USB Flash Drives
JPEG, AVI Motion JPEG
Individual Picture View and Slide Show
Range of Transitional Styles for Slide Show
Variable Speed for Slide Show
Random Picture Shuffle
Set Favorite Picture
Copy and Save Functions
Color Adjustment Functions
AVI Motion JPEG Player
Extendable Stand for Angle Adjustment
Wall-mountable VESA hole pattern (75mm x 75mm)
Setting Power On/ Off Automatically
256MB
USB (for USB Flash Drives)
18
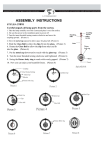
Assembly Instructions for
LP6532 Wall Mount
Safety Warning: If you do not understand these directions,
or have any doubts about the safety of the installation,please
call a qualified contractor.We can quickly assist you with
installation questions and address any missing or damaged
parts.Replacement parts for it products purchased through
authorized dealers will be shipped directly to you.Check
carefully to make sure there are no missing or defective parts,
refer to the sheet labeled "Installation Manual” to cofirm the
parts. Never use defective parts.Improper installation may
cause damage or serious injury.Do not use this product for
any purpose that is not explicitly specified. It will not be liable
for damage or injury caused by incorrect mounting,incorrect
assembly,or incorrect use.
Note: The supplied wall mounting hardware is not for steel
stud walls or old cinder block walls. If you are uncertain about
the nature of your wall, consult an installation contractor.
It makes every effort to assure all necessary frame
mounting hardware is included. If the hardware you need is not
included please consult your local hardware store or call us.
19
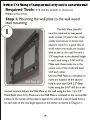
Notice: The fixing of hang on wall only suit to concrete wall
Required Tools: 3/16 drill bit, wrench or socket set,
Phillips screw driver
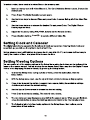
Step |: Mounting the wall plate to the wall wood
stud mounting:
ON The Wall Plate (item#1)
must be mounted to two wood
studs at least 12" apart. Use a high
quality stud sensor to locate two
adjacent studs. It is a good idea to
verify where the studs are located
with an awl or thin nail. Pre-drill a
2.5" deep hole at the desired height
in each stud using a 3/16" drill bit.
Make sure these holes are in the
center area of the studs and level
with each other.
Use the Wall Plate as a template to
mark the location of the second
Aa 5) hole in each stud. Drill 2.5" deep
holes using the 3/16" drill bit in the
marked location. Attach the Wall Plate to the wall using the four 1/4 x 2.5”
Metal Bolts (item #1 |). Make sure the Wall Plate is oriented so the vertical flat
surface in the center of the plate is against the wall and a set of metal bolts is
LO
on each side of the two large squares in the center as shown in Diagram |.
20
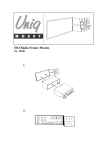
Step 2: Attaching the Brackets to the Frame
WARNING: Lay a clean fabric sheet on a flat
surface and carefully place the frame face down
on it or carefully lean it up against a wall or
other solid surface!
The frame brackets (item#2) should be aligned vertically with
the holes on the back of the frame similar to the diagram. To
fasten the brackets to the frame install the hardware in the
following order starting with the back of the frame: metal
washer (item #8), bracket (#2), nylon washer (#10), metal
washer (#7), finally the metal screw (#5 or #6). See detailed
diagram 2 for assistance. Proceed to tighten the screws firmly.
Bracket (#2)
Metal
screw (#5)
Metal
| washer (#7)
Nylon
y washer (410)
Metal
washer (#8)
a Te
ete aL
21
Step 3: Hang the Frame onto the Wall Plate:
(strongly recommend two people for this step)
First hook the Frame Brackets (Item #2 attached to
the back of the frame) over the top of the Wall Plate
(previously attached to wall), then let the bottom of
the Frame Brackets rotate in under the bottom of
the Wall Plate. Once the Frame is in place, insert the
Safety Screws (ltem#3) as shown in Diagram 3.
Safety
Bottom Y ess
Wall-mount installation is now completed. Please plug the
power cord into the digital picture frame and enjoy your
beautiful pictures!
22
A15-0352-111 Made In China