1
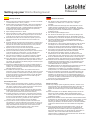
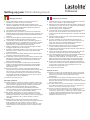
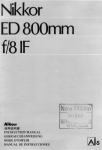
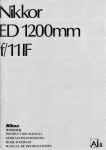
Setting up your HiLite Background
1
2
3
Setting up the HiLite
1. Remove the HiLite from the carry case and check the
contents. There should be 1 x HiLite and 4 x Rods.
2. Hold the two outer rims of the HiLite and allow the
centre rim to unfold. WARNING - The HiLite is quite
strong and can ‘pop’ out suddenly. Take care with
people and furniture in close proximity.
3. Allow the HiLite to completely unfold.
4
5
6
4. Lay the HiLite on the floor and position one end of the
rod on the corner of the lower steel rim. Ensure the
steel rim locates into the jaws of the tip at the end of
the rod.
5. Pull the two steel rims away from each other and locate
the jaws of the tip at the other end of the rod into the
upper rim.
6. If you wish you can secure the rod in place by tying
one end of the rod to the black cords located on each
corner of the HiLite. Use these cords as guidance on
where to position the rods.
7
8
9
7. Repeat steps 4-6 for the remaining three corners,
closing any open zips as you work your way round..
8. Stand the HiLite upright (portrait) with the velcro edge
on the white side at the bottom and running up the right
hand side (as you look at the HiLite).
9. Open one of the side zips and insert the head of your
flash unit. Close the zips around the flash head.
10
11
12
10. Alternatively, leave the zips closed and position the
flash head on the outside for a more diffused light. (you
may need to flag off the light to prevent flare).
11. Position the flash head centrally at the side of the
HiLite and point it towards the back panel for an even
illumination. You can experiment with different positions
for different lighting effects.
13
14
15
12. If you purchased the Superwhite vinyl train, attach the
velcro at the base of the HiLite to the velcro on the
train. The Hilite can also be rotated 90 degrees so it
sits on its long edge creating a landscape background.
In this case attach the velcro on the longer edge of the
Superwhite vinyl.
13. The HiLite is ready to use.
Breaking down the HiLite
14. Remove the vinyl train (if attached), roll it up and return
it to the protective tube. Open all zips to allow the air to
escape. Lay down the HiLite and release the jaws on
the tips of each rod from the two steel rims.
16
17
15. If you chose to secure the tips with the cords, the rods
can be left attached to the HiLite (When folding make
sure these are not trapped between the two outer
rims).
16. To Fold, stand at one corner and grip the two outer
rims as far down each edge as you can so the HiLite
forms a diamond shape in front of you. Whilst still
holding the rims firmly, lift your hands and bring them
together in a similar motion to closing a book. The
HiLite will form a ‘crisp’ shape.
17. As your hands get closer together the opposite corner
to where you are standing will start to curl under
towards your feet. As you continue the motion of
closing a book pass one hand over the other. The
HiLite will automatically fold to form three circles. Bring
the three circular shapes together expelling any
trapped air and return the HiLite to the carry case.
Setting up your HiLite Background
Montaje del HiLite
1. Retirar el HiLite de la maleta de transporte y controlar el contenido.
La maleta debe incluir 1 HiLite y 4 barras.
2. Sujetar ambos aros externos del HiLite y dejar que se despliegue
el aro central. ADVERTENCIA - El HiLite se encuentra bajo una
tensión relativamente fuerte y puede desplegarse repentinamente.
Es absolutamente necesario prestar atención a las personas y
muebles que se encuentren las cercanías.
3. Dejar desplegar totalmente el HiLite.
4. Colocar el HiLite en el suelo y pasar un extremo de la barra por la
esquina del aro de acero inferior. Asegurarse que el aro de acero
se encaje en los ganchos de la punta del extremo de la barra.
5. Estirar ambos aros de acero en la dirección opuesta y llevar los
ganchos de la punta del otro extremo de la barra hasta el aro
superior.
6. Se puede asegurar la posición de la barra fijando un extremo de la
barra con las cintas negras que se encuentran en las respectivas
esquinas del HiLite. Estas cintas además sirven como punto de
referencia para la posición correcta de las barras.
7. Repetir los pasos 4-6 para las otras tres esquinas. Durante el
montaje cerrar todos los cierres de cremallera abiertos.
8. Colocar el HiLite derecho (retrato) de forma que el cierre de velcro
se encuentre abajo en el lado blanco y que se extienda hacia
arriba por el lado derecho (cuando se mira para el HiLite).
9. Abrir una de las cremalleras a un costado e introducir el cabezal
del flash. Cerrar la cremallera alrededor del cabezal del flash.
10. Como alternativa las cremalleras pueden permanecer cerradas y el
cabezal del flash se puede posicionar fuera para obtener una luz
más difusa. (Eventualmente se deberá proteger la iluminación para
evitar spots de reflexiones.)
11. Posicionar el cabezal del flash en el centro al costado del HiLite y
dirigirlo hacia el campo trasero para garantizar una iluminación
uniforme. Se recomienda probar diversas posiciones para obtener
diferentes efectos luminosos.
12. Si el faldón de vinilo súper blanco se encuentra dentro de los
accesorios, fijar la cinta de velcro en la base del HiLite con la cinta
de velcro del faldón. El HiLite también se puede girar a 90 grados
de forma que asiente a lo largo para obtener un fondo de paisaje.
En este caso fijar la cinta de velcro en el canto más largo del
faldón de vinilo súper blanco.
13. Ahora el HiLite está listo para ser utilizado.
Desmontaje del HiLite
14. Retirar el fondo de vinilo (dado el caso), enrollarlo y colocarlo en
el tubo de protección. Abrir todas las cremalleras para que pueda
salir el aire. Acostar el HiLite y soltar los ganchos en cada una de
las puntas de las barras de ambos aros de acero.
15. En tanto que las puntas se hayan fijado con las cintas las barras
pueden permanecer en el HiLite. (Al plegar prestar atención que
no se queden aprisionadas entre los dos aros externos.)
16. Al plegar colocarse en una esquina y coger ambos aros externos
lo más abajo posible de los cantos, de manera que el HiLite tome
la forma un romboide delante de usted. Continuar sujetando bien
los aros, levantar las manos y juntarlas tal como si estuviera
cerrando un libro. El HiLite tendrá una forma "enrollada".
17. Al juntar más las manos la esquina opuesta se enrollará a sus
pies. Mientras se continua realizando el movimiento tal como si se
cerrara un libro, colocar una mano encima de la otra. El HiLite se
pliega automáticamente formando tres círculos. Doblar las tres
formas circulares y al hacerlo extraer el aire. Luego colocar
nuevamente el HiLite en la maleta de transporte.
Montieren des HiLite
1. Den HiLite aus dem Transportkoffer nehmen und den Inhalt
kontrollieren. Der Koffer muss 1 x HiLite und 4 x Stangen
enthalten.
2. Die beiden äußeren Einfassungen des HiLite festhalten und die
mittlere Einfassung aufklappen lassen. WARNUNG - Der HiLite
steht unter relativ starker Spannung und kann plötzlich aufklappen.
Unbedingt auf Personen und Möbelstücke in unmittelbarer
Umgebung achten.
3. Den HiLite komplett aufklappen lassen.
4. Den HiLite auf den Boden legen und ein Ende der Stange in die
Ecke der unteren Stahleinfassung führen. Sicherstellen, dass die
Stahleinfassung in die Klauen der Spitze am Ende der Stange greift.
5. Die beiden Stahleinfassungen in entgegengesetzte Richtung
ziehen und die Klauen der Spitze am anderen Ende der Stange in
die obere Einfassung führen.
6. Die Stange kann in ihrer Position gesichert werden, indem ein Ende
der Stange mit den schwarzen Bändern befestigt wird, die sich
jeweils in den Ecken des HiLite befinden. Diese Bänder dienen
außerdem als Anhaltspunkt für die korrekte Position der Stangen.
7. Die Schritte 4-6 für die anderen drei Ecken wiederholen. Während
der Montage alle geöffneten Reißverschlüsse schließen.
8. Den HiLite aufrecht hinstellen (Portrait), so dass sich der
Klettverschluss an der weißen Seite unten befindet und an der
rechten Seite nach oben verläuft (wenn man auf den HiLite schaut).
9. Einen der Reißverschlüsse an der Seite öffnen und den Kopf des
Blitzgeräts einführen. Den Reißverschluss um den Blitzkopf schließen.
10. Alternativ können die Reißverschlüsse geschlossen bleiben und
der Blitzkopf außen positioniert werden, um ein diffuseres Licht zu
erhalten. (Eventuell muss die Beleuchtung abgeschirmt werden,
um Reflexionsflecken zu vermeiden.)
11. Den Blitzkopf mittig an der Seite des HiLite positionieren und auf das
hintere Feld richten, um eine gleichmäßige Beleuchtung zu
gewährleisten. Es empfiehlt sich, verschiedene Positionen
auszuprobieren, um unterschiedliche Beleuchtungseffekte zu erhalten.
12. Wenn die Superwhite Vinyl-Schleppe zur Ausstattung gehört, das
Klettband an der Basis des HiLite am Klettband an der Schleppe
befestigen. Der HiLite kann auch um 90 Grad gedreht werden, so
dass er auf der langen Kante ruht, um einen Landschaftshintergrund
zu erhalten. In diesem Fall das Klettband an der längeren Kante der
Superwhite Vinyl-Schleppe befestigen.
13. Der HiLite ist jetzt einsatzbereit.
Zerlegen des HiLite
14. Die Vinyl-Schleppe (sofern angebracht) entfernen, aufrollen und in
die Schutzrolle führen. Alle Reißverschlüsse öffnen, damit die Luft
entweichen kann. Den HiLite hinlegen und die Klausen an den
Spitzen der einzelnen Stangen von den beiden Stahleinfassungen
lösen.
15. Sofern die Spitzen mit den Bändern befestigt wurden, können die
Stangen am HiLite verbleiben. (Beim Zusammenfalten darauf
achten, dass sie nicht zwischen den beiden äußeren Einfassungen
eingeklemmt werden.)
16. Beim Zusammenfalten auf einer Ecke stehen und die beiden äußeren
Einfassungen so weit wie möglich unter den Kanten anfassen, so dass
der HiLite vor Ihnen eine Rautenform annimmt. Die Einfassungen
weiterhin gut festhalten, die Hände anheben und wie beim Schließen
eines Buchs zusammenführen. Der HiLite bildet eine "aufgerollte"
Form.
17. Wenn die Hände weiter zusammengeführt werden, rollt sich die
gegenüberliegende Ecke zu Ihren Füßen hin auf. Während die
Bewegung wie beim Schließen eines Buchs fortgesetzt wird, eine
Hand über die andere führen. Der HiLite faltet sich automatisch so
zusammen, dass er drei Kreise bildet. Die drei Kreisformen
zusammenlegen und dabei die Luft herausdrücken. Den HiLite dann
wieder in den Transportkoffer legen.
Setting up your HiLite Background
Montaggio dell'HiLite
1. Estrarre l'HiLite dalla custodia e controllare il contenuto. La
custodia deve contenere 1 HiLite e 4 bacchette.
2. Afferrare i bordi esterni dell'HiLite facendo srotolare il bordo
centrale. ATTENZIONE - L'HiLite è sotto pressione e può srotolarsi
improvvisamente. Fare assolutamente attenzione a persone e
mobili nelle immediate vicinanze.
3. Far srotolare completamente l'HiLite.
4. Appoggiare l'HiLite sul pavimento e inserire una estremità della
bacchetta nell'angolo del bordo metallico più basso. Assicurarsi che
il bordo metallico venga collocato nell'incastro dell'estremità della
bacchetta.
5. Tirare i due bordi metallici in direzione opposta e infilare l'incastro
dell'altra estremità della bacchetta nel bordo superiore.
6. La bacchetta può essere fissata nella sua posizione legando un
lato della bacchetta con le cordicelle nere che si trovano nei relativi
angoli dell'HiLite. Queste cordicelle servono inoltre da punto di
riferimento per la corretta posizione delle bacchette.
7. Ripetere i passaggi da 4 a 6 per i rimanenti tre angoli. Durante il
montaggio chiudere tutte le cerniere lampo.
8. Piazzare in piedi l'HiLite (ritratto) in modo che la chiusura velcro del
lato bianco si trovi in basso e scorra verso l'alto nel lato destro
(guardando l'HiLite).
9. Aprire una delle cerniere lampo laterali e infilarvi la testa del flash.
Chiudere la cerniera lampo attorno al flash
10. In alternativa le cerniere lampo possono rimanere chiuse e la testa
del flash può essere posizionata all'esterno per ottenere una luce
più diffusa (eventualmente la luce dovrà essere schermata per
evitare macchie da riflessi).
11. Posizionare la testa del flash centralmente sul lato dell'HiLite e
dirigerla sul pannello posteriore per garantire una illuminazione
uniforme. Si consiglia di provare diverse posizioni per ottenere
diversi effetti di luce.
12. Se avete acquistato lo strascico vinilico Superwhite fissate la
chiusura velcro che si trova alla base dell'HiLite alla chiusura velcro
sullo strascico. L'HiLite può essere girato anche di 90 gradi in
modo che appoggi sul lato lungo e si possa ottenere uno sfondo
per paesaggi. In questo caso fissare la chiusura velcro al lato più
lungo dello strascico vinilico Superwhite.
13. L'HiLite è ora pronto per l'uso.
Smontaggio dell'HiLite
14. Togliere lo strascico vinilico (se montato), arrotolarlo e infilarlo nel
tubo di protezione. Aprire tutte le cerniere lampo in modo che l'aria
possa fuoriuscire. Appoggiare l'HiLite e allentare gli incastri alle
estremità delle singole bacchette dei due bordi metallici.
15. Se le punte con le cordicelle sono state fissate le bacchette
possono rimanere con l'HiLite. (Nel ripiegare fare attenzione che
non vengano incastrate fra i due bordi metallici esterni.)
16. Nel ripiegare, posizionarsi in un angolo e afferrare i due bordi
esterni il più sotto possibile in modo che l'HiLite formi un rombo.
Continuare a tenere fermi i bordi, sollevare le mani e ricongiungerle
come se si chiudesse un libro. L'HiLite prenderà una forma
"arrotolata".
17. Mentre tenete le mani ancora congiunte l'angolo opposto si
arrotolerà ai vostri piedi. Mentre continuate il movimento a chiusura
di libro, passare una mano sull'altra. L'HiLite si piegherà
automaticamente in modo da formare tre cerchi. Unire i tre cerchi
facendo fuoriuscire l'aria. Riponete poi l'HiLite nuovamente nella
custodia.
Installer votre fond HiLite
1. Sortez le HiLite de son sac de transport et vérifier les composants.
Il doit y avoir un HiLite et 4 tiges d'assemblage.
2. Maintenez les deux extrémités du HiLite et laissez le HiLite s'ouvrir
seul. Attention : le HiLite peut s'ouvrir rapidement. Faites attention
aux personnes et objets placés à proximité.
3. Laissez le HiLite s'ouvrir complètement.
4. Posez le HiLite au sol et positionnez l'extrémité d'une des tiges au
niveau du coin bas de l'anneau en acier. Assurez vous que
l'anneau soit bien fixé dans la fente prévue à cet effet à l'extrémité
de la tige.
5. Séparez les deux anneaux en acier et fixez l'autre extrémité de la
tige dans l'anneau supérieur.
6. Si vous le souhaitez, vous pouvez sécuriser les tiges en les
attachants aux cordons noirs prévus à cet effet à chaque coin du
HiLite. Ces cordons vous servent également de repère pour
positionner correctement les tiges d'assemblage.
7. Recommencez les étapes 4 à 6 pour les trois coins restants, en
ouvrant et fermant les fermetures éclair si nécessaire.
8. Positionnez le HiLite (format portrait) à l'aide des velcro situés sur
la partie blanche, et basse.
9. Ouvrez une des fermetures éclair et insérez la tête de votre flash.
Fermez les fermetures éclair autour de la tête d'éclairage.
10. Vous pouvez également positionner votre éclairage à l'extérieur du
HiLite, vous obtiendrez ainsi un éclairage plus diffus
Positionnez la tête d'éclairage sur le côté du HiLite, au milieu, et
faites le pointer vers le panneau arrière. Vous pouvez essayer
différentes positions afin d'obtenir différents effets d'éclairages.
11. Si vous avez acheté le rouleau vinyle Superwhite, attachez les 2
parties velcro ensemble. Le HiLite peut également être positionné
sur sa longueur, créant ainsi un fond paysage. Dans ce cas,
repositionnez le Superwhite vinyle.
12. Le HiLite est prêt à l'emploi.
Démonter le HiLite
13. Enlevez le rouleau vinyle (s'il était attaché), roulez le et rangez le
dans son tube protecteur. Ouvrez toutes les fermetures éclair afin
d'évacuer l'air. Couchez le HiLite et démontez les tiges
d'assemblage.
14. Si vous aviez choisi de sécuriser les tiges avec les cordons, vous
pouvez laisser les tiges attachées aux cordons (lorsque vous
plierez le HiLite, assurez vous que les tiges ne soient pas coincées
entre les deux anneaux).
15. Pour plier, placez vous à un coin et prenez le carré ainsi formé par
deux côtés avec l'angle droit au milieu. Pliez le en ramenant les
coins l'un vers l'autre, comme pour plier un livre.
16. Comme vos mains se rapprochent, le coin opposé de là ou vous
vous trouvez commencera à se plier vers vos pieds. Tout en
continuant à " fermer un livre ", passer une main par-dessus l'autre.
Le HiLite se pliera automatiquement en formant trois cercles.
Superposez les trois cercles en enlevant l'air à l'intérieur et
remettez le HiLite dans son sac.