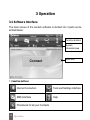
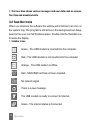
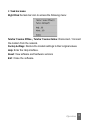
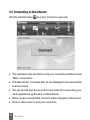
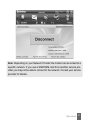
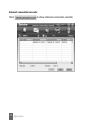
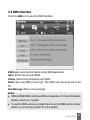
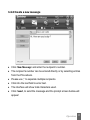
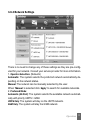
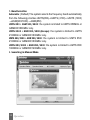
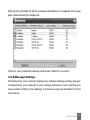
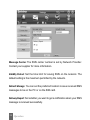
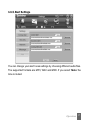
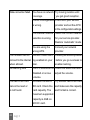
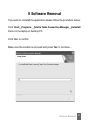
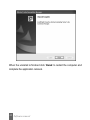
1
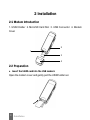
Contents
1 Introduction ............................................................................................... 3
1.1 Introduction .................................................................................. 3
1.2 Warnings and Safety Notice ........................................................ 3
1.3 Radiation from Electronic Devices .............................................. 5
1.4 System requirements .................................................................. 5
1.5 Functions ..................................................................................... 6
1.6 Technical Specifications .............................................................. 6
1.7 LED indications ........................................................................... 7
2 Installation ................................................................................................ 8
2.1 Modem Introduction .................................................................... 8
2.2 Preparation ................................................................................. 8
2.3 Plug and Play Software Installation ........................................... 10
2.4 Quick Connect ........................................................................... 14
2.5 Safe Removal of Hardware ...................................................... 15
3 Operation ................................................................................................. 16
3.1 Software Interface ..................................................................... 16
3.2 Task Bar Icons ........................................................................... 18
3.3 Connecting to the Internet ......................................................... 20
3.4 SMS Interface ........................................................................... 23
3.4.1 Read Incoming Messages ................................................. 24
3.4.2 Create a new message ..................................................... 25
3.4.3 SMS General Features ..................................................... 27
3.5 PhoneBook ............................................................................... 28
3.6 Settings ..................................................................................... 30
Contents
1
3.6.1 Connection Settings .......................................................... 30
3.6.2 Security Settings ............................................................... 32
3.6.3 Network Settings ............................................................... 33
3.6.4 Message Settings ............................................................. 35
3.6.5 Alert Settings ..................................................................... 37
3.7 MicroSD card ............................................................................ 38
3.8 Help ........................................................................................... 38
4 FAQ’s ........................................................................................................ 39
5 Software Removal ................................................................................... 41
Package Contents:
1 x USB Modem, 1 x USB Extender lead, 1 x User Guide, 1 x
Quick Start Guide, 1 x warranty card.
Important Note:
After the computer wakes up from hibernation mode please
remove and insert the modem to resume using the device.
2
Contents
1 Introduction
1.1 Introduction
Thank you for choosing the Telstra Turbo 7 Series HSPA modem. Please
read this manual carefully and keep it for future reference. The pictures,
symbols and contents in this manual are for reference only. They are correct at the time of printing but they might not be completely identical with
your modem. We operate a policy of continuous development. We reserve the right to update the technical specifications in this document at
any time without prior notice.
The HSPA USB modem is a multi-mode 3G high speed modem suitable
for GSM, GPRS, WCDMA, EDGE, HSDPA, and HSUPA networks. It
uses the USB standard interface for easy connection to any laptop or desktop PC. Compatible with GSM and 3G mobile networks it can connect to
wireless data and SMS services to give you high speed data access wherever you are.
1.2 Warnings and Safety Notice
Some electronic devices are susceptible to electromagnetic interference.
The modem is a transmitting device and may cause interference to
sensitive electronic equipment such as audio systems, vehicle systems
and medical equipment. Please consult the manufacturer of the other
device before using the modem.
Operating of laptop or desktop PCs with the modem may interfere
with medical devices like hearing aids and pacemakers. Please keep
Introduction
3
4
the modem more than 20 centimetres away from such medical devices.
Turn the modem off if necessary. Consult a physician or the manufacturer
of the medical device before using the modem near such devices.
Be aware of the regulations when using the modem at places such as
oil warehouses or chemical factories, where there are explosive gases
or explosive products being processed. Turn off your modem as
instructed.
Don’t touch the antenna area unnecessarily whilst connected. This can
affect your modem performance and reduce the signal quality.
Store the modem out of the reach of children. The modem may cause
injury or get damaged.
The modem contains sensitive electronic circuitry. Do not expose the
modem to any liquids, high temperatures or shock.
Only use original accessories or accessories that are authorized by
the manufacturer. Using unauthorized accessories may affect your
modem’s performance, damage your modem and violate related
national regulations.
Avoid using the modem in areas that emit electromagnetic waves or in
enclosed metallic structures eg lifts.
The modem is not waterproof. Please keep it dry and store it in a cool,
dry place.
Don’t use the modem immediately after a sudden temperature change
eg from an air conditioned environment to high temperature and humidity
outside. In such cases there could be condensing moisture inside the
modem which can cause internal damage. Unplug the modem and
leave it for 30 minutes before use.
Introduction
Always handle the modem with care. Be careful not to drop or bend
the modem.
There are no user serviceable parts inside the modem. Unauthorised
dismantling or repair of the modem will void the warranty.
1.3 Radiation from Electronic Devices
The USB Wireless modem is a transmitting device with similar output power
to a mobile phone. It uses an internal antenna to connect to the mobile
network. To get the best performance from your device do not cover or
shield the device in any way as this will lead to increased output power.
Always leave a clear space around the device to allow the transmit and
receive signals to propagate. It is not intended to be used as a handheld or
body worn device but the SAR tests have been completed and exceed the
Australian regulatory requirements.
1.4 System requirements
The HSPA Modem supports any PC or MAC system using the USB 2.0
interface and operating systems listed below:
Operating System: Windows 2000 / XP / Vista, and MAC OS X 10.5 and
above
Configuration (Recommended):
CPU
1GHz Pentium or above
Hard Disk 20GB or above
RAM
512M or above
The performance of the modem may be reduced if the configuration is
below the recommended requirement.
Introduction
5
1.5 Functions
This HSPA modem is peak rated at 7.2Mbps* downstream and 2Mbps*
upstream in HSUPA mode. It supports SMS Messages over the cellular
system, applied management, data concurrence, and MicroSD memory
cards.
* Actual speeds will be less. Speeds may vary due to congestion, distance
from the cell, local conditions, hardware, software and other factors.
1.6 Technical Specifications
Networks
Frequency Bands
Dimensions
Weight
Data Rate
6
Introduction
HSUPA/HSDPA/UMTS/GSM/GPRS/EDGE
HSUPA/HSDPA/UMTS 2100 MHz:
HSUPA/HSDPA/UMTS 1900 MHz:
HSUPA/HSDPA/UMTS 850 MHz:
GSM/GPRS/EDGE 850 MHz
GSM/GPRS/EDGE 900 MHz
GSM/GPRS/EDGE 1800 MHz
GSM/GPRS/EDGE 1900 MHz
69mm x 26.5mm x 12mm
Approx. 40g
HSUPA Mode up to 2Mbps
HSDPA Mode up to 7.2Mbps
UMTS Mode up to 384 Kbps
EDGE Mode up to 236.8Kbps
GPRS Mode up to 57.6Kbps
Working Voltage
Current Consumption
Max Emitted Power
External interface
Operating systems
Functions
MicroSD HC memory card
Temperature range
5V
Resting: 100mA rms
Max: 450mA rms
In 3G WCDMA Mode: 250mW
In 2G GSM/GPRS Mode: 2W
USB 2.0
Windows 2000, XP SP2, Vista
Apple MAC OS X 10.5 and above
High speed wireless data, internet, applied
management, supports MicroSD card, SMS
application on PC systems.
Up to 4GB memory capacity on Micro SD
HC card. 2GB on Micro SD
-5ºC ~ +45ºC
1.7 LED indications
The USB modem has a multi colour LED indicator to show the status of
the modem:
LED indication
Green solid
Green blinking
Blue solid
Blue blinking
Red solid
Red blinking
USB modem working status
Not registered on the 3G network
Active data transfer on the 2G network
Registered on the 3G network
Active data transfer on the 3G network
Roaming status
Active data transfer in roaming status
Introduction
7
2 Installation
2.1 Modem Introduction
1. USIM Holder 2. MicroSD Card Slot 3. USB Connector 4. Modem
Cover
2
1
3
4
2.2 Preparation
Insert the USIM card into the USB modem:
Open the modem cover and gently pull the USIM holder out.
8
Installation
Insert the USIM card into the slider making sure the gold contacts are
facing down and the bevelled edge is on the left hand side. Carefully close
the slider so it clicks into place.
Your USIM card should support data services otherwise contact your service provider for more information.
Insert a memory card if required
If you want to add some memory capacity you can install a MicroSD card
into your USB Modem. Note: MicroSD HC cards up to 4GB can be used.
Open the MicroSD slot on the side of the modem. Carefully insert the card
into the slot. Make sure the card is aligned as shown below:
Close the card slot cover.
Connect the USB modem to your PC:
The computer should be switched on and fully booted up.
Insert the USB modem in to the USB port.
The modem will be detected automatically.
The system will install the new hardware and display a new icon
on the system task bar.
Installation
9
After a few seconds, the installation program will start automatically or be available to start (depending on your system and configuration)
2.3 Plug and Play Software Installation
The modem features Plug and Play installation. When you first insert the
modem your system will automatically detect the new hardware and start
to install the software. Depending on your system configuration autorun
may not function:
Windows users: Double click the Autorun.exe file to start the software
installation
MAC users: Open the CD-ROM, ZTE MODEM, and double click Telstra
Turbo Connection Manager
Follow the prompts to complete the installation. MAC users will need to
reboot the system.
The installation method shown below is for Windows XP. Other systems
will follow a similar but not necessarily identical installation process:
10 Installation
Click ‘Next’ to continue:
Installation 11
Read the agreement carefully. If you agree, choose ‘I accept the terms of
the license agreement’, and then click ‘Next’.
Press ‘Next’ to accept the default folder location, or press ‘Change’ to define your own path.
The installation shield will install the software…
12 Installation
Please wait a few seconds for the installation to proceed and the following
screen will show:
Installation 13
Click ’Finish’ to complete the installation.
Notes:
The installation will create a new shortcut on your desktop and a new
program listing under Start-Programs.
If you have problems with the installation please contact your supplier
or see our website, www.zte.com.au/ for more assistance and FAQ’s.
2.4 Quick Connect
After installation the software interface will launch automatically.
In normal operation click:
Start Programs Telstra Turbo Connection Manager Telstra Turbo
Connection Manager or double click the shortcut icon on the desktop:
The modem will take a few minutes to initialize then the main application
window will appear.
When the message below appears your installation is complete.
Press Connect to get on line.
Launch your normal browser software (eg Internet Explorer, Netscape
etc).
14 Installation
When you have finished your internet or email connection remember
to return to the software interface* and press Disconnect to
end your session.
* If the software has been minimized then double click the small icon on
the task bar to re-open the application window.
2.5 Safe Removal of Hardware
If you need to remove your USB modem from the computer then always
use the Safe Removal of Hardware procedure. If you remove the USB
modem when it is active you can cause the software drivers to lock up or
become corrupted.
First close the software application by clicking the close button
then
click ‘OK’ to confirm.
Safely remove the modem
Eg in Windows XP, left click the icon on the windows taskbar
Click on Safely remove Hardware to shut down the drivers safely
Remove the USB modem
Safely remove the USB Storage Device
If you use a MicroSD card in the modem then the following message
may be displayed :
Select ‘Safely remove USB Mass Storage Device’
Remove the USB Modem
Installation 15
3 Operation
3.1 Software Interface
The main screen of the modem software is divided into 3 parts as described below:
Function buttons
System
infomation area
User area
1. Function buttons:
Internet Connection
Tools and Settings Interface
SMS Interface
Help
Phonebook for all your Contacts
16 Operation
2. The System Information area displays the system status:
The antenna icon indicates network signal strength from none
to the strongest.
The SMS icon indicates when there are new SMS messages.
The Red Computer icon indicates the Internet status is Not
Connected.
The Green Computer icon indicates the Internet status is
Connected.
‘P’ indicates a packet-switched connection, required for internet
access. ‘C’ is a circuit switched connection.
The Green Modem icon indicates the modem has been
inserted into the computer.
The Red Modem icon indicates the modem has not been in
serted into the computer.
The Orange Modem icon indicates the modem is inserted but
is offline, eg No USIM.
The Green SIM icon indicates the SIM/USIM card is inserted
into the modem.
The Red SIM icon indicates the SIM/USIM card is not inserted
into the modem.
The Network Description icon indicates the current network
type, i.e. EDGE, GPRS or HSPA service.
The Service Provider icon indicates the name of the current
network supplier.
Operation 17
3. The User Area shows various messages and user data such as connection time and download data.
3.2 Task Bar Icons
When you minimize the software the window will minimize to an icon on
the system tray. The program is still active in the background but disappears to free your normal Windows space. Double click the Task Bar icon
to resize the display.
1. Taskbar icons
Green - The USB modem is inserted into the computer.
Red - The USB modem is not inserted into the computer.
Orange - The USB modem is offline.
Red - SIM/USIM card has not been inserted.
No network signal.
There is a new message.
The USB modem is ready to connect to Internet.
Green - The Internet status is Connected.
18 Operation
2. Task bar menu
Right Click the task bar icon to access the following menu:
Telstra 7 Series Offline / Telstra 7 Series Online: Disconnect / Connect
the modem from the network.
Factory Settings: Restore the modem settings to their original values.
Help: Enter the Help interface.
About: View software and hardware versions
Exit: Close the software.
Operation 19
3.3 Connecting to the Internet
Click the Internet button
then click ‘Connect’ to proceed.
The card takes a few seconds to verify your connection and then shows
‘State: connected to …’.
The data amount, connected time etc are displayed in the main window
as shown below.
You can access the Internet and receive email etc by launching your
usual applications eg Browser or Mail software.
When you are connected the ‘Connect’ ‘button changes to ‘Disconnect’.
Click on ‘Disconnect’ to end your connection.
20 Operation
Note: Depending on your Network Provider the modem can be locked to a
specific network. If you use a SIM/USIM card from another service provider you may not be able to connect to the network. Consult your service
provider for details.
Operation 21
Internet connection records:
Click
22 Operation
to show Internet connection records:
3.4 SMS Interface
Click the SMS icon to use the SMS Interface:
SMS Tools: Launches the Telstra online SMS application
Inbox: Stores the received SMS.
Outbox: Stores the successfully sent SMS.
Drafts: Save any SMS not sent yet. The drafts can only be saved on the
PC.
New Message: Write a new message.
Notes:
Different SIM/USIM cards have different capacities. For more information,
please consult your supplier.
To use the SMS service you might have to set the SMS centre number.
Refer to your service provider for more details.
Operation 23
3.4.1 Read Incoming Messages
Click the ‘Inbox’ button or the SMS icon on the system information area to
read the SMS saved in the box.
You can use the buttons under the menu to Read, Reply, Forward, Move,
Delete, Save and cancel.
24 Operation
3.4.2 Create a new message
Click ‘New Message’ and enter the recipient’s number.
The recipient’s number can be entered directly or by selecting entries
from the Phonebook.
Please use ‘;’ to separate multiple recipients.
Click into the text field to enter text.
The interface will show total characters used.
Click ‘Send’, to send the message and the prompt screen bellow will
appear:
Operation 25
Select ‘Yes’ to confirm.
After the message has been sent successfully, the SMS will be saved
in the outbox. If it fails to send it will be saved in the draft box.
Send SMS while browsing the web:
You can send short messages while connected to the web if the network
supports this feature.
26 Operation
3.4.3 SMS General Features
Enter any of the Inbox / Outbox / Drafts to use the tabs at the bottom of the
window:
Read: Read the selected SMS.
Reply: Reply to the selected SMS.
Forward: Forward the SMS to other recipients.
Move: Save the SMS on the PC or USIM/SIM card.
Delete: Delete the selected SMS.
Save: Save the phone number from the message to the contacts
phonebook.
Cancel: Return to the SMS interface.
Operation 27
Notes:
If you want to select several messages, you can use the ‘Ctrl’ or ‘Shift’
keys.
New messages can not be received when the USIM/SIM card is full
(Different USIM/SIM cards have different capacities).
The system will indicate the USIM/SIM inbox is full. Messages cannot
be saved until some are deleted by the user.
3.5 PhoneBook
Click the PhoneBook button
to select the phonebook interface. You
can save your contacts either on the PC or directly on the USIM card.
Each record includes Name, Number 1, Number 2, Email and Group.
28 Operation
To create a new contact click ‘New’
select ‘OK’ to finish.
’New Contact’, enter the details and
If your stored location (Folder) is PC then you can also create a new
Group.
To create a new group: Click ‘New’
’New Group’ and enter the group
name.
Select contacts from the list on the right and drag them to the group
location.
If a contact is selected, you can carry out the following additional steps
using the tabs on the bottom of the screen:
View: View the selected contact’s information.
Delete: Delete contacts or groups.
Operation 29
SMS: Send messages to the mobile phone number selected.
Save as: Save the contact information to a TXT file on your PC.
Edit: Edit the contact information.
3.6 Settings
Click the ‘Settings’ button
to select the settings interface.
Note:
Normally there is no need to change any of these settings as they are
pre-configured for your network. If you change networks or are roaming
you may need to modify some settings. Consult your service provider for
more information.
3.6.1 Connection Settings
30 Operation
The default internet setting is pre-configured in your modem. Only change
these settings on the advice of your service provider.
Add: Add new configuration files.
Delete: Delete the selected configuration files.
Edit: Edit the selected configuration files.
Set Default: Set the selected profile as your default connection
Select ‘add’ to add a new connection profile eg. When roaming overseas
you may need to set a new APN. Contact your Service Provider for more
information.
Operation 31
3.6.2 Security Settings
1. Enable the PIN Code:
You can enable a PIN code using the ‘PIN enable’ feature. You will need to
enter your PIN to start the modem PIN code function. The PIN code is
stored on the SIM card. Consult your service provider for more information
or if you forget your PIN. Click ‘Change PIN’ to modify the number.
2. Backup Phonebook and SMS:
You can create a local backup for your Phonebook and SMS data. Click
the ‘Restore’ to restore to the previous data.
32 Operation
3.6.3 Network Settings
There is no need to change any of these settings as they are pre-configured for your network. Consult your service provider for more information.
1. Operator Selection: (Network)
Automatic: The system selects the preferred network automatically depending on the network status.
Manual: The network can be manually selected by the user.
When ‘Manual’ is selected click ‘Apply’ to search for available networks.
2. Preferred Mode:
Automatic (3G Pref): The system selects the available network automatically with priority UMTS > GSM.
UMTS Only: The system will stay on the UMTS network.
GSM Only: The system will stay the GSM network.
Operation 33
3. Band Selection
Automatic: (Default) The system selects the frequency band automatically
from the following priorities UMTS(850) UMTS (2100) UMTS (1900)
GSM(900/1800) GSM(850)
UMTS 850 + GSM 900/1800: the system is limited to UMTS 850MHz or
GSM900/1800MHz only.
UMTS 2100 + GSM 900/1800 (Europe): the system is limited to UMTS
2100MHz or GSM900/1800MHz only.
UMTS 850/2100 + GSM 900/1800: the system is limited to UMTS 850/
2100MHz or GSM900/1800MHz only.
UMTS 850/1900 + GSM 850/1900: the system is limited to UMTS 850/
1900MHz or GSM850/1900MHz only.
4. Searching in Manual Mode
34 Operation
Wait up to 2 minutes for all the network information to complete. The available networks will be displayed:
Click on your preferred network and press ‘Select’ to connect.
3.6.4 Message Settings
Normally there is no need to change any of these settings as they are preconfigured for your network. If you change networks or are roaming you
may need to modify some settings. Consult your service provider for more
information.
Operation 35
Message Center: The SMS center number is set by Network Provider.
Contact your supplier for more information.
Validity Period: Set the time limit for saving SMS on the network. The
default setting is the maximum permitted by the network.
Default Storage: You can set the preferred location to save received SMS
messages to be on the PC or on the SIM card.
Delivery Report: Set whether you want to get a notification when your SMS
message is received successfully.
36 Operation
3.6.5 Alert Settings
You can change your alert tones settings by choosing different audio files.
The supported formats are MP3, WAV and MIDI. If you select ‘Mute’ the
tone is muted.
Operation 37
3.7 MicroSD card
If you use a MicroSD card in your modem your computer will display a
removable disk related to the MicroSD card. You can then use the modem
as a flash drive to store and transfer files.
Micro SD cards up to 2GB are FAT 16 format. Micros SD HC cards (high
capacity) are FAT 32 format.
If you want to remove the modem please use the Safe Removal of Hardware to stop the removable disk first. For more details refer to the Safe
Removal of Hardware process.
3.8 Help
Click ‘Help’ button
38 Operation
to access the help system and user guide.
4 FAQ’s
If you have any problems with your connection or modem please consult
the manual and check this section. If the problem still exists contact your
service provider or check our website for more details at www.zte.com.au
Problem Description Possible Causes
Suggested Solution
The user interface
PC configuration is not Start the program manually
doesn’t start after
correct. (autorun
by going Start
the modem is
disabled)
Files or use the shortcut on
plugged in.
Program
the desktop.
The modem has no
The antenna is at the Adjust the angle and posi-
signal.
wrong angle or position. tion of the USB modem.
You have no network Try moving location until
coverage.
you get good reception.
You have not entered Restart the application and
your PIN number at
enter your PIN number. If
start up.
the PIN is invalid you cannot
connect to the network.
Message sent failed. The SMS center
Check with your with ser-
number isn’t correct. vice provider and enter the
correct number in the Message settings.
FAQ’S 39
Data connection failed. You have no network Try moving location until
coverage.
you get good reception.
The APN configuration Check with your service
is wrong.
provider and set the APN
in the configuration settings.
The manual network Select the correct network
selection is wrong.
for your service provider.
Restore ‘Automatic’ mode.
The modem cannot
You are using the
Consult your network
wrong APN.
provider.
You don’t have roam- Consult your service provider
connect to the internet ing enabled on your
before you go overseas to
when abroad.
plan.
enable roaming.
No warning tone
The PC soundcard is Check the audio card and
disabled or on low
adjust the volume.
volume.
The Micro-SD card
Re-insert the Micro
Try another Micro-SD card
cannot be read or
SD card. Check the
and make sure the capacity
is not found.
card capacity. The
and format is correct.
maximum supported
capacity is 4GB on
SD HC card.
40 FAQ’S
5 Software Removal
If you wish to uninstall the application please follow the procedure below:
Click ‘Start Programs Telstra Turbo Connection Manager Uninstall’
menu on the laptop or desktop PC.
Click ‘Yes’ to confirm
Make sure the modem is removed and press ‘Yes’ to continue…
Software Removal 41
When the uninstall is finished click ‘Finish’ to restart the computer and
complete the application removal.
42 Software removal