1
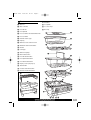
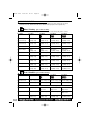
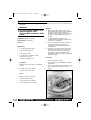
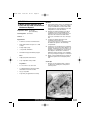
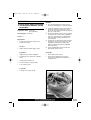
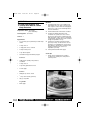
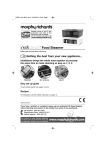
48780 rev2 29/4/08 14:32 Page 1 TM Food Steamer Please read and keep these instructions Getting the best from your new appliance... Intellisteam brings the whole meal together at precisely the same time to make steaming as easy as 1, 2, 3. ⁄ ¤ PREPARE ‹ SET & RELAX ENJOY Easy set-up guide To get started quickly, see pages 3 and 4. Recipes For inspiration, see the weekly meal plan on page 14. For replacement parts, help with using your Morphy Richards product, problems and lots more, contact us by phone or through our website. UK Helpline: 0844 871 0951 Replacement Parts: 0844 873 0717 Ireland Helpline: 1800 409 119 FS48780 MUK Rev 2 48780 rev2 29/4/08 14:32 Page 2 CONTENTS EASY SET-UP GUIDE 3-4 FEATURES 5 BEFORE USE 6 USING 6 CONFIGURATIONS 6-7 DIGITAL INTERFACE 7-8 HINTS AND TIPS 9 COOKING GUIDE 10-13 CARE AND CLEANING RECIPES 2 13 14-21 IMPORTANT SAFETY INSTRUCTIONS 22 ELECTRICAL REQUIREMENTS 23 HELPLINE 23 GUARANTEE 24 UK Helpline 0844 871 0951 Replacement Parts 0844 873 0717 Ireland Helpline 1800 409 119 48780 rev2 29/4/08 14:32 Page 3 TM Easy set-up guide 1 Max Fill the water reservoir with cold water to the maximum level. This will produce enough steam to cook for approximately 60 minutes. 2 Assemble the appliance, fitting the drip tray and then the containers. 3 Place food directly into the containers before setting the timer. Use the divider wall for the front container if cooking two different types of food. Use the accessories if required, see suggestions. 4 Cut and keep Please also refer to the main instruction booklet, which contains impor tant safety information and more detail on how to use Intellisteam. 5 Back Front left Front dual Plug into the electrical socket. Set the time for each container, using the corresponding heater buttons. Front right Press the heater button until the rectangle appears under the food type you are cooking. The pre-set cook time will appear in the timer column. Soft boiled eggs, 16 mins Leaf/pod veg, 15 mins Chicken, 27 mins Fish, 20 mins Root veg, 35 mins Sauce, 30 mins Rice, 42 mins 3 48780 rev2 29/4/08 14:32 6 7 The pre-set cook time is based on cooking four portions (see ‘Cooking guide’ for portion and specific food type adjustments). To adjust the time, press the upwards and downwards arrows. To begin cooking, press the steam button once. One bleep will sound. To save adjusted times for future use, hold the steam button down for two seconds, until a second bleep is heard. 8 The container with the longest cook time will begin steaming first. The timer counts down so all food finishes together. After cooking has finished, the alarm will sound and the keep warm function will start automatically for 40 minutes. To stop the keep warm function, press the steam button. 9 WARNING: Use oven gloves to remove the lids and containers, ensuring the lids are tilted to direct the steam away from you. Do not remove the drip tray until it is completely cooled. 10 4 Page 4 UK Helpline 0844 871 0951 Pour away excess water from the main base unit, using the pouring lip at the back. The containers, lids, accessories and drip tray may be washed in a dishwasher. Replacement Parts 0844 873 0717 Ireland Helpline 1800 409 119 48780 rev2 29/4/08 14:32 Page 5 Features Accessories ⁄ Back lid Ô Food plinth ¤ Back container 2 x sauce trays ‹ Front left lid Ò Rice tray › Front right lid ⁄ fi Front container removable divider wall fl Front container ‡ External water top-up ¤ · Drip tray ‚ Main base unit / water reservoir › ‹ „ Maximum water level indicator ‰ Heaters  Pouring lip Ê Water level gauge fi Á Back heater button fl Ë Front left heater button È Front right heater button Í Front dual heater button Î Display screen (see page 7) Ï Steam button ‡ Ì Increase steam time button Ó Decrease steam time button · Ô ‚ „‰ Â Î Ï Ì Ó Ò Ê Á Ë È Í 5 48780 rev2 29/4/08 14:32 Page 6 Front container removable divider wall BEFORE USE Before using Intellisteam for the first time, wash all parts except the main base unit ‚. USING Filling the water reservoir • A • Fill the water reservoir ‚ with cold water to the maximum level indicated „. This will produce enough steam to cook for approximately 60 minutes. • The system is designed for cold water only. Do not add any other liquids or add anything to the water. A Max Use the divider wall fi if cooking foods with different cook times. Alternatively, use the front container as one large container C. C Food plinth • Use in the front or back container. • Use the plinth Ô in raised position to place food on and below D. D Fitting the drip tray and containers B 1 Fit the drip tray · to the main base, aligning the steam vents with the heaters ‰. 2 Fit the front fl and back ¤ containers to the drip tray, aligning them above the steam vents in the drip tray. • Alternatively, use the plinth upside down to place food on, using the legs as handles for easy removal E. E B Rice Tray • Use in the front or back container. • Use for cooking rice or pasta. Other foods may be cooked in the space below the rice tray F. F Sauce Trays USING THE ACCESSORIES TO ARRANGE YOUR FOOD BEFORE COOKING • 6 • Use in the front or back container. • Use for cooking sauce, peas or small portions of rice G. G Place food directly into the containers or use accessories as required. The accessories are very versatile and can be used in a number of ways (see C, D, E, F, G). UK Helpline 0844 871 0951 Replacement Parts 0844 873 0717 Ireland Helpline 1800 409 119 48780 rev2 29/4/08 14:32 Page 7 • IMPORTANT: If steaming meat, fish or poultry together with vegetables, always place the meat, fish or poultry separately so that the juices from raw or partially cooked meat cannot drip onto other foods. • Once food is arranged, place all lids ⁄‹› back on the containers H. Ê Ú H Û Ù ı Á Ï Ë Ì È Í Ó Î Display screen features If using as one large container, use the dual heater button I. Ê Water level gauge I Á Back heater button Back Ë Front left heater button Front left È Front right heater button Front dual Í Front dual heater button Î Display screen Ï Steam button Front right 3 Ì Increase steam time button Ó Decrease steam time button Ú Digital rectangle icons Û Food symbols Press the heater button to move the rectangle Ú until it appears under the required food symbol (refer to food symbols guide Û). A bleep will sound each time the heater button is pressed. The cook time for each food symbol will appear in the timer column. Repeat this process for each container, the rectangle will flash to indicate your last setting J. J Ù Keep warm symbol ı Timer column (minutes) Setting timer using pre-set cook times 1 Plug into the electrical socket. 2 Set the time for each container using the corresponding heater buttons. If using the front container with the divider wall, use the separate right and left heater buttons. • If using the back container for foods with different cook times, set the timer to the longest cook time. Alternatively, stop the appliance during cooking and add the food with the shortest cook time. 7 48780 rev2 4 29/4/08 14:32 Page 8 Press the steam button Ï once to begin cooking. A bleep will sound and the display screen and steam button will illuminate brightly until cooking and keep warm finishes. The timer will count down from the longest cook time so everything finishes together K. Adjusting the timer The timer can be adjusted for portion sizes and specific food types (see cooking guide) or to suit your personal preferences. 1 Press the heater button until the rectangle appears under the food symbol you want to adjust. 2 Press the upwards arrow button to increase the cook time or the downwards arrow button to decrease the cook time. Each time the arrow button is pressed, a bleep will sound and the time will increase/decrease by one minute M. K M • When cooking has finished, the alarm will sound and the keep warm function will start automatically for 40 minutes. To stop, press the steam button once. After 40 minutes, the keep warm function will automatically turn off L. Always check there is water in the water reservoir when using the keep warm function. L 3 Repeat the process for each container as required. Saving time adjustments To save your personal time adjustments for future use, hold down the steam button for two seconds. One bleep will sound, indicating steaming has begun, the second bleep indicates your time adjustments have been saved N. Food symbols guide Û N Soft boiled eggs, pre-set time: 16 minutes Leaf & Pod vegetables, pre-set time: 15 minutes Chicken, pre-set time: 27 minutes Fish, pre-set time: 20 minutes Root vegetables, pre-set time: 35 minutes • If you do not want to save your personal time settings for future use, press the steam button once to start cooking. Sauce, pre-set time: 30 minutes Rice, pre-set time: 42 minutes Keep warm Ù, pre-set time: 40 minutes Pre-set times are a guide and based on approximately 4 portions. Refer to ‘Cooking guide’ for portion and specific food type adjustments. 8 UK Helpline 0844 871 0951 Replacement Parts 0844 873 0717 Ireland Helpline 1800 409 119 48780 rev2 29/4/08 14:32 Page 9 Reverting back to pre-set times External water top-up during cooking 1 Plug into the electrical socket. • 2 Before pressing any other buttons, hold down the increase steam time button for 2 seconds until a bleep is heard. Repeat for the decrease steam time button O. If steaming for a long period, it may be necessary to add extra water. The water level can be checked using the external water gauge. • To fill, fully extend the external water top-up ‡ and slowly pour cold water through it using a suitable jug P. O P 1st 2nd • Intellisteam is now set to the original pre-sets. To cook rice Boil dry alarm 1 Add rice to the rice tray. For every 75g of rice, add 122ml of cold water and stir. If water in the water reservoir reaches unsafe levels, an alarm will sound, the digital display will flash, and cooking will stop automatically. 2 Set the time using the pre-set time for rice or adjust if required. Immediately add more cold water by slowly pouring through the external water top-up. To stop steaming during cooking To restart cooking, press the steam button once. Cooking will re-start from when it stopped. • To stop steaming, press the steam button once. The alarm will sound and the illuminated display screen and steam button will dim. • To re-start steaming, press the steam button once. A bleep will sound and cooking will start from when it stopped. • Removing food from the steamer • Keep warm function When cooking has finished, the alarm will sound and the keep warm function will start automatically for 40 minutes. To stop, press the steam button once. After 40 minutes the keep warm function will automatically turn off. Always check there is water in the water reservoir when using the keep warm function. To check the water level, use the external water gauge Ê and fill using the external water top-up ‡ P. WARNING: Use oven gloves to remove the lids and containers, ensuring the lids are tilted to direct the steam away from you. Do not remove the drip tray until it is completely cooled. COOKING HINTS AND TIPS • For best results, use pieces of food that are similar in size. If pieces vary in size and layering is required, place smaller pieces on top. • Do not crowd food in the containers or rice tray. Arrange the food with spaces between pieces to allow for maximum steam flow. • Never steam meat, poultry or seafood from frozen. Always completely thaw first. • Meat, poultry and seafood can be wrapped and cooked in cooking foil to retain juices. 9 48780 rev2 29/4/08 14:32 Page 10 COOKING GUIDE Cooking times are approximate and may vary depending on the size of the food, the space between the food, and the amount of food. Portion sizes per person are a guide only. Meat / Poultry (pre-set time: 27 mins) Protein from meat and poultry may leave white residue on meat and poultry when cooked. Food type 1 portion 2 portions 3 portions 4 portions Chicken breast (whole boneless) 18 mins x1 (150g / 6oz) 20 mins x2 (300g / 11oz) 25 mins x3 (450g / 16oz) 27 mins x4 (600g / 21oz) Duck breast (whole boneless) 18 mins x1 (150g / 6oz) 20 mins x2 (300g / 11oz) 25 mins x3 (450g / 16oz) 27 mins x4 (600g / 21oz) Chicken drumsticks 20 mins 20 mins 30 mins 30 mins Turkey escalope 11 mins x1 (100g / 4oz) 15 mins x2 (200g / 7oz) 20-25 mins x3 (300g / 10oz) 20-25 mins x4 (400g / 14oz) Pork fillet 20 mins 80g / 3oz 20 mins 160g / 6oz 25 mins 250g / 9oz 30 mins 400g / 14oz Lamb steaks 20 mins x1 (100g / 4oz) 20 mins x2 (200g / 7oz) 23 mins x3 (300g / 10oz) 23-27 mins x4 (400g / 14oz) Lamb leg 20 mins x1 (100g / 4oz) 20 mins x2 (200g / 7oz) 25 mins x3 (300g / 10oz) 25-30 mins x4 (400g / 14oz) Lamb rump steaks 20 mins x1 (100g / 4oz) 20 mins x2 (200g / 7oz) 25 mins x3 (300g / 10oz) 25-30 mins x4 (400g / 14oz) Sausages 15 mins x3 (170g / 6oz) 15 mins x6 (340g / 12oz) 17 mins x9 (500g / 18oz) 22-30 mins x12 (680g / 24oz) 3 portions 4 portions Fish / Shellfish Food type 1 portion 2 portions Thick fillet of fish 15 mins 125g / 5oz 15 mins 250g / 9oz 20 mins 375g / 13oz 20 mins 500g / 18oz Thin fillet of fish 13 mins 100g / 4oz 13 mins 200g / 7oz 15 mins 300g / 10oz 16 mins 400g / 14oz Whole fish 10 (pre-set time: 20 mins) 23 mins for 1 whole fish (220g / 8oz) Mussels 10 mins 200g / 7oz 10-12 mins 400g / 14oz King prawns (raw) 10 mins 100g / 4oz 13 mins 200g / 7oz 15 mins 300g / 10oz 15-17 mins 400g / 14oz Scallops 10 mins x3 (70g / 3oz) UK Helpline 0844 871 0951 10 mins x6 (150g / 5oz) 12-13 mins 600g / 21oz 12 mins x9 (230g / 8oz) Replacement Parts 0844 873 0717 15-17 mins 800g / 28oz 13 mins x12 (300g / 10oz) Ireland Helpline 1800 409 119 48780 rev2 29/4/08 14:32 Page 11 Leaf and Pod Vegetables (pre-set time: 15 mins) Food type 1 portion 2 portions 3 portions 4 portions Asparagus 15 mins 60g / 2oz 12-15 mins 120g / 5oz 15 mins 180g / 6oz 15-17 mins 240g / 8oz Broad beans 15 mins 50g / 2oz 15 mins 100g / 4oz 20 mins 150g / 6oz 20 mins 200g / 7oz Broccoli 20 mins 60g / 2oz 20 mins 120g / 5oz 22-25 mins 180g / 6oz 25-27 mins 240g / 8oz Cabbage 15 mins 50g / 2oz 15 mins 100g / 4oz 15-20 mins 150g / 6oz 20 mins 200g / 7oz Cauliflower florets 30 mins 100g / 4oz 30 mins 200g / 7oz 30 mins 300g / 10oz 30 mins 400g / 14oz Courgette 15 mins 60g / 2oz 15 mins 120g / 5oz 15 mins 180g / 6oz 15 mins 240g / 8oz Green beans 20 mins 50g / 2oz 20 mins 100g / 4oz 20-23 mins 150g / 6oz 25 mins 200g / 7oz Leeks 15 mins 70g / 3oz 15 mins 140g / 6oz 15 mins 210g / 7oz 15-17 mins 280g / 9oz Mange tout 12-15 mins 50g / 2oz 12-15 mins 100g / 4oz 15 mins 150g / 6oz 15 mins 200g / 7oz Mushrooms 13-15 mins 50g / 2oz 13-15 mins 100g / 4oz 13-15 mins 150g / 6oz 15 mins 200g / 7oz Peas (fresh) 10 mins 60g / 2oz 10 mins 120g / 5oz 10 mins 180g / 6oz 10-12 mins 240g / 8oz Peas (frozen) 10 mins 60g / 2oz 10 mins 120g / 4oz 10 mins 180g / 6oz 10-12 mins 240g / 8oz Peppers 15 mins 80g / 3oz 15 mins 160g / 6oz 15 mins 240g / 8oz 15-17 mins 320g / 10oz Spinach 15 mins 60g / 2oz 15 mins 120g / 5oz 15 mins 180g / 7oz 15 mins 240g / 8oz Sprouts 20 mins 100g / 4oz 20 mins 200g / 7oz 25 mins 300g / 10oz 25-30 mins 400g / 14oz Sweet corn (canned) 12-13 mins 80g / 3oz 15 mins 160g / 6oz 17 mins 240g / 8oz 18-20 mins 320g / 10oz Sweet corn (frozen) 15 mins 80g / 3oz 15 mins 160g / 6oz 17 mins 240g / 8oz 18-20 mins 320g / 10oz Tomatoes 10 mins 120g / 5oz 10-15 mins 240g / 8oz 15 mins 360g / 13oz 15 mins 400g / 14oz 11 48780 rev2 29/4/08 14:32 Page 12 Root vegetables (pre-set time: 35 mins) Food type 1 portion Butternut squash 15 mins 100g / 4oz 15 mins 200g / 7oz 20 mins 300g / 10oz Carrots 30 mins 100g / 4oz 30 mins 200g / 7oz 30 mins 300g / 10oz 30 mins 400g / 14oz Celeriac 20 mins 100g / 4oz 20 mins 200g / 7oz 20 mins 300g / 10oz 20 mins 400g / 14oz New potatoes 28 mins 180g / 6oz 30 mins 350g / 12oz 32 mins 530g / 19oz 35 mins 760g / 27oz Old potatoes 30 mins 180g / 6oz 30 mins 350g / 12oz 32 mins 530g / 19oz 33-35 mins 760g / 27oz Onions (small whole) 20 mins x2 Swede 30 mins 100g / 4oz 30-32 mins 200g / 7oz Sweet corn (whole cobs) 2 portions 20 mins x4 20 mins x6 4 portions 20-25 mins 400g / 14oz 20 mins x8 35 mins 300g / 10oz 35-40 mins 400g / 14oz 30 mins for 1 whole cob (250g / 9oz) Rice / Pasta / Noodles 30 mins for 2 whole cobs (500g / 18oz) (pre-set time: 42 mins) Food type 1 portion 2 portions 3 portions 4 portions Hints and Tips Easy cook rice 30 mins 75g / 3oz 30 mins 150g / 6oz 35 mins 225g / 8oz 42 mins 300g / 10oz White long grain 30 mins rice 75g / 3oz 30 mins 150g / 6oz 40 mins 225g / 8oz 40 mins 300g / 10oz White basmati rice 30 mins 75g / 3oz 30 mins 150g / 6oz 35 mins 225g / 8oz 45 mins 300g / 10oz Bulgar wheat 20 mins 75g / 3oz 27 mins 150g / 6oz 30 mins 225g / 8oz 30 mins 300g / 10oz Add 112ml of cold water per 75g portion of rice, and stir. Add 112ml of cold water per 75g portion of rice, and stir. Add 112ml of cold water per 75g portion of rice, and stir. Add 100ml of water per portion Couscous 15 mins 75g / 3oz 17 mins 150g / 6oz 20 mins 225g / 8oz 25 mins 300g / 10oz Add 65ml of water per portion Ready-to-Wok Noodles 10 mins 1 pack (125g / 5oz) 20 mins 1 sheet (60g / 2oz) 30 mins 75g / 3oz 10 mins 2 packs (250g / 9oz) 20 mins 2 sheets (120g / 5oz) 35 mins 150g / 6oz 10-15 mins 3 packs (375g / 13oz) 27 mins 3 sheets (180g / 7oz) Too large to fit in the rice container 10-15 mins 4 packs (500g / 18oz) 27 mins 4 sheets (240g / 8oz) Too large to fit in the rice container Add 1 tbsp of cold water per portion, and stir Make sure water covers noodles Egg noodles Pasta 12 3 portions UK Helpline 0844 871 0951 Replacement Parts 0844 873 0717 Make sure water covers pasta Ireland Helpline 1800 409 119 48780 rev2 29/4/08 Eggs 14:32 Page 13 (pre-set time: 16 mins) Food type 1 portion 2 portions 3 portions 4 portions Soft boiled 11 mins x1 12 mins x2 14 mins x3 16 mins x4 Hard boiled 18 mins x1 20 mins x2 22 mins x3 23-24 mins x4 Food type 1 portion 2 portions 3 portions 4 portions Pears 20 mins x1 20-25 mins x2 25 mins x3 22-30 mins x4 Bananas (in skin) 15 mins x1 20 mins x2 25 mins x3 30 mins x4 Apples 15 mins x1 15-17 mins x2 15-17 mins x3 15-17 mins x4 Fruit CARE AND CLEANING Main base unit WARNING: Allow steamer to cool before washing. Unplug from the mains socket. The base unit may be wiped with a clean, damp cloth. Wipe dry with a soft cloth. • Remove the containers and the lids. Do not use abrasive cleaners to clean any part of Intellisteam. • Carefully remove the drip tray and pour away juices into a bowl or sink. • If there is any water remaining in the main base unit, pour away using the pouring lip at the back into a bowl or sink. WARNING: Do not immerse the steamer base, cord or plug in water or in any other liquid. Containers, drip tray and accessories The containers, lids, accessories and drip tray may be washed in a dishwasher. Prolonged dishwasher use could discolour these parts. Alternatively, wash in hot soapy water, rinse and dry thoroughly. DESCALING Occasionally, you may need to remove mineral deposits (known as descaling) from the steaming system. This is normal and will depend on the degree of hardness of the water in your area. If you notice a slowing in steam production, or a lengthening of steaming times, you should descale the steaming system using a mild descaling solution. 13 48780 rev2 29/4/08 14:32 Page 14 RECIPES Enjoy our delicious weekly recipe plan. Visit our website for recipes and more information about intellisteam. MONDAY Method: Sesame Salmon Noodles and Steamed Greens with Coconut Milk and Sweet Chilli Sauce Preparation time: 15 minutes 1 Brush salmon fillets with sesame oil and then sprinkle with sesame seeds. Arrange in the back container. Empty 2 packs of noodles into the rice tray and position above the salmon. Add vegetable stock to the noodles. 2 Position the divider wall in the front container. Mix the vegetables together and put into the compartment. 3 Pour coconut milk into the sauce tray and stir in sweet chilli sauce, ginger and coriander. Place the tray in the remaining compartment. 4 Set time for the salmon and noodles using the fish pre-set (20 mins). Set time for the sauce using the sauce pre-set (30 mins) then adjust to 18 mins. Set time for the vegetables using the leaf and pod vegetable pre-set (15 mins). Cooking time: 20 minutes Serves: 4 Ingredients: • 4 x 125g (5oz) salmon fillets • 4 tsp toasted sesame oil • 1 tsp sesame seeds • 2 x 150g packs of medium or thick ready-to-wok noodles • 4 tbsp hot vegetable stock Cooks tip: • Stir noodles before serving. Vegetables: • • 150g (6oz) sugar snap peas or mangetout, halved If you prefer crunchier vegetables, adjust the pre-set time. • • 6 spring onions, thinly sliced Fish can be wrapped and cooked in cooking foil to retain juices and prevent surface protein. • 1 carrot, cut into fine strips Sauce: 14 • 300ml (1/2 pint) coconut milk • 2 tbsp sweet chilli sauce • 1 tsp grated fresh root ginger • 1 tbsp chopped fresh coriander UK Helpline 0844 871 0951 Replacement Parts 0844 873 0717 Ireland Helpline 1800 409 119 48780 rev2 29/4/08 14:32 Page 15 TUESDAY Maple-glazed Chicken with Corn-on-the-cob and Crushed Butternut Squash Preparation time: 15 minutes, plus marinating Method: 1 Put chicken breasts into a non-metallic bowl and add orange zest, orange juice, maple syrup and chilli flakes. Season with a little salt and plenty of black pepper. Cover and refrigerate for at least 30 minutes. 2 Arrange the chicken breasts in the back container. Put rice and vegetable stock powder into the rice tray. Position the rice tray above the chicken and add 250ml (9fl oz) of cold water to the rice, stirring to mix. 3 Position the divider wall in the front container. Put four pieces of corn-on-the-cob in one compartment and the butternut squash in the remaining compartment. 4 Set time for the chicken and rice using the chicken pre-set (27 mins) then adjust to 35 minutes. Set time for the corn-on-the-cob using the root vegetable pre-set (35 mins) then adjust to 30 minutes. Set time for butternut squash using the root vegetable pre-set (35 mins) then adjust to 25 minutes. 5 When cooked, add butter and rosemary to butternut squash and crush lightly with a fork. Cooking time: 35 minutes Serves: 4 Ingredients: • 4 skinless, boneless chicken breasts • Finely grated zest and juice of 1 small orange • 2 tbsp maple syrup • 1/4 • Salt and freshly ground black pepper tsp dried chilli flakes Rice: • 250g (9oz) white and wild rice • 1 tsp vegetable stock powder Vegetables: • 2 corn-on-the-cob, cut in half • 1 medium butternut squash, peeled, deseeded and cut into chunks • 15g (1/2 oz) butter • 2 tsp finely chopped fresh rosemary Cooks tip: • Chicken can be wrapped and cooked in cooking foil to retain juices and prevent surface protein. 15 48780 rev2 29/4/08 14:32 Page 16 WEDNESDAY Method: Sweet Red Peppers stuffed with Leeks and Feta Cheese with Spring Onions and Pine Nut Couscous 1 Split peppers lengthways, taking care not to cut in half. Remove the core and seeds. Mix together leek, parsley and olive oil, then add parmesan cheese and bread crumbs. Mix in crumbled feta cheese, then season with a little salt and plenty of black pepper. Stuff the mixture into the peppers. 2 Remove the divider wall from the front container and place the peppers inside. 3 Position the rice tray in the back container. Add couscous and 265ml of cold water. Stir in stock powder, spring onions and pine nuts. 4 Set time for couscous using the rice pre-set (42 mins) then adjust to 25 minutes. Set time for the peppers (using the front dual heater button) using the leaf and pod vegetable pre-set (15 mins) then adjust to 20 minutes. 5 When cooked, allow to stand for 5 minutes. Fluff up the couscous with a fork. Garnish with parsley sprigs. Preparation time: 25 minutes Cooking time: 25 minutes Serves: 4 Ingredients: • 4 sweet (long) red peppers, tops removed • 1 small leek, finely chopped • 1 tbsp chopped fresh parsley • 2 tbsp olive oil • 25g (1oz) finely grated parmesan cheese • 25g (1oz) fresh bread crumbs • 100g (4oz) feta cheese, finely crumbled • Salt and freshly ground black pepper Couscous: • 200g (7oz) couscous • 2 tsp vegetable stock powder • 4 spring onions, finely chopped • 25g (1oz) pine nuts To garnish: • 16 Parsley sprigs UK Helpline 0844 871 0951 Replacement Parts 0844 873 0717 Ireland Helpline 1800 409 119 48780 rev2 29/4/08 14:32 Page 17 THURSDAY Tikka Masala Chicken with Zesty Cardamom Rice Preparation time: 10 minutes, plus marinating Cooking time: 42 minutes Method: 1 Spoon yoghurt, curry paste and coriander into a large non metallic bowl. Mix well, add chicken chunks and stir to coat. Season with a little salt and pepper, then cover and refrigerate for at least 30 minutes. 2 Position the rice tray in the back container. Add rice and 450 ml (16 fl oz) of cold water. Stir in stock powder. Put strips of pared lemon zest on top and sprinkle in cardamom pods. 3 Remove the divider wall from the front container. Tip the chicken with it’s marinade into the container and make sure the mixture is well spread out. 4 Set time for the rice using the rice pre-set (42 mins). Set time for the chicken (using the front dual heater button) using the chicken pre-set (27 mins). 5 Serve garnished with lime wedges and coriander sprigs. Serves: 4 Ingredients: • 4 tbsp low fat natural yogurt • 2 tbsp chicken tikka masala curry paste • 2 tbsp chopped fresh coriander • 4 skinless, boneless chicken breasts, chopped into chunks • Salt and freshly ground black pepper Rice: Cooks tip: • 300g (11oz) basmati rice • • 2 tsp vegetable stock powder • 2 strips pared lemon zest • 6 green cardamom pods, lightly crushed Chicken can be wrapped and cooked in cooking foil to retain juices and prevent marinade from staining containers. To garnish: • Lime wedges and coriander sprigs 17 48780 rev2 29/4/08 14:32 Page 18 FRIDAY Method: Steamed Halibut with Lemon & Thyme Dressing. Preparation time: 15 minutes Cooking time: 35 minutes 1 Arrange fish fillets in the back container. Place a small knob of butter on top of each one and arrange thyme sprigs on top. Season with a little salt and pepper. 2 Position the divider wall in the front container. Put potatoes into one compartment. Mix vegetables together and put in the remaining compartment. 3 For the sauce, put butter, lemon zest, lemon juice and thyme leaves into the rice tray and position above the fish. 4 Set time for the fish and sauce using the fish pre-set (20 mins). Set time for the potatoes using the root vegetables pre-set (35 mins). Set time for the vegetables using the leaf and pod vegetables pre-set (15 mins). Serves: 4 Ingredients: • 4 x 125g (5oz) halibut fillets, skinned (or use Pacific cod) (1/2oz) • 15g butter • 4 small thyme sprigs • Salt and freshly ground black pepper Vegetables: • 750g (1lb 11oz) small new potatoes • 2 leeks, thinly sliced • 1 large carrot, sliced into fine strips • 150g (6oz) fine green beans, trimmed and halved Cooks tip: • If you prefer crunchier vegetables, adjust the pre-set time. • Fish can be wrapped and cooked in cooking foil to retain juices and prevent surface protein. Sauce: 18 • 50g (2oz) butter • Finely grated zest and juice of 1 lemon • 1 tbsp fresh thyme leaves UK Helpline 0844 871 0951 Replacement Parts 0844 873 0717 Ireland Helpline 1800 409 119 48780 rev2 29/4/08 14:32 Page 19 SATURDAY Hoisin Duck with Egg Noodles and Steamed Chinese-spiced Vegetables. Method: 1 Toss sliced duck breasts in hoisin sauce. Cover and refrigerate for at least 30 minutes. 2 Tip the duck breasts and any marinade into the back container. Position the rice tray above the duck and add noodles and 250 ml (9 fl oz) of cold water. 3 Remove the divider wall from front container. In a large bowl, toss the stir-fry vegetables, pak choi, toasted sesame oil and Chinese 5-spice powder together and tip into the front container. 4 Set time for the duck and noodles using the chicken pre-set (27 mins). Set time for the vegetables (using the front dual heater button) using the leaf and pod vegetable pre-set (15 mins). 5 Serve sprinkled with sesame seeds and garnish with spring onions. Preparation time: 10 minutes, plus marinating Cooking time: 27 minutes Serves: 4 Ingredients: • • 4 skinless duck breasts, thinly sliced 4 tbsp hoisin sauce Noodles: • 180g (3 sheets) medium egg noodles Vegetables: Cooks tip: • 350g pack fresh stir-fry vegetables • Stir noodles before serving. • 2 heads pak choi, broken into separate leaves • • 1 tbsp toasted sesame oil Duck can be wrapped and cooked in cooking foil to retain juices and prevent surface protein. • Pinch of Chinese 5-spice powder • 1 tsp sesame seeds To garnish: • 4 spring onions, thinly sliced 19 48780 rev2 29/4/08 14:32 Page 20 SUNDAY Method: Lamb with Oregano and Tomato with Mint & Lemon Baby Potatoes 1 Preparation time: 20 minutes, plus marinating Put lamb steaks into a non metallic bowl and add the olive oil, garlic, tomato puree and oregano. Season with salt and pepper, then toss to coat. Cover and refrigerate for at least 30 minutes. 2 Put the lamb steaks in the back container. Cooking time: 35 minutes 3 Position the divider wall in the front container. Toss potatoes in olive oil and lemon zest, then tip the compartment and add mint sprigs. Place carrots in remaining compartment, sprinkle with cumin seeds (if using) and put butter on top. 4 Set time for the lamb using the chicken pre-set (27 mins). Set time for the carrots using the root vegetable pre-set (35 mins) then adjust to 30 minutes. Set time for the potatoes using the pre-set for root vegetables (35 mins). 5 Serve garnished with mint sprigs. Serves: 4 Ingredients: • 4 x 110-125g (4-5oz) lamb leg or lamb rump steaks • 1 tbsp olive oil • 1 large garlic clove, crushed • 2 tbsp tomato puree • 1 tsp dried oregano • Salt and freshly ground black pepper Potatoes: • 750g (1lb 11oz) baby new potatoes, scrubbed • 1 tbsp olive oil • 1 tsp finely grated lemon zest • 2 mint sprigs Cooks tip: • Lamb can be wrapped and cooked in cooking foil to retain juices and prevent surface protein. Carrots: • 400g (14oz) carrots, sliced • 1/2 • 10g (1/3 oz) butter tsp cumin seeds (optional) To garnish: • 20 Mint sprigs UK Helpline 0844 871 0951 Replacement Parts 0844 873 0717 Ireland Helpline 1800 409 119 48780 rev2 29/4/08 14:32 Page 21 SUNDAY TREAT! Ginger and Banana Sponge Pudding with Sticky Toffee Sauce Preparation time: 25 minutes Cooking time: 42 minutes Method: 1 In a large mixing bowl, cream butter and sugar until light and fluffy. Gradually beat in eggs, then stir in vanilla. Sift in flour, ground ginger and salt, and fold in, using a large metal spoon. Stir in the mashed banana. 2 Butter 2 x 200ml (7 fl oz) individual pudding basins. Slice stem ginger and place it in the bottom of the basins, spooning 1 tbsp of syrup into each one. Spoon over the creamed mixture and level the tops. Cover tightly with pieces of buttered foil. 3 Arrange the puddings in the back compartment. 4 Position the divider wall in the front container. Put the sauce ingredients into a sauce tray and place in one compartment. 5 Set time for the puddings using the rice pre-set (42 mins). Set time for the sauce using the sauce pre-set (30 mins) then adjust to 20 minutes. 6 When cooked, run a knife around the basins to release the puddings. Stir the sauce thoroughly and spoon over each pudding. Serve with ice-cream or custard. Serves: 4 Ingredients: • 75g (3oz) butter, plus extra for greasing • 75g (3oz) light muscovado sugar • 2 medium eggs, beaten • 1/2 tsp vanilla extract • 75g (3oz) self-raising flour • 1/2 • Pinch of salt • 1 large ripe banana, mashed • 2 pieces stem ginger in syrup, plus 4 tbsp of syrup from the jar tsp ground ginger Sauce: • 3 tbsp golden syrup • 25g (1oz) butter • 25g (1oz) light muscovado sugar To serve: • Vanilla ice-cream or custard 21 48780 rev2 29/4/08 14:32 Page 22 IMPORTANT SAFETY INSTRUCTIONS Personal safety • Do not touch hot surfaces. Use oven gloves or a cloth when removing the lid or handling hot containers as hot steam will escape. • WARNING: To protect against fire, electric shock and personal injury, do not immerse cord, plugs, or appliance in water or other liquid. • WARNING: Extreme caution must be used when moving the steamer when containing hot food, water, or other hot liquids. • Appliances must not be immersed. • Unplug from the socket when not in use, before putting on or taking off attachments, and before cleaning. • Do not operate any appliance with a damaged lead or plug, or after an appliance has malfunctioned, or has been dropped or damaged in any way. Contact Morphy Richards for advice on examination, repair or electrical or mechanical adjustment. • Do not fill above the maximum level. If the steamer is over-filled, boiling water may be ejected which can scald. • This appliance is not intended for use by persons (including children) with reduced physical, sensory or mental capabilities, or lack of experience and knowledge, unless they have been given supervision or instruction concerning the use of the appliance by a person responsible for their safety. Location 22 • Do not use outdoors or near water. • Ensure that this appliance is situated out of reach of children. • Do not place directly under kitchen wall cupboards when in use, as it produces large amounts of steam. Avoid reaching over the steamer when in use. UK Helpline 0844 871 0951 Mains lead • • • • The mains lead should reach from the socket to the base unit without straining the connections. Do not let the cord hang over the edge of the table or counter and keep it away from any hot surfaces. Do not let the lead run across an open space e.g. between a low socket and table. If the supply cord is damaged, it must be replaced by the manufacturer, it’s service agent or similarly qualified persons in order to avoid a hazard. Children • Never allow a child to operate this appliance. Teach children to be aware of dangers in the kitchen, warn them of the dangers of reaching up to areas where they cannot see properly or should not be reaching. • Children should be supervised to ensure that they do not play with the appliance. Other safety considerations • Do not use attachments or tools not recommended by Morphy Richards as this may cause fire, electric shock or injury. • To open, lift the lids off towards yourself but tilted away from you. • Do not use any steamer parts in a microwave or on any cooking/heated surfaces. • Do not place on or near a hot gas or electric burner, or in a heated oven. • Do not leave it in a damp and corrosive environment. • Do not switch the steamer on unless it contains at least 1 cup of water, otherwise the steamer may be damaged. • Always make sure the water does not fall below the minimum level. Replacement Parts 0844 873 0717 Ireland Helpline 1800 409 119 48780 rev2 29/4/08 14:32 Page 23 HELPLINE ELECTRICAL REQUIREMENTS If you have any difficulty with your appliance, do not hesitate to call. We are more likely to be able to help than the store from where you bought it. Check that the voltage on the rating plate of your appliance corresponds with your house electricity supply which must be A.C. (Alternating Current). If the socket outlets in your home are not suitable for the plug supplied with this appliance, the plug should be removed and the appropriate one fitted. WARNING: The plug removed from the mains lead, if severed, must be destroyed, as a plug with bared flexible cord is hazardous if engaged into a live socket outlet. Please have the following information ready to enable our staff to deal with your enquiry quickly: • Name of the product. • Model number as shown on the underside of the appliance. • Serial number as shown on underside of the appliance. Should the fuse in the 13amp plug require replacement, a 13 amp BS1362 fuse must be fitted. UK Helpline 0844 871 0951 Replacement Parts 0844 873 0717 WARNING: This appliance must be earthed. Ireland Helpline 1800 409 119 23 48780 rev2 29/4/08 14:32 Page 24 YOUR TWO YEAR GUARANTEE Subject to the exclusions set out below (see Exclusions), the faulty appliance will then be repaired or replaced and dispatched usually within 7 working days of receipt. It is important to retain the retailer’s receipt as proof of purchase. Staple your receipt to this back cover for future reference. If, for any reason, this item is replaced during the guarantee period, the guarantee on the new item will be calculated from original purchase date. Therefore, it is vital to retain your original till receipt or invoice to indicate the date of initial purchase. Please quote the following information if the product develops a fault. These numbers can be found on the base of the product. Model no. Serial no. All Morphy Richards products are individually tested before leaving the factory. In the unlikely event of any appliance proving to be faulty within 28 days of purchase, it should be returned to the place of purchase for it to be replaced. If the fault develops after 28 days and within the guarantee period from the original purchase date, you should contact the Helpline number quoting Model number and Serial number on the product, or write to Morphy Richards at the address shown. You will be asked to return the product (in secure, adequate packaging) to the address below along with a copy of proof of purchase. 3 Repairs have been attempted by persons other than our service staff (or authorised dealer). 4 The appliance has been used for hire purposes or non domestic use. 5 The appliance is second hand. 6 Morphy Richards are not liable to carry out any type of servicing work, under the guarantee. • This guarantee does not confer any rights other than those expressly set out above and does not cover any claims for consequential loss or damage. This guarantee is offered as an additional benefit and does not affect your statutory rights as a consumer. • This guarantee is valid in the UK and Ireland only. To qualify for the guarantee, the appliance must have been used according to the instructions supplied. EXCLUSIONS Morphy Richards shall not be liable to replace or repair the goods under the terms of the guarantee where: 1 2 The fault has been caused or is attributable to accidental use, misuse, negligent use or used contrary to the manufacturer’s recommendations or where the fault has been caused by power surges or damage caused in transit. The appliance has been used on a voltage supply other than that stamped on the product. For electrical products sold within the European Community. At the end of the electrical products useful life, it should not be disposed of with household waste. Please recycle where facilities exist. Check with your Local Authority or retailer for recycling advice in your country. The After Sales Division Morphy Richards Ltd Mexborough, South Yorkshire, England, S64 8AJ Morphy Richards products are intended for household use only. Morphy Richards has a policy of continuous improvement in product quality and design. The company, therefore reserves the right to change the specification of it’s models at any time. Helplines (office hours) UK 0844 871 0951 Spare Parts 0844 873 0717 Republic of Ireland 1800 409 119 FS48780 MUK Rev 2 04/08 For details of other products in the Morphy Richards range, please see our website . . .