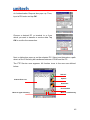
1
HT680 Rugged Handheld Terminal
- HT680 -
User’s Manual
400737G Version 1.4
Preface
About This Manual
This manual explains how to install, operate and maintain the HT680 Rugged
Enterprise Terminal.
No part of this publication may be reproduced or used in any form, or by any
electrical or mechanical means, without permission in writing from the
manufacturer. This includes electronic or mechanical means, such as
photocopying, recording, or information storage and retrieval systems. The
material in this manual is subject to change without notice.
© Copyright 2009 Unitech Electronics Co., Ltd. All rights reserved.
Unitech global website address: http:\\www.unitech-adc.com
Bluetooth is a registered trademark of Bluetooth SIG.
Microsoft, Windows and ActiveSync are either
registered trademarks or trademarks of Microsoft
Corporation. Other product names mentioned in this
manual may be trademarks or Registered
trademarks of their respective companies and are
hereby acknowledged.
Unitech is a member of Oracle Embedded Software
Licensing Program.
i
Regulatory Compliance Statements
FCC Warning Statement
This equipment has been tested and found to comply with the limits for a Class
B digital device, pursuant to part 15 of the FCC rules. These limits are
designed to provide reasonable protection against harmful interference in a
residential installation. This equipment generates, uses and can radiate radio
frequency energy and, if not installed and used in accordance with the
instructions, may cause harmful interference to radio communications.
However, there is no guarantee that interference will not occur in a particular
installation. If this equipment does cause harmful interference to radio or
television reception, which can be determined by turning the equipment off and
on, the user is encouraged to try to correct the interference by one or more of
the following measures:
–Reorient or relocate the receiving antenna.
–Increase the separation between the equipment and receiver.
–Connect the equipment into an outlet on a circuit different from that to
which the receiver is connected.
–Consult the dealer or an experienced radio/TV technician for help.
1.
2.
3.
This Transmitter must not be co-located or operating in conjunction with
any other antenna or transmitter.
This equipment complies with FCC RF radiation exposure limits set forth
for an uncontrolled environment. To maintain compliance with FCC RF
exposure compliance requirements, avoid direct contact to the
transmitting antenna during transmitting.
Any changes or modifications (including the antennas) made to this device
that are not expressly approved by the manufacturer may void the user’s
authority to operate the equipment.
FCC Label Statement
This device complies with part 15 of the FCC rules. Operation is subject to the
following two conditions:
1. This device may not cause harmful interference, and
2. This device must accept any interference received, including interference
that may cause undesired operation.
ii
Canadian Compliance Statement
This Class B Digital apparatus meets all requirements of the Canadian
Interference-Causing Equipment Regulations.
Cet appareil numerique de la classe B respecte les exigences du Reglement
sur le material broilleur du Canada.
European Conformity Statement
Declaration of Conformity with Regard to the R&TTE 1999/5/EC and EMC
89/336/ EEC directives.
RoHS Statement
This device conforms to RoHS (Reduction Of Hazardous
Sub-stances) European Union regulations that set
maximum concentration limits on hazardous materials
used in electrical and electronic equipment.
Taiwan NCC Warning Statement
交通部電信總局低功率電波輻射性電機管理辦法 (930322)
根據交通部低功率管理辦法規定:
第十二條
經型式認證合格之低功率射頻電機,非經許可,公司、商號或使用者
均不得擅自變更頻率、加大功率或變更原設計之特性及功能。
第十四條
低功率射頻電機之使用不得影響飛航安全及幹擾合法通信;經發現有
幹擾現象時,應立即停用,並改善至無幹擾時方得繼續使用。前項合
法通信,指依電信法規定作業之無線電通信。
低功率射頻電機須忍受合法通信或工業、科學及醫療用電波輻射性電
機設備之幹擾。
SAR標準值2.0W/Kg;送測產品為0.268W/Kg
為減少電磁波,請妥適使用
RF Radiation Exposure Statement:
For body worn operation, this phone has been tested and meets FCC RF
exposure guidelines when used with an accessory that contains no metal and
that positions the handset a minimum of 1.5 cm from the body. Use of other
accessories may not ensure compliance with FCC RF exposure guidelines.
iii
Laser Information
The Unitech HT680 series is certified in the U.S. to conform to the
requirements of DHHS/CDRH 21CFR Subchapter J and to the requirements of
IEC 825-1. Class II and Class 2 products are not considered to be hazardous.
The HT680 series contains internally a Visible Laser Diode (VLD) whose
emissions do not exceed the maximum limits as set forth in the above
regulations. The scanner is designed so that there is no human access to
harmful laser light during normal operation, user maintenance or during
prescribed service operations.
The laser safety warning label required by the DHHS/IEC for the HT680 series'
optional laser scanner module is located on the memory compartment cover,
on the back of the unit.
CAUTION! Use of controls or adjustments or performance of procedures other
than those specified herein may result in hazardous laser light.
Use of optical instruments with the scanner will increase eye
hazard. Optical instruments include binoculars, microscopes, and
magnifying glasses. This does not include eyeglasses worn by the
user.
Battery Notices
The HT680 is equipped with a Lithium-Ion battery pack and backup battery.
Both batteries will discharge after an extended period of not being used.
When both batteries are discharged, recharge the unit for 16 hours in order to
fully charge the main battery and backup battery. Recharge the HT680 through
the following:
1. Plug the USB charging cable to the HT680 and plug the 5V/3A AC-DC
adapter to the power jack of the USB charging cable.
2. Place the HT680 into the docking station and plug the 5V/3A AC-DC
adapter to the power jack of the docking station.
iv
If the main battery is removed, the backup battery ensures the data on SDRAM
is safe for up to 6 hours. To prevent data loss, do not leave the HT680
uncharged with the main battery removed for an extended period. See First
Time to Charge the Main Battery & Backup Battery on page 9 for more details.
Note: Rechargeable batteries are advised to replace every year or when 500
charge/discharge cycles achieved to guarantee optimal performance. It
is normal that the battery balloons or expands beyond one year or the
maximum of 500 cycles. Although it does not cause harm, it cannot be
used again and must be disposed of according to the location's safe
battery disposal procedures.
If the performance decrease is greater than 20% in a Lithium-Ion battery,
the battery is at the end of its life cycle. Do not continue to use, and
ensure the battery is disposed of properly.
The length of time that a battery power lasts depends on the battery type and
how the device is used. Conserve the battery life through the following:
Avoid frequent full discharges because this places additional strain on the
battery. Several partial discharges with frequent recharges are better than
a deep one. Recharging a partially charged lithium-Ion battery does not
cause harm because there is no memory.
Keep the lithium-Ion battery cool. Avoid a hot car. For prolonged storage,
keep the battery at a 40% charge level.
Do not leave the lithium-Ion battery discharged and unused for an
extended period because the battery will wear out and the longevity of the
battery will be at least shorter than half of the one with frequent recharges.
Battery charge notice
It is important to consider the environment temperature whenever the
Lithium-Ion battery pack is charged. Charging is most efficient at normal room
temperature or in a slightly cooler environment. It is essential that batteries are
charged within the stated range of 10°C to 45°C. Charging batteries outside of
the specified range could damage the batteries and shorten their charging life
cycle.
CAUTION! Do not charge batteries at a temperature lower than 0°C, which will
increase the internal resistance to cause heat and make the
batteries unstable and unsafe. Please use a battery temperature
detecting device for a charger to ensure a safe charging
temperature range. Further, to protect and avoid battery from
v
inflating, the battery is detected for thermal protection and will not
be charged when the temperature of battery is over 50 degrees.
Do not leave the terminal for a long time in the charging cradle and
do not charge the battery with a cable long, which will shorten the
battery life and cause battery expanding/ballooning. The unit
should not be subject to very high temperature, excessive moisture,
and direct heat. Avoid the battery from being fully charged and
staying in a high temperature environment. Avoid terminal or spare
battery from staying in a hot vehicle. For prolonging the storage
time, keep the battery at a 40% charge level. Lithium ion batteries
oxidize least when they are stored at the state of 40% charge.
Storage and safety notice
Although charged Lithium-Ion batteries may be left unused for several months,
their capacity may be depleted due to build up of internal resistance. If this
happens they will require recharging prior to use. Lithium-Ion batteries may be
stored at temperatures between -20°C to 60°C, however they may deplete
more rapidly at the higher temperature ranges. It is recommended to store
batteries within normal room temperature ranges.
Warranty
The following items covered under Unitech Limited Warranty are free from
defects during normal use:
HT680 – 1-year limited warranty.
Accessories – limited warranty depending upon your local dealer’s
definition
Warranty becomes void if equipment is modified, improperly installed or used,
dam-aged by accident or neglect, or if any parts are improperly installed or
replaced by the user.
Use only the adapter supplied. Using the wrong adapter may damage the unit
and will void the warranty.
vi
Table of Contents
Preface
About This Manual ............................................................................................ i
Regulatory Compliance Statements.......................................................... ii
FCC Warning Statement .................................................................... ii
FCC Label Statement ........................................................................ ii
Canadian Compliance Statement ..................................................... iii
European Conformity Statement....................................................... iii
RoHS Statement ............................................................................... iii
Taiwan NCC Warning Statement ...................................................... iii
Laser Information..................................................................................... iv
Battery Notices ........................................................................................ iv
Battery charge notice......................................................................... v
Storage and safety notice ................................................................. vi
Warranty .................................................................................................. vi
Table of Contents ........................................................................................ vii
Chapter 1
Getting Started .................................................................................................1
Introducing the HT680 ..............................................................................1
Notice .......................................................................................................1
Warranty ............................................................................................2
Regulatory .........................................................................................2
HT680 Model Specification .......................................................................3
vii
HT680 Accessories ...................................................................................4
Communication and Charging Cradle................................................4
Communication and Charging Cable Kits ..........................................4
Universal Adaptor ..............................................................................4
Holster ...............................................................................................4
Li-ion Battery Pack ............................................................................4
HT680 Product Introduction & Accessory Kit ............................................5
HT680 Front View..............................................................................6
HT680 Rear View ..............................................................................7
First Step with HT680 ........................................................................8
Install the Battery Pack ......................................................................8
Switch On Backup Battery .................................................................9
Supply Power to the HT680...............................................................9
First Time to Charge the Main Battery & Backup Battery.................10
Protective Screen Film..................................................................... 11
First Time Use of the HT680............................................................ 11
Setting the Time Zone First..............................................................12
Setting Date/Time ............................................................................12
Chapter 2
Using the Keypad and Scanner .....................................................................13
Keypad....................................................................................................13
HT680 HotKey .................................................................................14
Software Keyboard (Windows CE Keyboard) .........................................14
Opening the Windows CE Keyboard ...............................................14
Other Character Support from WinCE Keyboard.............................15
viii
Bar Code Scanner ..................................................................................15
Chapter 3
Power system ................................................................................................17
Charging the Lithium-Ion Battery Pack ...................................................17
Charging the Main and Backup Battery for the First Time ...............17
Environment Consideration for Charging.........................................18
Power Status Indication ...................................................................18
“Backup Battery Low” Icon...............................................................18
Charging the Lithium-Ion Battery Pack ...................................................18
Storage and Safety Precautions .............................................................19
Backlight Setting .....................................................................................20
Warm Boot / Cold Boot ...........................................................................20
Warm Boot.......................................................................................20
Warm Boot via Software ..................................................................21
Warm Boot via Hardware.................................................................21
Cold Boot.........................................................................................21
Cold Boot via Software ....................................................................22
Chapter 4
Data Communication .....................................................................................23
Introduction .............................................................................................23
Connecting..............................................................................................23
Serial or USB Cable.........................................................................23
Docking Station................................................................................24
RF Communication ..........................................................................24
Using ActiveSync .............................................................................24
ix
Installation...............................................................................................25
Using the Mobile Devices Window..........................................................27
Changing Communications Settings.......................................................28
Wireless Communication .................................................................28
Bluetooth Setup ...............................................................................29
Bluetooth ActiveSync .......................................................................29
GPRS Connection ...........................................................................31
WiFi Connection ..............................................................................33
Bluetooth Connection ......................................................................39
Chapter 5
Useful Utilities ................................................................................................49
Introduction .............................................................................................49
Scanner Setting ...............................................................................49
Scan2Key ........................................................................................52
Registry Backup/Restore .................................................................52
UniPing ............................................................................................52
Chapter 6
Device Setting................................................................................................53
Introduction .............................................................................................53
Info...................................................................................................54
Funckey ...........................................................................................54
IO.....................................................................................................55
Server ..............................................................................................55
Virtual Key .......................................................................................57
Screen .............................................................................................58
x
Ping .................................................................................................58
CPU .................................................................................................59
Backup.............................................................................................59
Battery .............................................................................................59
Appendix
Worldwide Support.........................................................................................61
xi
xii
Chapter 1
Getting Started
Introducing the HT680
The HT680 is a rugged, compact and ergonomic handheld
terminal powered by the WinCE. NET OS to enhance your
work more efficient and profitable. It incorporates an integral
barcode scanning 1D laser/ 2D imager device, color LCD
with touch screen, keypad, BT and wireless communication
interface capability. It provides the user with a standard
Windows-based environment for customization and
operation.
The following HT680 Product Reference Guide provides
simple step-by-step procedures to give you hands-on
experience with your HT680. For programming your HT680,
please refer to our SKD and programming manual.
Notice
1.
2.
This unit is equipped with a battery pack and backup battery. It is possible
that the Unitech HT680 may not be powered ON due to battery discharge
as a result of storage. In the above situation and the first-time use, plug
the HT680 to the charging cable or charging cradle (with 5V/2A AC-DC
adapter), and charge the unused unit for over 16 hours in order to fully
charge its backup battery as well.
Under normal condition, the back-up battery will be charged from external
power or the main battery (if the main battery still has enough power to
turn on). If it is charged for the first time, the back-up battery will be fully
charged while main battery is charged fully.
1
Warranty
Unitech's Limited Warranty provides for different warranty periods for different
parts and accessories:
Terminal is covered by 1-year limit warranty.
Docking Station is covered by 1-year limit warranty.
Cable is covered by 1-year limit warranty.
Battery is covered by 6-month warranty.
Regulatory
Compliance with VCCI, CE, FCC, BSMI, UL, CCC
2
HT680 Model Specification
Rugged/Environment
Keypads
Physical
Drop
1.5M
IP Rating
IP 54
Operation Temp.
-10°C to 50°C
Storage Temp.
-20°C to 70°C (W/O Battery)
Humidity
5%~95% non-condensing
ESD
Contact ± 8KV, Air ± 12KV
Full Alphanumeric
12 keys
Weight (g)
280g ± 10g (W/O Battery)
Dimension (LxWxH mm)
169 x 55 x 30
Main Battery Type
Power supply &
Management
Battery Recharging Time
3.7V / 2200mAH Li-ion,
8.14WH
Under 4 hrs.
BT
Battery Life
Backup Battery Type
Up to 12 hours
WLAN
around 8 hours
GPRS
6hours
70mAH Li-polymer
2.7” Color TFT LCD with Touch v
Display
Panel
Display pixels
Docking Station
240x320 pixel
USB/Ethernet, Four-Bay Multi. Charger
Barcode Scanner Reader 1D Laser & 2D Imager
System Architecture
Speaker
CPU Processor
PXA270 - 520MHz
Operating System
WinCE 5.0 Pro.
Flash ROM
512MB
SDRAM
128MB
v
Communication Interface USB Client / USB Host
Expansion Memory Slot
miniSD Slot
v
802.11b/g / GPRS / GPRS v
Radio Options
EDGE
Bluetooth
v
Remark: V= Contain ; X= Not Contain
3
HT680 Accessories
Each of the following items is sold separately to enhance your HT680
terminal’s capabilities.
Communication and Charging Cradle
USB Cradle is for data transmission and charging purpose. Modem Cradle is
for data transmission via phone line and charging purpose.
Communication and Charging Cable Kits
An included USB cable or an optional serial cable connects the HT680 terminal
directly to a peripheral device for communication and a power source for
charging.
Universal Adaptor
This power supplier adaptor plugs the terminal directly into a switch to power
the terminal and charge the battery pack. This accessory converts the
120~240 Volts for different countries use.
Holster
The holster holds the terminal for mobile use.
Li-ion Battery Pack
The 3.7v, 1950mAh Li-ion rechargeable battery pack provides the main power
supply for HT680 terminal.
4
HT680 Product Introduction & Accessory Kit
HT680 Terminal
Manual CD
Communication Cable
Battery
Adaptor
Plugs
Communication Cradle
5
HT680 Front View
LED Indicator
Touch Screen Display
Trigger
Function
Alpha
I/O Port
Power
6
HT680 Rear View
Bar Code Scanner
Stylus
miniSD Slot
Speaker
Battery Cover
7
First Step with HT680
Before first using the HT680, please ensure the battery is fully charged. There
are three ways to charge your HT680:
Docking Station
USB/Charging cable
Rechargeable Lithium-Ion battery pack
NOTE: Data loss may occur if the HT680's backup battery is not adequately
charged. Before charging the main battery, make sure the backup
battery switch is ON.
Install the Battery Pack
1.
Remove the battery cover.
2.
Move the backup battery switch to the ON position (see the description
3.
below).
Insert the battery pack so that the contacts on the battery pack line up
with the contacts in the battery compartment. Fully seat the battery.
8
4.
Cover the battery.
Switch On Backup Battery
Locate the backup battery switch inside the battery
compartment on the left-hand side. Please ensure that
it is in the “ON” position before charging the main
battery.
Supply Power to the HT680
Before using the power adapter, please follow the instruction made below to
remove the O-ring from the socket of the adapter.
9
Then, Connect the USB/Charging Cable to the HT680 and connect the AC
adapter to the cable’s power jack and an electrical outlet. To connect the USB
cable to the terminal:
1. Hold the terminal face up;
2. Face the side of the connector with the smaller pillar up, as shown below;
and
3. Connect.
WARNING
CONNECTING CABLE INCORRECTLY MAY
CAUSE DAMAGE!
1.
CONNECT CABLE “UP” WITH KEYPAD
FACE UP.
2.
TIGHTEN SCREWS TO SECURE
CONNECTION.
Or place the HT680 into the Docking Station (first connect the power supply to
the Docking Station).
First Time to Charge the Main Battery & Backup
Battery
We would like to propose to charge the battery at least up to 16 hours for the
first time to use. While it normally only takes about 4 hours to charge the
battery after it's been drained, when charging the battery for the first time
please allow at least 16 hours. While charging the main battery the backup
battery should also be charged. Please make sure the backup battery has
been switched “ON” (this cannot be emphasized enough).
CAUTION: There is a high risk of data loss from RAM if the backup battery is
not fully charged. This can happen if the main battery has been
drained and the unit is not connected to the AC adaptor. For this
reason, it is crucial that the backup battery is switched on before
charging the main battery for the first time.
10
Protective Screen Film
To protect screen, the HT680 has been provided with a protective plastic film.
You may remove it (if required). The screen will be more susceptible to
scratching without the film, but will be more readable.
First Time Use of the HT680
Pressing the Power ON/OFF Key
The Unitech HT680 welcome screen appears. The Windows CE screen will
appear shortly thereafter.
Align the Screen
When prompted, use the stylus to tap the targets as they appear in order to
align the touch screen.
When you complete the procedure, press any key or press anywhere on the
touch screen to start up the WinCE system.
Adjusting Screen Brightness
To adjust the original default setting of the screen brightness, the backlight
setting will be required. Please refer to page 20 for the new setting procedure.
Setting Time Zone/ Date
Before using the HT680 please take a few minutes
to set the time and date so that data can be properly
time-stamped.
11
Setting the Time Zone First
Follow the steps below to set up your time zone.
1. Tap the location arrow to see a list of cities.
2. Choose your location (or nearest listed one).
3. Select the Daylight Savings Time check box, if necessary.
4. Tap the Apply button.
If you would like the terminal automatically adjust clock for daylight saving,
please tick on it.
Setting Date/Time
Tap the Left or Right arrows to scroll the year and month you desire. Or,
directly tap location of year or month to change the year or month setting. To
set up time, tap on the Hr/Min/Sec AM/PM to input the Hr/Min/Sec
12
Chapter 2
Using the Keypad and Scanner
Keypad
Data can be entered into the HT680 via its keypads, which includes: 0~9,
alpha, function, escape, enter, scanner trigger, cursor, and on/off keys.
Scan Key
Enter Key
Escape Key
Cursor Key
Power ON/OFF Key
Function Key
[ENT]
Alpha Key
The Enter key confirms data entry.
[FUNC] The Function Key is used in conjunction with specific number keys to
operate as Hotkeys (see next page).
[ESC]
The escape key returns the user to a previous page.
[Cursor] The cursor key moves the cursor around the screen.
[Alpha] The Alpha key toggles Alpha mode on and off and Caps mode on and
off. One press of the Alpha key causes the HT680's keys to input
alpha characters, indicated by a blue LED light. A second press
causes the input of upper-case characters, indicated now by a green
LED. A third press returns the HT680 to numerical input.
13
HT680 HotKey
The HT680 provides hotkeys for frequently used functions. Press the Function
key and the appropriate numeric key for the following functions listed below:
Func 6 = Task Manager
Func 7 = Scanner Setting
Func 8 = Power Properties
Func 9 = System Info
Hotkeys can be modified to suit the user's preferences. To modify hotkeys,
please follow the path below:
Path: My computer/Windows/RegFuncKey.exe
Software Keyboard (Windows CE Keyboard)
Besides its hardware keypad, the HT680 provides a touchscreen keyboard as
an alternative method of character input. This software keyboard replicates the
layout of a standard PC keyboard.
Opening the Windows CE Keyboard
The Windows CE keyboard can be opened by
tapping the “keyboard” icon on the task bar.
(Refer to picture).
14
Other Character Support from WinCE Keyboard
In addition to standard keyboard input, the
HT680 supports special European character
and symbol input. To enter these characters,
tap the [áü] key on the touch screen keyboard
to display the available characters.
Bar Code Scanner
The HT680 has an integrated 1D laser and 2D imager bar code scanner
(depending on model number) capable of reading all major bar code labels.
15
16
Chapter 3
Power system
Charging the Lithium-Ion Battery Pack
The HT680's batteries can be charged via the USB or serial communication
cable, or via the optional docking station - both using the included AC adaptor.
Please charge the battery for at least 4 hours per session to ensure a full
charge. Please note that the first time charge should be for at least 16 hours
(see the description below).
Charging the Main and Backup Battery for the
First Time
When first charging the HT680, please allow at least 16 hours to fully charge
both the main and backup batteries. When the HT680 arrives from the factory
the backup battery switch is in the OFF position in order to protect the backup
battery. Before first charging the HT680, make sure the backup battery switch
is moved to the ON position. The backup battery switch can be found inside
the main battery compartment. Data loss can occur if the backup battery is not
adequately charged - therefore it is imperative to ensure that the backup
battery switch is in the ON position before charging for the first time.
A properly charged backup battery can store data for up to 72 hours without
power from the main battery. This is not recommended. Please make sure an
adequately charged main battery or AC power is presented and try not to rely
on the backup battery for other than unusual or emergency situations. To
prevent data loss due to backup battery failure (always a slim possibility),
please minimize the amount of time that the backup battery has to operate
without the main battery pack installed or while disconnected from AC power.
17
Environment Consideration for Charging
It is important to consider the environment temperature whenever you are
charging the Lithium-Ion battery pack. The process is most efficient at normal
room temperature or slightly cooler. It is essential that you charge batteries
within the stated range of -5°C to 50°C. Charging batteries outside of the
specified range could damage the batteries and shorten their charging life
cycle.
Power Status Indication
When the "Main Batteries Very Low" icon
appears, charging the main battery pack as
soon as possible is highly recommended in
order to avoid system shutdown at an
awkward moment.
“Backup Battery Low” Icon
When the "Backup Battery Low" icon appears, it indicates that the backup
battery is low and needs to be charged.
Charging the Lithium-Ion Battery Pack
Automatic shutdown of the HT680
The HT680 will enter idle mode when there is no task, or all tasks are waiting
for input. In default setting, the HT680 will automatically turn itself off if it
remains idle for 3 minutes and when there is no external charging power
applied. Pressing the power button will return the HT680 to the same point at
the time of automatic shutdown.
Do not leave the terminal for a long time in the charging cradle and do not
charge the battery with a cable long, which will shorten the battery life and
cause battery expanding/ballooning. The unit should not be subject to very
high temperature, excessive moisture, and direct heat. Avoid the battery from
being fully charged and staying in a high temperature environment. Avoid
18
terminal or spare battery from staying in a hot vehicle. For prolonging the
storage time, keep the battery at a 40% charge level. Lithium ion batteries
oxidize least when they are stored at the state of 40% charge.
To save the battery power, it is better to turn off wireless mode. Please follow
the steps below to turn off the wireless mode
Tap Setting → Control Panel → Device
Setting to enter the Device Setting zone.
Alternatively, Press Func key and “9” button to
bring the Device Setting screen.
Move to the IO tab and select Disable to
disable the wireless mode.
Storage and Safety Precautions
Batteries should be stored in an open environment and placed where there is
no risk of accidental shorting or other damage. Although charged Li-Ion
batteries may be left unused for several months, their capacity may be reduced
due to back up and internal resistance. If this happens they will require
recharging prior to use. Li-Ion batteries may be stored at temperatures
between -4°F and 158°F (-20°C to 70°C).
19
Backlight Setting
The backlight for color display is user-defined. There are two tabs – one for
Battery Power and the other for External Power.
Field
Description
Dim Backlight if
Select how many minutes you want to elapse before the
backlight dims.
Turn Off Backlight if
Select how many minutes you want to elapse before the
backlight automatically turns off.
Turn on Backlight
Select this option if you want the backlight to turn on
when the button is pressed or the touch screen is tapped.
Warm Boot / Cold Boot
Warm Boot
Warm Boot is a reset to re-boot the HT680 without losing saved data. Perform
a warm boot when:
The terminal fails to respond.
After installing some software applications
After making changes to certain system settings, such as network cards
WARNING -
20
Performing a Warm Boot will result in the loss of all
unsaved data!
Warm Boot via Software
Tap Start →
Programs →
Utilities →
BootMode.
Tap “Warm Boot”. The system will be warm
started.
Warm Boot via Hardware
warm-boot
Use a blunt pin (like an unfolded paper clip) to
stab the warm-boot pinhole located on the
front of the HT680, above the keypad.
pinhole
Cold Boot
A Cold Boot is used to reset the operating
system, restore the terminal back to factory
default, and reset the terminal after a
bootloader, keyboard, or kernel upgrade. You
are also allowed to stab the cold-boot pinhole
cold-boot
pinhole
to cold boot the HT680.
WARNING - Performing a Cold Boot will return the HT680 to its original
factory settings!
21
Cold Boot via Software
Tap Start →
Programs →
Utilities →
BootMode.
Tap “Cold Boot”. The system is reset and you
will lose all data including all files in the RAM
memory.
You will need to recalibrate the screen and
reset the date and time.
Cold Boot via Hardware
1. Remove the Main Battery.
2.
3.
4.
5.
6.
22
Switch OFF the Backup Battery.
Switch the Backup Battery back ON.
Insert the Main Battery.
The terminal will be cold started and reset back to factory default.
Recalibrate the screen and reset the date and time.
Chapter 4
Data Communication
Introduction
The Unitech HT680 allows users to link to a host computer via RS-232 / USB,
Bluetooth, or Wireless connection for data communication.
This chapter provides an overview of the communication of the HT680. The
following subchapters cover these topics:
“Series or USB or Modem” communication via cable or docking station
“RF Communication” for details about wireless communication between
the HT680 and host computers
“Microsoft ActiveSync” for details about serial communication via USB
port
Connecting
Serial or USB Cable
Plug the USB end of the HT680 communication
cable into your PC's USB port, and the other
end into the HT680's communication port. To
simultaneously charge the HT680, plug the AC
power adaptor into the power receptacle on the
USB plug.
23
Docking Station
USB Cradle
For data transmission, plug one end of your
HT680's USB communication cable into your
PC's USB Port and the other end into the
HT680 Docking Station's USB port. To
simultaneously charge the HT680, plug the AC
power adaptor into the power receptacle on
the Docking Station.
RF Communication
Windows CE can support TCP/IP protocol and
the user can link to the Internet via the settings
under “ Network and Dial-up Connections”.
In the Network and Dial-up Connections, go to
PRISM1 to set up the IP to connect to internet.
Using ActiveSync
Using Microsoft ActiveSync, you can synchronize and transfer information
between your desktop computer and terminal. The most current version of
ActiveSync can be downloaded from www.microsoft.com.
Additional Capabilities
With ActiveSync, you can also:
Back up and restore your device data.
Copy (rather than synchronize) files between your device and desktop
computer.
Control when synchronization occurs by selecting a synchronization
mode. For example, you can synchronize continually while connected to
your desktop computer or only when you choose the synchronize
command.
Select which information types are synchronized and control how much
data is synchronized. For example, you can choose how many weeks of
24
past appointments you want synchronized.
Before beginning installation, carefully read the following:
Because you will be restarting your computer during installation, save your
work and quit all programs before you begin.
To set up your communication settings, the HT680 serial cable is required
to connect the HT680 to your host computer.
If you run the Windows NT® operating system with a service pack, you will
be informed during setup that you may need to reinstall the service pack.
Try connecting first, and if unsuccessful, reinstall the latest service pack.
Requirements
To synchronize, ActiveSync version 3.7 or higher must be installed on both
your desktop computer and the HT680 terminal. The HT680 terminal is
installed with ActiveSync and shipped. Therefore, you must install ActiveSync
3.7 on your desktop computer.
To install ActiveSync on your desktop computer, please link to Microsoft
website to get free download driver.
Installation
Follow the installation procedure below to install Microsoft ActiveSync,
connect your HT680 to your desktop computer, and establish a partnership for
synchronization, if required.
Download the executable program “msasync.
exe” from the Microsoft web site at:
http://www.microsoft.com/mobile/pocketpc/
downloads/activesync35.asp. Execute this
program.
Select the folder into which Microsoft
ActiveSync will be installed. If you choose not
to download into the displayed default folder,
click the Change button.
25
After you’ve selected the folder, click Next to
set up Microsoft ActiveSync. After you’ve
installed Microsoft ActiveSync and restarted
your computer, you’ll see the screen:
Using the USB, plug the PA966 into a
communication port on your desktop
computer.
Turn the HT680 on. Click the Next button.
Microsoft ActiveSync should recognize your HT680 and configure your
communication port. If a message appears indicating that it is unable to detect
a connection, click the Cancel button and manually configure the
communication settings.
When the HT680 is initially connected to a PC,
the following screen appears prompting you to
set up a “Partnership”. Setting up a
Partnership is required if your HT680 is to be
synchronized with other computers and/or
terminals. Otherwise select No.
Now select synchronization settings. Currently
the HT680 can support “Synchronized Files”.
Different HT680 cannot share the same
Device Name if more than one terminal is to be
connected to the same PC via a “Partnership”.
The default Device Name assigned to the
HT680 is “WinCE”. It is important to specify a
different name for each terminal if more than
one terminal is to be connected to the same
PC. When ActiveSync displays the following
screen, assign each terminal its own unique
name.
26
Click the Next button and follow the instructions to set up a partnership
between the HT680 and your desktop computer. This partnership allows you
to synchronize information between the two computers.
When the configuration process is complete,
you’ll see the screen.
Synchronization will be initialized and will take place if you’ve chosen to
synchronize periodically or upon connection.
Note: Your desktop computer can create a partnership with multiple HT680.
Also, The HT680 can create a partnership with up to two desktop
computers.
Using the Mobile Devices Window
Start Microsoft ActiveSync by clicking the
Microsoft ActiveSync shortcut on your desktop
and then clicking the “Explore” icon.
In the displayed window, you can:
Select your HT680 to use Microsoft
ActiveSync features such as changing
synchronization options, as described in the
“Synchronization” section.
27
Open the Explorer window by double
Clicking your device icon in the Mobile
Devices window.
Use this window, which is the root window to
the HT680, to copy and move files between
the HT680 and your desktop computer, as
described in the “Synchronization” section.
Changing Communications Settings
If Microsoft ActiveSync fails to detect the HT680 during installation, set up
communications manually instead. Make sure the following conditions are
met:
Verify that the correct communications port is selected for your desktop
computer and that it is free.
Microsoft ActiveSync uses the specified communication ports to connect
to the HT680. Make sure these resources are available for Microsoft
ActiveSync to connect to the HT680. Other programs cannot use them
while the HT680 and your desktop computer are connected.
Set your baud rate on the HT680 - the desktop computer will match it.
To check communications settings, open the
Mobile Devices folder, and click File /
Connection Settings. The connection on the
HT680 is set to USB connection by default. To
adjust the connection, tap Start, Settings,
Control Panel, select the Communication
icon, select the PC Connection tab, and then
tap the Change Connection… button.
For more information see Microsoft ActiveSync
Help.
Wireless Communication
Your HT680 is equipped with built-in Bluetooth for wireless communication.
28
Bluetooth Setup
Tap Start → Programs → Bluetooth →
BTPowerON.
Select Bluetooth Module Power On and tap
OK.
Bluetooth ActiveSync
Select BTActiveSync from Communication on
the Startup bar.
On your PC, tap the Bluetooth icon on the task
bar. The screen to the right will appear. Select
More...
29
Choose Inquiry. The inquiry process might
take a few seconds. Then select the device to
synchronize and tap OK.
Tap the Bluetooth icon on the task bar again.
Click Sync.
The message “Connecting to Bluetooth” will appear on your HT680.
A Bluetooth security screen will appear
prompting you to enter a PIN code. This PIN
code can be any series of letters and numbers,
and must be the same code you enter on your
HT680 when prompted.
When prompted by your HT680, enter the same PIN code that you’d entered
on your PC. Once it is successfully entered, your synchronization is complete.
30
GPRS Connection
Before GPRS connection, insert a SIM card into your terminal first.
NOTE: Please turn off the SIM card lock if your SIM card is password
protected.
1.
Tap Start → Programs → GPRS →
32WANDEMO.
2.
Tap Power On.
3.
The screen displays “Modem Power Status
is ON”. Tap OK.
31
4.
Tap Start → Programs → GPRS →
32WANRAS.
The 32WANRAS DialUp window appears.
Tap Open Connection.
5.
The Connection window appears. Tap
Connect.
For the detailed settings, please consult
your local telecom company.
6.
The GPRS icon on the taskbar indicating
the signal strength.
Tap Disconnect Connection, you can end
the GPRS connection.
32
WiFi Connection
Unitech terminals come with built-in RF facility. A wireless network can be
added either when the network access point is detected or by manually
entering setting data. Before following these instructions, make sure if
authentication information is needed.
Using the Summit Utility
You can use the Summit Client Utility tool to do or change the WiFi settings.
Admin Login
1. Tap Start → Programs → SUMMIT →
scu.
2.
To login as an administrator, tap Admin
Login.
33
3.
Enter the Admin Password.
pass-word: SUMMIT
(Default
Scan Available AP
1.
Under Profile tab, tap Scan for available
AP.
2.
You may select a desired AP to create a
new profile. Tap Configure.
34
3.
Tap Yes to create the new profile.
4.
Enter the WEP key or network key. Tap OK.
Commit and Activate
1.
Tap Commit to activate the setting.
35
2.
Under Main tab, select the profile you want
to activate.
3.
A pop-up window appears “A Power Cycle is required to make settings
activate properly.” Tap OK, and then tap OK to exit the Summit Client
Utility.
Tap Start → Programs → Utilities → Boot-Mode. Tap Warm Boot
4.
to warm start the terminal and load the previous settings.
5.
The Summit icon on the taskbar indicating
the AP is connected.
Double tap this icon to bring up Summit
Control Utility. Tap Disable Radio, you can
disconnect the AP.
Under Status tab, you can see the IP
address, signal strength and quality.
If you want to learn more detailed settings of the SUMMIT utility, please visite
SUMMIT website (http://www.summitdatacom.com/documentation.htm).
36
Using the Microsoft Wireless Networking Tool
Alternatively, you may use the built-in Microsoft wireless networking tool to
connect to an access point.
1.
Tap Start → Programs → Summit →
scu.
2.
The Summit Client Utility window appears.
Select Third Party Config from the drop
down menu of Active Profile.
3.
A pop-up window appears “A Power Cycle
is required to make settings activate
properly.” Tap OK, and then tap OK to exit
the Summit Client Utility.
37
4.
Tap Start → Programs → Utilities →
Boot-Mode. Tap Warm Boot to warm start
the terminal and load the previous settings.
5.
Tap the wireless network icon as a shortcut
on the desktop.
6.
Tap Add New or double tap a preferred
network.
38
7.
Enter a Network Name (SSID) and a
Network Key. For the detailed instruction on
wireless network encryption setting, please
visit Microsoft website.
8.
The network icon appears on the taskbar
when the RF is connected.
Bluetooth Connection
Your device is provided with Bluetooth wireless technology that you can use
to synchronize information with a computer equipped with a Bluetooth adapter
or access point. Bluetooth wireless technology allows you to communicate
with the computer whenever it is within a range.
Follow these instructions below to do a Bluetooth connection.
1.
Tap Start → Programs → Bluetooth →
BTPowerON.
39
2.
Check Bluetooth Module Power ON, and
tap OK.
Alternatively, you may use BTMAN, which will be described, to enable the
Bluetooth module.
Using BTMAN to connect and pair a Bluetooth device
After enabling the built-in Bluetooth module, you may use BTMAN to connect
and pair a Bluetooth device around.
BTMAN is a Bluetooth manager gathering and
managing all Bluetooth profiles you add.
Tap Start →
Programs →
Bluetooth →
BTMAN to open the manager.
In the Service tab, six icons, About, Power
OFF/ON, FTP, ActiveSync, Modem, and
Audio OFF/ON, are arranged.
About: To show you the software version and
BT module MAC address
Power OFF/ON: To enable ON or OFF the BT
module
FTP: To transfer files to or receive files from a PC or terminal
ActiveSync: To synchronize with a PC
Modem: To allow you go on Internet after connecting to a cell phone as a
modem
40
Power OFF/ON: To enable or disable paired Bluetooth earphones
First of all, tap the Power OFF icon to enable
the Bluetooth module.
Tap Yes to turn ON the Bluetooth module.
Tap the Scan Device tab to scan Bluetooth
devices around.
Tap Scan Device.
41
Scanned Bluetooth devices around are listed.
Later, you may double tap a desired device and
check Trusted and then Active.
ActiveSync Between HT680 and a PC or Terminal
On the Scan Device tab, for example, select
and double tap a desired PC.
Tap Trusted.
Tap Yes.
42
Enter a PIN code on the terminal and tap OK.
Then, an Enter PIN dialog box pops up and
enter the PIN code same as that you inputted on
the terminal.
Double tab the paired PC. When the pairing is
successful, Trust and Active are checked.
Move to the Service tab and tap ActiveSync.
Tap Yes to launch ActiveSync. Then, HT680 will
synchronize with the desired PC by means of
Bluetooth.
43
File Transfer Protocol (FTP) via Bluetooth
You may use the FTP profile to transfer files to and receive files from a PC or
terminal. Please follow the instruction below to connect and pair the PC or
terminal for file transfer and receiving.
On the Serve tab, tap the FTP icon.
The terminal is searching for PCs and terminals
that are provided with the FTP function.
Select a device and tap OK.
44
An Authentication Request box pops up. Then,
input a PIN code and tap OK.
Choose a desired PC or terminal to or from
which you want to transfer or receive data. Tap
OK to confirm the connection.
Next, a dialog box pops up on the selected PC. Select and determine a path
where a file or files may be transferred between HT680 and the PC.
The FTP Service zone appears. All function icons in the zone are defined
below.
Refresh
Shared Files List
Upload
Download
End and Exit
Move to upper directory
Move to subdirectory
45
Modem
You may surf on Internet by connecting HT680 to a mobile phone that serves
as a modem. Follow the instruction below to connect and pair a mobile phone
with GPRS function.
Tap the Scan Device tab to scan Bluetooth
devices around.
Tap Scan Device.
Scanned Bluetooth mobile phones around are
listed. Later, you may double tap a desired
phone and check Trusted and then Active.
Then, HT680 is successfully connect to and
paired with the phone as the modem.
46
Audio (Headset) OFF/ON:
HT680 is provided with the feature of headset profile. Follow the instruction
below to connect and pair a Bluetooth earphone.
Tap the Scan Device tab to scan Bluetooth
devices around.
Tap Scan Device.
Scanned Bluetooth earphones around are
listed. Later, you may double tap a desired
earphone.
Tap Trusted.
47
Tap Yes.
Input a specified PIN code and tap OK.
When the Bluetooth earphone is successfully
paired with HT680, you will see Audio ON on
the Service tab.
48
Chapter 5
Useful Utilities
Introduction
Unitech has been developing some of useful utilities for user’s application. The
followings are Unitech Utilities introduction.
Scanner Setting
When it is necessary for the user to change the
default barcode symbology for a different application,
Scanner Control Panel provides the setting function
to change default symbology, place delimiter
characters behind scanned data, and save the
settings. Run this program from \Start\Setting\Control
Panel\Scanner Setting.exe and Scanner Control
Panel will be displayed.
Barcode Symbologies
Barcode
Enable/
Char Check /
Symbology
Disable
Digit verification
Bookland
Transmit
Leading
Check
Digit
Char/digit
Transmit
Others
YES
EAN
Codabar
YES
YES
YES
Transmit
Start/Stop bits,
CLSI format, *data
length
Code 11
YES
YES
* check digits,
*data length
Code 128
YES
*data length
Code 32
YES
Transmit Tailing
digit
49
Barcode
Enable/
Char Check /
Symbology
Disable
Digit verification
Code 39
YES
Transmit
Leading
Check
Digit
Char/digit
Transmit
YES
Others
For ASCII,
Transmit
Start/Stop bits,
Function Code,
Double label
decoding,*data
length, *double
labels separator
Code 93
YES
Deta Code
YES
EAN 128
YES
YES
YES
*data length
YES
YES
Transmit Code ID,
* Field separator
EAN 13
YES
YES
EAN 8
YES
YES
* Not suppress
first or last digit,
*data length
Interleaved YES
YES
YES
Fixed Length, *
2 of 5
Not suppress first
or last digit, *data
length
Label Code YES
YES
IV&V
MSI/Plessey YES
YES
* Check digit
double module 10,
* data length
Interleaved YES
YES
YES
Fixed Length,
2 of 5
Telepen
*Data Length
YES
*Standard
Character Set
UPC A
YES
YES
YES
UPC E
YES
YES
YES
Zero
Expension,NSC
UPC/EAN
Supplement 2,
Group
Supplement
50
Barcode
Enable/
Char Check /
Symbology
Disable
Digit verification
Transmit
Leading
Check
Digit
Char/digit
Transmit
Others
5,Insert Space
before
supplement, most
have supplement,
*Add-on code try
level
Group GS1 YES
Note: *Value Adjustable Scanner Control Pannel V3.0
Barcode Symbologies 2D
Barcode
Enable/
Char Check /
Symbology
Disable
Digit verification
Aztec
Transmit
Leading
Check
Digit
Char/digit
Transmit
YES
Others
Runes, *data length
Codablock F YES
*data length
Code 49
YES
*data length
Data Matrix
YES
*data length
EAN-UCC
YES
UPC composite,
Composite
MaxiCode
*data length
YES
*data length
MicroPDF417 YES
*data length
OCR
OCR mode, OCR
YES
direction, Template,
Group G, Group H,
Check character
PDF-417
YES
QR Code
YES
TLC-39
YES
*data length
(TCIF Linked
Code 39)
Note: *Value Adjustable Scanner Control Panel Version 5.14
51
Scan2Key
The Scan2Key application can route input from the
scanner port to the keyboard buffer, with the result
that all scanned data will be treated as if they were
input from the keypad. With this router, scanned data
can be directly input into generic applications like MS
Pocket Word. Scan2Key can be found at:
\Start\Setting\Control Panel\Scanner Setting\ To kpd.
Registry Backup/Restore
The Registry Backup program stores the HT680's
registry settings for the user to access. If a cold boot
should be required, or the user otherwise wants to
return the registry to a previous state, the user can
retrieve an earlier setting from Registry Backup.
Registry Restore allows the user to restore the
HT680s registry to a previously saved version.
\Start\Program\Utilities\Registry Backup
UniPing
This Unitech program enables the user to ping their IP to determine the status
of the connection.
52
Chapter 6
Device Setting
Introduction
The Device Setting is a short cut for you to view device information and do settings,
such as Function Key, I/O, Server and so on. The following description will guide you
through completion of all device-setting items.
1.
Left click Control Panel in My Device.
2.
Double click Device Setting.
53
Info
Info tab shows general information of this terminal
such as OS version, memory space, battery power,
product ID and etc.
Funckey
1.
Tap “FuncKey” tab. Four hot keys can be
changed by the users.
2.
Tap “Func6”. Tap “Browse” to select a file. Tap
“Set”.
3.
Press “Func” key and “6” key. Func6 will call the application that the users
specified.
You can repeat the steps for Func7, Func8, and Func9.
4.
By default:
Func6 – Task Manager
Func7 – Scanner Settings
Func8 – Power Properties
54
IO
1. Tap “IO” tab.
2.
3.
Under status, select “Enable” or “Disable”.
When enable, SD/ Wireless card is always accessible; when disabled,
SD/Wireless card is not accessible.
Server
Server Manager is a tool for the user to manager the
NTLM (Windows NT LAN Manager) users, FTP users
and telnet users.
Account Manager
NTLM
1.
2.
Tap “Server” tab.
Tap “NTLM”. Tap “Add” to add a new user.
55
3.
4.
5.
6.
Key in the user name and password. Tap OK.
To modify a user’s password, select the user and tap “Modify”.
Enter the new password and confirm password. Tap OK.
To delete a user, select the user you want to delete, tap “Delete”.
FTP
1.
Under “FTP” tab, tap “Add” to add FTP user.
2.
3.
Select the user and tap “Add”.
To delete ftp user, select the user and tap “Delete”. You will see the dialog
box – “Do you want to delete the user X?” Tap “Yes”.
Telnet
1.
2.
Under “Telnet” tab, tap “Add”. Add the telnet user from NTLM.
Select the user and tap “Add”.
3.
To delete telnet user, select the user and tap “Delete”. You will see the
dialog box – “Do you want to delete the user X?” Tap “Yes”.
56
Server Settings
Option
1.
Tap “Option”.
For telnet server setting, enable/disable server.
2.
For FTP server setting, enable/disable server and define anonymous
login.
Save
Tap “Save” to save the server settings.
Load
Tap “Load” to load the saved server settings.
Virtual Key
This tool allows you to enable/disable the alpha keys on the terminal’s keypad,
set auto enter and inter character delay.
1. Tap “Virtual Key tab.
2.
3.
4.
Check “Enable Virtual Keys Applet”. Tap “Set”. Tap OK.
Open MS WordPad and test alpha keys. Press “alpha” key and press
numeric key. The characters output as alpha keys.
Uncheck “Enable Virtual Keys Applet”. Tap “Set”. Tap OK.
57
5.
Press “alpha” key and press numeric key. The characters output as
non-alpha keys.
6. In “Virtual keys”, enter the time delay for “Delay To Send Key”. Characters
will be output in the speed as defined.
7. In “Virtual keys”, check “Enable Auto Enter”.
8. Define a value for “Auto Enter Timeout”. Tap “Set”. Tap OK.
9. In MS WordPad, turn to alpha mode. Press and hold a key. The alpha
characters are highlighted in a loop. Release the key. The character,
which was focused on will be printed after a period of time, according to
the auto enter timeout defined.
10. Tap “Load” to load the previous setting.
Screen
1.
2.
3.
Tap Rotate Right. Screen rotates to the right.
Tap Rotate Left. Screen rotates to the left.
Tap Upside Down. Screen rotates upside down.
Ping
This tool allows you to ping to other devices in LAN network while your terminal
is connected to the network.
1. Tap “Ping” tab, on Host field, enter the IP address
of the device you want to ping to.
2. Check “Constant Ping” so that your terminal will
continuously ping to the remote device.
3. Tap “Start”. The terminal will search for the remote
computer with the IP address, which you entered.
If not found, you will see “Request Time Out”. If
the remote computer is found, you will see “Host
Responding”.
58
CPU
This allows you to select the speed of the CPU according to your requirement
of the performance.
1. Select “Most Efficient”. This will speed up the
CPU but very power consuming.
2. Select “Most Power Saving”. This will save the
battery power but the efficiency is lower.
3. Select “Dynamic arrange”. This will let the speed
changes according to the system status.
4. For every selection, please tap “Apply” button to
take the effect.
Backup
This tool allows you to save the current registry or reset to factory default.
1. Tap “Backup” tab.
2. Tap “Save” to save current registry settings.
3. Or tap “Restore” to reset registry to factory
default. The terminal will be warm started. (Note
that “Restore” button is grey out if the registry
setting was not saved before.)
Battery
This tool allows you to charge the battery in the Smart
Charge mode as soon as the power of battery
decreases to a level to which you drag. After changing
the charge mode, you are required to warm boot the
device. Whenever you charge the battery in the Smart
Charge mode, turn ON the device. The default charge
mode is Normal Charge.
59
60
Appendix
Worldwide Support
Unitech’s professional support team is available to quickly answer questions or
technical-related issues. Should an equipment problem occur, please contact
the nearest Unitech regional service representative. For complete contact
information please visit the Web sites listed below:
Region
Web Site
Global Operation Center
www.unitech-adc.com
Unitech Asia Pacific & Middle East
www.unitech-utp.com.tw
Greater China Division
www.unitech-sbd.com
Unitech Japan
www.unitech-japan.co.jp
Unitech America
www.ute.com
Unitech Latin America
www.latin.ute.com
Unitech Europe
www.unitech-europe.nl
61