1
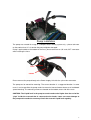
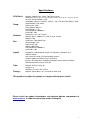
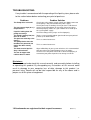
Another way
RECOM ®
PowerStation Evo Liquid Case
Manual
v1.1
Liquid Cooling Case Installation Manual
Introduction
The working principle of the PowerStation Evo liquid cooling case, works on a
method known as “Heat Exchange”. When power is sent to the pump, it begins
to circulate the liquid around the system. Liquid coolant is then passed through
the cooling blocks which are attached to your CPU, VGA & Northbridge Chipset
(optional parts), the liquid coolant will then transfer the heat from the heat
source through the cooling blocks and then into the coolant. From there, the
water circulates into the radiator which will then be “Surface Cooled” by 2
Pieces Silent 12cm (14cm optional) Fans, and will finally disperse the heat from
the Coolant.
Caution: Please read and understand this manual correctly and accurately
before installing or operating this product. By disregarding any instructions
in this manual could result in damage to your computer, loss of data, damage
to this product and/or personal injury.
Thank you for purchasing the Recom PowerStation Evo liquid cooling product.
NOTICE
• This product is subject to updates or changes without prior notice.
• Recom is not responsible for any direct, indirect, intended, or unmeant damage
to your computer, loss of use, loss of data, loss of income or profit, and/or
personal injury due to incorrect installation and illegal operation.
• If you do not understand any part of this manual, please contact the technical
support. Without understanding the instructions, the installation is forbidden.
•
•
•
•
•
•
•
•
•
IMPORTANT NOTICE
Before using this liquid cooling set, please read and keep the manual close
by for reference.
The working temperature environment of the liquid cooling set is from –10°C
to +40°C.
If there are any leaks from the liquid cooling system, shut down your pc, and
unplug it and peripherals immediately and check the system carefully.
Keep the radiator out of direct sunlight and away from any other heat
sources.
Before using the equipment, please make sure that your power supply is at
least 450W or more for safe operation.
Hold the Molex when unplugging the power cable. Plucking the power cable
directly is not advised.
Try not to bend or kink the tubing when using the system.
Running the system with low liquid may result in damage to the parts within
your computer, please check the liquid every 3 months.
Please screw the fittings on the components by hand, no tools will be
needed, there is no guarantee for the damage due to this!
2
MAIN PARTS AND WORKING PRINCIPLE
1. CPU Cooling Block: Specifically designed for the heat transfer process from
the CPU core.
2. Pump: will provide power for the circulation of the coolant.
3. Radiator & Fan: Also know as the Heat Exchanger, for dispersing heat from the
coolant
4. Mounting Plate: for 1156 (i5), 1366(i7), LGA775, AM3/AM2(+), 754 / 939 / 940 / 478
5. Heat-Transferring Liquid: Liquid coolant, used to transfer heat from the
system. Ready-to-use (doesn’t have to be diluted with distilled water anymore)
6. Thermal compound: Used to increases heat transfer from the heat source to
the cooling block.
7. Tubing: Used to direct coolant around the system.
8. Fittings: Used to fix hose on the liquid cooling components.
Installation
SET UP YOUR WORK AREA
Your working area should be well lit at all times, gather your tools: screwdriver;
scissors etc.
Installation of the CPU Block
Warning: Please take care while installing the CPU-Block. Fixing too hard using
tools might cause damages to the CPU and M/B!
1. Please remove the retention module from the M/B if necessary. The M4 screws have to
be put through the M/B from the bottom side. Please make sure that the washer and
insulating is placed in between as shown on the picture.
3
2. Please use the washer on the topside of the M/B as well.
3. Screw the four nuts onto the screws to fix the clip on the M/B.
4. Remove clear film from the base of the CPU Cooling Block and apply the thermal
grease on it properly, and put it onto the CPU.
5. Fix the 1/4“ fittings on the CPU Block (hand screwed – no tool needed !) As a last step
please fix the springs and the knurled nuts included in delivery onto the screws as you
can see on the next page.
4
Pump installation
The pump was created for usage in a complete water cooling system only – please take care
on the coolant level. If it is too low the pump might be damaged.
Pump is preinstalled on the bottom of the case, please take care on „IN“ and „OUT“ connector
while installing the hose.
Please connect the pump directly to the Power Supply Unit with the 4 pin molex connector.
The pump can be moved for mounting. The current location is a suggested location. In some
cases it can be possible the pump needs be moved a few centimetres because of mainboard
space/mounting. The mounting screws are located on the bottom, outer side of the case.
CAUTION: The Liquid level in the pump/reservoir needs to be higher then the end of the
“pipe” inside the reservoir that is connected to the intake. Lower can cause damage to
the pump and exceeds the warranty. Check the reservoir liquid level regularly.
5
Radiator Fitting Installation
Screw the two 1/4” fittings into G1/4” thread of the pre-mounted radiator by hand, now you can
connect this radiator with other components by using enclosed tube.
Tubing Installation
After installing the CPU-Block, it is time to connect the single components to each other. Please
trim the tubes due to your personal system.
It is important to straight cut the ends of the tubes. A side cutter is recommended to do so.
The tubes will be connected with the included 1/4“ fittings.
The single steps to connect the single components as followed:
Step 1:
Step 2:
Step 3:
From Pump „OUT“ to CPU Block
From CPU Block to Radiator
From Radiator to Pump „IN“
It is sufficient to fix hand-screwed only!
Filling up the Cooling Systeme & Testing Pump
To fill up the water cooling kit you need the funnel or syringe, the coolant and a screwdriver.
The coolant is ready-to-use and doesn’t have to be mixed anymore with destilled water.
Step 1:
Step 2:
Step 3:
Please remove the 220 Volt plug from your PC (!)
Remove the 20 (24) PIN power plug of the PSU from your M/B. It is best to
remove other components like HDD from power as well.
Bypass the power plug by connecting the green wire with the black one using a
paper clip for example. This step prevents the M/B for getting electricity but it is
still possible to switch the pump „on“ and „off“ using the power button at the PSU.
You also can use the Recom T8 or T12 PSU power tester.
6
Step 4:
Step 5:
Step 6:
Please open the screw at the top of the pump to fill up, fill in some coolant into the
pump using a small funnel. Switch on the ATX PSU and fill the pump step for
step.
Initial noises from the pump are quite normal and will stop after filling up the
system completely. If there are problems with the circulation of the coolant please
shake the pump carefully.
In order to get out the air bubbles inside the radiator, you need to shake the
radiator gently as well. Please test the pump for a minimum of 1 – 2 hours before
closing the case.
The installation is now completed !
Please check all connectors and cables before you turn on your Computer.
7
Specifications:
CPU Block:
Material: Copper base, Cover: Fiber Glass Nylon
Dimension: 50,4 x 50,4 x 9 mm (Copper base), total: 80,5 x 104,5 x 25 mm
2x G1/4“ thread, Weight: 175 g
Compatible Sockets: 1156(i5) / 1366(i7) / 478/ 775/ 939/ 754/ AM2(+) / AM3
Pump:
Rated Voltage: 12V, 60 Hz
Power Input: 10 W
Pump Speed: 700 L/hr.
Pump Height: 1.7 m
Life Expectancy: 50000 hrs.
Connector: 4 pin
Radiator:
Dimension: 323 x 142 x 29 mm
Material: Brass, Copper Fins, with 2x G1/4“ thread
Weight: 710 g
Fan:
Dimension: 120x120x25 mm
Rated Voltage: 12V
Power Input: 2W
Speed: 1000 RPM
Life Expectancy: 50000 hrs.
Connector: 3 pin
Liquid:
Ingredients: Distilled Water, Glycol, UV liquid etc. (Ready-to-use)
Volume: 500 ml
Anti-corrosive fluid for PC liquid cooling systems
Protects copper, aluminium, brass and nickel.
Injurious to health when swallowing! Keep out of the reach of children!
Avoid contact with the eyes and skin.
Tube:
Material: PUR or PVC 8/10
Length: 2 m
Diameter: ID 8 mm, OD: 10 mm
Fittings:
Material: Plated Brass, for ¼“ thread, for tube 8/10
This product is subject to updates or changes without prior notice!
Please check for update informations and optional add-on components at
www.recom.nl, in order to extend your water cooling kit!
8
TROUBLESHOOTING:
If any trouble is encountered with the operating of the liquid system, please refer
to the section below before contacting your point of purchase.
Problems
The Pump does not work?
The cpu reports high (70°c) +
temperatures?
Liquid is leaking from the
pump constantly?
The liquid is getting low, but
there is no leak?
The pressure reducing valve
fizzles?
The pump fizzles when the
mainboard is powered, but
fizzles die down shortly
after?
The heat transfer liquid is
dirty & discolored?
The fan of copper tube
radiator doesn’t work?
Problem Solution
Check your mains power supply; Check your Molex connector
on the pump is fully connected to the power supply
Check your Pump is working, Check you have used thermal
grease on the water blocks & also check if they have been
mounted properly; Make sure your 120mm fan is wired up to
the system power supply.
Check the fittings of the pumps are fixed properly.
Top the system up with coolant (purchased from your point of
purchase) or distilled water.
This is a normal occurrence.
This is a normal occurrence.
Algae will build up in your system after time; it is recommended
that you replace the Liquid Coolant every 6–8 months.
Check to see if the power connector is connected properly. If
not contact your point of purchase to arrange a new fan.
Disclaimer:
Please read and understand this manual correctly and accurately before installing
or operating this product. By disregarding any instructions of this manual could
result in damage to your computer, loss of data, damage to this product / or
personal injury. Recom will not be held responsible for any of the above and in
proper use of this piece of equipment.
*All trademarks are registered to their respective owners.
(Manual v1.1)
9