Transcript
CX-39
POWER SOURCE ---------------------------------------
Operating
Instruction
AM/FM/SW1/SW2 4 BAND RADIO WITH ALARM CLOCK
1
5
6
2
FM/MW/SW1/SW2 4 BAND DIGITAL RADIO
POWER
AM
(((
(((
13
3
TIME SET ALARM SET ALARM
LIGHT
ON/OFF
FM
4
MIN
MW
HOUR
SW1 SW2
7 89
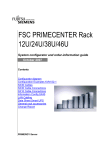
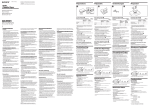
1. Telescopic Antenna
2. Handle Bar
3. AC socket
4. Battery Compartment
5. Power Indicator
6. LCD
7. Time Set/Light
8. Alarm Set
14
11
10
15
12
9. Alarm On/Off
10. MIN
11. HOUR
12. Band Switch
13. Tuning Dial
14. Volume Dial with
Power Switch
15. Earphone Jack
AM
(((
BATTERY OPERATION
1. Open the Battery Cover.
2. Insert 2 "D" size (UM-1 or equivalent) batteries
into the battery compartment,making sure that the
batteries are installed with the proper polarities
(+ and -).
AC Supply
1. Make sure the Voltage Selector is set to the
correct position. Connect the AC cord to the AC
socket and the wall socket. The set is now
ready to use.
2. To switch off the set completely, pull the AC cord
from the wall socket.
To prevent possible damage to this unit:
* Load new batteries with their polarities ( + and -)
aligned correctly.
* Do not apply heat to batteries, or internal shortcircuit may occur.
* If this unit is not to be used for a long period of
time , remove all batteries and store them in a
cool and dry place.
* Remove dead batteries immediately and dispose
of them.
* Do not use old and new batteries together. Also
never use an alkaline battery with a manganese
Battery.
* Battery life
If the sound becomes low or distorted, replace all
of the batteries with new ones.
RADIO OPERATION -----------------------------------1. Rotate the volume dial to turn the radio on and
adjust to the desired sound level.
2.Select the preferred frequency band
(FM/AM/SW1/SW2) by silding the band switch
3. Rotate the tuning dial to tune to the desired
station.The display shows the frequency.
4. Adjust the antenna (See ANTENNAS).
5. To switch off the radio,rotate the volume dial
until a click is heard.
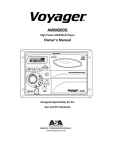
CLOCK FUNCTION-------------------------------TO SET THE TIME
AM
(((
(((
FM/MW/SW1/SW2 4 BAND DIGITAL RADIO
POWER
AM
TIME SET ALARM SET ALARM
LIGHT
ON/OFF
FM
MIN
MW
HOUR
SW1 SW2
1. Press and hold the TIME SET button, and press
the HOUR button until the correct hour is shown.
* Ensure that the AM/PM is set properly.
2. While holding the TIME SET button, press the
MINUTE button until the correct minute is shown.
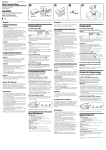
TO SET THE ALARM TIME
1. Press and hold the ALARM SET button, and a
"
" Will appear on the display to identify the
alarm time. While holding the ALARM SET button,
press the HOUR button until the desired hour is
shown.
* Ensure that the AM/PM is set properly.
(((
FM/MW/SW1/SW2 4 BAND DIGITAL RADIO
POWER
FM
AM
TIME SET ALARM SET ALARM
LIGHT
ON/OFF
FM
HELPFUL HINTS -----------------------------------
SW1 SW2
2. While holding the ALARM SET button, press the
MINUTE button until the desired minute is shown.
AM
(((
(((
FM/MW/SW1/SW2 4 BAND DIGITAL RADIO
POWER
((( (((
AM
TIME SET ALARM SET ALARM
LIGHT
ON/OFF
FM
MIN
MW
SW1-2
powder to clean the cabinet. Wipe it with a soft cloth
moistened with a mild soap and water solution.
* Avoid spray-type insecticides. Some insecticides
contain chemicals that could cause cabinet
deformation.
HOUR
MIN
MW
AM
HOUR
SW1 SW2
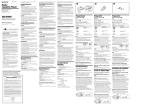
3. After setting the alarm time, turn on the radio,
select the station, and turn the unit off.
4. Press the ALARM ON/OFF button, a " ((( (((" will
appear on the display. The radio will turn itself on
at the alarm time.
ANTENNAS
FM:
Pull out the Telescopic Antenna and adjust its
Length and angle for optimum reception.
AM :
The sensitive ferrite core antenna inside the set
will provide excellent AM reception in most areas.
Turn the set in the direction which gives the best
results because the ferrite core antenna is
directional.
SW1-2:
Fully and vertically extend the telescopic antenna.
* If the set is not used for a long period of time,
Remove the batteries to prevent potential damage
due to possible battery leakage.
* Do not subject the set to temperatures over
60 C(140 F) because characteristics of the internal
parts may be adversely affected by heat. Never
leave the set in a car exposed to direct sunlight
for a long period of time with the doors and
windows closed . The cabinet may become
deformed and deterioration of the performance
may result.
* Since a strong magnet is used for the speaker,
keep magnetized commuter passes , tickets or
personal credit cards, recorded tapes, watches
etc. away from the radio. The speaker magent in
the radio may damage them.
* Do not place the set near strong magnets such
as those used in radio, television sets, speaker
boxes etc. as these may cause the frequency to
drift.
* Do not drop or subject the set to a strong impact
since the set is composed of precision parts.
* When listening in a train, car or building, use the
Radio near a window to obtain
reception.Reception may be difficult in a tunnel
or subway. Also note that operating the radio on
a metal object may adversely affect reception.
* Do not use benzene, thinners or any abrasive
-------------- SPECIFICATIONS --------------------Power Source: 2 "D" size/UM-1 batteries (DC 3V)
Frequency Range:
AM:
530 - 1710 KHz
FM:
87.5-108.0 MHz
SW1:
6.0 - 12
MHz
SW2:
12 - 18
MHz
Speaker: 8 3W
Power Output: 150mW (RMS. Max.)
Output Jack: Earphone 32
----------------------------------------------------------------------* Design and Specifications are subject to change
without notice.
For recycling or disposal information about this
product, please contact your local authorities or the
Electronics lndustries Alliance: www.eiae.org