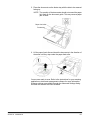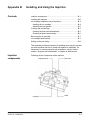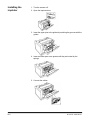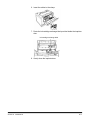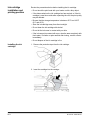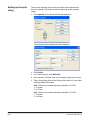
1
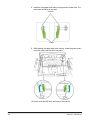
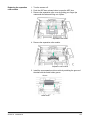
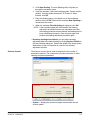
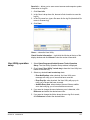
OVERVIEW
1-1
INSTALLATION
2-1
SCANNING
3-1
MAINTENANCE
4-1
USER UTILITY
5-1
TROUBLESHOOTING
6-1
APPENDICIES
A-C
Safety
User Precautions
• Place the scanner on a sturdy, level work surface capable of supporting 9.1 kg (20.1 lbs) and leave adequate clearance on all
sides of the scanner.
• Do not install the scanner in a location subject to dust, humidity or steam. This may cause electrical shock or a fire. Only use
the scanner indoors in a dry location.
• Make sure the electrical power outlet is located within 1.52 meters (5 feet) of the scanner and is easily accessible.
• When disconnecting equipment from the electric socket, be sure to grasp the plug, not the cord.
• Be sure the power cord is securely plugged into the wall outlet. Failure to do so may cause electrical shock or fire.
• Do not damage, knot, cut or modify the power cord or use a damaged power cord. This may cause electrical shock or fire.
• The scanner requires a properly grounded power outlet. Do not use an extension cord or power strip with the scanner.
• Do not leave the power cord plugged into the AC outlet if the scanner is not used for an extended period of time.
• Leave sufficient space around the power outlet so it can be easily unplugged in case of an emergency.
• Do not use the scanner if it becomes inordinately hot, has a strange odor, emits smoke, or makes unfamiliar noises.
Immediately stop the scanner and disconnect the power cord from the power outlet. Contact Kodak Service.
• Do not disassemble, service or modify the scanner except as explained in the User’s Guide.
• Do not move the scanner with the power cord and interface cable attached. This may cause damage to the cord/cable.
Remove the power cord from the wall outlet before moving or relocating the scanner.
• Follow the Kodak recommended cleaning procedures. Do not use air, liquid or gas spray cleaners. These cleaners displace
dust, dirt and debris to other locations within the scanner, which may cause the scanner to malfunction.
• Material Safety Data Sheets (MSDS) for chemical products are available on the Kodak website at: www.kodak.com/go/msds.
When accessing the MSDSs from the website, you will be required to provide the catalog number or keyword of the
consumable you want the Material Safety Data Sheet for. See the section entitled, “Supplies and consumables” later in this
guide for supplies and catalog numbers.
Users and their employers need to observe the common sense precautions applicable to the operation of any machinery. These
include, but are not limited to, the following:
• Do not wear loose clothing, unbuttoned sleeves, etc.
• Do not wear loose jewelry, bracelets, bulky rings, long necklaces, etc.
• Hair length should be kept short, using a hair net if needed, or tying long hair up in a bundle.
• Remove all other loose objects from the area that could be drawn into the machine.
• Take sufficient breaks to maintain mental alertness.
• Use only the recommended cleaning supplies.
• Do not use canned/compressed air.
Supervisors should review their employee practices and make compliance with these precautions a part of the job description
for operation of the scanner or any mechanical device.
Environmental information
• The Kodak Sidekick Scanners are designed to meet worldwide environmental requirements.
• Guidelines are available for the disposal of consumable items that are replaced during maintenance or service; follow local
regulations or contact Kodak locally for more information.
• For disposal or recycling information, contact your local authorities or, in the USA, visit the Electronics Industry Alliance
website: www.eiae.org.
• The product packaging is recyclable.
• Kodak Sidekick Scanners are Energy Star compliant and shipped from the factory with the default time set to 15 minutes.
European Union
This symbol indicates that when the last user wishes to discard this product, it must be sent to appropriate
facilities for recovery and recycling. Please contact your local Kodak representative or refer to www.kodak.com/
go/recycle for additional information on the collection and recovery programs available for this product.
Please consult www.kodak.com/go/REACH for information about the presence of substances included on the candidate list
according to article 59(1) of Regulation (EC) No. 1907/2006 (REACH).
Acoustic emission
Maschinenlärminformationsverordnung – 3, GSGV
Der arbeitsplatzbezogene Emissionswert beträgt <70 dB(A).
[Machine Noise Information Ordinance — 3, GSGV
The operator-position noise emission value is <70 dB(A).]
EMC statements
United States
This equipment has been tested and found to comply with the limits for a Class A digital device pursuant to Part 15 of the FCC
rules. These limits are designed to provide reasonable protection against harmful interference when the equipment is operated
in a commercial environment. This equipment generates, uses, and can radiate radio frequently energy and, if not installed and
used in accordance with the instruction manual, may cause harmful interference to radio communications. Operation of this
equipment in a residential area is likely to cause harmful interference in which case the user will be required to correct the
interference at their own expense.
Japan
This is a Class A product based on the standard of the VCCI Council. If this equipment is used in a domestic environment, radio
interference may occur, in which case, the user may be required to take corrective actions.
この装置は、クラス A 情報技術装置です。この装置を家庭環境で使用すると電波妨害を引き起こすことが
あります。この場合には使用者が適切な対策を講ずるよう要求されることがあります。VCCI- A
・電源プラグは抜き差しが容易にできる近くのコンセントに接続してください
・付属の電源コードは本機専用です。他の機器には使用しないでください
Taiwan
WARNING: This is a Class A product. In a domestic environment this product may cause radio interference in which case the
user may be required to take adequate measures.
Peoples Republic of China
WARNING: This is a Class A product. In a domestic environment this product may cause radio interference in which case the
user may be required to take adequate measures.
Korea
Please note that this equipment has obtained EMC registration for commercial use. In the event that it has been mistakenly sold
or purchased, please exchange it for equipment certified for home use.
Germany
• Machine noise information regulation - 3.GPSGV, the maximum sound pressure level is 70 dB(A) or less, in conformity with
EN ISO 7779.
• This device is not intended for use in the direct field of view at visual display workplaces. To avoid incommoding reflections at
visual display workplaces this device must not be placed in the direct field of view.
Für Benutzer in der BRD (nur für Deutschland)
• Maschinenlärminformations-Verordnung - 3. GPSGV, der höchste Schalldruckpegel beträgt £ 70 dB(A) oder
weniger gemäss EN ISO 7779.
• Das Gerät ist nicht für die Benutzung im unmittelbaren Gesichtsfeld am Bildschirmarbeitsplatz vorgesehen. Um
störende Reflexionen am Bildschirmarbeitsplatz zu vermeiden, darf dieses Produkt nicht im unmittelbaren
Gesichtsfeld platziert werden.
European Union
For information on Compliance with EU relevant Regulatory Directives, contact your Authorised representative:
Kodak GMBH
Hedelfinger Strasse 60
D-70327 Stuttgart, Germany
Telefon: (+49) 0711 406 5505
Fax: (+49) 0711 406 5869
1 Overview
Contents
Supporting documentation .............................................................. 1-1
Optional accessories....................................................................... 1-1
What’s in the box ........................................................................... 1-2
Scanner components ...................................................................... 1-3
Front view ................................................................................... 1-3
Rear view.................................................................................... 1-4
With the Kodak Sidekick 1400u Scanner you get high quality and
efficient scanning. Packed with professional-grade scanning
features, the Kodak Sidekick 1400u Scanner provides everything
you need to connect and operate a total desktop scanning solution.
The 1400u Scanner is perfect for small offices or departments that
need convenience and a professional-quality scanning solution.
The Kodak Sidekick 1400u
Scanner scans up to 43 pages
per minute, includes ultrasonic
multifeed detection and VRS
image enhancement.
Supporting
documentation
The User’s Guide for the Kodak Sidekick 1400u Scanner and VRS
manuals are available on the Installation Resource CD. You will need
Adobe Acrobat Reader to view the manuals.
Optional accessories
Imprinter Kit — front page (pre-scan) imprinter prints the userspecified alphanumeric string on the front side of documents before
they are scanned. CAT No. 887 0958
White Sensor Roller Kit — if you are scanning translucent documents,
the White Sensor Rollers will reduce black background bleed-through,
which produces whiter images. CAT No. 842 2370
NOTE: VRS image enhancement cropping and deskew are not
functional with the White Sensor Roller Kit.
A-61676 June 2010
1-1
What’s in the box
• Kodak SideKick 1400u Scanner
• Power cord
• USB cable
• Shading Sheet
• Starter Cleaning Kit
• Sample Cleaning Kit
• Welcome Folio which includes:
- Installation Resource CD which includes the following:
• User Utility
• ISIS/TWAIN Driver
• VRS Software
• Kodak SideKick User’s Guide - languages
• VRS User Manual and Release Notes
-
1-2
Warranty/Registration sheets
Reference Guide, English
Installation Guide
Service & Support Contact Information sheets
Miscellaneous flyers
A-61676 June 2010
Scanner components
Front view
Printer access door
ADF door
ADF door
release
Paper feed
roller
Document guide
Stop/Start
button
LED
Feeder tray
Exit tray
extension
Exit stopper
Business card
guides
Exit tray
Power
switch
Paper feed roller — feeds a single document at a time into the
scanner.
Feeder tray — holds documents in place for automatic or manual
scanning. The documents should be placed face-up to ensure they are
scanned in the correct order.
Exit tray extension — pull this extension out to accommodate
document sizes longer than 11 inches (279.4 mm).
Exit stopper — located on the exit tray, the exit stopper can be
positioned to accommodate the length of the documents being fed
through the scanner.
Exit tray — collects the documents after scanning. The scanned
documents will be deposited face-down in the exit tray.
Power switch — press this button to turn the scanner on or off.
Business card guides — allows you to scan smaller documents, such
as business cards. When scanning, lift up the business card guides and
stopper.
LED — lights when the power to the scanner is on.
Stop/Start button — starts or stops scanning.
Document guides — slide the document guides in or out to
accommodate the size of the documents you are scanning.
ADF door release — push this button to open the ADF door.
ADF door — provides access to the Automatic Document Feeder.
Printer access door — provides access to the optional imprinter for
installation and maintenance
A-61676 June 2010
1-3
Rear view
AC power input
Power cord
USB port
AC power input/power cord — connects the power cord to the
scanner.
USB port — connects the USB 2.0 cable to the scanner.
1-4
A-61676 June 2010
2 Installation
Contents
Installation checklist ........................................................................ 2-1
Making connections ........................................................................ 2-1
Installing the software ..................................................................... 2-2
Installation checklist
• After the scanner has been unpacked, it is recommended that you
keep the original carton and all packing materials in case you need
them later.
• Read the Kodak SideKick 1400u User’s Guide located on the
Installation Resource CD.
NOTE: If Autoplay is disabled, go to the Windows taskbar, select
Start>Run and type D:\SETUP.EXE, where “D” is the CDROM drive. Click OK. Select your language and click OK.
Then click View Manuals.
• Verify the system requirements. Refer to Appendix A, Specifications.
• Connect the scanner. See the next section entitled, “Making
connections”.
• Install the software. See the section entitled, “Installing the software”
later in this chapter.
You are now ready to scan. Refer to the instructions for your scanning
or document management software application.
Making connections
1. Plug the power cord into the AC power input on the back of the
scanner and connect the other end to a power outlet.
2. Connect the USB cable to an available USB 2.0 port on the host PC
and connect the other end to the USB port on the scanner.
1
2
NOTE: Do not connect the scanner to a USB hub.
A-61676 June 2010
2-1
Installing software
1. Turn on the host PC. You must log in as an Administrator.
2. Insert the Sidekick Resource Installation CD in the CD-ROM drive
and follow the installation steps.
3. After the software installation, press the Power switch to turn the
scanner on.
LED
The LED will light and Windows will detect the scanner and launch
the Found New Hardware dialog box.
4. Follow the Windows New Hardware detect wizard.
NOTE: A compatibility message may be displayed. Click Continue
Anyway.
5. Insert the Sidekick Resource Installation CD into the host PC.
NOTE: The drive letter will vary depending on where your
computer CD-ROM drive is located.
6. Click OK. If the files cannot be found, you will be prompted to
browse to locate the file.
NOTE: If Windows does not automatically install the Sidekick
device drivers then insert the Installation CD and Browse
to the MiniDriver folder on the CD.
7. When the installation is completed, click Finish.
8. Restart the host PC.
2-2
A-61676 June 2010
3 Scanning
Contents
Turning the scanner on ................................................................... 3-1
Document preparation and guidelines ............................................ 3-2
Scanning documents ...................................................................... 3-3
Stop/Start button operation ............................................................. 3-6
Making selections on the Advanced Settings dialog box ................ 3-7
Turning the scanner
on
1. Press the power switch.
LED
2. After the LED on the scanner is a steady green, turn on your PC.
NOTE: See the section entitled, “Scanner LED status” in Chapter 6
for more information regarding the LEDs.
A-61676 June 2010
3-1
Document
preparation and
guidelines
For best results, follow these guidelines:
• Remove all staples and paper clips.
• When scanning a curled or folded document, flatten the document
before feeding it.
• Scanning documents such as carbon or carbonless paper may cause
skewing, paper jamming or multiple-sheet feeding because it makes
the rollers dirty and chemicals can cause the rollers to swell.
• The height of the documents placed in the feeder tray must not
exceed the paper limit mark that appears on the document guide.
• Sheets that are exceptionally thick or thin should be placed in the
feeder manually, one sheet at a time.
• When you scan an irregular or fragile document, you should make a
copy and then scan the copy.
• Remove the documents from the exit tray after they are scanned.
WARNING: Your warranty will be voided if you scan documents
with staples, paper clips or thick plastic documents
like credit cards. Feeding these items may cause
scratches on the imaging guides resulting in
permanent vertical streaks on the image.
Paper size: 2.0 x 2. 8 in. (50.8 x 70 mm) to 8.5 x 25 in. (216 x 356 mm)
Paper thickness: Onionskin to card stock
Single paper feed: 2.0 to 5.9 mils (0.05 to 0.15 mm)
Continuous paper feed: 2.36 to 5.9 mils (0.06 to 0.15 mm)
Paper Weight:
Single paper feed: 10.7 to 33.9 lbs. (40 to 127 g/m2)
Continuous paper feed: 13.3 to 33.9 lbs. (50 to 127 g/m2)
3-2
A-61676 June 2010
Scanning documents
For best results follow the document preparation recommendations as
previously described.
1. Separate documents that have been stapled or clipped together.
Remove glued documents and documents that are curled; these
types of documents may cause a paper jam and damage the
scanner.
2. Prepare the document set as shown below:
• Fan the stack of documents to
separate all the sheets. Be
sure the edges of the sheets
do not stick together.
• Hold both edges of the sheets
and bend the documents.
• To flatten the documents, hold
firmly then pull them apart.
3. Carefully align the documents.
4. Adjust the document guides on the feeder tray so that they are
slightly wider than the size of the documents you are scanning.
Document guides
A-61676 June 2010
3-3
• When scanning documents that are longer than the feeder tray,
you can pull out the feed extension tray, exit stopper and exit
extension tray to accommodate the size of the documents you
are scanning.
Feed extension tray
Exit stopper
Exit extension tray
• When scanning small documents such as business cards, raise
the business card guides and the business card stopper.
Business card guides
Business card stopper
3-4
A-61676 June 2010
5. Place the documents on the feeder tray with the side to be scanned
facing up.
NOTE: The quantity of the documents should not exceed the paper
limit mark on the document guide. This may cause a paper
jam or skew.
Paper feed roller
Feeder tray
6. Lift the paper feed roller and insert the documents in the direction of
the arrow until they stop under the paper feed roller.
You are now ready to scan. Refer to the instructions for your scanning
application or document management software for more information.
Scanner settings are available through the Advanced Settings dialog
box after the scanner has been selected.
A-61676 June 2010
3-5
Stop/Start button
operation
The Stop/Start button has different functions depending on how it is set
via the Advanced Settings dialog box. See the next section, “Making
selections on the Advanced Settings dialog box” for more information.
Emergency Stop mode — if the scanner is running and feeding paper,
press the blue Stop/Start button to immediately stop the paper in the
scanner. This is the default mode of operation.
Start Feed mode — to use this mode, the Manual Feed Mode on the
Advanced Settings dialog box must be set to Start Button. In this
mode, you can manually control the Start and Stop of the batch using
the Stop/Start button.
Multifeed Ignore — allows one document to go through the scanner
without having the scanner stop for a multifeed condition. Multifeed
Ignore can be used with envelopes, documents with a Post-It note
attached, documents with photographs or any other document that is
comprised of two overlapping items. When the scanner has been set up
for Multifeed Ignore, it only works for the top document in the scanned
batch. If you want to ignore multifeeds for several documents, modify
the multifeed settings. See the next section, “Making selections on the
Advanced Settings dialog box” for more information.
If a multifeed occurs:
1. Remove the document from the ADF (Automatic Document Feeder)
by opening the scanner cover or pressing the Stop/Start button.
2. Press and hold the Stop/Start button for 2 seconds until the LED
alternates between green and orange. When this occurs, the
scanner is in Multifeed Ignore mode.
3. Place the document in which you want to ignore the multifeed on top
of the document stack.
4. The scanner will automatically begin scanning again or you can reinitialize the scan within your scanning application.
To clear the Multifeed Ignore feature, open the scanner cover.
3-6
A-61676 June 2010
Making selections on
the Advanced
Settings dialog box
1. Open your scanning application and select Settings. The Advanced
Settings dialog box will be displayed.
2. Select Portrait or Landscape depending on how you want to scan
your batch.
3. If you have an optional imprinter, click Imprinter to make your
imprinter selections. See the section entitled, “Setting up the print
string” in Appendix B, Installing and Using the Imprinter for more
information regarding imprinter setup.
4. Click the More button to display the Advanced Settings dialog box
and make any of the following settings.
NOTE: If your scanning application supports the Advanced
Scanner Settings, you can configure the scanner feed
mode, color dropout, scanner speed and double feed
detection using the Advanced Settings dialog box.
Detect Double Feed — select this checkbox to turn Double Feed
Detect on. This function detects the feeding of more than one document
going through the feeder at a time.
NOTE: This function can detect double feeds even when sheets are
superimposed exactly on top of each other, but it may not be
detected properly with some paper thicknesses and when
creasing and other factors are present.
A-61676 June 2010
3-7
Sensitivity — if the Detect Double Feed function operates incorrectly,
adjust the sensitivity level by selecting one of the following levels:
• High: select this when feeding thin documents.
• Normal: this is the standard sensitivity.
• Low: select this when feeding thick documents.
Feeding Speed — when scanning thin paper, badly creased paper,
fragile paper, etc. you can change the speed of the scanner.
• Slow: this speed slows the documents that are fed through the ADF
to about one-half the speed of Normal mode. The image quality in
the Slow mode is the same as in the Normal mode.
• Normal: this is the normal speed of the scanner and is used for most
document scanning.
NOTE: At resolutions above 300 dpi, the paper is fed at the same
speed as in the Normal mode even if Slow has been specified.
Image Options
• Image Emphasis: allows you to select the amount of sharpness of
an image.
-
None: no image sharpness will be performed.
Smooth: blurs or softens the image slightly.
Low: performs the lowest amount of sharpness.
Medium: performs medium sharpness.
High: performs the highest amount of sharpness.
Deskew — allows the scanner to automatically straighten documents
that are fed into the scanner crooked. When using VRS, this option is
not available.
Black Border Removal — check this option to turn Black Border
Removal on which will produce an image that contains just the
document by eliminating any residual border. Residual border can be
caused by variations in a document edge; for example, when a
document is not a perfect rectangle and/or was fed crooked. When
using VRS, this option is not available.
Length Control — limits the length of the image to the actual page
length.
Gamma — this is a shading adjustment.
• Normal: uses a predefined curve that works best under most
conditions in all color modes.
• Gamma CRT: select if you intend to view the images on a display.
• User Download: allows you to download your own curve formula.
3-8
A-61676 June 2010
Drop Out — allows you to remove colored (red, green or blue) text or
lines printed on documents. Color dropout can only be used with binary
images in black and white or binary modes and can be set
independently for the front and back of a document. This functionality is
primarily used in OCR (Optical Character Reading) to dropout form
lines.
1. Select either Front or Back depending on which side of the
document you want to use the color dropout option.
2. Select the color you want to dropout: Red, Green or Blue from the
Drop Out list.
Manual Feed Mode — select one of the following options:
• Off — if you select this option, you will need to load the documents in
the scanner and click Start Batch (or a button with similar name) in
the scanning application to start scanning.
• On — select On when manually feeding documents. This should be
selected when feeding mixed document types that are difficult to
separate and may cause multifeeds. In this mode the feeder rollers
are not engaged until the document’s leading edge approaches the
feeder roller.
• Start Button — if selected, the scanner will not start feeding until the
Stop/Start button is pressed.
Timeout(s) — the timeout indication is active in all Manual Feed Mode
options except for Off. This feature sets the time between the end of
the scanned batch and the “out of paper” indication. Values range from
1 to 300 seconds. The default is 30 seconds.
A-61676 June 2010
3-9
4 Maintenance
Contents
Cleaning procedures....................................................................... 4-1
Roller cleaning pads................................................................... 4-2
Cleaning the outside of the scanner........................................... 4-2
Cleaning inside the scanner ....................................................... 4-3
Cleaning the rollers, sensors and imaging guides...................... 4-3
Replacing consumables.................................................................. 4-6
Replacing the paper feed roller module ..................................... 4-6
Replacing the separation roller module...................................... 4-9
Replacing the front and back sensor rollers ............................. 4-10
Resetting counters ................................................................... 4-12
Supplies and consumables .......................................................... 4-12
Cleaning procedures
The following cleaning guidelines and procedures will help ensure best
scanner performance.
NOTE: Use only the recommended cleaning supplies when cleaning
the scanner.
• If paper jamming, marking or multiple-sheet feeding occurs
frequently, clean the rollers, sensors and imaging guides as
described in this section. If paper jamming, marking or double
feeding occurs frequently even after cleaning, you may need to
change the rollers.
• To maintain scanning quality, clean the scanner at least once a week
or after 20,000 sheets have been scanned, whichever comes first. To
determine the number of sheets scanned, use the User Utility. See
Chapter 5, User Utility for more information.
• Be sure the documents you scan are clean. If the documents you
scan are dirty, the scanner components will also become dirty.
• It is recommended that you clean all of the rollers at the same time.
A-61676 June 2010
4-1
Roller cleaning pads
Review the following information before using the roller cleaning pads.
• If you need more information about the roller cleaning pads, refer to
the Material Safety Data Sheet (MSDS). See the Kodak website at:
www.kodak.com/go/msds.
• Additional roller cleaning pads can be purchased. See “Supplies and
consumables” later in this chapter for ordering information.
NOTE: Use the roller cleaning pads immediately after opening the bag.
Cleaning the outside of the
scanner
Clean the outside of the scanner at least once a month.
1. Turn the scanner off.
2. Clean the exit tray, the feeder and feeder tray, cover and other
surfaces with a soft cloth.
3. Use a brush to remove dirt and dust from the side vent.
Vent
4-2
A-61676 June 2010
Cleaning inside the
scanner
Clean inside the scanner at least once a week or after 20,000 sheets
have been scanned, whichever comes first.
NOTE: To determine the number of sheets scanned, use the
User
Utility. See the Chapter 5, User Utility for more information.
• Be sure the documents you are scanning are clean to minimize
frequent scanner dirt and dust build-up.
• When cleaning the rollers, hold the roller to prevent it from rotating,
then horizontally wipe the roller from side to side. Turn the roller as
you continue to wipe until the entire roller has been cleaned.
• If black or white lines appear on the scanned images, clean the
imaging guides as described in the next section.
• If paper jamming, marking, or multi-sheet feeding occurs frequently
even after cleaning, you may need to change the rollers as described
in the section entitled, “Replacing consumables” later in this chapter.
Cleaning the rollers,
sensors and imaging
guides
1. Turn the scanner off.
2. Push the ADF door release button to open the ADF cover.
ADF door
release
button
A-61676 June 2010
4-3
3. Use a roller cleaning pad to remove any dirt from the surfaces of all
of the rollers and reflector sheets.
Separation roller
Drive rollers
Reflector sheets
Drive rollers
.
A
B
C
D
E
F
4-4
Waiting Sensor
Paper Feed Roller
Separation Roller
Free Rollers
Starting Position Sensor
Free Rollers
A-61676 June 2010
4. Clean the reflector sheet for the ending sensor.
•
A
B
Remove dust on the reflector sheet of the ending sensor with a
cotton swab. The reflector sheet is located behind the shaft.
Reflector sheet for ending sensor
Cotton swab
5. Verify that the sensor rollers are installed properly.
6. Clean the upper and lower imaging guide and the sensor rollers with
a roller cleaning pad.
NOTE: If the sensor rollers are removed while cleaning, reinstall
them after cleaning.
Front
sensor
roller
Lower imaging
guide
A
B
C
Front sensor roller
Upper imaging guide
Rear sensor roller
7. Gently close the ADF door and turn on the scanner.
8. After cleaning the rollers, open the User Utility and click Clear
Counter to clear the roller counter. For more information, see the
section entitled, “Scanner counter” in Chapter 5, User Utility.
A-61676 June 2010
4-5
Replacing
Consumables
Replace the paper feed roller module and the separation roller module
after 300,000 scans. Replace the roller modules more often if feeding
problems continue after cleaning (i.e., paper jamming, slipping, multifeeding, marking, etc.).
See “Supplies and consumables” later in this chapter for more
information regarding additional roller modules.
Replacing the paper feed
roller module
1. Turn the scanner off.
2. Push the ADF door release button to open the ADF door.
3. Open the new Roller Exchange Kit.
4. Push the two green levers down at both ends of the paper feed
roller module to unlock and remove the paper feed rollers.
NOTE: When moving the green levers, do not apply pressure in
any direction other than shown by the arrows.
4-6
A-61676 June 2010
5. Remove the paper feed roller module by holding up the paper feed
case along the groove of the feed cover to pull the pin out of the slot.
A
B
C
Pin
Slot
Paper feed case
6. Install the new paper feed roller module with its gear on the right
side.
7. Slightly lift the paper feed roller module and pass the pin along the
groove of the feed cover.
A-61676 June 2010
4-7
8. Install the new paper feed roller into the grooves at each end. The
white gear should be to the right.
Grooves
Levers
9. While holding the paper feed roller in place, rotate the green levers
up at both ends until they click into place.
10. Gently close the ADF door and turn on the scanner.
4-8
A-61676 June 2010
Replacing the separation
roller module
1. Turn the scanner off.
2. Push the ADF door release button to open the ADF door.
3. Remove the separation roller cover by putting your finger tips
underneath the tabs and lifting out of place.
Separation roller cover
4. Remove the separation roller module.
Separation roller module
5. Install the new separation roller module by matching the groove of
the shaft with the metal holder groove.
Groove
Metal holder
A-61676 June 2010
4-9
6. Reinstall the separation roller cover and snap it into place.
7. Gently close the ADF door and turn on the scanner.
Replacing the front and
back sensor rollers
There are two sensor rollers, a front sensor roller (the longer roller) and
the back sensor roller (the shorter roller). Both rollers should be
replaced at the same time.
1. Turn the scanner off.
2. Push the ADF door release button to open the ADF door.
3. Front sensor roller: Remove the front sensor roller by grasping
both ends of the roller and lifting the roller out of the holder.
4. Take the new front sensor roller (the longer roller) and place it in the
right slot first, then the left slot. The white gear should be to the left.
Front sensor
roller
4-10
A-61676 June 2010
5. Back sensor roller: Push back the wire springs that hold the back
sensor roller in place and lift the roller up and out of the holder.
Back sensor
roller
Wire spring
6. Take the new back sensor roller (shorter roller), gently lift the right
spring and insert the back sensor roller in place; then lift the left
spring and insert the other side of the roller in place. The white gear
should be on the right.
7. Verify that the back roller sensor is securely in place.
Back sensor roller
8. Gently close the ADF door and turn on the scanner.
A-61676 June 2010
4-11
Resetting counters
After replacing the paper feed module, separation roller module and/or
front and back sensor rollers, click the User Utility icon to open the User
Utility.
• Select the User Utility option and click Clear Counter to clear the
roller counter. For more information, see the section entitled,
“Scanner counter” in Chapter 5, User Utility.
Supplies and
consumables
Contact your scanner supplier to order supplies or go to:
www.scannerstore.kodak.com.
Description
CAT No.
Kodak Digital Science Roller Cleaning Pads
853 5981
Roller Exchange Kit (includes: 1 Feeder Roller, 1 Front Sensor
Roller, 1 Rear Sensor Roller)
846 0321
Shading Paper
153 5376
Replacement Packaging
145 2812
Accessories
CAT No.
Imprinter Kit
877 0958
Printer Cartridge
155 8667
White Roller Sensor Kit
842 2370
NOTE: Items and catalog numbers are subject to change. For the most
up to date list of supplies and consumables go to:
www.kodak.com/go/scannersupplies.
4-12
A-61676 June 2010
5 User Utility
Contents
Starting the User Utility ................................................................... 5-1
The User Utility dialog box .............................................................. 5-1
Scanner Status ........................................................................... 5-2
Scaner Information ..................................................................... 5-2
Scanner Condition ...................................................................... 5-2
Scanner Counter......................................................................... 5-3
The User Utility is a software program used to maintain and
troubleshoot the Kodak Sidekick 1400u Scanner. The User Utility is
installed as part of the scanner’s software installation.
If the User Utility icon is not on your desktop, see the section entitled,
“Installing the software” in Chapter 2.
Starting the User
Utility
• Click the User Utility icon or click the Start>Programs>Kodak>
Scanner Tools.
NOTE: When starting the User Utility, the Select Scanner dialog box
may be displayed. If this dialog box is displayed, select the
desired scanner from the drop-down list.
The User Utility
dialog box
A-61676 June 2010
This dialog box displays the Scanner Status, Scanner Information,
Scanner Counter and the User Utility functions and settings options.
5-1
Scanner Status
Scanner Status displays the status of the scanner along with error
codes. For information about the messages and error codes, see the
section entitled, “User Utility error codes” in Chapter 6.
Scanner Information
Scanner information provides information about the scanner: Model,
Firmware Version, Interface and the status of the imprinter.
Scanner Condition
The Scanner Condition section provides the following options:
• Sleep Mode — the scanner is configured with the power saver
feature enabled with a 15-minute wait time. This conserves energy
and reduces operating costs. Sleep Mode will go into effect after 15
minutes after the last scanner operation. If you want to change these
values, click Sleep Mode and make your selection.
The wait time can be set from 1 to 60 minutes in 1-minute
increments.
• Clean Imprinter: if you have the imprinter installed, this option is
available. If the imprinter ink cartridge is clogged, verify that the
imprinter door is closed and click the Clean Imprinter button to clean
the cartridge. An automatic cleaning will be performed to improve the
print quality.
• User Shading — provides adjustments to improve image quality.
Shading adjustment should be performed when the density of the
scanned images is uneven and the image displays perpendicular
lines, when colors in some parts of the scanned image are extremely
different from what is expected, or when the image quality fails to be
improved after cleaning the scanner.
Before performing a shading adjustment, thoroughly clean the drive
rollers and imaging guides. Only use shading paper that is supplied
with the scanner and is in good condition.
1. Click User Shading on the User Utility.
5-2
A-61676 June 2010
2. Click Start Shading. The User Shading utility will guide you
through the necessary steps.
3. Clean the transport, rollers and imaging guides. See the section
entitled, “Cleaning inside the scanner” in Chapter 4. When
finished, click OK.
4. Place the shading paper in the feeder tray in the Landscape
position, then click OK. Wait until the message Now Adjusting is
cleared from the screen.
5. When the message Finish Adjusting is displayed, click OK.
NOTE: If the scanned images are still lined after the shading
adjustment and these lines are not eliminated even after
the imaging guides have been cleaned, the shading has not
been compensated properly. Clean the parts again and
perform the shading adjustment procedure again.
• Restoring shading to the default: you can restore shading
adjustment data to the default setting by clicking Restore Default on
the User Shading dialog box. Restore the default if the image quality
deteriorates or has not improved as a result of the shading
adjustment process.
Scanner Counter
The scanner counter can be used to keep track of the number of
documents scanned. The counters also provide a reminder for roller
cleaning and parts replacement.
• System — displays the number of pages scanned after the last
counter update.
A-61676 June 2010
5-3
• After Clean Roller — displays the number of pages scanned after
the rollers were last cleaned. When the After Clean Roller number is
greater than the Warning number, the rollers need to be cleaned.
(The Warning number indicates how many pages can be scanned
after roller cleaning before the rollers need to be cleaned again.)
• After Replace Roller — displays the number of pages scanned after
the rollers were last replaced. When the After Replace Roller number
is greater than the Warning number, the rollers need to be replaced.
(The Warning number indicates how many pages can be scanned
with a new set of rollers before the rollers need to be replaced.)
• Update All Counters — updates the counter display to the latest
numbers. Document scanning operations do not automatically
update the counter displays.
• Clear Counter buttons — there are two Clear Counter buttons, one
to clear the After Clean Roller display and one to clear the After
Replace Roller display.
- After you clean the rollers, click Clear Counter for After Clean
Roller and reset the number to zero.
- After you replace the rollers, click Clear Counter for After
Replace Roller and reset the counter to zero.
Help — opens the Kodak Sidekick 1400u Scanner User’s Guide in PDF
file format. The manual contains information about scanner operations,
cleaning and maintenance and information about the User Utility
messages and error codes.
Select Scanner(X) — opens the Select Scanner dialog box. If more
than one scanner is connected to the computer, you can use the Select
Scanner dialog box to select a different scanner. The User Utility
functions and settings will then apply to the selected scanner. To select
a different scanner:
1. Click Select Scanner(X).
2. Click the drop-down list and select a different scanner, then click
OK.
5-4
A-61676 June 2010
Save Info — allows you to save current scanner and computer system
information to a log file.
1. Click Save info.
2. In the Save in drop-down list, browse to find a location to save the
log file.
3. In the File name box, type a file name for the log file (the default file
name is Scanner.log).
4. Click Save.
Close — closes the User Utility.
Check Version Information — right-click the title bar at the top of the
display window and click About to view the version information.
User Utility operation
setup
1. Select Start>Programs>Kodak>Scanner Tools>Operation
Setup. The User Utility Operation Setup window is displayed.
2. Check Load “User Utility” to task tray to have the User Utility icon
loaded to the task tray.
3. Select any desired Load on start up alerts:
• Error Notification: when checked, the User Utility error
message will notify you of errors that have occurred.
• Error Pop-Up: when checked, the User Utility will pop up to
notify you of errors that have occurred.
• Audible Error Alert: when checked, there will be an audible
error alert notifying you of errors that have occurred.
4. If you want to change the sound when an error is detected, click
Reference and select the desired sound file.
5. If you want to change the folder where the error log file is saved,
click Reference to select the desired folder.
A-61676 June 2010
5-5
6 Troubleshooting
Contents
Clearing a document jam ................................................................ 6-1
Problem solving .............................................................................. 6-2
User Utility error codes ................................................................... 6-4
Scanner LED status ........................................................................ 6-5
Contacting Service.......................................................................... 6-5
Clearing a document
jam
To minimize document jams, review the “Document preparation and
guidelines” in Chapter 3 for best feeder performance.
IMPORTANT: Only remove jammed documents from the ADF when the
ADF door is open. Removing documents when the door
is closed may damage the document.
1. Press the ADF door release button to open the ADF door.
ADF door
release
button
2. Remove the jammed document(s)..
3. Gently close the ADF door and resume scanning.
A-61676 June 2010
6-1
Problem solving
Occasionally you may encounter a situation with your scanner where it
may not function properly. Use the chart below as a guide to check
possible solutions to help resolve the situation before calling Technical
Support.
If a problem persists after you have checked the User Utility status
messages and error codes as described in the “User Utility error codes”
section later in this chapter, review the problems and possible solutions
below. If the scanner still is not working, turn the scanner off, unplug the
power cord and call Technical Support.
Problem
Possible Solution
The LED does not light when the power • Be sure that the power cord is securely plugged into the power outlet
and into the scanner.
button is turned on.
• There could be a problem with the power supply. Disconnect the
scanner from the power outlet and call Technical Support.
The computer does not recognize the
scanner.
• Be sure the scanner is properly connected to the computer. See
“Making connections” in Chapter 2.
• Scanner is not properly configured via Found New Hardware. Uninstall
the scanner from the PC. Register the scanner hardware again.
USB connection.
• Check the computer to determine that the USB interface is installed
properly. Check the USB properties using the Windows Device
Manager.
• Verify that the scanner is not connected to a USB hub.
• Be sure the USB cable does not have a High Speed log. Only use the
cable that was provided with the scanner.
Scan speed is running too slow with
USB connection
Verify that the scanner is connected with a USB 2.0 interface.
The ADF door does not open when the The ADF door is not closed properly. Push the ADF door release button
and lift up the ADF door, then close the ADF door securely until it is
ADF door release button is pressed.
latched. DO NOT slam the ADF door.
(ADF) The document has been loaded • The document is not loaded properly. See the section entitled,
on the feeder tray, but the scanner does “Scanning documents” in Chapter 3.
• The sensor cannot detect the document because the edge of the
not start scanning.
document is curled. Flatten the document and load it again. See the
section entitled, “Document preparation and guidelines” in Chapter 3.
(ADF) Double feeding or skewing
problems occur frequently or the
scanner stops feeding while scanning.
• The rollers may be dirty or have reached their life expectancy. Clean
the rollers and examine them for wear. See Chapter 4, Maintenance for
cleaning and replacement procedures.
• The document is curled for folded. Flatten the document, reduce the
number of sheets in the feeder tray and load the document again.
(ADF) Scanned image is skewed.
• Be sure the document guides are adjusted to the size of the documents
being scanned.
• Verify that the document to be scanned is straight in the feeder tray.
• The right and left sides of the document to be scanned are not the
same height because of curls and folds. Remove the curls or folds,
reduce the number of sheets in the feeder tray and load the document
again.
(ADF) The scanned document is blank. Verify that the document to be scanned is positioned correctly in the
feeder tray. Documents should be placed in the feeder tray with the side
you want to scan face-up.
6-2
A-61676 June 2010
Problem
Possible Solution
Vertical lines appear on the scanned
document.
Clean the imaging guides. See Chapter 4, Maintenance for cleaning
procedures.
The scanning density is uneven.
• Clean the imaging guides. See Chapter 4, Maintenance for cleaning
procedures.
• Perform a shading adjustment. See Chapter 5, User Utility for more
information.
The color of the scanned document is
very different from the original
document.
Adjust the computer display and monitor settings.
Dark spots or noise appear on the
scanned documents.
Clean the imaging guides. See Chapter 4, Maintenance for cleaning
procedures.
Scanned image has moire fringes or
patterns, such as stripes or wavy
pattern noise.
This is caused by the original printing pattern on the document and the
selected scanning resolution. Change the scanning resolution, then scan
the document(s) again.
A-61676 June 2010
6-3
User Utility error
codes
Error code and message
If an issue occurs during scanning, click the
icon to open the User Utility.
Check the Scanner Status message and Error Code information. The following
table explains the error codes and messages and describes possible causes/
solutions.
Possible Cause/Solution
U11, U12, U13, U16
A document is jammed or the document sensors are dirty.
Jam occurred. Please open the • Open the ADF and remove the jammed paper. See “Clearing a document jam”
door and remove the paper.
earlier in this chapter.
Place the documents back in
• Clean the sensors. See Chapter 4, Maintenance for cleaning procedures.
the document feed tray.
U18
A document is jammed or the sensors are dirty.
Document remains in the
• Open the ADF and remove the jammed paper. See “Clearing a document jam”
scanner. Please open the door
earlier in this chapter.
and remove the paper. Place
• Clean the sensors. See Chapter 4, Maintenance for cleaning procedures.
the documents back in the
document feed tray.
A double feed has occurred or the rollers are dirty.
U23
Double feed occurred. Please • Open the ADF and remove the jammed paper. See “Clearing a document jam”
open the door and remove the
earlier in this chapter.
paper. Place the documents
• Clean the rollers. See Chapter 4, Maintenance for cleaning procedures.
back in the document feed tray.
U30
Scanner door is open. Please
close the door.
• Securely close the ADF door.
• Contact Technical Support.
Fxx
System error occurred. Please
contact Technical Support.
***Warning***
Warning counter has expired.
The rollers need to be cleaned. The rollers need to be cleaned.
Please clean the rollers.
• Clean the rollers. See Chapter 4, Maintenance for cleaning procedures. After
cleaning the rollers, return to the User Utility and click the Clear Counter
button. See the section entitled, “The User Utility dialog box“ (Scanner Counter)
in Chapter 5.
***Warning***
Warning counter has expired.
The rollers need to be replaced. The rollers need to be replaced.
• Replace the rollers. See Chapter 4, Maintenance for replacement procedures.
Please replace the rollers.
After replacing the rollers, return to the User Utility and click the Clear Counter
button. See the section entitled, “The User Utility dialog box“ (Scanner Counter)
in Chapter 5.
Scanner is not connected
6-4
• The scanner is not connected or not turned on.
Be sure the scanner is connected properly and that the scanner is turned on.
See Chapter 2, Installation for proper connections.
• The PC was turned on before the scanner was ready.
Turn the scanner on first and then restart the PC.
A-61676 June 2010
Scanner LED status
Contacting Service
The color of the LED indicates the scanner status.
LED
Status
Steady green
Ready to scan or scanning is in process.
Flashing green
Sleep mode.
Steady orange
Ready to scan or scanning with a warning. The
rollers need to be cleaned or replaced.
Flashing orange
Initializing or sleep mode with warning. Check
the status of the scanner using the User Utility.
Red
An error occurred.
1. Visit www.Kodak.com/go/dicontacts to obtain the most current
phone number for your country.
2. When calling, please have the following information ready:
•
A description of your problem.
•
The scanner model and serial number.
•
Computer configuration.
•
Software application you are using.
For updated drivers, see www.kodak.com\go\scanners.
A-61676 June 2010
6-5
Appendix A
Contents
Specifications
Specifications ..................................................................................A-1
System requirements ......................................................................A-2
Space requirements ........................................................................A-3
Feature
Specification
Scanning mode
Duplex
Scanning method
CIS (Contact-type color image sensor) Front and Back sides
Background: Black sensor roller
Scanning speed
Black and White, 200 dpi: Simplex: 43 ppm; Duplex: 76 ipm
Lettersize, Color, 150 dpi: Simplex: 19 ppm; Duplex: 34 ipm
Multifeed detection
Ultrasonic
Resolution
Black and White/Grayscale: 100 to 600 dpi
Color (with VRS): 100 to 400 dpi
Optical: 600 dpi
Output options
Black and White, Grayscale (8-bit) and Color (24-bit)
Image enhancement
VRS cropping, deskew, auto brightness, contrast control
Document size
Onionskin paper to card stock: 2.0 x 2.8 in. (50.8 x 70 mm) to 8.5 x 25 in.
(216 x 356 mm)
Paper thickness
Single paper feeding: 2.0 to 5.9 mils (0.05 to 0.15 mm)
Continuous paper feeding: 2.36 to 5.9 mils (0.06 to 0.15 mm)
Paper weight
Single paper feeding: 10.7 to 33.9 lbs. (40 g/m2 to 127 g/m2)
Continuous paper feeding: 13.3 to 33.9 lbs. (50 to 127 g/m2)
Feeder capacity
120 sheets (17-lb./64 g/m2) paper
100 sheets (20-lb./75 g/m2) paper
Scanner dimensions
14 x 12.5 x 9.25 in. (35.5 x 32 x 24.1 cm)
With tray extended: 14 x 19.75 x 10.6 in. (35.5 x 50 x 27 cm)
Scanner weight
20.1 lbs. (9.1 kg)
Interface
USB 2.0 (cable included)
Power requirements
AC 100-120 V, 50/60 Hz (US model)
AC 220-240 V, 50-60 Hz (EU model)
Power consumption
Maximum (scanning)
1A 50W (100-120V)
0.5A 50W (200-240V)
Minimum (standby)
0.3A 17W (100-120V)
0.2A 19W (200-240V)
Sleep mode
0.1A 3.5W (100-120V)
0.1A 6W (200-240V)
A-61676 June 2010
A-1
Feature
Environment
Operating Temperature
and Humidity
Storage Temperature
and Humidity
Specification
59° to 86°F (15°C to 30°C), 30 to 80% RH non-condensing
32° to 95°F (0°C to 35°C), 30 to 80% RH
Additional contents
Power Cord, USB Cable 2.0, Roller Cleaning paper, CD-ROM
Additional features
End user replaceable feed and sensor rollers; electronic color drop out (red,
green, blue)
Application connectivity
VRS with Image Control, VRS enables ISIS and TWAIN Drivers
Direct ISIS and TWAIN Drivers
System requirements
Following is the minimum recommended system configuration to run
the Kodak Sidekick 1400u Scanner:
Processor: Pentium IV, 1.4 GHz or higher
Memory:
Black and white scanning:
• Recommended: 512 MB or higher for improved scanning speed
• Minimum: 256 MB
Color scanning:
• Recommended: 1 GB or higher for improved scanning speed
• Minimum: 512 MB
Operating system
• Microsoft Windows XP Professional; Service Pack 3 (32-bit )
• Microsoft Windows Vista Business; Service Pack 2 (32-bit and 64-bit)
• Microsoft Windows 7 Professional (32-bit and 64-bit)
Interface: USB 2.0 (standard)
NOTES:
• Do not connect the scanner to a USB hub.
• There must be 1 GB or more of free space on the hard drive.
• Depending on the computer system and the scanning application or
document management software used, you may not be able to scan
a large color image in high resolution.
A-2
A-61676 June 2010
Space requirements
Following are the minimum space requirements that are recommended
to open and maintain the scanner. The recommended clearance of the
top and sides of the scanner will ensure that there is proper ventilation
and provide the necessary area for scanner maintenance.
• Top: 4 in. (10 cm)
• Sides: 7.9 in. (200 mm)
• Front: 9 in. (22 cm)
• Rear:10 in. (25 cm)
A-61676 June 2010
A-3
Appendix B
Contents
Installing and Using the Imprinter
Imprinter components .....................................................................B-1
Installing the imprinter.....................................................................B-2
Ink cartridge installation and print position......................................B-4
Installing the ink cartridge............................................................B-4
Adjusting the print position ..........................................................B-5
Cleaning the ink cartridge ...............................................................B-6
Cleaning the print head automatically .........................................B-6
Cleaning the print head manually ................................................B-6
Removing the ink cartridge .............................................................B-7
Ink cartridge specifications..............................................................B-7
Setting up the print string ................................................................B-8
This appendix provides procedures for installing and using the optional
pre-scan imprinter and how to install and replace ink cartridges. For
information on ordering supplies and accessories, see the section
entitled, “Supplies and consumables” in Chapter 4, Maintenance.
Imprinter
components
Following are the components of the imprinter.
Adjusting lever
Carriage
A-61676 June 2010
Connector
Scale
B-1
Installing the
imprinter
1. Turn the scanner off.
2. Open the imprinter door.
3. Insert the upper pins to the guides by matching the grooves with the
guides.
4. Insert the lower pins to the guides until they are locked by the
springs.
5. Connect the cables.
B-2
A-61676 June 2010
6. Insert the cables in the clamp.
7. Paste the ink cartridge exchange label provided inside the imprinter
door.
Ink cartridge exchange label
8. Gently close the imprinter door.
A-61676 June 2010
B-3
Ink cartridge
installation and
printing position
Review the precautions below before installing the ink cartridge:
• Do not touch the print head with your hands or with a dirty object.
• If the date marked on the ink cartridge box has expired, or if the ink
cartridge is used six months after unpacking the unit, the print quality
may be affected.
• Be sure that the storage temperature is between 32°F and 104°F
(0°C and 40°C).
• Store the ink cartridge away from direct sunlight.
• Do not clean the ink cartridge with alcohol.
• Do not let the ink come in contact with your skin.
• If the ink comes into contact with eyes, rinse the area completely with
fresh water. If irritation or pain remains after rinsing, consult a doctor
immediately.
• Do not dispose of the ink cartridge in fire.
Installing the ink
cartridge
1. Remove the protective tape from the ink cartridge.
2. Insert the cartridge into the carriage.
B-4
A-61676 June 2010
3. Move the carriage to the cartridge exchange position and lock the
cartridge adjusting lever.
Adjusting the printing
position
To add an imprint to the page that will appear on the scanned image,
adjust the position of the carriage according to the size of the
documents you want to scan.
This chart shows the position of the imprint according to the document
size selected when adjusting the printer position.
97.5 mm (3.8 in.)
83.5 mm (3.3 in.)
66.8 mm (2.6 in.)
56.5 mm (2.2 in.)
45 mm (1.8 in.)
A6
Center of the document
B6 A5
B5
A4
LGL
LTR
Document size
• Move the carriage to align the tab on carriage with one of the marks
that appears on the scale.
NOTE: The tab on the carriage must be aligned with one of the
marks on the scale. If the carriage is not properly aligned, the
imprinter will not print.
A-61676 June 2010
B-5
Cleaning the ink
cartridge
If the head of the ink cartridge is dirty or if the ink cartridge has not been
used for a long period of time, it may not print properly.
Cleaning the print head
automatically
1. Click the User Utility icon to open the User Utility.
Cleaning the print head
manually
1. Remove the ink cartridge as described in the next section.
2. Click Clean Imprinter. This option only improves the print quality.
This option is only available if the imprinter is installed.
2. Use a moistened tissue paper to gently wipe and clean the print
head.
CAUTION: Do not use any material that contains alcohol or the
roller cleaning paper to clean the print head.
B-6
A-61676 June 2010
Removing the ink
cartridge
• Pinch the cartridge adjusting lever (1) and lift the cartridge out of
position (2).
Ink cartridge disposal: Consult the Hewlett-Packard website for
recycling printing supplies or disposing of the ink cartridges according
to local regulations.
Ink cartridge
specifications
The optional pre-scan imprinter unit and replacement ink cartridges are
available from resellers, web merchants and from the Kodak on-line
store (http:/scannerstore.kodak.com). See the section entitled,
“Supplies and consumables” in Chapter 4, Maintenance.
Ink cartridge life
Approximately 4,000,000 characters (standard font)
Nozzles
12
Unusable documents
Plastic film or coated paper should not be used with
the imprinter
Storage environment
Temperature: 32°F to 104°F (0°C to 40°C)
Humidity: 10% to 80% RH
Operating environment Temperature: 59°F to 86°F (15°C to 30°C)
Humidity: 30% to 80% RH
A-61676 June 2010
B-7
Setting up the print
string
The pre-scan imprinter prints on the front side of documents before
they are scanned. The printed results are reflected on the scanned
image.
1. Click Imprinter on the Advanced Settings dialog box.
The Imprinter Setting dialog box will be displayed.
2. Click Enable.
3. If you want bold type, click Bold Font.
4. In the Imprinter Text field, type in the character string to be printed.
5. Type in the printing offset in the Printing Offset field. A 10 mm offset
is always added to this value.
Unit: 2.38 mm per increment (printing orientation: 90, 270°)
1: 12.38 mm
2: 14.76 mm
Unit: 3.44 mm per increment (printing orientation: 00, 180°)
1: 13.44 mm
2: 16.88 mm
B-8
A-61676 June 2010
6. In the Start Value field, type in the default value of the counter
specified by the imprinter string.
7. In the Step Value field, type in the step number of the counter
specified by the imprinter string.
8. Select the printing orientation from the Orientation drop-down list.
9. If desired, check the Starting Number Automatic Increment
checkbox to automatically increment the number at the start of
scanning plus the number of pages scanned x the step number,
upon completion of scanning.
10. Click OK when finished.
A-61676 June 2010
B-9
Appendix C
Repacking the Scanner
If you need to transport or ship the scanner, follow these repacking
instructions.
• Use the original scanner carton and packing materials. You will also
need shipping tape and scissors.
• Improper repacking of the scanner may cause damage during
handling and shipment.
• The scanner should always be handled in the horizontal position.
1. Turn the scanner off.
2. Disconnect the power cord from the scanner and electrical outlet.
3. Disconnect the USB cable from the scanner and the host PC.
4. Pack the scanner in the original carton using the packing materials.
A-61676 June 2010
C-1