1
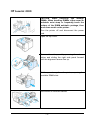
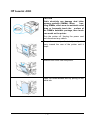
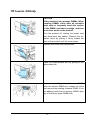
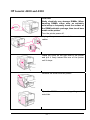
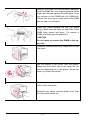
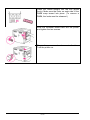
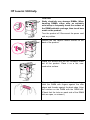
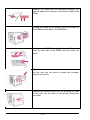
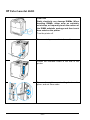
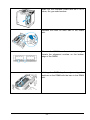
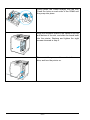
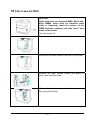
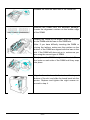
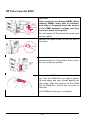
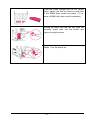
EuroForm DIMM Installation Guide English For HP LaserJet Printers Installation Guide NOTE • • • • • • • The information contained in this document is subject to change without notice. EuroForm makes no warranty of any kind with regard to this material, including, but not limited to, the implied warranties of merchantability and fitness for a particular purpose. EuroForm shall not be liable for errors contained herein or for incidental or consequential damages in connection with the furnishings, performance, or use of this material. EuroForm assumes no responsibility for the use or reliability of its software on equipment that is not furnished by EuroForm. This document contains proprietary information which is protected by copyright. All rights reserved. No part of this document may be photocopied, reproduced, or translated to another program language without the prior written consent of EuroForm. Microsoft®, Microsoft Windows™, Windows 95™, Windows 98™, Windows NT™ and Windows 2000 are US registered trademarks of Microsoft Corporation. All other company and/or product names are trademarks or registered trademarks of their respective companies. Version 09 Copyright © EuroForm A/S. All rights reserved. -2- Caution DIMM boards and your printer formatter board can be damaged by small amounts of static electricity. When handling a DIMM or other board, wear an antistatic wrist strap connected to the metal frame of the printer (or to your antistatic system). During installation, to prevent generation of static electricity, avoid moving about the work area. Warranty The information contained in this document is subject to change without notice. EuroForm makes no warranty of any kind with respect to this information. EUROFORM SPECIFICALLY DISCLAIMS THE IMPLIED WARRANTY MERCHANTABILITY AND FITNESS FOR PARTICULAR PURPOSE. OF EuroForm shall not be liable for any direct, indirect, incidental, consequential, or other damage alleged in connection with the furnishing or use of this information. -3- Table of Contents Table of Contents..................................................................................................................................4 HP LaserJet 2300 ..................................................................................................................................5 HP LaserJet 4100................................................................................................................................... 7 HP LaserJet 4100mfp...........................................................................................................................9 HP LaserJet 4200 and 4300............................................................................................................. 11 HP LaserJet 9000 ................................................................................................................................13 HP LaserJet 9000mfp.........................................................................................................................15 HP Color LaserJet 3700 .....................................................................................................................17 HP Color LaserJet 4600................................................................................................................... 20 HP Color LaserJet 5500 ....................................................................................................................23 HP Color LaserJet 9500................................................................................................................... 26 Notes:......................................................................................................................................................28 Support ...................................................................................................................................................31 -4- HP LaserJet 2300 CAUTION. Static electricity can damage DIMMs. When handling DIMMs, either wear an antistatic wrist strap or frequently touch the surface of the DIMM antistatic package, then touch bare metal on the printer. Turn the printer off and disconnect the power cord. Open the top cover. Remove the side panel by pressing the release button and sliding the right side panel forward until the alignment arrows line up. Pull the panel away from the printer, exposing the available DIMM slots. Disconnect all interface cables. -5- Remove the DIMM from the antistatic package. CAUTION. To reduce the possibility of damage caused by static electricity, always wear an electrostatic discharge (ESD) wrist strap or touch the surface of the antistatic package before handling DIMMs. Holding the DIMM by the edges (as shown in the illustration), align the notches on the DIMM with the DIMM slot. (Check that the locks on each side of the DIMM slot are open.) Press the DIMM straight into the slot (press firmly). Make sure the locks on each side of the DIMM snap inward into place. (To remove a DIMM, the locks must be released.) Repeat steps 6, 7, and 8 for each DIMM being installed. Reconnect the interface cable(s) and power cord. To replace the side panel, line up the alignment arrows and slide the panel backwards until the release button latches into place. Close the top cover and turn the printer on. -6- HP LaserJet 4100 CAUTION Static electricity can damage dual inline memory modules (DIMMs). When handling DIMMs, either wear an antistatic wrist strap or frequently touch the surface of the DIMM’s antistatic package, then touch bare metal on the printer. Turn the printer off. Unplug the power cord and disconnect any cables. Grasp the cover (as illustrated) and pull it firmly toward the rear of the printer until it stops. Remove the cover from the printer. Open the DIMM access door by pulling on the metal tab. -7- Remove the DIMM from the antistatic package. Hold the DIMM with fingers against the side edges and thumbs against the back edge. Align the notches on the DIMM with the DIMM slot. (Check that the locks on each side of the DIMM slot are open, or outward.) Press the DIMM straight into the slot (press firmly). Make sure the locks on each side of the DIMM snap inward into place. (To remove a DIMM, the locks must be released.) 7 Close the DIMM access door. Make sure it locks into place. Set the bottom of the cover onto the printer. Make sure the bottom tabs on the cover fit into the corresponding slots in the printer. Rotate the cover up towards the printer. Slide the cover toward the front of the printer until it clicks into place. Reattach any cables and the power cord, then turn the printer on. -8- HP LaserJet 4100mfp CAUTION Static electricity can damage DIMMs. When handling DIMMs, either wear an antistatic wrist strap or frequently touch the surface of the DIMM’s antistatic package, and then touch bare metal on the product. Turn the product off. Unplug the power cord and disconnect any cables. Remove the formatter cover by pulling it firmly toward the back of the product until the cover stops. Remove the cover from the product. Open the DIMM access door by pulling on the large metal tab. If you are installing a new firmware DIMM, open the bottom DIMM slot, release the locks and remove the existing firmware DIMM. If you are adding a new font or memory DIMM, open any of the three upper DIMM slots. 8 -9- Remove the new DIMM from the antistatic package. Hold the DIMM with your fingers against the side edges and your thumbs against the back edge. Align the notches on the DIMM with the DIMM slot. (Make sure that the locks on each side of the DIMM are open, or outward.) Press the DIMM straight into the appropriate slot. Press firmly. Make sure that the locks on each side of the DIMM snap inward into place. Close the DIMM access door. Make sure that it locks into place. 10 Insert the bottom of the cover into the slot and rotate the cover upward. Slide the cover toward the front of the MFP until the cover clicks into place. Plug in the power cord, reconnect all cables, and turn the MFP on. - 10 - HP LaserJet 4200 and 4300 CAUTION Static electricity can damage DIMMs. When handling DIMMs, either wear an antistatic wrist strap or frequently touch the surface of the DIMM antistatic package, then touch bare metal on the printer. Turn the printer power off. Unplug the power cord and disconnect any cables. 2 Grasp the cover on the right side of the printer and pull it firmly toward the rear of the printer until it stops. Remove the cover from the printer. Open the DIMM-access door by pulling on the metal tab. - 11 - Remove the DIMM from the antistatic package. Hold the DIMM with your fingers against the side edges and thumbs against the back edge. Align the notches on the DIMM with the DIMM slot. (Check that the locks on each side of the DIMM slot are open, or outward.) Press the DIMM straight into the slot (press firmly). Make sure the locks on each side of the DIMM snap inward into place. (To remove a DIMM, the locks must be released.) CAUTION Do not move or remove the DIMM in the upper slot. Close the DIMM-access door. Make sure it locks into place. 8 Set the bottom of the cover onto the printer. Make sure the bottom tab on the cover fits into the corresponding slot in the printer. Rotate the cover up, toward the printer. Slide the cover toward the front of the printer until it clicks into place. Reattach any cables and the power cord, then turn the printer power on. - 12 - HP LaserJet 9000 CAUTION Static electricity can damage DIMMs. When handling DIMMs either wear an antistatic wrist strap or frequently touch the surface of the DIMM antistatic package, then touch bare metal on the printer. Turn the printer off. Disconnect the power cord and any cables. Loosen the two captive thumb screws on the back of the printer. 3 2 Grasp the screws and pull the formatter board out of the printer. Place it on a flat, nonconductive surface. Remove the DIMM from the antistatic package. Hold the DIMM with fingers against the side edges and thumbs against the back edge. Align the notches on the DIMM with the DIMM slot. (Check that the locks on each side of the DIMM slot are open, or outward.) - 13 - Press the DIMM straight into the slot (press firmly). Make sure the locks on each side of the DIMM snap inward into place. (To remove a DIMM, the locks must be released.) Slide the formatter board back into the printer and tighten the two screws. 7 Plug in the power cord and connect all cables. Turn the printer on. - 14 - HP LaserJet 9000mfp CAUTION Static electricity can damage DIMMs. When handling DIMMs, either wear an antistatic wrist strap or frequently touch the surface of the DIMM antistatic package, then touch bare metal on the product. Turn the product off. Disconnect the power cord and any cables. Loosen the two captive thumb screws on the back of the product. Grasp the screws and pull the formatter board out of the product. Place it on a flat, nonconductive surface. Remove the DIMM from the antistatic package. Hold the DIMM with fingers against the side edges and thumbs against the back edge. Align the notches on the DIMM with the DIMM slot. (Check that the locks on each side of the DIMM slot are open, or outward.) - 15 - Press the DIMM straight into the slot (press firmly). Make sure the locks on each side of the DIMM snap inward into place. (To remove a DIMM, the locks must be released.) Slide the formatter board back into the product and tighten the two screws. Plug in the power cord and connect all cables. Turn the product on. - 16 - HP Color LaserJet 3700 CAUTION Static electricity can damage DIMMs. When handling DIMMs, either wear an antistatic wrist strap, or frequently touch the surface of the DIMM antistatic package and then touch bare metal on the printer. Turn the printer off. Disconnect all power and interface cables. Open the DIMM access door by gently prying it with a flat-bladed screwdriver. Remove the door by pulling the door toward the back of the printer. Loosen the screw that holds the formatter door on the printer. Remove the formatter door. - 17 - Remove the DIMM from the antistatic package. Locate the alignment notches on the bottom edge of the DIMM. Holding the DIMM by the edges, align the notches on the DIMM with the bars in the DIMM slot. Firmly press the DIMM straight into the slot. Close the locks on each side of the DIMM until they snap into place. Align the formatter door in the tracks at the bottom of the slot, and turn the screw to attach the formatter board to the printer. Replace the DIMM access door by inserting the tabs on the door into the slots on the printer. Swing the door shut. - 18 - Reconnect the power cable and USB/parallel cable. Turn the printer on. - 19 - HP Color LaserJet 4600 CAUTION Static electricity can damage DIMMs. When handling DIMMs, either wear an antistatic wrist strap, or frequently touch the surface of the DIMM antistatic package and then touch bare metal on the printer. Turn the printer off. Disconnect all power and interface cables. Locate the formatter board in the rear of the printer. Remove the eight screws holding the board in place, and set them aside. - 20 - Slide out the formatter board and set it on a clean, flat, grounded surface. Release the locks on each side of the DIMM slot. Remove the DIMM from the antistatic package. Locate the alignment notches on the bottom edge of the DIMM. Holding the DIMM by the edges, align the notches on the DIMM with the bars in the DIMM slot. - 21 - Firmly press the DIMM straight into the slot. Close the locks on each side of the DIMM until they snap into place. Align the formatter board in the tracks at the top and bottom of the slot, and slide the board back into the printer. Replace and tighten the eight screws removed in step 2. 10 Reconnect the power cable and interface cables, and turn the printer on. - 22 - HP Color LaserJet 5500 CAUTION Static electricity can damage DIMMs. When handling DIMMs, either wear an antistatic wrist strap, or frequently touch the surface of the DIMM antistatic package and then touch bare metal on the printer. Turn the printer off. Disconnect all power and interface cables Locate the formatter board in the rear of the printer. Remove the eight screws holding the board in place, and set them aside. Slide out the formatter board and set it on a clean, flat, grounded surface. - 23 - Release the locks on each side of the DIMM slot. Remove the DIMM from the antistatic package. Locate the alignment notches on the bottom edge of the DIMM. Holding the DIMM by the edges, align the notches on the DIMM with the bars in the DIMM slot. Note: If you have difficulty inserting the DIMM or closing the latches, make sure the notches on the bottom of the DIMM are aligned with the bars in the slot. If the DIMM still does not go in, make sure you are using the correct type of DIMM. Firmly press the DIMM straight into the slot. Close the locks on each side of the DIMM until they snap into place. Align the formatter board in the tracks at the top and bottom of the slot, and slide the board back into the printer. Replace and tighten the eight screws removed in step 4. - 24 - Reconnect the power cable and interface cables, and turn the printer on. - 25 - HP Color LaserJet 9500 CAUTION Static electricity can damage DIMMs. When handling DIMMs, either wear an antistatic wrist strap or frequently touch the surface of the DIMM antistatic package and then touch bare metal on the printer. Turn the printer off. Disconnect the power cord and any cables. Remove the eight screws on the left side of the printer. Grasp the black tab near the top and pull the formatter board out of the printer. Place it on a flat, non-conductive surface. Remove the DIMM from the antistatic package. Hold the DIMM with your fingers against the side edges and your thumbs against the back edge. Align the notches on the DIMM with the DIMM slot. (Check that the locks on each side of the DIMM slot are open, or outward.) - 26 - Press the DIMM straight into the slot (press firmly). Make sure that the locks on each side of the DIMM snap inward into place. (To remove a DIMM, the locks must be released.) 6 Holding the black tab near the top, slide the formatter board back into the printer and tighten the eight screws. Plug in the power cord and reconnect any cables. Turn the printer on. - 27 - Notes: - 28 - - 29 - - 30 - Support If you experience problems with DIMM installation or you have other questions, please send an email to [email protected]. However, before contacting us via email or telephone, we recommend that you visit our home page http://www.euroform.com, where you can find updates, FAQs etc. EuroForm A/S Riskaer 15 DK-2765 Smørum Tel.: +45 4466 8338 Fax: +45 4466 8333 - 31 - EuroForm A/S technologies have created a range of solutions that integrate with Hewlett-Packards LaserJet and Color LaserJet printers and multifunctional devices enhancing your business. EuroForm Barcode 100 EuroForm ELP EuroForm JetLogo® EuroForm BusinessCard EuroForm FFM EuroForm JetAdvice® EuroForm IPDS 100 EuroForm PowerFlash 200 EuroForm ThinPrint For detailed information on the different solutions please refer to http://www.euroform.com or contact us at [email protected]. This document is non-contractual. Specifications and descriptions of products can be modified at any time without prior notice. © EuroForm A/S, Smoerum, Denmark - 32 -