1
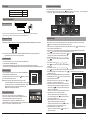
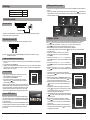
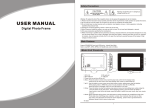
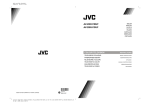
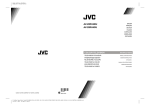
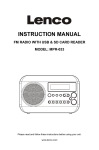
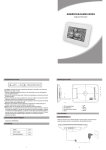
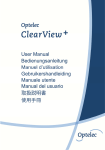
Safety Precautions
CAUTION
Warning: To alert the user to dangerous
voltage inside the unit
RISK OF ELECTRIC SHOCK
DO NOT OPEN
USER MANUAL
Digital Photo Frame
Warning: To reduce the risk of fire or electric shock, do not expose this apparatus to rain or moisture.
1) Please read the instruction manual carefully and follow all the requirements of safe operation to operate the device.
2) Do not use this unit near water. Do not place over the unit any container with liquid inside.
3) Do not install near any heat sources such as radiators, heat registers, stoves, or other apparatus (including
amplifiers) that produce heat.
4) Unplug this unit during lightning, storms or when not use for long.
5) About Cleaning: Unplug the system, use only wet cloth to clean. Do not use liquid detergent or aerosol.
6) Only use accessories specified by the manufacturer.
7) Refer all servicing to qualified service personnel, servicing is required when the unit has been damaged in any way,
such as power supply cord or plug is damaged, liquid has been spilled or objects have fallen into the unit, exposed
to moisture, does not operate normally. Don't try to repair the machine by yourself because of the danger of high
voltage and electric shock.
Main Features
Support SD/MMC/MS card and USB device.
Able to read JPEG.
Main Unit Controls
POWER
4
3
DC INPUT:9V
1A
MENU
5
6
2
DC IN 5V
7
ENTER
1
MODE
8
9
1. DC in 5V
2. SD card slot
3. USB port
4. Power :turn on and turn off the unit
5. Menu: Press this button to return menu root from play mode.
6.
: Use this button to move cursor up and down when at menu, setting menu.
7. Enter : Press this button to enter the submenu step when at menu root and setting menu; when displaying
pictures, press this button for delete or copy function.
8. Mode: When automatic playing photo, press this button to switch among automatic play mode(Photo single view,
Photo slide show, multi-image view, calendar + picture, timer +picture).
9. Support stand
1
Package
Calendar and clock display
Main unit
Instruction manual
AC/DC power adapter
1. After connecting power to the unit, turn on the unit with the “POWER” button.
2. Press “MENU” button to enter the main menu. Use “
”button to select the “CLOCK” option,
to confirm. Use “ MODE ” button to select the calendar and clock display mode.
1 PC
1 PC
1 PC
Press “ENTER”button
System Connection
10:30:28 AM
09:30
Power connection
2009-03-18
Plug one end of the supplied AC/DC power adaptor into the DC input jack of the machine, then plug the
other end into the AC power receptacle. Please refer to the illustration above.
S
M
1
8
15
22
29
2 3
9 10
16 17
23 24
30 31
T
March
W
T
F
S
4
11
18
25
5
12
19
26
6
13
20
27
7
14
21
28
2009-03-18
T
W
March
S
M
1
8
15
22
29
2 3 4 5 6 7
9 1 0 11 1 2 1 3 1 4
16 17 18 19 20 21
23 24 25 26 27 28
30 31
T
F
2009-03-18
S
10:30:28 AM
09:30
T
W
March
S
M
1
8
15
22
29
2 3 4 5 6 7
9 1 0 11 1 2 1 3 1 4
16 17 18 19 20 21
23 24 25 26 27 28
30 31
T
F
S
Using your SD card
System Setup
Upon using an SD card, insert it to the corresponding slot flatly with the label side backward until you hear a click.
Select “SETUP” on main menu and press “ENTER” button to enter setup menu. In setup menu, user can press
“
” button to select below item, and press “ENTER” button to confirm.
1.“Interval Time” of picture display (5Sec,10Sec,15Sec,30Sec,1Min,3Min,Off). Press “
”to choose the item you
desire, and press “ENTER” button to exit.
2.“Transition Effect” of picture display (No Effect, Rombus, Rectspread, Blind Vertical,Blind Horizontal, Random).
Press “
”to choose the item you desire, and press “ENTER” button to exit.
3.“Show Type” of screen (Full, Screen, Fit Screen). Press “
” to
SETUP
choose the item you desire, and press“ENTER” button to exit.
Exit
4.“TFT Brightness” of screen -3 -2 -1 0 +1 +2 +3 .
Exit to MENU
MENU
Interval Time
Press “
”to choose the item you desire, and press “ENTER”
Transition Effect
button to exit.
Show Type
TFT Brightness
5.“TFT Contrast” of screen -3 -2 -1 0 +1 +2 +3 .
ENTER
Press “
” to choose the item you desire, and press“ENTER”
button to exit.
6.“TFT Saturation” of screen -3 -2 -1 0 +1 +2 +3 .
Press “
” to choose the item you desire, and press “ENTER” button to exit.
7.“OSD Language” (English, French, German ,Dutch). Press “
” to choose the item you desire, and press
“ENTER” button to exit.
8.“Media” of auto-play (SD/MMC/MS,USB,SPI). After inserting USB
SETUP
or SD/MMC/MS card, Press “
” to choose the item you desire,
TFT Contrast
0
MENU
and press “ENTER” button to exit.
TFT Saturation
0
OSD Language
English
9.“Time mode” Move the cursor to “Time mode”, press “
” to
Media
SD
Time Mode
24 hour
choose 24H or 12H and press “ENTER” to exit.
Set Time
00:00:00
ENTER
10.“Set Time” Move the cursor to Set Time, and press “ENTER” to
start the time setting, and change the setting for Hour, Minute
and Second, press“
” to change the number and then press
“ENTER” to exit. When clock
shown as 12-hour system, the user have to choose AM or PM.
11.“Set Date” Move the cursor to Set Date, and press
“ENTER” to start the date setting, and change the setting
SETUP
for Year, Month and Day, press “
” to change the number
and then press “ENTER” to exit.
Set Date
2009/04/01
MENU
Alarm Setting
00:00 Off
12.“Alarm Setting” Move the cursor to Set Alarm, and press
Default
Read
“ENTER” to start the alarm setting, and change the
setting for Hour, Minute and On or Off, press “
” to change
ENTER
the number and On or Off, then press “ENTER” to exit.
13.“Default” Move the cursor to “Default”, press
“ENTER” to enter the item, and press “
”to return to the
original factory setting.
Note: Please do not disconnect USB device or plug out SD/MMC/MS card while they are working with the unit.
Functional failure may occur in case of wrong operations.
Auto Playing file
1. After connecting power to the unit, turn on the unit with the POWER button.
2. Insert USB device or SD/MMC/ MS card.
3.The unit will automatically play image when turn on.Then you can press MODE button to select display
Mode circularly, as photo single play/photo slide show/multi image view/clock and photo view/calendar and photo view.
Custom playing
1. After connecting power to the unit, turn on the unit with the POWER button.
2. Insert USB device or SD/MMC/ MS card.
3. Press MENU butten to enter the main menu. Use “
“button to select the
option, press “ENTER”button to confirm.
MENU
EXIT
PHOTO
SET UP
Notice: When selecting an option and press “ENTER” button to play,
the unit will automatically check whether USB device or other card has
been connected to the unit. If both USB device and card are inserted,
USB device will be read only. To select the media source, press
MENU button to access the Setup-Media.
ENTER
Photo
Playing JPEG file(photos)
Select “ Photo” option on main menu, press “ENTER”button to
enter the menu. Under this mode, only JPEG file is available to play. The
unit will automatically play JPEG when entering this mode.
When playing pictures in USB device or SD/MMC/MS card, press
“ ENTER ” button to copy current picture into the unit; when playing the stored
pictures , press “ ENTER ” to delete the current picture.
2
MENU
CLOCK
3
Specification
Compatibility: JPG
Panel size: 7 inch
Panel Resolution: 480 (RGB) X 234
USB: Support USB 1.1 (USB2.0 can be recognized but will read as per version 1.1)
Maximum pixel: 7 million
USB maximum handling capacity: 2 GB
Card maximum handling capacity: 2 GB
Power source: DC 5 V
Power consumption:<10W
Operating temperature: 5-40
Weight: 0.43 kgs
Dimension (W x D x H): 208 x 138 x 31.5 mm
Troubleshooting
PROBLEM
The icon
appears on
screen
Picture is distorted
SOLUTION
The feature or action cannot be completed at this time because:
1. The file's software restricts it.
2. The file's software doesn't support the feature .
3. The feature is not available at the moment.
The file might be damaged. Try another file;
It is normal for some distortion to appear during forward or
reverse scan.
If at any time in the future you should need to dispose of this product please note that
waste electrical products should not be disposed of with household waste. Please
recycle where facilities exist. Check with your Local Authority or retailer for recycling
advice.(Waste Electrical and Electronic equipment Directive)
Owing to continuous improvement, no prior notice will be given regarding changes on above
feature and spec.
4
Veiligheidsvoorschriften
OPGELET
Verwittiging: om de gebruiker te verwittigen dat er zich
binnenin gevaarlijke spanningen bevinden
GEVAAR VOOR ELEKTRISCHE SCHOKKEN
NIET OPENEN
GEBRUIKSAANWIJZING
Digitaal fotokader
Verwittiging: om het risico op een elektrische schok te vermijden, dit toestel niet blootstellen aan regen of
vocht.
1) Gelieve aandachtig de gebruiksaanwijzing te lezen en op te volgen om het toestel veilig te kunnen
gebruiken.
2) Gebruik dit toestel niet naast water. Plaats geen objecten, gevuld met een vloeistof, boven het toestel.
3) Plaats het toestel niet naast warmtebronnen zoals radiatoren, kachels of andere apparatuur (inclusief
een versterker) die warmte verspreidt.
4) Trek de stekker uit in geval van bliksem, storm of als het toestel lange tijd niet gebruikt wordt.
5) Reinigen: trek de stekker uit en gebruik een bevochtigd doekje. Gebruik geen vloeibare detergenten of
spuitbussen.
6) Gebruik alleen de accessoires die door de fabrikant aanbevolen worden.
7) Maak gebruik van een erkende servicedienst als onderhoud nodig is. Dat is het geval wanneer het
toestel beschadigd is, wanneer de netstroomkabel beschadigd is, wanneer er vloeistof in of andere
voorwerpen op het toestel gevallen zijn, wanneer het blootgesteld is aan vocht of wanneer het niet goed
meer functioneert. Probeer niet zelf het toestel te herstellen wegens het gevaar van hoge spanningen en
het risico op een elektrische schok.
Voornaamste eigenschappen
Gebruik van SD/MMC/MS kaarten en USB.
Mogelijkheid om JPEG weer te geven.
Bedieningsfuncties
POWER
4
3
DC INPUT:9V
MENU
5
1A
6
2
DC IN 5V
7
ENTER
1
MODE
8
9
1.DC in 5 V
2.SD kaartingang
3.USB poort
4.Power: om het toestel in en uit te schakelen
5.Menu: druk hier om in het hoofdmenu te gaan
6.:
gebruik deze toetsen om de cursor in het menu naar boven of beneden te verplaatsen
7.Enter: gebruik deze toets om naar een submenu te gaan en instellingen te bewaren; bij
weergave van foto's, gebruik deze toets om gebruik te maken van de annuleer of
kopieermogelijkheden
8.Mode: gebruik deze toets tijdens de weergave van foto's om de weergavemodus te kiezen
(weergave enkele foto, diapresentatie, meerdere fotoweergave, kalender + foto, klok + foto)
9.Steun
1
Weergave van de kalender en de klok
Verpakking
1. Na aansluiting aan de netstroom, druk op de POWER toets om het toestel in te schakelen.
2. Druk op MENU om in het hoofdmenu te komen. Gebruik de
toetsen om de KLOK optie te kiezen.
Druk op ENTER om te bevestigen. Gebruik de MODE toets om te kiezen tussen weergave van klok of
kalender
1 stuk
Toestel
Gebruiksaanwijzing
AC/DC stroomadapter
1 stuk
1 stuk
Aansluitingen
10:30:28 AM
09:30
Netstroomaansluiting
2009-03-18
Steek een uiteinde van de AC/DC stroomadapter in de DC ingang van het toestel en het andere uiteinde in
het stopcontact. Zie tekening hierboven.
Gebruik van de SD kaart
Steek de kaart, met de labelkant naar achteren, in de gleuf totdat u een klik hoort.
Opmerking: verwijder geen USB apparaat of een SD/MMC/MS kaart terwijl deze in gebruik zijn. Dit kan
slechte werking als resultaat hebben.
Automatische weergave van documenten
1. Na aansluiting aan de netstroom, druk op de POWER toets om het toestel in te schakelen.
2. Breng een USB of een SD/MMC/MS kaart in.
3. Het toestel start automatisch de weergave. U kan dan op de MODE toets drukken om te kiezen tussen de
weergavemogelijkheden (weergave enkele foto, diapresentatie, meerdere fotoweergave, kalender + foto,
klok + foto)
Aangepaste weergave
MENU
1. Na aansluiting aan de netstroom, druk op de POWER toets om het
toestel in te schakelen.
2. Breng een USB of een SD/MMC/MS kaart in.
3. Druk op de MENU toets om in het hoofdmenu te gaan. Gebruik de
toetsen om de gewenste optie te kiezen en druk op ENTER om te
bevestigen.
Opmerking: na het kiezen van een optie en het bevestigen met ENTER
onderzoekt het toestel automatisch of er een USB of een andere kaart
ingebracht is. Als er zowel een USB als een kaart is ingebracht, wordt
alleen de USB gelezen. Om een andere bron te kiezen, druk op MENU
om naar de pagina te gaan met de mediakeuze.
EXIT
PHOTO
SET UP
ENTER
Photo
JPEG weergave (foto's)
Selecteer 'Foto' in het hoofdmenu en druk op ENTER om in het menu te
gaan. In deze modus kan alleen JPEG weergegeven worden. In deze
modus worden de JPEG documenten automatisch weergegeven.
Bij de weergave van foto's van USB of SD/MMC/MS kaart, druk op
ENTER om de huidige foto naar het toestel te kopiëren; bij weergave van
opgeslagen foto's, druk op ENTER om de huidige foto te verwijderen.
2
MENU
CLOCK
S
M
1
8
15
22
29
2 3
9 10
16 17
23 24
30 31
T
March
W
T
F
S
4
11
18
25
5
12
19
26
6
13
20
27
7
14
21
28
2009-03-18
T
W
March
S
M
1
8
15
22
29
2 3 4 5 6 7
9 1 0 11 1 2 1 3 1 4
16 17 18 19 20 21
23 24 25 26 27 28
30 31
T
F
2009-03-18
S
10:30:28 AM
09:30
T
W
March
S
M
1
8
15
22
29
2 3 4 5 6 7
9 1 0 11 1 2 1 3 1 4
16 17 18 19 20 21
23 24 25 26 27 28
30 31
T
F
S
Systeeminstellingen
Selecteer SETUP in het hoofdmenu en druk op ENTER om in het instelmenu te komen. In dit menu kunnen
de
toetsen gebruikt worden om een van de hieronder genoemde items te kiezen. Druk dan op ENTER om
te bevestigen.
1. “Intervaltijd” tussen de foto's (5, 10, 15, 30 sec; 1 of 3 min, uit). Gebruik de toetsen om uw keuze te
maken en druk op ENTER om het menu te verlaten.
2. “Overgangseffect” tussen de foto's (geen effect, Rombus, Spreiden, Verticaal of Horizontaal blinderen,
Willekeurig). Gebruik de
toetsen om uw keuze te maken en druk op ENTER om het menu te verlaten.
3. “Showtype” van het scherm (volledig scherm, aangepast scherm).
Gebruik de
toetsen om uw keuze te maken en druk op ENTER
SETUP
om het menu te verlaten.
Exit
Exit to MENU
4. “Helderheid TFT” van het scherm (-3, -2, -1, 0, +1, +2, +3). Gebruik
MENU
Interval Time
de
toetsen om uw keuze te maken en druk op ENTER om het
Transition Effect
menu te verlaten.
Show Type
TFT Brightness
5. “Contrast TFT” van het scherm (-3, -2, -1, 0, +1, +2, +3). Gebruik de
ENTER
toetsen om uw keuze te maken en druk op ENTER om het
menu te verlaten.
6. “Saturatie TFT” van het scherm (-3, -2, -1, 0, +1, +2, +3). Gebruik de
toetsen om uw keuze te maken en druk op ENTER om het
menu te verlaten.
7. “OSD taal” (Engels, Frans, Duits, Nederlands). Gebruik de
toetsen om uw keuze te maken en druk op ENTER om het menu te
verlaten.
SETUP
8. “Media” voor automatische weergave (SD/MMC/MS/USB/SPI). Na
TFT Contrast
0
MENU
de USB of SD/MMC/MS kaart ingebracht te hebben, gebruik de
TFT Saturation
0
OSD Language
English
toetsen om uw keuze te maken en druk op ENTER om het menu te
Media
SD
verlaten.
Time Mode
24 hour
Set Time
00:00:00
9. “Tijdmodus”. Ga met de cursor naar 'Tijdmodus' en gebruik de
ENTER
toetsen om te kiezen tussen 24H of 12H en druk op ENTER om het
menu te verlaten.
10. “Tijdinstelling”. Ga met de cursor naar 'Tijdinstelling' en druk op
ENTER om met het instellen van de tijd te beginnen. Gebruik de
toetsen om de uren, minuten en seconden in te stellen en druk op
ENTER om het menu te verlaten. Als gekozen wordt voor het 12H
systeem, dient ook gekozen te worden tussen AM of PM.
11. “Datuminstelling”. Ga met de cursor naar 'Datuminstelling' en druk
SETUP
op ENTER om met het instellen van de datum te beginnen. Gebruik
Set Date
2009/04/01
de
toetsen om het jaar, de maand en de dag in te stellen en
MENU
Alarm Setting
00:00 Off
druk op ENTER om het menu te verlaten.
Default
Read
12. “Alarminstelling”. Ga met de cursor naar 'Alarminstelling' en druk
op ENTER om met het instellen van de tijd te beginnen. Gebruik de
ENTER
toetsen om de uren, minuten in te stellen en te kiezen tussen
Aan of Uit en druk op ENTER om het menu te verlaten.
13. “Standaardinstelling”. Ga met de cursor naar 'Standaardinstelling'
en druk op ENTER om in het menu te komen. Gebruik de
toetsen
om de fabrieksinstellingen te selecteren.
3
Specificaties
Geschikt voor: JPG
Schermgrootte: 7 “
Resolutie: 480 (RGB) x 234
USB: ondersteunt USB1.1 (USB2.0 wordt herkend en gelezen als 1.1)
Maximum aantal pixels: 7 miljoen
Maximum capaciteit USB: 2 GB
Maximum capaciteit kaart: 2 GB
Voeding: DC 5V
Verbruik: < 10 W
Gebruikstemperatuur: 5°-40° C
Gewicht: 0.43 kg
Afmetingen (B x D x H): 208 x 138 x 31.5 mm
In geval van problemen
PROBLEEM
OPLOSSING
Het symbool
verschijnt op het scherm
De gewenste actie kan op het ogenblik niet uitgevoerd worden omdat
1.De software het niet toelaat.
2.De software de gewenste actie niet ondersteunt.
3.De actie op het ogenblik niet beschikbaar is.
Vervormd beeld
Het document kan beschadigd zijn. Probeer een ander document.
Indien u vroeg of laat het toestel wil verwijderen, noteer dan dat afgedankte elektrische
apparaten niet met het ander huisvuil gemengd mogen worden. Maak gebruik van de
recyclagemogelijkheden. Contacteer de lokale autoriteiten of uw dealer. (Richtlijn
betreffende Afval van Elektrische en Elektronische Apparatuur).
Wegens constante verbeteringen, kunnen de eigenschappen en specificaties zonder
verwittiging aangepast worden.
4
Précautions de sécurité
ATTENTION
Avertissement : pour informer l'utilisateur qu'il existe
des hauts voltages à l'intérieur de l'appareil
RISQUE DES CHOCS ELECTRIQUES
NE PAS OUVRIR
MANUEL D'UTILISATION
Cadre photo digital
Avertissement : afin de réduire le risque des chocs électriques, ne pas exposer l'appareil à la pluie ou à
l'humidité.
1) Lisez attentivement le manuel d'utilisation et suivez les instruction pour une opération en toute sécurité.
2) Ne pas utiliser l'appareil à côté d'eau. Ne pas placer des objets remplis des liquides au-dessus de l'appareil.
3) Ne pas placer l'appareil à côté des sources de chaleurs telles que radiateurs ou d'autres appareils (y compris
des amplificateurs) qui produisent du chaleur.
4) Retirez la prise courant secteur en cas d'éclairs, d'orages ou quand l'appareil n'est pas utilisé pendant un
certain temps.
5) Nettoyage : utilisez un chiffon légèrement humide. Ne pas utiliser des détergents liquides ou de aérosols.
6) Utilisez uniquement les accessoires recommandés par le fabricant.
7) Consultez un service professionnel si nécessaire. Ceci est nécessaire quand l'appareil est endommagé,
quand le câble courant secteur est endommagé, quand une liquide a pénétré l'appareil ou quand en objet est
tombé de ssus, quand il a été exposé a l'humidité ou quand il ne fonctionne pas bien. N'essayez pas de réparer
vous-même l'appareil à cause du danger des hauts voltages et le risque de choc électrique.
Caractéristiques principales
Prévu pour les cartes SD/MMC/MS ou USB
Lecture JPEG
Fonctions de commandes
POWER
4
3
DC INPUT:9V
1A
MENU
5
6
2
DC IN 5V
7
ENTER
1
MODE
8
9
1.
2.
3.
4.
5.
6.
7.
Entrée DC 5 V
Entrée carte SD
Porte USB
Power : pour mettre l'appareil en et hors fonction
Menu : poussez ce bouton pour entrer dan le menu pricipal
: utilisez ces boutons pour bouger le curseur dans les menus
Enter : poussez ce bouton pour entrer dans les sous-menus ; pendant la reproduction des photos
poussez ce bouton pour choisir la fonction annuler ou copier.
8. Mode : pendant la reproduction automatique des photos, poussez ce bouton pour sélectionner le
mode de lecture (seulement une photo, présentation dia, multiples photos, calendrier +
photo, montre + photo).
9. Support
1
Affichage calendrier et montre
Emballage
1. Après avoir connecté l'appareil au courant secteur, poussez le bouton POWER pour mettre l'appareil en
fonction.
2. Poussez le bouton MENU pour entrer dans le menu principal. Utilisez les boutons
pour sélectionner
l'option MONTRE. Poussez le bouton ENTER pour confirmer. Utilisez le bouton MODE pour sélectionner
l'affichage calendrier ou montre.
1 PC
1 PC
1 PC
Appareil
Manuel d'utilisation
Adaptateur AC/DC
Connexion système
10:30:28 AM
Courant secteur
09:30
2009-03-18
Connectez un bout de l'adaptateur courant secteur à l'entrée DC de l'appareil et l'autre bout au prise
courant secteur. Voyez le dessin ci-dessus.
S
M
1
8
15
22
29
2 3
9 10
16 17
23 24
30 31
T
March
W
T
F
S
4
11
18
25
5
12
19
26
6
13
20
27
7
14
21
28
2009-03-18
T
W
March
S
M
1
8
15
22
29
2 3 4 5 6 7
9 1 0 11 1 2 1 3 1 4
16 17 18 19 20 21
23 24 25 26 27 28
30 31
T
F
2009-03-18
S
10:30:28 AM
09:30
T
W
March
S
M
1
8
15
22
29
2 3 4 5 6 7
9 1 0 11 1 2 1 3 1 4
16 17 18 19 20 21
23 24 25 26 27 28
30 31
T
F
S
Réglages système
Utilisation de la carte SD
Insérez la carte SD dans l'entrée carte SD avec la face non imprimée vers vous.
Remarque : ne retirez pas l'USB ou la carte SD/MMC/MS pendant qu'elles sont utilisées. Ceci peut
endommager l'appareil.
Lecture automatique des documents
1. Après avoir connecté l'appareil au courant secteur, poussez le bouton POWER pour mettre l'appareil
en fonction.
2. Insérez l'USB ou la carte SD/MMC/MS.
3. L'appareil commence automatiquement avec la reproduction. Vous pouvez pousser le bouton MODE
pour sélectionner le mode de reproduction (seulement une photo, présentation dia, multiples photos,
calendrier + photo, montre + photo).
Lecture adaptée
MENU
1. Après avoir connecté l'appareil au courant secteur, poussez le
bouton POWER pour mettre l'appareil en fonction.
2. Insérez l'USB ou la carte SD/MMC/MS.
3. Poussez le bouton MENU pour entrer dans le menu principal.
Utilisez les boutons
pour sélectionner l'option et poussez le
bouton ENTER pour confirmer.
Remarque : après avoir sélectionné l'option et avoir poussé le bouton
ENTER l'appareil cherche automatiquement quel type de carte ou USB
a été connecté à l'appareil. Si les deux types de média sont connectés
seulement l'USB sera reproduit. Pour sélectionner la source média,
poussez le bouton MENU pour aller vers la page de sélection média.
EXIT
PHOTO
SET UP
ENTER
Photo
Lecture JPEG (photos)
Sélectionnez 'photo' dans le menu principal et poussez ENTER pour
entrer dans le menu. Dans ce mode uniquement les documents JPEG
peuvent être reproduits. Dans ce mode l'appareil lit automatiquement
les documents JPEG.
Pendant la lecture des photos sur USB ou carte SD/MMC/MS, poussez
le bouton ENTER pour copier la photo actuelle vers l'appareil. Pendant
la lecture des photos mémorisés, poussez ENTER pour annuler la
photo actuelle.
2
MENU
CLOCK
Sélectionnez SETUP dans le menu principal et poussez ENTER pour entrer dans le menu. Utilisez les
boutons
pour sélectionner l'item voulu (voir ci-dessous) et poussez ENTER pour confirmer.
1.'Temps d'intervalle' entre photos (5, 10, 15, 30 sec ou 1, 3 min ou hors fonction). Utilisez les
boutons
pour faire votre choix et poussez ENTER pour quitter le menu.
2.'Effet de transition' entre photos (pas d'effet, Rombus, Elargement, Disparition
horizontale/verticale, Aléatoire). Utilisez les boutons
pour faire votre choix et poussez ENTER
pour quitter le menu.
3. 'Type d'écran' (entièrement rempli, écran fixe). Utilisez les
boutons
pour faire votre choix et poussez ENTER pour
SETUP
quitter le menu.
Exit
4. 'Luminosité TFT' de l'écran (-3, -2, -1, 0, +1, +2, +3). Utilisez les
Exit to MENU
MENU
Interval Time
boutons
pour faire votre choix et poussez ENTER pour quitter
Transition Effect
le menu.
Show Type
5. 'Contraste TFT' de l'écran (-3, -2, -1, 0, +1, +2, +3). Utilisez les
TFT Brightness
ENTER
boutons
pour faire votre choix et poussez ENTER pour quitter
le menu.
6. 'Saturation TFT' de l'écran (-3, -2, -1, 0, +1, +2, +3). Utilisez les
boutons
pour faire votre choix et poussez ENTER pour quitter
le menu.
7. 'Langue OSD' (Anglais, Français, Allemand, Néerlandais).
Utilisez les boutons
pour faire votre choix et poussez ENTER
pour quitter le menu.
SETUP
8. 'Média' de lecture automatique (SD/MMC/MS/USB/SPI). Après
TFT Contrast
0
MENU
TFT Saturation
avoir connecté l'USB ou la carte, utilisez les boutons
pour faire
0
OSD Language
English
votre choix et poussez ENTER pour quitter le menu.
Media
SD
Time Mode
24 hour
9. 'Mode temps'. Sélectionnez 'mode temps'. Utilisez les boutons
Set Time
00:00:00
pour choisir entre 24H ou 12H et poussez ENTER pour
ENTER
quitter le menu.
10. 'Réglage temps'. Sélectionnez 'réglage temps'. Utilisez les
boutons
pour régler l'heure, les minutes et les secondes et
poussez ENTER pour quitter le menu. Si vous avez choisi le
système 12H, il faut choisir entre AM et PM.
11. 'Réglage date'. Sélectionnez 'réglage date. Utilisez les boutons
pour régler l'année, le mois et la date et poussez ENTER
SETUP
pour quitter le menu.
12.Réglage alarme'. Sélectionnez 'réglage date'. Utilisez les
Set Date
2009/04/01
MENU
Alarm Setting
00:00 Off
boutons
pour régler l'heure, les minutes, les secondes et
Default
Read
pour choisir entre en ou hors fonction et poussez ENTER pour
quitter le menu.
ENTER
13. 'Standard'. Sélectionnez 'standard' et poussez ENTER pour
entrer dans le menu. Utilisez les boutons
pour remettre tous
les réglages au niveau d'usine.
3
Spécifications
Lecture : JPG
Résolution : 480 (RGB) x 234
USB : supporte USB1.1 (USB2.0 est reconnu mais lu comme 1.1).
Nombre maximal de pixels : 7 millions
Capacité maximale USB : 2 GB
Capacité maximale Carte : 2 GB
Alimentation : DC 5 V
Consommation : < 10 W
Température d'opération : 5° - 40° C
Poids : 0.43 kg
Dimensions (L x P x H) : 208 x 138 x 31.5 mm
En cas de problèmes
PROBLEME
Le symbole
apparaît sur l'écran
Image avec distorsion
SOLUTION
L'action ne peut pas être effectué parce que :
1.Le software l'interdit.
2.Le software ne supporta pas l'action
3.L'action n'est pas disponible à l'instant
Le document peut être endommagé. Essayez un autre document.
Si à un certain moment vous voulez vous dégager de votre appareil, souvenez vous qu'un
appareil électrique ne peut pas être mélangé avec les autres déchets domestiques.
Utilisez un système de recyclage. Prenez contact avec les autorités locaux ou avec le
revendeur. (Directive pour les Déchets d'Equipement Electrique et Electronique).
A cause d'améliorations constantes, les caractéristiques et les spécifications
peuvent être modifiées sans préavis.
4