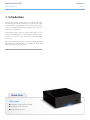
1
LaCinema Mini HD User Manual Table of Contents page 1 Table of Contents 1. Introduction................................................................................................................. 7 1.1.Minimum System Requirements......................................................................................................... 8 1.1.1. Windows Users.................................................................................................................... 8 1.1.2. Mac Users........................................................................................................................... 8 1.2.Supported Formats.......................................................................................................................... 9 1.3.Box Content.................................................................................................................................. 10 1.4.Languages.................................................................................................................................... 10 1.5.Views of the LaCinema Mini HD..................................................................................................... 11 1.5.1. Front View......................................................................................................................... 11 1.5.2. Rear View.......................................................................................................................... 11 1.5.3. Internal............................................................................................................................. 11 1.6.Cables and Connectors................................................................................................................. 12 1.6.1. A/V (Audio/Video) Cables.................................................................................................. 12 1.6.2. USB Cable........................................................................................................................ 12 1.7.Power Management....................................................................................................................... 13 2. Using the Remote Control.......................................................................................... 14 2.1.Battery Installation......................................................................................................................... 14 2.2.Remote Control Key Index.............................................................................................................. 15 2.2.1. Important Button Details..................................................................................................... 16 3. Setting Up: Transferring Files Via USB........................................................................ 17 3.1.STEP 1: Connect the USB cable...................................................................................................... 18 3.2.STEP 2: Connect the Power Supply (Optional).................................................................................. 18 3.3.STEP 3: Transferring Files............................................................................................................... 19 3.4.STEP 4: Unmounting Your Drive..................................................................................................... 20 4. Setting Up: Connecting to TV..................................................................................... 21 4.1.STEP 1: Connect HDMI or Composite Cables.................................................................................. 21 4.1.1. HDMI (High-Definition) Connection..................................................................................... 22 4.1.2. Composite Video & Stereo Audio Cable.............................................................................. 22 4.1.3. Optical Audio (S/PDIF) Connection..................................................................................... 23 4.2.STEP 2: Connect the Ethernet Cable............................................................................................... 24 4.3.STEP 3: Connect the Power Supply ................................................................................................ 25 4.4.STEP 4: Complete the Installation Wizard........................................................................................ 26 5. Playing Multimedia Files............................................................................................ 28 5.1.Movie Space................................................................................................................................. 29 5.1.1. Movie Space Options......................................................................................................... 30 5.2.Photos Space................................................................................................................................ 32 5.2.1. Photo Space Options......................................................................................................... 33 5.3.Music Space................................................................................................................................. 34 5.3.1. Music Space Options......................................................................................................... 36 5.4.Network Space.............................................................................................................................. 38 5.4.1. Media Servers.................................................................................................................... 38 5.4.2. Shared folders................................................................................................................... 38 6. Playing Files Located on USB Hard Drive.................................................................... 39 6.1.USB Disk Connection..................................................................................................................... 39 6.2.Compatibility................................................................................................................................ 40 6.3.Safe USB Disk Removal.................................................................................................................. 40 LaCinema Mini HD User Manual Table of Contents page 2 7. Playing Files From a Networked Media Server........................................................... 41 7.1.Network-Attached Storage (NAS).................................................................................................... 41 7.2.From Windows or Mac Computers.................................................................................................. 42 7.2.1. Packet Video TwonkyVision................................................................................................. 42 7.2.2. Windows Media Player (WMP)............................................................................................ 43 7.2.3. Shared folders on your Computer........................................................................................ 44 8. Sharing Files Throughout Your Home Network.......................................................... 47 8.1.Manage Files from a Networked Computer..................................................................................... 47 8.1.1. STEP 1: Connect the Power Supply...................................................................................... 48 8.1.2. STEP 2: Connect the Ethernet Cable.................................................................................... 49 8.1.3. STEP 3: Connect HDMI or Composite Cables...................................................................... 49 8.1.4. STEP 4: Configure Network Settings.................................................................................... 50 8.1.5. STEP 5: LaCie Network Assistant: Install............................................................................... 51 8.1.6. STEP 6: LaCie Network Assistant: Transfer Files.................................................................... 52 8.1.7. Alternative Network Connection Methods............................................................................. 54 8.2.Play Files on Networked Media Players............................................................................................ 55 8.2.1. Enable the Media Server Function....................................................................................... 55 8.2.2. UPnP Usage Example: XBOX.............................................................................................. 56 9. Reformatting the LaCinema Mini HD.......................................................................... 57 9.1.Reformatting: Windows Users......................................................................................................... 58 9.2.Reformatting: Mac Users................................................................................................................ 60 10.Settings Menu............................................................................................................ 61 10.1.Settings: Audio/Video.................................................................................................................. 61 10.1.1.Video Output.................................................................................................................... 61 10.1.2.Display Resolution.............................................................................................................. 62 10.1.3.Aspect Ratio...................................................................................................................... 62 10.1.4.Audio Output.................................................................................................................... 62 10.1.5.NTSC/PAL......................................................................................................................... 63 10.2.Settings: Video............................................................................................................................ 63 10.2.1.Video Sequence................................................................................................................. 63 10.2.2.Subtitle Font Size............................................................................................................... 64 10.3.Settings: Music............................................................................................................................ 65 10.3.1.Music Sequence................................................................................................................ 65 10.3.2.Audio Track Display........................................................................................................... 65 10.4.Settings: Photo............................................................................................................................ 66 10.4.1.Slideshow.......................................................................................................................... 66 10.4.2.Picture Scaling................................................................................................................... 66 10.4.3.Transition Effect................................................................................................................. 67 10.4.4.Interval Time..................................................................................................................... 67 10.5.Settings: System........................................................................................................................... 68 10.5.1.Language.......................................................................................................................... 68 10.5.2.Content Aggregation.......................................................................................................... 68 10.5.3.Screensaver Delay............................................................................................................. 68 10.5.4.Browse Mode.................................................................................................................... 68 10.5.5.Additional Encoding Support.............................................................................................. 69 10.5.6.System Reset...................................................................................................................... 69 10.5.7.About............................................................................................................................... 70 10.5.8.Update Device................................................................................................................... 70 10.6.Settings: Network........................................................................................................................ 71 10.6.1.Network Setup: Wired / Wireless......................................................................................... 71 10.6.2.Device Name.................................................................................................................... 72 10.6.3.Media Server..................................................................................................................... 72 LaCinema Mini HD User Manual Table of Contents page 3 10.6.4.Shared Folders.................................................................................................................. 72 10.6.5.Auto Login........................................................................................................................ 73 10.6.6.Clear Account Information.................................................................................................. 73 10.7.Settings: Shutdown...................................................................................................................... 73 10.7.1.Shutdown.......................................................................................................................... 73 10.7.2.Restart.............................................................................................................................. 73 11.Technical Information................................................................................................ 74 11.1.HD File Format Compatibility....................................................................................................... 74 11.2.Optimizing Data Transfers............................................................................................................ 74 12.Troubleshooting......................................................................................................... 75 12.1.Troubleshooting the Television/Stereo Connection......................................................................... 76 12.2.USB Connection (Mac Users)........................................................................................................ 77 12.3.USB Connection (Windows Users)................................................................................................. 79 13.Contacting Customer Support.................................................................................... 81 13.1.LaCie Technical Support Contacts................................................................................................. 82 14.Warranty Information................................................................................................ 83 LaCinema Mini HD User Manual Copyrights Copyright © 2010 LaCie. All rights reserved. No part of this publication may be reproduced, stored in a retrieval system, or transmitted in any form or by any means, electronic, mechanical, photocopying, recording or otherwise, without the prior written consent of LaCie. Trademarks Apple, Mac, and Macintosh are registered trademarks of Apple Inc. Microsoft, Windows XP, Windows Vista, and Windows 7 are registered trademarks of Microsoft Corporation. Other trademarks mentioned in this manual are the property of their respective owners. Manufactured under license from Dolby Laboratories. “Dolby” and the double-D symbol are trademarks of Dolby Laboratories. Manufactured under license under U.S. Patent #: 5,451,942 & other U.S. and worldwide patents issued & pending. DTS and the Symbol are registered trademarks and DTS Digital Out and the DTS logos are trademarks of DTS, Inc. Product includes software. © DTS, Inc. All Rights Reserved. Changes The material in this document is for information only and subject to change without notice. While reasonable efforts have been made in the preparation of this document to assure its accuracy, LaCie assumes no liability resulting from errors or omissions in this document, or from the use of the information contained herein. LaCie reserves the right to make changes or revisions in the product design or the product manual without reservation and without obligation to notify any person of such revisions and changes. 100309 v1.0 Foreword page 4 FCC Statement LaCinema Mini HD Tested to comply with FCC standards for home or office use This device complies with Part 15 of the FCC Rules. Operation is subject to the following conditions: 1. The devices may not cause harmful interference 2. The devices must accept any interference received, including interference that may cause undesired operation. NOTE: This equipment has been tested and found to comply with the limits for a Class B digital device, pursuant to Part 15 of the FCC Rules. These limits are designed to provide reasonable protection against harmful interference in a residential installation. This equipment generates, uses and can radiate radio frequency energy and, if not installed and used in accordance with the instructions, may cause harmful interference to radio communications. However, there is no guarantee that interference will not occur in a particular installation. If this equipment does cause harmful interference to radio or television reception, which can be determined by turning the equipment off and on, the user is encouraged to try and correct the interference by one or more of the following measures: ■■ Reorient or relocate the receiving antenna. ■■ Increase the separation between the equipment and receiver. ■■ Connect the equipment into an outlet on a circuit different from that to which the receiver is connected. ■■ Consult the dealer or an experienced radio/TV technician for help. Modifications to this product not authorized by LaCie could void the FCC & Industry Canada regulations and negate your authority to operate the product. Canada Compliance Statement This Class B digital apparatus meets all requirements of the Canadian InterferenceCausing Equipment Regulations. Manufacturer’s Declaration for CE Certification We, LaCie, solemnly declare that this product conforms to the following European standards: Class B EN60950, EN55022, EN55024, EN61000-3-2: 2000, EN61000-3-3: 2001 With reference to the following conditions: 73/23/EEC Low Voltage Directive; 89/336/EEC EMC Directive CAUTION: Modifications not authorized by the manufacturer may void the user’s authority to operate this device. CAUTION: The LaCinema Mini HD’s warranty may be void as a result of the failure to respect the precautions listed above. NOTE: The main cable must be in conformity with CEI 60227 or CEI 60245 and the type of plug must match the standards in the country of use. LaCinema Mini HD User Manual This symbol on the product or on its packaging indicates that this product must not be disposed of with your other household waste. Instead, it is your responsibility to dispose of your waste equipment by handing it over to a designed collection point for the recycling of waste electrical and electronic equipment. The separate collection and recycling of your waste equipment at the time of disposal will help to conserve natural resources and ensure that it is recycled in a manner that protects human health and the environment. For more information about where you can drop off your waste equipment for recycling, please contact your local city office, your household waste disposal service, or the shop where you purchased the product. CAUTION: The LaCinema Mini HD’s warranty may be void as a result of the failure to respect the precautions listed above. Foreword page 5 ■■ Make sure that the computer and LaCinema Mini HD are electrically grounded. If the devices are not grounded, there is an increased risk of electrical shock. Power requirements 100-240 V~, 1.5 A, 60-50 Hz, (Supply voltage fluctuations not exceeding ± 10% of the nominal, transient over-voltages according to over-voltage category II). General Use Precautions ■■ Do not expose the LaCinema Mini HD to temperatures outside the range of 5° C to 30° C (41° F to 86° F); or to operational humidity beyond 5-80%, noncondensing, or non-operating humidity beyond 10-90%, non-condensing. Doing so may damage the LaCinema Mini HD or disfigure its casing. Avoid placing your LaCinema Mini HD near a source of heat or exposing it to sunlight (even through a window). Inversely, placing your LaCinema Mini HD in an environment that is too cold or humid may damage the unit. Health and Safety Precautions ■■ Always unplug the LaCinema Mini HD from the electrical outlet if there is a risk of lightning or if it will be unused for an extended period of time. Otherwise, there is an increased risk of electrical shock, short-circuiting or fire. ■■ Only qualified persons are authorized to carry out maintenance on this device. ■■ Use only the power supply shipped with the device. ■■ Read this User Manual carefully and follow the correct procedure when setting up the device. ■■ Do not place objects on top of the LaCinema Mini HD or use excessive force on it. ■■ Do not open a disk drive or attempt to disassemble or modify it. Never insert any metallic object into the drive to avoid any risk of electrical shock, fire, short-circuiting or dangerous emissions. The disk drives shipped with your LaCinema Mini HD contain no user-serviceable parts. If it appears to be malfunctioning, have it inspected by a qualified LaCie Technical Support representative. ■■ Never use excessive force on your LaCinema Mini HD. If you detect a problem, see the Troubleshooting section in this manual. ■■ Never expose your device to rain, or use it near water, or in damp or wet conditions. Never place objects containing liquids on the LaCinema Mini HD, as they may spill into its openings. Doing so increases the risk of electrical shock, short-circuiting, fire or personal injury. CAUTION: A shielded-type power cord is required in order to meet FCC emission limits and also to prevent interference to the nearby radio and television reception. It is essential that only the supplied power cord be used. LaCinema Mini HD User Manual Foreword page 6 Operating Environment Temperatures ■■ Do not expose the LaCinema Mini HD to temperatures outside the range of 5° C to 30° C (41° F to 86° F). As high end audio/ video appliance, the LaCinema Mini HD has been designed with an efficient ventilation system. Allow 5 cm of clearance for airflow on all sides of the LaCinema Mini HD to prevent overheating. See Fig. 01. ■■ Do not stack the LaCinema Mini HD on or below another audio/ video appliance such as a TV, VCR or DVD player. Other audio/ video appliances require sufficient airflow and carry the same precautions of use. See Fig. 02 and Fig. 03. 5 cm 5 cm Fig. 01 IMPORTANT INFO: Any loss, corruption or destruction of data while using a LaCie drive is the sole responsibility of the user, and under no circumstances will LaCie be held liable for the recovery or restoration of this data. To help prevent the loss of your data, LaCie highly recommends that you keep TWO copies of your data; one copy on your external hard disk, for instance, and a second copy either on your internal hard disk, another external hard disk or some other form of removable storage media. LaCie offers a complete line of CD and DVD drives. If you would like more information on backup, please refer to our website. IMPORTANT INFO: 1GB = 1,000,000,000 bytes. 1TB = 1,000,000,000,000 bytes. Once formatted, the actual available storage capacity varies depending on operating environment (typically 5-10% less). Fig. 02 IMPORTANT INFO: Do not stack objects on top of the LaCinema Mini HD, as they may interfere with the WiFi antenna. Fig. 03 5 cm LaCinema Mini HD User Manual 1.Introduction Congratulations on the purchase of your new LaCinema Mini HD! The LaCinema Mini HD plugs directly into a wide array of audio/ visual equipment for instant playback of stored home movies, music or photos. And with high-quality video and quality audio, there’s no compromise on performance. To get started, simply connect the LaCinema Mini HD to your TV and use the included remote to easily navigate through the menus, called Spaces, to listen to music, view photos or watch High definition movies. The LaCinema Mini HD allows you to choose from MPG, AVI, MP4, MKV, WMV, ISO, VOB, IFO, ASF, TS, TP, TRP, MTS, M2TS, and DAT video formats for easy playback. Quick Links Click a topic: ■■ Setting Up: Transferring Files Via USB ■■ Setting Up: Connecting to TV ■■ Playing Multimedia Files Introduction page 7 LaCinema Mini HD User Manual 1.1. Minimum System Requirements 1.1.1. Windows Users ■■ 500MHz Intel Pentium II processor or later ■■ Windows XP, Vista, or Windows 7 ■■ 256MB RAM ■■ USB interface port ■■ Internet connection (for downloading updates) 1.1.2. Mac Users ■■ G5 or later, or Intel Core Duo ■■ Mac OS X 10.4.9 ■■ 256MB RAM ■■ USB interface port ■■ Internet connection (for downloading updates) Introduction page 8 LaCinema Mini HD User Manual Introduction page 9 1.2. Supported Formats Video Codecs Photo File Types ■■ MPEG-1 ■■ Xvid ■■ PNG ■■ BMP ■■ MPEG-2 / HD ■■ H.264 HD ■■ GIF ■■ MPEG4 ■■ WMV9 HD ■■ JPEG (except Progressive JPEG) ■■ DivX / HD ■■ VC-1 ■■ TIFF Video Outputs Video File Types (Containers) ■■ Composite (CVBS) ■■ AVI ■■ MOV ■■ TRP ■■ MP4 ■■ MPEG ■■ M2TS Audio Outputs ■■ MKV ■■ VOB ■■ DVR-MS ■■ Optical ■■ WMV ■■ ASF ■■ ISO* ■■ DivX ■■ TS ■■ Video_TS* ■■ DAT ■■ TP ■■ HDMI 1.3 ■■ Stereo External Hard Drive File Systems * DVD Video function is supported via VOB / IFO (Video_TS folder). If the drive is formatted in FAT32, DVD ISO file size cannot exceed 4GB due to file system format limitation. ■■ NTFS ** Supports iTunes encoded (m4a). ■■ FAT32 (MSDOS) ■■ HFS+ (not Journaled) ■■ SRT ■■ SSA ■■ SUB ■■ SMI ■■ PSB ■■ ASS Subtitles Audio File Types (Containers) ■■ MP3 ■■ AAC** ■■ AC3 ■■ WMA ■■ OGG ■■ MP4 ■■ WAV/PMC/ LPMC ■■ FLAC ■■ MKA ■■ PLS ■■ WPL Playlists ■■ M3U Dolby Digital / DTS ■■ Two channels only*** ■■ Multichannel decoding via optical S/PDIF and HDMI to home amplifier *** For audio with more than 2 channels, connect the product to a digital home receiver. The audio is passed through the coaxial connection (see section 4.1.3. Optical Audio (S/PDIF) Connection). TECHNICAL NOTE: A container, such as AVI or MOV, is a file format that defines how the data stream is stored. They contain data that has been compressed using a codec. For a file to play properly on your LaCinema Mini HD, both its codec and container type must be supported. TECHNICAL NOTE: You can download third party applications that will help you to identify a file’s codec, container, and other information. LaCie suggests the free application Media Info. LaCinema Mini HD User Manual Introduction page 10 1.3. Box Content Your LaCinema Mini HD package contains the system tower and an accessories box containing the items listed below. 1. LaCinema Mini HD 2. Remote control 3. 2 x AAA batteries 4. Video composite + stereo cable 5. HDMI cable 6. USB cable 7. Ethernet cable 8. External power supply 9. Quick Install Guide 10.Utilities CD-ROM (includes User Manual and Packet Video TwonkyMedia Server software for Mac and PC) IMPORTANT INFO: Please save your packaging. In the event that the drive should need to be repaired or serviced, it must be returned in its original packaging. 1.4. Languages Supported Languages ❖ Chinese (Simplified) ❖ Chinese (Traditional) ❖ Dutch ❖ English ❖ French ❖ German ❖ Greek ❖ Italian ❖ Japanese ❖ Korean ❖ Polish ❖ Portuguese ❖ Russian ❖ Spanish ❖ Swedish Please check the LaCie website for a complete list of supported languages. PV TwonkyMedia Server 5.0 for Windows XP, Vista Mac OS 10.3.9 or higher Genie Backup Assistant for Windows XP, Vista Intego Backup Assistant for Mac OS 10.4.9 or higher User Manual Manuel d’utilisation Guida per l'utente Benutzerhandbuch Manual de Usuario Quick Install Guide ©2 0 09 09 La C ie , all r ights s ved. 7 1 3 25 5 r e er 3 03 1 LaCinema Mini HD User Manual Introduction page 11 1.5. Views of the LaCinema Mini HD 1.5.1. Front View 1. Infrared receiver – Receives the infrared signal from the remote control. Make sure the receiver is not obstructed. Stand-by button – By default, pushing this button puts the drive into stand-by mode or wakes it from standby (this behavior can be modified; see 1.7. Power Management for more details) 2. Blue status light – If the drive is connected to a TV or computer, this light will be on. It will turn off when disconnected. 3. USB port (connect disk) – Connect a USB disk, digital camera, or card reader to access its multimedia files directly from your TV. Fig. 04 1.5.2. Rear View 1. USB 2.0 device – Connect to your PC or Mac to copy files to the LaCinema Mini HD’s internal storage 2. USB 2.0 host – Connect a USB disk, digital camera, or card reader 3. Ethernet connector – Connect to your home network via an Ethernet cable to your router 4. Optical audio out – Connect to digital home amplifier 5. Video composite + stereo connector – Connect to any TV (CRT) 6. HDMI – Connect to a High Definition flat screen TV or video projector 7. Power connector – Must be connected when the drive is attached to a TV. When connected to a computer, the drive is bus powered through the USB connection, but if your computer does not provide enough power through the USB port, connect the power supply. Fig. 05 1.5.3. Internal 1. WiFi connection – Antenna is inside the product. Connect the LaCinema mini HD to a network via WiFi in order to transfer and play multimedia files. CAUTION: Do not stack another electronic device on or below the LaCinema Mini HD or place it in an enclosed area to avoid performance and overheating issues (Fig. 06). Fig. 06 LaCinema Mini HD User Manual Introduction page 12 1.6. Cables and Connectors 1.6.1. A/V (Audio/Video) Cables These cables provide the audio and video signals to your stereo and TV. The LaCinema Mini HD supports the following standards: 1. Composite video + stereo audio – This is the most standard video connection (yellow) as well as left (white) and right (red) stereo audio inputs. If your TV only has a SCART connector, you can purchase a SCART-Composite adapter from your local retailer. 2. HDMI (High-Definition Multimedia Interface) – This is the best audio/video method for connecting the LaCinema Mini HD to HDTVs. Fig. 07 3. Optical Audio (S/PDIF) (not included) – This connection allows you to connect your LaCinema Mini HD to a digital amplifier. 1.6.2. USB Cable USB is a serial input/output technology for connecting peripheral devices to a computer or to each other. Hi-Speed USB 2.0 is the latest implementation of this standard, and it provides the necessary bandwidth and data transfer rates to support high speed devices such as hard drives, CD/DVD drives and digital cameras. NOTE: Your LaCinema Mini HD is shipped with a Hi-Speed USB 2.0 cable to be used to connect the product to a PC or Mac (this cable should be connected to the rear (device) port). If you want to connect a USB peripheral (digital camera, USB drive, etc.) to the LaCinema Mini HD, use the USB cable that shipped with that product and connect it to the front (host) port. TECHNICAL NOTE: The included (device) cable will also work when connected to a USB port, but drive performance will be limited to USB 1.1 transfer rates. To achieve Hi-Speed USB 2.0 data transfer rates you need to be connected to a Hi-Speed USB 2.0 host interface. Otherwise, transfer rates will be limited to USB 1.1 speeds. Connection Maximum Resolution High Definition HDMI 1080p Standard Definition Composite 576p Fig. 08 - USB cable ends LaCinema Mini HD User Manual Introduction page 13 1.7. Power Management This product features a low power mode which conserves electricity when the drive is not in use, and an instant on mode which optimizes the drive for responsiveness. By default, the LaCinema Mini HD is set to Instant ON mode, which means that when you press the power button on the remote control (Fig. 09) or the standby button on the front of the drive (Fig. 10), the user interface will turn off but the drive will remain available for network connections (including file and UPnP/DLNA server features). Alternatively, you can put the drive in low power mode from the user interface. Go to the Shut Down menu in the Settings Space and choose Shut Down. This mode will turn off the user interface, attached hard disk (if connected), and network services (including UPnP/DLNA server features). Fig. 09 Fig. 10 LaCinema Mini HD User Manual Using the Remote Control page 14 2.Using the Remote Control Some of the buttons of the remote control have different functions or no function at all depending on the type of file you are viewing. This chapter discusses the button functions for each type of file (movies, photos and music) and battery installation. 2.1. Battery Installation The remote control uses two AAA batteries. The batteries are not pre-installed, so you will need to install them before you can use the remote control. To install the batteries: 1. Remove the battery compartment cover (Fig. 11). 2. Load the batteries onto the battery compartment. Position the batteries so that the “+” symbols on the batteries face the same direction as the “+” symbols on the battery compartment. 3. Slide the battery compartment cover back into the remote. IMPORTANT INFO: If you will not be using the remote control for an extended period of time, LaCie recommends that you remove the batteries. Fig. 11 IMPORTANT INFO: The remote control must be pointed at the infrared receiver on the LaCinema Mini HD (Fig. 12) no further away than of 23 feet (7 meters). IMPORTANT INFO: When replacing batteries, please do not dispose of the used batteries with your normal household waste. Dispose of them by handing them over to a designed collection point for the recycling of waste electrical and electronic equipment. Remote control receiver Fig. 12 LaCinema Mini HD User Manual Using the Remote Control page 15 2.2. Remote Control Key Index The LaCinema Mini HD’s remote control allows you to control the LaCinema Mini HD while its connected to your TV or home theatre center. Button 1. Infrared emitter 2. Stand-by 3. Previous track 4. Next track 5. Back (previous screen) 6. Select 7. Home menu 8. Play 9. Menu up 10. Left/rewind 11. Right/fast forward 12. Menu down 13. Stop 14. Pause 15. Access search menu 16. Option/info menu 17. Safely eject USB disk Fig. 13 LaCinema Mini HD User Manual Using the Remote Control page 16 2.2.1. Important Button Details 1. OK: This button allows you to confirm a selection. 2. Return: Press this button to return to the previous menu. 3. Settings button: This button is used to display the available settings or actions in the different media spaces. During playback, pressing this button will bring up a contextual menu with adjustable settings. Fig. 14 LaCinema Mini HD User Manual Setting Up: Transferring Files page 17 3.Setting Up: Transferring Files Via USB This chapter explains how to transfer files to the LaCinema Mini HD from your computer via the USB connection. If your files are located on external sources, such as a USB hard drive or a networked device, you can learn about how to play these files in chapter 6. Playing Files Located on USB Hard Drive. Since the USB connection may offer faster transfer rates than the Ethernet connection for some network configurations, LaCie suggests as a first step to transfer the bulk of your multimedia files to the LaCinema Mini HD through the USB connection. The USB connection consists of the following steps: 3.1. STEP 1: Connect the USB cable 3.2. STEP 2: Connect the Power Supply (Optional) 3.3. STEP 3: Transferring Files 3.4. STEP 4: Unmounting Your Drive When you have finished transferring files, disconnect the USB connection and proceed to chapter 4. Setting Up: Connecting to TV. IMPORTANT INFO: The drive cannot be connected to your computer via USB and to the television simultaneously. Fig. 15 LaCinema Mini HD User Manual Setting Up: Transferring Files page 18 3.1. STEP 1: Connect the USB cable 1. Connect one end of the USB cable to your computer (Fig. 16) and the other end to the small USB port on the rear of the LaCinema Mini HD. IMPORTANT INFO: To avoid data corruption, make sure to unmount your drive before disconnecting the USB cable. See section 3.4. STEP 4: Unmounting Your Drive for details. 3.2. STEP 2: Connect the Power Supply (Optional) Fig. 16 IMPORTANT INFO: The power supply is only necessary if your computer’s USB connection is not bus powered. If your drive does not mount when you connect the USB cable, follow the steps below to connect the power supply. 1. Plug one end of the power adapter cord into the back of LaCinema Mini HD and the other end into a power outlet (Fig. 17). 2. Move on to the next step, 3.3. STEP 3: Transferring Files. CAUTION: Only use the AC adapter supplied with your specific LaCie device. Do not use a power supply from another LaCie device or another manufacturer. Using any other power cable or power supply may cause damage to the device and void your warranty. Always remove the AC adapter before transporting your LaCie drive. Failure to remove the adapter may result in damage to your drive and will void your warranty. TECHNICAL NOTE: You may use your LaCie drive when in a foreign country thanks to its 100-240 Volt power supply. To be able to use this feature, you may need to purchase an appropriate adapter or cord. LaCie accepts no responsibility for any damage to the drive resulting from the use of an inappropriate adapter. Using an adapter other than one authorized by LaCie will void your warranty. Fig. 17 - Optional step LaCinema Mini HD User Manual Setting Up: Transferring Files page 19 3.3. STEP 3: Transferring Files 1. Once you connect the USB cable (and, if necessary, the power supply), the drive will mount on your computer. Windows Users The drive will mount in My Computer/Computer (Windows users) (Fig. 18). Mac Users a. As the drive is preformatted in NTFS for immediate use with Windows, you will need to reformat the drive into HFS+ in order for the drive to mount on your Mac. Follow the steps in section 9.2. Reformatting: Mac Users, then proceed to step b below. b. The drive will mount on your Desktop (Fig. 19). c. Copy multimedia files to the mounted volume normally. Fig. 18 NOTE: If the drive does not mount on your computer after you connect the USB cable, connect the power supply. Refer to chapter 3.2. STEP 2: Connect the Power Supply (Optional) for details. 2. Copy multimedia files to the mounted volume normally. 3. Unmount the drive and unplug the USB cable before connecting the drive to your television (see 3.4. STEP 4: Unmounting Your Drive). TECHNICAL NOTE: The LaCinema Mini HD operating system features a file database that will detect the type of file (movie, music, etc.) and display it automatically on your TV in the correct media space. If you create folders on the mounted volume and want to browse the files according to this structure on your TV, your can choose to view files by Folder from within each media space. Fig. 19 LaCinema Mini HD User Manual Setting Up: Transferring Files page 20 3.4. STEP 4: Unmounting Your Drive As the LaCinema Mini HD behaves like an external USB device when it is connected to your computer via USB, you should unmount its volume before unplugging the USB cable. Windows Users From the System Tray (located in the lower right-hand side of your screen), click the Eject icon (a small green arrow over a hardware image) (Fig. 20). Fig. 20 - Windows Users A message will appear, listing the devices the Eject icon controls (it should say, “Safely remove...”). Click on the LaCie hard drive in this prompt. This message will appear: “Safe to Remove Hardware” (or similar). It is now safe to disconnect the device. Mac Users Drag the LaCinema Mini HD drive icon to the trash (Fig. 21). (The icon pictured below is a generic USB device icon. Your drive may be represented by an icon that looks like the drive itself.) When the icon disappears from the desktop, the drive can be disconnected. Fig. 21 - Mac Users LaCinema Mini HD User Manual Setting Up: Connecting to TV page 21 4.Setting Up: Connecting to TV This chapter explains how to connect your LaCinema Mini HD to your television in order to browser and play files. Once the connection is established, move on to section 5. Playing Multimedia Files for information on playing files. Setup consists of these steps: 4.1. STEP 1: Connect HDMI or Composite Cables 4.2. STEP 2: Connect the Ethernet Cable 4.3. STEP 3: Connect the Power Supply Composite Router 4.4. STEP 4: Complete the Installation Wizard Power (optional) 4.1. STEP 1: Connect HDMI or Composite Cables IMPORTANT INFO: The LaCinema Mini HD cannot be connected to a TV and computer at the same time. Disconnect the USB cable before proceeding (see 3.4. STEP 4: Unmounting Your Drive). The LaCinema Mini HD supports different ways of connecting to televisions. From the following methods, choose the setup that matches the ports on your television or receiver: ■■ HDMI (section 4.1.1. HDMI (High-Definition) Connection) ■■ Composite (section 4.1.2. Composite Video & Stereo Audio Cable) In each of the above connection methods, it is possible to connect the LaCinema Mini HD to home theater systems by plugging the S/ PDIF cable (not included) to your digital amplifier via the digital optical audio connector (see section 4.1.3. Optical Audio (S/PDIF) Connection for details. The chart at right illustrates the qualities made possible by the different connection methods. continued on the next page >> Ethernet Fig. 22 Connection Maximum Resolution High Definition HDMI 1080p Standard Definition Composite 576p TECHNICAL NOTE: The connectors on the rear of your TV may not appear exactly as shown in the following pages. Please read the labels next to the connectors carefully to ensure correct connections. LaCinema Mini HD User Manual Setting Up: Connecting to TV page 22 4.1.1. HDMI (High-Definition) Connection 1. Connect the HDMI cable to your television’s HDMI port and to the corresponding port on the LaCinema Mini HD (Fig. 23). 2. Move on to the next step, 4.2. STEP 2: Connect the Ethernet Cable. 4.1.2. Composite Video & Stereo Audio Cable 1. Connect the three tips of the composite video and stereo cable to the proper ports on your television and to the corresponding port on the LaCinema Mini HD (Fig. 24). 2. Move on to the next step, 4.2. STEP 2: Connect the Ethernet Cable. Fig. 23 - HDMI connection IMPORTANT INFO: Before connecting either of these cables, make sure you TV is turned off. Fig. 24 - Composite connection LaCinema Mini HD User Manual Setting Up: Connecting to TV page 23 4.1.3. Optical Audio (S/PDIF) Connection In each of the above connection methods, it is possible to connect the LaCinema Mini HD to home theater systems by plugging the S/ PDIF cable (not included) into your digital amplifier via the LaCinema Mini HD’s digital optical audio connector. IMPORTANT INFO: Before connecting the cable, power off your digital amplifier. 1. Connect one end of a S/PDIF cable to your digital amplifier (Fig. 25). 2. Connect the other end of the cable to the back of the LaCinema Mini HD. 3. Move on to the next step, 4.2. STEP 2: Connect the Ethernet Cable. Fig. 25 - S/PDIF connection IMPORTANT INFO: Once you connect the cable and finish the rest of the steps in this section, you must enable digital audio in Settings > Audio Output instead of the default stereo audio. See section 10.1. Settings: Audio/Video (Fig. 26 and Fig. 27). Fig. 26 Fig. 27 LaCinema Mini HD User Manual Setting Up: Connecting to TV page 24 4.2. STEP 2: Connect the Ethernet Cable NOTE: If you prefer to connect to the network wirelessly, skip this step. You will set up wireless in 4.4. STEP 4: Complete the Installation Wizard. 1. Connect the Ethernet cable to the Ethernet port on the back of the LaCinema Mini HD (Fig. 28). 2. Connect the other end of the Ethernet cable into an available Ethernet LAN (local area network) port on your router or hub (refer to your router or hub’s documentation if necessary). Allow a few moments for your network to recognize the drive. Now move on to the next step, 4.3. STEP 3: Connect the Power Supply. Fig. 28 LaCinema Mini HD User Manual Setting Up: Connecting to TV page 25 4.3. STEP 3: Connect the Power Supply IMPORTANT INFO: If your power supply cable is already connected, turn on your TV and then skip to 4.4. STEP 4: Complete the Installation Wizard. 1. Plug one end of the power adapter cord into the back of LaCinema Mini HD and the other end into a power outlet (Fig. 29). 2. Turn on your television. TECHNICAL NOTE: If you don’t see the loading screen, adjust the video input on your TV to match the type of video cable you connected above (either HDMI or composite) (Fig. 30). Fig. 29 3. Move on to the next step, 4.4. STEP 4: Complete the Installation Wizard. HDMI 1 HDMI 2 S-VIDEO AV1 AV2 TV Fig. 30 * * Screen may look different on your TV. LaCinema Mini HD User Manual Setting Up: Connecting to TV page 26 4.4. STEP 4: Complete the Installation Wizard The first time you turn on the LaCinema Mini HD, a wizard appears to help you configure your settings. The wizard appears only the first time you turn on the LaCinema Mini HD unless you have reset drive. 1. Make sure the LaCinema Mini HD is connected to the TV, the power supply has been connected, and the TV is turned on. 2. A startup screen will appear during product initialization. 3. Select your language using the Up and Down buttons and pushing the Right or button to confirm (Fig. 31). 4. In the next screen, click Next (Fig. 32). Fig. 31 5. Select your TV’s physical aspect ratio (4:3 or 16:9) and click Next (Fig. 33). continued on the next page >> Fig. 32 Fig. 33 LaCinema Mini HD User Manual Setting Up: Connecting to TV page 27 6. Select the type of network connection (Wireless or Ethernet) and click Next, or click Skip (Fig. 34). IMPORTANT INFO: If you choose the Ethernet (wired) connection, make sure you have connected the Ethernet cable as described in section 4.2. STEP 2: Connect the Ethernet Cable. 7. Select whether your network is assigned an IP address automatically of if you want to assign a static IP and click Next (Fig. 35). 8. If you selected a wired network, setup is finished. If you choose wireless: a. Select Wireless Favorites from the menu. b. Choose your wireless network and press Connect Now. Fig. 34 c. You can configure multiple wireless networks from this page. To set one network as preferred, and therefore the server that the LaCinema Mini HD will connect to automatically, select the network and select the Favorites button (Fig. 36). d. When you see the successful connection icon to the right of the network listing, you can click the Close button. 9. Setup is finished. For further details, move on to 5. Playing Multimedia Files. Fig. 35 Fig. 36 LaCinema Mini HD User Manual Playing Multimedia Files page 28 5.Playing Multimedia Files This chapter explains how to use the interface and to play files you’ve transferred to the LaCinema Mini HD’s internal storage. For information on accessing files located on external sources, refer to section 6. Playing Files Located on USB Hard Drive. To access your files, use the remote control to browse through the different media spaces – Movie, Photo, or Music. The following section outlines how to play files for each media space. Related Section ■■ 6. Playing Files Located on USB Hard Drive File Type Section Movies 5.1. Movie Space Photos 5.2. Photos Space Music 5.3. Music Space Fig. 37 LaCinema Mini HD User Manual Playing Multimedia Files page 29 5.1. Movie Space Navigate to the Movies Space using the Left and Right buttons. Then use the Up and Down buttons to browse within the Movie Space (Fig. 38). The Movie Space will display all of the supported video files that are accessible to the LaCinema Mini HD. Only files recognized as video files will be displayed. Music and Photo files will not be displayed. The way files are organized will be based on their location, i.e. whether they are stored on the LaCinema Mini HD’s internal storage, on an external hard drive, or on a networked server. If you enable Content Aggregation in the Settings Space (see section 10.5.2. Content Aggregation and Fig. 39 and Fig. 40), files will be organized according to the criteria below: Fig. 38 ■■ All Movies: Displays all available videos, sorted alphabetically ■■ By Folder: Displays videos according to the volume’s folder structure, including files located on an external USB hard drive connected to the front USB port ■■ Most recent: Displays the most recently played videos only ■■ USB1: Displays movie files located on an external USB hard drive connected to the front USB port (for details, refer to section 6. Playing Files Located on USB Hard Drive) To load a movie, select the file you wish to play and press the button. A loading animation will appear while the it is being analyzed to ensure optimum playback experience. NOTE: If you stop a film and then come back to it later, you will be asked if you want to play from where you left off or to start from the beginning. Fig. 39 Fig. 40 LaCinema Mini HD User Manual Playing Multimedia Files page 30 5.1.1. Movie Space Options While a movie is playing, you can adjust several playback pa rameters. Press the Setup button to display or exit the on-screen menu, and use the Left and Right buttons to navigate to a setting and to enter the setting menu (see Fig. 41 for reference). Once you’ve selected the option you want, click the button. 1. Audio Languages: Select this option to modify the audio language (if alternates are available) 2. Subtitle: Select this option to activate/change the subtitles (if are available) 3. Zoom In: This feature allows you to zoom into a video. Once the feature has been selected, use the Up button to zoom in (Fig. 42). Fig. 41 4. Zoom Out: To zoom out, select this icon and press the Up button. 5. Scroll: If you have zoomed into a video, select this icon to scroll around the video. Use the direction buttons on your remote control (Fig. 43). continued on the next page >> Fig. 42 Fig. 43 LaCinema Mini HD User Manual 6. Change play mode: By pressing the Setup adjust the play mode as follows: Playing Multimedia Files page 31 button you can a. Normal (Fig. 45) b. Repeat one: The currently playing file will repeat continuously (Fig. 46) c. Repeat all: All files in the current folder will play in succession repeatedly (Fig. 47) 7. Display info: Click this button to display information about the currently playing file such as time remaining and time elapsed. To exit the on-screen menu, click the Setup button once again. Fig. 44 NOTE: You can pause the video while adjusting settings. NOTE: If you stop a file, the settings will revert to the default when you reopen the file. Fig. 45 Fig. 46 Fig. 47 LaCinema Mini HD User Manual Playing Multimedia Files page 32 5.2. Photos Space Navigate to the Photo Space using the Left and Right buttons. Then use the Up and Down buttons to browse within the Photo Space (Fig. 48). The Photo Space will display all of the supported video files that are accessible to the LaCinema Mini HD. Only files recognized as photo files will be displayed. Music and video files will not be displayed. The way files are organized will be based on their location, i.e. whether they are stored on the LaCinema Mini HD’s internal storage, on an external hard drive, or on a networked server. If you enable Content Aggregation in the Settings Space (see section 10.5.2. Content Aggregation and Fig. 49 and Fig. 50), files will be organized according to the criteria below: Fig. 48 ■■ All Photos: Displays all available photos, sorted alphabetically by name ■■ By Date: Displays photos according to when the picture was taken ■■ By Folder: Displays photos according to the volume’s folder structure ■■ Most Recent: Displays the most recently played pictures only ■■ USB1: Displays photo files located on an external USB hard drive connected to the front USB port (for details, refer to section 6. Playing Files Located on USB Hard Drive) To load a picture, select the file you wish to display and press the button. NOTE: It is possible to play music while watching a photo slideshow. To do so, first start the music via the Music Space. Then press the Home button, navigate to the Music Space, then the track you wish to play, and press the button. Fig. 49 Fig. 50 LaCinema Mini HD User Manual Playing Multimedia Files page 33 5.2.1. Photo Space Options While a photo is being displayed, you can adjust several playback parameters. Press the Setup button to display or exit the onscreen menu, and use the Left and Right buttons to navigate to a setting and to adjust (see Fig. 51 for reference). Once you’ve selected the option you want, click the button. 1. Scroll: If you have zoomed into a video, select this icon to scroll around the video. Use the direction buttons on your remote control. 2. Rotate right: Rotate the photo 90 degrees clockwise. 3. Rotate left: Rotate the photo 90 degrees counter-clockwise. Fig. 51 4. Zoom in: This feature allows you to zoom into a video. Once the feature has been selected, use the Up button to zoom in (Fig. 52). 5. Zoom out: To zoom out, select this icon and press the Up button. 6. Change play mode: Choose from: a. Normal b. Random (Fig. 53) Fig. 52 c. Repeat one: The currently playing file will repeat continuously d. Repeat all: All files in the current folder will play in succession repeatedly. 7. Display info: Display info: Click this button to display information about the currently playing file. NOTE: You can pause the slideshow while adjusting settings. NOTE: If you stop a slideshow, the settings for a given photo and for the slideshow will revert to the default when you replay. Fig. 53 LaCinema Mini HD User Manual Playing Multimedia Files page 34 5.3. Music Space Navigate to the Music Space using the Left and Right buttons. Then use the Up and Down buttons to browse within the Music Space (Fig. 54). The Music Space will display all of the supported video files that are accessible to the LaCinema Mini HD. Only files recognized as audio files will be displayed. Photo and video files will not be displayed. The way files are organized will be based on their location, i.e. whether they are stored on the LaCinema Mini HD’s internal storage, on an external hard drive, or on a networked server. If you enable Content Aggregation in the Settings Space (see section 10.5.2. Content Aggregation and Fig. 55 and Fig. 56), files will be organized according to the criteria below: Fig. 54 ■■ All Music: Displays all available music files, sorted alphabetically by name ■■ By artist: Displays music files according to artist ■■ By genre: Displays music files according to genre ■■ By album: Displays music files according to album ■■ By folders: Displays music files according to the volume’s folder structure ■■ Most recent: Displays the most recently added music files only ■■ Playlist: Displays playlists (M3U, PLS, and WPL files) ■■ USB1: Displays music files located on an external USB hard drive connected to the front USB port (for details, refer to section 6. Playing Files Located on USB Hard Drive) continued on the next page >> Fig. 55 Fig. 56 LaCinema Mini HD User Manual Playing Multimedia Files page 35 ■■ Now playing: If a music file is playing, this icon will be present (Fig. 57). Clicking the button will take you to the Now Playing window. Click the button to stop music playback. To load a music file, select the file you wish to display and press the button. NOTE: It is possible to watch a photo slideshow while listening to music. To do so, first start the music. Then press the Home button, navigate to the Photos Space, then the album you wish to display, and press the button (Fig. 58). Fig. 57 Fig. 58 LaCinema Mini HD User Manual Playing Multimedia Files page 36 5.3.1. Music Space Options During playback, you can adjust several parameters (Fig. 59). Press the Setup button to display or exit the on-screen menu and configure the following settings. Once you’ve selected the option you want, click the button. 1. Normal : The currently playing file will repeat continuously (Fig. 60). 2. Repeat one: The currently playing file will repeat continuously (Fig. 61). 3. Repeat all: All files in the current folder will play in succession repeatedly (Fig. 62). Fig. 59 continued on the next page >> Fig. 60 Fig. 61 Fig. 62 LaCinema Mini HD User Manual Playing Multimedia Files page 37 4. Random: Files in the current folder or playlist will play in random order (Fig. 63). 5. Random repeat all: Files in the current folder or playlist will play in random order and in succession repeatedly (Fig. 64). Fig. 63 Fig. 64 LaCinema Mini HD User Manual Playing Multimedia Files page 38 5.4. Network Space Navigate to the Network Space using the Left and Right buttons. Then use the Up and Down buttons to browse within the Network Space (Fig. 65). From this menu, you can access media servers and computer shared folders located on your home network. 5.4.1. Media Servers Files located on networked UPnP/DLNA devices will appear in this section (Fig. 65). For more information on playing files from networked media servers, see 7. Playing Files From a Networked Media Server. Fig. 65 To play files, use the remote control to select the files and then press the button. 5.4.2. Shared folders If you have configured certain folders on your PC or Mac to be shared on the network (see section 7.2. From Windows or Mac Computers), files located in these locations will be shown in Shared folders (Fig. 66). To play files, use the remote control to select the files and then press the button. Fig. 66 LaCinema Mini HD User Manual Playing Files Located on USB Hard Drive page 39 6.Playing Files Located on USB Hard Drive Simply turn on and plug in external hard disks to the LaCinema Mini HD’s front USB port (Fig. 69, left) or rear device USB port (Fig. 69, right) to be able to play multimedia files on your television. See below for more details. TECHNICAL NOTE: It is not possible to transfer files from an external source to the LaCinema Mini HD using the TV interface. In this case, transfer files first to your computer, then follow the steps in section 3. Setting Up: Transferring Files Via USB. 6.1. USB Disk Connection Fig. 67 1. Connect the external USB hard drive to your computer and transfer multimedia files from your computer to the hard drive. Unmount the drive safely from your computer (Fig. 67). 2. Connect the LaCinema Mini HD’s power supply (see section 3.2. STEP 2: Connect the Power Supply (Optional) for details), then connect the LaCinema Mini HD to your TV (see section 4.1. STEP 1: Connect HDMI or Composite Cables for details) (Fig. 68). 3. Next, power on the external hard disk and plug its USB cable into either the LaCinema Mini HD’s front or rear USB device slot (Fig. 69). continued on the next page >> Fig. 68 Fig. 69 LaCinema Mini HD User Manual Playing Files Located on USB Hard Drive page 40 4. Once connected, use the remote control to navigate to one of the Media Spaces (Movies, Photos, or Music). Files located on the external USB hard drive can be accessed under the USB1 heading (Fig. 70). 6.2. Compatibility In addition to hard disks, you can also connect card readers, digital cameras, or digital camcorders with USB Mass storage support. Hard drives with the following file system formats are supported: FAT32, NTFS, HFS+/Mac OS Extended (non-journaled), and Linux file systems. Fig. 70 IMPORTANT INFO: External USB hard drives formatted in HFS+ (journaled) are not compatible. 6.3. Safe USB Disk Removal Click the (Eject) button on the remote control, confirm (Fig. 71), and then disconnect the drive. IMPORTANT INFO: If the disk is not properly disconnected, the data located on that disk could be damaged. Make sure that you always safely eject disks in this way before disconnecting. This also applies when the disk is connected to a computer. Fig. 71 LaCinema Mini HD User Manual Playing Files From a Networked Media Server page 41 7.Playing Files From a Networked Media Server You can stream content to your LaCinema Mini HD via the network connection from a networked UPnP or DLNA server located on a host computer (Mac or PC) or a network-attached hard disk (NAS). In addition, the LaCinema Mini HD can read files from any UPnP device connected your Ethernet or wireless network. Once connected, files located on these sources will appear in the LaCinema Mini HD interface. For details, see below. Television Network Router TECHNICAL NOTE: The WiFi connection may not be sufficient to stream HD movies. You will noticed movie lagging or dropped images. Photo slideshow could also show some delay on display, but streaming music should not be a problem. TECHNICAL NOTE: If you are having trouble streaming video, your router may be the limiting factor if it only supports 802.11g or lesser protocols. For best results streaming HD content, use a router that supports 802.11n. 7.1. Network-Attached Storage (NAS) If you have a NAS running a media server, it is possible to stream this content to the LaCinema Mini HD. In order to view your NAS content on LaCinema Mini HD, first make sure that both devices are connected to the network (Fig. 72). Once connected, files located on the NAS will appear in the various Spaces on the LaCinema Mini HD. TECHNICAL NOTE: It is not possible to transfer files from a NAS to the LaCinema Mini HD using the TV interface. In this case, transfer files first to your computer, then follow the steps in section 3. Setting Up: Transferring Files Via USB. LaCinema Mini HD Fig. 72 NAS Media Server LaCinema Mini HD User Manual Playing Files From a Networked Media Server page 42 7.2. From Windows or Mac Computers Television You can install software on your computer which will enable it to act as a UPnP media server and stream files to the LaCinema Mini HD via your Ethernet or wireless network. Once the software has been installed and configured, files located on the host computer will appear in the various Spaces on the LaCinema Mini HD (see Fig. 73). Choose from two different software: Software Compatibility 7.2.1. Packet Video TwonkyVision PC/MAC 7.2.2. Windows Media Player (WMP) PC only Network Router LaCinema Mini HD PC or Mac with TwonkyVision server software installed 7.2.1. Packet Video TwonkyVision 1. From the Utilities CD-ROM, install the Packet Video TwonkyVision software. Fig. 73 2. Once installed, launch the server from the Start Menu (Windows users) or the Applications folder (Mac users). 3. In the configuration page that opens in your web browser, click on the Sharing link and then select the folders on your computer that contain the multimedia content you wish to access from the LaCinema Mini HD (Fig. 74). Make sure to click the Save Changes button when you finish. 4. It may be necessary to restart the server. To do so, select the First Steps link and click Restart server. 5. You will now be able to access your computer’s multimedia content using the LaCinema Mini HD remote control. Files will appear in the various Spaces on the LaCinema Mini HD. Fig. 74 LaCinema Mini HD User Manual Playing Files From a Networked Media Server page 43 7.2.2. Windows Media Player (WMP) IMPORTANT INFO: This software is compatible with Windows only. Television Install Windows Media Player (WMP) 11 to allow you to stream content to the LaCinema Mini HD via your Ethernet or wireless network. Follow these steps to configure the connection: 1. Make sure that the software is installed on your computer. TECHNICAL NOTE: WMP is preinstalled on Vista and Windows 7, but XP users may have to download and install the software. LaCinema Mini HD 2. Make sure that your computer, the LaCinema Mini HD, and any UPnP devices are properly connected to your network (Fig. 75). 3. In WMP, turn on Media Sharing by clicking on Library > Media Sharing... (Fig. 76). Fig. 75 4. In the Media Sharing dialogue box, select Share My Media to... You must then tell WMP to share content with the LaCinema Mini HD. Below the Share My Media check box, select the LaCinema Mini HD and click Allow (Fig. 77). 5. Multimedia content imported into WMP will now be accessible in the various Spaces on the LaCinema Mini HD. Fig. 76 Fig. 77 Network Router PC or Mac with Windows Media Player software installed LaCinema Mini HD User Manual Playing Files From a Networked Media Server page 44 7.2.3. Shared folders on your Computer After you modify some settings in your operating system, you can make files located in certain folders on your computer available for playback on your LaCinema Mini HD in Network > Shared Folders (Fig. 78). Follow the steps below according to your operating system. Windows XP 1. Log on to your computer as an administrator. 2. Right-click the folder that you want to share, and then click Sharing and Security (Fig. 79). Fig. 78 3. If you see a message that reads, As a security measure, Windows has disabled remote access to this computer, click the Network Setup Wizard link (Fig. 80). Then follow the instructions in How to set up your computer for home networking. On the File and printer sharing page of the Network Setup Wizard, be sure to select Turn on file and printer sharing. If you do not see this message, skip this step and go to step 4. 4. In the Properties dialog box, select the Share this folder on the network check box (Fig. 81). 5. Click OK. Windows Explorer will show a hand holding the folder icon, indicating that the folder is now shared. The files contained in the folders you select will now be available to the LaCinema Mini HD in Network > Shared Folders. Fig. 79 Fig. 80 Fig. 81 LaCinema Mini HD User Manual Playing Files From a Networked Media Server page 45 Windows Vista 1. Locate the folder with the files you want to share. 2. Right-click the folder that you want to share, and then click Share (Fig. 82). 3. In the File Sharing dialog box, click the arrow to the right of the text box and click Everyone to share the files with any device on your network (Fig. 83, 1), and then click Add (Fig. 83, 2). 4. Under Permission Level, click the arrow next to Everyone and select A Contributor (Fig. 83, 3). 5. When you are finished, click Share (Fig. 83, 4). If you are prompted for an administrator password or confirmation, type the password or provide confirmation. The files contained in the folders you select will now be available to the LaCinema Mini HD in Network > Shared Folders. Fig. 82 Fig. 83 LaCinema Mini HD User Manual Playing Files From a Networked Media Server page 46 Mac OS X 10.5.x 1. Open your System Preferences and select Sharing. 2. Click File Sharing in the left-hand column and check the box (Fig. 84, 1). 3. Click the + sign under the column Shared Folders (Fig. 84, 2), and add the folders you would like to share with the LaCinema Mini HD. 4. Select the first folder listed under Shared Folders. In the righthand column, click on the permissions type for Everyone and select Read & Write (Fig. 84, 3). 5. Still in File Sharing preferences, click the Options button in the lower right-hand corner (Fig. 84, 4). In the window that opens, select Share files and folders using SMB. The files contained in the folders you select will now be available to the LaCinema Mini HD in Network > Shared Folders. Fig. 84 Mac OS X 10.4.x 1. Open your System Preferences and select Sharing in the Internet & Network section. 2. Click the Services tab, then select the check box next to Personal File Sharing. The files contained in the folders you select will now be available to the LaCinema Mini HD in Network > Shared Folders. Fig. 85 LaCinema Mini HD User Manual Sharing Files Throughout Your Home Network page 47 8.Sharing Files Throughout Your Home Network Thanks to its support for the network protocols, your LaCinema Mini HD can share files located on its internal storage and on an external USB connected to its device port to computers and digital media players on your network. To manage files located on your LaCinema Mini HD from a networked PC or Mac, see section 8.1. Manage Files from a Networked Computer. To use a UPnP- or DLNA-compliant digital media player to play files located on your LaCinema Mini HD, see section 8.2. Play Files on Networked Media Players. 8.1. Manage Files from a Networked Computer It is convenient to use the network connection to transfer, move, or delete files located on the LaCinema Mini HD once it has been connected to the TV. Follow these steps to manage (move, delete, or transfer) files located on the LaCinema Mini HD using your networked computer: 8.1.1. STEP 1: Connect the Power Supply 8.1.2. STEP 2: Connect the Ethernet Cable 8.1.3. STEP 3: Connect HDMI or Composite Cables 8.1.4. STEP 4: Configure Network Settings 8.1.5. STEP 5: LaCie Network Assistant: Install 8.1.6. STEP 6: LaCie Network Assistant: Transfer Files LaCinema Mini HD User Manual Sharing Files Throughout Your Home Network page 48 8.1.1. STEP 1: Connect the Power Supply 1. Plug one end of the power adapter cord into the back of LaCinema Mini HD and the other end into a power outlet (Fig. 86). The LaCinema Mini HD may take a few seconds to boot. Move on to the next step, 8.1.2. STEP 2: Connect the Ethernet Cable. CAUTION: Only use the AC adapter supplied with your specific LaCie device. Do not use a power supply from another LaCie device or another manufacturer. Using any other power cable or power supply may cause damage to the device and void your warranty. Always remove the AC adapter before transporting your LaCie drive. Failure to remove the adapter may result in damage to your drive and will void your warranty. TECHNICAL NOTE: You may use your LaCie drive when in a foreign country thanks to its 100-240 Volt power supply. To be able to use this feature, you may need to purchase an appropriate adapter or cord. Fig. 86 LaCinema Mini HD User Manual Sharing Files Throughout Your Home Network page 49 8.1.2. STEP 2: Connect the Ethernet Cable 1. Connect the Ethernet cable to the Ethernet port on the back of the LaCinema Mini HD (Fig. 87). 2. Connect the other end of the Ethernet cable into an available Ethernet LAN (local area network) port on your router or hub (refer to your router or hub’s documentation if necessary). Allow a few moments for your network to recognize the drive. Now move on to the next step, 8.1.3. STEP 3: Connect HDMI or Composite Cables. 8.1.3. STEP 3: Connect HDMI or Composite Cables Fig. 87 1. Connect your LaCinema Mini HD to your television using either the HDMI cable or the composite video & audio cable. For more details on this step, see section 4.1. STEP 1: Connect HDMI or Composite Cables (Fig. 88). 2. Turn on the TV. The loading screen will appear. TECHNICAL NOTE: If you don’t see the loading screen, adjust the video input on your TV to match the type of video cable you connected above (either HDMI or composite) (Fig. 89). Now move on to the next step, 8.1.4. STEP 4: Configure Network Settings. Fig. 88 Fig. 89 LaCinema Mini HD User Manual 8.1.4. Sharing Files Throughout Your Home Network page 50 STEP 4: Configure Network Settings In order for your LaCinema Mini HD to be assigned an IP address, which will allow it to connect to the network, you must either follow the setup steps in the Installation Wizard or configure network settings in the Settings Space. In the Settings Space, follow these steps to request an IP address: Use the remote control to navigate to Settings Space > Network > Network setup and press the button (Fig. 90, Fig. 91 and Fig. 92). Once you make your choices, your network router will assign an IP address to the LaCinema Mini HD. Move on to the next step, 8.1.5. STEP 5: LaCie Network Assistant: Install. Fig. 90 Fig. 91 Fig. 92 Fig. 93 LaCinema Mini HD User Manual 8.1.5. Sharing Files Throughout Your Home Network page 51 STEP 5: LaCie Network Assistant: Install LaCie Network Assistant software detects all LaCie network attached storage devices on your network and gives you easy ways to connect to or configure them. Once installed and running, LaCie Network Assistant (LNA) will appear in your task bar (Windows users) or in the menu bar (Mac users) and automatically search for storage devices on your network. When a new device is found, the icon will blink. When the LNA finds your LaCinema Mini HD on the network, you can connect to the mounted volume or configure the LaCinema Mini HD’s network settings. TECHNICAL NOTE: As an alternative to using the LaCie Network Assistant to access the drive, you can use its IP address to open a network (SMB) connection. See section 8.1.7. Alternative Network Connection Methods for more details. The IP address can be found by using the remote control to navigate to Settings > Network > Network Setup. Install LaCie Network Assistant: 1. Insert the CD-ROM into your computer’s CD-ROM drive. 2. Windows users, the CD should appear in My Computer. Mac users, the CD should appear on the desktop. Double-click the CD icon, then double-click “LaCie Network Assistant Setup” (Fig. 94). 3. Follow the Wizard to complete installation. Now move on to the next step, 8.1.6. STEP 6: LaCie Network Assistant: Transfer Files. Fig. 94 LaCinema Mini HD User Manual Sharing Files Throughout Your Home Network page 52 8.1.6. STEP 6: LaCie Network Assistant: Transfer Files Windows Users: a. Select LaCie Network Assistant in Start/Programs. A Network Assistant icon will appear in the system tray (Fig. 95) and Network Assistant will automatically detect your LaCinema Mini HD. b. From the system tray, click the LaCie Network Assistant icon then click Connect Manually (Fig. 97). The volume will open in an explorer window. Fig. 95 c. Drag files or folders onto this volume. Mac Users: a. Select LaCie Network Assistant in your Applications folder. A Network Assistant icon will appear in the menu bar (Fig. 96) and Network Assistant will automatically detect your LaCinema Mini HD. Fig. 96 b. From the menu bar, click the LaCie Network Assistant icon then click Connect Manually. The volume will open in a Finder window. c. Drag files or folders onto this volume. To remove files from their folders, simply drag them to the Trash or the Recycle Bin. continued on the next page >> Fig. 97 LaCinema Mini HD User Manual Sharing Files Throughout Your Home Network page 53 IMPORTANT INFO: Make sure that IPConf support is activated in the LaCie Network Assistant preferences (Fig. 98, PC users, and Fig. 99, Mac users). IMPORTANT INFO: If you want to remove files from the LaCinema Mini HD, you must empty the Trash or Recycle Bin after placing the files there. Otherwise, the files will still have a reference and occupy hard drive space. TECHNICAL NOTE: The LaCinema HD is optimized for multimedia playback. If you want a network-attached hard drive for backing up your files, consider purchasing a LaCie Network Space, which offers features and performance more suited to this use. Fig. 98 Fig. 99 LaCinema Mini HD User Manual Sharing Files Throughout Your Home Network page 54 8.1.7. Alternative Network Connection Methods If your LaCinema Mini HD is connected to your home network, it is possible to access its volume without using the LaCie Network Assistant. Windows Users To access the volume in Windows, look in My Network Places, and select Microsoft Windows Workgroup. By default, the volume will be named MiniHD * (Fig. 100). Alternatively, you can access the volume by typing the following in a Windows explorer address field: Fig. 100 smb://MiniHD * or smb://[IP address] ** Mac Users From the Finder, select Go and then Connect to Server... In the window that opens, type (Fig. 101): smb://MiniHD * or smb://[IP address] ** [If your drive is connected to the TV, you can find the IP address using the remote control by navigating to Settings > Network.] Click Connect. Alternatively, you can find the drive listed in the Network folder. Fig. 101 * If you changed the machine name in the Settings Space, type this name instead. ** The IP address can be found by using the remote control to navigate to Settings > Network > Network setup. Fig. 102 LaCinema Mini HD User Manual Sharing Files Throughout Your Home Network page 55 8.2. Play Files on Networked Media Players LaCinema is both a network media player and server. It can play content located on a local network server and also share the content located on its internal storage to other UPnP- and DLNA-compatible digital media players on your network. Examples include Playstation, XBox, DLNA TV or mobile phones, Kodak Photoframe, and Philips Streamium. LaCinema Mini HD 8.2.1. Enable the Media Server Function The media server function will allow you to view your content on a compatible media player in a different room in your home via your home network. Follow these steps: 1. Make sure your LaCinema Mini HD is connected to your network (Fig. 103) and has been assigned an IP address (for details, see 8.1.4. STEP 4: Configure Network Settings). Fig. 103 2. Activate Media Servers service in the Settings Space (see section 10.6.3. Media Server) (Fig. 104). 3. Now you will be able to play files located on the LaCinema Mini HD on any other UPnP/DLNA-certified player/adapter connected to your network. For a typical configuration, see section 8.2.2. UPnP Usage Example: XBOX. NOTE: Content located on the LaCinema internal HDD or attached USB disk will scanned and then shared in your home to other UPnP DLNA media players. TECHNICAL NOTE: Once the media server function is activated, it will take few seconds for the server to become available to the UPnP player. As the content needs to be analyzed (artist, genre, etc.), this process can take several minutes. When new content is added to the LaCinema Mini HD’s internal storage, it should appear few minutes following the completion of the transfer. The same delay should occur when adding or removing the a USB device containing multimedia content. Fig. 104 Network Router DLNAcompatible TV LaCinema Mini HD User Manual 8.2.2. UPnP Usage Example: XBOX Here is a typical example using an XBOX: 1. Connect the LaCinema Mini HD to your computer using the USB cable (see 3.2. STEP 2: Connect the Power Supply (Optional) and 3.1. STEP 1: Connect the USB cable). 2. Load content on the LaCinema Mini HD’s internal storage. 3. If not already done, connect the LaCinema Mini HD to your TV (see 4.1. STEP 1: Connect HDMI or Composite Cables). 4. Using the remote control, navigate to Settings > Network > Media Server > ON and press the button. The server is now activated and multimedia content is being scanned and added to the media server database. You can now go the room where the XBOX is located and navigate to the XBOX media server section to select MiniHD (or, if you have modified the name, select the modified name). You should be able to view and play content located on the LaCinema Mini HD. TECHNICAL NOTE: Some files might not be available on you media player for two reasons, either the file format is not compatible with your network player, or content has not yet been added to the database as the media server is still analyzing the content. Sharing Files Throughout Your Home Network page 56 LaCinema Mini HD User Manual Reformatting the LaCinema Mini HD page 57 9.Reformatting the LaCinema Mini HD Please read the following information on file system formats for Windows and Mac operating systems to determine if you need to reformat the LaCinema Mini HD. The LaCinema Mini HD is formatted in NTFS for immediate use with Windows. If you would like to reformat the drive, follow the steps below for your operating system. The following chart will help you decide which file format is most appropriate for your use. Once you’ve chosen a file format, see sections 9.1. Reformatting: Windows Users and 9.2. Reformatting: Mac Users for instructions on reformatting. Windows File System Formats NTFS NTFS is the ideal format if you will be using the drive only with Windows machines (performance will generally be greater when compared to FAT 32 without the file size restriction). MS-DOS (FAT32) MS-DOS (FAT32) is a good file format if you will be using your drive with both Windows and Macs. MS-DOS (FAT32) has a maximum single file size restriction of 4GB. This means you cannot transfer files larger than 4GB to the drive. Mac File System Formats HFS+ (non-journaled) HFS+ is the ideal file format if you will be using the drive on Macs only; performance is generally superior to that offered by FAT 32 without the file size restriction. MS-DOS (FAT32) MS-DOS (FAT32) is a good file format if you will be using your drive with both Windows and Macs. MS-DOS (FAT32) has a maximum single file size restriction of 4GB. This means you cannot transfer files larger than 4GB to the drive. LaCinema Mini HD User Manual Reformatting the LaCinema Mini HD page 58 9.1. Reformatting: Windows Users The process of formatting a drive on a computer running Windows XP, Windows Vista, or Windows 7 consists of two steps: (1) installing a signature on the drive, and (2) formatting the drive. These steps will erase anything that is on the disk. CAUTION: Following these steps will erase everything from the LaCinema Mini HD. If you have information that you want to protect or continue to use, back up this information before performing these steps. 1. Connect the drive to the computer via the interface port. 2. Right-click My Computer and select Manage. 3. From the “Computer Management” window, select Disk Management (located below the Storage group). See Fig. 105. Fig. 105 4. If the “Initialize and Convert Disk Wizard” window appears, click Cancel. 5. Windows will list the Hard Disks that are installed on the system. Locate the drive that is represented by the icon. Right-click the icon and select Initialize. 6. In the box to the right that says Unallocated, right-click and select New Partition… 7. On the first page of the “New Partition Wizard,” click Next. See Fig. 106. continued on next page Fig. 106 LaCinema Mini HD User Manual Reformatting the LaCinema Mini HD page 59 8. Click Next. 9. Click Next. 10.Click Next. 11.Click Next. 12.On the Format Partition window, select Quick Format. Click Next. 13.Click Finish to begin the formatting process. 14.Windows Disk Management will format and partition the disk according to your settings (Fig. 108), and your drive will appear in My Computer, ready to use. IMPORTANT INFO: If you choose to format the LaCinema Mini HD in MS-DOS (FAT32), which is compatible with almost all computers, keep in mind that you will not be able to transfer files larger than 4GB to the LaCinema Mini HD. Fig. 107 Fig. 108 LaCinema Mini HD User Manual Reformatting the LaCinema Mini HD page 60 9.2. Reformatting: Mac Users TECHNICAL NOTE: The LaCinema Mini HD is formatted in NTFS for immediate use with Windows. Mac users must reformat the drive into Mac OS Extended (NOT journaled). IMPORTANT INFO: You can alternatively choose to format the LaCinema Mini HD in MS-DOS (FAT32), which is compatible with almost all computers, keep in mind that you will not be able to transfer files larger than 4GB to the LaCinema Mini HD. CAUTION: Following these steps will erase everything from the LaCinema Mini HD. If you have information that you want to protect or continue to use, back up this information before performing these steps. 1. Connect the drive to the computer and turn on the drive. 2. Select Utilities from the Go menu in the Finder menu bar. 3. In the Utilities folder, double-click Disk Utility. 4. The Disk Utility window will open. Select the volume labeled LaCie Hard Disk from the list of available hard disks on the left side of the window. 5. Select the Partition tab. 6. From the Volume Scheme: menu, choose the number of partitions you want to divide the drive into (Mac OS X gives you the option of dividing the drive into at most 16 partitions). You can adjust the size of each partition using the slide bar between the partitions in the Volume Scheme: area. 7. In the Volume Information section, enter a name for each volume (partition), and choose a file system (Mac OS Extended or MS-DOS) from the drop-down menu (Fig. 110). 8. Once you have finalized the volume options, click Partition. Click Partition again when the alert message appears to continue. 9. Mac Disk Utility will format and partition the disk according to your settings, and your drive will be ready to use. Fig. 109 Fig. 110 LaCinema Mini HD User Manual Settings Menu page 61 10. Settings Menu The LaCinema Mini HD Setup Space will help you to properly configure and customize your device. Access it at any time by clicking the Setup button. When the setup menu is shown, the playback will be automatically paused. Scroll through the Setup menu using the Up tons (Fig. 111). and Down but- To display the available options of a setup category, press the Right or button. To confirm your choice, press the button. All changes are automatically saved. To select another option, press the Return button to go back to an previous menu. Press the Setup button again to exit the setup menu from the screen. Fig. 111 10.1.Settings: Audio/Video 10.1.1. Video Output Select Video Out, then choose from the following options (Fig. 113) depending on your television capabilities and the method you used to connect the LaCinema Mini HD to your TV (note that HDMI is the default setting): ■■ Composite ■■ HDMI. Fig. 112 Fig. 113 LaCinema Mini HD User Manual Settings Menu page 62 10.1.2. Display Resolution Choose a display resolution to match your television (default is Auto). 10.1.3. Aspect Ratio Depending on your television’s setup, choose either (Fig. 114) (note that Widescreen is the default setting): ■■ Normal ■■ Widescreen 10.1.4. Audio Output Fig. 114 Choose either (Fig. 115) (note that Stereo is the default setting): ■■ Stereo ■■ Digital IMPORTANT INFO: If you connected the S/PDIF cable, make sure to select the Digital option. Fig. 115 LaCinema Mini HD User Manual Settings Menu page 63 10.1.5. NTSC/PAL Depending on your television’s configuration, choose either PAL or NTSC (Fig. 116) (note that PAL is the default setting). Alternatively, you can change this setting by pressing and holding the Setup button until the standard changes. ■■ NTSC ■■ PAL 10.2.Settings: Video 10.2.1. Video Sequence Choose from the following (Fig. 117): Fig. 116 ■■ Normal ■■ Repeat One: The currently playing file will repeat continuously ■■ Repeat All: All files in the current folder will play in succession repeatedly Fig. 117 Fig. 118 LaCinema Mini HD User Manual Settings Menu page 64 10.2.2. Subtitle Font Size Choose from a range of 24pt to 40pt (Fig. 119): Fig. 119 LaCinema Mini HD User Manual Settings Menu page 65 10.3.Settings: Music 10.3.1. Music Sequence Choose from the following (Fig. 120): ■■ Repeat one: The currently playing file will repeat continuously. ■■ Repeat all: All files in the current folder will play in succession repeatedly. ■■ Random: Files in the current folder or playlist will play in random order. 10.3.2. Audio Track Display The parameter affects how audio tracks are displayed (Fig. 121). Choose from: Fig. 120 ■■ File name ■■ Title Fig. 121 LaCinema Mini HD User Manual Settings Menu page 66 10.4.Settings: Photo 10.4.1. Slideshow This parameter allows you to change the way pictures are played back (default is Normal) (Fig. 123): ■■ Normal ■■ Shuffle ■■ Repeat All ■■ Repeat All and Shuffle 10.4.2. Picture Scaling This parameter affects how the picture fits on screen (default is Keep as Original) (Fig. 124): Fig. 122 ■■ Keep as Original ■■ Fit to Screen ■■ Display in Full Screen Fig. 123 Fig. 124 LaCinema Mini HD User Manual Settings Menu page 67 10.4.3. Transition Effect This parameter allows you to modify the transition effects between photos (default is Normal) (Fig. 125): ■■ Normal ■■ Fade ■■ Random 10.4.4. Interval Time This settings allows you to set the amount of time a photo is displayed (default is 3 Seconds) (Fig. 126): ■■ 3 ■ 5 ■■ 10 ■ 20 ■■ 30 ■ 1 Minute Fig. 125 ■■ 5 Minutes Fig. 126 LaCinema Mini HD User Manual Settings Menu page 68 10.5.Settings: System 10.5.1. Language Choose your language. 10.5.2. Content Aggregation This setting activates or deactivates the file database, which allows you to browse files within each media type according to certain parameters (date, recent, etc.). If this feature is deactivated, you will be able to browse files in the different media spaces alphabetically only (or, in the case of the Music Space, additionally according to artist, genre, and album) (Fig. 127). Fig. 127 10.5.3. Screensaver Delay This setting controls how long a period of inactivity will last before the screensaver turns on (Fig. 128). 10.5.4. Browse Mode This setting allows you to change how files are displayed in a list (default is Thumbnail) (Fig. 129): ■■ Thumbnail ■■ List mode Fig. 128 Fig. 129 LaCinema Mini HD User Manual Settings Menu page 69 10.5.5. Additional Encoding Support Change this setting if you encounter incorrect text characters in file names in the drive operating system (default is Western Europe) (Fig. 130). 10.5.6. System Reset This feature allows you to reset the product to its factory defaults, erasing all files and reverting all settings (Fig. 131). Fig. 130 Fig. 131 LaCinema Mini HD User Manual Settings Menu page 70 10.5.7. About Clicking this feature will provide you with the firmware version of your LaCinema Mini HD (Fig. 132). 10.5.8. Update Device This feature allows you to update your LaCinema Mini HD’s operating system. Update using USB Key If the drive does not have internet access, you can download an update file from the LaCie website, copy it to a USB flash drive, and connect the drive to the front port of the LaCinema Mini HD. An icon will appear in the Settings Space when a valid update file is detected (Fig. 133). Select this option and confirm (Fig. 134). When it has finished updating, the product will restart. Fig. 132 Update through Internet Access If your drive is connected to the network and has access to the internet, click the button to check for updates (Fig. 133). If updates are available, they will be listed. Click the button to download and install. When it has finished updating, the product will restart. The device will also perform an automatic check when you restart the product. Fig. 133 Fig. 134 LaCinema Mini HD User Manual Settings Menu page 71 10.6.Settings: Network 10.6.1. Network Setup: Wired / Wireless This page will display your LaCinema Mini HD’s network values, such as IP address (Fig. 136). To modify these values, click the Configure button. 1. Wired/Wireless: Choose whether your network connection is wired (Ethernet) or wireless (WiFi). 2. DHCP/Static IP: Choose DHCP if your device is automatically assigned an IP address by your router, or static IP if you want to assign an IP address (Fig. 137). 3. If you chose wired, configuration is complete. If you chose wireless: Fig. 135 a. Select Wireless Favorites from the menu. b. Choose your wireless network and press Connect Now. c. You can configure multiple wireless networks from this page. To set one network as preferred, and therefore the server that the LaCinema Mini HD will connect to automatically, select the network and select the Favorites button. d. When you see the successful connection icon to the right of the network listing, you can click the Close button. Fig. 136 Fig. 137 LaCinema Mini HD User Manual Settings Menu page 72 10.6.2. Device Name This page allows you to change the device name of your LaCinema Mini HD. This is the name that will appear on your network. (Fig. 138). Use the arrow keys and the button to use the on-screen keyboard to type a new name. 10.6.3. Media Server Use this page to turn on or off the Media servers (default is OFF). For details on configuring your LaCinema Mini HD as a UPnP multimedia server, see section 8.2. Play Files on Networked Media Players. (Fig. 139). 10.6.4. Shared Folders Fig. 138 Use this page to turn on or off shared folder (SMB/Samba) support (default is ON). SMB is a network protocol that allows you to access the LaCinema Mini HD’s volume using your operating system’s file system (Windows - Explorer window; Mac - Finder window). For details on accessing your drive using SMB, see 8. Sharing Files Throughout Your Home Network. (Fig. 140) Fig. 139 Fig. 140 LaCinema Mini HD User Manual Settings Menu page 73 10.6.5. Auto Login This feature allows your LaCinema Mini HD to connect automatically to your wireless network (default is ON) (Fig. 141). If auto login is turned off, you will need to type your network password each time your drive is turned on. 10.6.6. Clear Account Information This function will delete your network login credentials from the LaCinema Mini HD’s operating system. Press OK to confirm (Fig. 142). 10.7.Settings: Shutdown Fig. 141 This menu will allow you to shut down the LaCinema mini HD or restart it in the case you encounter a playback issue (Fig. 143). 10.7.1. Shutdown By pressing the Shutdown button, you will enter a low power consumption mode which will make the hard drive stop spinning. To restart the product, press the power button on the remote control. 10.7.2. Restart By pressing the Restart button, you will initiate a restart process, which could resolve playback issues. During a restart, all network file transfer processes will be terminated (Fig. 143). Fig. 142 Fig. 143 LaCinema Mini HD User Manual Technical Information page 74 11. Technical Information 11.1.HD File Format Compatibility The LaCinema Mini HD is fully compatible with the hi-def formats below, and can play any video encoded with these compression formats: MPEG-2 HD Xvid H.264 (MPEG-4 P10) MPEG-4.2 WMV9 VC-1 11.2.Optimizing Data Transfers Data transfers are the flow of data that accomplishes a task, usually related to moving data from storage to computer RAM, or between storage devices. With external drives, such as the LaCinema Mini HD, the data is transferred from the drive to the computer via the USB interface. The data is fed from the drive through the USB port on the drive, and passes to the computer through the USB host-bus adapter interface. USB To utilize the enhanced Hi-Speed USB 2.0 performance, your computer must be equipped with a Hi-Speed USB 2.0 host bus adapter card (either sold separately, or integrated by your computer’s manufacturer) and the appropriate drivers. These host bus adapter cards, which include one or more USB ports, are shipped with special HiSpeed USB 2.0 drivers that enable the computer to control the card. These drivers must be installed in order for USB 2.0 devices connected to the port to work at their correct speeds. Computers running Windows XP and Windows Vista automatically manage Hi-Speed USB 2.0 devices and drivers, while Windows 98 SE and Windows Me will require that drivers be installed before a Hi-Speed USB 2.0 device is attached. Mac OS 9.x does not support Hi-Speed USB 2.0 functionality, and all Hi-Speed USB 2.0 devices will only operate at the original USB specifications. Mac OS 10.2.7 and later supports Hi-Speed USB 2.0. Contact your LaCie reseller or LaCie Customer Support for information about Hi-Speed USB 2.0 PCI or PC Cards, or visit our Web site: www.lacie.com. LaCinema Mini HD User Manual 12. Troubleshooting If your LaCinema Mini HD is not working correctly, please refer to the following checklist to determine the source of the problem. If you have gone through all of the points on the checklist and your LaCinema Mini HD still does not work properly, please check the FAQs that are regularly published on our website – www.lacie.com. One of these FAQs may provide an answer to your specific question. You can also visit the downloads page, where the most recent software updates will be available. If you need further assistance, please contact your LaCie reseller or LaCie Customer Support (see section 13. Contacting Customer Support for details). Manual Updates LaCie strives to give you the most up-to-date, comprehensive user manuals available on the market. It is our goal to provide you with a friendly, easy-to-use format that will help you quickly install and utilize the many functions of your new device. If your user manual does not reflect the configuration of the product you purchased, please check our website for the most current version of the user manual. www.lacie.com Troubleshooting page 75 LaCinema Mini HD User Manual Troubleshooting page 76 12.1.Troubleshooting the Television/Stereo Connection Problem Question Answer The drive is connected, but the TV doesn’t recognize it. Have you properly set the video out parameters in the Settings menu? Using the remote control, click the Info button to change from HDMI (default) to Composite Video Out mode. Checking the firmware version. How do you know which firmware version your LaCinema Mini HD is using? To check which firmware is currently installed on your LaCinema Mini HD, attach it to your TV and use the remote control to navigate to the Settings menu. The firmware version is displayed in the bottom right corner of the Settings menu. How do you get new firmware, and how do you install it? For a detailed explanation, please see section 10.5.8. Update Device or go to www.lacie.com. There is no picture being displayed. Are all of the cables connected correctly? Ensure that all of the cables are connected correctly. See section 4. Setting Up: Connecting to TV. The picture is in black and white or there is no picture being displayed. Is the LaCinema Mini HD’s Video setting correctly set? In the event that there is an error with the Video setting, press the Info button on the remote control until the correct image is displayed. Once the picture is being displayed, go into the Settings menu and select Video. From there, you can select the correct settings. For more information, please see section 10.2. Settings: Video. Optimizing video connections. What connectivity method will produce the best quality? For optimal quality and performance, the best video connection is the HDMI cable (included). There is no sound when connecting the LaCinema Mini HD to a digital stereo. Have the Audio Settings been adjusted? When using the A/V cable to connect the LaCinema Mini HD to a TV, go into the Settings menu and select Audio Settings. From this menu, you will need to select the Analog option instead of Digital. Slideshows are sluggish. Does it take several seconds to load a picture? Depending on file size, photos may take several seconds to load properly. Reducing the photo’s resolution will reduce the file size, as well, and allow the file to load faster. LaCinema Mini HD User Manual Troubleshooting page 77 12.2.USB Connection (Mac Users) Problem Question Answer The drive is not recognized by the computer. Does an icon for the drive appear on the desktop? There should be an icon for the LaCie drive on the desktop (unless you’ve set the Finder preference not to show External disks on the desktop). If the drive does not appear, follow the rest of the Troubleshooting tips to isolate the problem. Does your computer’s configuration meet the minimum system requirements for use with this drive? See section 1.1. Minimum System Requirements for more information. Is the drive’s power supply connected? Make sure that the power supply is properly connected (see section 4.2. STEP 2: Connect the Ethernet Cable) and that the outlet the power supply is connected to is working. Did you follow the correct installation steps for the specific interface and operating system? Review the installation steps in section 3. Setting Up: Transferring Files Via USB. Are both ends of the USB cable securely attached? Only use a USB cable provided by LaCie. Check both ends of the USB cable to make sure they are fully seated in their respective ports. Try disconnecting the cables, waiting 10 seconds, and then reconnecting them. If the drive is still not recognized, restart your computer and try again. Is there a conflict with other device drivers or extensions? Contact LaCie Technical Support for help. Does your computer’s operating system support the file system? Check your computer’s documentation and see section 9. Reformatting the LaCinema Mini HD for more information. Did you get an “Error –50” message while copying to a FAT 32 (MS-DOS) volume? When copying files or folders from Mac OS 10.x to a FAT 32 volume, file names with certain characters cannot be copied. These characters include, but are not limited to: The drive is not recognized by the computer. Error messages under Mac OS 10.x. ?<>/\: Check your files and folders to ensure that these types of characters are not being used. The drive is not running noticeably faster when connected via Hi-Speed USB 2.0. Are you operating in Mac OS 9.x? Apple does not support the Hi-Speed USB 2.0 standard under Mac OS 9.x. You will be limited to the slower transfer rates of the original USB standard. For more information, please see section 11.2. Optimizing Data Transfers. Is the drive connected to a standard USB port on your computer? If your drive is connected to a standard USB port, this is normal. A HiSpeed USB 2.0 device can only operate at Hi-Speed USB 2.0 performance levels when it is connected directly to a Hi-Speed USB 2.0 port. Otherwise, the Hi-Speed USB 2.0 device will operate at the slower USB transfer rates. For more information, please see sections 11.2. Optimizing Data Transfers and 1.6. Cables and Connectors. LaCinema Mini HD User Manual Troubleshooting page 78 Problem Question Answer The drive is not running noticeably faster when connected via Hi-Speed USB 2.0. Is the drive connected to a HiSpeed USB 2.0 port on your computer? Check to see that the Hi-Speed USB 2.0 drivers for both your host bus adapter and device have been installed correctly. If in doubt, uninstall the drivers and re-install them. Also, make sure that you are connected directly to a Hi-Speed USB 2.0 port on your computer. Does your computer or operating system support Hi-Speed USB 2.0? See sections 1.1. Minimum System Requirements and 11.2. Optimizing Data Transfers for more information. LaCinema Mini HD User Manual Troubleshooting page 79 12.3.USB Connection (Windows Users) Problem Question Answer The drive is not recognized by the computer. Has the drive been formatted? Make sure that the drive has been formatted properly. Please see section 9. Reformatting the LaCinema Mini HD. Does your computer’s operating system support the file system? Check your computer’s documentation and see section 6. Reformatting the LaCinema Mini HD. Is there an icon for the drive in My Computer? Go into My Computer and look for an icon and drive letter assigned to the LaCie drive. If the drive does not appear, follow the rest of the Troubleshooting tips to isolate the problem. Go into My Computer and look for an icon and drive letter assigned to the LaCie drive. If the drive does not appear, follow the rest of the Troubleshooting tips to isolate the problem. Does your computer’s configuration meet the minimum system requirements for use with this drive? See section 1.1. Minimum System Requirements for more information. Is the drive’s power supply connected? Make sure that the power supply is properly connected (see section 4.2. STEP 2: Connect the Ethernet Cable) and that the outlet the power supply is connected to is working. Did you follow the correct installation steps for the specific interface and operating system? Review the installation steps in section 3. Setting Up: Transferring Files Via USB. Are both ends of the USB cables firmly attached? Check both ends of the USB cable to make sure they are fully seated in their respective ports. Try disconnecting the cables, waiting 10 seconds, and then reconnecting them. If the drive is still not recognized, restart your computer and try again. Is there a conflict with other device drivers or extensions? Contact LaCie Technical Support for help. LaCinema Mini HD User Manual Troubleshooting page 80 Problem Question Answer The drive is not running noticeably faster when connected via Hi-Speed USB 2.0. Is the drive connected to a standard USB port on your computer? If your drive is connected to a standard USB port, this is normal. A HiSpeed USB 2.0 device can only operate at Hi-Speed USB 2.0 performance levels when it is connected directly to a Hi-Speed USB 2.0 port. Otherwise, the Hi-Speed USB 2.0 device will operate at the slower USB transfer rates. For more information, please see sections 11.2. Optimizing Data Transfers and 1.6. Cables and Connectors. Is the drive connected to a Hi-Speed USB 2.0 port on your computer? Check to see that the Hi-Speed USB 2.0 drivers for both your host bus adapter and device have been installed correctly. If in doubt, uninstall the drivers and re-install them. Also, make sure that you are connected directly to a Hi-Speed USB 2.0 port on your computer. The LaCinema Mini HD will not work properly when connected to a hub. Does your computer or operating system support Hi-Speed USB 2.0? See sections 1.1. Minimum System Requirements and 11.2. Optimizing Data Transfers for more information. LaCinema Mini HD User Manual Contacting Customer Support page 81 13. Contacting Customer Support Before You Contact Technical Support 1. Read the manuals and review section 12. Troubleshooting. 2. Try to isolate the problem. If possible, make the drive the only external device on the CPU, and make sure that all of the cables are correctly and firmly attached. If you have asked yourself all of the pertinent questions in the troubleshooting checklist, and you still can’t get your LaCie drive to work properly, contact us at www.lacie.com. Before contacting us, make sure that you are in front of your computer and that you have the following information on hand: Information Location 1. LaCie hard drive serial number Located on a sticker at the back of drive or on the original packaging 3. Macintosh/PC model Mac users: Click on the Apple icon in the menu bar and select About This Mac. 4. Operating system version 5. Processor speed 6. Computer memory 7. The brands and models of other internal and external peripherals installed on your computer Windows users: Right click My Computer and select Properties > General. Mac users: Click on the Apple icon in the finder bar and select About This Mac. Select More Info... The Apple System Profiler will launch and will list your internal and external peripherals. Windows users: Right click My Computer and select Properties > Hardware. LaCinema Mini HD User Manual Contacting Customer Support page 82 13.1.LaCie Technical Support Contacts LaCie Asia Contact us at: http://www.lacie.com/asia/contact/ LaCie Australia Contact us at: http://www.lacie.com/au/contact/ LaCie Belgium Contact us at: http://www.lacie.com/be/contact/ LaCie Canada Contact us at: http://www.lacie.com/caen/contact/ (English) LaCie Denmark Contact us at: http://www.lacie.com/dk/contact LaCie Finland Contact us at: http://www.lacie.com/fi/contact/ LaCie France Contact us at: http://www.lacie.com/fr/contact/ LaCie Germany Contact us at: http://www.lacie.com/de/contact/ LaCie Italy Contact us at: http://www.lacie.com/it/contact/ Japan – ELECOM CO., LTD. Contact us at: http://www.lacie.com/jp LaCie Netherlands Contact us at: http://www.lacie.com/nl/contact/ LaCie Norway Contact us at: http://www.lacie.com/no/contact/ LaCie Spain Contact us at: http://www.lacie.com/es/contact/ LaCie Sweden Contact us at: http://www.lacie.com/se/contact LaCie Switzerland Contact us at: http://www.lacie.com/chfr/contact/ (Français) LaCie United Kingdom Contact us at: http://www.lacie.com/uk/contact LaCie Ireland Contact us at: http://www.lacie.com/ie/contact/ LaCie USA Contact us at: http://www.lacie.com/contact/ LaCie International Contact us at: http://www.lacie.com/intl/contact/ LaCinema Mini HD User Manual Warranty Information page 83 14. Warranty Information This Limited Warranty applies only to hardware products manufactured by or for LaCie that can be identified by the “LaCie” trademark, trade name, or logo affixed to them. The Limited Warranty does not apply to any non-LaCie hardware products or any software, even if packaged or sold with LaCie hardware. Manufacturers, suppliers, or publishers, other than LaCie, may provide their own warranties to the end user purchaser, but LaCie, in so far as permitted by law, provides their products “as is”. Software distributed by LaCie with or without the LaCie brand name (including, but not limited to system software) is not covered under this Limited Warranty. Refer to the licensing agreement accompanying the software for details of your rights with respect to its use. LaCie does not warrant that the operation of the product will be uninterrupted or error-free. LaCie is not responsible for damage arising from failure to follow instructions relating to the product’s use. This warranty does not apply: ■■ to consumable parts, unless damage has occurred due to a defect in materials or workmanship; ■■ to cosmetic damage, including but not limited to scratches, dents and broken plastic on ports; ■■ to damage caused by use with non-LaCie products; ■■ to damage caused by accident, abuse, misuse, flood, fire, earthquake or other external causes; ■■ to damage caused by operating the product outside the permitted or intended uses described by LaCie; ■■ to damage caused by service (including upgrades and expansions) performed by anyone who is not a representative of LaCie or a LaCie Authorized Service Provider; ■■ to a product or part that has been modified to alter functionality or capability without the written permission of LaCie; or ■■ if any LaCie serial number on the product has been removed or defaced. To obtain warranty service, call LaCie Technical Support. You will be asked to provide your LaCie product’s serial number, and you may be asked to furnish proof of purchase to confirm that the drive is still under warranty. All drives returned to LaCie must be securely packaged in their original box and shipped with postage prepaid. IMPORTANT INFO: Register online for free technical support: www.lacie.com/register