1
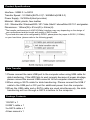
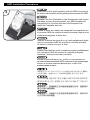
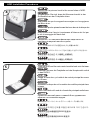
Light and Easy to car r y
RVS01
Manual
Product Specifications
Interface : USB2.0 / e-SATA
Transfer Speed : 3.0 Gbit/s(SATA 2.0)* / 480Mbit/s(USB 2.0)
Power Supply : 5V/500mA(Host provides)
Material : Metal, plastic, faux leather
O.S : Window Me / Windows2000 / XP / Vista ;Mac9.1 above/Mac OS 10.1 and greater.
Dimensions : 145mm(W) x 81mm(D) x 24mm(H)
*The transfer performance of eSATA(3Gbits) interface may vary depending on the design of
your motherboard and the length and quality of SATA cable.
*If your hard drive can not be recognized by RVS01, please place the jumper to SATA I (1.5Gbits)
on your hard drive. (please refer to the following graph)
Data Transfer
1.Please connect the main USB port to the computer when using USB cable for
data transferring. If the HDD fails to work properly because of power shortage,
please connect the second USB connector to the computer simultaneously.
2.When using e-SATA cable for data transferring. Please connect the USB Y
cable to the USB port or DC port for additional power from the computer.
3.When the USB cable and e-SATA cable are used simultaneously, the data
transferring will run through e-SATA interface to the computer.
Package Contents
1.RVS01 x 1
2.USB Y-cable x 1
3.e-SATA cable x 1
4.User manual x 1
HDD Installation Procedures
1
Lift up the leather cover and the main control module.
Öffnen Sie die Lederhülle und nehmen Sie das Hauptmodul heraus.
Levante la cubierta de cuero y el módulo de control principal.
Soulevez le cache en cuir et le module de contrôle principal.
Sollevare la copertura in pelle ed il modulo di controllo
principale.
Поднимите кожаный чехол и главный блок управления.
レザーカバーおよびメインコントロールモジュールを引き上げます。
가죽 커버와 메인 컨트롤 모듈을 들어 올립니다.
打開RVS01皮革上蓋與主控件模組
打开RVS01皮革上盖与主控件模块
2
Press the left and right pincer to make them open widely
Drücken Sie die linke und die rechte Klammer damit diese
offen stehen.
Presione los enganches izquierdo y derecho para abrirlos del todo.
Appuyez sur les pinces droite et gauche pour les ouvrir largement
Premere i Fermi di destra e sinistra in modo che si aprano
per consentire il posizionamento dell’hard disk.
Надавите на левый и правый защелки-фиксаторы, чтобы
они разошлись.
左右のクリップを押して大きく開くようにします。
오른쪽과 왼쪽 집게를 눌러 넓혀준 다음 열어 줍니다.
按下模組的左右鉗片兩底端以打開模組
按下模块的左右钳片两底端以打开模块
HDD Installation Procedures
3
Insert HDD until it match perfectly with the NSS connector of
the main control module, and let go the pincers to secure the HDD.
Schieben Sie Ihre Festplatte in das Hauptmodul und richten
Sie diese so aus, dass sie perfekt zum NSS Hauptmodul
ausgerichtet ist. Drücken Sie dann die Klammern ran,
damit die Festplatte fest sitzt.
Inserte el disco duro hasta que encaje de forma perfecta con
el conector NSS del módulo de control principal, deje que los
enganches aseguren el disco duro.
Insérez un disque dur jusqu’à ce qu’il soit parfaitement aligné
avec le connecteur NSS du module de contrôle principal,
et clipser le disque dur pour le fixer.
Inserire l’hard disk fino a che i contatti non entrino perfettamente
nel connettore NSS del modulo di controllo principale,
rilasciare i fermi per bloccare l’hard disk.
Вставьте жесткий диск так, чтобы он состыковался с
износостойким разъемом SATA главного блока управления,
затем отпустите защелки-фиксаторы, чтобы они
зафиксировали диск.
HDDをメインコントロールモジュールのNSSコネクタに正しく接続さ
れるまで挿し、左右のクリップがHDDを固定するようにします。
하드디스크를 삽입하고, 메인 모듈의 NSS 커넥터에 완벽하게
밀착되도록 한 다음, 집게를 놓아 하드디스크를 고정시킵니다.
將硬碟裝入,當硬碟與主控件連接器連接到位時,請鬆開手
讓左右鉗片鎖固硬碟
将硬盘装入,当硬盘与主控件连接器连接到位时,请松开手
让左右钳片锁固硬盘
HDD Installation Procedures
4
Make sure the pincers hook to the screw holes of HDD.
Vergewissern Sie sich, dass die Klammer korrekt in den
Schraublöchern der Festplatte sitzen.
Asegúrese de que los enganches encajan con los agujeros
del disco duro.
Vérifiez bien que les pinces tiennent les trous des vis du disque dur.
Assicuratevi che i fermi si inseriscano all’interno dei fori per
le viti di serraggio dell’hard disk.
Убедитесь, что защелки-фиксаторы зацеплены за
винтовые отверстия жесткого диска.
クリップがHDDのネジ穴に固定されたことを確かめます。
집게의 고리가 하드디스크의 나사 구멍에 걸렸는지 반드시 확인합니다.
請確認鉗片定位柱已卡入硬碟上的螺絲孔
请确认钳片定位柱已卡入硬盘上的螺丝孔
5
Place the HDD and the main control module back onto the base.
Platzieren Sie nun die Festplatte und das Hauptmodul zurück
in das RVS01.
Ponga el disco duro y el módulo de control principal de nuevo
en la base.
Remettez le disque dur et le module de contrôle principal dans
la base.
Porre l’hard disk ed il modulo di controllo principale sulla base.
Поместите жесткий диск и главный блок управления
обратно на основание модуля.
HDDおよびメインコントロールモジュールをベースに戻します。
하드디스크와 메인 컨트롤 모듈을 베이스에 다시 놓습니다.
將硬碟與主控件模組裝回RVS01底座中
将硬盘与主控件模块装回RVS01底座中
HDD Installation Procedures
6
Put on the leather cover to finish installation.
Schließen Sie als letztes die Lederhülle um die Installation
zu beenden.
Vuelva a poner la cubierta de cuero para finalizar la
instalación.
Remettez le cache en cuir pour terminer l’installation.
Riposizionare la copertura in pelle per terminare
l’installazione.
Наденьте кожаный чехол. Установка завершена.
レザーカバーを元に戻すと、インストール完了です。
가죽 커버를 덮어 설치를 마칩니다.
閤上皮革上蓋,安裝完成
关上皮革上盖,安装完成
Warranty Information
Issue Date : December, 2008
NO.G11209210