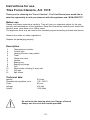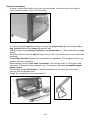
1
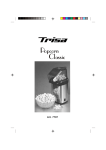
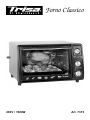
Forno Classico
230V / 1500W
Art. 7315
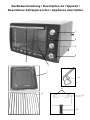
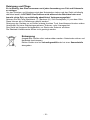
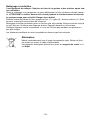
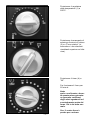
Gerätebeschreibung / Description de l’appareil /
Descrizione dell’apparecchio / Appliance description
1
2
3
4
6
5
7
8
10
9
11
12
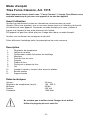
Gebrauchsanweisung
Trisa Forno Classico, Art. 7315
Vielen Dank, dass Sie sich für unseren “Forno Classico” entschieden haben. Das
Trisa Electro Team wünscht Ihnen viel Freude mit diesem Gerät und einen guten
Appetit!
Vor dem Benutzen
Bitte lesen Sie alle in dieser Gebrauchsanweisung aufgeführten Informationen aufmerksam
durch. Sie geben Ihnen wichtige Hinweise für den Gebrauch, die Sicherheit und die Wartung des Gerätes. Bewahren Sie die Gebrauchsanweisung sorgfältig auf und geben Sie
diese gegebenenfalls an Nachbenutzer weiter.
Das Gerät darf nur für den vorgesehenen Zweck, gemäss dieser Gebrauchsanweisung,
verwendet werden.
Beachten Sie die Sicherheitshinweise.
Verpackungsmaterial ordnungsgemäss entsorgen.
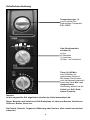
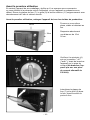
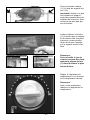
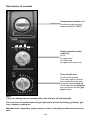
Beschreibung
1
2
3
4
5
6
7
8
9
10
11
12
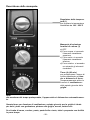
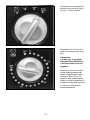
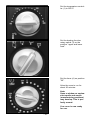
Temperaturregler
Kontrolllampe
Heiz-Funktionsdrehschalter
Timer
Glas-Ofentüre
Handgriff
Backblech
Backblech-Zange
Backrost
Fleischhaken inkl. 2 Flügelschrauben
Grill-Drehspiess
Drehspiess Halter
Technische Daten
Fassungsvermögen:
Temperatur-Regulierung:
Timer:
Spannung:
Leistung:
23 Liter
100 - 250°C
60 Min.
230 Volt
1500 Watt
Berühren Sie das heisse Gehäuse nicht. Verbrennungsgefahr!
Benutzen Sie dafür den vorgesehenen Ofentür-Griff.
-1-
Vor dem Erstgebrauch
Prüfen Sie bereits beim Auspacken des Gerätes ob alle Zubehörteile gemäss dieser
Gebrauchsanweisung enthalten sind und das Gerät keine Schäden aufweist.
Das Backblech (7), den Backrost (9) und den Grill-Drehspiess (11) gründlich mit Spülmittel
und heissem Wasser spülen und gut trocknen.
Vor dem Erstgebrauch das Gerät von Produktionsrückständen reinigen:
Auf eine ebene, stand- und
feuerfeste Fläche stellen.
30cm
10cm
10cm
Abstand von 10 und 30 cm
unbedingt einhalten.
10cm
Prüfen Sie, dass der
Timer (4) auf Position
“Off” ist, bevor Sie das
Gerät am Netz anschliessen.
(Nur an Wechselstrom mit
Spannung von 230 Volt).
Backblech (7) und Rost (9)
in den Ofen schieben, dann
die Ofentüre schliessen.
-2-
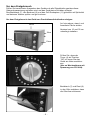
Temperaturregler (1) auf
250°C stellen
Heizfunktionsdrehschalter
(3) auf Position “Oberund Unterhitze” stellen.
Den Timer (4) auf Position
“20” stellen.
Lassen Sie das Gerät während ca 20 Minuten laufen.
Hinweis:
Öffnen Sie dabei ein
Fenster, es können unangenehme Gerüche und
eventuell Rauch entstehen. Dies ist völlig normal.
Ihr Backofen ist nun
betriebsbereit.
-3-
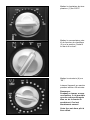
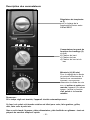
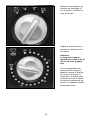
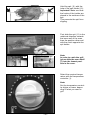
Schalterbeschreibung
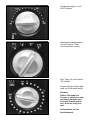
Temperaturregler (1)
zum Einstellen der
gewünschten Temperatur
100 - 250°C
a)
b)
c)
d)
Heiz-Funktionsdrehschalter (3)
a) Aus
b) Oberhitze
c) Unterhitze
d) Ober- und Unterhitze
Timer (4) (60 Min.)
zum Einstellen der
gewünschten Backzeit.
Mit diesem Drehschalter
wird die Backzeit eingestellt
sowie das Gerät Ein- und
Ausgeschaltet.
Gleichzeitig aktiviert es die
Umluft und Grill- Drehspiess-Funktion.
Hinweis:
Ist die eingestellte Zeit abgelaufen schaltet das Gerät automatisch ab.
Dieser Backofen mit Umluft und Grill-Drehspiess ist ideal zum Backen, Gratinieren,
Grillieren, Braten, Garen etc.
Ob Fleisch, Gemüse, Teigwaren, Blätterteig oder Kuchen, alles schnell und einfach
zubereitet.
-4-
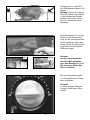
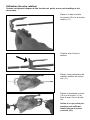
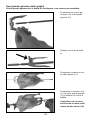
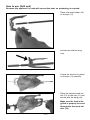
Anwendung (Grill-Drehspiess)
Da dieses Gerät mit Umluft ausgestattet ist, braucht es kein Vorheizen.
Den einen Fleischhaken
(10) am Drehspiess (11)
platzieren
Mit Flügelschraube fixieren
Grillgut zentriert auf Spiess
(11) platzieren
Den zweiten Fleischhaken
(10) am Drehspiess (11)
platzieren und mit
Flügelschraube fixieren.
Achten Sie darauf, dass
das Grillgut genügend
durch die beiden
Fleischhaken (10) gesichert ist.
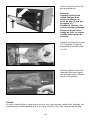
-5-
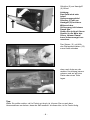
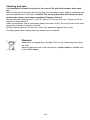
Drehspiess (11) mit Hilfe
des Drehspiess-Halters (12)
tragen.
Wichtig! Achten Sie darauf,
dass die Haken des Halters
in den Kerben am Spiess
platziert sind. Dies verhindert ein verrutschen des
Spiesses.
Den Drehspiess (11) zuerst
rechts in die Drehvorrichtung an der Innenwand des
Ofens schieben, dann das
andere Ende mit der Kerbe
gegenüber auf die Spiesshalterung legen.
links
rechts
Hinweis:
Um den herunterlaufenden Grill-Saft aufzufangen, das Backblech (7) in
die untersten Rillen des
Ofens schieben.
Mit dem Temperaturregler
(1) die gewünschte Temperatur einstellen.
Hinweis:
Je nach Grillgut Temperaturregler tiefer oder höher
stellen.
-6-
Den Heiz-Funktionsschalter
(3) auf Position “Ober- und
Unterhitze stellen
Den Timer (4) auf die
gewünschte Grillzeit einstellen.
Achtung:
Die Grillzeit hängt von der
Grösse und der Art des
Grillgutes ab.
Wenn Ihr Grillgut vor Ablauf
der programmierten Zeit fertig ist, den Timer (4) auf
Position “0” stellen.
Ansonsten ertönt nach
Ablauf der eingestellten
Grillzeit ein Signalton und
das Gerät schaltet automatisch ab.
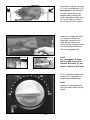
-7-
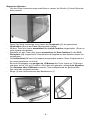
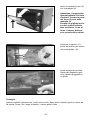
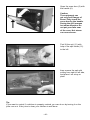
Ofentüre (5) am Handgriff
(6) öffnen.
Achtung:
Das Gerät wird sehr
heiss!
Verbrennungsgefahr!
Ofentüre (5) nur am
Handgriff (6) berühren.
Während dem
Grillvorgang tritt heisser
Dampf aus.
Gehen Sie nicht mit Ihrem
Gesicht in die Nähe des
Ofens. Heisser Dampf
kann Verbrennungen verursachen.
Den Spiess (11) mit Hilfe
des Drehspiess-Halters (12)
zuerst links anheben
dann nach links aus der
rechten Vorrichtung herausnehmen und auf auf eine
Platte oder einen Teller
legen.
Tipp:
Wenn Sie prüfen wollen, ob Ihr Poulet gut durch ist, können Sie es nach dem
Herausnahmen so drehen, dass der Saft ausläuft. Ist dieser klar, ist Ihr Poulet fertig.
-8-
Allgemeine Hinweise:
Um dem Ofen-Innenraum etwas auskühlen zu lassen, die Ofentür (5) leicht öffnen bis
diese arretiert.
-
Damit das Gerät funktioniert muss immer die Temperatur (1), die gewünschte
Heizfunktion (3) und der Timer (4) eingestellt werden.
Mit dem Timer wird immer automatisch die Umluft-Funktion eingeschaltet. (Diese ist
nicht separat einschaltbar)
Ebenfalls mit dem Timer wird immer automatisch die Dreh-Funktion für den GrillDrehspiess (11) eingeschaltet. Deshalb beim Nichtgebrauch des Spiesses diesen herausnehmen.
Die Heizfunktion (3) kann nicht separat eingeschaltet werden. Diese Programme laufen immer kombiniert mit Umluft.
Bei einer Zeiteingabe von weniger als 15 Minuten den Timer zuerst auf 15 Minuten
und dann zurück z.B. auf 10 stellen. Wird dies nicht gemacht, erklingt kein Signalton.
Für Garzeiten über 60 Minuten muss der Timer entsprechend der gewünschten
Zeit mehrmals eingestellt werden.
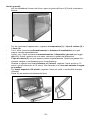
Zange (8) zum Herausnehmen des Backbleches (7)
-9-
Reinigung und Pflege
Es ist wichtig, den Ofen-Innenraum nach jeder Anwendung von Fett und Krümmeln
zu reinigen.
Vor dem Reinigen und Verstauen stets den Netzstecker ziehen und das Gerät vollständig
abkühlen lassen. ACHTUNG! Das Gehäuse wird während des Betriebes heiss und
braucht einige Zeit, um vollständig abzukühlen! Verbrennungsgefahr!
Nehmen Sie alle Teile (Backblech (7) / Backrost (9) / Grill-Drehspiess (11) aus dem Ofen.
Diese können alle in Seifenlauge gespült werden.
Reinigung des Gerätes nur mit einem mässig feuchten Tuch. Anschliessend trocken reiben.
Verwenden Sie keine Stahlreinigungskissen, Scheuer- oder Lösungsmittel.
Das Gerät bei längerem Nichtgebrauch vor Staub oder Schmutz schützen.
Die Edelstahl-Heizelemente dürfen nicht gereinigt werden.
Entsorgung
Ausgediente Geräte sofort unbrauchbar machen. Netzstecker ziehen und
Netzkabel durchtrennen.
Elektro-Geräte sind im Verkaufsgeschäft oder bei einer Sammelstelle
abzugeben.
- 10 -
Allgemeine Sicherheitshinweise
Berühren Sie das heisse Gehäuse nicht. Benutzen Sie dafür den vorgesehenen
Handgriff.
Gerät nur an Wechselstrom mit Netzspannung gemäss dem Typenschild und nur
an Steckdosen mit Erdung (3-polig) anschliessen.
Ein Elektrogerät ist kein Kinderspielzeug. Kinder erkennen die Gefahren nicht, die
beim Umgang mit Elektrogeräten entstehen können. Das Gerät deshalb ausser
Reichweite von Kindern und gebrechlichen Leuten benutzen und aufbewahren.
Netzkabel nicht herunterhängen lassen. Verpackungsmaterialien wie z.B.
Folienbeutel gehören nicht in Kinderhände.
Einen zusätzlichen Schutz bietet der Einbau einer Fehlerstrom-Schutzeinrichtung
mit einem Nennauslöserstrom von nicht mehr als 30 mA in die Hausinstallation.
Lassen Sie sich von Ihrem Elektroinstallateur beraten. Gefahr besteht auch bei ausge
schaltetem Gerät. Deshalb nach Gebrauch immer den Netzstecker ziehen.
Benützen Sie dieses Gerät nicht in der Nähe von Wasser, das in Badewannen,
Waschbecken oder anderen Gefässen enthalten ist und setzen Sie es weder
Regen noch anderer Feuchtigkeit aus.
Sollte das Gerät doch einmal ins Wasser gefallen sein, nehmen Sie es erst dann
heraus,wenn der Netzstecker gezogen ist. Danach Gerät nicht mehr in Betrieb
nehmen, sondern zuerst von einer zugelassenen Servicestelle überprüfen
lassen.
Prüfen Sie regelmässig, ob das Netzkabel Schadstellen aufweist. In diesem Fall
darf das Gerät nicht in Betrieb genommen werden (Netzstecker sofort ziehen) und
das Gerät zur Reparatur an den Hersteller übergeben.
Das Gerät darf nicht in Betrieb genommen werden (Netzstecker sofort ziehen),
wenn:
* das Gerät, das Gehäuse oder Kabel beschädigt ist.
* das Gerät sichtbare Schäden aufweist.
* der Verdacht auf einen Defekt nach einem Sturz oder ähnlichem besteht.
* bei Störungen während des Gebrauchs.
* vor der Reinigung, Umplazierung.
* nach dem Gebrauch.
Den Stecker niemals am Netzkabel oder mit nassen Händen aus der Steckdose
ziehen.
Das Gerät nie am Netzkabel tragen oder ziehen.
Das Netzkabel nicht über scharfe Kanten ziehen oder einklemmen.
Knicken Sie das Netzkabel nicht, und wickeln Sie es nicht um das Gerät.
- 11 -
Stellen Sie das Gerät nie auf heisse Oberflächen oder in die Nähe von offenen
Flammen und verlegen Sie das Netzkabel so, dass es ebenfalls nicht mit heissen
oder scharfkantigen Gegenständen in Berührung kommt. Benützen Sie das Gerät
nicht, wenn Sie sich auf feuchtem Boden befinden oder wenn Ihre Hände oder
das Gerät nass sind.
Stellen Sie das Gerät nie über Tischecken bzw. Tischkanten hinaus.
Lassen Sie das Gerät nicht unbeaufsichtigt, solange es angeschlossen ist.
Bevor Sie Teile entfernen, das Gerät reinigen oder wegräumen, lassen Sie es komplett
abkühlen.
Das Gerät niemals mit einem Tuch oder anderen Materialien wie Papier etc. bedecken.
Entzündungsgefahr!
Das Gerät nicht im Freien betreiben.
Stellen Sie keine brenn- oder schmelzbare Behälter in den heissen Ofen.
Stellen Sie keine anderen Geräte auf den Backofen.
Dieses Gerät ist nicht für den gewerblichen Gebrauch bestimmt, sondern aus
schliesslich für die Benützung im privaten Haushalt.
Von einem Gebrauch von Zubehörteilen, die vom Hersteller weder empfohlen noch verkauft werden, ist aus Sicherheitsgründen abzusehen.
Es dürfen weder (organische) Lebewesen noch Pflanzen in den Ofen gesteckt
werden.
Reparaturen an Elektrogeräten dürfen nur von Fachkräften durchgeführt werden.
Durch nicht fachgerechte Reparaturen können erhebliche Gefahren für den
Benutzer entstehen.
Bei Beschädigung der Anschlussleitung darf diese nur durch eine vom Hersteller
genehmigte Kundendienststelle ersetzt werden.
Wird das Gerät zweckentfremdet, falsch bedient oder nicht fachgerecht
repariert, kann keine Haftung für eventuelle Schäden übernommen werden.
In diesem Fall erlischt der Garantieanspruch.
- 12 -
Mode d'emploi
Trisa Forno Classico, Art. 7315
Merci beaucoup d'avoir choisi notre " Forno Classico". L'équipe Trisa Electro vous
souhaite beaucoup de joie avec cet appareil et un très bon appétit!
Avant l'utilisation
Veuillez lire attentivement toutes les informations contenues dans ce mode
d'emploi. Elles vous signalent tout ce que vous devez savoir sur l'utilisation, la sécurité
et l'entretien de votre appareil. Conservez ce mode d'emploi pour vous y référer et
joignez-le à l'appareil si une autre personne doit l'utiliser.
Cet appareil ne peut être utilisé que pour l'usage décrit dans ce mode d'emploi.
Veuillez vous conformer aux consignes de sécurité.
Prière d'éliminer l'emballage selon les prescriptions de votre commune.
Description
1
2
3
4
5
6
7
8
9
10
11
12
Régulateur de température
Lampe de contrôle
Commutateur rotatif de fonction de chauffage
Minuterie
Porte de four en verre
Poignée
Plaque de four
Pince pour la plaque de four
Gril
Crochet à viande y compris deux écrous à ailettes
Broche rotative
Support broche
Dates techniques
Volume:
Régulation de température jusqu’à:
Minuterie:
Tension:
Puissance:
23 litres
100 - 250°C
60 Min.
230 Volt
1500 Watt
Ne touchez pas le boîtier chaud. Danger de se brûler!
Utilisez la poignée prévue à cette fin.
- 13 -
Avant la première utilisation
En sortant l’appareil de son emballage, vérifiez qu’il ne manque aucun accessoire
en vous référant à la présente notice d’utilisation, et que l’appareil ne présente aucun
défaut. Rincez la plaque de four (7), la grille (9) la broche rotative (11) soigneusement avec
abondamment de l'eau et séchez ensuite.
Avant la première utilisation, nettoyez l'appareil de tous les résidus de production:
Posez sur une surface
plane, stable et résistant au
feu.
30cm
10cm
10cm
Respectez absolument
une distance de 10 et
30 cm.
10cm
Vérifiez si la minuterie (4)
est sur la position " off "
("arrêt "), avant de brancher
l'appareil sur la prise de
courant (Ne branchez l'appareil que sur une prise
de courant alternatif de
230 Volt).
Introduisez la plaque de
four (7) et la grille (9) dans
le four, fermez ensuite la
porte du four.
- 14 -
Mettez le régulateur de température (1) sur 250°C
Mettez le commutateur rotatif de fonction de chauffage
(3) sur la position "chaleur
en haut et en bas".
Mettez la minuterie (4) sur
“20 ".
Laissez l'appareil en marche
pendant environ 20 minutes.
Remarque:
Pendant ce temps, ouvrez
une fenêtre, il est possible
que des odeurs désagréa
bles ou de la fumée se
produisent. Ceci est
absolument normal.
Votre four est alors prêt à
être utilisé.
- 15 -
Description des commutateurs
Régulateur de température (1)
pour le réglage de la
température choisie entre
100 et 250°C
a)
b)
c)
d)
Commutateur tournant de
fonction de chauffage (3)
a) Arrêt
b) Chaleur du haut
c) Chaleur du bas
d) Chaleur du hout et du
bas
Minuterie (4) (60 min)
Pour le réglage de la durée
de cuisson sélectionnée. A
l'aide de ce commutateur
tournant, vous pouvez
déterminer la durée de cuis
son, et arrêter et mettre en
marche l'appareil. En même
temps, il active la fonction
d'air pulsé et de broche
rotative.
Remarque:
Si le temps réglé est terminé, l'appareil s'arrête automatiquement.
Ce four à air pulsé et à broche rotative est idéal pour cuire, faire gratiner, griller,
rôtir, faire cuire à point etc.
Que ce soit viande, légumes, pâtes alimentaires, pâte feuilletée ou gâteaux - tout est
préparé de manière simple et rapide.
- 16 -
Utilisation (broche rotative)
Comme cet appareil dispose d'une fonction air pulsé, aucun préchauffage n'est
nécessaire.
Placer l'un des crochets
de viande (10) sur la broche
rotative (11)
Fixez-le avec l'écrou à
ailettes.
Placez votre préparation de
manière centrée sur la broche (11)
Placez le deuxième crochet
(10) sur la broche (11) et
fixez-le avec l'écrou à ailettes.
Veillez à ce que votre préparation soit suffisamment fixée par les deux
crochets (10).
- 17 -
Porter la broche rotative
(11) à l'aide du support broche (12).
Important! Veillez à ce que
les crochets du support
soient bien placés dans les
entailles de la broche. Ainsi,
la broche ne peut pas glisser de travers.
Insérez d'abord, la broche
(11) à droite dans le dispositif de rotation fixé à la paroi
intérieure, posez ensuite
l'autre bout avec l'entaille
sur le support broche d'enface.
gauche
droite
Remarque:
Pour recueillir le jus de
cuisson coulant d'en haut,
insérez la plaque de four
(7) dans la rainure la plus
basse du four.
Réglez le régulateur de
température (1) en fonction
de la température choisie.
Remarque:
Selon votre préparation,
réduisez ou augmentez la
température.
- 18 -
Mettez le commutateur de
fonction de chauffage (3)
sur la position "chaleur du
haut et du bas."
Réglez la minuterie (4) en
fonction du temps de cuisson choisi.
Attention:
Le temps de cuisson
dépend de la taille et de la
nature de votre préparation.
Si votre préparation est
prête avant le temps programmé, mettez la minuterie (4) sur la position "0".
Autrement, un signal sono
reretentit dès que le temps
de cuisson programmé est
écoulé, et l'appareil s'arrête
automatiquement.
- 19 -
Ouvrez la porte du four (5)
par la poignée (6).
Attention:
l'appareil devient très
chaud. Danger de se
brûler! Ne touchez la
porte du four (5) que par
la pognée (6).
Pendant la cuisson, une
vapeur chaude se dégage.
N'approchez pas votre
visage du four. La vapeur
chaude peut causer des
brûlures.
D'abord, soulevez la broche
(11) à gauche à l'aide du
support de la broche rotative (12).
Ensuite, enlevez le tout du
dispositif droit vers la gauche et posez-le sur une plaque ou une assiette.
Conseil:
Si vous voulez vérifier si votre poulet est bien cuit, vous pouvez, après l'avoir retiré du four,
le positionner de telle manière que le jus sorte. Si celui-ci est clair, votre poulet est prêt.
- 20 -
Remarques générales:
Pour laisser refroidir un peu l'intérieur du four, ouvrez la porte du four (5) légèrement
jusqu'à son déclic.
-
Pour que l'appareil fonctionne, il est nécessaire de régler toujours la température (1),
la fonction de chauffage souhaitée (3) et la minuterie (4).
Avec la minuterie, la fonction d'air pulsé est automatiquement mise en marche.
(Elle ne peut pas être mise en marche séparément.)
De même, avec la minuterie, la fonction rotative pour la broche est mise en marche. Il est donc nécessaire d'enlever la broche quand vous ne l'utilisez pas.
La fonction de chauffage (3) ne peut pas être mise en marche séparément. Ce programme ne fonctionne qu'avec l'air pulsé.
Lors d'une indication de temps inférieur à 15 minutes, mettez d'abord la minuterie sur
15 minutes et ensuite sur une valeur inférieure, par ex. sur 10 minutes. Si ceci n'est
pas fait, aucun signal sonore ne retentit.
Pour les temps de cuisson supérieurs à 60 minutes, la minuterie doit être réglée plusieurs fois de suite selon le temps souhaité.
Pince (8) pour enlever la plaque de four (7).
- 21 -
Nettoyage et entretien
Il est important de nettoyer l'intérieur du four de la graisse et des miettes, après chaque utilisation.
Avant le nettoyage et le rangement, toujours débrancher la fiche et laisser refroidir l'appareil. ATTENTION! Le boîtier devient très chaud pendant le fonctionnement et nécessite quelque temps pour refroidir! Danger de se brûler!
Enlevez toutes les pièces du four (plaque de four (7) / grille (9) / broche rotative (11). Elles
peuvent toutes être rincées dans de la lessive.
Nettoyage du boîtier seulement avec un torchon pas trop humide. Essuyez ensuite jusqu'à
ce qu'il soit sec. N'utilisez pas d'éponge d'acier, d'agents abrasifs ou de solvants.
Protégez l'appareil contre la poussière, si vous ne l'utilisez pas pendant une période un
peu plus longue.
Les éléments chauffants en acier inoxydable ne devront pas être nettoyés.
Elimination
Mettre immédiatement hors d’usage les appareils usés. Retirer la fiche
de contact et couper le câble d’alimentation.
Les appareils électriques doivent être remis au magasin de vente ou à
un dépôt.
- 22 -
Directives générales de sécurité
Ne touchez pas les surfaces chaudes. Utilisez les poignées et boutons prévus à cet
effet.
Vérifiez que la tension du secteur corresponde bien à celle indiquée sur la plaquette
signalétique. Ne branchez l'appareil que sur une prise de courant avec mise à la terre
(tripolaire).
Un appareil électrique n'est pas un jouet. Les anfants ou les handicapés ne sont
pas conscients des dangers inhérents au maniement d'appareils électrique. Par
conséquent, utilisez-le et rangez-le hors d'atteinte des enfants.
Le matériel d'emballage, tel que les sachets de vinyl ne doit pas ètre remis aux mains
d'enfants.
Une protection supplémentaire est offerte par le montage d'un dispositif de sécurité
contre le courant de défaut dans l'installation domestique. Tension nominale de pas
plus de 30 mA. Consultez votre électricien. Le danger, subsistant même quand
l'appareil est éteint, retirez la prise après l'utilisation.
N'employez pas cet appareil à proximité d'eau dans des baignoires, lavabos ou
d'autres récipients et ne l'exposez ni à la pluie ni à d'autre humidité.
Au cas où l'appareil serait tombé à l'eau, ne le sortez qu'après avoir retiré la fiche.
Ensuite, ne plus faire marcher l'appareil mais d'abord le faire contrôler par
un magasin spécialisé autorisé.
Contrôlez régulièrement si le cordon est défectueux. Dans ce cas, l'appareil ne
doit pas être mis en marche (immédiatement tirer la fiche) et envoyer-le au
fabricant pour réparation.
N'utilisez pas l'appareil (débranchez-le aussitôt):
* si l'appareil, le boîtier ou le cordon secteur sont endommagés.
* si l'appareil présente une défectuosité apparente.
* si vous pensez que l'appareil a été endommagé en chutant.
* en cas de mauvais fonctionnement.
* avant chaque nettoyage ou entretien.
* en cas d'interruption ou après utilisation.
Ne débranchez jamais la fiche en tirant sur le cordon ni avec les mains mouillées.
Ne portez ni ne retirez jamais l'appareil par le cordon.
Ne tirez pas le cordon par-dessus des bords tranchants. Ne le coincez pas.
Ne pliez pas le cordon et ne le roulez pas autour de l'appareil.
- 23 -
Ne mettez jamais l'appareil sur des surfaces chaudes, ni à proximité de flammes
ouvertes. Veillez à ce que le cordon ne touche pas des objets chauds ou des
arêtes coupantes. N 'employez pas l'appareil si vous vous trouvez sur un plancher
humide ou si vos mains ou l'appareil sont mouillés.
Ne mettez jamais l'appareil jamais au bord d'une table et évitez le contact avec des surfaces chaudes.
Ne laissez pas l'appareil sans surveillance pendant qu'il est branché.
Laissez-le refroidir avant de monter ou de démonter des accessoires et avant de le nettoyer.
Ne couvrez jamais l'appareil d'un tissu ou d'autres matériaux comme le papier etc.
Danger d'incendie!
N’utilisez pas l’appareil à l'extérieur.
Ne mettez pas de récipients qui peuvent s'enflammer ou fondre dans le four chaud.
Ne posez pas d'autres appareils sur le four.
Cet appareil n'est pas destiné à l'usage industriel, mais exclusivement à l'emploi
dans le ménage privé.
Employez exclusivement l'appareil pour ce qu'il est construit et selon le mode d'emploi.
Utilisez uniquement les accessoires d'origine.
Ne jamais mettre de produits chimiques, d’êtres vivants organiques (animaux ou
plantes) ou tout autre produit non-alimentaire dans le four.
Les réparations d'appareils électriques doivent uniquement être effectuées par
des spécialistes. Des réparations non appropriter peuvent causer des dangers considérables pour l'usager.
En cas de défectuosité du cordon d'alimentation, celui-ci ne peut être remplacé
que par un technicien spécialisé, agréé par le fabricant.
Au cas où l'appareil est désaffecté, manié ou réparé d'une manière incorrecte,
nous déclinons la responsibilité de dommages éventuels. Dans ce cas la revendication de garantie n’est plus valable.
- 24 -
Istruzioni per l'uso
Trisa Forno Classico, Art. 7315
Vi ringraziamo che avete scelto il nostro "Forno Classico". Il team della Trisa Electro
vi augura buon divertimento con questo apparecchio e: BUON APPETTITO!
Prima dell'uso
Leggete attentamente le informazioni di questo modo di usare. Vi daranno direttive
importanti per l'uso, la sicurezza e la manutenzione dell' apparecchio. Serbate il modo
di usare con cura e, eventualmente, trasmettetelo ad utenti seguenti.
L'apparecchio deve solamente essere adoperato allo scopo previsto in conformità a
questo modo di usare.
Osservate le direttive di sicurezza.
Eliminare il materiale di imballaggio secondo le prescrizioni.
Descrizione
1
2
3
4
5
6
7
8
9
10
11
12
Regolatore della temperatura
Spia di controllo
Manopola di selezione funzioni di cottura
Timer
Porta a vetro del forno
Maniglia
Lamiera del forno
Pinza per lamiera del forno
Griglia
Uncino per la carne con due viti a farfalla
Spiedo girevole per la griglia
Portaspiedo
Dati tecnici
Capacità:
Regolazione della temperatura fino a:
Timer:
Tensione:
Potenza:
23 litri
100 - 250°C
60 min.
230 Volt
1500 Watt
Non toccare il mobile bollente. Pericolo di ustioni!
Per aprire o chiudere utilizzare la maniglia della porta del forno.
- 25 -
Prima del primo utilizzo
Al momento del disimballaggio dell’apparecchio, controllate che siano presenti tutti gli
accessori indicati nelle presenti istruzioni d’uso e che non presentino alcun danno.
Lavare con acqua calda e detersivo la lamiera del forno (7), la griglia (9) e lo spiedo girevole della griglia (11) ed asciugare bene.
Prima di usare l’apparecchio per la prima volta e necessario pulire i residni.
Poggiare su una superficie
piana, solida e ignifuga.
30cm
10cm
10cm
Devono essere rispettate le
distanze di 10 e 30 cm.
10cm
Controllare che il timer (4) è
posizionato su OFF prima di
collegare l'apparecchio alla
rete (collegare alla corrente alternata con una tensione di 240 volt)
Inserire la lamiera del forno
(7) e la griglia (9) nel forno
e, quindi, chiudere la porta
del forno.
- 26 -
Posizionare il regolatore
della temperatura (1) a
250°C.
Posizionare la manopola di
selezione funzioni di cottura
(3) su "Forno statico" (si
accendono i due elementiriscaldanti superiore ed inferiore).
Posizionare il timer (4) a
"20".
Far funzionare il forno per
20 minuti.
Nota:
aprire una finestra, durante questa prima operazione possono verificarsi
degli odori sgradevoli ed
eventualmente anche del
fumo. Ciò è del tutto normale.
Ora, il vostro forno è
pronto per cucinare.
- 27 -
Descrizione delle manopole.
Regolatore della temperatura (1)
per regolare la temperatura
desiderata da 100 - 250°C
a)
b)
c)
d)
Manopola di selezione
funzioni di cottura (3)
a) OFF
b) Forno sopra: si accende
l'elemento riscaldante
superiore
c) Forno sotto: si accende
l'elemento riscaldante
inferiore
d) Forno statico: si accendono entrambi gli elementi
riscaldanti
Timer (4) (60 min)
per preimpostare il tempo di
cottura desiderato ed inserire e disinserire il forno.
Temporaneamente attiva le
funzioni di ventilazione e
dello spiedo girevole della
griglia.
Nota:
alla scadenza del tempo preimpostato, l'apparecchio si disinserisce automaticamente.
Questo forno con funzione di ventilazione e spiedo girevole per la griglia è ideale
per dolci, piatti con gratinatura, pietanze alla griglia, arrosti, cottura ecc.
Se si tratta di carne, verdure, paste, pasta frolla o torte, tutto è preparato con facilità
in poco tempo.
- 28 -
Uso (spiedo girevole della griglia)
Poiché questo apparecchio è dotato di ventilazione, non occorre preriscaldarlo.
Posizionare un uncino per
la carne (10) sullo spiedo
girevole (11).
Fissarlo con la vite a farfalla.
Posizionare la carne al centro dello spiedo (11).
Posizionare il secondo uncino (10) sullo spiedo girevole
(11) e fissarlo con la vite a
farfalla.
Controllare che la carne
sia bloccata in modo sufficiente dai due uncini (10).
- 29 -
Prendere lo spiedo girevole
(11) con il portaspiedo (12).
Importante! Fare attenzione che i ganci del porta
spiedo siano posizionati
nelle intaccature dello spiedo. In tal modo si evita lo
scivolamento dello spiedo.
Inserire lo spiedo girevole
(11) prima a destra nel
dispositivo girevole sito
nella parete interna del
forno, quindi poggiare l'altro
con l'intaccatura sull'altrolato sul poggiaspiedo.
sinistra
destra
Nota:
per raccogliere il sugo
della griglia, inserire la
lamiero del forno (7) nel
ripiano inferiore del forno.
Con il regolatore della temperatura (1) impostare la
temperatura desiderata.
Nota:
regolare la temperatura a
seconda della carne da grigliare.
- 30 -
Posizionare la manopola di
selezione funzione di cottura (3) su "Forno statico".
Impostare con il timer (4) il
tempo necessario per la griglia.
Attenzione:
il tempo per la grigliata
dipende dalle dimensioni
e dal tipo della carne da
grigliare.
Qualora la carne sia cotta
prima della scadenza del
tempo programmato, posizionare il timer (4) su "0".
Oppure, alla scadenza del
tempo di griglia impostato, è
emesso un segnale acustico
e il forno si disinserisce
automaticamente.
- 31 -
Aprire la porta del forno (5)
con la maniglia (6).
Attenzione: l'apparecchio
diventa bollente! Pericolo
d'ustioni! Toccare la porta
del forno (5) solo sulla
maniglia (6).
Durante la grigliata fuoriesce del vapore bollente.
Non avvicinare il viso al
forno. Il vapore bollente
può causare delle ustioni.
Sollevare lo spiedo (11)
prima da sinistra per mezzo
del porta spiedo (12),
quindi estrarlo da sinistra
destra dal dispositivo gire
vole e destra poggiarlo su
un piatto.
Consiglio:
qualora vogliate controllare se il pollo è ben cotto, dopo averlo estratto girarlo in modo da
far uscire il sugo. Se il sugo è limpido, il vostro pollo è fatto.
- 32 -
Avvisi generali:
per far raffreddare l'interno del forno, aprire la porta del forno (5) finché la stessa si
blocca.
-
Per far funzionare l'apparecchio, regolare la temperatura (1), il tipo di cottura (3) e
il timer (4).
Con il timer s'inserisce automaticamente la funzione di ventilazione (non può
essere inserita separatamente).
Inoltre, con il timer s'inserisce automaticamente il dispositivo girevole per la griglia (11). Quindi, qualora non sia usato, estrarre lo spiedo dal dispositivo.
Il tipo di cottura (3) non può essere inserito separatamente. Questi programmi funzionano sempre in combinazione con la ventilazione.
Qualora si imposti una durata inferiore a 15 minuti, regolare il timer prima su 15
minuti, quindi ridurre per la 10 minuti. Non facendo così, non sarà emesso il segnale acustico.
Per tempi superiori a 60 minuti, regolare il timer più volte in conformità al tempo
richiesto.
Pinza (8) per estrarre la lamiera del forno.
- 33 -
Pulizia e cura
Dopo ogni uso, è importante pulire l'interno del forno togliendo grasso e briciole.
Prima della pulizia e l'immagazzinamento, estrarre la spina dalla rete e far raffreddare l'apparecchio completamente. ATTENZIONE! Durante il funzionamento, il mobile diventa
molto bollente e richiede un po' di tempo prima di raffreddarsi completamente.
Pericolo d'ustioni!
Estrarre tutti i componenti dal forno (lamiera (7), griglia (9), spiedo girevole (11)). Possono
essere lavati tutti con detersivo e acqua calda.
Pulizia dell'apparecchio con un panno leggermente inumidito. Quindi, asciugarlo. Non utilizzare mezzi o polveri abrasivi o solventi.
In caso di mancato uso per un periodo prolungato proteggere l'apparecchio da sporcizia e
polvere.
Non pulire gli elementi riscaldanti di acciaio inox.
Smaltimento
Rendere subito inutilizzabili gli apparecchi fuori uso. Togliete la spina e
staccate il cavo
portacorrente.
Gli apparecchi elettrici devono essere riportati in un negozio di vendita
o presso un centro di raccolta.
- 34 -
Direttive di sicurezza
Non toccare le superfici calde. Servirsi sempre delle apposite manopole e delle
impugnature.
Lapparecchio va collegato solo a corrente alterna con tensione pari a quella indicata
sulla targhetta di designazione. Inseritelo solo in una presa con messa a terra
(tripola).
Un apparecchio non è un giocattolo. I bambini non si rendono conto dei pericoli che
possono risultare maneggiando degli apparecchi elettrici. In consequenza usare e conservare l'apparecchio lontano dei bambini. Materiale d'imballaggio per esempio buste di
plastica devono stare lontano dai bambini.
Nell'installazione domestica una protezione supplementare è fornita per mezzo del
montaggio di un dispositivo di sicurezza contro la corrente scorretta. Tensione
nominale nonpiù di 30 mA. Consultate il vostro elettricista. Poiche il pericolo esiste
anche quando l'apparecchio è chiuso, estraete la spina dopo uso.
Non utilizzare quest' apparecchio presso di acqua contenuta in vasche da bagno, lavandini o altri recipienti e non esporrlo nè alla pioggia nè ad altra umidità.
Se però è caduto una volta nell'acqua, non prenderlo fuori prima di tirare la spina. Poi
non più utilizzare l'apparecchio, ma lasciarlo controllare da un negozio specializato autorizzato.
Controllate regolarmente se il cavo è difettoso. In questo caso l'apparecchio non deve
essere messo in opera (subito tirare la spina) e mandare l'apparecchio al fabbricante
per riparazione.
Non mettere l'apparecchio in funzione (oppure tirare subito la spina) se:
* l'apparecchio, il mobile o il cavo di rete è danneggiato.
* l'apparecchio mostra dei danni.
* sospettate che ci sia un difetto dopo una caduta o qualche cosa di simile.
* in caso di disturbi durante l'uso.
* prima di pulire l'apparecchio oppure quando lo si deve spostare in un altro luogo.
* dopo l'uso.
Non estraete mai la spina fuori della presa al cavo ne con mani bagnate.
Non trasportate ne tirate mai l'apparecchio al cavo.
Non tirate il cavo attraverso bordi taglianti. Non schiacciatelo.
Non piegare il cavo die rete non avvolgerlo cittorno l'apparecchio
Mai mettere l'apparecchio sopra superfici calde ne vicino a fiamme aperte. Fate attenzione che non tocchi oggetti caldi o oggetti ad angoli acuti. Non utilizzare l'apprecchio se
vi trovate su un pavimento umido o se le vostre mani o l'apparecchio sono bagnati.
- 35 -
Evitate di poggiare l’apparecchio sull’orlo del tavolo o della tovaglia.
Non lasciare l'apparecchio senza sorveglianza mentre che funziona.
Prima di togliere l'accessori o prima di pulirlo, lasciarlo raffreddare completamente.
Non coprire mai l'apparecchio con un panno o altri materiali, come carta, etc. Pericolo di
incendio!
Non utilizzare l’apparecchio all’aperto.
Non inserire nel forno recipienti infiammabili o fusibili.
Non posizionare altri apparecchi sul forno.
Questo apparecchio non è destinato all'uso industriale ma esclusivamente all'uso a
casa.
Utilizzare solo dei accessori supplementari che sono raccomandati dal produttore.
Non introdurre nel forno prodotti chimici, organismi viventi (animali o vegetali) o
“non-food” di qualsiasi tipo.
Reparazioni di apparecchi elettrici devono unicamente essere effettuate per specialisti.
Reparazioni improprie possono causare dei pericoli gravi per l'utente.
In caso di un guasto al cavo d'alimentazione, questo solo potrà essere sostituito da un
tecnico autorizzato dal produttore.
Nel caso che l'apparecchio viene usato a scopi originalmente non intenzionati,
usato o riparato in modo scorretto, non possiamo assumere una responsabilità
per danni eventuali. In questo caso la rivendicazione di garanzia è fuori causa.
- 36 -
Instructions for use
Trisa Forno Classico, Art. 7315
Thank you for choosing the "Forno Classico". The Trisa Electro team would like to
take this opportunity to wish you pleasure with this appliance and “BON APPETIT!”
Before use
Please read these instructions carefully. They will give you important advice for the use,
security and maintenance of the appliance. Keep the instructions carefully and, should the
situation arise, pass them on to further users.
The appliance must only be used for the intended purpose according to these instructions.
Observe the notes on safety regulations.
Dispose the packaging properly.
Description
1
2
3
4
5
6
7
8
9
10
11
12
Temperature controller
Control light
Heating function rotary switch
Timer
Glass oven door
Handle
Baking tray
Baking tray tongs
Grill
Meat holder including 2 wing nuts
Grill spit
Spit holder
Technical data
apacity:
Temperature regulation up to:
Timer:
Voltage:
Output:
23 litres
100 - 250°C
60 min.
230 Volt
1500 Watt
Do not touch the housing when hot. Danger of burns!
Always use the oven door handle provided.
- 37 -
Before using for the first time
Check when you are unpacking the appliance whether all the accessories are included in
accordance with these instructions for use and that the appliance is not damaged in any
way. The baking tray (7), the grill (9) and the grill spit (11) should be thoroughly cleaned
with detergent and hot water and then dried.
Before using clean it thourenghly of any manufacturing residues:
Place the appliance on a
even fireproof surface.
30cm
10cm
10cm
The distance of 10 to 30 cm
to other appliances / wall
etc. must be kept.
10cm
Check that the timer (4) is in
the "off" position before
plugging the appliance in to
the mains power supply.
(Only use a 230v AC supply).
Slide the baking tray (7) and
the grill (9) into the oven
and close the door.
- 38 -
Set the temperature controller (1) to 250°C.
Set the heating function
rotary switch (3) on the
position "upper and lower
heat".
Set the timer (4) on position
"20".
Allow the oven to run for
about 20 minutes.
Note:
Open a window as unpleasant smells and smoke
(manufacturing-residues)
may develop. This is perfectly normal.
Your oven is now ready
for use.
- 39 -
Description of controls
Temperature controller (1)
for selecting the required
temperature 100 - 250°C
a)
b)
c)
d)
Heating function rotary
switch (3)
a) Off
b) Upper heat
c) Lower heat
d) Upper and lower heat
Timer (4) (60 min)
To set cooking times.
This rotary switch controls
the cooking times by switching the oven on and off.
At the same time activation
the convection and the grill
spit function.
Note:
If the set cooking time is exceeded the oven will turn off automatically.
The oven has convection heat and grill spit and is perfect for baking, gratinate, grilling, roasting, cooking etc.
Whether meat, vegetables, pasta, pastry or cakes, everything is fast and easy to prepare.
- 40 -
How to use (Grill spit)
Because this appliance is used with convection heat, no preheating is required.
Place one meat holder (10)
on the spit (11)
and secure with the wing
nuts.
Centre the food to be grilled
on the spit (11) property.
Place the second meat holder (10) on the spit (11) and
secure with the wing nuts.
Make sure the food to be
grilled is properly secured
through the two meat hol
ders (10)
- 41 -
Hold the spit (11) with the
help of the spit holder (12).
Important! Make sure that
the hooks of the holder are
placed in the notches of the
spit.
This prevents the spit from
slipping.
First slide the spit (11) in the
rotational direction towards
the inner wall of the oven,
then the position other end
with the notch opposite the
spit holder.
left
right
Note:
In order to catch the grill
juices slide the oven shelf
(7) into the lowest position in the oven.
Select the required temperature with the temperature
controller (1).
Note:
Set the temperature controller higher or lower, depending of what you want to
grill.
- 42 -
Set the heating function
rotary switch (3) on position
"upper and lower heat".
Set the timer (4) for the
required grill time.
Note:
The grill time depends on
the size and type of
food you want to grill.
If your food is grilled before
the set time run off set the
timer (4) to position "0".
Otherwise when the grill
time run off signal will be
heard and the oven will
switch off automatically.
- 43 -
Open the oven door (5) with
the handle (6).
Caution:
The equipment can
get very hot! Danger of
burns! Only touch the
oven door by the handle.
During the grill process
hot steam escapes. Do
not put your face near
of the oven. Hot steam
can cause burns.
First lift the spit (11) with
help of the spit holder (12)
to the left
then remove the spit with
pulling from right to left side,
and place it on a tray or
plate
Tip:
If you want to control if a chicken is properly cooked, you can do so by turning it so the
juice runs out. If the juice is clear, your chicken is well done.
- 44 -
General information:
- In order to allow the interior of the to oven cool down, open the oven door slightly
in the correct position it will click into place.
-
To ensure that the appliance works correctly, the temperature (1), the required heating function (3) and the timer (4) must be set.
With the timer the convection function is automatically on. (This cannot be set separately)
Similarly with the timer the spit will also turn on. So if the spit is not in use it should be
removed.
The heating function (3) cannot be switched on separately. This program runs in con
junction with the convection.
When setting a time of less than 15 minutes. First set the timer to 15 minutes and
then set it to the actual time required, e.g. 10 minutes, otherwise no audible signal
will be heard.
For settings of over 60 minutes, it will be necessary to set the timer more than
once to set the required time.
Tongs (8) for removal of the oven shelf (7).
- 45 -
Cleaning and care
It is important to clean the interior of the oven of fat and food residues after each
use.
Before cleaning and storage remove the plug from the mains power supply completely and
allow the appliance to cool down. Caution! The housing becomes hot during use and
needs some time to cool down completely! Danger of burns!
Remove all parts (Baking tray (7), grill (9), grill spit (11)) from the oven. These can all be
rinsed in a soap solution.
Clean the appliance with a moderately damp cloth and rub dry. Do not use steel wool cleaning pads or abrasive cleaning solvents.
During extended periods of non-use, protect the appliance against dust or dirt.
The high-grade steel heating elements should not be cleaned.
Disposal
Make worn out appliances unusable. Pull out the mains plug and sever
the cord.
Electric appliances are to be returned to a shop of sale or handed over
to an official dump.
- 46 -
Safety regulations
The equipment can get very hot! Danger of burns! Only touch the oven door by
the handle.
Plug the appliance only in on outlet as mentioned on the rating plate and only plus it into
an earthed, three-pin socket.
An electric appliance is not a children's toy. Children are not aware of the hazards
of electrical appliances. Therefore close supervision is necessary when the appliance
is used by children. Keep children away from packing material, e.g., plastic bags.
The installation of a faulty current protective device with a rated breaking current offers
you additional safety by ensuring that 30 mA will not be exceeded in the house installa
tion.
Let your installation elecrician advise you. Danger also exists with appliance which have
been switched off, this is why, after use, the plug should be removed for the mains.
Do not use this appliance near the water contained in bath-tubs, washbasins or other
receptables nor expose it to rain or other humidity.
Should however the appliance fall into water, only take it out after pulling the plug.
Then do not use the appliance anymore, but first have it checked by an authorized
service department.
Regulary check if the main cable is defective. In this case the appliance must not be
put into operation (immediately pull the plug). Send it to the manufacturer for repair.
The appliance must not be operated (disconnect the mains plug immediately) when:
* the appliance, casing or cable is damaged.
* the appliance shows visible signs of damage.
* a fault is suspected after a fall or the like.
* in case of faults during use.
* before cleaning or moving the appliance from place to place.
* after use.
Never pull the plug out of the socket with wet hands.
Never carry nor pull the appliance by the flex.
Don't pull the flex over sharp edges. Don't wedge it.
Do not bend the flex nor wind it around the appliance.
Never put the appliance on hot surfaces nor near open flames. Lay the cord so that it
does not touch hot or sharp-edged objects. Do not use the appliance while standing on a
humid floor or when your hands or the appliance are wet.
Never put the appliance on the edge of the table and avoid the contact with hot
surfaces.
- 47 -
Do not leave the appliance unattended while it is connected to the power source.
Allow to cast before putting on or taking off part, and before cleaning this appliance.
Never cover the appliance with a cloth or other materials such as paper. Fire hazard!
Do not use the equipment in the open air.
Do not place any containers that may melt or ignite inside the oven.
Do not place any other devices on the oven.
This appliance is not meant for commercial use only exclusively for private use.
Use this appliance only for its intended use as described in this manual. Do not
use attachments not recommended by the manufacturer.
Do not place chemicals, living organisms (animals or plants) or non-food items of any
kind in the microwave.
Only trained personnel should repair electrical appliances. Unskilled repairs can cause
considerable danger to the user.
In case of damage to the power cable this may only be replaced by a customer service
authorized by the manufacturer.
No warranty for any possible damage can be accepted if the appliance is used for
impro per purpose, wrongly operated or unprofessionally repaired. In such a case,
any warranty claim is void.
- 48 -
Switzerland
Trisa Electro AG
Kantonsstrasse 121
CH-6234 Triengen
[email protected]
++ 41 41 933 00 30
Austria
Franz Holzbauer
Service GmbH
Unterhaus 33
A-2851 Krumbach
[email protected]
++ 43 (2647)4304070
Germany
HKS
Satellitentechnik Vertriebs GmbH
Graf von Stauffenbergstrasse 8
D-63150 Heusenstamm
[email protected]
++49 (6104) 5920