1
WW ;
INSTALLATION
GUIDE
>
NVIDIA.
NVIDIA.
Software Installation
EE a e? 02
FCBNE us iy 04
Se aries ee see ay 06
Hallan an is aa 08
JADE ia on ERE tar 10
ES ea Ae aa a are ea 12
PortuguUas --.0==— mm. scsi so oi om vm im 14
FCC TIN LEI. nea ei ae re 16
PELIS SITE yaaa AN ia MAN Au e th 18
“Dania ra 20
AT sii arias site svn iam sii sass sais ovine 22
Graphics Card Hardware Installation Guide .............—.—-=—-.e=... 24
How to use HDMI audio? .....................201s0sscsacunann sans ame ma sans a neu ss 26
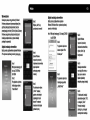
Software Installation English
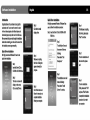
Introduction Quick Driver Installation
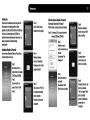
Congratulations on the purchase of your graphics Step 3 We highly recommend Windows 7/Windows Vista
Step 4
accelerator card. You are now the owner of a state Click Next to install users to follow the installation procedure: P
The Windows is installing
of-the-art video adapter, which offers features and display driver. Step 1 Insert the Driver CD into CD-ROM or DVD- :
functionality beyond any other card in its VGA class. poy P ROM dri the drivers, please press
pes. "Next" to continue:
We recommend that you read through the Installation —
Guide before installing your video card to ensure that Step 2
the installation process goes smoothly. The AutoPlay will run and
Quick Driver Installation A a НО ННРое ach
We Highly recommend Windows XP users to use Step 4 em] ei Р ian cia
uick driver installation ; ; ‘ EEE пана еее Please select "Run The driver installation will
3 ' Windows Is Installing li: Nvsetup.exe" take some time, please
Step the driver. A dialog box By | a
Insert the Driver CD into appears showing the y TUN
a CD-ROM or DVD-ROM drive. progress.
nst hile] Step 3
Imstaë Diræcté 5%
Step 2 The Installation screen will
The Auto run screen will show as following: =p E installati
display on the screen, Step 5 Please select "Install e driver installation
Click on Install Drivers.
Click Finish button and
follow the instruction to
complete installation.
Restart your computer.
Drivers" to continue.
finish, please select "Yes"
and press "Finish" button
to complete the installation
procedure. And, restart
your computer.
Introduction
Félicitations pour l'achat de votre nouvelle carte
graphique.
Vous possèdez maintenant un superbe adaptateur
vidéo vous offrant les meilleures fonctions et
caractéristiques des cartes graphiques actuelles.
Nous vous recommandons vivement de bien lire ce
guide avant de commencer l'installation afin
d'assurer qu’elle soit rapide et sans difficulté.
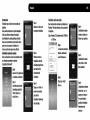
Installation rapide des pilotes
Nous recommandons vivement une installation rapide
aux utilisateurs possédant les systèmes
d'exploitation Windows XP
install Dovers
UTE PETER RT |
Etape1
Insérez le CD de pilotes dans
le CD-ROM ou le DVD-Rom.
Etape 2
Une fenétre de lancement
automatique apparait sur
I'ecran. Cliquez sur «
Install Drivers ».
Etape 3
Cliquez sur « Next » pour
commencer l'installation.
Etape 4
Windows commence
l'installation. Une boîte
de dialogue apparaît pour
vous montrer l'état
d'avancement de
l'installation.
Etape 5
Cliquez sur « Finish » et
suivez les instructions
pour terminer
l'installation. Redémarrez
votre ordinateur.
Installation rapide des pilotes
Nous recommandons vivement aux utilisateurs de
Windows 7 / Windows Vista de suivre la procédure
d'installation.
Etape 1 Insérez le CD de pilotes dans le CD-ROM ou
le DVD-Rom.
a LVLYLD-HW Drive {F
‘2
Abr de Tin Mr eof 2 1 gama
Jill di tué proue
[255 пы вела ине
(dE amorce
Genen opt
брат alder Е ав Бан:
el AP dee 5 sr Faped
Etape 2
Le lancement automatique
démarre, sélectionnez «
Lancez Nvsetup.exe ».
Etape 3
Cliquez sur « Install
Drivers ».
Etape 4
L'installation des pilotes
commence, cliquez sur «
Suivant » pour continuer.
Etape 5
L'installation des pilotes
peut prendre un certain
temps, patientez.
Etape 6
L'installation est terminée,
sélectionnez « oui » et
appuyez sur le bouton «
Fin » pour finaliser la
procédure d'installation.
Redémarrez votre
ordinateur.
Einfithrung
Vielen Dank fiir den Kauf dieser Grafikkarte. Sie sind
nun im Besitz einer state-of-the-art VGA Karte, welche
weitaus mehr Funktionen in einem vereint, als die
meisten anderen Grafikkarten ihrer Klasse. Bevor Sie
nun mit der Installation beginnen, empfehlen wir Ihnen
diese Anleitung sorgfältig zu lesen, um eine
einwandfreie Installation zu gewährleisten.
Schnell-Installation des Treibers
Für Windows XP empfehlen wir die Schnell
Installation des Treibers.
[TETRA TT
GEER [ERTS |
Schritt 1
Legen Sie die Treiber CD in
Ihr CD-ROM oder DVD-ROM
Laufwerk ein.
Schritt 2
Automatisch erscheint
das Menü auf Ihrem
Bildschirm. Bitte klicken
Sie auf "INSTALL
DRIVERS".
Schritt 3
Klicken sie nun "NEXT",
um die Installation
auszuführen.
Schritt 4
Windows installiert den
Treiber. Der Prozess wird
angezeigt.
Schritt 5
Bitte klicken Sie nun
"FINISH" um die
Installation abzuschlieBen.
Starten Sie Ihren
Computer neu.
Schnell Installation
Wir empfehlen Windows 7/Windows Vista Nutzern
nachfolgenden Installationsvorgang:
Schritt 1 Legen Sie die Treiber CD in Ihr CD-ROM
oder DVD-ROM Laufwerk ein.
8 Schritt 2
gg "Ramet Autostart beginnt. Auf
ES dem Bildschirm erscheint
tenn folgende Meldung:
Oe Bitte “Run Nvsetup.exe”
Ta auswählen.
Schritt 3
Auf dem Bildschirm
erscheint folgendes Bild
Bitte wählen Sie “Treiber
installieren” um
fortzufahren.
Schritt 4
Windows installiert den
Treiber. Bitte drücken Sie
auf “Weiter” um
fortzufahren.
Schritt 5
Treiber Installierung
benótigt einen Moment .
Bitte warten.
Schritt 6
Die Installation ist beendet.
Bitte wáhlen sie “Ja” und
driicken Sie “Beenden” um
den Vorgang
abzuschliessen. Bitte
starten Sie den Rechner
erneut.
Introduzione
Congratulazioni per aver effettuato I'acquisto della
Vostra scheda grafica. Siete ora proprietari di un
adattatore video con caratteristiche allo stato dell'arte
e le cui funzionalita vanno ben al di lá delle altre
schede della stessa categoria. Vi raccomandiamo di
leggere attentamente la Guida all'installazione prima
di installare la Vs scheda video per permettere al
processo di installazione di andare a buon fine.
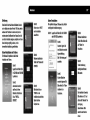
Installazione veloce dei driver
Invitiamo vivamente gli utilizzatori di Windows XP
ad utilizzare un'installazione veloce dei driver.
Punto 1
Inserire il CD dei Driver in un
iii lettore CD-ROM o in un lettore
DVD-ROM.
[la e o
Punto 2
Comparira, in automatico
sullo schermo, il menú.
Premere su Install Drivers.
Punto 3
Premere Next per
installare il driver della
scheda video.
Punto 4
Windows sta installando il
driver. Una finestra
apparira mostrando la
barra di progresso
dell'installazione.
Punto 5
Premere il pulsante Finish
e seguire le istruzioni per
completare l'installazione.
Riavviare il computer.
Guida veloce all’installazione dei Driver:
Raccomandiamo agli utenti di Windows 7/Windows Vista
di utilizzare la seguente procedura di installazione:
Punto 1 Inserire il CD dei Driver in un lettore
CD-ROM o in un lettore DVD-ROM.
| Punto 2
L’ AutoPlay partira in
automatico e verra
RE visualizzata la seguente
® pis | schermata:
Semi tim = Per cortesia selezionare
On de “Run Nvsetup.exe”
el Аи речия AE NEN] EZ! E
>, DVDICO-K Drive [5
pod
си
Albvart des [uy сотой ara queer
Punto 3
Verrá visualizzata la
seguente schermata di
installazione:
Per cortesia selezionare
“Install Drivers” per
proseguire.
Punto 4
Verrá visualizzata la
seguente schermata di
installazione:
Per cortesia selezionare
“Install Drivers” per
prosequire.
Punto 5
Per favore attendere che
l'installazione dei driver
sia completata, questa
operazione potrebbe
impiegare alcuni minuti:
Punto 6
L'installazione dei driver é
completata, per cortesia
selezlonare “Yes” e
premere sul pulsante
“Finish” per completare la
procedura d'installazione.
Il computer eseguira un
riavvio.
Japanese
Ay Hada 215573 Windows Vista/Windows7 185
COUTO 574970— FEBAL E NL WindowslZ F741/Y 7497 FIN IA R=IVERIRA LE. F101 В
EEE, D4 VA VER JAN VEBEIDINE LES. ET omnia
174 FEAR ACHTE, PEO YAFR— LET NEXT] 2571 CD-ROMEÉIiDVD-ROM E5471: E5 han STA a
VHA FEBIRA CESEN, ELES, ANCDEANET., EXT 1 bad
Windows XPDIBA —
747 FIANZA H—JILEFIFBLE, ВОДО У 254754 Poor Нате
Abe LES, ESA UAH pa o TlRun Nvsetup.exe | #7 25475
25971 —NUTNES, 5 Mene === | 708%: K54 1384 YA R=ILLTLY
FS4/\CD#CD-ROMZ# TISFTH rm £7. RT TRETHEFHC
pp [3DVD-ROM F314 JICA ZEN, Ni EL,
den NET,
hai a АУ? e A773
- = = Fa ха —- НН тео -
— eu (FINISHJE 757 OT, lInstall Drivers | # ATI E
A ` LET, DUDES, РОЯ ЛУАЗ Г LE
ILLES, ` = LE. lYes1EIVYVL, Æ(ET
172 hbase Y Finish JE7Y7LET,
33H, PCÉE
EE LTE, AYAH— NET I SEDIT,
PORAEBL TEL.
Wprowadzenie
Gratulujemy zakupu karty graficznej 3D! Zostali
Pañstwo posiadaczami najnowoczesniejszej karty
graficznej oferujacej funkcjonalnosc znacznie
prrewyzszajaca inne karty VGA w tej klasie. Zalecamy
Pañstwu przeczytanie ponizszej instrukcji przed
instalacja urzadzenia tak, aby proces instalacji
przeblegi bez przeszkod.
Szybka instalacja sterownikôw
Bardzo prosimy uzytkownikow systemow Windows
XP o wykonanie ponizszej procedury instalacyjnej.
Krok 1
Wióz dysk instalacyjny CD
—_ do stacji CD-ROM lub
ET Je E DVD-ROM
| Krok 2
Po pojawieniu sig ekranu
instalacyjnego wybierz
“Install Drivers”
Krok 3
Wybierz , Next”, aby
zainstalowaé sterowniki
Krok 4
System Windows
rozpocznie procedure
instalowania sterowników,
pojawi sig ekran
pokazujacy postep
instalacii
Krok 5
Po zakoñczeniu wybierz
»Finish” i postepuj
zgodnie z instrukcjami
pojawiajacymi sie na
ekranie. Po restarcie
komputera karta bedzie
gotowa do pracy.
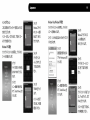
Szybka instalacja sterownikôw
Bardzo prosimy uzytkownikow systemow
Windows 7/Windows Vista o wykonanie ponizszej
procedury instalacyjnej.
Krok 1 Wióz dysk instalacyjny CD do stacji CD-ROM
lub DVD-ROM
9
Capra] cpt!
mili} on nun program
ГА) был Мод ея
ie) ia
= DDR Orrve !F
Eje da this for crftwane ans games
Krok 2
Po pojawieniu sie ekranu
Autorun wybierz "Run
Nvsetup.exe”
Krok 3
Po pojawieniu sie ekranu
instalacyjnego wybierz
„Install Drivers”
Krok 4
System Windows
rozpocznie procedure
instalowania sterownikow,
wybierz ,,Next”, aby
kontynuowaé
Krok 5
Instalacja sterownikow
moze zajac kilka minut, w
tym czasie na ekranie
bedzie wyswietlany
wskaznik postepu instalacji
Krok 6
Po zakonczeniu instalacji
sterownikow wybierz “Yes”,
a nastepnie , Finish”.
Procedura instalacji
zakonczy sie, a komputer
automatycznie zrestartuje.
Introducáo
Parabéns pela aquisicdo de sua placa gráfica
aceleradora MYMAX. Agora vocé é proprietario de
uma placa de video que oferece caracteristicas e
funcionalidades muito superiores as placas VGA da
mesma categoria.
Primeiramente, nós recomendamos que vocé leia
atentamente o Guía de Instalaçäo, para certificar-se
que o processo de instalacáo ocorra adequadamente.
Instalacáo Rápida do Driver
Recomendamos aos usuários de Windows XP que
sigam estes procedimentos de instalagáo:
Etapa 1
Insira o CD no drive de
CD-ROM ou DVD-ROM de
seu computador.
Lei et
GEE el 01
le CE Etapa 2
[ETT РНЕ O programa de
instalacáo abrirá
automaticamente,
clique em “Install
Drivers”.
Portuguese
Etapa 3
Clique em “Próximo
(Next)” para iniciar a
instalaçäo do Driver.
Etapa 4
O Windows está
instalando o Driver,
uma tela com o
progresso da instalaçäo
irá aparecer.
Etapa 5
Clique no botäo
“Finalizar (Finish)” e
siga as instrugúes para
completar a instalacáo.
Reinicie seu
computador.
Instalacáo Rápida do Driver
Nós recomendamos aos usuários do Windows 7 /
Windows Vista que sigam estes procedimentos de instalaçäo:
Etapa 1 Insira o CD no drive de CD-ROM ou
DVD-ROM de seu computador.
Da. m Etapa 2
ep" À janela de dialogo
AN с: abrira automaticamente
conforme figura ao
Talal gr ye progies
(6) uma
| il
№
Leneral optus
lado. Por favor,
selecione: “Executar
(Run) Nvsetup.exe”.
Etapa 3
À tela do programa de
instalaçäo abrira
conforme figura ao
lado. Por favor,
selecione “install
Drivers” para continuar.
Etapa 4
O Windows está
instalando os Drivers,
por favor, pressione
“Próximo (Next) para
continuar.
Etapa 5
À instalaçäo do Driver
levara algum tempo, por
favor, aguarde.
Etapa 6
À instalaçäo foi
concluida, por favor,
selecione “Sim (Yes)” e
pressione o botáo
“Finalizar (Finish) para
completar o processo.
Reinicie seu computador.
Introducere
Felicitari pentru achizitionarea unei placi grafice 3D.
Esti posesorul unui adaptor graphic de ultima
generatie, care ofera functii dincolo de orice alta placa
din clasa sa. Va recomandam sa cititi Ghidul de
Instalare inainte de instalarea placii video pentru a va
asigura ca procesul de instalare decurge
corespunzator.
Instalarea Rapida a Driverului
Se recomanda utilizatorilor Windows XP sa utilizeze
Instalarea Rapida a Driverului.
NES Ma E
Ге INC TEWERN
Pasul 1
Se introduce CD-ul ce
contine driver-ul in unitatea
CD-ROM sau DVD-ROM.
Pasul 2
Ecranul Auto Run va
aparea, Click pe “Install
drivers”.
Romanian
Pasul 3
Click pe “Next” pentru a
instala driverul de imagine.
Pasul 4
Windows instaleaza
driver-ul. O fereastra de
dialog apare pentru a afisa
progresul instalarii.
Pasul 5
Click pe butonul “Finish” si
se urmeaza instructiunile
pentru a completa
instalarea. Se reporneste
calculatorul.
Ghid de Instalare Rapida a Driverului
Recomandam utilizatorilor de Windows 7/
Windows Vista sa urmeze procedura de instalare:
Pasul 1 Se introduce CD-ul ce contine driver-ul in
>, NTC Drive dl
2
Fibs do bang Fol astm til game
Vila 21 righ progam
a Pirri Hevia Les da
Denen) opt
unitateaCD-ROM sau DVD-ROM.
Pasul 2
AutoPlay va rula iar
ecranul va arata dupa cum
urmeaza:
Se selecteaza “Run
Nvsetup.exe”
Pasul 3
Ecranul de instalare va
arata astfel:
Se selecteaza “Install
Drivers” pentru a continua
Pasul 4
Windows-ul instaleaza
driverele, se apasa “Next”
pentru a continua:
Pasul 5
Se asteapta cateva
momente pana cand
driver-ul se va instala
Pasul 6
Instalarea driver-ului a luat
sfarsit, se selecteaza
“Yes” si se apasa “Finish”
pentru a completa
procesul de instalare.Se
porneste din nou
computerul.
Введение
Поздравляем Вас с приобретением данного
графического акселератора! Вы стали
обладателем истинного произведения
искусства в области графических адаптеров,
по своим параметрам и функциональности
стоящим особняком среди других видео
адаптеров своего класса. Дабы процесс
установки прошёл наиболее гладко,
рекомендуем Вам внимательно изучить
данную Инструкцию по Установке.
Быстрая Установка
Настоятельно рекомендуем пользователям
Windows XP Wcnonb30BaTb быструю установку.
install Divers
Trent Direct 9.
Действие 1
Вставьте СО с драйверами
8 CD-ROM unn DVD-ROM
накопитель.
Действие 2
После появления на
экране контекстного
меню, нажмите на
Install Drivers.
Действие 3
Нажмите на №х? для
установки драйвера.
Действие 4
Идет установка
npaveepa B Windows
с отображением
процесса в
диалоговом окне.
Действие 5
Haxmure Ha Finish m
следуйте
дальнейшим
инструкциям для
завершения
установки.
Перегрузите
компьютер.
Быстрая установка драйверов
Мы настоятельно рекомендуем пользователям
Windows 7/Windows Vista cnenogaTs следующей инструкции:
War 1 Bcragere CD c apañsepamu B CD-ROM unn
ox DVD-RW Drive [Fl
ta
ler de Per Fai cofres se el gime
nikal gr mys progies
10) Bat
LET DECO
DVD-ROM HaxonwTerb.
Шаг 2
Автоматически
запустится приложение и
появится окно,
приведенное ниже:
Выберите “Запустить
(Run) Nvsetup.exe”
War 3
На экране появится
нижеследующее
диалоговое окно:
Выберите "Установить
dpaüeep(Instal! Drivers)"
для продолжения.
Шаг 4
Windows npowieeger
установку, нажмите
Далее(“Мех?”):
Шаг 5
Установка драйвера
займет некоторое время,
пожалуйста подождите:
Шаг 6
После того, как установка
завершится, выберите Да
(“Yes”) и нажмите кнопку
lorogo (“Finish”) ana
завершения.
Перезагрузите компьютер.
Introduccion
Felicitaciones por la compra de su nueva tarjeta
grafica. Desde ahora es usted propietario de un
adaptador de video que ofrece unas caracteristicas y
una funcionalidad muy superiores a las de otras
tarjetas VGA de su misma clase. Le recomendamos
que lea atentamente la Guía de Instalación antes de
instalar su tarjeta gráfica, para asegurar que el
proceso de instalación se efectúa correctamente.
Recomendamos encarecidamente a los usuarios de
Windows XP que sigan esta instalación rápida
de controladores :
Paso 1
Inserte el Driver CD en el
CD-ROM o dispositivo
Install Era DVD-ROM
Cria Me
Paso 2
La ventana de instalacion
deberia aparecer
automaticamente en
pantalla. Cliquee sobre
Install Drivers (Instalar
Controladores)
Paso 3
Cliquee sobre Siguiente
para instalar los
controladores.
Paso 4
Windows está instalando
el controlador. Una
ventana muestra el
progreso de la operación.
Paso 5
Cliquee sobre el botón
Finalizar y siga las
instrucciones para
completar la instalación.
Reinicie su
ordenador.
Instalación rápida del Driver
Recomendamos encarecidamente a los usuarios de
Windows 7/Windows Vista que sigan el procedimiento de
instalación:
Paso 1 Inserte el Driver CD en el CD-ROM o
dispositivo DVD-ROM.
Paso 2
@ 7% El AutoPlay se iniciara y la
Aa ee Eos Tear cetro al arias pantalla mostrará lo
a. a siguiente:
EN nio nie
came Por favor seleccione “Run
Gte al epic
ps er Nvsetup.exe”
Paso 3
La pantalla de instalaciôn
mostrara lo siguiente:
Por favor seleccione
“Install Drivers” para
continuar.
Paso 4
La Ventana se encuentra
instalando los drivers, por
favor presione “Next” para
continuar:
Paso 5
El dispositivo de
instalación puede tomar
algún tiempo, por favor
espere:
Paso 6
Instalación del driver
finalizada, por favor
seleccione “Yes” y presione
el botón “Finish” para
completar el procedimiento
de instalación. A
continuación, reinicie su
ordenador.
Giris
3D grafik hizlandirici kartim satin aldiginiz için
tebrikler. Artik, kendi sinifi icerisindeki diger VGA
kartlarindan daha fonksiyonel ve daha fazla ôzellik
sunan son teknoloji ürünü bir ekran kartina
sahipsiniz.
Ekran Kartinizi yúklemeden once, yúkleme súrecinin
kolay gerçeklesmesi için Kurulum Kilavuzunu
okumanizi óneririz.
Hizh Sürücü Kurulumu
Windows XP kullanicilarinin asaÿidaki yükleme
sürecini takip etmesi siddetle ónerilir.
Adim 1
Sürücü CD’sini, CD-ROM
A ya da DVD-ROM
CN a, sürücünüze yerlestiriniz.
Adim 2
“Auto Run” ekrani
karsiniza cikacaktir,
"Install Drivers”a
tiklayiniz.
Turkish
Adm 3
Nexfe tiklayiniz.
Adim 4
Windows kuruluma
baslayacaktir. Durumu
gôsteren bir pencere acilir.
Adim 5
Yüklemeyi tamamlamak
için ekrandaki talimatlari
izleyip son olarak
“Finish”e tiklayiniz ve
bilgisayarinizi yeniden
baslatiniz.
Hizh Siiriicii Kurulumu
Windows 7/Windows Vista kullanicilarinin asagidaki
yúkleme sirecini takip etmesi siddetle ônerilir.
Adim 1 Siirlcii CD’sini, CD-ROM ya da DVD-ROM
sürücünüze yerlestiriniz.
= = Adm2
@ Е CD otomatik olarak
hay de Ev or one a gares çalistirilacaktir, karginiza
Sears gikacak olan ekranda “Run
mow Nvsetup.exe”i seciniz.
Adim 3
Kurulum ekrani yandaki
gibi karginiza cikacaktir,
devam etmek icin “Install
Drivers’ seginiz.
Adim 4
Windows kuruluma
baslayacaktir. Devam
etmek igin “Next”e
basiniz.
Adm 5
Sürücünün yüklenmesi
biraz zaman alacaktır.
Liitfen bekleyiniz.
Adim 6
Sürücü yüklemesini
tamamlamak için ilk olarak
“Yes ”i sonra da “Finish”i
seçiniz ve bilgisayarinizi
yeniden baslatiniz.
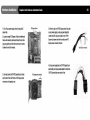
Hardware Installation Graphics Card Hardware Installation Guide
1). Turn off your power supply unit and un-plug its AC PCI Express x16 slot 3). If there is only one 12V PCI Express power 6-pin cable
power cable, PU | on your power supply, you may use power adaptor to
2). Locate an empty PCI Express x16 slot on motherboard. combine two IDE 4-pin power cables to one 12V PCI
Remove the chassis’s metal bracket behind the slot; then Express 6-pin power cable for the card’s second PCI
plug your graphics card into the slot and use new screws Express power connector (if exists)
to fasten the card to the chassis.
4-pin IDE power connector
4). If your power supply have no 12V PCI Express 8-pin
power cable, you may use power adaptor to convert one
3). You must connect all 12V PCI Express 6-pin (or 8-pin) PCI Express power connectors 12V FG! Express Spin power catiy to S-pln.
power cable to VGA card if there are PCI Express power
connectors on the graphics card.
How to use HDMI audio?
Through Internal SPDIF cable: (As Pic #1)
Step a.
Use the internal SPDIF cable, plug one side of the
cable into the SPDIF-in header on the graphics
card.
Step b.
Plug another side of the cable into the SPDIF-out
header on the motherboard.
(Different motherboards may have different SPDIF
connectors, please follow the instruction of the
motherboard.)
** Red line is for signal (+),
Black line is for ground (-).
** SPDIF cable is for GeForce GTX295, GTX285, GTX275, GTX260, GTS250, 9800GT, 9600GT, 9600GSO,
9500GT, 9400GT, 8400GS Series only