1
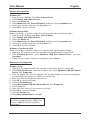
USB Audio Adapter Pro
English
User Manual
LINDY No. 42775
www.lindy.com
© LINDY ELECTRONICS LIMITED & LINDY-ELEKTRONIK GMBH - FIRST EDITION (August 2009)
User Manual
English
2
User Manual
English
Introduction
Thank you for purchasing the USB Audio Adapter Pro. This compact adapter is the
easiest way to add high quality sound capability to your notebook or desktop computer.
Simply plug it into a USB port and you‘re ready to go. The optical S/PDIF output
supports virtual 7.1 channel surround sound for enhanced audio effects when playing
games, watching movies, listening to music and Voice over IP applications. Plus, the
easily accessible microphone and headphone sockets means there‘s no need to crawl
around under your desk when you want to plug your headphones in! For convenience,
four buttons allow volume up/down control as well as playback and microphone mute
status.
System Requirements
• Available USB 2.0 port
• Windows XP/ Server 2003 and 2008/Vista/7, Mac OS 10.4.11 or higher
(Windows 7 and Mac OS does not support Xear 3D software! Please check
www.lindy.com for latest drivers!)
Package Contents
•
•
•
•
•
USB Audio Adapter
USB Extension Cable
S/PDIF Adapter
Generic CD
LINDY Manual
Features
• Optical S/PDIF output provides true 7.1 channel surround sound
• Built-in amplifier for rich and powerful sound
• Supports AES/EBU, IEC60958, S/PDIF consumer formats for stereo PCM data at
S/PDIF output
• Supports EAX 2.0, A3D 1.0 and Microsoft DirectSound 3D
• Embedded 16Bit ADC input with microphone boost
• Xear 3D software offers 27 environment effects, 3 environment sizes, plus a 10band equalizer with pre-sets or manual configuration
• Functional keys: playback and microphone mute status, volume up/down control
• USB 2.0 Full Speed (12 Mbps), USB audio device compliant
• Power from USB port
• Plug & Play
• LEDs for playback mute and microphone mute
• Connectors: USB Type A Male, S/PDIF & Stereo output jack, microphone input
jack
3
User Manual
English
Volume control: Increases/decreases the system volume; analogue mode only.
Audio Out: Connect headphones or stereo speakers via mini-3.5mm stereo plug.
Doubles as an S/PDIF Optical out when used with the included S/PDIF Optical adapter.
Volume Mute: Press this button to turn off the system sound, pause for several
seconds between button presses; analogue mode only.
Microphone Mute: Press this button to turn on/off the microphone jack.
Microphone Jack: Use this jack to connect MP3 players, CD players, iPods and
other audio output devices for playback or recording, connect a microphone and turn
your system into a P.A. or Karaoke system (analogue mode only).
Power/Activity LED: The light will be on when the system is powered up. The light
will blink when activity is detected, however, the light is not affected by microphone jack
inputs.
Microphone LED: When the microphone jack is muted, the light will turn on.
USB Connector :– to be plugged in the system´s USB port.
4
User Manual
English
Software Installation
Windows XP/Server 2003/Server 2008/Vista/7 will automatically install it’s built-in driver
for the USB Sound adapter when connected. To get Xear 3D Audio Utility, Mixer,
Equalizer and simulated 7.1-channel sound from headphones or stereo speakers, install
the Xear 3D software and driver from the CD. Plug in the USB Sound adapter, and allow
the Windows driver to load before inserting the software CD.
Please check www.lindy.com for latest drivers!
For Windows XP/Server 2003
1. Insert the software CD.
2. Click start then Run, type X:\BT-USB711\setup.exe, and then click OK.
(Change X: to match your CD-ROM drive letter)
3. Click Next, Next .
4. Select Yes, I want to restart my computer now, and then click Finish.
For Windows Vista/Server 2008
1. Insert the software CD.
2. Click start, in start search, type X:\BT-USB711\setup.exe, then press Enter.
(Change X: to match your CD-ROM drive letter) Windows Vista: click Allow.
Server 2008: continue to step #2
3. Select Yes, I want to restart my computer now, and then click Finish.
To Verify Installation
1. For Windows XP/2003: right click My Computer, click Manage, and click Device
Manager. Continue to step #2.
For Windows Vista: right click Computer, click Manage, click Continue, and click
Device Manager. Continue to step #2.
2. Double click Sound, video and game controllers:
With Xear 3D driver: USB PnP Sound Device will be displayed.
With Windows built-in driver: USB Audio Device or C-Media USB Headphone Set
will be displayed.
Xear 3D Software Utility (for Windows XP/Server 2003 & 2008 and Vista)
The Xear 3D quick start icon, located in the system taskbar by the clock, starts
automatically during installation. Simply click on the quick start icon to open the audio
utility.
Enable/Disable Optical S/PDIF Output
The Optical S/PDIF out is enabled by default.
1. Click on the Xear 3D quick start icon.
2. From the Main Settings tab, click on the radial button next to S/PDIF Output.
5
User Manual
English
Speaker Configuration
Windows XP
1. From the main desktop, Click Start, Control Panel.
2. Click Sounds and Audio Devices.
3. Select the Audio tab.
4. Click Advanced under Sound Playback, and then click the Speakers tab.
5. Select your speaker type from the drop down list.
6. Click OK to save the settings.
Windows Server 2003
Make sure to login as Administrator or an account with administrator privileges.
1. From the main desktop, click Start, Control Panel.
2. Click Sounds and Audio Devices.
3. Select the Audio tab.
4. Click Advanced under Sound Playback, and then click the speakers tab.
5. Select your speaker type from the drop down list.
6. Click OK to save the settings.
Windows Vista/Server 2008
Make sure to login as Administrator or an account with administrator privileges.
1. Right click the volume control icon located in the taskbar by the system clock.
2. Click Playback devices, select Speakers USB PnP Sound Device, and click
Configure.
3. Follow the on screen instructions to configure your speakers.
Microphone Configuration
Windows Vista
1. Right click the volume control icon located in the taskbar by the system clock.
2. Click Playback Devices, under the Playback tab, select Speakers USB PnP Sound
Device, click Properties.
3. Click the Levels tab. Click the speaker icon to either enable or mute the microphone
as indicated by the red circle (muted) next to the icon.
4. Move the slider to change the volume level.
5. Click OK to save the changes.
6. Click the Recording tab.
7. Select Microphone USB PnP Sound Device, click Properties.
8. Click Levels tab.
9. Move the slider to the left to increase sensitivity.
10. Click OK to save the changes.
11. Click the Custom tab.
12. Check Microphone Boost, click OK.
Note: Microphone Boost increases
sensitivity by approximately 20dB. This
setting is optional and not needed in
most cases.
6
User Manual
English
Uninstalling Xear 3D Software
For Windows XP/Server 2003
1. Click Start.
2. Select Settings (skip for XP/Server2003).
3. Click Control Panel, double click Add/Remove Programs.
4. Select USB Audio Device or C-Media USB Headphone Set, and then click
Change/Remove or Add/Remove.
5. Follow on the screen instructions to complete.
For Windows Vista
1. Click Start, Control Panel
2. Click Classic View.
3. Double click Programs and Features icon.
4. Select USB PnP Sound Device, and then click Uninstall/Change.
5. Click Continue.
6. Select Yes, I want to restart my computer now and click Finish.
For Windows Server 2008
1. Click Start, Control Panel
2. Click Classic View.
3. Double click Programs and Features icon.
4. Select USB Audio Device, and then click Uninstall/Change.
5. Select Yes, I want to restart my computer now and click Finish.
7
CE/FCC & Recycling Information
CE Certification
This equipment complies with the requirements relating to electromagnetic compatibility, EN55022/EN55024 class B for
IEC/EN61000-4-2/3 the essential protection requirement of Council Directive 89/336/EEC on the approximation of the laws of
the Member States relating to electromagnetic compatibility.
WEEE (Waste of Electrical and Electronic Equipment),
Recycling of Electronic Products
United Kingdom
In 2006 the European Union introduced regulations (WEEE) for the collection and recycling of all waste electrical and electronic
equipment. It is no longer allowable to simply throw away electrical and electronic equipment. Instead, these products must
enter the recycling process.
Each individual EU member state has implemented the WEEE regulations into national law in slightly different ways. Please
follow your national law when you want to dispose of any electrical or electronic products. More details can be obtained from
your national WEEE recycling agency.
Germany
Die Europäische Union hat mit der WEEE Direktive umfassende Regelungen für die Verschrottung und das Recycling von
Elektro- und Elektronikprodukten geschaffen. Diese wurden von der Bundesregierung im Elektro- und Elektronikgerätegesetz –
ElektroG in deutsches Recht umgesetzt. Dieses Gesetz verbietet vom 24.März 2006 an das Entsorgen von entsprechenden,
auch alten, Elektro- und Elektronikgeräten über die Hausmülltonne! Diese Geräte müssen den lokalen Sammelsystemen bzw.
örtlichen Sammelstellen zugeführt werden! Dort werden sie kostenlos entgegen genommen. Die Kosten für den weiteren
Recyclingprozess übernimmt die Gesamtheit der Gerätehersteller.
France
En 2006, l'
union Européenne a introduit la nouvelle réglementation (DEEE) pour le recyclage de tout équipement électrique et
électronique.
Chaque Etat membre de l’ Union Européenne a mis en application la nouvelle réglementation DEEE de manières légèrement
différentes. Veuillez suivre le décret d’application correspondant à l’élimination des déchets électriques ou électroniques de
votre pays.
Italy
Nel 2006 l’unione europea ha introdotto regolamentazioni (WEEE) per la raccolta e il riciclo di apparecchi elettrici ed elettronici.
Non è più consentito semplicemente gettare queste apparecchiature, devono essere riciclate. Ogni stato membro dell’ EU ha
tramutato le direttive WEEE in leggi statali in varie misure. Fare riferimento alle leggi del proprio Stato quando si dispone di un
apparecchio elettrico o elettronico.
Per ulteriori dettagli fare riferimento alla direttiva WEEE sul riciclaggio del proprio Stato.
LINDY No. 42775
1st Edition August 2009
www.lindy.com
© LINDY ELECTRONICS LIMITED & LINDY-ELEKTRONIK GMBH - FIRST EDITION (August 2009)