1
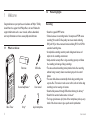
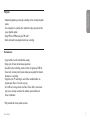
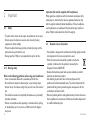
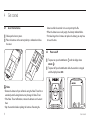
Digital Voice Tracer
LFH 660
LFH 860
LFH 870
LFH 880
For product information and support, visit
www.philips.com/dictation
3
ES
Manual del usuario
57
DE Benutzerhandbuch
21
IT
Manuale di istruzioni
75
FR
39
NL Gebruikershandleiding
EN User manual
Manuel de l‘utilisateur
93
1
Welcome
1.1 What’s in the box 1.2 Product highlights
4
4
4
2
Important
2.1 Safety
2.2 Disposal of your old product
6
6
6
3
Your Digital Voice Tracer
4
4.1
4.2
4.3
4.4
4.5
4.6
Get started 8
Insert the batteries 8
Power on/off
8
Hold function 9
Set date and time
9
Display information
9
Use the Voice Tracer with a computer 9
User manual
7
5
5.1
5.2
5.3
Record
10
Record with the built-in microphone 10
Record with an external microphone 11
Overlap recording
(LFH 860/870/880 only)
11
5.4 Add index marks
11
8.4 Delete a preset radio station
8.5 Record from FM radio
15
15
9
16
6
Playback
6.1 Playback functions
6.2 Play features
12
13
13
11 Technical support and warranty 18
12 Troubleshooting 19
7
Delete
14
13 Technical data
20
8
8.1
8.2
8.3
Radio mode (LFH 880 only)
Auto tune radio stations
Manually tune to a radio station
Play a preset radio station
14
14
15
15
Customize settings
10 Update the firmware
18
3
E N GLIS H
User manual
1.2
1 Welcome
Congratulations on your purchase and welcome to Philips! To fully
benefit from the support that Philips offers, visit our Website for
support information such as user manuals, software downloads,
warranty information and more: www.philips.com/dictation.
1.1
What’s in the box
Voice Tracer
4
Batteries
USB cable
Stereo headphones *
User manual
Strap *
Lapel microphone
Product highlights
Recording
• Records in popular MP3 format.
• Choose between six recording modes. Uncompressed PCM stereo
recording* for audio CD-like quality, two stereo modes including
SHQ and HQ, or three monaural modes including SP, LP and SLP for
extended recording times.
• An adjustable recording sensitivity avoids background noises and
adjusts to the recording environment.
• Ample internal memory offers a large recording capacity and allows
the recording and storage of long recordings.
• The voice-activated recording mode provides hands-free recording
without having to worry about remembering to push the record
button.
• The auto divide feature automatically divides long recordings into
separate files. This makes it much easier to find, edit and archive long
recordings such as meetings or lectures.
• Record while powered through USB without draining the battery.*
• Records from external audio sources via line-in.*
• The large signal-to-noise (s/n) ratio of the microphone picks up every
detail of the human voice to give superb sound reproduction.
User manual
E N GLIS H
Playback
• Adjustable playback speed to play recordings in fast and slow playback
modes.
• Set a complete or a portion of an audio file to play repeatly with the
repeat playback option.
• Enjoy MP3 and WMA music plus FM radio *.
• Alarm clock with voice playback and timer recording.
Convenience
• Large backlit screen for comfortable viewing.
• Enjoy up to 22 hours of continuous operation.
• Speedily transfer recordings, music and data via high-speed USB 2.0.
• Index mark and temp mark features allow you to quickly find desired
locations in a recording.
• Supports up to 99 recordings in each of four available folders to
organize your files in a fast and easy way.
• As a USB mass storage device, the Voice Tracer offers a convenient
way to save, back up and move files without special software or
driver installations.
* Only available for some product versions.
User manual
5
2 Important
2.1
Safety
• To avoid a short circuit, do not expose the product to rain or water.
• Do not expose the device to excessive heat caused by heating
equipment or direct sunlight.
• Protect the cables from being pinched, particularly at plugs and the
point where they exit from the unit.
• Back up your files. Philips is not responsible for any loss of data.
2.1.1 Hearing safety
Observe the following guidelines when using your headphones:
• Listen at reasonable volumes for reasonable periods of time.
• Be careful not to adjust the volume higher as your hearing adapts.
• Do not turn up the volume so high that you can’t hear what’s around
you.
• You should use caution or temporarily discontinue use in potentially
hazardous situations.
• Do not use headphones while operating a motorized vehicle, cycling,
or skateboarding, etc. It may create a traffic hazard and is illegal in
many areas.
6
Important (for models supplied with headphones):
Philips guarantees compliance with the maximum sound power of its
audio players as determined by relevant regulatory bodies, but only
with the original model of provided headphones. If these headphones
need replacement, we recommend that you contact your retailer to
order a Philips model identical to that of the original.
2.2
Disposal of your old product
• Your product is designed and manufactured with high quality materials
and components that can be recycled and re-used.
• When this crossed-out wheeled bin symbol is attached to
a product, it indicates that the product is covered by the
European Directive 2002/96/EC.
• Become informed about your local separate collection system for
electrical and electronic products.
• Act according to your local rules and do not dispose of old
products with normal household waste. The correct disposal of old
products will help prevent potential negative consequences for the
environment and human health.
• Batteries (including built-in rechargeable batteries) contain substances
that may pollute the environment. All batteries should be disposed of
at an official collection point.
User manual
1 Headphone socket
2 Microphone socket, line-in socket
3 Built-in microphone
4 Record / Pause / Power on
5 Stop / Display / Delete
6 Speaker
7 Menu / FM radio
8 Index / Folder / Repeat
9 Display
10 Record / Play indicator
11 Volume up
12 Power on/off, Play/Pause, Play speed
13 Fast forward / File selection / Menu selection
14 Volume down
15 Fast rewind / File selection / Menu selection
16 Hold switch
17 Battery compartment
18 USB socket
19 Strap hole
E N GLIS H
3 Your Digital Voice Tracer
1
2
10
11
3
12
15
9
13
14
8
7
4
6
16
5
17
19
User manual
18
7
4 Get started
4.1
Insert the batteries
batteries while the recorder is in use may corrupt the file.
• When the batteries are nearly empty, the battery indicator blinks.
• If it takes longer than 2 minutes to replace the battery, you may have
to reset the time.
1 Slide open the battery cover.
2 Place the batteries in the correct polarity as indicated and close
the cover.
1
2
4.2
Power on/off
1 To power on, press the f button 1 until the display shows
HELLO A .
2 To power off, press the f button while the recorder is stopped
until the display shows BYE.
D Note
• Remove the batteries if you will not be using the Voice Tracer for an
extended period. Leaking batteries may damage the Voice Tracer.
• If the Voice Tracer malfunctions, remove the batteries and re‑insert
them.
• Stop the recorder before replacing the batteries. Removing the
8
1
A
User manual
4.4 Set date and time
When the batteries are installed for the first time, you will be
prompted to set the date and time.
1 ‘CLOCK’ will be shown on the display. Press the f button 1 . The
year indicator A flashes.
2 Press the h or b button 2 to set the year.
3 Press the f button 1 to advance to the settings for the month.
4 Repeat steps 2 and 3 to continue to set the month, day, 12/24hour system and the time in the same way.
1
2
A
User manual
DNotes
The date and time can be changed at any time using the menu. See
Customize settings on page 16 for more information.
E N GLIS H
4.3 Hold function
When the HOLD switch is in the Hold position, all buttons on the
device are inactive. On Hold will be shown briefly on the display, and
the display will turn off. Unlock the Voice Tracer by moving the HOLD
switch to the Off position.
4.5 Display information
• Press the j / DEL button while the recorder is stopped to rotate the
information on the display: total playback time of the current file
> time > date > remaining recording time > recording time of the
current file > recording date of the current file.
• Press and hold f during recording to display the remaining
recording time.
4.6 Use the Voice Tracer with a computer
As a USB mass storage device, the Voice Tracer offers a convenient
way to save, back up and move files. The Voice Tracer connects to
a computer using a USB connection and does not require special
software to be installed. The Voice Tracer is automatically displayed
as a removable drive, allowing you to simply drag and drop files to and
from the unit.
DNotes
• Do not disconnect the Voice Tracer while files are transferred from
or to the device. Data is still being transferred while the record/play
indicator light is blinking in orange.
• Do not format the drive of the Voice Tracer on a computer.
9
5 Record
5.1
Record with the built-in microphone
1 Press the INDEX / a button 1 while the recorder is stopped to
select the desired folder A .
2 Press the g button 2 to start recording. The record/play
indicator lights red B . Point the built-in microphone toward the
sound source.
3 To pause recording, press the g button 2 . The record/play
indicator will blink B , and PAUSE will flash on the display C .
Press the g button again to resume recording.
4 To stop recording, press the j / DEL button 3 .
B
1
2
A
3
C
10
D Notes
• Set the desired voice activation function and recording mode before
starting recording (see Customize settings on page 16 for details).
• Make a test recording to make sure that the Voice Tracer settings
are correct.
• Press and hold f during recording to display the remaining
recording time.
• Press b during recording to create a new file.
• The maximum number of files in each folder is 99, for a total capacity
of 396 files (99 files x 4 folders).
• If the recording time exceeds the available capacity or the number of
files reaches 396, recording stops and ‘FULL’ will be displayed. Delete
a few recordings or move them to a computer.
• Do not remove the batteries during recording. This may cause the
recorder to malfunction.
• If recording for a prolonged period of time, replace the batteries
before beginning.
• The Voice Tracer can record while powered through a USB cable
without draining the battery. Connect the recorder to a computer
using the USB cable and press the g button for 1 second or longer
to start recording (LFH860/870/880 only).
User manual
1
4
3
E N GLIS H
5.2 Record with an external microphone
To record with an external microphone, connect the microphone
to the microphone socket and follow the same procedure as for the
built-in microphone.
B
A
2
5
5.3 Overlap recording (LFH 860/870/880 only)
Follow these steps to make additions to a recording and overlap parts
of a recording.
1 Press the INDEX / a button 1 while the recorder is stopped to
select the desired folder A .
2 Press the h or b button 2 to select the file to which the
addition should be made.
3 Play or forward to the position where the addition should be made
and press the f button 3 to pause playback.
4 Press the g button 4 to start overlap recording. The record/
play indicator will blink B , and OVER will be shown on the display
C . The existing recording will be overwritten.
5 Press the j / DEL button 5 to stop recording.
C
5.4 Add index marks
Index marks can be used to mark certain points in a recording as points
of reference.
1 Press the INDEX / a button during recording to add an index mark.
The index number is displayed for one second.
D Notes
• The
icon indicates that the recording contains index marks.
• Up to 32 index marks can be set per file.
D Note
• The recording mode of the original file before is in effect when
overlapping a recording.
• Overlap recording is not available in the M (music) folder.
User manual
11
6 Playback
1 Press the INDEX / a button 1 while the recorder is stopped to
select the desired folder A .
2 Press the h or b button 2 to select the file to play back.
3 Press the f button 3 . The playback time will be shown on the
display, and the green LED B will light.
4 Adjust the volume using the + and – buttons 4 .
5 To stop playback, press the j / DEL button 5 . The total playback
time C of the current file will be shown on the display.
6 Press the f button again to continue playback from the previous
position.
B
1
4
3
A
2
D Note
When headphones are connected to the EAR jack, the recorder
speaker will be switched off.
D Notes on using the Voice Tracer as a music player
• The recorder supports music files in .wma and .mp3 formats that
can be transferred from the computer to the music folder of the
recorder. Files with copy protection (digital rights management) are
not supported.
• The Voice Tracer supports up to two folder levels within the music
folder. Each folder can hold up to 199 entries (files and folders).
• Press the f button to open a selected folder/file. Press the
INDEX / a button to return to the folder one level higher.
• Press the g button during music playback to change the equalizer
mode (Normal > Classic > Jazz > Rock > Pop > Normal).
5
C
12
User manual
Playback functions
6.1.1 Slow, fast, normal playback
Press and hold the f button for 1 second or longer to switch
between normal, slow and fast playback.
6.1.2 Search
Press and hold the h or b button during playback to scan backward
or forward in the current file at a fast speed. Release the button to
resume playback at the selected speed.
6.1.3 Rewinding and forwarding
Press the h or b button during playback to rewind to the beginning
of the file being played or forward to the next file, respectively. If the
file contains index marks, playback begins at that point.
6.2 Play features
You can set the Voice Tracer to play files repeatedly or randomly.
6.2.1 Repeat a sequence
1 To repeat or loop a sequence in a song, press the INDEX / a button
1 at the chosen starting point. REP. A – B flashes on the screen A .
2 Press the INDEX / a button again at the chosen end point. The
User manual
repeat sequence begins.
3 Press the j / DEL button 2 to stop playback or press the
INDEX / a button to return to normal playback.
E N GLIS H
6.1
1
2
A
6.2.2 Repeat a file or folder / shuffle mode
1 Press and hold the INDEX / a button for 1 second or longer during
playback to switch between play modes (repeat file, repeat folder,
shuffle folder or normal playback).
Icon
Meaning
REP. FILE
Play one file repeatedly
REP. FOLD Play all files within folder repeatedly
SHUF FOLD Play all music files within folder randomly
D Note
Shuffle mode is available only in the M (music) folder.
13
7 Delete
8 Radio mode (LFH 880 only)
1 Press the INDEX / a button while the recorder is stopped to select
the desired folder.
2 Press and hold the j / DEL button for 1 second or longer. DELETE
appears on the screen.
3 Press the h or b button to select a delete option:
Icon
Meaning
FILE
Delete a single file
FOLD
Delete all files in a folder
Delete all index marks in a file
1 Connect the headphones. The supplied headphones serve as a
radio antenna.
2 Press and hold the MENU button for 1 second or longer to enter
the radio mode.
4 Press the f button.
5 Press the h or b button to select the file, the folder or the file
containing the index marks to be deleted.
6 Press the f button again. N (No) is displayed.
7 Press the h or b button to select Y (Yes).
8 Press the f button to confirm.
8.1
Auto tune radio stations
1 Press the MENU button while the recorder is in radio mode to
open the menu.
2 Press the h or b button to select AUTO.
3 Press the f button again. N (No) is displayed.
4 Press the h or b button to select Y (Yes).
5 Press the f button to confirm. The radio automatically tunes
radio stations and saves the frequencies to presets. The radio can
store up to 20 radio stations to presets.
D Note
Sequential file numbers are reassigned automatically.
14
User manual
1
1
2
3
4
Manually tune to a radio station
To fine-tune frequency, quickly press the h or b button.
To search for the next stronger signal, press and hold h or b.
Press the f button to save the frequency under a preset.
Adjust the volume using the + and – buttons.
To exit the radio mode, press and hold the MENU button for 1
second or longer.
D Note
Press the j / DEL button while the recorder is in radio mode to switch
between stereo and mono reception.
8.3
Play a preset radio station
8.4
Delete a preset radio station
1 Press the INDEX / a button while the recorder is in radio mode to
switch between frequency and preset mode.
2 In preset mode, press the h or b button to select the preset
radio station to be deleted.
3 Press and hold the j / DEL button for 1 second or longer to delete
the preset radio station.
8.5
Record from FM radio
1 Manually tune to a radio station or play a preset radio station.
2 Press the g button to start recording.
3 To stop recording, press the j / DEL button.
1 Press the INDEX / a button while the recorder is in radio mode to
switch between frequency and preset mode.
2 In preset mode, press the h or b button to change to another
preset radio station.
3 Adjust the volume using the + and – buttons.
4 To exit the radio mode, press and hold the MENU button for 1
second or longer.
User manual
15
E N GLIS H
8.2
9 Customize settings
The menu is available while the recorder is stopped and during radio
reception. The available menu items differ depending on whether you
are in a voice folder, a music folder or in radio mode.
1 Press the MENU button 1 while the recorder is stopped or during
radio reception to open the menu.
Press the h or b button 2 to select a menu item A .
Press the f button 3 to enter a sub-menu.
Press the h or b button 2 to change a setting.
Press the f button 3 to confirm your selection.
Press the MENU button 1 to exit the current settings screen.
2
3
4
5
6
REC*
2
A
16
SPLIT*
DIVIDE*
3
1
Menu
INPUT
Setting
Yes
No
Description
Split a large file into two separate files so that
they can be easily archived or transferred via
e-mail, or so that part of a file can be deleted. To
split a file, play and stop at the position where
the splitting should be made, then open the
SPLIT menu.
Choose among several recording modes, from unPCM
compressed PCM stereo recording for audio CDSHQ
like quality (LFH 880), two stereo modes including
HQ
SHQ and HQ, or three monaural modes including
SP
SP, LP and SLP for extended recording times. See
LP
Technical data on page 20 for details about available
SLP
recording modes and recording times.
The auto divide feature automatically records
Off
into a new file every 30 or 60 minutes. This
30 min.
makes it much easier to find, edit and archive
60 min.
long recordings such as meetings or lectures.
V (voice) Use the L (line-in) setting when recording from
L (line-in) external audio sources via the line-in jack of the
recorder (LFH 860/870/880 only).
User manual
BEEP
LIGHT
VA*
CLOCK
TIMER
User manual
HI
LO
Adjust the recording sensitivity to avoid
recording background noises and to adjust to the
recording environment.
On
The recorder gives sound feedback about button
Off
operations or errors.
On
The display will remain lit for a few seconds
Off
when a button is pressed.
On
Voice-activated recording is a convenience
Off
feature for hands-free recording. When voiceactivated recording is enabled, recording will
start when you begin speaking. When you stop
speaking, the recorder will automatically pause
recording after three seconds of silence, and
resume only when you begin speaking again.
DD:MM:YY If the date and time is set, the information when
12/24 H the file is recorded is automatically stored with
HH:MM:SS each file.
Schedule automatic recording to begin with the
Off microphone (select V) or of a radio channel
V (select CH / LFH 880 only). Specify the start
CH
time, the duration of the recording (30/60/120
minutes/All), a folder and the radio channel to
be recorded.
AUTO**
Yes
No
Use the Voice Tracer as a mobile alarm clock.
Choose the alarm mode (b = beep, F = file
playback) and specify the start time and the file
to be played.
Delete all files on the recorder including
programmed radio stations. Transfer any
important files to a computer before formatting
the recorder.
Display the firmware version and the release
date.
Auto-tune a radio station and store up to 20
stations to presets.
OUTPUT
**
EP
SP
Switch between earphone (EP) and speaker (SP)
output in radio mode.
ALARM
Off b F
FORMAT
Yes
No
VER
* This function is not available in the M (music) folder.
** This function is available only in radio mode.
17
E N GLIS H
SENSE*
10 Update the firmware
11 Technical support and warranty
Your Voice Tracer is controlled by an internal program called firmware.
Regularly check www.philips.com/dictation for new firmware updates.
This Philips product was designed and manufactured to the highest
quality standards. If your Philips product is not working correctly or is
defective, contact your supplying Philips Speech Processing dealer who
will provide you with the necessary information on how to proceed.
1 Download the firmware update for your Voice Tracer model from
www.philips.com/dictation > Support Center > Software Downloads and
save the file in the root directory of the Voice Tracer.
2 Press the MENU button 1 while the recorder is stopped to open
the menu.
3 Press the h or b button 2 to select UPDATE A .
4 Press the f button 3 . N (No) is displayed.
5 Press the h or b button 2 to select Y (Yes).
6 Press the f button again to install the new firmware.
If you have questions that your dealer cannot answer or any other
related question, visit www.philips.com/dictation to contact us.
No components are user-serviceable. Do not open or remove covers
and do not insert objects not suitable for the specific connectors.
Repairs may be made only by Philips service centers and official repair
facilities. Failure to do so will void any warranty, stated or implied.
Any operation expressly prohibited in this manual, any adjustments, or
assembly procedures not recommended or authorized in this manual
will void the warranty.
3
1
2
A
18
User manual
My recorder cannot power on
The batteries may be out of power or not inserted correctly. Replace
the batteries with new ones and verify that the batteries are inserted
correctly.
My recorder does not record anything
The recorder may be in HOLD mode. Slide the HOLD switch to the
Off position.
E N GLIS H
12 Troubleshooting
My recorder cannot play recordings
The recorder may be in HOLD mode. Slide the HOLD switch to the
Off position.
The batteries may be out of power or not inserted correctly. Replace
the batteries with new ones and verify that the batteries are inserted
correctly.
Nothing has been recorded yet. Check the number of recordings.
The maximum number of recordings may be reached or the recording
capacity is full. Delete some recordings or move recordings to an
external device.
I cannot hear anything from the speaker
The headphones may be plugged in. Remove the headphones.
The volume is at the lowest setting. Adjust the volume.
My recorder cannot stop, pause, play or record
The recorder may be in HOLD mode. Slide the HOLD switch to the
Off position.
I cannot hear anything through the headphones
The headphones may not be plugged in properly. Plug in the
headphones properly.
The volume is at the lowest setting. Adjust the volume.
User manual
19
13 Technical data
Connectivity
• USB: High-speed 2.0 mini-USB
• Microphone: 3.5 mm, impedance 2.2 kΩ
• Headphone: 3.5 mm, impedance 16
Ω or more
Display
• Type: LCD, segment
• Diagonal screen size: 39 mm / 1.5 in.
Recording format
• .mp3 (Mpeg 1/Audio Layer 3)
• .wav (PCM) (LFH880)
Recording media
• Built-in flash memory
Microphone
• Built-in: mono (LFH 660) / stereo (LFH 860/870/880)
• External: mono (LFH 660) / stereo (LFH 860/870/880)
20
Recording time
• LFH 660 (1024 MB):
SHQ mode (.mp3 / mono): 17.5 hours
HQ mode (.mp3 / mono): 35 hours
SP mode (.mp3 / mono): 46.5 hours
LP mode (.mp3 / mono): 69.5 hours
SLP mode (.mp3 / mono): 139.5 hours
• LFH 860/870 (2048 MB):
SHQ mode (.mp3 / stereo): 35.5 hours
HQ mode (.mp3 / stereo): 71 hours
SP mode (.mp3 / mono): 94.5 hours
LP mode (.mp3 / mono): 142 hours
SLP mode (.mp3 / mono): 284 hours
• LFH 880 (2048 MB):
PCM mode (.wav / stereo): 3.25 hours
SHQ mode (.mp3 / stereo): 35.5 hours
HQ mode (.mp3 / stereo): 71 hours
SP mode (.mp3 / mono): 94.5 hours
LP mode (.mp3 / mono): 142 hours
SLP mode (.mp3 / mono): 284 hours
Compression rate / sampling
frequency
• PCM mode: 1411 kbps / 44.1 kHz
• SHQ mode: 128 kbps / 44.1 kHz
• HQ mode: 64 kbps / 22 kHz
• SP mode: 48 kbps / 16 kHz
• LP mode: 32 kbps / 16 kHz
• SLP mode: 16 kbps / 16 kHz
Music playback
• Compression format: .mp3, .wma
• MP3 bit rates: 8 – 320 kbps
• WMA bit rates: 32 – 192 kbps
• No DRM support
Tuner/reception (LFH 880)
• Tuner bands: FM stereo
• Frequency range: 87.5 – 108 MHz
• Number of preset channels: 20
• Auto digital tuning
Speaker
• Built-in 30 mm round dynamic speaker
• Output power: 110 mW
Operating conditions
• Temperature: 5° – 45° C / 41° – 113° F
• Humidity: 10 % – 90 %
Power
• Battery type: two Philips AAA alkaline
batteries (LR03 or R03)
• Battery life (SLP mode): 50 hours
Dimensions
• Product dimensions (W × D × H):
40 × 18.4 × 108 mm / 1.6 × 0.7 × 4.3 in.
• Weight: 81 g / 2.9 oz. incl. batteries
System requirements
• Windows Vista / XP / 2000,
Mac OS X, Linux
• Free USB port
User manual
f
Declaration of Conformity
Tested to comply with FCC standards
FOR HOME OR OFFICE USE
Model Number: LFH 660, LFH 860, LFH 870, LFH 880
Trade Name: Philips Digital Voice Tracer 660 / 860 / 870 / 880
Responsible Party: Philips Speech Processing
Address: 64 Perimeter Center East, Atlanta, GA 30346, USA
Telephone number: 888-260-6261
Website: www.philips.com/dictation
This device complies with part 15 of FCC rules. Operation is subject to the following two conditions:
1) This device may not cause harmful interference.
2) This device must accept any interference received, including interference that may cause undesired operation.
Disclaimer and notices
Philips performs extensive testing with the most popular configurations. However, since PC add-ons and device drivers are updated
continually, conflict-free operation cannot be guaranteed.
c
f
b
g
a
Discover the comprehensive range of high-end dictation products from Philips
www.philips.com/dictation
Specifications are subject to change without notice.
Trademarks are the property of Royal Philips Electronics or their respective owners.
© 2008 Royal Philips Electronics. All rights reserved.
Document version 1.0, 2008/08/29.