1
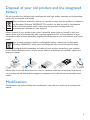
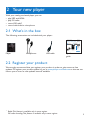
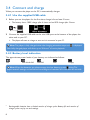
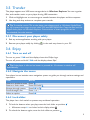
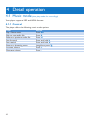
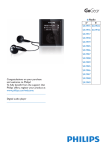
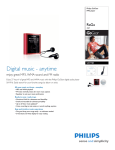
Radio
✔
✘
SA1915 SA1922
SA1916 SA1924
SA1917 SA1942
SA1918 SA1982
SA1919
SA1925
SA1926
SA1927
SA1928
SA1929
SA1945
SA1946
Congratulations on your purchase
and welcome to Philips!
To fully benefit from the support that
Philips offers, register your product at
www.philips.com/welcome
MP3 player
SA1947
SA1948
Need help?
Please visit
www.philips.com/welcome
where you can access a full set of supporting materials such as user manual, the
latest software updates and answers to frequently asked questions.
ii
Contents
1
Important safety information
1
2
Your new player
5
3
Getting started
6
2.1
2.2
3.1
3.2
3.3
3.4
3.4.1
3.4.2
What’s in the box
Register your product
Overview of controls and connections
Main menu
Install
Connect and charge
Use the supplied USB cable
Battery level indication
5
5
6
7
7
8
8
8
3.5
Transfer
9
3.6
Enjoy
9
3.5.1
3.6.1
3.6.2
3.6.3
4
4.1
4.1.1
4.1.2
4.1.3
Disconnect your player safely
Turn on and off
Navigate the menu
Lock slider
9
9
9
9
Detail operation
10
Control
Find your music
Limit the volume
10
11
11
Music mode
10
4.2
Audiobooks
12
4.3
Radio1 14
4.4
Recordings
16
4.5
4.6
Settings
Use your player to store and carry data files
17
17
4.2.1
4.2.2
4.2.3
4.3.1
4.3.2
4.3.3
4.3.4
4.3.5
4.3.6
4.4.1
4.4.2
4.4.3
Add audiobooks to SA19
Audiobook controls
Select audiobook by book title
Auto tune radio stations:
Play a preset radio station
Manual tune a radio station
Save a new frequency under a preset
Record from FM radio1 when the radio is playing:
Record from FM radio1 when the radio is not playing:
Play recordings
Delete your recording
Upload recordings to the computer
Radio: This feature is available only in some regions.
FM radio recording: This feature is available only in some regions.
12
12
13
14
14
14
15
15
15
16
16
16
1
iii
Contents
5
Update your player
18
6
Technical data
19
7
Frequently asked questions
21
5.1
iv
Manually verify software status
18
1 Important safety information
General maintenance
To avoid damage or malfunction:
• Do not expose the player to excessive heat caused by heating equipment or direct sunlight.
• Do not drop your player or allow objects to fall on your player.
• Do not allow your player to be submerged in water. Do not expose headphone socket or
battery compartment to water, as water entering the set may cause major damage.
• Do not use any cleaning agents containing alcohol, ammonia, benzene, or abrasives as these
may harm the set.
• Active mobile phones in the vicinity may cause interference.
• Back up your files. Please ensure that you retain the original files you have downloaded to
your device. Philips is not responsible for any loss of data if the product becomes damaged
or not readable / legible.
• Manage (transfer, delete, etc.) your music files only with the supplied music software to
avoid problems!
About operating and storage temperatures
• Operate in a place where temperature is always between 0 and 35ºC (32 to 95ºF)
• Store in a place where temperature is always between -20 and 45ºC (-4 to 113ºF)
• Battery life may be shortened in low temperature conditions.
Replacement parts/accessories
Visit www.philips.com/support to order replacement parts/accessories.
Hearing Safety
Listen at a moderate volume.
• Using headphones at a high volume can impair your hearing. This product can produce
sounds in decibel ranges that may cause hearing loss for a normal person, even for
exposure less than a minute. The higher decibel ranges are offered for those that
may have already experienced some hearing loss.
• Sound can be deceiving. Over time your hearing “comfort level” adapts to higher volumes
of sound. So after prolonged listening, what sounds “normal” can actually be loud and
harmful to your hearing. To guard against this, set your volume to a safe level before your
hearing adapts and leave it there.
To establish a safe volume level:
• Set your volume control at a low setting.
• Slowly increase the sound until you can hear it comfortably and clearly, without distortion.
1
Listen for reasonable periods of time:
• Prolonged exposure to sound, even at normally “safe” levels, can also cause hearing loss.
• Be sure to use your equipment reasonably and take appropriate breaks.
Be sure to observe the following guidelines when using your headphones.
• Listen at reasonable volumes for reasonable periods of time.
• Be careful not to adjust the volume as your hearing adapts.
• Do not turn up the volume so high that you can’t hear what’s around you.
• You should use caution or temporarily discontinue use in potentially hazardous situations.
• Do not use headphones while operating a motorized vehicle, cycling, skateboarding, etc.; it
may create a traffic hazard and is illegal in many areas.
Important (for models supplied with headphones):
Philips guarantees compliance with the maximum sound power of its audio players as
determined by relevant regulatory bodies only with the original model of provided
headphones. In case this one needs replacement, we recommend that you contact your
retailer to order a model identical to that of the original, provided by Philips.
Copyright information
All other brands and product names are trademarks of their respective companies or
organizations.
Unauthorized duplication of any recordings whether downloaded from the Internet or made
from audio CDs is a violation of copyright laws and international treaties.
The making of unauthorized copies of copy-protected material, including computer
programmes, files, broadcasts and sound recordings, may be an infringement of copyrights and
constitute a criminal offence. This equipment should not be used for such purposes.
The Windows Media and the Windows logo are registered trademarks of Microsoft
Corporation in the United States and/or other countries.
Data logging
Philips is committed to improving the quality of your product and enhancing the Philips user
experience. To understand the usage profile of this device, this device logs some info / data to
the non-volatile memory region of the device. These data are used to identify and detect any
failures or problems you as a user may experience while using the device. The data stored, for
example, will be the duration of playback in music mode, duration of playback in turner mode,
how many times battery low was encountered, etc. The data stored do not reveal the content
or media used on the device or the source of downloads. The data stored on the device are
retrieved and used ONLY if the user returns the device to the Philips service centre and
ONLY to simplify error detection and prevention. The data stored shall be made available to
user on user’s first request.
2
Disposal of your old product and the integrated
battery
All our products are designed and manufactured with high quality materials and components,
which can be recycled and reused.
The crossed-out wheel bin symbol on a product means that the product is subject to
the European Directive 2002/96/EC. This symbol can also be used in combination
with a chemical symbol, which means that the product complies with the
environmental directive for that chemical.
Never dispose of your product with other household waste. Inform yourself or ask your
dealer about local environmentally safe recycling regulations. The correct disposal of your
old product helps prevent potentially negative consequences for the environment and human
health.
Your product contains a built-in rechargeable battery covered by the European
Directive 2006/66/EC, which cannot be disposed with normal household waste.
To safeguard the functionality and safety of your product, always bring your product
to an official collection point or service centre where a professional can remove / replace the
battery as shown:
a
b
c
d
e
Please inform yourself about the local rules on separate collection of batteries because the
correct disposal will help prevent negative consequences for the environmental and human
health.
Modifications
Modifications not authorized by the manufacturer may void user authority to operate this
device.
3
Notice for USA
Note:
This equipment has been tested and found to comply with the limits
for a Class B digital device, pursuant to part 15 of the FCC Rules.
These limits are designed to provide reasonable protection against
harmful interference in a residential installation. This equipment
generates, uses, and can radiate radio frequency energy and, if not
installed and used in accordance with the instruction manual, may cause
harmful interference to radio communications.
Philips
SA1915 SA1916 SA1922
SA1924 SA1925 SA1926
SA1927 SA1928 SA1929
SA1942 SA1945 SA1948
SA1982
However, there is no guarantee that interference will not occur in a particular installation. If
this equipment does cause harmful interference to radio or television reception, which can be
determined by turning the equipment off and on, the user is encouraged to try to correct the
interference by one or more of the following measures:
-- Relocate the receiving antenna.
-- Increase the separation between equipment and receiver.
-- Connect the equipment into an outlet on a circuit different from that to which the receiver
is connected.
-- Consult the dealer or an experienced radio/TV technician for help.
Notice for Canada
This Class B digital apparatus complies with Canadian ICES-003.
The set complies with the FCC-Rules, Part‑15 and with 21 CFR 1040.10. Operation is subject
to the following two conditions:
• This device may not cause harmful interference, and
• This device must accept any interference received, including interference that may cause
undesired operation.
Notice for the European Union
This product complies with the radio interference requirements of the European Union.
4
2 Your new player
With your newly purchased player, you can:
•
•
•
•
play MP3 and WMA
play FM radio1
record FM radio1
record with built-in microphone
2.1 What’s in the box
The following accessories are included with your player:
Philips GoGear audio player
Quick start guide
EN
FR
ES
DE
NL
Quick start guide
Guide de démarrage rapide
Guía de inicio rápido
Kurzbedienungsanleitung
Handleiding voor snel gebruik
1
13
25
37
49
IT
SV
RU
PL
TR
SA1915 SA1918
SA1925 SA1926
SA1927 SA1928
SA1929 SA1945
SA1946 SA1947
SA1948 SA1949
Guida di riferimento rapido
Snabbstartsinstruktioner
Быстрый запуск
Przewodni szybkiego startu
Hızlı Başlama Kılavuzu
61
73
85
97
109
1 Install
2 Connect
and charge
3 Transfer
4 Enjoy
Player
Headphones
USB cable
Quick start
guide
2.2 Register your product
We strongly recommend that you register your product in order to gain access to free
updates. To register your product, please log on to www.philips.com/welcome so that we can
inform you as soon as new updates become available.
Radio: This feature is available only in some regions.
FM radio recording: This feature is available only in some regions.
1
5
3 Getting started
3.1 Overview of controls and connections
B
A
h
C
d
g
A p
B MIC
C O
D z / 2;
E slider
F Reset
G H1
2
+/-
6
f
e
Headphone jack
Microphone
Back one level (hold to return to root menu)
On / Off
Play/Record / Pause
Confirm selection
Hold slider to lock/unlock all keys (except + / -)
USB connector with dust cap
Skip back (hold to quick skip)
Skip forward (hold to quick skip)
In menus: scroll up/down (hold to quick scroll)
In playscreen: increase / decrease Volume (hold to increase / decrease fast)
3.2 Main menu
Menu
Music
Radio1
Recordings
Folder view
Settings
To
Play your digital music tracks
Listen to FM radio
Create or listen to recordings
View files in folders
Customize the settings of your player
3.3 Install
System requirements:
•
•
•
•
•
•
•
Windows 2000, XP or Vista
Pentium III 800MHz processor or higher
128MB RAM
500MB hard disk space
Internet connection (preferable)
Microsoft Internet Explorer 6.0 or later
USB port
1 Connect the mini USB plug of the supplied cable to the player.
2 Connect the standard USB plug of the supplied cable to your PC.
3 From the pop-up window, select Install Philips Device Manager.
4 Follow the on-screen instructions to complete the installation of Philips Device
Manager.
If the pop-up window is not displayed automatically:
1 Select My Computer (Windows XP / Windows 2000) / Computer (Windows Vista).
2 Right click on Philips GoGear SA19.
3 Select Install Philips Device Manager.
4 Follow the on-screen instructions to complete the installation of Philips Device
Manager.
Radio: This feature is available only in some regions.
1
7
3.4 Connect and charge
When you connect the player to the PC, it automatically charges.
3.4.1 Use the supplied USB cable
1 Before you use the player for the first time, charge it for at least 5 hours.
>> The battery2 has a 100% charge after 4 hours and an 80% charge after 2 hours.
2 Connect the supplied USB cable to the mini USB port at the bottom of the player, the
other end to your PC.
>> The player will start to charge as soon as it is connected to your PC.
Note The player is fully charged when the charging animation stops and
Your fully charged player will allow up to 28 hours2 of music playback.
is displayed.
3.4.2 Battery level indication
The approximate power levels of your battery are indicated as follows:
Full
Two-thirds full
Half full
Low
Empty
Note When the batteries are almost empty, the low battery screen blinks. The
player saves all settings and unfinished recordings and switches off in less than 60 seconds.
Rechargeable batteries have a limited number of charge cycles. Battery life and number of
charge cycles vary by use and settings.
2
8
3.5 Transfer
The player appears as a USB mass storage device in Windows Explorer. You can organize
files, and transfer music to your player during USB connection.
1 Click and highlight one or more songs to transfer between the player and the computer.
2 Use drag and drop actions to complete your transfer.
Tip To transfer music CDs to the player use software such as Windows Media Player
11, rip (convert) the songs on your music CD into MP3/WMA files. Copy the files into the
digital audio player via Windows Explorer. Free versions of these programs can be
downloaded from the internet.
3.5.1 Disconnect your player safely
1 Exit any active application working with your player.
2 Remove your player safely by clicking
in the task tray shown in your PC.
3.6 Enjoy
3.6.1 Turn on and off
To turn on, press z/2; until the display shows the Philips logo.
To turn off, press and hold z/2; until the display shows ‘Bye’.
Tip If the player is idle and no button is pressed for 10 minutes, it switches off
automatically.
3.6.2 Navigate the menu
Your player has an intuitive menu navigation system to guide you through various settings and
operations.
Goal
Return to previous menu
Return to main menu
Browse through menus
Scroll through a list
Select an option
Action
Press O
Press and hold O
Press 2; or O
Press + or Press 2;
3.6.3 Lock slider
The player has a lock switch to prevent any accidental operation.
1 To lock the buttons when you play, move the lock slider to position
.
>> All buttons except +/- are locked and the display shows .
2 To unlock the buttons again, move the lock slider to position
9
4 Detail operation
4.1 Music mode (also play mode for recordings)
Your player supports MP3 and WMA formats.
4.1.1 Control
The player offers the following music mode options:
Goal
Action
Play / Pause music
Press 2;
Skip to next audio file
Press 2
Return to previous audio file
Press 1
Fast forward
Press and hold 2
Fast rewind
Press and hold 1
Return to browsing menu
Long/short press O
Increase volume
Press +
Decrease volume
Press -
10
4.1.2 Find your music
1
1 From the main menu, select
to enter music mode.
The player offers the following menu options:
All songs
Artists
Alphabetically listed tracks
Alphabetically listed artists
Alphabetically listed albums
Albums
Alphabetically listed albums
Tracks listed in album order
Tracks listed in
album order
2 Press + or - to scroll through the list.
3 Press 2; to select or press O to return to previous level.
4 Press 2; to play.
Note This player does not support copyright protected (Digital Rights Management –
DRM) WMA songs bought from the Internet.
4.1.3 Limit the volume
Listening to loud sounds for longer than a moment can be harmful to the listener. You can set
the volume level of the player to suit your preferences:
1 From the main menu, select Settings > Sound settings > Volume limit > Set.
2 Press + or - to adjust the level.
3 Press 2; to set.
>> When you set a volume limit, you can no longer exceed the set volume, even if you press the
+ button.
To enable maximum volume again, set the volume limit back to maximum or turn off,
select Settings > Sound settings > Volume limit > Off.
11
4.2 Audiobooks
SA19 supports books in audio format. The use of this feature requires that you download
AudibleManager from www.audible.com. With AudibleManager you can manage the
digital contents of your audiobooks.
Visit www.audible.com/gogear and register. The onscreen instructions guide you through
AudibleManager software download process.
4.2.1 Add audiobooks to SA19
Important SA19 supports audiobook format
or format .
4 On your computer, launch AudibleManager.
5 Follow the online instructions to download your audiobooks in format
or format .
6 Follow the AudibleManager on-screen instructions to activate SA19 for your
audiobooks.
7 Follow the AudibleManager on-screen instructions to transfer your audiobooks to
SA19.
Note SA19 can only play audiobooks for which it is activated.
4.2.2 Audiobook controls
SA19 offers the following audiobook mode controls:
Goal
Play / pause
Skip forward to beginning of new section / chapter
Skip back to beginning of current section / chapter
Fast skip forwards through audiobook
Fast skip backwards through audiobook
Return to browsing menu
Increase / decrease volume
Action
Press 2;
Press 2
Press 1
Press and hold 2
Press and hold 1
Press O
Press –VOL +
Tip You can resume play after navigating away from audiobooks (see section Resume
play in this user manual).
12
4.2.3 Select audiobook by book title
1 From the main menu, select
to enter music mode.
2 Press + or –, then 2; to select [Audiobooks].
3 Press + or – to select title, then 2; to play.
>> To exit, press O.
13
4.3 Radio1
From the main menu, select
to enter radio mode.
Connect the headphones
The supplied headphones serve as a radio antenna. Ensure you connect the headphones
properly for an optimal reception.
4.3.1 Auto tune radio stations:
Note The Auto tune function overwrites existing presets.
1
1 From the Radio menu
, select Auto tune.
>> The radio automatically tunes radio stations and saves the frequencies to presets.
The radio can store up to 20 radio station to presets.
To stop auto tuning, press O.
To exit radio, long press O.
4.3.2 Play a preset radio station
1 From the Radio menu
, select Presets.
2 Press +/- to select preset, 2; to start playing.
3 Press 1/2 to change to another preset.
To exit radio, long press O.
4.3.3 Manual tune a radio station
1 From the Radio menu
, select Manual tune.
>> The play screen is displayed.
2 To fine tune frequency, quick press 1/2.
3 To search for the next stronger signal, long press 1/2.
To exit radio, long press O.
Radio: This feature is available only in some regions.
1
14
4.3.4 Save a new frequency under a preset
1 Tune to the new frequency you want to save.
2 Press 2; to enter preset screen.
3 Press +/- to select, then 2; to save.
To exit radio, long press O.
4.3.5 Record from FM radio1 when the radio is playing:
1 Press O one or more times to enter Radio menu
.
2 Select Start FM Recording.
3 Press 2; to start recording.
To stop recording, press O.
4 Press 2; to save the recording.
5 To exit radio, long press O.
4.3.6 Record from FM radio1 when the radio is not playing:
1 From the Radio menu
, select Start FM recording.
2 Press 1 / 2 to select the FM channel.
3 Press 2; to start recording.
To stop recording, press O.
4 Press 2; to save the recording.
5 To exit radio, long press O .
FM radio recording: This feature is available only in some regions.
1
15
4.4 Recordings
You can record audio with the player. The section Overview of controls and connections
shows you the location of the microphone.
1 From the main menu, select
> Start voice recording.
>> The player records and shows the recording display.
2 Press 2; to pause.
3 Press O to stop.
4 Press 2; to save the recording or press O to cancel.
>> Recordings will be saved on the player. (Filename format: VOICEXXX.WAV where XXX is the
recording number which will be automatically generated.)
5 You can find this file under
> Recording library > Voice.
Note To record FM radio1, see section Radio.
4.4.1 Play recordings
From the main menu, select
> Recording library > Voice or FM radio1.
1 Select the recording you want to hear.
2 Press 2; to confirm.
4.4.2 Delete your recording
Use your computer when you delete recordings on the computer.
1 Connect the player to the computer.
2 Select the player in Window Explorer.
3 Select Recordings > Voice or FM radio1.
4 Select the files your want to delete and press Delete on the computer.
4.4.3 Upload recordings to the computer
1 Connect the player to your computer.
2 Select the player in Windows Explorer.
3 Select Recordings > Voice or FM radio1.
4 Copy and paste the recordings to any desired location on the computer.
FM radio recording: This feature is available only in some regions.
1
16
4.5 Settings
You can set preferences in your player to suit your needs.
1
1 Press O and select
.
2 Press 3 or 4 to select an option.
3 Press 2; to go to next level or O to return to previous level.
4 Press 2; to confirm your selection.
5 Press O to exit the Settings menu
In the Settings menu, the following options are available:
Settings
Play mode
Sound settings
Language
Backlight timer
Information
Factory settings
Further Options
Off / Repeat 1 / Repeat all / Shuffle all / Repeat & shuffle
Equalizer
Off / Rock / Funk / Hip Hop / Jazz‑/ Classical /
Techno
Volume limit
Off / Set
English / German / Spanish / French / Italian / Hungarian / Dutch‑/
Norwegian / Polish / Portuguese / Portuguese Brazilian / Russian /
Finnish / Swedish / Turkish / Czech / Slovak / Chinese Simplified /
Chinese Traditional / Japanese / Korean / Thai
10 sec / 30 sec / 60 sec / Always on
Memory usage / Firmware version
Restore to default factory settings
4.6 Use your player to store and carry data files
You can use your player to store and carry data files by copying data files into your player
with Windows Explorer.
17
5 Update your player
Your player is controlled by an internal program called the firmware. Newer versions of the
firmware may have been released after you have purchased your player.
A software program called Philips Device Manager checks for firmware updates that are
available on the Internet.
Install Philips Device Manager from your player or download the latest version from
www.philips.com/support.
5.1 Manually verify software status
1 Make sure you are connected to the internet.
2 Connect your player to the computer.
3 To launch Philips Device Manager on the computer, click Start > Programs >
Philips Digital Audio Player > SA19XX > Philips SA19XX Device Manager.
4 Click Update.
3
4
5
>> Philips SA19XX Device Manager checks for updates and installs new firmware, if it is
available on the Internet.
5 When the display shows Update completed, click OK.
6 Disconnect the player from the computer.
>> The display shows Updating firmware.
The player automatically restarts after the firmware is updated. Your player is now ready for
use again.
18
6 Technical data
Power
• Power supply
310mAh Li-ion internal rechargeable
battery2
Display
• White backlight LCD, 128 x 48 pixels
Sound
• Channel separation: 40dB
• Equalizer setting:
Off / Rock / Funk / Hip Hop / Jazz /
Classical / Techno
• Frequency response: 80-18000Hz
• Signal to noise ratio: > 80dB
• Output Power (RMS): 2x3mW
System requirements
• Windows® 2000, XP or Vista
• Pentium III 800MHz processor or higher
• 128MB RAM
• 500MB hard disk space
• Internet connection
• Microsoft Internet Explorer 6.0 or later
• Video display card
• Sound card
• USB port
Audio playback
• Compression format: MP3 (8-320kps and
VBR, Sample rates: 8, 11.025, 16, 22.050,
24, 32, 44.1, 48kHz), WMA (32-192kbps,
Sample rates: 8, 11.025, 16, 22.050, 24, 32,
44.1, 48kHz)
• Play time: 28 hours2
• ID3-tag support
Recording
• Audio Capturing: Build-in microphone
(Mono)
• FM radio1
Storage media
• Built-in memory capacity:
SA191x 1GB NAND Flash3
SA192x 2GB NAND Flash3
SA194x 4GB NAND Flash3
Connectivity
• Headphone 3.5mm, USB 2.04
Music transfer
• Drag and drop in Windows Explorer
Data transfer
• Via Windows Explorer
19
FM radio recording: This feature is available only in some regions.
1
Rechargeable batteries have a limited number of charge cycles. Battery life and number of
charge cycles vary by use and settings.
2
1MB = 1 million bytes; available storage capacity will be less.
1GB = 1 billion bytes; available storage capacity will be less.
Full memory capacity may not be available as some memory will be reserved for the player.
Storage capacity based on 4 minutes per song and 64kbps WMA encoding.
3
Actual transfer speed may vary based on your operating system and software configuration.
4
20
7 Frequently asked questions
If you encounter problems with your player, go through the following points listed in the next
section. Please also check out FAQs at www.philips.com/support for further help and other
troubleshooting tips.
Consult your dealer or service center if you are unable to find a solution by following these
hints.
Warning Under no circumstances should you try to repair the set yourself, as this will
invalidate the warranty.
My player cannot power on.
• You may have failed to press and hold 2; long enough. Press and hold 2; until the Philips
welcome screen appears on display.
• Your device battery may be out of power due to long period of non-usage. Please charge
your player.
If none of the above works, then you may have to use the Device Manager to
recover your player:
1 Launch the Philips Device Manager at Start > Programs > Philips Digital Audio
Player > SA19XX > Philips SA19XX Device Manager on your PC.
2 Press and hold the O button while your player is connecting to the PC.
3 Keep holding the key until the Philips Device Manager acknowledges your player and
goes into recovery mode.
4 Click the repair button and follow the instructions given by the Device Manager.
5 After the player has been repaired, disconnect it from your PC and re-start.
There is no music on my player after transfer.
Are your songs in MP3 or WMA format?
Other formats will not playback on the player.
My player hangs.
1 In the unlikely event that your player hangs, do not panic. Insert a small pin or other sharp
object into the reset hole located at the left of the player. Hold until the player shuts
down.
Note The existing contents on your player will not be erased.
2 If nothing happens, recharge the battery for at least 4 hours and try to power on or reset
again. If this does not work, you might have to repair your player with Philips Device
Manager.
There is no sound.
Make sure your headphones are inserted all the way into the headphones jack.
21
Some songs do not show up or playback on the player.
• This player does not support copyright protected (DRM) WMA tracks bought from on-line
music stores, only unprotected WMA files can be played back on this player. The song is in
a format that is not supported by the player. Only MP3, WMA are supported.
• The audio file might be corrupted, try to playback the file on your PC first. If it does not
play, rip the song again.
22
PHILIPS reserves the right to make design and specification changes for product improvement
without prior notice.
23
Specifications are subject to change without notice.
Trademarks are the property of Koninklijke Philips
Electronics N.V. or their respective owners
© 2009 Koninklijke Philips Electronics N.V.
All rights reserved.
www.philips.com
Printed in China
SA19_00_UM_V2.3
wk9332