1
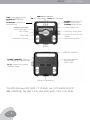
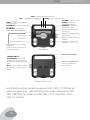
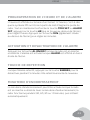
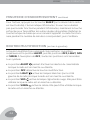
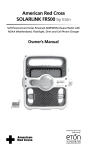
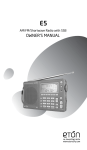
SOLARLINK FR550
Self-Powered and Solar-Powered AM/FM/LW/Shortwave
Radio with Flashlight, Siren and Cell Phone Charger
OWNER’S MANUAL
FR550 OWNER’S MANUAL
DO YOU NEED HELP?
If you need help, please contact us:
Monday-Friday, 8:30 a.m.-4:00 p.m., North American Pacific Time.
1-800-872-2228 from the U.S ; 1-800-637-1648 from Canada
650-903-3866, worldwide ; FAX: 650-903-3867 ; www.etoncorp.com
Etón Corporation, 1015 Corporation Way, Palo Alto, CA 94303, USA
WARNING
•
•
•
•
•
•
•
•
•
Do not expose this appliance to rain or moisture.
Do not submerge or expose for extended period to water.
Protect from high humidity and rain.
Only operate within specified temperature range (0 °C to 40 °C).
Unplug immediately if liquid has been spilled or object have fallen into the
apparatus.
Clean only with a dry cloth. Do not use detergents or chemical solvents as
this might damage the finish.
Unplug and disconnect external antennas (not included) during lightning storms.
Do not remove cover [or back].
Refer servicing to qualified service personnel.
ENVIRONMENT
Disposal
According to the European Directive 2002/96/EC all
electrical and electronic products must be collected
separately by a local collection system.
Please act according to your local rules and do not dispose of your old
products with your normal household waste.
3
FR550 OWNER’S MANUAL
TIME : clock adjust button
ALARM SET : set alarm
time
AL/ON/OFF : open/close
alarm function
MIN: Minute Adjusting
HR: HourAdjusting
LIGHT: LCD Backlight
POWER: Power On/OFF
SLEEP: Sleep Power
SNOOZE: 5 Min Snooze
Charging Light (left)
Power Light (right)
Power Supply Knob
Frequency Tuning Knob
Focus Lamp
Bouton de sélection des
bandes
Hand Crank
Band Selecting Knob
Multifunctional Knob
Speaker
Telescopic Antenna
PHONE CHARGER: USB Jack
for Charging the Cellphone (big)
DC in Jack (Adaptor)
Earphone Jack
Audio in Jack
DC in: USB Jack for Charging
the Radio (small)
Battery Compartment
The FR550 plays AM (520-1710 KHz), LW (120-360 KHz), FM
(88-108 MHz), SW (SW1: 5.3-10.6 MHz; SW2: 10.6-21.6 MHz)
4
FR550 OWNER’S MANUAL
VOLUME CONTROL
Turning the Volume Adjusting Knob (located on the lower right
of the radio) clockwise turns up the volume; counterclockwise turns
down the volume. Always turn down the volume before using
earphones.
POWERING AND TURNING ON THE FR550
The FR550 is powered with 3 AA batteries, the solar cell, the
Dynamo (rechargeable Ni-MH battery), the AC adapter (not included)
or the DC computer input. Select BATTERY, SOLAR or DYNAMO power
with the Power Supply Knob on the upper right side of the radio. The
power sockets are on the back of the radio, under the rubber covers.
After applying power, select the correct position with the Power
Supply Knob and by pressing the POWER button. Turn it off by placing the Power Supply Knob in the Off position.
NOTE: Please don’t plug in the adaptor when not listening to the
radio.
Note: the radio can be played while it’s charging.
BATTERY POWER
Install 3 AA batteries and set the power selector switch to the BATTERY position.
5
FR550 OWNER’S MANUAL
SOLAR POWER
When you’re in sunlight set the power switch to the SOLAR position.
This position also recharges the Ni-MH rechargeable battery.
DYNAMO POWER
The rechargeable Ni-MH (nickel-metal-hydride) battery is in the battery compartment. To use it plug the battery into the socket adjacent
to it, then set the power switch to the DYNAMO position. You may
have to charge the battery; to do this turn the crank for 90 seconds.
The rechargeable battery will eventually lose its ability to hold a
charge. Call Eton Corporation to order another one.
DC-IN 5V AC ADAPTER (not included)
This socket is located on the back of the radio, under the rubber
plugs. Plug in the AC adapter to the DC IN 5 volt socket. This also
charges the Ni-MH battery.
DC-IN USB COMPUTER SOCKET (USB cord not included)
This socket is located on the back of the radio, under the rubber
plugs. Plug in the AC adapter to the DC IN 5 volt socket. This also
charges the Ni-MH battery.
6
FR550 OWNER’S MANUAL
ANSWERS TO YOUR QUESTIONS
REGARDING CHARGING
How much operating time does hand cranking provide? Cranking 120 times per minute, for 1 minute, plays the radio for about 4
minutes at low volume. Since volume is relative this may be higher or
lower depending on how loud the volume is.
How long does it take to fully charge the battery by hand
cranking? It is not practical to charge the battery via hand cranking.
Since the battery capacity is 600mAh (milliamp hours). Fully charging
it by cranking would take 3 hours at 120 turns per minute.
How do you switch from hand crank direct power to just
charging the battery? When in the OFF position, cranking or solar
cell is charging the cell phone or MP3; when the switch is at the other
3 positions, both the solar cell and cranking can charge the battery.
Can the solar cell power the radio on its own, or is it just
used to charge the battery? Yes, the solar cell can power the radio
on its own, and also charge the battery.
How long does it take the solar cell to charge the battery? It
will take 12-15 hours for the solar cell to charge the battery.
A fully charged battery will last about 6 hours at low volume when
receiving radio programs and about 5 hours at low volume when
receiving aircraft band.
7
FR550 OWNER’S MANUAL
CHARGING CELL PHONES
If you revolve the Power Supply Knob to the OFF/PHONE
CHARGER position the radio will charge cell phones. Plug the cell
phone charging cord into the jack at the rear of the radio. Plug the cell
phone charging adapter tip (one of the 5 tips in the plastic bag) into
the other end of the cord and then into the jack of the cell phone.
Then put the radio in the sun or revolve the hand crank to charge the
cell phone. About 10 minutes of cranking results in one or two short
emergency calls.
CHARGING AND POWER LIGHT
Charging Light
• If charged by turning the hand crank, the charging light is green.
• If charged by solar, the charging light is orange.
• If charged by the external adaptor, the charging light is red.
Power Light
• If the battery power is full, the power light is green.
• If the battery power is medium, the power light is orange.
• If the battery power is low, the power light is red, please charge.
LCD BACKLIGHT
Press the LIGHT button to turn on the LCD backlight. It will light for
5 seconds and then turn off.
8
FR550 OWNER’S MANUAL
SELECTING BANDS AND TUNING IN STATIONS
Turn the radio on. Select the band with the BAND Selection Knob
and by looking at the red light above the radio’s display. The red light
appears to the left of the band or the weather channel that you’ve
selected.
When listening to FM and Shortwave, pull up the telescopic antenna
all the way. When tuning AM and LW stations the telescopic antenna
is not needed and can be lowered. Tune in stations by revolving the
Frequency Tuning Knob.
LISTENING TO SHORTWAVE
For best results, listen to SW1 from about an hour before sunset, all
night until about an hour after sunrise. Most stations in SW1 will be
in the 49 meter band (5.8-6.2 MHz), the 41 meter band (7.1-7.7 MHz)
and the 31 meter band (9.4-10 MHz).
Listen to SW2 mostly during the day, except the 25 meter band
(11.6-12.2 MHz), which can be used day and night. The daytime
bands in SW2 are 25 meters (11.6-12.2 MHz), 19 meters (15.1-15.7
MHz), 16 meters (17.55-18 MHz) and 13 meters (21.45-21.6 MHz).
9
FR550 OWNER’S MANUAL
SETTING THE TIME AND ALARM
The clock is a 12-hour clock, showing PM in the display starting at
Noon. Turn off the radio. While pressing and holding the TIME or
ALARM SET button, toggle the HR button (located above the display) to adjust the hour. Then toggle the MIN button (located above
the display) to set the minutes.
TURNING THE ALARM ON AND OFF
With the radio on or off press the AL ON/OFF button. Notice that
when it’s on, ALARM appears in the lower right of the display.
SNOOZE BUTTON
When the alarm activates, pressing the SNOOZE button deactivates
it for 5 minutes, then it starts again.
SLEEP FEATURE
The sleep timer can be activated with the radio turned on or off.
Activating the sleep timer enables the radio to play for 90, 60, 30
and 10 minutes, then shut off automatically.
To activate it press the SLEEP button (in the upper right corner of
the front of the radio). 90 minutes appears. If you don’t want it to
play for 90 minutes, keep pressing the button over and over and
10
FR550 OWNER’S MANUAL
SLEEP FEATURE continued
notice that the other minute selections appear. When it’s on the one
you want, stop pressing. The radio plays for the number of minutes
and then stops.
MULTIFUNCTION KNOB (lower left corner)
The function switch has five positions. The top position is the ALERT
position, then the OFF, LIGHT, SOS and SIREN position. All positions
except OFF are labeled with an icon.
• The ALERT position
radio on or off.
sets the Weather Channel alerts with the
• The OFF position turns the function switch off.
• The LIGHT position
turns the white lights on (left side of radio)
with the radio on or off.
• The SOS position
turns the red flashing light on. Can be used
with the radio on or off.
• The SIREN position
radio on or off.
turns on the siren. Can be used with the
EARPHONE JACK
Located on the back of the radio, under the rubber plugs. Plug in any
stereo earphones. Audio is heard in mono only. Always turn down the
volume before using earphone/headphoness.
11
FR550 OWNER’S MANUAL
AUDIO-IN JACK
Located on the back of the radio, under the rubber plugs, it enables
you to listen to other devices, such as an iPod, using a stereo 3.5 mm
(1/8 inch) cord to connected to it.
WARRRANTY REGISTRATION
To ensure full warranty coverage or product updates, registration of
your product should be completed as soon as possible after purchase
or receipt. You may use one of the following options to register your
product:
1. By visiting our website at http://www.etoncorp.com.
2. Mail in enclosed warranty card.
3. Mail your warranty card or information to following address; include
your name, full mailing address, phone number, email address,
model purchased, date purchased, retail vendor name:
Etón Corporation
1015 Corporation Way
Palo Alto, CA 94303 USA
LIMITED WARANTY
Retain the warranty information from your warranty card with your
proof of purchase or the Limited Warranty information can also be
viewed at www.etoncorp.com.
12
FR550 OWNER’S MANUAL
SERVICE FOR YOUR PRODUCT
To obtain service for your product, we recommend first contacting
an Etón service representative at 1-800-872-2228 US, 1-800-6371648 Canada, (650) 903-3866, [email protected] or your
respective country distributor in Europe (see enclosed list) for problem determination and trouble-shooting. If further service is required,
the technical staff will instruct how to proceed based on whether the
radio is still under warranty or needs non-warranty service.
WARRRANTY - If your product is still in warranty and the Etón service representative determines warranty service is needed, a return
authorization will be issued and instructions will be given. DO NOT
ship your radio back without obtaining the return authorization.
NON-WARANTY - If your product is no longer under warranty and
requires service, the Etón service representative will refer you to the
nearest repair facility that will best handle the repair.
For service outside North America, please refer to the distributor
information included at time of purchase/receipt.
NOTE FCC
The manufacturer is not responsible for any radio or tv interference
caused by unauthorized modifications to this equipment. Such modifications could void the user’s authority to operate the equipment.
13
FR550 MANUAL D’OPÉRATION
Vous avez besoin d’aide ?
Si vous avez besoin d’aide, contactez-nous SVP, lundi-vendredi, 8:30 –
16:00, heure du Pacifique nord-américain. 1-800-872-2228 des ÉU;
1-800-637-1648 du Canada; 650-903-3866, international; Télécopieur:
650-903-3867; site web, www.etoncorp.com; Etón Corporation , 1015
Corporation Way, Palo Alto, CA 94303, USA
AVERTISSEMENT
• Ne pas exposer cet appareil à la pluie à l’humidité.
• Ne pas plonger l’appareil dans l’eau ou le mettre en contact de l’eau pendant une période
prolongée.
• Protéger l’appareil en cas de pluie et de taux d’humidité élevé.
• Utiliser l’appareil uniquement en respectant la gamme de température spécifiée
(0 °C à 40 °C).
• Débranchez immédiatement l’appareil si du liquide a été renversé ou si un objet est tombé
dans l’appareil.
• Nettoyer uniquement avec un chiffon sec. Ne pas utiliser de détergents ou de solvants
chimiques, vous risqueriez d’endommager le revêtement.
• Débranchez et déconnectez les antennes externes pendant les orages.
• Ne pas enlever le couvercle [ou l’arrière].
• Faire appel à un spécialiste pour d’éventuelles réparations.
ENVIRONNEMENT
Élimination
Conformément à la Directive Européenne 2002/96/EC,
tous les produits électriques et électroniques doivent
être collectés séparément par un organisme local de ramassage.
S’il vous plait, agissez en accord avec les règles locales et ne jetez pas
vos produits usagés avec vos déchets ménagers habituels.
15
FR550 MANUAL D’OPÉRATION
min : programation des minutes
HR : programmation de l’heure
LIGHT : rétroéclairage LCD
POWER : marche/ arrêt
SLEEP : minuterie
d’endormissement
SNOOZE : répétition
toutes les 5 min.
TIME : touche de programmation de l’heure
ALARM SET : programmation
de l’alarme
AL ON/OFF : activation/
désactivation de l’alarme
Bouton d’alimentation
électrique
Bouton de réglage des
fréquences
Bouton de sélection des
bandes
Lampe focus
Manivelle
Bouton de réglage du
volume
Bouton multifonction
Lampe témoin de recharge
(à gauche)
Lampe témoin de fonctionnement (à droite)
Haut-parleur
Antenne télescopique
CHARGEUR DE
TÉLÉPHONE : prise USB
permettant de recharger le
téléphone portable (grande
taille)
Prise DC in (adaptateur)
Prise pour oreillettes
Prise audio in
DC in : prise USB permettant
de recharger la radio (petite
taille)
Compartiment des piles
Le FR550 reçoit les ondes moyennes (AM : 520-1710 KHz), les
ondes longues (LW : 120-360 KHz), les ondes ultracourtes (FM
: 88-108 MHz), les ondes courtes (SW1 : 5.3-10.6 MHz ; SW2 :
10.6-21.6 MHz)
16
FR550 MANUAL D’OPÉRATION
REGLAGE DU VOLUME
Tournez le bouton de réglage du volume (situé sur la radio en bas
à droite) dans le sens des aiguilles d’une montre pour augmenter le
volume ; tournez-le dans le sens inverse des aiguilles d’une montre
pour baisser le volume. Baissez toujours le volume avant
d’utiliser les oreillettes.
MISE EN MARCHE DE LA FR550
La FR550 fonctionne avec 3 piles AA batteries, la cellule solaire, la
dynamo (pile Ni-MH rechargeable), l’adaptateur AC (non fourni) ou
l’entrée DC USB. Sélectionnez le mode de fonctionnement BATTERY,
SOLAR ou DYNAMO à l’aide du bouton d’alimentation électrique
situé sur la radio en haut à droite. Les douilles se trouvent au dos de
la radio sous les protections en caoutchouc. Après avoir effectué le
branchement correspondant, sélectionnez la position correcte à l’aide
du bouton d’alimentation électrique et appuyez sur la touche
POWER. Pour éteindre la radio, placez le bouton d’alimentation
électrique en position Off.
Note : Veuillez ne pas brancher l’adaptateuren n’écoutant pas n
n’écoutant pas la radio.
Note : la radio peut être utilisée normalement pendant la recharge.
ALIMENTATION A PILES
Insérez 3 piles AA et placez le bouton d’alimentation électrique en
position BATTERY.
17
FR550 MANUAL D’OPÉRATION
ALIMENTATION SOLAIRE
Si vous vous trouvez dans la lumière du soleil, placez le bouton
d’alimentation électrique en position SOLAR. Cette position permet
également de recharger la pile Ni-MH rechargeable.
ALIMENTATION AVEC LA DYNAMO
La pile Ni-MH (nickel-métal-hydride) rechargeable s’insère dans le
compartiment des piles. Pour l’utiliser, branchez la pile dans la douille
adjacente, puis réglez placez le bouton d’alimentation électrique en
position DYNAMO. Il se peut que vous deviez recharger la pile ; pour
ce faire, tournez la manivelle pendant 90 secondes. La pile rechargeable sera éventuellement difficile à recharger avec le temps. Dans ce
cas, contactez Eton Corporation pour en commander une autre.
ADAPTATEUR AC DC-IN 5V (non fourni)
Cette douille se trouve au dos de la radio sous les protections en
caoutchouc. Branchez l’adaptateur AC à la douille DC IN de 5 volts.
Ceci permet également de recharger la pile Ni-MH.
CONNEXION USB DC-IN (câble USB non fourni)
Cette douille se trouve au dos de la radio sous les protections en
caoutchouc. Elle permet de faire fonctionner la radio à partir d’un
ordinateur et également de recharger la pile Ni-MH. Branchez le câble
USB à l’ordinateur et aux connexions USB de la radio.
18
FR550 MANUAL D’OPÉRATION
REPONSES AUX QUESTIONS CONCERNANT LE
PROCESSUS DE RECHARGE
Quelle est la durée de fonctionnement garantie par
l’utilisation de la manivelle ? Si vous tournez la manivelle 120
fois par minute, pendant une minute, la radio fonctionnera pendant 4
minutes à volume bas. Étant donné que le volume est relatif, il peut
être plus faible ou plus élevé selon la puissance du volume.
Combien de temps est-il nécessaire pour recharger entièrement la pile avec la manivelle ? Ce n’est pas très pratique de recharger la pile avec la manivelle. La capacité de la pile est de 600mAh
(milliampère-heures). Pour la recharger entièrement, il faudrait
compter 3 heures en tournant 120 fois la manivelle par minute.
Comment peut-on passer de l’alimentation directe avec la
manivelle au processus de recharge de la pile ? Lorsque la
radio est en position OFF, la manivelle ou la cellule solaire recharge le
téléphone portable ou le lecteur MP3 ; lorsque le bouton a été placé
dans l’une des 3 autres positions, la cellule solaire et la manivelle
peuvent recharger la pile.
La cellule solaire est-elle en mesure de faire fonctionner la
radio d’elle-même ou sert-elle uniquement à recharger la pile
? Oui, la cellule solaire peut faire fonctionner la radio d’elle-même et
également recharger la pile.
Combien de temps est-il nécessaire pour recharger entièrement la pile avec la cellule solaire ? 12 à 15 heures sont
nécessaires pour recharger entièrement la pile avec la cellule solaire.
19
FR550 MANUAL D’OPÉRATION
REPONSES AUX QUESTIONS CONCERNANT LE
PROCESSUS DE RECHARGE continué
Une pile entièrement rechargée fonctionnera pendant 6 heures à bas
volume en cas de réception programmes radio et pendant 5 heures à
bas volume en cas de réception de la bande aviation
RECHARGER LES TELEPHONES PORTABLES
Tournez le bouton d’alimentation électrique en position OFF/
PHONE CHARGER pour que recharger des téléphones portables
avec la radio. Branchez le câble de recharge du téléphone portable
dans la prise USB PHONE CHARGER se trouvant au dos de la radio.
Branchez l’adaptateur de recharge (l’un des 5 embouts dans le sachet
en plastique) de téléphone portable dans l’autre extrémité du câble,
puis dans la prise du téléphone portable. Placez ensuite la radio au
soleil ou tournez la manivelle pour recharger le téléphone portable.
Après 10 minutes de manivelle, il est possible d’envoyer un ou deux
appels d’urgence courts.
20
FR550 MANUAL D’OPÉRATION
LAMPE TEMOIN DE RECHARGE ET
DE FONCTIONNEMENT
Lampe témoin de recharge
• Si la recharge est effectuée à la manivelle, la lampe témoin de
recharge est verte.
• Si la recharge est effectuée avec la cellule solaire, la lampe témoin
de recharge est orange.
• Si la recharge est effectuée avec un adaptateur externe, la lampe
témoin de recharge est rouge.
Lampe témoin de fonctionnement
• Si la pile est entièrement chargée, la lampe témoin de fonctionnement est verte.
• Si la pile est à moitié chargée, la lampe témoin de fonctionnement
est orange.
• Si la pile est faible, la lampe témoin de fonctionnement est rouge.
Rechargez SVP.
RETROECLAIRAGE LCD
Appuyez sur la touche LIGHT pour activer le rétroéclairage LCD. Il
s’allumera pendant 5 secondes, puis s’éteindra.
21
FR550 MANUAL D’OPÉRATION
SELECTIONNER LES BANDES
ET SYNTONISER LES STATIONS
Mettez la radio en marche. Sélectionnez la bande à l’aide du bouton
de sélection des bandes et en tenant compte de la lumière rouge audessus de l’écran de la radio. La lumière rouge apparaît à gauche de la
bande ou du canal météo que vous avez sélectionné.
Pour écouter les ondes ultracourtes (FM) et les ondes courtes,
dépliez entièrement l’antenne télescopique. Pour écouter les ondes
moyennes (AM) et les ondes longues (LW), l’antenne télescopique
n’est pas nécessaire et peut être rentrée. Syntonisez les stations en
tournant le bouton de réglage des fréquences.
ÉCOUTER LES ONDES COURTES
Pour obtenir les meilleurs résultats d’écoute, écoutez les stations
SW1 environ une heure avant le lever du soleil, toute la nuit et environ une heure après le coucher du soleil. La plupart des stations SW1
se trouvent sur la bande de 49 mètres (5.8-6.2 MHz), la bande de 41
mètres (7.1-7.7 MHz) et la bande de 31 mètres (9.4-10 MHz).
Écoutez les stations SW2 plutôt la journée, sauf la bande de 25
mètres (11.6-12.2 MHz) qui est disponible le jour et la nuit. Les
bandes diurnes disponibles sur SW2 sont celles de 25 mètres
(11.6-12.2 MHz), 19 mètres (15.1-15.7 MHz), 16 mètres (17.55-18
MHz) et 13 mètres (21.45-21.6 MHz).
22
FR550 MANUAL D’OPÉRATION
PROGRAMMATION DE L’HEURE ET DE L’ALARME
L’heure est affichée sur la base d’un format 12 heures, c’est-à-dire
que le symbole PM sur l’écran à partir de midi. Éteignez le poste de
radio. Tout en maintenant enfoncée la touche TIME SET ou ALARM
SET, appuyez sur la touche HR (qui se trouve au-dessus de l’écran)
pour régler l’heure. Appuyez sur la touche MIN (également située
au-dessus de l’écran) pour régler les minutes.
ACTIVATION ET DESACTIVATION DE L’ALARME
Appuyez sur la touche AL ON/OFF lorsque la radio est en marche
ou éteinte. L’alarme est activée lorsque ALARM est affiché en bas à
droite de l’écran.
TOUCHE DE REPETITION
Lorsque l’alarme retentit, appuyez sur la touche SNOOZE pour la
désactiver pendant 5 minutes. Elle retentira ensuite de nouveau.
MINUTERIE D’ENDORMISSEMENT
La minuterie d’endormissement peut être activée lorsque la radio
est en marche ou éteinte. Avec la minuterie d’endormissement, la
radio fonctionne pendant 90, 60, 30 ou 10 minutes, puis s’éteint
automatiquement.
23
FR550 MANUAL D’OPÉRATION
MINUTERIE D’ENDORMISSEMENT continué
Pour l’activer, appuyez sur la touche SLEEP (sur le devant de la radio
en haut à droite). L’écran indique 90 minutes. Si vous ne souhaitez
pas que la radio fonctionne pendant 90 minutes, maintenez la touche
enfoncée pour faire défiler les autres durées disponibles. Relâchez la
touche lorsque la durée qui vous convient apparaît. La radio fonctionnera pendant le nombre de minutes correspondant, puis s’arrêtera.
BOUTON MULTIFONCTION (en bas à gauche)
Le bouton multifonction comprend cinq positions. La position
supérieure est la position ALERT, puis les positions OFF, LIGHT, SOS
et SIREN. À l’exception de OFF, toutes les positions sont associées
à un symbole.
• La position ALERT permet d’activer les alertes du canal météo
lorsque la radio est en marche ou éteinte.
• La position OFF désactive le bouton multifonction.
• La position LIGHT
active les lampes blanches (sur le côté
gauche de la radio) lorsque la radio est en marche ou éteinte.
• La position SOS
active la lampe clignotante rouge. Elle peut être
utilisée lorsque la radio est en marche ou éteinte.
• La position SIREN
active la sirène. Elle peut être utilisée lorsque
la radio est en marche ou éteinte.
24
FR550 MANUAL D’OPÉRATION
BRANCHEMENT POUR OREILLETTES
Est situé au dos de la radio sous les protections en caoutchouc. Convient à toutes les oreillettes stéréo. La réception audio est possible
en mode mono uniquement. Baissez toujours le volume avant
d’utiliser les oreillettes/ les écouteurs.
PRISE AUDIO-IN
Située au dos de la radio sous les protections en caoutchouc, elle
vous permet d’écouter d’autres appareils, par exemple un iPod, en les
connectant à l’aide d’un câble stéréo de 3,5 mm (1/8 pouces).
ENREGISTREMENT DE LA GARANTIE
Il est conseillé d’effectuer l’enregistrement de votre produit dès que
possible après l’achat ou la réception afin d’assurer une couverture
de garantie complète ou les mises à jour du produit. Vous pouvez
enregistrer votre produit de trois manières différentes :
1. En consultant notre site web http://www.etoncorp.com.
2. En renvoyant la carte de garantie ci-jointe par courrier.
3. En renvoyant votre carte ou votre information d’enregistrement
à l’adresse suivante ; inscrivez votre nom, votre adresse postale
complète, votre numéro de téléphone, votre adresse e-mail, le nom
du modèle acheté, la date d’achat, le nom du revendeur :
Etón Corporation
1015 Corporation Way
Palo Alto, CA 94303 USA
25
FR550 MANUAL D’OPÉRATION
GARANTIE LIMITÉE
Conservez l’information de garantie de votre carte de garantie avec
votre preuve d’achat ou consultez l’information de garantie limitée
sur www.etoncorp.com.
SERVICE DE GARANTIE POUR VOTRE PRODUIT
Pour bénéficier d’un service de garantie pour votre produit, nous vous
conseillons de contacter en premier lieu un représentant du service
de garantie Etón au 1-800-872-2228 pour les États-Unis, 1-800637-1648 pour le Canada ou (650) 903-3866, customersvc@
etoncorp.com ou le revendeur dans votre pays en Europe (voir liste
ci-jointe) qui constatera le problème et vous dépannera. Si une intervention supplémentaire s’avère nécessaire, le personnel technique
vous informera de la marche à suivre. Elle diffère si votre radio est
toujours sous garantie ou si elle est soumise à une réparation hors
garantie.
GARANTIE - Une autorisation de retour sera émise et des instructions seront données si votre produit est toujours sous garantie et
que le représentant du service de garantie Etón justifie la nécessité
d’une réparation sous garantie. NE renvoyez PAS votre radio tant que
vous n’avez pas encore reçu le numéro d’autorisation de retour.
HORS GARANTIE - Si votre produit n’est plus sous garantie et doit
être réparé, notre représentant du service de garantie Etón vous
conseillera l’atelier de réparation le plus proche qui sera en mesure de
réparer votre produit.
26
FR550 MANUAL D’OPÉRATION
SERVICE DE GARANTIE POUR VOTRE
PRODUIT continué
Pour le service de réparation hors Amérique du Nord, consultez
l’information fournie par le revendeur au moment de l’achat/de la
réception.
NOTE FCC
Le fabricant ne peut être en aucun cas tenu responsable des interférences radio ou télé causées par des modifications non autorisées
effectuées sur cet appareil. De telles modifications peuvent entraîner
l’annulation du droit de l’utilisateur à manipuler l’appareil.
27
FR550 BETRIEB HANDBUCH
BENÖTIGEN SIE HILFE?
Falls Sie Hilfe benötigen, erreichen Sie uns von Montag-Freitag,
8:30 - 16:00, US Pazifische Standardzeit. 1-800-872-2228 aus den
USA; 1-800-637-1648 aus Kanada; +1-650-903-3866, weltweit;
FAX: +1-650-903-3867; Internet: www.etoncorp.com;
Etón Corporation , 1015 Corporation Way, Palo Alto, CA 94303, USA
ACHTUNG
• Setzen Sie das Gerät weder Wasser noch Feuchtigkeit aus.
• Tauchen Sie das Gerät nicht in Wasser.
• Schützen Sie das Gerät vor hoher Luftfeuchtigkeit und Regen.
• Betreiben Sie das Gerät nur im angegebenen Temperaturbereich (0 °C bis 40 °C).
• Ziehen Sie sofort den Netzstecker, wenn Flüssigkeit auf das Gerät geschüttet
wurde oder Gegenstände in das Gerät gefallen sind.
• Reinigen Sie das Gerät nur mit einem trockenen Tuch. Verwenden Sie keine Reini
gungsmittel oder chemische Lösungsmittel, da dadurch die Oberfläche beschädigt
werden könnte.
• Ziehen Sie während eines Gewitters den Netzstecker und trennen Sie externe Antennen
(nicht enthalten).
• Entfernen Sie nicht das Gehäuse [oder die Rückseite].
• Überlassen Sie Wartungs- oder Reparaturarbeiten immer qualifi ziertem Fachpersonal.
UMWELT
ENTSORGUNG
Gemäß der europäischen Richtlinie 2002/96/EC müssen alle elektrischen und elektronischen Geräte
über lokale Sammelstellen getrennt entsorgt werden.
Bitte beachten Sie die lokalen Vorschriften und entsorgen Sie
Ihre Altgeräte nicht mit dem normalen Haushaltsmüll.
29
FR550 BETRIEB HANDBUCH
min: zum Einstellen der Minutenanzeige
HR: zum Einstellen der Stundenanzeige
LIGHT: LCD-Hintergrundbeleuchtung
POWER: ein-/ausschalten
SLEEP: Abschaltautomatik
SNOOZE: Schlummerfunktion (5 min)
TIME: Taste zum Einstellen
der Uhrzeit
ALARM SET: Taste zum
Einstellen des Alarms
AL ON/OFF: Alarm aktivieren/
deaktivieren
Wahlknopf für die Stromversorgung
Abstimmknopf Frequenzen
Fokusleuchte
Einstellung Wellenbereich
Handkurbel
Drehknopf zur
Lautstärkeregulierung
Multifunktionsknopf
Ladeanzeige (links)
Betriebsanzeige (rechts)
Lautsprecher
Teleskopantenne
PHONE CHARGER:
USB-Buchse zum Laden von
Mobiltelefonen (groß)
DC-Eingang (Netzteil)
Kopfhöreranschluss
Audio-Eingang
DC in: USB-Buchse zum
Laden des Radios (klein)
Batteriefach
Empfangsbereiche: MW (520-1710 kHz), UKW (88-108 MHz), LW
(120-360 kHz), KW (1: 5,3-10,6 MHz, 2: 10,6-21,6 MHz)
30
FR550 BETRIEB HANDBUCH
LAUTSTÄRKEREGELUNG
Die Lautstärke kann über den Drehknopf zur Lautstärkeregulierung (rechts unten am Gerät) eingestellt werden. Durch Drehen
nach links wird die Lautstärke erhöht, durch Rechtsdrehen verringert.
Vor der Verwendung von Kopfhörern die Lautstärke stets
nach unten regulieren.
EINSCHALTEN DES GERÄTS / VERSCHIEDENE VERSORGUNGSQUELLEN
Das FR550 lässt sich über 3 Batterien vom Typ AA, die Solarzelle,
elektrodynamisch (mit Ni-MH-Akku), das Netzteil (nicht enthalten)
oder DC-Eingang am Rechner betreiben. Dazu die entsprechende Versorgungsquelle mit dem Wahlknopf für die Stromversorgung oben an
der rechten Seite des Geräts einstellen: BATTERY (Batterie), SOLAR
(Solarzelle) oder DYNAMO (elektrodynamisch). Die Anschlussbuchsen für die Stromversorgung befinden sich auf der Rückseite des
Geräts und sind mit Gummikappen abgedeckt. Nach Anschluss der
Stromquelle und Einstellung der richtigen Position des Wahlknopfes für die Stromversorgung die Taste POWER betätigen. Zum
Ausschalten des Geräts den Wahlknopf für die Stromversorgung
auf OFF stellen.
Hinweis: Entfernen Sie das Netzteil, wenn Sie das Gerät nicht
verwenden.
Hinweis: Auch während des Ladevorgangs können Sie Radio hören.
31
FR550 BETRIEB HANDBUCH
BATTERIEBETRIEB
3 Batterien vom Typ AA einlegen und den Wahlknopf für die Stromversorgung auf BATTERY einstellen.
SONNENENERGIE
Bei Sonnenschein können Sie den Wahlknopf für die Stromversorgung auf SOLAR einstellen. In dieser Position wird auch der
Ni-MH-Akku geladen.
ELEKTRODYNAMSICH
Der Ni-MH-Akku (Nickelmetallhydrid) befindet sich im Batteriefach.
Um diesen Akku verwenden zu können, muss er in das daneben
liegende Fach eingelegt und der Wahlknopf für die Stromversorgung
auf DYNAMO eingestellt werden. Der Akku muss ggf. zuerst geladen
werden. Hierzu die Kurbel ca. 90 Sekunden lang drehen. Akkus können unter Umständen ihre Ladefähigkeit verlieren. Austauschakkus
können bei Eton Corporation bestellt werden.
NETZTEIL/5V-DC-EINGANG (nicht enthalten)
Die Anschlussbuchse (DC IN 5V) für das Netzteil befindet sich auf der
Rückseite des Geräts und ist mit einer Gummikappe abgedeckt. Durch
Anschluss des Netzteils kann ebenfalls der Ni-MH-Akku geladen
werden.
32
FR550 BETRIEB HANDBUCH
USB-EINGANG (USB-Kabel nicht enthalten)
Die Anschlussbuchse (DC in) befindet sich auf der Rückseite des
Geräts und ist mit einer Gummikappe abgedeckt. Hierüber kann das
Gerät per USB mit einem Rechner verbunden und mit Strom versorgt
werden. Auch das Laden des Ni-MH-Akkus ist möglich.
HÄUFIG GESTELLTE FRAGEN ZUM LADEN
Wie lange ist das Gerät durch Kurbeln einsatzbereit? Nach
1 Minute Kurbeln mit 120 U/min kann das Radio vier Minuten bei
geringer Lautstärke betrieben werden. Aufgrund des individuellen Empfindens von Lautstärke ist dies ein Richtwert. Je höher die
Lautstärke desto kürzer die Betriebszeit.
Wie lange dauert es, bis der Akku durch Kurbeln vollständig aufgeladen ist? Das Aufladen des Akkus per Handkurbel ist
praktisch nicht möglich. Da die Kapazität des Akkus bei 600 mAh
(Milliamperestunden) liegt, würde die vollständige Ladung per Kurbel
bei 120 U/min 3 Stunden dauern.
Wie wechselt man zwischen direkter Versorgung über Kurbel
und Laden des Akkus? Unter der Position OFF wird das Mobiltelefon oder ein MP3-Gerät über Kurbeln oder Solarzelle geladen; unter
den anderen drei Positionen kann der Akku sowohl über Kurbeln als
auch über die Solarzelle geladen werden.
Kann das Radio allein über Solarzelle betrieben werden oder
dient diese nur zum Laden des Akkus? Ja, das Radio kann allein
über Solarzelle betrieben werden, die Solarzelle kann auch zum Laden
des Akkus verwendet werden.
33
FR550 BETRIEB HANDBUCH
HÄUFIG GESTELLTE FRAGEN ZUM LADEN fortgefahren
Wie lange dauert es, bis der Akku über die Solarzelle aufgeladen ist? Es dauert 12-15 Stunden, bis der Akku über die Solarzelle
aufgeladen ist.
Mit einem vollständig geladenen Akku beträgt die Betriebszeit beim
Empfang von Radiosendern mit geringer Lautstärke ca. 6 Stunden,
beim Empfang von Flugfunk mit geringer Lautstärke ca. 5 Stunden.
LADEN VON MOBILTELEFONEN
Durch Einstellen der Position OFF/PHONE CHARGER mit dem
Wahlknopf für die Stromversorgung startet der Ladevorgang
für Mobiltelefone. Das Ladekabel des Mobiltelefons in die USBBuchse (PHONE CHARGER) zum Aufladen des Mobiltelefons an der
Rückseite des Geräts stecken. Den Anschlussadapter zum Laden
des Mobiltelefons (einen der 5 Adapter aus dem Kunststoffbeutel)
an das freie Ende des Ladekabels stecken und dann mit der Buchse
am Telefon verbinden. Zum Laden des Mobiltelefons das Radio in die
Sonne stellen oder die Kurbel drehen. So kann das Mobiltelefon nach
ca. 10 min Aufladen durch Kurbeln evtl. für 1 bis 2 kurze Gespräche
genutzt werden.
34
FR550 BETRIEB HANDBUCH
LADE- UND BETRIEBSANZEIGE
Ladeanzeige
•Beim Laden über Kurbel leuchtet die Anzeige grün.
•Beim Laden über Solarzelle leuchte die Anzeige orange.
•Beim Laden über externes Netzteil leuchte die Anzeige rot.
Betriebsanzeige
•Bei vollem Batteriestand leuchte die Anzeige grün.
•Bei mittlerem Batteriestand leuchte die Anzeige orange.
•Bei niedrigem Batteriestand leuchte die Anzeige rot. Der Akku muss
aufgeladen werden.
LCD-HINTERGRUNDBELEUCHTUNG
Die LCD-Hintergrundbeleuchtung lässt sich durch die Taste LIGHT
einschalten. Die Beleuchtung bleibt 5 Sekunden an und erlischt dann
automatisch.
WAHL DES WELLENBEREICHS
UND EINSTELLEN VON SENDERN
Radio einschalten. Über den Knopf zum Einstellen des Wellenbereichs
das entsprechende Band einstellen. Neben dem eingesellten Band
oder Wetterkanal leuchte links eine rote Leuchte über dem Display auf.
Bei UKW-/KW-Empfang die Teleskopantenne vollständig herausziehen. Bei MW-/LW-Empfang wird diese Antenne nicht benötigt und
kann eingezogen werden. Über den Abstimmknopf Frequenzen
können Sender eingestellt werden.
35
FR550 BETRIEB HANDBUCH
KURZWELLENEMPFANG
Der Bereich SW1 liefert nachts den besten Empfang (eine Stunde vor
Sonnenuntergang bis ungefähr ein Stunde nach Sonnenaufgang). Die
meisten Sender im Bereich SW1 befinden sich auf dem 49-MeterBand (5,8-6,2 MHz), 41-Meter-Band (7,1-7,7 MHz) und 31-MeterBand (9,4-10 MHz).
Die meisten Sender im Bereich SW2 lassen sich tagsüber besser
empfangen, außer beim 25-Meter-Band, bei dem der Empfang
tagsüber und nachts möglich ist. Tagsüber lassen sich folgende
Bänder im Bereich SW2 empfangen: 25 Meter (11,6-12,2 MHz), 19
Meter (15,1-15,7 MHz), 16 Meter (17,55-18 MHz) und 13 Meter
(21,45-21,6 MHz).
EINSTELLEN VON UHRZEIT UND ALARM
Die Uhrzeit wird im 12-Stundenformat angezeigt. Ab 12:00 Uhr
mittags wird der Zusatz PM (nachmittags) angezeigt. Das Gerät ausschalten. Die Taste TIME bzw. ALARM SET gedrückt halten und mit
der HR-Taste (oberhalb des Displays) die Stundenanzeige einstellen.
Zum Einstellen der Minuten die MIN-Taste (oberhalb des Displays)
verwenden.
36
FR550 BETRIEB HANDBUCH
AKTIVIEREN UND DEAKTIVIEREN DES ALARMS
Bei eingeschaltetem Gerät die Taste AL ON/OFF drücken. Bei aktiviertem Alarm erscheint unten rechts in der Anzeige „ALARM“.
TASTE SNOOZE
Durch Drücken der Taste SNOOZE beim Wecken wird der Alarm für 5
Minuten unterbrochen.
EINSTELLEN DER SCHLAFFUNKTION
Die Einstellungen lassen sich bei ein- oder ausgeschaltetem Radio
aufrufen und verändern. Über die Schlaffunktion lässt sich das Gerät
nach einer bestimmten Zeit (90, 60, 30 und 10 Minuten) automatisch
ausschalten.
Zum Aktivieren der Abschaltautomatik die SLEEP-Taste oben rechts
an der Vorderseite des Geräts drücken. Es wird ein Minutenwert
angezeigt. Durch wiederholtes Drücken verändert sich die Minutenzahl. Wenn die gewünschte Minutenzahl angezeigt wird, nicht mehr
drücken. Das Gerät bleibt jetzt für die eingestellte Minutenzahl
eingeschaltet und schaltet danach automatisch ab.
37
FR550 BETRIEB HANDBUCH
MULTIFUNKTIONSKNOPF (unten links)
Dieser Funktionsregler verfügt über fünf Positionen. Es lassen
sich folgende Positionen einstellen: ALERT, OFF, LIGHT, SOS und
SIREN. Alle Positionen (bis auf OFF) sind mit einem Symbol gekennzeichnet.
•ALERT: Aktivierung/Deaktivierung der Warnhinweise über Wetterkanal
•OFF: Ausschalten des Funktionsreglers
•LIGHT:
Einschalten der weißen Leuchte (links am Gerät) bei einoder ausgeschaltetem Gerät
•SOS:
Einschalten des roten Blinklichts Das Radio kann sowohl
an- als auch ausgeschaltet sein.
•SIREN:
Einschalten der Sirene. Das Radio kann sowohl an- als
auch ausgeschaltet sein.
KOPFHÖRERANSCHLUSS
Die Anschlussbuchse (EAR) befindet sich auf der Rückseite des
Geräts und ist mit einer Gummikappe abgedeckt. An diese Buchse
können Sie Ihre Stereo-Kopfhörer anschließen. Die Wiedergabe erfolgt jedoch in mono. Vor der Verwendung von Kopf-/Ohrhörern
die Lautstärke stets nach unten regulieren.
38
FR550 BETRIEB HANDBUCH
AUDIO-EINGANG
Die Anschlussbuchse befindet sich auf der Rückseite des Geräts und
ist mit einer Gummikappe abgedeckt. Hierüber können andere Geräte
wie ein iPod angeschlossen werden. Ein Kabel mit 3,5-mm-Stereoanschluss verwenden.
Produktregistrierung
Registrieren Sie Ihr Gerät möglichst umgehend nach dem Kauf bzw.
Erhalt, um eine vollständige Garantieabdeckung und Produkt-Updates
zu gewährleisten. Zur Registrierung stehen Ihnen verschiedene
Möglichkeiten zur Verfügung:
1. auf unserer Webseite unter http://www.etoncorp.com
2. Rücksenden der beigefügten Garantiekarte
3. Senden Sie die Garantiekarte oder Daten ausgefüllt mit Ihrem Namen, der vollständigen Adresse, Telefonnummer, E-Mail-Adresse,
Modell, Kaufdatum und Händler an folgende Adresse:
Etón Corporation
1015 Corporation Way
Palo Alto, CA 94303 USA
Garantiebestimmungen
Bewahren Sie die Garantiekarte mit den Garantiebestimmungen und
dem Kaufbeleg auf. Die Garantiebestimmungen können Sie auch
unter www.etoncorp.com nachlesen.
39
FR550 BETRIEB HANDBUCH
Kundendienst
Wir empfehlen, sich zur Problembestimmung und Fehlerbehebung
zuerst an einen Kundendienstmitarbeiter von Etón oder Ihren Generalvertreter des jeweiligen Landes zu wenden. Sie erreichen uns unter
1-800-872-2228 (USA) oder 1-800-637-1648 (Kanada), (650)
903-3866, [email protected] bzw. über das beigefügte
Händlerverzeichnis (Europa). Sollte eine Reparatur erforderlich sein,
werden Sie unsere technischen Kundendienst¬mitarbeiter über das
weitere Vorgehen informieren, abhängig davon, ob für das Gerät noch
Garantie besteht oder nicht.
MIT GARANTIE – Sollte das Gerät innerhalb der Garantiezeit eine
Reparatur benötigen, erhalten Sie eine Genehmigungsnummer für
die Rücksendung sowie Informationen zum Versand. Senden Sie das
Gerät NICHT ohne Genehmigungsnummer zurück.
OHNE GARANTIE - Sollte die Garantiezeit bereits abgelaufen und
eine Reparatur erforderlich sein, wird Sie unser Mitarbeiter an den
nächstgelegenen und für die Reparatur fachlich geeigneten Kundendienst verweisen.
Informationen zum Kundendienst außerhalb Nordamerikas erhalten
Sie beim Kauf von Ihrem Händler.
40
FR550 BETRIEB HANDBUCH
FCC Hinweis
Der Hersteller ist nicht verantwortlich für Empfangsbeeinträchtigungen, die durch unerlaubte Veränderungen am Gerät hervorgerufen
werden. Veränderungen am Gerät können zudem dazu führen, dass
die Betriebserlaubnis erlischt.
41
FR550 MANUALE DI ISTRUZIONI
IN CASO DI NECESSITA’?
In caso di necessità, contattateci dal Lunedì al Venerdì, dalle 8:30 a.m.
alle 4.00 p.m., Orario Nord America costa Pacifica. 1-800-872-2228
dagli USA; 1-800-637-1648 dal Canada; 650-903-3866, dal resto
del mondo; FAX: 650-903-3867; sito web, www.etoncorp.com;Etón
Corporation , 1015 Corporation Way, Palo Alto, CA 94303, USA
AVVERTENZE
• Non esporre l’apparecchio a pioggia o umidità.
• Non immergere o esporre per lungo periodo in acqua.
• Proteggere l’apparecchio dall’alta umidità e dalla pioggia.
• Utilizzare unicamente alle temperature prescritte (da 0 a 40 °C ).
• Staccare immediatamente in caso di liquido versato o di oggetti caduti
sull’apparecchio.
• Pulire solo con un panno asciutto. Non usare detergenti o solventi chimici che
potrebbero danneggiare l’apparecchio.
• Scollegare la spina e disconettere le antenne esterne (non incluse) durante i temporali.
• Non rimuovere la calotte di protezione [o la parte posteriore].
• Affidarsi a personale qualificato in caso di necessità.
AMBIENTE
Smaltimento
In conformità alla Direttiva Europea 2002/96/CE tutti i rifiuti di apparecchiature elettriche ed elettroniche
devono essere smaltiti separatamente da una ditta di raccolta locale.
Si prega di attenersi alle normative locali e di non smaltire i prodotti
usati come normali rifiuti domestici.
43
FR550 MANUALE DI ISTRUZIONI
min: Per impostare i minuti
HR: Per impostare l’orario
LIGHT: Controluce LCD
POWER: Power On/OFF
SLEEP: Per attivare la
funzione Sleep
SNOOZE: Funzione
Snooze 5 Minuti
TIME: Tasto per impostare
l’orario
ALARM SET: Tasti per impostare l’orario dell’allarme
AL ON/OFF: Attiva/disattiva
l’allarme
Manopola di alimentazione
Manopola per la sintonizzazione delle frequenze
Focus Lampada
Manopola per la sintonizzazione della banda
Manovella a mano
Manopola
multifunzionale
Luce che indica la ricarica luce
(sinistra)
Luce che indica il livello di carica
(destra)
Manopola per l’impostazione
del volume
Altoparlante
Antenna telescopica
PHONE CHARGER: Presa
USB per la ricarica del telefono cellulare (grande)
DC in : Presa USB per la
ricarica della radio (piccola)
Presa DC in (adattatore)
Presa per gli auricolari
Presa Audio in
Compartimento delle batterie
La FR550 riproduce in AM (520-1710 KHz), LW (onde lunghe)
(120-360 KHz), FM (88-108 MHz), SW (onde corte) (SW1: 5.3-10.6
MHz; SW2: 10.6-21.6 MHz)
44
FR550 MANUALE DI ISTRUZIONI
CONTROLLO DEL VOLUME
Facendo ruotare la Manopola per l’impostazione del volume (si
trova nella parte inferiore della radio sulla destra) in senso orario, si
aumenta il volume; facendola ruotare in senso antiorario il volume
diminuisce. Abbassate sempre il volume prima di utilizzare gli
auricolari.
ALIMENTARE E ACCENDERE LA FR550
La FR550 è alimentata da 3 batterie tipo AA, pannello solare, dinamo
(batterie ricaricabili tipo Ni-MH), adattatore AC (non incluso) o input
DC da computer. Selezionare alimentazione a BATTERIA, SOLARE
o con DINAMO con la manopola di alimentazione che si trova nella
parte superiore della radio sulla destra. Le prese si trovano nella parte
posteriore della radio, sotto i coperchi protettivi in plastica. Dopo aver
attivato la radio, selezionate la posizione corretta con la Manopola
di alimentazione e premete il tasto POWER. Potete spegnere la
radio semplicemente posizionando la Manopola di alimentazione
in posizione Off.
NOTA BENE: Non collegate l’adattatore se non state ascoltando la
radio.
NOTA BENE: la radio può essere accesa durante il processo di carica.
ALIMENTAZIONE A BATTERIA
Installare 3 batterie tipo AA e porre l’interruttore per selezionare il
tipo di alimentazione sulla posizione BATTERIA.
45
FR550 MANUALE DI ISTRUZIONI
ALIMENTAZIONE AD ENERGIA SOLARE
Se vi trovate in una posizione nella quale potete catturare la luce
solare, posizionate il selezionatore sulla posizione SOLARE. Questa
posizione permette inoltre di ricaricare le batterie ricaricabili a Ni-MH.
ALIMENTAZIONE CON DINAMO
Le batterie ricaricabili a Ni-MH (nichel-metallo-idruro) si trova nel
compartimento delle batterie. Per utilizzarle, inseritele nella presa
adiacente al compartimento. Quindi posizionate l’interruttore in posizione DINAMO. È possibile che dobbiate ricaricare la batteria: per farlo
ruotate la manovella per 90 secondi. Le batterie ricaricabili possono
perdere con il tempo la capacità di mantenere la carica. Mettetevi in
contatto con la Eton Corporation per ordinare una nuova batteria.
ADATTATORE AC DC-IN 5V (non incluso)
Questa presa si trova nella parte posteriore della radio, sotto i
coperchi protettivi in plastica. Inserite l’adattatore AC nella presa DC
IN da 5 volt. Questo vi permetterà di ricaricare contemporaneamente
le batterie Ni-MH.
46
FR550 MANUALE DI ISTRUZIONI
PRESA USB PER COMPUTER
DC-IN (CAVO USB NON INCLUSO)
Questa presa si trova nella parte posteriore della radio, sotto i
coperchi protettivi in plastica. Vi permette di alimentare la radio direttamente dal computer e contemporaneamente di ricaricare le batterie
Ni-MH. Inserite il cavo USB nel computer e nelle prese USB della radio.
RISPOSTE ALLE VOSTRE DOMANDE RIGUARDANTI LA RICARICA
Quanta autonomia si può ottenere con la manovella a mano?
Azionando la manovella 120 volte al minuto per un minute, vi permette di attivare la radio per circa 4 minuti a basso volume. Dato che il
volume è relativo, quest’ultimo può essere più o meno alto.
Quanto tempo è necessario per ricaricare completamente
la batteria con la manovella? Non è pratico ricaricare la batteria
con la manovella a mano. Dato che la capacità della batteria è pari
a 600mAh (milliampere/h). Per ricaricare la batteria completamente
sono necessarie 3 ore, facendo compiere alla manovella 120 giri al
minuto.
Come si può passare direttamente dalla ricarica a manovella
alla ricarica a batteria? Quando ci si trova in posizione OFF, la
manovella o il pannello solare stanno ricaricando il telefono cellulare
o il MP3; quando l’interruttore è all’altra posizione 3, sia il pannello
solare che la manovella possono ricaricare la batteria.
47
FR550 MANUALE DI ISTRUZIONI
RISPOSTE ALLE VOSTRE DOMANDE RIGUARDANTI LA RICARICA continuato
Il pannello solare è in grado di alimentare la radio o può essere utilizzato solamente per ricaricare le batterie? Il pannello
solare è in grado di alimentare la radio e di ricaricare le batterie.
Quanto tempo è necessario per ricaricare le batterie ad
energia solare? Sono necessarie 12-15 ore per ricaricare le batterie
ad energia solare.
Una batteria completamente carica può riprodurre per circa 6 ore a
basso volume programmi radio o circa 5 ore se riceve aircraft band.
CARICARE IL TELEFONO CELLULARE
Se posizionate la Manopola di alimentazione in posizione OFF/PHONE
CHARGER la radio sarà in grado di ricaricare il telefono cellulare.
Inserire il cavo per la ricarica del telefono cellulare nella presa USB
PHONE CHARGER che si trova nella parte posteriore della radio.
Inserite la spina per la ricarica del telefono cellulare (una delle 5 spine
nella busta di plastica) nella presa alla fine del cavo e l’altra estremità
nella presa del telefono cellulare. A questo punto posizionate la radio
al sole o azionate la manovella per ricaricare il telefono cellulare. Circa
10 minuti di ricarica a manovella vi permetteranno di fare una o due
brevi telefonate di emergenza.
48
FR550 MANUALE DI ISTRUZIONI
LUCE CHE INDICA LA RICARICA E
IL LIVELLO DI CARICA
Luce che indica la ricarica
• Se la ricarica avviene tramite manovella a mano, la luce che indica la
ricarica è verde.
• Se la ricarica avviene tramite energia solare, la luce che indica la
ricarica è arancione.
• Se la ricarica avviene tramite adattatore esterna, la luce di ricarica
è rossa.
Luce che indica il livello di carica
•Quando la batteria è completamente carica, la luce che indica il
livello di carica è verde.
•Quando la batteria è mediamente carica, la luce che indica il livello di
carica è arancione.
•Quando il livello di carica della batteria è basso, la luce sarà rossa. È
consigliabile ricaricare la batteria a questo punto.
CONTROLUCE LCD
Premere il tasto LIGHT per accendere controluce LCD. Lampeggerà
per 5 secondi e poi si spegnerà automaticamente.
49
FR550 MANUALE DI ISTRUZIONI
SELEZIONARE LE BANDE E SINTONIZZARE
LE STAZIONI
Accendete la vostra radio. Selezionate la banda desiderata con la manopola di sintonizzazione e osservate la luce rossa che si trova nella
parte superiore del display. La luce rossa appare sulla sinistra rispetto
alla banda o sul canale meteorologico da voi prescelto.
Per l’ascolto in FM o in Onde corte, estendere completamente
l’antenna telescopica. Quando ascoltate stazioni che si trovano in AM
o LW, l’antenna telescopica non è necessaria e può essere ripiegata.
Sintonizzate le stazioni, utilizzando la Manopola per la sintonizzazione della frequenza.
ASCOLTO IN ONDE CORTE
Per ottenere i migliori risultati, ascoltate SW1 a partire da un’ora
prima del tramonto, durante tutta la notte fino a circa un’ora dopo
l’alba. La maggior parte delle stazioni in SW1 si trovano nella banda
49 metri (5.8-6.2 MHz), nella 41 metri (7.1-7.7 MHz) e nella 31 metri
(9.4-10 MHz).
Ascoltate le stazioni in SW2 durante il giorno, eccetto per la banda
25 metri (11.6-12.2 MHz), che può essere ascoltata giorno e notte.
Le bande che si trovano in SW2 sono 25 metri (11.6-12.2 MHz),
19 metri (15.1-15.7 MHz), 16 metri (17.55-18 MHz) e 13 metri
(21.45-21.6 MHz).
50
FR550 MANUALE DI ISTRUZIONI
SETTARE L’ORARIO E L’ALLARME
L’orologio ha un formato da 12 ore. Le ore pomeridiane vengono
contraddistinte dal simbolo PM. Spegnete la radio. Mentre premete il
tasto TIME o ALARM SET, premete il tasto HR (che si trova sopra
il display) per impostare l’orario. Premete quindi il tasto MIN (che si
trova sopra il display) per impostare i minuti.
ATTIVAZIONE E DISATTIVAZIONE DELL’ALLARME
Con la radio accesa o spenta, premete il tasto AL ON/OFF. Notate
che quando l’allarme è attivato, l’icona ALARM compare nella parte
inferiore del display, sulla destra.
TASTO SNOOZE
Quando l’allarme è attivato, premete il tasto SNOOZE per disattivare temporaneamente l’opzione per 5 minuti, che poi riprenderà
automaticamente.
OPZIONE SLEEP
Questa funzione può essere attivata sia quando la radio è in funzione
che quando è spenta. La funzione “sleep timer” permette alla radio di
funzionare per un numero stabilito di minuti, per es. 90, 60, 30 o 10
minuti e poi di spegnersi automaticamente.
51
FR550 MANUALE DI ISTRUZIONI
OPZIONE SLEEP continuato
Per attivare la funzione sleep timer, premete il tasto SLEEP (si trova
nella parte anteriore della radio, in alto sulla destra). 90 minuti appare.
Se non desiderate attivare la radio per 90 minuti, tenete premuto
il tasto e attendete che compaia un’altra combinazione di minuti.
Quando compare quella da voi desiderata, rilasciate il tasto. La radio
verrà attivata per il numero di minuti desiderato e quindi si spegnerà
automaticamente.
MANOPOLA
MULTIFUNZIONALE (ANGOLO INFERIORE DESTRO)
L’interruttore di funzione ha cinque posizioni differenti. La posizione
più in alto è la posizione ALERT, quindi le posizioni OFF, LIGHT, SOS
e SIREN. Tutte le posizioni, eccetto OFF, sono contrassegnate da
un’icona.
•La posizione ALERT imposta la funzione di “alert” per il canale
meteorologico a radio accesa o spenta.
•La posizione OFF disattiva la funzione.
•La posizione LIGHT
attiva le luci bianche (parte sinistra della
radio) a radio accesa o spenta.
•La posizione SOS
attiva la luce rossa lampeggiante. Questa
funzione può essere utilizzata a radio accesa o spenta.
•La posizione SIREN
attiva la sirena. Questa funzione può essere
utilizzata a radio accesa o spenta.
52
FR550 MANUALE DI ISTRUZIONI
PRESA PER GLI AURICOLARI
Questa presa si trova nella parte posteriore della radio, sotto i
coperchi protettivi in plastica. Inserire qualsiasi tipo di auricolari
stereo. L’audio viene riprodotto solo in mono. Abbassate sempre il
volume prima di utilizzare gli auricolari/cuffie.
PRESA AUDIO-IN
Si trova nella parte posteriore della radio, sotto i coperchi protettivi in
plastica e permette di ascoltare altri dispositivi come iPod, utilizzando
un cavo stereo da 3,5 mm.
REGISTRAZIONE DELLA GARANZIA
Per garantire la copertura completa della garanzia e consentire
l’aggiornamento del prodotto, il prodotto deve essere registrato
prima possibile dopo l’acquisto o il ricevimento. La registrazione del
prodotto può essere effettuata in diversi modi:
1. Visitando il nostro sito http://www.etoncorp.com.
2. Spedendo il certificato di garanzia allegato.
3. Spedendo la scheda di garanzia allegato o le informazioni necessarie all’indirizzo indicato sotto; indicare il nome, l’indirizzo completo,
il numero di telefono, l’indirizzo e-mail, il modello acquistato, la data
di acquisto, il nome del rivenditore:
Etón Corporation
1015 Corporation Way
Palo Alto, CA 94303 USA
53
FR550 MANUALE DI ISTRUZIONI
GARANZIA LIMITATA
Conservare le informazioni relative alla garanzia presenti sul certificato di garanzia stesso insieme alla ricevuta dell’acquisto; è possibile
consultare le informazioni relative alla garanzia limitata all’indirizzo
www.etoncorp.com.
ASSISTENZA PER IL PRODOTTO ACQUISTATO
Per ottenere assistenza circa il prodotto acquistato, si consiglia di
contattare il servizio clienti Etón al numero 1-800-872-2228 USA,
1-800-637-1648 Canada, (650) 903-3866, customersvc@etoncorp.
com o il distributore locale in Europa (si veda l’elenco allegato) al
fine di determinare l’entità del problema e risolverlo. Nel caso fosse
necessaria ulteriore assistenza, il servizio tecnico fornirà le istruzioni
su come procedere, a seconda che l’apparecchio sia ancora in garanzia
o necessiti di interventi non coperti da garanzia.
GARANZIA – Se l’apparecchio è ancora coperto da garanzia e il
servizio clienti Etón stabilisce che è necessario un intervento in
garanzia, sarà autorizzata la restituzione e verranno fornite le
indicazioni necessarie. NON restituire l’apparecchio senza previa
autorizzazione.
INTERVENTI NON COPERTI DA GARANZIA – Se l’apparecchio
non è più coperto da garanzia e si rende necessario un intervento di
riparazione, il servizio clienti Etón vi indicherà il centro di assistenza
più vicino a voi, cui rivolgersi per le riparazioni.
54
FR550 MANUALE DI ISTRUZIONI
ASSISTENZA PER IL PRODOTTO
ACQUISTATO continuato
Per assistenza al di fuori del Nord America, fare riferimento all’elenco
dei distributori fornito al momento dell’acquisto/ricevimento.
Nota FCC
Il produttore non è responsabile di alcuna interferenza ad apparecchi
radio o televisivi causata da modifiche non autorizzate agli stessi.
Tali modifiche potrebbero invalidare l’autorità dell’utente ad usare tali
apparecchi.
55
GUÍA DE FUNCIONADMIENTO DE FR550
¿Necesita ayuda?
Si necesita ayuda, contáctenos de
lunes a viernes, de 8:30 a.m. a 4:00 p.m., hora estándar del Pacífico
de EE. UU. 1-800-872-2228 desde los EE UU; 1-800-637-1648
desde Canadá; 650-903-3866 desde el resto del mundo; FAX:
650-903-3867; sitio Web, www.etoncorp.com; Etón Corporation,
1015 Corporation Way, Palo Alto, CA 94303, EE UU.
ADVERTENCIA
• No exponga este dispositivo a lluvia o humedad.
• No exponga o sumerja este aparato al agua durante un período largo.
• Proteja el aparato de gran humedad y lluvia.
• Utilice la unidad solamente dentro de un rango de temperatura especificado
(0 °C a 40 °C).
• Desenchufe la unidad inmediatamente si ha caído líquido algún objeto dentro de la radio.
• Limpie la unidad solamente con un paño seco. No utilice detergentes o disolventes
que puedan dañar la cubierta del dispositivo.
• Desenchufe y desconecte las antenas externas durante tormentas con relámpagos.
• No quite la cubierta [o la parte posterior].
• Si este producto muestra algún problema, póngase en contacto con personal cualificado de servicio.
GARANZIA LIMITATA
Eliminación
De acuerdo a la Directiva Europea 2002/96/EC, todos los aparatos eléctricos y electrónicos deben ser
recolectados en forma separada por un sistema local de recolección.
Por favor, actúe según las normas de su localidad y no elimine
los aparatos antiguos en su basura del hogar usual.
57
GUÍA DE FUNCIONADMIENTO DE FR550
MIN: Ajuste de minutos
HR: Ajuste de hora
LUZ: Luz de fondo LCD
TIEMPO: Botón de ajuste
de reloj
AJUSTE DE ALARMA:
Ajuste del tiempo de
alarma
AL ON/OFF: Iniciar/cerrar
alarma
POTENCIA: Potencia
ON/OFF
SLEEP: Ajuste de sleep
SNOOZE: Activación de
snooze de 5 minutos
Botón de alimentación de
corriente
Botón de sintonización de
frecuencia
Lámpara de enfoque
Botón de selección de
banda
Manivela
Botón de ajuste de
volumen
Bouton multifonction
Luz de carga (izquierda)
Luz de potencia (derecha)
Altoparlantes
Antena telescópica
CARGADOR DE TELÉFONO:
Enchufe USB para carga de
teléfono móvil (grande)
Enchufe de entrada DC
(adaptador)
Entrada de auriculares
Enchufe de entrada de
audio
Entrada DC: Enchufe USB
para carga de radio (pequeño)
Compartimento de baterías
El FR550 reproduce AM (520-1710 KHz), onda larga (120-360 KHz),
FM (88-108 MHz), onda corta (onda corta 1: 5,3-10,6 MHz; onda
corta 2: 10,6-21,6 MHz)
58
GUÍA DE FUNCIONADMIENTO DE FR550
CONTROL DE VOLUMEN
Con el giro del botón de ajuste de volumen (ubicado en la parte
derecha inferior de la radio) en sentido de las agujas del reloj se
aumenta el volumen, mientras se reduce con un giro contra el sentido
de las agujas del reloj. El volumen debe bajarse siempre antes
de usar los auriculares.
ALIMENTACIÓN DE POTENCIA Y
ACTIVACIÓN DEL FR550
El FR550 es alimentado con 3 baterías del tipo AA, la célula solar, el
dinámo, (batería NI-MH recargable), el adaptador AC (no incluido) o la
entrada del computador DC. Seleccione la alimentación de potencia
por BATERÍA, SOLAR o DINÁMO con el botón de alimentación de potencia ubicado en la parte derecha superior de la radio. Los enchufes
de potencia se encuentran en la parte posterior de la radio, cubiertos
con tapas de caucho. Después de la alimentación de potencia, debe
seleccionarse la posición correcta con el botón de alimentación
de potencia y pulsando a continuación el botón POTENCIA. La
radio se apaga mediante colocación del botón de alimentación de
potencia en la posición Off.
Nota: No enchufe por favor el adaptador al no escuchar la radio.
Nota: La radio puede seguir reproduciendo tocando durante su carga
POTENCIA DE BATERÍA
Instale 3 baterías del tipo AA y coloque el selector de potencia en la
posición BATERÍA.
59
GUÍA DE FUNCIONADMIENTO DE FR550
POTENCIA SOLAR
Instale 3 baterías del tipo AA y coloque el selector de potencia en la
posición BATERÍA.
POTENCIA POR DINÁMO
La batería recargable Ni-MH (níquel-metal-hidruro) se encuentra en
el compartimento de batería. Para usarla, debe enchufarse la batería
en el enchufe adyacente y colocar luego el botón de potencia en la
posición DINÁMO. Eventualmente tendrá que cargar la batería, en
este caso debe girarse la manivela durante aprox. 90 segundos. La
batería recargable perderá eventualmente su capacidad para mantener la carga. En este caso recomendamos contactar a Eton Corporation
para pedir el suministro de otra batería.
ADAPTADOR AC DE ENTRADA DC 5V (no incluido)
Cette douille se trouve au dos de la radio sous les protections en
caoutchouc. Branchez l’adaptateur AC à la douille DC IN de 5 volts.
Ceci permet également de recharger la pile Ni-MH.
ENCHUFE USB DE ENTRADA DC DE
COMPUTADOR (cable USB no incluido)
Este enchufe se encuentra en la parte posterior de la radio, cubierto
con una tapa de caucho. Permite la alimentación de potencia desde
un computador y recarga también la batería Ni-MH. Enchufe el cable
USB en el computador y en el enchufe USB de la radio.
60
GUÍA DE FUNCIONADMIENTO DE FR550
RESPUESTAS PARA SUS PREGUNTAS
SOBRE LA CARGA
¿Cuánto tiempo de servicio permite la generación de potenciapor manivela? Con 120 giros por minuto durante 1 minuto, la
radio reproduce durante aprox. 4 minutos con volumen bajo. Ya que el
volumen es relativo, puede resultar más alto o más bajo en función de
la intensidad del volumen.
¿Cuánto tiempo demora la carga completa de la batería mediante uso de la manivela? No resulta práctico recargar la batería
con la manivela. La capacidad de la batería asciende a 600mAh (miliamperios/hora). La carga completa a través de la manivela demoraría
3 horas con 120 giros por minuto.
¿Cómo puedo conmutar desde la alimentación directa por
manivela hacia la simple carga de batería? Al estar en posición
OFF, el uso de manivela o celda solar recarga el teléfono móvil o
el MP3. Cuando el conmutador se encuentra en una de las otras 3
posiciones, tanto la celda solar como la manivela pueden recargar la
batería.
¿Es posible que la celda solar alimente la radio en forma
independiente o se usa solamente para cargar la radio? Sí, la
celda solar puede alimentar la radio en forma independiente, así como
cargar la batería.
¿Cuánto tiempo demora la carga de la batería con la celda
solar? La celda solar demora aprox. 12 a 15 horas para la carga de la
batería.
61
GUÍA DE FUNCIONADMIENTO DE FR550
RESPUESTAS PARA SUS PREGUNTAS
SOBRE LA CARGA continuado
Una batería completamente cargada trabaja durante aprox. 6 horas
con volumen bajo al sintonizar programas de radio, así como durante
5 horas con volumen bajo al sintonizar una banda aérea.
CARGA DE TELÉFONOS MÓVILES
Al conmutar el botón de alimentación de potencia a la posición
OFF/CARGA DE TELÉFONO en la radio, se procede con la carga
del teléfono móvil. Enchufe el cable de carga del teléfono móvil en
el enchufe USB del CARGADOR DE TELÉFONO ubicado en la
parte posterior de la radio. Enchufe la punta adaptadora de carga
(una de las 5 puntas en la bolsa plástica) del teléfono móvil en el
otro extremo del cable y luego en el enchufe del teléfono móvil. A
continuación debe colocarse la radio en el sol o bien se debe girar la
manivela para cargar el teléfono móvil. Aprox. 10 minutos de giro de
manivela permiten la realización de dos llamadas de emergencia.
CARGA Y LUZ DE POTENCIA
Luz de carga
• En caso de cargar mediante giro de la manivela, la luz de carga se
indica en color verde.
• En caso de carga solar, la luz de carga se indica en color naranja.
• En caso de carga con un adaptador externo, la luz de carga se indica
en color rojo.
62
GUÍA DE FUNCIONADMIENTO DE FR550
CARGA Y LUZ DE POTENCIA continuado
Luz de potencia
• Cuando la potencia de batería está llena, la luz de potencia se indica
en color verde.
• Cuando la potencia de batería está media, la luz de potencia se
indica en color naranja.
• Cuando la potencia de batería está baja, la luz de potencia se indica
en color rojo y se debe proceder con la carga.
LUZ DE FONDO LCD
Pulse el botón LUZ para activar la luz de fondo LCD. Luego se enciende durante 5 segundos y se apaga a continuación.
SELECIÓN DE BANDAS Y SINTONIZACIÓN
DE ESTACIONES
Encienda la radio. Seleccione la banda con el botón de selección de
BANDA y observando la luz roja que se indica sobre la pantalla de la
radio. La luz roja se indica al lado izquierdo de la banda o del canal de
tiempo que usted ha seleccionado.
Al sintonizar la FM y onda corta, debe extenderse completamente la
antena telescópica. No se requiere la antena telescópica al sintonizar
las estaciones AM y onda larga, por lo cual se puede guardar. Las
estaciones se sintonizan mediante uso del botón de sintonización
de frecuencia.
63
GUÍA DE FUNCIONADMIENTO DE FR550
SINTONIZAR LA ONDA CORTA
Para resultados óptimos, se recomienda sintonizar la onda corta 1
aprox. una hora antes del atarceder, durante toda la noche hasta
aprox. una hora antes del amanecer. La mayoría de las estaciones
en onda corta 1 se encuentran en la banda de 49 metros (5,8-6,2
MHz), la banda de 41 metros (7,1-7,7 MHz) y la banda de 31 metros
(9,4-10 MHz).
Se recomienda sintonizar la onda corta 2 principalmente durante el
día, con excepción de la banda de 25 metros (11,6-12,2 MHz), que se
puede usar de día y de noche. Las bandas de día en onda corta 2 son
25 metros (11,6-12,2 MHz), 19 metros (15,1-15,7 MHz), 16 metros
(17,55-18 MHz) y 13 metros (21,45-21,6 MHz).
AJUSTE DE LA HORA Y ALARMA
El reloj se indica en el formato de 12 horas y muestra PM en la
pantalla después del mediodía. Apague la radio. Durante la pulsación
y manteniendo pulsado el botón TIEMPO o AJUSTE DE ALARMA,
conmute con el botón HR (ubicado en la parte superior de la pantalla)
para ajustar la hora. Conmute luego con el botón MIN (ubicado en la
parte superior de la pantalla) para ajustar los minutos.
64
GUÍA DE FUNCIONADMIENTO DE FR550
ACTIVACIÓN Y DESACTIVACIÓN DE LA ALARMA
Con la radio en estado activado o desactivado, pulse el botón AL
ON/OFF. Observe que se indica ALARM en la derecha inferior de la
pantalla al estado activada.
BOTÓN SNOOZE
Cuando se activa la alarma, pulse el botón SNOOZE para desactivarla
durante 5 minutos, luego se activa nuevamente.
FUNCIÓN DE SLEEP
El temporizador de sleep puede activarse cuando la radio está
activada o desactivada. Con la activación del temporizador de sleep,
la radio seguirá reproduciendo durante 90, 60, 30 y 10 minutos para
apagarse a continuación automáticamente.
Para activar la función, pulse el botón SLEEP (en la esquina derecha
superior de la parte frontal de la radio). Se indica “90 minutos”. En
caso de no querer ajustar la opción de 90 minutos, siga pulsando el
botón repetidamente hasta que se indique otra opción de minutos.
Cuando desee ajustar la cantidad de minutos indicados, termine de
pulsar el botón. La radio trabaja ahora durante la cantidad de minutos
ajustados y se apaga luego.
65
GUÍA DE FUNCIONADMIENTO DE FR550
BOTÓN MULTIFUNCIONAL (en la esquina izquierda inferior)
El conmutador de función tiene cinco posiciones. La posición superior
es la posición de ALERTA, luego vienen las posiciones OFF, LUZ,
SOS y SIRENA. Todas las posiciones con excepción de OFF son
rotuladas con un ícono.
• La posición ALERTA ajusta la alerta de canal de tiempo con la
radio activada o desactivada.
• La posición OFF desactiva el conmutador de función.
• La posición LUZ
activa las luces blancas(lado izquierdo de la
radio) con la radio en estado activado o desactivado.
• La posición SOS
activa la luz parpadeante de color rojo. Se
puede usar con la radio en estado activado o desactivado.
• La posición SIRENA
activa la sirena. Se puede usar con la radio
en estado activado o desactivado
ENTRADA DE AURICULARES
Este enchufe se encuentra en la parte posterior de la radio, cubierto
con una tapa de caucho. Enchufe los auriculares estéreos. El audio se
escucha solamente en mono. El volumen debe bajarse siempre
antes de usar los auriculares.
66
GUÍA DE FUNCIONADMIENTO DE FR550
ENCHUFE DE ENTRADA DE AUDIO
Ubicado en la parte posterior de la radio debajo de una tapa de caucho, permite escuchar otros dispositivos, como un iPod, a través de
un cable con enchufe estéreo de 3,5 mm (1/8 pulgada) que se debe
conectar con éste.
REGISTRO DE GARANTÍA
Para asegurar la cobertura completa de la garantía o adquirir actualizaciones del producto, debe registrar su producto tan pronto posible
después de la compra o recibo del producto. Usted puede utilizar una
de las siguientes opciones para registrar su producto:
1. Ya sea visitando nuestro sitio Web en http://www.etoncorp.com.
2. Enviando por correo la tarjeta de garantía suministrada.
3. Envíe por correo su tarjeta de garantía suministrada o información
a la dirección siguiente; escriba su nombre, dirección postal
completa, número de teléfono, dirección de e-mail, modelo comprado, fecha de compra, nombre del distribuidor del producto donde
ha adquirido el producto:
Etón Corporation
1015 Corporation Way
Palo Alto, CA 94303 EE.UU.
67
GUÍA DE FUNCIONADMIENTO DE FR550
GARANTÍA LIMITADA
Conserve la información de garantía de su tarjeta de garantía con su
comprobante de compra. La información de Garantía Limitada puede
ser también leída en www.etoncorp.com.
SERVICIO PARA SU PRODUCTO
Para solicitar algún servicio para su producto, le recomendamos
contactar primero al representante de servicio de Etón llamando al
número de teléfono 1-800-872-2228 para los EE.UU., o al número
de teléfono 1-800-637-1648 para Canadá ó (650) 903-3866,
[email protected] o bien su distribuidor respectivo del país
dentro de Europa (véase la lista adjunta) para la localización y resolución del problema. Si requiere un servicio adicional, el equipo técnico
lo instruirá de como proceder considerando si la radio aún posee
garantía o si necesita servicio técnico para un producto que ya no
posee garantía.mentaire s’avère nécessaire, le personnel technique
vous informera de la marche à suivre. Elle diffère si votre radio est
toujours sous garantie ou si elle est soumise à une réparation hors
garantie.
GARANTÍA – Si su producto aún posee garantía y el representante
de servicio de Etón determina que el servicio de garantía sea necesario, se le enviará una autorización de retorno e instrucciones de envío
a una unidad de servicio de reparación autorizada de la garantía. NO
ENVÍE su radio de regreso sin haber recibido el número de autorización de retorno.
68
GUÍA DE FUNCIONADMIENTO DE FR550
SERVICIO PARA SU PRODUCTO continuado
SIN GARANTÍA – Si su producto ya no posee garantía y requiere servicio de nuestro equipo técnico, el representante de servicio de Etón le
indicará la unidad de reparación más cercana de su localidad que pueda
ofrecer el mejor servicio de reparación.
Para servicio fuera de América del Norte, por favor, consulte la información del distribuidor incluido en la fecha de la compra o del recibo.
NOTA FCC
El fabricante no asume la responsabilidad para cualquier tipo de
interferencia de radio o TV causada por modificaciones no autorizadas
en este equipo. Estas modificaciones podrían anular la autorización del
usuario para operar el equipo.
69
Etón Corporation
Corporate Headquarters
1015 Corporation Way
Palo Alto, California 94303 USA
tel +1 650-903-3866
tel +1 800-872-2228
fax +1 650-903-3867
Etón Canada
1 Yonge Street, Suite 1801
Toronto, Ontario M5E 1W7 Canada
tel +1 416-214-6885
Designed by Etón Corporation and assembled in China. I © Copyright 2008 Etón Corporation. All rights reserved.
v. 060308