1
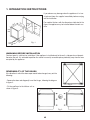
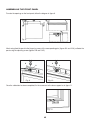
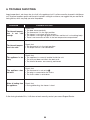
MANUAL DE INSTALACIÓN Y USO
DE SU CONGELADOR
MANUAL DE INSTALAÇÃO E USO
DO CONGELADOR
MANUEL D’INSTALLATION ET D’UTILISATION
DU CONGÉLATEUR
INSTALLATION AND USER’S MANUAL
OF THE FREEZER
MONTAGE- UND GEBRAUCHSANLEITUNG
DES GEFRIERGERÄTS
GEBRUIKS- EN MONTAGE-AANWIJZING
VAN DE VRIESKIST
MANUALE DI INSTALLAZIONE E USO
DEL FREEZER
1. INTEGRATION INSTRUCTIONS
If you observe any damage when the appliance is in transit, please inform the supplier immediately before carrying
out the installation.
5
50
58
0
0
55
n
mi
820
870
815
865
For modular kitchens with the dimensions indicated in the
figure, the appliance may be installed below the work surface.
60
0
35
170
220
100
150
0
41
Fig. 1
WARNINGS BEFORE INSTALLATION
One front panel is sufficient for installation. If the appliance is installed next to the wall, a side panel must be positioned on the wall. It is advisable to position the socket in an easily accessible place, preferably away from the area
occupied by the appliance.
REVERSIBILITY OF THE DOORS
If the direction in which the doors open needs to be changed, carry out the
following:
- Remove the door and diagonally invert the hinges, following the diagram
in figure 2.
Fig. 2
- Fix the profile on to the kitchen unit as
shown in figure 3.
Fig. 3
43
POSITIONING THE APPLIANCE
- Place the power cable so that after installation, the electrical connection can be made easily.
- Fit the appliance into the space until the front edge of the hinge is at the same level as the front edge of the body
of the adjacent unit.
- Raise the refrigerator by regulating its feet with an adjustable spanner until the upper part touches the work top
(figure 4).
- To raise the appliance, turn the feet to the left using the adjustable spanner, then block the locknut by turning it
to the right.
- Once the unit is in the correct position, fix the hinges on it as shown in figure 5.
Fig. 5
Fig. 4
ASSEMBLING THE FOOT PLATE
- In order not to limit the appliance’s performance, it is important to use the
original ventilation grille. (Minimum transverse section of the foot plate opening and 250 cm2 channel).
- Remove the ventilation grille by releasing the safety catches in figure 6-A.
- If the space measures 820 mm in height and the height of the foot plate is
100 mm, assembly can be carried out without any modifications.
B
- The same occurs with a maximum space height of 870 mm and foot plate
height of 150 mm.
- In any other case, the foot plate will have to be cut to get the appropriate
measurement. (Height 100 or 150 mm* Width 580 mm).
Fig. 6
A
- Rest the foot plate on the kitchen floor as shown in figure 7. Mark and cut
the excess part of the grille support (B). To make the cut, remove the foot
plate again. For cutting, use one of the marks which have already been prepared on the support.
- Fix the foot plate to the rest of the units.
- Replace the ventilation grille.
Fig. 7
44
B
ASSEMBLING THE FRONT PANEL
To make the openings on the front panel, follow the diagram in figure 8.
Fig. 8
After having fixed the panel to the hinges by means of the corresponding pins (figures 9-A and 10-A), calibrate the
panel using the adjusting screws (figures 9-B and 10-B).
B
B
A
A
Fig. 10
Fig. 9
Once the calibration has been completed, fix the screws on to the lower support as in figure 11.
Fig. 11
45
2. SAFETY INFORMATION AND GENERAL ADVICE
RECYCLABILITY
This appliance has been manufactured with the utmost concern for environmental aspects.
OLD APPLIANCE
- To prevent damage to the environment and to recover materials, please use your local council’s collection service.
- Ensure that the refrigerating circuit is not damaged, as it may contain substances which affect the environment.
- Disable your old appliance:
1. Cut the mains cable.
2. Remove the door to prevent children from having easy access to the interior.
PACKAGING
- The materials used in the packaging are fully recyclable. (Cardboard, plastic, EPS, etc.).
- Do not throw the packaging away, select the different materials according to local requirements for
eliminating waste and in accordance with current law.
Warning:
Do not leave packaging materials within the reach of children, as they are potentially dangerous.
SAFETY
- This appliance does not contain CFC or HFC (The refrigerating circuit contains R600A - ISOBUTANE).
- Isobutane is a natural refrigerating gas which does not affect the environment, despite the fact that in certain circumstances it may present a risk if the appropriate steps are not taken.
- Therefore, during transit, installation and use, deterioration of the refrigeration system elements must be prevented. If these elements are damaged in any way, flames or incandescent bodies must be avoided at all times.
- If the refrigerant is lost, prevent open flames or ignition sources near the leak point.
- Isobutane (R600A) is heavier than air, and therefore concentrates on the floor.
In the event of leaks, the room where the appliance is located must be ventilated.
- The appliance must be installed by two people to prevent harm to people or objects.
- This appliance may only be repaired by the technical support service and using original spare parts.
- Do not use fire elements or electrical appliances inside the refrigerator.
- The appliance must be used exclusively for the domestic preserving and/or freezing of food.
- Do not use the foot plates, drawers, doors or grilles as a brace or support.
- Do not allow children to play with the appliance
- Do not handle the appliance with wet hands and/or feet or barefoot.
- Each grille or drawer can support a distributed load of 18 kg.
46
3. INSTALLATION
FEATURES OF THE APPLIANCE
- This appliance is designed to operate correctly at room temperature according to its climate classification, which
is stated on the features plate located on the back of the appliance.
CLIMATE CLASSIFICATION
SN
N
ST
T
ROOM TEMPERATURE
+10°C a +32°C
+16°C a +32°C
+18°C a +38°C
+18°C a +43°C
LOCATION
- The appliance must be installed on a flat, stable surface, and the levelling feet regulated according
to the instructions in section 1.
- When placing the appliance into the unit space, take care not to squash the mains cable. It is advisable not to use extensions or adaptors for connecting to the mains.
- The air input and output for ventilation of the appliance must be ensured by means of an opening
in the foot plate.
Attention:
Access to the mains must be ensured to help with unplugging when required. If this is not possible, connect the
appliance to the mains by means of a double-break switch with an opening distance for the contacts of at least 3
mm, situated in an accessible place.
ELECTRICAL CONNECTION
- The appliance must be earthed in accordance with the law. The manufacturer cannot be held
liable for any incidents caused by failure to comply with this.
- Make sure that the voltage stated on the appliance’s features plate, located inside on the lefthand side, corresponds to the voltage for the wiring in the house.
- Do not use adaptors or extensions.
- Prevent the cable from coming into contact with the motor.
- Prevent the cable from being trapped under the appliance.
BEFORE CONNECTING YOUR APPLIANCE
When the appliance is fully installed, the following is recommended:
- Clean the inside with warm water and bicarbonate of soda. Rinse and dry carefully.
- Wait 2 hours before starting up to ensure the stabilisation of the motor lubricants.
- Plug into the mains.
47
4. OPERATION AND USE OF THE APPLIANCE
The freezer that you have chosen allows frozen food to be preserved and fresh food to be frozen (see the paragraph on freezing - page 49-).
TEMPERATURE REGULATION
The thermostat allows the temperature to be regulated gradually.
- The position means interrupted operation of the appliance. (Turned off, the internal light is not working).
- The position means minimum operation.
- The position means maximum operation.
1
Thermostat
Temperature regulation
2
Green Light Indicator
Freezer supplied with mains voltage.
3
Red Light Indicator
The alarm system is connected when the temperature in
the compartment is above -12º C and can be detected
when the light indicator comes on.
4
Yellow Indicator
This comes on when the switch is connected in the super position.
5
Super Switch
This must be used to freeze food.
ALARM INDICATOR
The increase in temperature in the preserving compartment may be caused by the following:
- Frequent and prolonged opening of the door.
- Freezing large amounts of food.
- High room temperature.
- An anomaly in the operation of the refrigerating system (in this case, contact your nearest technical support centre).
Attention: Before placing frozen food to be preserved or fresh food to be frozen into the freezer for the first time,
wait until the internal temperature has reached -18º C (The light indicator switches off).
Do not forget that the regulation of the thermostat may vary according to room temperature, the amount of food
preserved, the location and how often the doors are opened.
The most appropriate regulation for your needs will come with experience.
48
PRESERVATION OF FOOD
In the low temperature compartment, where it can reach -18º C, frozen food can be preserved for several months. It is recommended that you regulate the thermostat to positions 2 or 2¹⁄₂.
Preservation time for food depends primarily on the kind of food.
This preservation time for purchased food is generally stated on the packaging. Never consume food
whose sell-by date has expired; it may cause food poisoning.
A product which has begun to thaw must, under no circumstances, be refrozen and must be consumed as soon as possible.
To preserve flavours, freshness, etc., well, we recommend that you wrap food in tin foil or cling film,
or place it in covered containers.
FREEZING
- Avoid products to be frozen from coming into contact with products which have already been frozen.
- Always place dry containers in the freezer to prevent several containers from forming a single block
when they freeze.
- Prepare the food in portions to help with faster freezing.
- To freeze the maximum amount of foodstuffs indicated on the technical features plate, follow the
instructions described below:
• Connect the switch in the Super position (yellow indicator switched on) 24 hours before freezing.
• To freeze food, place it directly on the cooling grille and once it has frozen, place it on the shelves
with sliding drawers appropriate for preservation.
• Do not open the door unnecessarily, but if you have to, open it as quickly as possible.
• After 26 hours following the start of freezing, place the switch in the energy saving position (yellow
indicator switched off).
• Lighter products (up to 2 kg) may be frozen without connecting the fast freeze, placing them directly into the drawer.
49
HOW TO MAKE ICE CUBES:
Fill up the trays three quarters full of water and place them in the low temperature compartment.
Once the water has frozen, you can remove the ice cubes by gently twisting the trays.
If one of the trays when freezing becomes stuck to the base of the compartment, do not
attempt to unstick it with cutting or pointed objects, as they may damage the appliance.
Use wooden or plastic spatulas.
Do not swallow ice cubes immediately after extracting them as they can cause cold burns.
HOW TO THAW FOOD
Not all food should be thawed the same way.
- If you have bought frozen food from a shop, follow the instructions on the packet.
- Vegetables must be cooked from frozen.
- Generally, prepared or pre-cooked food can be cooked from frozen.
- Meat and fish must be thawed slowly in the refrigerator for several hours.
If you have a microwave, you can significantly speed up the thawing process.
HOW TO USE YOUR APPLIANCE PROPERLY:
TIPS
- Do not open the freezer door too often to prevent the temperature inside the compartment from rising.
- Do not exceed the recommended preservation expiry date on the packaging of deep-frozen products.
- The amount of food to be frozen in one go must not exceed the freezing power value indicated on
the features plate.
- Always freeze food in a good condition.
- So that food does not dry out, wrap it in tin foil or cling film.
- Place a sticker on the wrapping indicating the content and the date of freezing.
- Never refreeze thawed food.
- Do not store bottles with fizzy drinks or glass bottles containing liquids in the freezer as they may explode.
- Do not consume very cold ice cream or food as they may burn your mouth.
SUGGESTIONS FOR SAVING ELECTRICITY
- Do not install the appliance in places exposed to direct sunlight or near heat sources, as this requires a higher
energy consumption.
- Do not block the grille or openings for air circulation. For this, we recommend that you dust it once or twice a year.
- Do not place hot food in the freezer.
- Open the freezer door only when necessary.
50
5. CLEANING AND MAINTENANCE
Before any cleaning or maintenance, disconnect the appliance either by unplugging it from the socket or by turning off the mains switch.
To disconnect the appliance from the mains, unplug it. When doing so, do not pull the appliance’s mains cable.
DEFROSTING
- To reduce electricity consumption, we recommend that you frequently remove any excess frost from inside the
freezer compartment (3 or 4 mm). The thawing process must be carried out as quickly as possible as if the temperature of the food rises, the preservation period will decrease.
- You can use a plastic spatula to speed up the process, but under no circumstances use metal, sharp or pointed
objects (knives, forks, metal spatulas, etc.), as they may damage the refrigerating circuit. Never use humidifiers,
braziers, hair dryers or de-icing sprays to speed up this process either. The refrigerating circuit may be damaged
irreparably and be a source of danger if the appliances operate with R-600 A.
- To defrost the freezer, follow the instructions below:
1. Turn the thermostat to the position.
2. Remove the plug from the mains socket or disconnect the main switch.
3. Remove the food from the freezer and store it in cold insulation bags in a cool place.
4. Let the discharge water flow into a container.
5. Collect the water which forms during defrosting with a sponge or cloth.
6. Also dry the walls and/or cooling grilles.
7. Plug into the mains.
8. Turn the thermostat to the desired position (Please refer to the "TEMPERATURE REGULATION" section).
MAINTENANCE
- Disconnect, either by using the buttons of the freezer before cleaning, or by disconnecting the mains plug.
- Clean the inside when defrosting.
- To clean the inside and the accessories, we recommend that you use a water and bicarbonate of soda solution.
Avoid:
• Abrasive powders, detergents or soap.
• Scouring pads or plastic materials.
• Aggressive products (alcohol, thinners, etc.).
- Clean the outflow opening frequently, which is located on the rear wall, with either a brush or a blunt instrument
(e.g. a cotton bud).
- Rinse in clear water.
- Carefully dry all the components and leave the door ajar for a few minutes.
- You can now place the food inside the appliance.
- Clean the ventilation grille of the motor and condensor with a vacuum cleaner or soft brush, taking care not to
damage or separate the internal connections.
- For brief periods when you are away, we recommend that you leave the appliance plugged in.
51
Attention:
You must never use a steam cleaner to defrost or clean the appliance. Steam may damage the parts of the low voltage appliance and cause a short circuit or an electrical discharge. Steam may damage the plastic parts.
Oils and organic solvent substances must not come into contact with the walls of the
appliance, but should be positioned in suitable containers as they may affect the plastic
elements.
Examples of these substances are:
- Olive and seed oils.
- Butter and animal fats.
- Lemon or orange juice.
- Detergents or products which contain acetic acid.
WHAT TO DO IN THE EVENT OF INACTIVITY
In the event of extended absence, we recommend that you unplug the appliance from the mains, empty it, clean
the inside and leave the door open to prevent bad smells from forming.
NORMAL NOISES IN YOUR APPLIANCE
- Refrigerating gas may produce bubbling as it moves through the circuits.
- The compressor may make a humming and/or a slight tapping noise, which may be more accentuated when
starting up.
- A crack made by the expansion and contraction of the materials used.
- The insulating material amplifies the noise level.
52
6. TROUBLE SHOOTING
Irregular operation is not always due to a fault in the appliance, but it is often caused by incorrect installation or
use. To prevent needless repairs and the costs involved in calling for assistance, we suggest that you read the following advice, which may help you solve the problem
PROBLEM
POSSIBLE SOLUTION
The internal temperature is not cold
enough.
Check that:
• The door closes perfectly.
• The thermostat is in the right position
• The freezer is not close to heat sources.
• The freezer is not right up against the walls and that air is circulating freely.
• There is not an excess of frost in the low temperature compartment.
The internal temperature is too cold.
Check that:
• The thermostat is in the right position.
• The Super switch is not connected
The appliance is too
noisy
Check that:
• The appliance is correctly levelled inside the unit.
• The rear part does not touch the back wall.
• The internal drawers are correctly positioned.
The appliance does
not work
Check that:
• The thermostat is not set to .
• The plug is connected to the mains.
• The mains cable is not broken
Water is leaking from
the appliance.
Check that:
• During defrosting, the freezer is level.
If after having checked all this, it still does not work normally, contact your nearest Support Service.
53
7. CALLING THE TECHNICAL SUPPORT SERVICE
Read the manual carefully and if you are unable to solve the problem, call the technical support
service. Inside your appliance, you will find a red and white sticker with the telephone number
of the Technical Support Service.
The address and telephone number nearest to where you live appears in the list of official technical service offices
supplied with the appliance or in your local telephone directory.
- To help the technical support service, please provide them with the following details:
• Appliance model.
• Date of purchase.
• Appliance reference.
• Description of the problem.
• Your address and telephone number.
- During repairs, ask the distributor to use only replacement parts which have been certified at origin.
- Any repair, including the replacement of the mains cable, must be carried out by the technical suport
service or by a qualified person.
This appliance is intended to come into contact with foodstuffs and complies with l.d. 108 of
25/01/92 (European Directive 89/109 CE). This appliance has been designed, manufactured
and put on sale in accordance with:
- LOW VOLTAGE Directive
73/23 CE
- EMC Directive
89/336 CE
- CE Marking Directive
93/68/CE
- Energy Efficiency Directive
96/57 CE
54