1
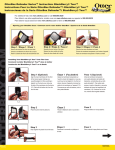
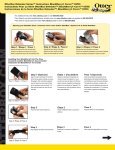
1942 Series Instruction Sheet - iPhone™ 3G
Fiche d’instructions de la série 1942 - iPhone™ 3G
Hoja de instrucciones de la serie 1942 - iPhone™ 3G
To view an online video tutorial of the 1942 go to www.otterbox.com/iphone3g-video or call 888.695.8820
Pour visionner un tutoriel vidéo en ligne sur le 1942, visitez le site www.otterbox.com/iphone3g-video ou appelez le 888. 695. 8820
Para ver un tutorial en línea del modelo 1942 visite el sitio web www.otterbox.com/iphone3g-video o llame al 888.695.8820
Opening your OtterBox Case // Comment ouvrir votre boîtier OtterBox // Apertura de la funda OtterBox
Étape 2
Étape 1
Retirez l’enveloppe de silicone
de la coquille en commençant
au bas du boîtier et en continuant jusqu’au dessus.
2
1
Paso 1
OTTERBOX.COM
Step 1
Remove the silicone skin from the
hard shell starting at the bottom of
the case and working your way up
to the top.
Retire la película de silicona
de la carcasa comenzando
por la parte inferior de la
funda y subiendo hasta la
parte superior.
Step 2
To open the case you need to release 2 of the
snaps. To release the snaps, use your fingernail
and pry apart until there is a small gap. Release
the snaps in the order indicated.
Pour ouvrir le boîtier, vous devez détacher 2
des attaches à pression. Pour détacher les
attaches à pression, utilisez vos ongles et
soulevez chaque attache jusqu’à ce qu’elle
soit entrouverte. Détachez les attaches à
pression dans l’ordre indiqué.
Paso 2
Para abrir la funda deberá soltar 2 de los
broches. Para ello, haga palanca con la uña
hasta que se produzca una pequeña abertura.
Suelte los broches en el orden indicado.
Installing Your iPhone™ Into The Case // Comment installer iPhone™ dans le boîtier // Instalación del iPhone™ en la funda
Step 3
Étape 3
Paso 3
Step 4
Étape 4
Paso 4
Step 5
Étape 5
Snap together the plastic lid and the base.
Pressionez le couvercle en plastique et
la base.
Paso 5
Step 6
Étape 6
Paso 6
You can now separate the two halves by
pulling apart at the opening.
Step 3/ Étape 3/ Paso 3
Step 4/ Étape 4/ Paso 4
Place the phone into the plastic lid.
Wrap the silicone skin around the device.
Make sure to locate the retaining slots for
the silicone as shown. Note: If any part is
misaligned take apart the case and start
over. Pay close attention to the alignment
of keyboard, screen & case features at
every step of installation.
2
Vous pouvez alors séparer les deux
moitiés en tirant sur l’ouverture
Placez le téléphone dans le couvercle
en plastique.
Enroulez l’appareil à l’aide revêtement en
silicone. Assurez-vous vous d’avoir localisé
les fentes de rétention du silicone comme
illustré. Remarque: Si une pièce est mal
alignée, démontez le boîtier, puis recommencez. A chaque étape de l’installation,
prêtez une attention particulière à
l’alignement du clavier, de l’écran et des
fonctions du boîtier.
Ahora puede separar las dos mitades
desde la abertura
Ponga el teléfono en la tapa plástica.
Cierre uniendo la tapa plástica con la base.
Envuelva la película de silicona alrededor
de la unidad. Confirme que se ubiquen las
ranuras de retención para la silicona como
se muestra. Nota: Si alguna parte queda
desalineada desarme la funda y comience
de nuevo. Preste especial atención a la
alineación del teclado, la pantalla y las
características de la funda en cada paso
de la instalación.
1
Step 5/ Étape 5/ Paso 5
Step 6/ Étape 6/ Paso 6
SM40179D
SM40149A
1942 Instruction Sheet
Fiche d’instructions de 1942
Hoja de instrucciones de 1942
Swivel Belt Clip
To use the belt clip, place the bottom of the
phone face in into the belt clip. Then push
the top of the phone towards the belt clip
locking it into place (7).
To take the phone out of the belt clip, press
the middle of the case towards the belt clip
and then apply upward pressure (8).
7
Note: The phone must face inward to use
the belt clip. This protects the screen
and locks the case into the belt clip
8
Clipstand
The belt clip can also be used as a clipstand
for hands-free viewing of videos. To use the
belt clip as a clipstand lock the belt clip latch
to the out position by pulling the bottom of
the latch out until it clicks into place (9).
Place the bottom of the phone into the
clipstand face out. Then press the top of the
phone into the clipstand.
You can now swivel the latch to the desired
viewing angle (10).
Note: To unlock the latch, press up on
the locking tab at the top of the latch.
9
Pince de ceinture pivotante
Presilla giratoria para cinturón
Pince stationnaire
Pedestal
Pour utiliser la pince de ceinture, placez le
bas de la face du téléphone dans la pince
de ceinture. Poussez ensuite le dessus
du téléphone vers la pince de ceinture de
manière à le verrouiller en place (7).
Pour sortir le téléphone de la pince de
ceinture, appuyez sur le milieu du boîtier
vers la pince de ceinture, puis exercez une
pression vers le haut (8).
Remarque : Le téléphone doit faire face
vers l’intérieur pour utiliser la pince de
ceinture. Cela permet de protéger l’écran
et de verrouille le boîtier dans la pince
de ceinture.
La pince de ceinture peut aussi être utilisée
comme pince stationnaire pour le visionnement de vidéos en mains libres. Pour
utiliser la pince de ceinture comme pince
stationnaire, verrouillez la pince de ceinture
à la position sortie en tirant le bas du loquet
vers l’extérieur jusqu’à ce qu’il s’enclenche
en place (9).
Placez la partie inférieure du téléphone
dans la pince stationnaire, face vers
l’extérieur. Poussez ensuite sur le dessus
du téléphone afin de l’insérer dans la pince
stationnaire.
Vous pouvez maintenant déplacer le loquet
à l’angle de visionnement désiré (10).
Remarque : Pour détacher le loquet,
appuyez sur la languette de verrouillage
sur le dessus du loquet.
Para usar la presilla de cinturón, coloque
la parte inferior de la cara del teléfono en
el interior de la presilla. Luego empuje la
parte superior del mismo hacia la presilla
trabándolo en su lugar (7).
Para retirar el teléfono de la presilla, oprima
la parte intermedia de la funda hacia la
presilla y luego presione hacia arriba (8).
Nota: El teléfono debe estar orientado
hacia adentro para usar la presilla de
cinturón. De esta forma se protege la
pantalla y se traba la funda en la presilla.
La presilla de cinturón se puede usar también como pedestal a fin de ver vídeos sin
sostener la unidad con las manos. Para ello
trabe el pestillo de la presilla en la posición
hacia afuera empujando la parte inferior del
mismo hacia el exterior hasta que emita un
chasquido al calzar en su lugar (9).
Coloque la parte inferior del teléfono en
el pedestal orientada hacia afuera. Luego
presione la parte superior del teléfono en
el pedestal.
Ahora podrá girar el pestillo al ángulo de
visión deseado (10).
Nota: Para destrabar el pestillo, presione
hacia arriba la lengüeta trabante situada
en la parte superior del mismo.
10
Warranty / Garantie / Garantía
WARRANTY INFO
OtterBox Products come with a ONE (1) YEAR Limited
Warranty from the date of the retail purchase by the
original end-user. If a material or workmanship defect
arises and a valid claim is received within the Warranty
Period, OtterBox will replace the case only.
OtterBox cannot be held liable for damages to
personal property due to misuse or improper care and
maintenance of case and o-ring seals.
OtterBox warranty does not, under any circumstance,
cover the replacement or cost of any electronic device
or personal property inside or outside of the case.
GARANTIE
Les produits OtterBox sont fournis assortis d’une garantie
limitée d’UN (1) AN à partir de la date d’achat au détail
par l’utilisateur final initial. Si un vice de matériel ou de
fabrication se présente et qu’une réclamation valable est
reçue durant la période de garantie, OtterBox remplacera
seulement le boîtier. OtterBox ne pourra pas être tenue pour
responsable de dommages subis par les biens personnels
suite à l’utilisation ou à l’entretien impropre du boîtier et des
joints toriques. La garantie OtterBox ne couvre en aucun cas
le remplacement ou le coût d’un appareil électronique ou les
biens personnels à l’intérieur ou à l’extérieur du boîtier.
INFORMACIÓN DE GARANTÍA
Los productos OtterBox vienen con una garantía limitada
de UN (1) año a partir de la fecha de compra por parte del
usuario final original. En caso de defectos de mano obra,
OtterBox reemplazará solamente la funda siempre y cuando
se reciba un reclamo válido dentro del período de vigencia
de la garantía. OtterBox no se responsabiliza por daños a la
propiedad personal debido al uso indebido o cuidado y mantenimiento inadecuados de la funda y los anillos selladores.
Bajo ninguna circunstancia la garantía de OtterBox cubre el
reemplazo o el costo de ningún dispositivo electrónico ni de
propiedad personal que vaya dentro o fuera de la funda.
Call us at 888.695.8820 or email us at
[email protected]
Appelez nous au 888.695.8820 ou envoyez nous un courriel
au [email protected]
Llámenos al 888.695.8820 o envíenos un mensaje por
correo electrónico a [email protected]
SM40121C
SM40179D