1
XL665_IFU_GB.book Page 1
Wednesday, October 14, 2009
4:36 PM
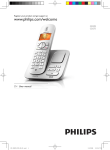
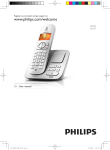
Register your product and get support at
www.philips.com/welcome
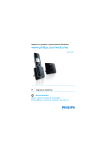
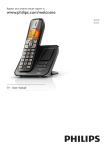
XL 665
To insert with
Telephone Answering Machine
!
Warning
Use only rechargeable batteries.
Charge the handset for 24 hours before use.
XL665_IFU_GB.book Page 2
Wednesday, October 14, 2009
4:36 PM
XL665_IFU_GB.book Page 1
Wednesday, October 14, 2009
4:36 PM
Table of contents
1
Important
4
3.7
What is standby mode?
15
1.1
Power requirements
4
3.8
Checking the signal strength
15
1.2
Using GAP standard
compliance
3.9
Missing handset(s)
15
5
3.10
Menu structure
16
1.3
Conformity
5
1.4
Environmental
6
4
Call
17
1.5
Recycling & disposal
6
4.1
Making a call
17
1.6
Electric, Magnetic and
Electromagnetic Fields ("EMF")
4.2
Ending a call
17
6
4.3
Answering a call
18
2
Your phone
8
4.4
During a call
18
2.1
What’s in the box
8
4.5
Using handsfree
18
2.2
Overview of your phone
9
4.6
Using quick dial
18
2.3
Overview of the base station 10
5
2.4
Display icons
11
Intercom and
Conference Calls
20
2.5
The menus
11
5.1
Calling another handset
20
5.2
Transferring a call
20
3
Getting started
12
5.3
Making a conference call
20
3.1
Connect the base station
12
3.2
Connect your charger
12
6
Text and Numbers
22
3.3
Install your handset
12
6.1
Entering text and numbers
22
3.4
Checking the battery level
13
7
Phonebook
23
3.5
Welcome mode
13
7.1
Viewing the phonebook
23
3.6
Setting the clock
14
7.2
Calling from the phonebook
23
Table of contents
1
XL665_IFU_GB.book Page 2
Wednesday, October 14, 2009
4:36 PM
Table of contents
Personalizing your phone’s
sounds
27
10.3
Auto conference
27
11
Advanced Settings
28
11.1
ECO mode
28
11.2
Registering handset(s)
28
11.3
Recall selection
29
11.4
Dial mode
29
25
11.5
Area code management
29
Deleting a call record
25
11.6
Carrier code
29
8.5
Deleting all call records
25
11.7
Restoring default settings
30
9
Redial List
26
12
The Answering Machine
31
9.1
Viewing the redial records
26
12.1
Turning the answering
machine on or off
31
9.2
Redialing a call
26
12.2
Greeting message
31
9.3
Saving a redial record to
your phonebook
26
12.3
Incoming messages (ICM)
32
9.4
Deleting a redial record
26
12.4
Call screening
33
9.5
Deleting all redial records
26
12.5
Setting the ring delay
33
10
Custom Options
27
12.6
Setting the answering
machine language
33
10.1
Personalizing your phone’s
display
27
7.3
Adding a record
23
7.4
Editing a record
24
7.5
Deleting a record
24
7.6
Deleting all records
24
8
Call log
25
8.1
Viewing the call records
25
8.2
Returning a call
25
8.3
Saving a call record to your
phonebook
8.4
2
10.2
Table of contents
XL665_IFU_GB.book Page 3
Wednesday, October 14, 2009
4:36 PM
Table of contents
13
Default (pre-programmed)
settings
34
14
Technical Data
35
15
Frequently asked
questions
36
Index
38
16
Table of contents
3
XL665_IFU_GB.book Page 4
1
Wednesday, October 14, 2009
Important
This product is not designed for making
emergency telephone calls when the
power fails. Alternative arrangements
should be made for access to emergency
services.
1.1
Power requirements
• This product requires an electrical
supply of 100-240 volts, single-phase
alternating current, excluding IT
installations defined in standard EN
60950 and AS/NZS 60950.1.
• The electrical network is classified as
dangerous according to criteria in the
standard EN 60950 and AS/NZS
60950.1. The only way to power down
this product is by unplugging the
power supply from the electrical
outlet. Ensure the electrical outlet is
located close to the apparatus and is
always easily accessible.
• The voltage on the network is classified as
TNV-3 (Telecommunication Network
Voltages, as defined in the standard EN
60950 and AS/NZS 60950.1). Following a
power cut, the call in progress, as well as
the date and time settings will be lost.
! Warning
• Do not allow the handset to come into
contact with liquids or moisture.
• Do not open the handset, base station
or charger. This could expose you to
high voltages.
• Do not allow the charging contacts or
the battery to come into contact with
conductive materials.
4
4:36 PM
• There is a slight chance that your
product could be damaged by an
electrical storm. We recommend that
you unplug the product from the
power supply and telephone socket
during a storm.
• Do not use the handset in an explosive
hazard area such as where there is gas
leaking.
• It is recommended that this product is
not used near intensive care medical
equipment or by persons with
pacemakers.
• This product can interfere with electrical
equipment such as answering machines,
television, radio, and computers if placed
too close. We recommend that you
position the base station at least one
meter from such appliances.
• Use only the mains adapter supplied
with this equipment. Incorrect adapter
polarity or voltage can seriously
damage the unit.
Base adapter:
Philips S005CB0500050 (for UK & IE only)
or S005CS0500050 (for AUS. & N.Z. only)
Input: 100-240VAC/150mA, 50/60 Hz
Output: 5 VDC, 500mA
Charger adapter:
Philips S002CB0500021 (for UK & IE only)
or S002CS0500021 (for AUS. & N.Z. only)
Input: 100-240VAC/100mA, 50/60 Hz
Output: 5 VDC, 210mA
• CAUTION: RISK OF EXPLOSION IF
BATTERY IS REPLACED BY AN
INCORRECT TYPE. Use only with
Philips, type no.: Multi-Life 600mAh
(2x 1.2V AAA 600mAh Ni-MH)
rechargeable battery. Use only the
recommended type supplied with this
Important
XL665_IFU_GB.book Page 5
Wednesday, October 14, 2009
product. Dispose of used batteries
according to the instructions.
Recommended type:
Philips 1.2V 600mAh AAA re-chargeable
batteries, Multi-Life 600mAh
• Handsfree activation could suddenly
increase the volume in the earpiece to
a very high level: make sure the
handset is not too close to your ear.
• This equipment is not designed to
make emergency calls when the power
fails. An alternative has to be made
available to allow emergency calls.
• Do not expose the phone to excessive
heat caused by heating equipment or
direct sunlight.
• Do not drop your phone or allow
objects to fall on your phone.
• Do not use any cleaning agents
containing alcohol, ammonia, benzene,
or abrasives as these may harm the
set.
• Do not use the product in places
where there are explosive hazards.
• Do not let small metal objects come
into contact with the product. This can
deteriorate audio quality and damage
the product.
• Active mobile phones in the vicinity
may cause interference.
About operating and storage
temperatures:
• Operate in a place where temperature
is always between 0 and 35º C.
• Store in a place where temperature is
always between -20 and 45º C.
• Battery life may be shortened in low
temperature conditions.
Important
4:36 PM
! Warning
Metallic objects may be retained if placed
near or on the handset receiver.
1.2
Using GAP standard
compliance
The GAP standard guarantees that all
DECT™ GAP handsets and base stations
comply with a minimum operating
standard irrespective of their make.
XL665 handset and base station are GAP
compliant, which means they guarantee
the minimum functions: register a
handset, take the line, make a call and
receive a call. The advanced features may
not be available if you use them with
other makes.
To register and use XL665
handset with a GAP compliant base
station of different make, first follow the
procedure described in the
manufacturer’s instructions, then follow
the procedure described in this
manual for registering a handset.
To register a handset from different make
to XL665 base station, put the
base station in registration mode, then
follow the procedure described in the
handset manufacturer’s instructions.
1.3
Conformity
We, Philips declare that the product is in
compliance with the essential
requirements and other relevant
provisions of Directive 1999/5/EC. This
product can only be connected to the
analogue telephone networks of the
countries mentioned on the packaging.
You can find the Declaration of
Conformity on www.p4c.philips.com.
5
XL665_IFU_GB.book Page 6
Wednesday, October 14, 2009
1.4
Environmental
Remember to observe local regulations
regarding the disposal of your packaging
materials, exhausted batteries and old
equipment. Promote their recycling
where possible.
1.5
Recycling & disposal
Disposal instructions for old products:
The purpose of the WEEE directive
(Waste Electrical and Electronic
Equipment; 2002/96/EC) is to ensure that
products are recycled using the best
available treatment, recovery and recycling
techniques to ensure human health and
high environmental protection. Your
product is designed and manufactured with
high quality materials and components
which can be recycled and reused.
Do not dispose of your old product in
your general household waste bin.
Inform yourself about the local separate
collection system for electrical and
electronic products marked by this
symbol.
• If you purchase a replacement
product, hand your complete old
product back to the retailer. The shop
should accept it as required by the
WEEE directive.
Disposal instructions for batteries:
Batteries should not be
disposed of with general
household waste.
Packaging information:
Philips has marked the packaging with
standard symbols designed to promote
the recycling and appropriate disposal of
your eventual waste.
A financial contribution has been
paid to the associated national
recovery & recycling system.
The labelled packaging material is
recyclable.
1.6
1.
2.
Use one of the following disposal options:
• Dispose of the complete product
(including its cables, plugs and
accessories) in the designated WEEE
collection facilities.
6
4:36 PM
3.
Electric, Magnetic and
Electromagnetic Fields
("EMF")
Philips Royal Electronics
manufactures and sells many
consumer oriented products which
usually, as with any electronic
apparatus, have the ability to emit
and receive electro magnetic signals.
One of Philips' leading Business
Principles is to take all necessary
health and safety precautions for our
products, to comply with all
applicable legal requirements and to
stay well within the EMF standards
applicable at the time of producing
the products.
Philips is committed to develop,
produce and market products that
cause no adverse health effects.
Important
XL665_IFU_GB.book Page 7
4.
5.
Wednesday, October 14, 2009
4:36 PM
Philips confirms that if its products
are handled properly for their
intended use, they are safe to use
according to scientific evidence
available today.
Philips plays an active role in the
development of international EMF
and safety standards, enabling Philips
to anticipate further developments
in standardisation for early
integration in its products.
Important
7
XL665_IFU_GB.book Page 8
2
Wednesday, October 14, 2009
4:36 PM
Your phone
Congratulations on your purchase and welcome to Philips!
To fully benefit from the support that Philips offers, register your product at
www.philips.com/welcome.
2.1
What’s in the box
Base station
Handset
Battery door
Power supply
NiMH AAA Rechargeable
Batteries x 2
Line Cord*
User Manual
Guarantee
Quick start
guide
Note
*The line adapter may not be attached to the line cord. You may find the line adapter
in the box. In this case, you have to connect the line adapter to the line cord first before
plugging the line cord to the line socket.
In multi-handset packs, you will find one or more additional handsets, chargers with
power supply units and additional rechargeable batteries.
8
Your phone
XL665_IFU_GB.book Page 9
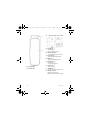
2.2
Wednesday, October 14, 2009
Overview of your phone
E
F
G
H
I
J
K
A
B
C
D
Earpiece
Memory keys MN
Quick dial your stored phone
numbers
4:36 PM
Down key <
Scroll down menu
Decrease earpiece and loudspeaker
volume
Up key C
Scroll up menu
Increase earpiece and loudspeaker
volume
Talk / End key :
Make and receive calls
End call
Speaker key v
Turn speaker on / off
Phonebook key e
Enter phonebook
Star key *
Dial *
Intercom / Conference key 0
Dial 0
Make intercom call
Make conference call
L
Pause key #
Dial # and enter pause
M
Microphone
Left Softkey (
Select the function displayed on the
handset screen directly above it.
Enter received calls and redial lists
Mute/unmute microphone
Right Softkey (
Select the function displayed on the
handset screen directly above it.
Access main menu
Exit menu / operation
Your phone
9
XL665_IFU_GB.book Page 10
Wednesday, October 14, 2009
2.3
A
B
4:36 PM
Overview of the base station
Paging key _
Find handset(s)
Enter registration mode
Volume up/down ,
Increase/Decrease speaker volume
C
D
E
F
N
Loudspeaker
O
Battery door
G
H
10
Previous key [
Skip backward during playback
Next key ]
Skip forward during playback
Play/Stop key p
Play messages
Stop message playback
Delete key f
Delete messages
On/Off key o
Turn the answering machine on/off
Message counter
Display message number
Display answering machine operation
Your phone
XL665_IFU_GB.book Page 11
2.4
Wednesday, October 14, 2009
Display icons
Each icon gives you a visual message of
what is happening on your handset.
Battery is fully charged
Battery is fully discharged
Call in progress
Voicemail indicator
Call log
Speaker on
Ringer off
Answering machine
4:36 PM
2.5
The menus
Your phone offers a variety of features
and functions grouped in the menus.
2.5.1 Browsing the menus
The main menu includes the Date & Time,
Ring Tones, Language, Key Beep,
Conference and Answering Machine
menus.
From standby mode, you can,
• Press the right softkey (MENU
to enter the main menu.
• Press the left softkey (CALLS
to enter the received calls and redial
lists.
• Press e to enter the phonebook.
Tip
Use C or < to navigate the
menus.
Tip
Exit to previous menu. Press the right
softkey
BACK to exit to the
)
previous menu. All unconfirmed changes
will not be saved.
Signal strength
ECO mode*
*When the ECO mode is activated, this
icon will replace the icon in the display.
Your phone
11
XL665_IFU_GB.book Page 12
3
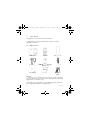
3.1
1
Wednesday, October 14, 2009
Getting started
3.2
1
Connect the base station
Connect the power adapter jack to
the socket on the bottom of the
base station.
4:36 PM
Connect your charger
(For multi-pack models only)
Connect the AC power adapter to a
standard wall outlet.
2 Connect the mains adapter to a
standard wall outlet.
3 Connect the telephone line cord to
the phone socket at the bottom of
the base station and the wall phone
socket.
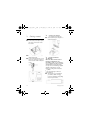
3.3
Install your handset
!
Warning
CAUTION: RISK OF EXPLOSION IF
BATTERY IS REPLACED BY AN
INCORRECT TYPE. Use only with Philips,
type no.: Multi-Life 600mAh (2x 1.2V AAA
600mAh Ni-MH) rechargeable battery.
Use only the recommended type supplied
with this product. Dispose of used
batteries according to the instructions.
Note
Charge the handset(s) for 24 hours
before initial use!
1 The batteries are pre-installed in
your handset. Before charging,
remove the insulation foil by pulling
the tab off your handset.
12
Getting started
XL665_IFU_GB.book Page 13
Wednesday, October 14, 2009
2 Place the handset on the base.
4:36 PM
Battery full
Battery empty. Require
charging.
Your handset may power down shortly if
it is not charged after the battery is
empty. If you are on the phone when the
battery is nearly empty, you will hear
warning tones. Your call may be cut off
shortly after the warning.
Note
Handset may get warm during initial
charging. This is normal. The handset may
take a few seconds to power up.
3.4
Checking the battery level
The battery icon displays the current
battery level.
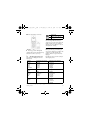
3.5
Welcome mode
Before you first use your handset, you
may need to configure it according to the
country of use. After inserting the
batteries, Welcome appears in various
languages.
Press OK. You can now set the country to
start using the phone.
Country
Default outgoing message
language
*Outgoing message language
available
Germany
Austria
Turkey
France
Switzerland
UK
Ireland
Italy
Portugal
Greece
Spain
German
German
Turkish
French
English
English
1 - German
2 - Turkish
3 - French
4 - Italian
5 - English
1 - English
Italian
Portuguese
Greek
Spanish
1 - Italian
2 - Portuguese
3 - Greek
4 - Spanish
5 - English
1 - Dutch
2 - French
3 - German
4 - English
Netherlands
Belgium
English
* By default, the outgoing message language 1 is displayed.
Getting started
13
XL665_IFU_GB.book Page 14
Wednesday, October 14, 2009
4:36 PM
Country
Default outgoing message
language
*Outgoing message language
available
Sweden
Norway
Finland
English
1 - Swedish
2 - Norwegian
3 - Finnish
4 - Danish
5 - English
1 - Russian
2 - Ukrainian
3 - English
1 - Romanian
2 - Polish
3 - Czech
4 - Hungarian
5 - English
Denmark
Russia
Ukraine
English
Romania
Poland
Czech
Hungary
Slovakia
Slovenia
Croatia
Bulgaria
Serbia
Singapore
Indonesia
Malaysia
Australia
New Zealand
English
English
1 - English
English
1 - English
* By default, the outgoing message language 1 is displayed.
3.5.1 Setting your country
It is necessary to set the correct country
for the phone for it to work properly
according to your country's standards.
After the welcome message,
1 Select your country.
2 Press OK to confirm.
• The country setting is saved.
After setting the country, you can set the
date and time (see next section). The
phone is now ready to use. If you wish to
set the date and time later, you can skip
the setting by pressing BACK.
14
To re-configure your country setting, you
will need to reset your phone, see
“Default (pre-programmed) settings” on
page 34.
3.6
Setting the clock
Your phone has a digital clock. Set the
clock before initial use of the phone.
3.6.1
Setting the date and time
1 Press MENU.
2 Select DATE & TIME. Press OK to
enter SET DATE mode.
3 Use the digit keys to enter the date.
Getting started
XL665_IFU_GB.book Page 15
Wednesday, October 14, 2009
4 Press OK.
5
6
• The handset displays the time
editing screen.
Use digit keys to enter the time.
Press the right softkey ( to
select AM or PM.
Press OK.
• The setting is saved.
3.7
What is standby mode?
Your phone is in standby mode when it is
idle. The standby screen displays the handset
name, the handset number, the signal icon,
and the battery icon.
Note
When the phone is idle for a few seconds,
the backlight of your phone will go off. If the
phone is left idle for the next 20 seconds, it
will switch to SCREENSAVER mode
displaying the time in digital clock format.
4:36 PM
Note
If your handset has lost link, you will not
be able to make or receive any calls. You
will also not be able to carry out many of
the phone's functions and features.
3.9
Missing handset(s)
1 Press _ on the base station.
2
• All the handsets connected to this
base station ring.
Press _ on the base station again
to stop paging.
• All the handsets stop ringing
OR
Press any key on the handset to stop
the paging for all handsets (except if
you press SILENT, it will only stop
paging for that handset).
3.8
Checking the signal strength
The signal icon
displays the link status
between your handset and the base
station. A steady icon means your
handset and the base station are linked. A
flashing icon means your handset and the
base station are not linked.
If you move too far away from the base
station while you are on the phone, you
will hear warning tones notifying you that
your handset is almost out of range - lost
link. Take your handset closer to the base
station or your call may be cut off shortly
after the warning.
Getting started
15
XL665_IFU_GB.book Page 16
Wednesday, October 14, 2009
4:36 PM
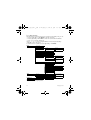
3.10 Menu structure
The table below describes the menu tree of your phone. From standby mode, you can:
• Press the right softkey (MENU to enter the main menu.
• Press the left softkey (CALLS to enter the received calls and redial lists.
• Press e to enter the phonebook.
Use the C or < keys to navigate within the menus and press left softkey
(OK to enter each option.
To exit the menu or operation, press the right softkey (BACK.
MENU
DATE & TIME
RING TONES
CHOICE
Melody list
RING VOLUME
OFF/LEVEL 1/LEVEL 2/
LEVEL 3/LEVEL 4/ LEVEL 5
LANGUAGE
Language list
KEY BEEP
ON/OFF
CONFERENCE
ON/OFF
ANSWER.MACHINE
ADV. SETTING
GREETING MESSAGE
PLAY/RECORD/DELETE
LANGUAGE
Language list
RING DELAY
3 RINGS/4 RINGS/5 RINGS/
6 RINGS/7 RINGS/8 RINGS/
ECONOMY
ECO
ON/OFF
REGISTRATION
RECALL TIME
SHORT/MEDIUM/LONG
DIAL MODE*
TONE/PULSE
AREA CODE*
ON/OFF
CARRIER CODE*
RESET
CALLS
PHONEBOOK
REDIAL LIST
Redial list
VIEW/SAVE NUMBER/
DELETE/DELETE ALL
RECEIVED CALLS
Received calls list
VIEW/SAVE NUMBER/
DELETE/DELETE ALL
Phonebook list
ADD/VIEW/MODIFY/
DELETE/DELETEALL
MEMORY
*This menu item is country-dependent
16
Getting started
XL665_IFU_GB.book Page 17
Wednesday, October 14, 2009
4:36 PM
2 Press : to dial out the call.
4
Call
Note
Emergency Call. This telephone is not
designed for making emergency
telephone calls when the power fails.
Alternative arrangements should be made
for access to emergency services.
4.1
Making a call
This section describes the different ways
to make a call.
Note
Signal Strength. Check the signal strength
before making a call and during a call. For
details, see “Checking the signal strength”
on page 15.
1 Press :.
2 Dial the phone number. The number
displays on the screen and is dialed
out.
Note
Call Timer. The call timer displays the talk
time of your current call.
Note
Low Battery. During a call, you will hear
warning tones if your handset is almost
out of battery. Charge your handset or
your call may soon be cut off. For details,
see “Checking the battery level” on
page 13.
4.1.1 Pre-dialing
Pre-dialing lets you view and edit the
number before making the call.
1 Enter the phone number. The
number displays on the screen. You
can make changes before dialing out.
Call
Tip
Press CLEAR to erase a digit.
Press and hold # to enter a pause. P
displays on the screen.
4.1.2 Calling from the redial list
Press CALLS.
Select REDIAL LIST. Press OK.
Select the record you want to call.
Press : to dial out the call.
1
2
3
4
4.1.3 Calling from the phonebook
For details on the phonebook, see
“Phonebook” on page 23.
1 Press e to access the
phonebook.
2 Select the phonebook record you
want to call.
3 Press : to dial out the call.
4.1.4 Calling from the call log
You can return a call from the incoming
(received or missed) call log. For details,
see “Call log” on page 25.
1 Press CALLS.
2 Select RECEIVED CALLS. Press OK.
3 Select the call record you want to
call.
4 Press : to dial out the call.
4.2
Ending a call
1 Press :.
Tip
Auto hang up. Place the handset on the
base or charging cradle to end the call
automatically.
17
XL665_IFU_GB.book Page 18
Wednesday, October 14, 2009
4.3
Answering a call
When you receive a call, your phone rings
and the LED blinks. Press : to answer
the call.
! Warning
When the handset rings during an
incoming call, do not put the handset too
close to your ear as the ringer volume
may damage your hearing.
Note
Caller ID Service. Subscribe from your
service provider.
Tip
Missed Call Alert. When a call is missed,
your handset displays a notification
message. The
icon flashes.
4.3.1 Turning off the ringer
You can turn off the ringer for all
incoming calls.
1 For details on the ringer setting, see
“Personalizing your phone’s sounds”
on page 27.
Tip
Silent Ringer. When the phone is ringing,
press SILENT to turn off the ringer for
the current call.
4:36 PM
4.4.2 Muting the microphone
The mute feature allows you to speak to
someone in the house privately.
1 Press MUTE during a call to mute
the microphone.
• The caller cannot hear you, but you
can still hear his voice.
2 Press UNMUTE to un-mute the
microphone.
• You can now communicate with the
caller.
4.5
Using handsfree
1 Press r to turn on/off the
speaker.
Note
Handsfree. Handsfree activation can
suddenly increase the earpiece volume to
a very high level. Make sure the handset is
not too close to your ear.
4.6
Using quick dial
You can store up to 2 direct access
memories in your phone. A long press on
the keys M or N will store
the number displayed on the phone as
your quick dial number.
Note
4.4
During a call
This section describes the features that
are available during a call.
4.4.1
1
18
Adjusting the earpiece or
loudspeaker volume
Press C or < to adjust the
volume during a call.
• The volume is adjusted and the
phone goes back to the call screen.
Replace memory. If the selected memory
is already assigned with a number, a
confirmation message will be displayed
when you attempt to store a new
number. Press YES to replace the current
memory with the new number.
Call
XL665_IFU_GB.book Page 19
4.6.1
Wednesday, October 14, 2009
4:36 PM
Viewing quick dial number
1 Press M or N.
• The stored number is displayed.
Note
Press : to dial out the viewing number.
4.6.2
Calling from quick dial
1 Press :.
2 Press M or N to dial out
the call.
Call
19
XL665_IFU_GB.book Page 20
Wednesday, October 14, 2009
4:36 PM
2 Select or press the desired handset
5
Intercom and
Conference Calls
An intercom call is a call to another
handset that shares the same base station.
A conference call involves a conversation
between another handset and outside
caller(s).
5.1
Calling another handset
Note
If the base station only has 2 handsets
(yours and another handset) registered to
it, you can press 0 to call the other
handset instantly.
1 Press and hold 0 for more than 2
seconds. The handset(s) available for
intercom is displayed.
2 Select or press the desired handset
number. Press OK.
• The desired handset rings.
3 Press : on the desired handset.
• The intercom is established.
4 Press : to cancel or end the
intercom call.
Note
You will hear busy tone if the handset you
are calling is not available.
5.1.1 While you are on the phone
While talking on the phone, you can call
another handset.
1 Press and hold 0 for more than 2
seconds during the call.
• The external caller is automatically
being put on hold.
20
number. Press OK.
3 Wait for the called handset to
answer your call.
5.1.2
To toggle between the calls
1 Press 0 to switch between the
outside call and the intercom call.
5.2
Transferring a call
1 Press and hold 0 during a call.
2 Select or press the desired handset
number. Press OK.
3 Press : after the called handset
answers your call.
• The outside call is now transferred
to the other handset.
5.3
Making a conference call
A 3-way conference call is a call between
you, outside caller(s), and another
handset user in your house.
Note
A 3-way conference call requires 2
handsets that share the same base station.
During an external call,
1 Press and hold 0 for more than 2
2
3
seconds to initiate an internal call.
The handset(s) available for
intercom is displayed.
• The external caller is automatically
being placed on hold.
Select or press the desired handset
number. Press OK.
• Your desired handset rings.
Press : on the desired handset.
• The intercom is established.
Intercom and Conference Calls
XL665_IFU_GB.book Page 21
Wednesday, October 14, 2009
4:36 PM
4 Press CONF to enter conference
5
mode.
• You are now on a 3-way conference
call with the external call and the
desired handset.
Press INT to end the conference call
and return to intercom mode.
Tip
Auto Conference. You can join an ongoing
external call with another handset by
pressing :. See “Auto conference” on
page 27.
During the conference call,
1 Press INT to put the external call on
hold and go back to the internal call.
• The external call is put on hold
automatically.
Note
Any handset hangs up during a
conference call will leave the other
handset still in connection with the
external call.
Intercom and Conference Calls
21
XL665_IFU_GB.book Page 22
6
Wednesday, October 14, 2009
Text and Numbers
You can enter text and numbers for
handset name, phonebook records, and
other menu items.
6.1
4:36 PM
Example to write "PAUL"
Press 7 once:
P
Press 2 once:
A
Press 8 two times: U
Press 5 three times: L
Entering text and numbers
1 Find the key with the character you
want.
2 Press it as many times as needed for
the character you want.
Tip
Editing. Use CLEAR to delete and
or < to move the cursor.
C
Input table
Key
Characters (Upper case)
0
. 0 , / : ; " ' ! ¡ ? ¿ * + - %
\^ ~ |
1
Space 1 @ _ # = < > ( )
& € £ $ ¥ [ ] { } ¤ § …
2
ABC2ÀÂÆÁÃĂÄÅĄ
ÇĆČ
3
DEF3ĎĐ ĚÈÉÊËĘ∆Φ
4
GHI4ĞÍÌÎÏİΓ
5
JKL5ΛŁĹĽ
6
MNO6ÑŇŃÓÔÕÖŐ
7
PQRS7ŘŞŠŚβΠΘΣ
8
TUV8ŢŤÙÚÛÜŮ
9
WXYZ9ÝŽ
ΞΨ
22
Ż
Ű
ØΩ
Text and Numbers
XL665_IFU_GB.book Page 23
7
Wednesday, October 14, 2009
Phonebook
Your phone has a phonebook that can
store up to 100 records. You can access
the phonebook from your handset. Each
record can have a name up to 14
characters long and a number up to 24
digits long.
7.1
Viewing the phonebook
Note
Only one handset can view the
phonebook at one time.
1 Press e.
2 Select the contact you want to view.
Tip
Options Menu. While viewing the
phonebook, you can press OPTION to
access the phonebook options menu.
7.1.1 Searching a record
You can search the phonebook by
scrolling or by searching the first
character.
4:36 PM
7.1.2 During a call
You can access the phonebook and view
your records during a call.
1 Press e during a call
2 Select the contact you want to view.
7.2
Calling from the phonebook
See “Calling from the phonebook” on
page 17.
7.3
Adding a record
Note
Memory Full. If your phonebook is full, the
handset displays a notification message.
Delete some records before adding new
ones.
1 Press e.
2 Press OPTION. Select ADD. Press
OK.
Note
Text and Number Editing. See “Text and
Numbers” on page 22.
3 Enter the name. Press OK.
4 Enter the number.
Note
Duplicate Record. Contacts with identical
7.1.1.1
Searching by scrolling
1 While in the phonebook, press
C or < to scroll.
7.1.1.2
1
Searching by the first
character
While in the phonebook, press the
digit key that contains the character
you want to search by.
Phonebook
number cannot be saved.
Tip
# to insert a
pause.
5 Press SAVE to confirm.
• Your new record is saved.
Pause. Press and hold
23
XL665_IFU_GB.book Page 24
7.4
Wednesday, October 14, 2009
4:36 PM
Editing a record
1 Press e.
2 Select the contact you want to edit.
3
4
7.5
Press OPTION. Select MODIFY.
Press OK.
Edit the name if necessary. Press OK.
Edit the number if necessary. Press
SAVE to confirm.
• The record is saved.
Deleting a record
1 Press e.
2 Select the contact you want to
delete. Press OPTION. Select
DELETE. Press OK.
• The record is deleted.
7.6
Deleting all records
1 Press e.
2 Press OPTION. Select DELETE ALL.
3
24
Press OK.
• The handset displays a confirmation
request.
Press OK to confirm.
• All records are deleted.
Phonebook
XL665_IFU_GB.book Page 25
8
Wednesday, October 14, 2009
Call log
The call log stores the call history of all
incoming (missed or received) calls. The
incoming call history includes the caller
name, number, call time and date. This
feature is available if you have registered
to the Caller ID service (CLI) with your
service provider.
Your phone can store up to 20 call
records. The call log icon
will blink to
remind you of any unanswered received
calls. If the identity of the caller is not
withheld, the name (or number) of the
caller will be displayed. The call records
are displayed in chronological order with
the most recent received call at the top of
the list.
Note
Call back from the call list may not work
for all received numbers if the received
number is not a valid number (e.g.
Private).
8.1
2
3
8.2
Returning a call
To call from the incoming call log, see
“Calling from the call log” on page 17.
8.3
1
2
3
4
5
8.4
calls have already been viewed
before)
Select RECEIVED CALLS, and then
press OK to enter the incoming call
log.
Select the record you want to view.
Press OPTION. Select VIEW. Press
OK.
Call log
Saving a call record to your
phonebook
Enter the RECEIVED CALLS list.
Select the record you want while
browsing the log. Press OPTION.
Select SAVE NUMBER. Press OK.
Enter and edit the name if necessary.
Press OK.
Enter and edit the number if
necessary. Press SAVE.
• The record is saved.
Deleting a call record
1 Enter the RECEIVED CALLS list.
2 Select the record you want while
browsing the log. Press OPTION.
3 Select DELETE. Press OK.
• The record is deleted.
8.5
Deleting all call records
1 Enter the RECEIVED CALLS list.
2 Press OPTION to enter the options
Viewing the call records
1 Press VIEW. (or press CALLS if all
4:36 PM
menu while browsing the log.
3 Select DELETE ALL. Press OK.
4
• The handset displays a confirmation
request.
Press OK to confirm.
• All records are deleted.
25
XL665_IFU_GB.book Page 26
Wednesday, October 14, 2009
4:36 PM
3 Select DELETE. Press OK.
9
The redial list stores call history of dialed
calls. The dialed call history includes the
name and number called. Your phone can
store up to 10 redial records.
9.1
• The record is deleted.
Redial List
9.5
menu while browsing the list.
3 Select DELETE ALL. Press OK.
Viewing the redial records
1 Press CALLS.
2 Select REDIAL LIST, and then press
OK to enter the redial list.
Deleting all redial records
1 Enter the REDIAL LIST.
2 Press OPTION to enter the options
4
• The handset displays a confirmation
request.
Press OK to confirm.
• All records are deleted.
3 Select the record you want to view.
Press OPTION. Select VIEW. Press
OK.
9.2
Redialing a call
To call from the redial list, see “Calling
from the redial list” on page 17.
9.3
1
2
3
4
5
9.4
Saving a redial record to your
phonebook
Enter the REDIAL LIST.
Select the record you want while
browsing the list. Press OPTION.
Select SAVE NUMBER. Press OK.
Enter and edit the name if necessary.
Press OK.
Enter and edit the number if
necessary. Press SAVE.
• The record is saved.
Deleting a redial record
1 Enter the REDIAL LIST.
2 Select the record you want while
browsing the list. Press OPTION.
26
Redial List
XL665_IFU_GB.book Page 27
Wednesday, October 14, 2009
10 Custom Options
Make this your phone - change the look
and sound of the handset to suit your
needs and preference.
10.1
Personalizing your phone’s
display
10.1.1 Setting the display language
This feature only applies to model(s) with
multiple-language support.
Note
Available languages for selection vary with
different countries.
1 Press MENU.
2 Select LANGUAGE. Press OK.
3 Select the new setting. Press OK.
• The setting is saved.
10.2
Personalizing your phone’s
sounds
10.2.1 Setting your handset's
ringer melody
You can choose from 10 polyphonic ring
melodies and 5 standard ring melodies.
1 Press MENU.
2 Select RING TONES > CHOICE.
Press OK.
3 Select the new setting. Press OK.
• The setting is saved.
Custom Options
4:36 PM
10.2.2 Setting your handset's
ringer volume
There are 6 ringer volume levels
(including ringer off).
1 Press MENU.
2 Select RING TONES > RING
VOLUME. Press OK.
3 Select the new setting. Press OK.
• The setting is saved.
10.2.3 Setting the key tone
Key tone is the sound you hear when you
press a key on your handset.
1 Press MENU.
2 Select KEY BEEP. Press OK.
3 Select the new setting. Press OK.
• The setting is saved.
10.3 Auto conference
Auto conference lets you join an external
call with another handset by simply
pressing :.
10.3.1 Activating/Deactivating
auto conference
1 Press MENU.
2 Select CONFERENCE. Press OK.
3 Select the new setting. Press OK.
• The setting is saved.
27
XL665_IFU_GB.book Page 28
Wednesday, October 14, 2009
11 Advanced Settings
Discover and explore the additional
settings your phone offers! Find out how
these features can benefit you and help
you make the most of your phone.
11.1 ECO mode
The ECO mode reduces the transmission
power of the handset and base station.
1 Press MENU.
2 Select ADV. SETTING > ECO, then
press OK to confirm.
3 Select the new setting, then press OK
to confirm.
• The setting is saved.
•
is displayed instead of
in
standby mode.
Note
When the ECO mode is activated, the
connection range between the handset
and the base station can be reduced.
11.2 Registering handset(s)
The procedures described below are the
procedures you will find in your handset.
The procedures may vary according to the
handset you want to register. In this case,
refer to the manufacturer's instruction of
the additional handset.
Additional handsets must be registered to
the base station before you can use them.
Your base station can register up to 5
handsets. The system PIN may be required
for registering or unregistering handsets.
28
4:36 PM
11.2.1 Auto registration
1 Place the handset on the base station.
The handset will detect the base and
start to register automatically.
• Registration shall be completed in
less than 2 minutes. The base
automatically assigns a handset
number to the handset.
11.2.2 Manual registration
If the base station is of a different make
from XL665, the handset and base linking
may not be achieved during auto
registration mode. Follow the
instructions below to register your
handset manually to the base station.
1 Press MENU.
2 Select ADV. SETTING >
REGISTRATION. Press OK.
• The display shows PRESS PAGE
KEY FOR 5 SEC.
3 Press OK to continue.
4 On the base station, press and hold
_ for approximately 5 seconds.
5 Enter the system PIN (Pre-set: 0000).
Use CLEAR to make corrections.
6 Press OK to confirm the PIN.
• Registration shall be completed in
less than 2 minutes. The base
automatically assigns a handset
number to the handset.
Note
If the PIN is incorrect or no base is found
within a certain period, your handset
displays a notification message. Repeat
the above procedure if registration failed.
Note
The pre-set system PIN code is 0000 and
it cannot be changed.
Advanced Settings
XL665_IFU_GB.book Page 29
Wednesday, October 14, 2009
11.3 Recall selection
Recall is a signal that needs to be sent to
the network when making or answering a
second call. Your phone shall already be
set up for use in your country. For details,
consult your service provider.
11.3.1 Setting the recall duration
There are 3 recall time options: Short,
Medium, and Long. The number of
available options varies with different
countries.
1 Press MENU.
2 Select ADV. SETTING > RECALL
TIME. Press OK.
3 Select the new setting. Press OK.
• The setting is saved.
11.4 Dial mode
This feature only applies to model(s) that
support both tone and pulse dialing.
Dial mode is the telephone signal used in
your country. Your phone supports tone
(DTMF) and pulse (rotary) dialing. Your
phone shall already be set up for use in
your country. For details, consult your
service provider.
11.4.1 Setting the dial mode
1 Press MENU.
2 Select ADV. SETTING > DIAL
3
MODE. Press OK.
Select the new setting. Press OK.
• The setting is saved.
Tip
Temporary Tone. If your phone is in pulse
dialing, press and hold * during a call for
Advanced Settings
4:36 PM
temporary tone mode. 'd' displays. Digits
entered after 'd' are sent out as tone
signals (for this call only).
11.5 Area code management
This feature only applies to model(s) with
area code support.
This feature automatically removes the
area code of an incoming call. You can
define an area code (up to 5 digits) you
want to remove. The phone number will
be saved in the call log without the area
code.
11.5.1 Activating area code
removal
1 Press MENU.
2 Select ADV. SETTING > AREA
CODE. Press OK.
3 Enter the area code. Press OK.
• The setting is saved.
11.5.2 Deactivating area code
removal
1 Press MENU.
2 Select ADV. SETTING > AREA
CODE. Press OK.
3 Use CLEAR to delete all the digits.
Press OK.
• The setting is saved.
11.6 Carrier code
This feature only applies to model(s) with
carrier code support.
For some telephone service providers,
you may need to add the carrier code
when making a call outside of your local
area. This feature automatically helps you
29
XL665_IFU_GB.book Page 30
Wednesday, October 14, 2009
decide if the carrier code is needed when
you are returning a call from the incoming
call log.
You only have to program the carrier
code of your service provider, and your
phone will do the rest for you.
4:36 PM
Note
After reset, your handset's power
switches off. It will switch back on in a few
seconds after updating all the settings. All
handsets return to the Welcome screen
after reset.
Note
Carrier Code. It is a 2 or 3-digit code that
represents a service provider. Consult
your service provider to find out its code.
To see a list of default setting, see
“Default (pre-programmed) settings” on
page 34.
11.6.1 Activating carrier code
1 Press MENU.
2 Select ADV. SETTING > CARRIER
CODE. Press OK.
3 Enter the carrier code. Press OK.
• The setting is saved.
11.6.2 Deactivating carrier code
1 Press MENU.
2 Select ADV. SETTING > CARRIER
CODE. Press OK.
3 Use CLEAR to delete all the digits.
Press OK.
• The setting is saved.
11.7 Restoring default settings
You can reset your phone settings to the
original factory settings.
1 Press MENU.
2 Select ADV. SETTING > RESET.
Press OK.
• The handset displays a confirmation
request.
3 Press OK to confirm.
• All settings have been reset.
30
Advanced Settings
XL665_IFU_GB.book Page 31
Wednesday, October 14, 2009
12 The Answering
Machine
Your phone includes a telephone
answering machine that records
unanswered calls when it is on. Once
switched on, your answering machine is
ready to be used.
The LED message counter (two digits 7segment display) on the base will show
the number of the new messages when
the answering machine is on.
--.
AA.
Memory full
The answering machine is
being accessed remotely (on
the handset or a touch tone
phone)
Recording
The 2-digit number shows:
- The volume level during
adjustment,
or
- The number of new messages
received
There are no new messages.
4:36 PM
Note
Once switched on, your answering
machine will answer incoming calls after a
certain number of rings depending on the
ring delay setting. See “Setting the ring
delay” on page 33.
12.2 Greeting message
The greeting message is the message your
caller hears when the answering machine
picks up the call. Your answering machine
comes with a pre-recorded greeting
message. You can record your personal
greeting message to replace the one in
your answering machine.
You can use the answering machine menu
on the handset to change the settings of
the answering machine.
12.2.1 Recording the greeting
message
The maximum length of the greeting
message is 3 minutes. After recording,
your new greeting message will
automatically replace the old one.
1 Press MENU.
2 Select ANSWER.MACHINE >
GREETING MESSAGE > RECORD.
Press OK.
3 Start recording after the beep.
4 Press SAVE to stop recording or
recording will stop after 3 minutes.
• The recorded outgoing message will
play back automatically for review.
12.1
Restore Pre-recorded greeting message. If
.
00.
.
Tip
Turning the answering
machine on or off
Through the base,
you want to restore the pre-recorded
greeting message, simply delete your
current greeting message.
1 Press o to turn the answering
machine on or off.
The Answering Machine
31
XL665_IFU_GB.book Page 32
Wednesday, October 14, 2009
12.2.2 Listening to the current
greeting message
1 Press MENU.
2 Select ANSWER.MACHINE >
GREETING MESSAGE > PLAY.
Press OK.
• The handset plays the current
outgoing message.
12.2.3 Deleting the greeting
message
1 Press MENU.
2 Select ANSWER.MACHINE >
GREETING MESSAGE > DELETE.
Press OK.
• The handset displays a confirmation
request.
3 Press OK to confirm.
• The pre-recorded greeting message
is restored.
Note
The pre-recorded outgoing message
cannot be deleted.
12.3 Incoming messages (ICM)
Each message can be up to 3 minutes
long. When you have received new
messages on your answering machine, the
LED message counter on the base will
show the number and the handset will
display a notification message. If you pick
up the phone when the caller is leaving a
message, the recording will stop and you
can talk to the caller directly.
4:36 PM
Delete some messages to allow room for
new messages.
12.3.1 Playing incoming messages
Incoming messages will be played back in
the sequence they were recorded.
From the base
1 Press p to start or stop message
playback.
• Adjust the volume. Press + to
increase or - to decrease the
speaker's volume.
• Skip backward.
- During message playback, press
[ to replay the message from
the beginning.
- During the first second of the
current message, press [ to
play the previous message.
• Skip forward. Press ] to skip to
the next message.
• Stop playback. Press p.
• Delete current message. Press f.
Note
Deleted message(s) cannot be recovered.
12.3.2 Deleting an incoming
message
From the base
1 Press f during message playback.
• The current message is deleted.
Note
Memory Full. The answering machine will
not be able to take in new messages.
32
The Answering Machine
XL665_IFU_GB.book Page 33
Wednesday, October 14, 2009
12.3.3 Deleting all old incoming
messages
From the base
1 Press and hold f during standby.
• All old messages are permanently
deleted.
Note
Unread message(s) cannot be deleted,
and deleted message(s) cannot be
recovered.
12.4 Call screening
Call screening allows you to hear the
caller while he is leaving a message. You
can then decide if you want to talk to the
caller directly.
From the base
You can use , to adjust the
speaker's volume during call screening.
The lowest volume level turns call
screening off.
4:36 PM
Tip
Economy. This is a cost effective way to
manage your messages when accessing
your answering machine remotely. When
economy is selected, your answering
machine will pick up the call after 3 rings
if you have new messages or 5 rings if you
do not have any messages.
12.6
Setting the answering
machine language
This feature only applies to model(s) with
multiple-language support.
The answering machine language is the
language for the pre-recorded OGM
announced by the answering machine.
1 Press MENU.
2 Select ANSWER.MACHINE >
LANGUAGE. Press OK.
3 Select the new setting. Press OK.
• The setting is saved.
12.5 Setting the ring delay
Ring delay is the number of times your
phone will ring before the answering
machine picks up the call. This setting
only applies when your answering
machine is switched on. You can change
this setting from 3 - 8 rings or economy.
1 Press MENU.
2 Select ANSWER.MACHINE > RING
DELAY. Press OK.
3 Select the new setting. Press OK.
• The setting is saved.
The Answering Machine
33
XL665_IFU_GB.book Page 34
Wednesday, October 14, 2009
4:36 PM
13 Default (pre-programmed) settings
Language
Country
dependent
Handset Name
PHILIPS
Date
01/01/09
Answering Machine
Ans Machine Status On
Base Call Screening On
Greeting message
memory
Pre-recorded
greeting message
Date Format
MM/DD
Time
00:00
Incoming message
memory
[Empty]
Time Format
12-hour
Voice Language
Phonebook List
Unchanged
Countrydependent
Auto Hang Up
On
Ring Delay
Economy
Recall Time
Country
dependent
Base Speaker
Volume
Level 3
Area Code
[Empty]
Carrier Code
[Empty]
Handset Speaker
Volume
Level 3
Conference
Country
dependent
Receiver Volume
Volume 3
Handset Ring
Volume
Level 3
Handset Ring
Melody
Melody 1
Handset Key Beep On
Incoming Call Log
[Empty]
Redial List
[Empty]
Dial Mode*
Country
dependent
* Country dependent features
34
Default (pre-programmed) settings
XL665_IFU_GB.book Page 35
Wednesday, October 14, 2009
4:36 PM
14 Technical Data
Display
•
White LCD backlight
Relative humidity
•
Operation: Up to 95% at 40°C
•
Storage: Up to 95% at 40°C
General telephone features
•
Dual mode caller name & number
identification
•
10 polyphonic ring melodies and 5
standard ring melodies
•
Conference call and voicemails
•
Intercom
Phonebook list, Redial list and Call log
•
Phonebook list with 100 entries
•
Redial list with 10 entries
•
Call log with 20 entries
Battery
•
2 x AAA NiMH Rechargeable
600mAh batteries
Power consumption
•
Power consumption at idle mode:
around 600mW
Weight and dimensions
•
Handset: 138.4 grams
174.0 x 56.3 x 30.0 mm (H x D x W)
•
Base: 170.7 grams
129.5 x 101.0 x 69.0 mm (H x D x W)
Temperature range
•
Operation: 0°C to +35°C (32°F to
95°F).
•
Storage: -20°C to +45°C (-4°F to
113°F).
Technical Data
35
XL665_IFU_GB.book Page 36
Wednesday, October 14, 2009
4:36 PM
15 Frequently asked
questions
www.philips.com/support
In this chapter, you will find the most
frequently asked questions and answers
about your phone.
Connection
Product behaviour
Signal icon flashing
• The handset may be out of range.
Move closer.
• If the handset displays REGISTER
YOUR HANDSET, register the
handset. See page 28.
I cannot change the settings of my
voice mail
• Operator voice mail is managed by
your operator and not the phone
itself. Please contact your operator
should you want to change the
settings.
Set-up
Registration fails continuously
• Your base memory may be full. Delete
an un-used handset and try again. See
page 28.
Sound
No dialing tone
• Check your phone connections.
• The handset may be out of range.
Move closer.
No parking tone
• The handset may not be placed
properly on the cradle. Try again.
• Charging contacts may be dirty.
Disconnect the power supply first and
then clean contacts with a damp cloth.
36
Handset on the charger does not
charge
• Check that the batteries are inserted
correctly.
• Make sure the handset is placed
properly on the charger. The battery
icon animates while charging.
• Batteries may be defective. Purchase
new ones from your dealer.
No display
• Check that the batteries are charged.
• Check the power and phone
connections.
Bad audio (crackles, echo, etc.)
• The handset may be nearly out of
range. Move closer to the base.
• The phone may be receiving
interference from nearby electrical
appliances. Move the base.
Frequently asked questions
XL665_IFU_GB.book Page 37
Wednesday, October 14, 2009
4:36 PM
• The phone may be at a location with
thick walls. Move the base.
Handset does not ring
• Check that the handset ringer is
turned on. See page 27.
Caller ID does not display
• Service may not be activated. Check
with your service provider.
• The caller's information may be
withheld or is unavailable.
Cannot make / answer a 2nd call
• Service may not be activated. Check
with your service provider.
• Check that the recall selection is
correct. See page 29.
The handset loses connection with
the base or the sound is distorted
during a call
• Check if the ECO mode is activated.
Turn it off to increase the handset
range and enjoy the optimal call
conditions.
Note
If the above solutions do not help,
remove the power from both the handset
and the base. Wait for 1 minute and try
again.
Frequently asked questions
37
XL665_IFU_GB.book Page 38
Wednesday, October 14, 2009
4:36 PM
16 Index
A
G
Accessories 8
Advanced Settings 28
Answering a call 18
Answering Machine 31
Area code 29
Auto conference 27
Auto prefix 29
Greeting message 31
C
Call 17
Call barring 29
Call log 25
Call screening 33
Calling from the call log 17
Calling from the phonebook 17, 23
Carrier code 29
Clock and alarm 23
Conference Calls 20
Conformity 5
Connect the base station 12
Country setting 14
D
Default settings 34
Deleting a record 24
Deleting all records 24
Dial mode 29
Display icons 11
Display language 27
E
Ending a call 17
Entering text and numbers 22
F
Frequently asked questions 36
38
H
Handset locator 15
Handsfree 18
I
Intercom 20
K
Key tone 27
M
Making a call 17
Making a conference call 20
Menu structure 16
Muting the microphone 18
O
Overview of the base 10
Overview of the handset 9
P
Personalizing your phone’s display 27
Personalizing your phone’s sounds 27
Phonebook 23
Power requirements 4
Pre-dialing 17
R
Recall selection 29
Recycling & disposal 6
Redial List 26
Redialing a call 26
Registering handset 28
Restoring default settings 30
Ringer melody 27
Ringer volume 27
Index
XL665_IFU_GB.book Page 39
Wednesday, October 14, 2009
4:36 PM
S
Setting the clock 14
Setting the ring delay 33
T
Transferring a call 20
W
Wall mounting 12
Index
39
Wednesday, October 14, 2009
4:36 PM
ENGLISH
XL665_IFU_GB.book Page 45
UFZZ01239AZ(0)
XL665_IFU_GB.book Page 46
Wednesday, October 14, 2009
4:36 PM
© 2008 Koninklijke Philips Electronics N.V.
All rights reserved
Reproduction in whole or in part is prohibited without the
written consent of the copyright owner
Document number: 01239AZ(0)
Printed in Vietnam