1
Parallels Desktop
User's Guide
Copyright © 1999-2009 Parallels Holdings, Ltd.
®
ISBN: N/A
Parallels Holdings, Ltd.
c/o Parallels Software, Inc.
13755 Sunrise Valley Drive
Suite 600
Herndon, VA 20171
USA
Tel: +1 (703) 815 5670
Fax: +1 (703) 815 5675
Copyright © 1999-2009 Parallels Holdings, Ltd. and its affiliates. All rights reserved.
Parallels, Coherence, Parallels Transporter, Parallels Compressor, Parallels Desktop, and Parallels Explorer
are registered trademarks of Parallels Software International, Inc. Virtuozzo, Plesk, HSPcomplete, and
corresponding logos are trademarks of Parallels Holdings, Ltd. The Parallels logo is a trademark of Parallels
Holdings, Ltd.
This product is based on a technology that is the subject matter of a number of patent pending applications.
Virtuozzo is a patented virtualization technology protected by U.S. patents 7,099,948; 7,076,633; 6,961,868 and
having patents pending in the U.S.
Plesk and HSPcomplete are patented hosting technologies protected by U.S. patents 7,099,948; 7,076,633 and
having patents pending in the U.S.
Distribution of this work or derivative of this work in any form is prohibited unless prior written permission is
obtained from the copyright holder.
Apple, Bonjour, Finder, Mac, Macintosh, and Mac OS are trademarks of Apple Inc.
Microsoft, Windows, Microsoft Windows, MS-DOS, Windows NT, Windows 95, Windows 98, Windows 2000,
Windows XP, Windows Server 2003, Windows Vista, Windows Server 2008, Windows 7, Microsoft SQL Server,
Microsoft Desktop Engine (MSDE), and Microsoft Management Console are trademarks or registered
trademarks of Microsoft Corporation.
Linux is a registered trademark of Linus Torvalds.
Red Hat is a registered trademark of Red Hat Software, Inc.
SUSE is a registered trademark of Novell, Inc.
Solaris is a registered trademark of Sun Microsystems, Inc.
X Window System is a registered trademark of X Consortium, Inc.
UNIX is a registered trademark of The Open Group.
IBM DB2 is a registered trademark of International Business Machines Corp.
SSH and Secure Shell are trademarks of SSH Communications Security, Inc.
MegaRAID is a registered trademark of American Megatrends, Inc.
PowerEdge is a trademark of Dell Computer Corporation.
eComStation is a trademark of Serenity Systems International.
FreeBSD is a registered trademark of the FreeBSD Foundation.
Intel, Pentium, Celeron, and Intel Core are trademarks or registered trademarks of Intel Corporation.
OS/2 Warp is a registered trademark of International Business Machines Corporation.
VMware is a registered trademark of VMware, Inc.
All other marks and names mentioned herein may be trademarks of their respective owners.
3
Contents
Introduction
7
About Parallels Desktop............................................................................................................................... 8
About This Guide......................................................................................................................................... 9
Organization of this Guide.............................................................................................................. 10
Documentation Conventions........................................................................................................... 10
Getting Help............................................................................................................................................... 11
Feedback .................................................................................................................................................... 12
Virtual Machine Technology Basics
13
Virtual Machine Technology Overview..................................................................................................... 13
Parallels Virtual Machine........................................................................................................................... 14
Installing Parallels Desktop
16
System Requirements................................................................................................................................. 16
Installing Parallels Desktop........................................................................................................................ 17
Activating Parallels Desktop...................................................................................................................... 20
Registering Parallels Desktop .................................................................................................................... 22
Upgrading to Parallels Desktop 5............................................................................................................... 24
Updating Parallels Desktop........................................................................................................................ 25
Automatic Updating........................................................................................................................ 26
Manual Updating ............................................................................................................................ 27
Removing Parallels Desktop ...................................................................................................................... 28
Removing Parallels Desktop Without Installation Disc.................................................................. 29
Principles of Working With Parallels Desktop
30
Starting Parallels Desktop .......................................................................................................................... 30
The Welcome Window ................................................................................................................... 31
New Virtual Machine Assistant ...................................................................................................... 33
Interface Basics .......................................................................................................................................... 35
Parallels Virtual Machines List....................................................................................................... 36
Virtual Machine Window ............................................................................................................... 39
Menus ............................................................................................................................................. 43
Status Bar........................................................................................................................................ 44
Customizing Toolbar ...................................................................................................................... 47
Editing Parallels Desktop Preferences ....................................................................................................... 47
General Preferences ........................................................................................................................ 48
Appearance Preferences.................................................................................................................. 50
Keyboard and Mouse Preferences................................................................................................... 53
USB Preferences ............................................................................................................................. 57
Network Preferences....................................................................................................................... 60
Memory Preferences ....................................................................................................................... 63
Security Preferences........................................................................................................................ 64
Speech Preferences ......................................................................................................................... 65
iPhone Preferences.......................................................................................................................... 67
Update Preferences ......................................................................................................................... 68
Feedback Preferences...................................................................................................................... 70
Contents
Setting Up a Virtual Machine
4
71
Overview.................................................................................................................................................... 72
Supported Guest Operating Systems.......................................................................................................... 73
Typical Configurations............................................................................................................................... 75
Creating a Virtual Machine ........................................................................................................................ 76
New Virtual Machine Assistant ...................................................................................................... 77
Express Windows Mode ................................................................................................................. 79
Express Linux Mode ....................................................................................................................... 84
Typical Installation Mode ............................................................................................................... 88
Custom Installation Mode............................................................................................................... 90
Installing a Guest Operating System.......................................................................................................... 95
Installing Parallels Tools............................................................................................................................ 97
Parallels Tools Overview................................................................................................................ 98
In a Windows guest OS................................................................................................................. 101
In a Linux guest OS ...................................................................................................................... 103
In Mac OS X ................................................................................................................................. 106
In OS/2 and eComStation Guest OSs ........................................................................................... 107
Updating Parallels Tools............................................................................................................... 109
Removing Parallels Tools ............................................................................................................. 111
Adding an Existing Virtual Machine ....................................................................................................... 112
Importing Physical Computers and Virtual Machines ............................................................................. 114
Downloading Virtual Appliances............................................................................................................. 115
Working in a Virtual Machine
116
Starting, Stopping, and Resetting a Virtual Machine ............................................................................... 117
Suspending and Pausing a Virtual Machine............................................................................................. 119
Using Mouse in the Virtual Machine ....................................................................................................... 121
Changing View Modes............................................................................................................................. 122
Working in Full Screen ............................................................................................................................ 125
Using Safe Mode...................................................................................................................................... 126
Using Keyboard Shortcuts in a Virtual Machine ..................................................................................... 127
Installing Applications in a Virtual Machine ........................................................................................... 128
Setting Up Parallels Internet Security ...................................................................................................... 129
Getting Acronis Applications................................................................................................................... 130
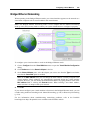
Placing an Image on Top of the Virtual Machine Window...................................................................... 131
Using 3D Graphics Applications.............................................................................................................. 132
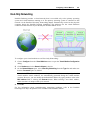
Making Screenshots ................................................................................................................................. 133
Using Touchpad Gestures and Apple Remote.......................................................................................... 134
Setting Up a Printer in a Virtual Machine................................................................................................ 136
Sharing a Mac Printer ................................................................................................................... 137
Setting Up a Printer via Bonjour................................................................................................... 138
Setting Up a Network Printer........................................................................................................ 139
Connecting USB Devices to a Virtual Machine....................................................................................... 141
Synchronizing a USB Palm OS Device With the Guest OS .................................................................... 144
Changing the Configuration at Runtime .................................................................................................. 145
Integrating Mac OS X and Your Virtual Machine
147
Coherence ................................................................................................................................................ 148
Crystal Mode............................................................................................................................................ 152
Using the MacLook Theme in Windows ................................................................................................. 154
Sharing Folders and Disks ....................................................................................................................... 155
Working With Shared Files and Folders....................................................................................... 158
Contents
5
Using Shared Profile ................................................................................................................................ 159
Using Shared Applications....................................................................................................................... 160
Using SmartSelect.................................................................................................................................... 162
Sharing Web Applications ....................................................................................................................... 165
Browsing Virtual Hard Disks in Finder ................................................................................................... 166
Working With Objects ............................................................................................................................. 167
Configuring a Virtual Machine
168
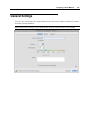
General Settings ....................................................................................................................................... 169
Options..................................................................................................................................................... 171
Startup and Shutdown Settings ..................................................................................................... 172
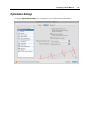
Optimization Settings.................................................................................................................... 174
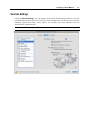
Services Settings ........................................................................................................................... 177
Security Settings ........................................................................................................................... 179
Shared Folders Settings................................................................................................................. 180
Shared Profile Settings.................................................................................................................. 182
Shared Applications Settings ........................................................................................................ 184
Internet Applications Settings....................................................................................................... 186
SmartMount Settings .................................................................................................................... 188
SmartGuard Settings ..................................................................................................................... 190
Undo Disks Settings...................................................................................................................... 192
Crystal & Coherence Settings ....................................................................................................... 194
Full Screen Settings ...................................................................................................................... 196
Modality Settings.......................................................................................................................... 198
Gestures & Apple Remote Settings .............................................................................................. 200
Hardware Settings .................................................................................................................................... 201
Boot Order Settings ...................................................................................................................... 201
Video Settings............................................................................................................................... 203
Floppy Settings ............................................................................................................................. 205
CD/DVD Settings ......................................................................................................................... 206
Hard Disk Settings ........................................................................................................................ 208
Network Adapter Settings............................................................................................................. 210
Printer Port Settings ...................................................................................................................... 212
Serial Port Settings........................................................................................................................ 214
Sound Settings .............................................................................................................................. 216
USB Settings................................................................................................................................. 217
Support for Virtual and Real Disks............................................................................................... 218
Adding and Removing Devices .................................................................................................... 220
Initializing the Newly Added Space ............................................................................................. 222
Networking in a Virtual Machine............................................................................................................. 228
Shared Networking ....................................................................................................................... 228
Bridged Ethernet Networking ....................................................................................................... 230
Host-Only Networking.................................................................................................................. 231
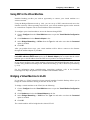
Using WiFi in the Virtual Machine............................................................................................... 232
Bridging a Virtual Machine to VLAN .......................................................................................... 232
Managing Virtual Machines
233
Cloning a Virtual Machine....................................................................................................................... 234
Removing a Virtual Machine ................................................................................................................... 236
Working With Virtual Machine Templates.............................................................................................. 237
Creating a Virtual Machine Template........................................................................................... 238
Deploying a Virtual Machine Template........................................................................................ 240
Backing Up a Virtual Machine................................................................................................................. 242
Compressing Virtual Hard Disks ............................................................................................................. 243
Managing Virtual Machines From iPhone ............................................................................................... 244
Troubleshooting the Firewall and Network Problems .................................................................. 248
Contents
Working With Snapshots
6
249
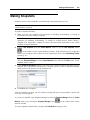
Making Snapshots .................................................................................................................................... 250
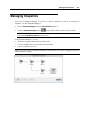
Managing Snapshots ................................................................................................................................ 251
Using the Boot Camp Partition in a Virtual Machine
255
Overview.................................................................................................................................................. 256
Creating a Virtual Machine for the Boot Camp Partition......................................................................... 258
Boot Camp Configurations ...................................................................................................................... 260
Booting via Parallels Virtual Machine ..................................................................................................... 261
Booting via Boot Camp............................................................................................................................ 262
Using Parallels Add-ons
263
Using Parallels Transporter...................................................................................................................... 263
Parallels Transporter Working Principles ..................................................................................... 263
Migration Scenarios ...................................................................................................................... 264
Starting Parallels Transporter........................................................................................................ 266
Using Parallels Mounter........................................................................................................................... 267
Using Parallels Image Tool...................................................................................................................... 268
Increasing the Virtual Hard Disk Capacity ................................................................................... 269
Managing the Virtual Hard Disk Properties.................................................................................. 270
Troubleshooting and Limitations
271
Getting Technical Support ....................................................................................................................... 271
Reporting a Problem to Parallels Team.................................................................................................... 272
Checking the Build Number..................................................................................................................... 273
Installing Windows 98 as a Guest OS ...................................................................................................... 274
Using the F8 Key in Windows Virtual Machines on Mac OS X.............................................................. 276
Upgrading or Installing Parallels Tools in Text Mode in a Linux Guest OS ........................................... 277
Installing the GCC package and kernel sources in Linux ........................................................................ 278
Memory Usage Problems ......................................................................................................................... 279
Configuring Network in Linux................................................................................................................. 280
Suspending a Boot Camp Virtual Machine.............................................................................................. 281
Problems With Setting Up Network......................................................................................................... 281
Problems With Antivirus Software .......................................................................................................... 282
Glossary
283
Index
287
7
CHAPTER 1
Introduction
Parallels Desktop® enables you to use the hardware resources of your Intel-based Mac more
efficiently by sharing them between multiple virtual machines running on it.
This chapter provides general information about Parallels Desktop for Mac and this guide.
In This Chapter
About Parallels Desktop........................................................................................................ 8
About This Guide.................................................................................................................. 9
Getting Help .......................................................................................................................... 11
Feedback ............................................................................................................................... 12
Introduction
8
About Parallels Desktop
Parallels Desktop® is a virtualization solution that enables you to create virtual machines on
Macintosh computers with Intel® processors (1.66 GHz and faster). You can install a Windows,
Linux, Mac OS X, or another operating system in each of your virtual machines and work with
them and their applications side by side with your Mac OS X applications.
Built on Parallels’ award-winning hypervisor-based virtualization technology, Parallels Desktop
enables you to:
create powerful and easy to use virtual machines
use 32-bit and 64-bit operating systems inside your virtual machines
use Windows and Linux applications side by side with your Mac OS X applications, without
need to restart your Mac
coherently work with the files and applications of your Mac and virtual machine
create Parallels virtual machines from physical computers and third-party virtual machines
To enhance your experience of running more than one operating system on your Macintosh
computer, Parallels Desktop for Mac includes several utilities: Parallels Transporter® (p. 263),
Parallels Mounter (p. 267)®, and Parallels Image Tool (p. 268)®.
Introduction
9
About This Guide
This guide is aimed at a wide range of users who want to use Parallels Desktop to create,
configure, and run Parallels virtual machines.
Abbreviations used in the text
In the present guide, the following abbreviations are used:
OS is used instead of operating system in long sentences where using it will not change the
meaning of the sentence.
VM is used instead of virtual machine in long sentences where using it will not change the
meaning of the sentence.
Definitions
Primary operating system (primary OS): In this guide, this term is used to refer to the operating
system that controls the I/O devices of the computer and that is loaded when the physical
computer is turned on, that is, Mac OS X.
Guest operating system (guest OS): The term is used to refer to an operating system that is
installed in a virtual machine.
Help Usage Tips
Use the icons in the upper part of the help window to:
go to the online documentation page
watch an online video tutorial
contact the Parallels support team
To print a help page, click on the Print icon
and choose Print Frame.
. If this doesn't work, right-click the Print icon
Introduction
10
Organization of this Guide
This guide consists of the following chapters:
Introduction (p. 7) (you are reading it now). Provides basic information about the product
and this guide.
Virtual Machine Technology Basics (p. 13). Provides information on the specification and
technologies of virtual machines.
Installing Parallels Desktop (p. 16). Provides instructions on product installation.
Principles of Working With Parallels Desktop (p. 30). Provides basic information on how to
work with Parallels Desktop.
Setting Up a Virtual Machine (p. 71). Provides instructions on creating a new virtual machine
and adding an existing one.
Working in a Virtual Machine (p. 116). Provides basic information on how to work with
virtual machines.
Integrating Mac OS X and Your Virtual Machine (p. 147). Provides information on how to
enhance the integration between Mac OS X and your virtual machine.
Configuring a Virtual Machine (p. 168). Provides information on how to change the virtual
machine configuration.
Managing Virtual Machines (p. 233). Provides basic information on how to manage your
virtual machines.
Working With Snapshots (p. 249). Provides information on how to make and use snapshots.
Using Boot Camp Partition in a Virtual Machine (p. 255). Provides information on how to use
a Boot Camp Windows partition in a virtual machine.
Using Parallels Add-ons (p. 263). Provides information on how and when you can use
Parallels Transporter, Parallels Image Tool, and other Parallels add-ons.
Troubleshooting and Limitations (p. 271). Provides the solutions for some of the known
issues.
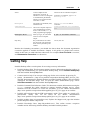
Documentation Conventions
Before you start using this guide, it is important to understand the documentation conventions
used in it.
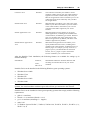
The table below presents the existing formatting conventions.
Formatting convention
Type of Information
Example
Go to the Resources tab.
Special Bold
Items you must select, such as
menu options, command
buttons, or items in a list.
Titles of chapters, sections, and
subsections.
Read the Basic Administration chapter.
Introduction
Italics
Used to emphasize the
importance of a point, to
introduce a term or to designate
a command-line placeholder,
which is to be replaced with a
real name or value.
11
These are the so-called EZ templates.
To destroy a Container, type vzctl
destroy ctid.
Monospace
The names of commands, files,
and directories.
Use vzctl start to start a
Container.
Preformatted
On-screen computer output in
your command-line sessions;
source code in XML, C++, or
other programming languages.
Saved parameters for Container
101
Monospace Bold
What you type, as contrasted
with on-screen computer
output.
# rpm –V virtuozzo-release
Key+Key
Key combinations for which
the user must press and hold
down one key and then press
another.
Ctrl+P, Alt+F4
Besides the formatting conventions, you should also know about the document organization
convention applied to Parallels documents: chapters in all guides are divided into sections,
which, in their turn, are subdivided into subsections. For example, About This Guide is a section,
and Documentation Conventions is a subsection.
Getting Help
Parallels Desktop offers several options for accessing necessary information:
Parallels Desktop Help. This document contains extensive information about the product, its
usage and troubleshooting. To open Parallels Desktop Help, choose Parallels Desktop Help
from the Parallels Desktop Help menu.
Context-sensitive help. You can open a help page for the active window by pressing F1.
Online documentation (http://www.parallels.com/products/desktop/pdfm5_docs-en_US/).
The PDF documentation for Parallels Desktop and other Parallels products, such as Parallels
Transporter and Parallels Image Tool. To open the online documentation page, choose
Online Documentation from the Parallels Desktop Help menu.
Parallels Command Line Reference Guide. This document contains information on using the
prlctl command line utility designed to manage Parallels Desktop and its virtual
machines from the Terminal. To access the document, go to the Online documentation
(http://www.parallels.com/products/desktop/pdfm5_docs-en_US/) page on our website.
Parallels API references and the SDK programmer's guide. These guides are aimed at ITprofessionals mainly and can be found on the Online documentation
(http://www.parallels.com/products/desktop/pdfm5_docs-en_US/) page on our website.
Parallels website (http://www.parallels.com). Explore the Support web page that includes
product help files and the FAQ section.
Parallels Knowledge Base (http://kb.parallels.com/). This online resource comprises
valuable articles about using Parallels Desktop and other Parallels products.
Introduction
12
Feedback
If you spot a typo in this guide, or if you have thought of a way to make this guide better, you
can share your comments and suggestions with us by completing the feedback form at the
Parallels documentation feedback page (http://www.parallels.com/en/support/usersdoc/).
13
CHAPTER 2
Virtual Machine Technology Basics
This chapter provides a brief description of Parallels virtual machines, their specifications, and
the underlying technologies.
In This Chapter
Virtual Machine Technology Overview................................................................................ 13
Parallels Virtual Machine...................................................................................................... 14
Virtual Machine Technology
Overview
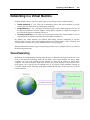
The Parallels Desktop software is based on the virtual machine technology that allows you to
share the hardware resources of the physical computer between the primary operating system
(the operating system installed on this physical computer) and multiple virtual machines running
on this computer.
The virtual machine technology can be successfully used on computers that support the Intel
virtualization technology (Intel VT-x). This technology allows Parallels Desktop to emulate
virtual processors inside virtual machines.
Intel VT-x implemented in the architecture of the new Intel processors is specially developed for
platforms running multiple operating systems. VT-x processors allow more precise emulation of
virtual processors. To learn more about Intel virtualization technology, visit the Intel website.
Virtual Machine Technology Basics
14
Parallels Virtual Machine
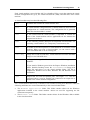
Taking the best from the virtual machine and Intel virtualization technologies, Parallels Desktop
enables you to create virtual machines with a variety of virtual hardware devices.
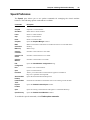
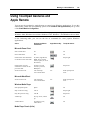
A Parallels virtual machine works like a stand-alone computer with the following hardware:
CPU
Up to 8-core Intel Celeron CPU
Motherboard
Intel i965 chipset based motherboard
RAM
Up to 8 GB of RAM
Video Adapter
VGA and SVGA with VESA 3.0 compatible Video Adapter
Video RAM
Up to 256 MB of Video RAM
Floppy Disk Drive
1.44 MB Floppy Disk Drive mapped to an image file or to a
physical floppy drive.
IDE Devices
Up to 4 IDE devices
Hard Disk
Hard Disk Drive mapped to an image file (up to 2 TB each)
CD/DVD-ROM Drive
CD/DVD-ROM drive mapped to a physical drive or to an
image file
SCSI Devices
Up to 15 SCSI devices
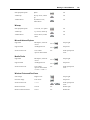
Hard Disk
Hard Disk Drive mapped to an image file (up to 2 TB each)
Generic SCSI Device
Generic SCSI device
Network Interfaces
Up to 16 Network interfaces: including Ethernet virtual
network card compatible with RTL8029
Serial (COM) Ports
Up to 4 Serial (COM) ports, mapped to a socket or to an
output file
Printer (LPT) Ports
Up to 3 Parallel (LPT) ports, mapped to output file, to a real
port, or to a printer
Sound Card
AC'97-compatible Sound Card, sound recording support
Keyboard
Generic PC keyboard
Mouse
Wheel mouse
Virtual Machine Technology Basics
15
Each virtual machine is stored in Mac OS X as a bundle of files (.pvm) that contains the virtual
machine configuration file (.pvs), the virtual hard disk file (.hdd), and other files of the virtual
machine.
A virtual machine may have the following files:
.pvm
A bundle that contains the virtual machine files.
.pvs
A virtual machine configuration file. It defines hardware and resources
configuration of a virtual machine. The configuration file is generated
when the virtual machine is created.
.sav
A file created when the virtual machine is suspended. It contains the
state of the virtual machine and its applications for the moment the
suspend was invoked.
.mem
A file containing memory dump for the suspended virtual machine. For
a running virtual machine, it is a temporary virtual memory file.
.hdd
A bundle of files that represents a virtual hard disk of a Parallels virtual
machine. When you create a virtual machine, you can create it with a
new virtual hard disk or use an existing one.
.iso/.dmg
Image files of CD or DVD discs. Virtual machines treat ISO and DMG
images as real CD/DVD discs.
.fdd
A floppy disk image file. Virtual machines treat FDD images as real
diskettes.
If you install a Windows guest OS in the Express Windows installation
mode, Parallels Desktop creates the unattended.fdd floppy disk
image file and places it to the virtual machine folder. The file is
required for Windows Server 2003, Windows XP, and Windows Vista
installation.
.txt
Output files for serial and parallel ports. The output .txt files are
generated when a serial or parallel port connected to an output file is
added to the virtual machine configuration.
For a virtual machine that has any of Windows OSs installed (starting from Windows 2000), the
following subfolders are created automatically in the virtual machine folder:
The Windows Applications folder. This folder contains aliases for the Windows
applications installed in the virtual machine. Aliases are used for supporting the file
extensions transparency.
The Windows Disks folder. This folder contains aliases for the Windows disks available
in the virtual machine.
16
CHAPTER 3
Installing Parallels Desktop
This chapter describes the system requirements and provides the information on how to install
Parallels Desktop on your Mac and activate it.
In This Chapter
System Requirements............................................................................................................ 16
Installing Parallels Desktop................................................................................................... 17
Activating Parallels Desktop................................................................................................. 20
Registering Parallels Desktop ............................................................................................... 22
Upgrading to Parallels Desktop 5.......................................................................................... 24
Updating Parallels Desktop................................................................................................... 25
Removing Parallels Desktop ................................................................................................. 28
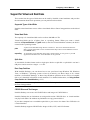
System Requirements
Before installing Parallels Desktop, make sure that your computer meets the hardware and
software requirements listed below.
Hardware Requirements
Any Macintosh computer with an Intel processor (1.66 GHz or greater). To run 64-bit
operating systems in virtual machines, an Intel Core 2 or later processor is required.
Minimum 1 GB of memory, 2 GB of memory is recommended.
Note: Your Mac must have enough memory to run Mac OS X and your Mac applications,
plus the memory required for the virtual machine's operating system and the applications
installed in it.
At least 450 MB of disk space on the boot volume for the program installation.
About 15 GB of disk space for each virtual machine.
Software Requirements
Mac OS X Snow Leopard v10.6
Mac OS X Leopard v10.5.2 or later
Mac OS X Tiger v10.4.11 or later
To get information about your Mac OS X version, type of processor, and amount of memory,
choose About This Mac from the Apple menu.
Installing Parallels Desktop
17
Installing Parallels Desktop
If you purchased Parallels Desktop from the Parallels online store, download the latest build
from Parallels Download Center (http://www.parallels.com/download/desktop/pdfm5-en_US).
When the download is complete, open the Parallels Desktop DMG package file. To start the
installation, double-click Install.
If you purchased a boxed copy of Parallels Desktop, insert the Parallels Desktop installation disk
into the optical drive of your Mac. Open the Parallels Desktop DMG package and double-click
Install.
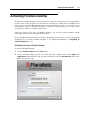
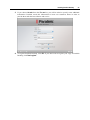
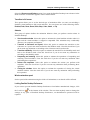
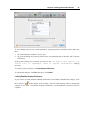
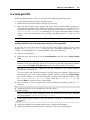
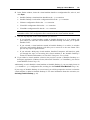
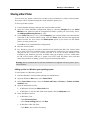
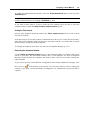
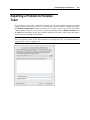
1 Parallels Desktop will connect to the Parallels update server and check for available updates.
If there is a newer version of Parallels Desktop available, you will be offered to install the
most recent version of Parallels Desktop. If you do not want to install the most recent
version, you may choose to install the version from the installation media.
Installing Parallels Desktop
18
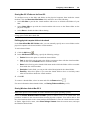
If you click Install current, Parallels Desktop will be installed from the installation
media.
If you click Download and install new version, the latest version of Parallels Desktop will
be downloaded and installed on your Mac.
If there is no update available or your Mac is not connected to the internet, Parallels Desktop
will be installed from the current installation source.
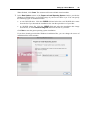
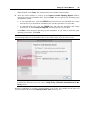
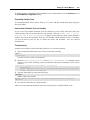
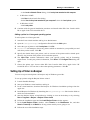
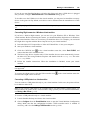
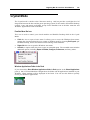
2 In the Welcome window, click Continue.
3 In the Important Information window, read the product Read Me file. Click Print to print the
document or Save to save it for future reading. When finished, click Continue.
Note: You can return to the previous steps by clicking the Go Back button.
4 In the Software License Agreement window, carefully read the license agreement. We
recommend to print the license agreement for your records using the Print button or to save
it for future reading using the Save button. When you are ready, click Continue.
Installing Parallels Desktop
19
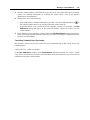
In the pop-up dialog, click Agree if you agree with the terms and conditions of the license
agreement.
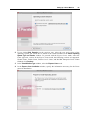
5 In the Customer Experience Program window, read about the Parallels Customer Experience
program and click Continue.
In the pop-up dialog, click Yes if you want to participate in the program. If you don't want to
participate, click No.
Note: If you choose not to participate, you may join the program later using the Feedback
pane (p. 70) of Parallels Desktop Preferences.
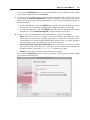
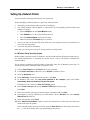
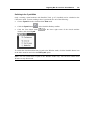
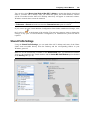
6 In the Select a Destination window, select the hard disk where to install Parallels Desktop.
You can install Parallels Desktop only on the boot volume, that is the hard disk where Mac
OS X is installed. Other disks, if any, are unavailable for selection. Click Continue.
Note: If you have only one volume on your Mac, this step is omitted.
7 Click Install to start the Parallels Desktop installation.
8 Enter your password when prompted and click OK.
9 The installation progress is shown in the Installing Parallels Desktop window.
10 The Installer informs you that the installation was successful. To complete the installation,
click Close.
After the installation, you can launch Parallels Desktop from the Applications folder on
your Mac. The Parallels Desktop add-ons like Parallels Transporter (p. 263) and Parallels Image
Tool (p. 268) are available from the /Applications/Parallels/ folder.
Installing Parallels Desktop
20
Activating Parallels Desktop
To fully run Parallels Desktop, you should activate it with an activation key. If you purchased a
boxed version of the program, you can find the activation key printed on the installation CD
sleeve. If you purchased the program online, the activation key was sent to your e-mail. If you
downloaded a copy of Parallels Desktop to evaluate it before buying, you can get a trial
activation key valid for a certain period of time.
After you activate your copy of Parallels Desktop, you can run virtual machines, install
operating systems and various applications in them.
If you upgraded Parallels Desktop to version 5 from the previous version, you need an upgrade
activation key to activate Parallels Desktop 5. For detailed information, see Upgrading to
Parallels Desktop 5 (p. 24).
Activating Your Copy of Parallels Desktop
To activate Parallels Desktop:
1
Choose Activate Product from the Help menu.
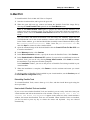
2 In the activation dialog, specify your name and your company name in the Name and
Organization fields (optional), and type the activation key into the Activation Key field. Click
OK to activate your copy.
Installing Parallels Desktop
21
Now that your copy of Parallels Desktop is activated, you can create virtual machines, install
operating systems in them, and work with the virtual machines' applications side by side with
the applications of your Mac.
Getting a Trial Activation Key
After you download Parallels Desktop from Parallels Download Center and install it, follow the
steps below:
1
Choose Activate Product from the Help menu.
2 In the activation dialog, click the Get Trial button.
3 In the User Registration Form dialog, specify your name and e-mail address. The Company
name field is optional.
4 You can provide additional information using the Optional Information tab.
5 Click the Register button to send this information to Parallels.
A free trial activation key will be sent immediately to the e-mail address you provided.
If you want to register online at the Parallels website, click the Register online button. You will
receive a free trial activation key by e-mail after you fill out and submit the online form.
When your free trial activation key expires, you will need to get a permanent activation key.
Getting a Permanent Activation Key
To purchase an activation key:
1
Choose Activate Product from the Help menu.
2 In the activation dialog, click the Buy now button to open Parallels Online Store
(http://www.parallels.com/en/buyonline) where you can purchase an activation key.
Installing Parallels Desktop
22
Registering Parallels Desktop
After you have activated your copy of Parallels Desktop with a permanent activation key, you
will be asked to register it.
We strongly recommend you to register your copy of Parallels Desktop. With registration, you
will be able to:
download and install the latest Parallels Desktop updates
create a backup copy of the product key on the Parallels web server and restore it at any
time
contact the Parallels support team
stay informed about Parallels news and announcements
All these services, including the product key backup, are free of charge for the registered users
of Parallels Desktop.
If you do not want to register now, choose Don't register. To initiate the registration procedure
later, select Register Product from the Help menu.
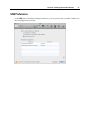
The registration procedure
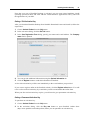
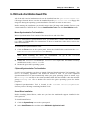
1
In the registration dialog, enter your name and e-mail in the corresponding fields and specify
where you are going to use Parallels Desktop.
2 Note: The registration dialog may differ from the one presented below.
Installing Parallels Desktop
23
3 If you choose At work from the For use list, you will be asked to specify some additional
information. Parallels needs this information to know our customers better in order to
provide them with the best software and service.
4 To register Parallels Desktop, click OK. If you don't want to register your copy of Parallels
Desktop, click Don't register.
Installing Parallels Desktop
24
Upgrading to Parallels Desktop 5
To upgrade Parallels Desktop 3 or 4 to version 5, you should purchase the Parallels Desktop
upgrade from Parallels Online Store (http://www.parallels.com/en/buyonline). An upgrade
activation key will be sent immediately to the e-mail address you provided.
Note: Parallels Desktop 2 cannot be upgraded to Parallels Desktop 5.
You can upgrade Parallels Desktop 3 or 4 to any localized version of Parallels Desktop 5. For
example, if you have the English version of Parallels Desktop 4 and want to upgrade it to the
German version of Parallels Desktop 5, you should purchase the German upgrade, install it on
your Mac, and activate with the upgrade activation key.
Before the upgrade, you should stop all your running virtual machines and close the previous
version of Parallels Desktop. Generally, the upgrading procedure for Parallels Desktop is the
same as for its installation. See Installing Parallels Desktop (p. 17).
You don't have to remove the previous version of Parallels Desktop before the upgrade: the
installer will remove it automatically before installing Parallels Desktop 5.
Using an Upgrade Activation Key
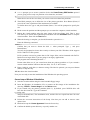
After you have installed Parallels Desktop 5, you should activate it with an upgrade activation
key. To launch the activation process, choose Activate Product from the Help menu and enter
your upgrade activation key and the required information in the activation dialog. If you
purchased your upgrade activation key for Parallels Desktop 5, you may need to confirm that
you have a valid permanent key for the previous version:
If you activated the previous version of Parallels Desktop with a permanent key, you will
need to enter the upgrade key only.
If you activated Parallels Desktop with a trial activation key, you will be prompted to enter
two keys: the upgrade activation key for Parallels Desktop 5 and a permanent or upgrade
key for the previous version.
If you purchased the previous version of Parallels Desktop but haven't installed it on your
Mac, you will need two keys to activate Parallels Desktop 5: the upgrade activation key for
Parallels Desktop 5 and a permanent or upgrade key for the previous version.
Upgrading the Virtual Machine Configuration and Updating Parallels Tools
When you start a virtual machine created in the previous version, the upgrading procedure starts
and runs automatically. During the upgrade, the virtual machine configuration and Parallels
Tools are processed. The virtual machine can be used in Parallels Desktop 5 only after it is
upgraded.
Note: In Linux virtual machines, X Server may fail to start after the upgrade, which means that
you may need to upgrade Parallels Tools manually in text mode (p. 277).
If you encounter any problems during the upgrade, visit the upgrade troubleshooting page
(www.parallels.com/support/pdfm5_upgrade-en_US) or use the online Troubleshooting guide
available through Help > Troubleshooting Guide.
Installing Parallels Desktop
25
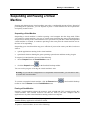
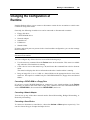
Updating Parallels Desktop
Parallels Desktop includes an updating feature that helps you keep your Parallels Desktop
installation up-to-date. You can use the update feature only if your computer is connected to the
Internet.
Update checks can be performed either automatically or manually.
We recommend that you turn on automatic updating to be notified when an update is
available. Parallels Desktop will regularly check for updates available and inform you about
them.
In addition to automatic updating, you can start the updating manually at any time.
Note: Before updating, you will be asked to quit Parallels Desktop. If you have any virtual
machines running or paused, suspend or shut them down. When you start or resume your virtual
machines after the update, reinstall Parallels Tools.
Installing Parallels Desktop
26
Automatic Updating
To use the automatic updating feature, your Mac computer should have a stable Internet
connection.
Parallels Desktop enables you to set up an automatic check for updates and determine the
frequency for this checking.
Note: To set up an automatic check for updates, you should register your copy of Parallels
Desktop (p. 22) first.
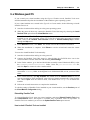
To set up automatic update checking:
1
Launch Parallels Desktop.
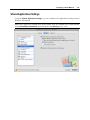
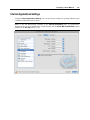
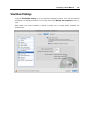
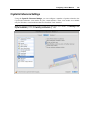
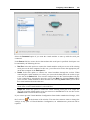
2 In the Parallels Desktop menu, select Preferences and go to the Update pane.
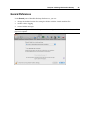
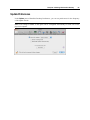
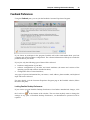
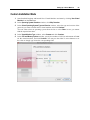
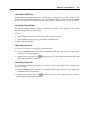
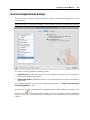
3 In the Update pane, you can define the necessary settings. To set up automatic checking for
new versions, just select the Check for updates option and define the checking frequency.
The system can search for new updates once a day, once a week, or once a month. With
these options set, Parallels Desktop will access the Parallels update server and notify you
when an update is available. If you do not need automatic checking, you can easily turn it
off by clearing the Check for updates check box.
Checking for new updates may take some time and, if you do not want to have the process
window on top of your desktop, you can hide it to the background. To do that, enable the
Check in background option.
Select the Download updates automatically option if you want all new available updates to be
downloaded at once without showing you the Download dialog.
From the Update pane, you can also perform a manual instant search for updates. To do that,
just click the Check Now button. The updates available for your version of Parallels Desktop
will be displayed in the Download dialog. Choose the update(s) you want to install and click
the Download button. If your version of Parallels Desktop is up to date, you will see the
corresponding message.
4 When you finish, click OK to save the changes and close the dialog.
Installing Parallels Desktop
27
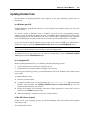
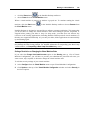
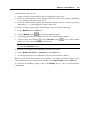
Manual Updating
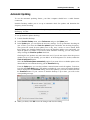
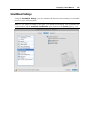
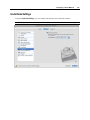
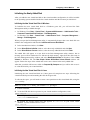
Parallels Desktop also enables you to check for updates manually whenever you want.
Note: To check for updates, you should register your copy of Parallels Desktop (p. 22) first.
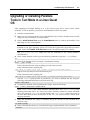
To check for updates manually:
1
Launch Parallels Desktop.
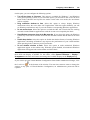
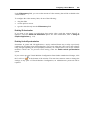
2 From the Help menu, choose Check for Updates. The program will immediately start the
search for updates.
While the updater accesses the Parallels update server and compares the available updates
with the installed version, you can hide this window by selecting Check in background.
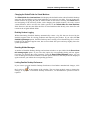
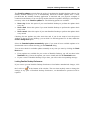
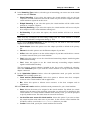
3 If there is one or more updates available, they will be listed in the Parallels Update window.
Select the update to install and click Install.
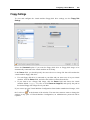
You can also download the update by clicking the Download button. To change the
download folder, type the path into the Download folder field or use the Choose button to
locate the folder.
Note: You can install the downloaded update later by locating it in Finder and launching the
installer.
Installing Parallels Desktop
28
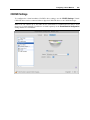
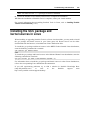
4 Specify your user name and password to start the installation and click OK.
5 Follow the Parallels Desktop installer's instructions to install the update.
Note: If the installer displays a list of conflicting applications, quit these applications to be
able to proceed with the installation.
6 When the update is installed, click Close to quit the installer.
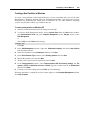
Removing Parallels Desktop
To remove Parallels Desktop:
1
Locate and open the DMG installation image file that you used to install Parallels Desktop.
Click Uninstall.
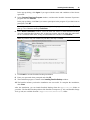
2 In the Welcome dialog, click Continue.
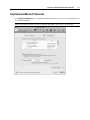
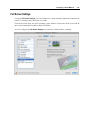
3 In the Select components to uninstall window, select the components you want to remove
and click Uninstall. Selecting the Application Settings option removes the Parallels Desktop
settings, network settings, and the list of registered virtual machines from your computer.
Note: The operation of removing Parallels Desktop doesn't remove the virtual machines and
their files from your Mac.
Confirm your choice of the components to be removed by clicking Uninstall.
4 Enter your password when prompted and click OK.
5 The uninstaller removes Parallels Desktop from your Mac.
6 When the removing is complete, click Close to quit the uninstaller.
Installing Parallels Desktop
29
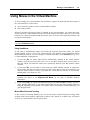
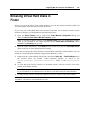
Removing Parallels Desktop Without Installation Disc
Parallels Desktop can be removed without the installation disc using the Terminal.
To remove Parallels Desktop using the Terminal:
1
Open the Terminal (it is usually available in the /Applications/Utilities folder) and enter the
following command:
# /Library/Parallels/Parallels\ Service.app/Contents/Resources/uninstaller.sh
desktop
Note: If the Password: line appears, you will need to enter an administrator's password.
2 When Parallels Desktop is removed the following message appears:
[UN_PERCENT]:100[UN_OP]:Uninstall successfull[UN_MSG]:Removed Successfully
Note: The operation of removing Parallels Desktop doesn't remove the virtual machines and
their files from your Mac.
30
CHAPTER 4
Principles of Working With Parallels
Desktop
Before you start to work with Parallels Desktop and create virtual machines, you can learn the
basic information about using it. This chapter provides essential information about starting
Parallels Desktop, using its interface elements, and configuring its preferences.
In This Chapter
Starting Parallels Desktop ..................................................................................................... 30
Interface Basics ..................................................................................................................... 35
Editing Parallels Desktop Preferences .................................................................................. 47
Starting Parallels Desktop
To start Parallels Desktop, open the Applications folder in Finder and double-click
Parallels Desktop.
When you start Parallels Desktop, its icon appears in the Dock.
To add the Parallels Desktop icon to the Dock, do one of the following:
If Parallels Desktop is currently open, right-click its icon in the Dock and choose Keep in
Dock from the shortcut menu.
Open the Applications folder in Finder and drag the Parallels Desktop icon to the
Dock.
When you launch the program for the first time, you will see the Welcome window (p. 31) that
will help you start working in Parallels Desktop.
If you set Parallels Desktop not to show the Welcome window, when you open Parallels
Desktop, you will see the Parallels Virtual Machines list (p. 36) that contains all virtual machines
registered in Parallels Desktop.
Principles of Working With Parallels Desktop
31
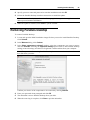
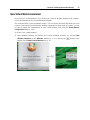
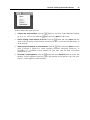
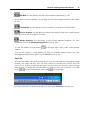
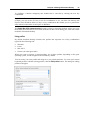
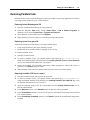
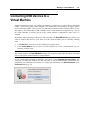
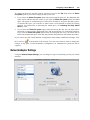
The Welcome Window
When you start Parallels Desktop for the first time, the Welcome window appears. This window
provides you with a fast access to the most common Parallels Desktop dialogs and assistants,
which is especially useful when making your first steps in Parallels Desktop. When Parallels
Desktop is running, you can open the Welcome window by selecting Welcome to Parallels
Desktop from the Help menu.
Later on, if you do not want to see this window again, just disable the Show at startup option at
the left bottom corner of the window. Next time you start Parallels Desktop, you will see the
Parallels Virtual Machines list (p. 36) if you have one or more virtual machines registered in
Parallels Desktop, or New Virtual Machine Assistant (p. 76) if you have no virtual machines
registered.
Principles of Working With Parallels Desktop
32
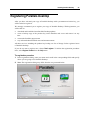
From the Welcome window, you can navigate between the following options:
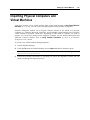
New Windows installation. This option allows you to launch New Virtual Machine Assistant
(p. 76, p. 33) to create a virtual machine with a Windows, Linux, or Mac OS X operating
system.
Import virtual machines. This option opens a Finder window that allows you to locate the
virtual machine you want to add. It can be a Parallels, VMware, Microsoft Virtual PC, or
VirtualBox virtual machine. If you open a Parallels virtual machine, it will be registered and
added to the Parallels Virtual Machines list (p. 36). If you open a VMware, Microsoft Virtual
PC, or VirtualBox virtual machine, Parallels Transporter will launch to convert it into the
Parallels format. To learn more about Parallels Transporter, refer to Parallels Transporter
User's Guide.
Use your virtual machines. This option allows you to open the Parallels Virtual Machines list
(p. 36) that contains all virtual machines registered in Parallels Desktop and third-party
virtual machines (VMware, Virtual PC, Virtual Box) stored on your Mac. If you open a
third-party virtual machine, Parallels Transporter will launch to convert it into the Parallels
format. To learn more about Parallels Transporter, refer to Parallels Transporter User's
Guide.
Note: This menu item appears in the welcome screen if you have at least one virtual
machine.
You can open and view the Parallels Desktop brief tutorials on the Parallels website by clicking
the Watch video tutorials button.
Principles of Working With Parallels Desktop
33
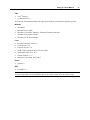
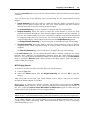
New Virtual Machine Assistant
If you have no virtual machines, you can start your work in Parallels Desktop with creating a
new virtual machine in New Virtual Machine Assistant.
The assistant offers several installation modes. You can choose the mode that better fits your
needs or your experience with Parallels Desktop. Regardless of what mode you select, you will
be able to change the configuration of your virtual machine later using the Virtual Machine
Configuration dialog (p. 168).
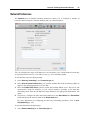
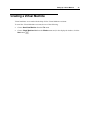
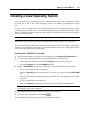
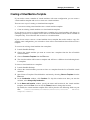
To create a new virtual machine:
1
Start Parallels Desktop and launch New Virtual Machine Assistant by selecting New
Windows installation in the Welcome window (p. 31) or clicking the
bottom of the Parallels Virtual Machines list (p. 36).
button at the
Principles of Working With Parallels Desktop
34
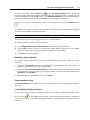
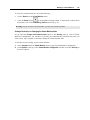
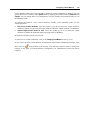
2 Insert the operating system installation disc or connect the installation source to your Mac.
In the Operating System Detection window, specify the source of installation files, and click
Continue. The operating system will be automatically detected and you will be asked to
provide a user name and a Windows product key (if you are installing Windows) or
password (if you are installing Linux).
Principles of Working With Parallels Desktop
35
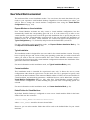
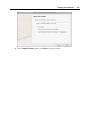
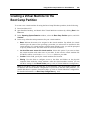
If you have the Boot Camp partition in your Mac and select the Boot Camp Partition option
in this window, the assistant will proceed with the Boot Camp virtual machine creation. For
detailed information, see Creating a Virtual Machine for the Boot Camp Partition (p. 258) in
Parallels Desktop User's Guide.
If you don't want the operating system to be detected automatically, click Skip Detection. In
this case, you will have to choose the operating system manually and specify the type of
installation. You can choose between the Express, Typical, and Custom installation modes.
3 After you specified the user name and other details necessary for the installation, click
Continue.
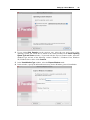
4 Before the creation starts, you can specify additional options for your virtual machine like
the virtual machine name and folders sharing. When finished, click Create.
Note: To specify additional settings, click Advanced.
5 The assistant will create a virtual machine based on your settings and install the operating
system and Parallels Tools in it.
Note: Parallels Tools are installed automatically in the following systems: Windows 7,
Windows Vista, Windows XP, Windows 2000, Windows Server 2008, Windows Server
2003, Fedora 11, Fedora 9, Red Hat Enterprise Linux 5, Ubuntu 9, and Ubuntu 8. In other
operating systems they should be installed manually (p. 97).
Interface Basics
This chapter provides a basic description of the Parallels Desktop interface elements and their
functions.
Principles of Working With Parallels Desktop
36
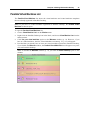
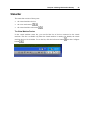
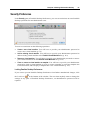
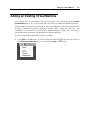
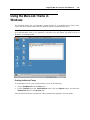
Parallels Virtual Machines List
The Parallels Virtual Machines list shows the virtual machines and virtual machines templates
that are already registered in Parallels Desktop.
Note: If you have no virtual machines registered in Parallels Desktop, the Parallels Virtual
Machines list doesn't open.
To open the Parallels Virtual Machines list:
Choose Virtual Machine List from the Window menu.
Right-click the Parallels Desktop icon in the Dock, and choose Virtual Machine List from the
shortcut menu.
Click Use your virtual machines option on the Welcome window (p. 31). However, if you
have no virtual machines, the New Virtual Machine Assistant (p. 76, p. 33) will appear.
Provided that you already have at least one virtual machine registered in Parallels Desktop,
if you disable the Welcome window, the Parallels Virtual Machines list will appear every time
you start Parallels Desktop.
Note: To disable the Welcome window (p. 31), just clear the Show at startup option in this
window.
Principles of Working With Parallels Desktop
37
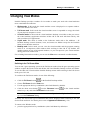
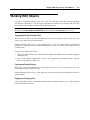
The List
The Parallels Virtual Machines list contains the registered virtual machines, virtual machine
templates, third-party virtual machines stored on your Mac, and the menu for managing this list.
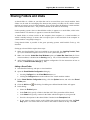
The Parallels Virtual Machines list allows you to manage the registered Parallels virtual machines
as follows:
Open virtual machines: Click the virtual machine name in the list to open the virtual machine
window.
Start virtual machines: Click the Start button
choose Start from the shortcut menu.
Edit the virtual machine configuration (p. 168): Right-click a virtual machine and select
Configure from the shortcut menu.
Locate the virtual machine files on your Mac: Right-click a virtual machine and choose Show
in Finder from the shortcut menu.
Rearrange the virtual machines: Drag a virtual machine to the desired position.
Remove any virtual machine: (p. 236) Drag a virtual machine from the list or right-click it
and select Remove from the context menu. You can add it back to the list later.
Assign colors to your virtual machines: Right-click a virtual machine and select the desired
color from the shortcut menu. In Finder, the virtual machine .pvm bundle will be marked
with the same color.
or right-click a virtual machine and
If the virtual machine files are stored on a remote USB device or network server, you will see
the corresponding icon to the right of the virtual machine name.
If you right-click a virtual machine template (p. 237), the set of commands will slightly differ.
is not available because you cannot start a template, but you can choose
The Start button
the Convert to Virtual Machine or Deploy to Virtual Machine options.
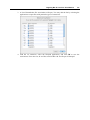
Third-party Virtual Machines
When you start Parallels Desktop, it finds all third-party virtual machines (VMware, Microsoft
Virtual PC, Virtual Box) stored on your Mac using the Spotlight search and adds them to the
Parallels Virtual Machine list. Before using these machines, you need to covert them into the
Parallels Desktop format. Open a third-party virtual machine, and Parallels Transporter (p. 263)
will start and guide you through the process of converting.
If you do not want to convert a third-party virtual machine into the Parallels Desktop format,
simply remove it from the Parallels Virtual Machines list (p. 236). Parallels Desktop will not add
it to the list any more.
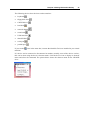
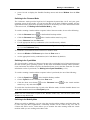
The Menu
This menu is situated in the lower left corner of the Parallels Virtual Machines list.
Principles of Working With Parallels Desktop
38
With the help of this menu, you can:
Create a new virtual machine: Click the
(p. 76, p. 33). You can also click the
button to start New Virtual Machine Assistant
button and select New from the menu.
Add an existing virtual machine to the list: Click the
button and select Open from the
menu to add an existing virtual machine stored on your Mac, on an external USB storage, or
on the network.
button and select Import from the
Import a physical computer or virtual machine: Click the
menu to migrate a physical or virtual computer (VMware, Microsoft Virtual PC, or
VirtualBox) to a Parallels virtual machine on your Mac with the help of Parallels
Transporter (p. 263).
Download a virtual appliance: Click the
button and select Download from the menu. The
Parallels Virtual Appliances Directory (http://ptn.parallels.com/en/ptn/dir) page will open.
Choose a virtual appliance and download it.
Principles of Working With Parallels Desktop
39
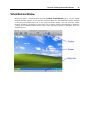
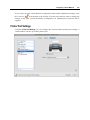
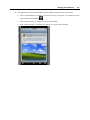
Virtual Machine Window
When you choose a virtual machine from the Parallels Virtual Machines list (p. 36), the virtual
machine window appears. If you start this virtual machine, the virtual machine window changes
to the guest OS window that acts as the virtual machine's display. You can resize the virtual
machine window by dragging its right corner. Its resolution changes automatically in Windows
(starting from Windows 2000) and in most Linux operating systems if Parallels Tools are
installed (p. 97).
Principles of Working With Parallels Desktop
40
The virtual machine window consists of three parts:
Toolbar - comprises buttons that can be used to manage the virtual machine and its
appearance.
Screen - acts as the virtual machine's screen.
Status bar - contains items for managing the virtual machine's devices and changing the
view mode and state. For more information, see Status Bar (p. 44).
When a guest operating system is running, you can switch between several display modes of the
guest OS window. For detailed information on the view modes, see Changing the View Mode (p.
122).
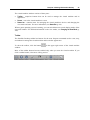
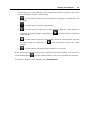
Toolbar
The Parallels Desktop toolbar has buttons for the most frequent commands used to start, stop,
and otherwise manage the virtual machine and its window appearance.
To show the toolbar, click the button
window.
in the upper right corner of the virtual machine
Most of the toolbar buttons become enabled only when you start the virtual machine. If you
click a toolbar button, it becomes visibly pressed.
Principles of Working With Parallels Desktop
41
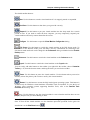
The default toolbar buttons:
Start. Use this button to start the virtual machine if it is stopped, paused or suspended.
Shut Down. Use this button to shut down your guest OS correctly.
Suspend. Use this button to put your virtual machine into the sleep mode for a certain
period of time. If you need to restart the host computer, you may temporarily suspend your
virtual machines and easily resume them after the restart.
Configure. Use this button to open the Virtual Machine Configuration dialog.
Full Screen. Use this button to switch the virtual machine to the Full Screen mode. To
return back to the Window mode, press Alt+Enter. The key combination for switching to the
Full Screen mode and back can be changed in the Preferences dialog available from the Parallels
Desktop menu.
Coherence. Use this button to switch the virtual machine to the Coherence mode.
Crystal. Use this button to switch the virtual machine to the Crystal mode.
You can easily add other buttons to the toolbar: just right-click the toolbar, choose Customize
Toolbar (p. 47) from the shortcut menu, and drag the items you need to the toolbar.
Pause. Use this button to pause the virtual machine. Use this button when you need to
instantly release the primary OS resources used by this virtual machine.
Restart. Use this button to restart the fully loaded guest operating system. This button is
available only for Windows virtual machines if Parallels Tools are installed. To view the list of
Windows guest operating systems supporting Parallels Tools, refer to the Parallels Tools
Overview subsection (p. 98).
Stop. Use this button to stop the virtual machine in cases when the machine does not run
properly and prevents you from shutting it down.
Note: If you click this button when the virtual machine is running, you may lose all the unsaved
data. To turn off the virtual machine, use the shutdown procedure specified for the guest OS
installed in it or the Shut Down button
.
Principles of Working With Parallels Desktop
42
Safe Mode. Use this button to run the virtual machine in Safe Mode (p. 126).
If you often work with snapshots, you can drag any of the three snapshot buttons to the toolbar
as well:
Take Snapshot. Use this button to create a snapshot (p. 250) for the virtual machine.
Revert to Snapshot. Use this button to roll back the changes made to the virtual machine
since the moment the last snapshot was made.
Manage Snapshots. Use this button to open Virtual Machine Snapshots. For more
information, refer to the Working with Snapshots section (p. 249).
To hide the toolbar, click the button
window.
in the upper right corner of the virtual machine
You can also manage a virtual machine by using the Parallels Desktop menus. For more
information about the menus options, see the Menus section (p. 43).
Status Bar
The status bar displays the virtual machine devices icons and the menus for managing the virtual
machine view mode and state. You can easily connect or disconnect the devices using the
devices icons on this bar: right-click the device icon and choose the necessary option from the
shortcut menu. To change the virtual machine view mode and state, you can use the view mode
menu
and the virtual machine state menu
correspondingly.
For more information on the status bar functions, refer to the Status Bar section (p. 44).
Principles of Working With Parallels Desktop
43
Menus
The Parallels Desktop menus contain all the controls available for Parallels Desktop and its
virtual machines. The menus are displayed on the Mac OS X menu bar.
There are the following menus:
The Parallels Desktop menu displays the About Parallels Desktop dialog and lets you set
Preferences (p. 47).
The File menu lets you create a new virtual machine or remove one of the already existing
virtual machines from the virtual machines list. The Import command allows you to open
virtual machines that are not registered in Parallels Desktop (p. 112). The Download
command allows you to download virtual appliances (p. 115) from the Internet. You can
also clone the virtual machine or convert it to a template (p. 237).
The View menu includes commands for switching between different view modes: the Full
Screen, Coherence, Crystal, Modality, or Window mode. You also can customize how you
view the toolbar and the Windows guest OS desktop, enable the MacLook theme (p. 154),
make clips and screen shots of the virtual machine screen.
The Virtual Machine menu allows to manage the virtual machine, edit the virtual machine
configuration, create snapshots, install Parallels Tools and Parallels Internet Security in the
virtual machine, and compress the virtual machine.
The Devices menu is available only when the virtual machine is running. It allows you to
configure certain devices and shared folders at runtime. Using the Shared Folders menu, you
can share folders (p. 155) between Mac OS X and your guest operating system. Using the
Keyboard menu, you can emulate keyboard shortcuts in the guest operating system.
The Window menu allows you to choose the application window you want to appear on top.
This menu simplifies the navigation between the virtual machines.
The Help menu opens Parallels Desktop Help Center, lets you activate and register the
product, open the welcome screen (p. 31), check for updates, and report problems.
Dock icon shortcut menu
Parallels Desktop Dock icon has a shortcut menu with a number of useful commands. Just rightclick the Parallels Desktop icon to open this menu.
Principles of Working With Parallels Desktop
44
Status Bar
The status bar consists of three parts:
the virtual machine devices
the view mode menu
the virtual machine state menu
The Virtual Machine Devices
In the virtual machine status bar, you can find the list of devices connected to the virtual
machine. This list is available only when the virtual machine is running. By default, the virtual
machine devices list is hidden. To see the list, click the left arrow button
button
.
near the Configure
Principles of Working With Parallels Desktop
45
The following devices have the icons on the status bar:
keyboard
floppy disk drive
CD/DVD drive
hard disk
network adapter
sound card
USB controller
shared folders
serial port
parallel port
If you see the
machine.
icon in the status bar, it means that Parallels Tools are installed in your virtual
If a device can be connected or disconnected at runtime (actually, most of the devices can be),
this can be done using the device's shortcut menu. Click the device icon to display its shortcut
menu and select the command. The picture below shows the shortcut menu for the CD/DVD
drive.
Principles of Working With Parallels Desktop
46
You can also connect CD/DVD discs or images of discs to the virtual machine's CD/DVD drive
or connect a floppy image to its floppy drive in the following way: drag the required image file
over the CD/DVD drive icon on the Parallels Desktop status bar. For more information, please
refer to the Changing Configuration at Runtime section (p. 145).
To add devices to the virtual machine configuration or remove them from the configuration,
click the Configure button
. For detailed information, see Adding and Removing Devices.
The View Mode Menu
To change the virtual machine view mode, you can use the View Mode menu
in the
status bar. This menu is available only when the virtual machine is running. To switch to the
Coherence mode, click the Coherence button
. To switch to any other view mode, click the
near the coherence button, and select the desired view mode from the
down arrow button
menu. For detailed information on the view modes, see Changing the View Mode (p. 122).
The Virtual Machine State Menu
You can start, shut down, suspend, or otherwise manage the virtual machine state using the
Virtual Machine State menu
in the status bar. Click the Virtual Machine State button
and select the desired command from the menu.
Principles of Working With Parallels Desktop
47
Customizing Toolbar
To change the appearance of the toolbar items, right-click the toolbar and use the shortcut menu
commands:
Icon & Text. Use this command if you want the toolbar to display both the button icons and
their names.
Icon only. Use this command if you want the toolbar to display only the button icons.
Text only. Use this command if you want the toolbar to display only the button names.
Use Small Size. Use this command if you want the toolbar buttons to appear in a smaller
size.
Remove Item. Point to a toolbar item and use this command if you want to remove this item
from the toolbar.
Customize Toolbar. This command opens the toolbar settings pane. See the description
below.
To customize the set of toolbar buttons and their appearance, right-click the toolbar and choose
Customize Toolbar from the shortcut menu. This will open the toolbar settings pane. You can use
this pane to:
add new buttons to the toolbar by dragging them from the settings pane to the toolbar
remove buttons from the toolbar by dragging them from the toolbar to the settings pane
add separators to the toolbar by dragging them from the settings pane to the toolbar
add spaces to the toolbar by dragging them from the settings pane to the toolbar
change the current toolbar buttons set to the default one by dragging it to the toolbar
select the toolbar buttons view mode in the Show list
To apply the changes you have made to the toolbar settings pane, click Done.
Editing Parallels Desktop
Preferences
This section provides the information on how to configure the Parallels Desktop settings using
the Preferences dialog. You can open this dialog by choosing Preferences from the Parallels
Desktop menu.
Principles of Working With Parallels Desktop
48
General Preferences
In the General pane of Parallels Desktop Preferences, you can:
change the default location for storing the folders with the virtual machine files
enable verbose logging
restore hidden messages
Note: The settings available in this pane can be configured individually for each user of the
physical computer.
Principles of Working With Parallels Desktop
49
Changing the Default Folder for Virtual Machines
The Default folder for virtual machines field displays the default location where Parallels Desktop
stores the files and folders of all virtual machines you create on your Mac. You can change the
default location by typing the path to another folder in this field or clicking the Choose button
and navigating to the necessary folder. After changing the default location, all newly created
virtual machines will be saved in the folder specified in the Default folder for virtual machines
field. However, this does not affect the files of virtual machines that already exist: their files will
remain in the original default folder.
Enabling Verbose Logging
While functioning, Parallels Desktop automatically creates a log file that can be used by the
Parallels support team for solving problems and improving the product. If you select the Use
detailed log messages option, Parallels Desktop starts creating a more detailed log file. It can be
helpful for the Parallels support team, but use more hard disk space and may slightly lower the
system performance.
Resetting Hidden Messages
A number of Parallels Desktop dialogs and assistant windows are provided with the Do not show
this message again option. If you select this option, the corresponding dialog will not appear
next time you perform the same operation. Using the Reset Hidden Messages button, you can
reset all dialogs and assistant windows with this option selected so that they would be displayed
again each time you initiate the corresponding operation.
Locking Parallels Desktop Preferences
If you want to prevent Parallels Desktop Preferences from further unauthorized changes, click
the Lock icon
at the bottom of the window. The next time anybody wants to change the
settings in any pane of Parallels Desktop Preferences, an administrator's password will be
required.
Principles of Working With Parallels Desktop
50
Appearance Preferences
In the Appearance pane of Parallels Desktop Preferences, you can choose the appearance of the
Parallels Desktop icon and define the animation for actions you perform in Parallels Desktop.
Note: The options on this tab can be configured individually for each user of your Mac.
Principles of Working With Parallels Desktop
51
Dock icon
This option defines what type of icon will appear in the Dock when Parallels Desktop is open.
The following types of icons are available:
Parallels Desktop. The standard Parallels Desktop icon appears in the Dock
Live Screenshot. If you choose this type, the Dock icon will appear as a live screenshot of
the virtual machine window.
Note: Irrespective of the Dock icon appearance, clicking this icon in the Coherence mode
invokes the Windows Start menu.
If you select the Use Start button icon in Coherence option, Parallels Desktop will display the
Start button icon in the Dock in the Coherence (p. 148) mode. If you click this icon, the
Windows Start menu appears.
Note: In the Crystal view mode (p. 152), the Start button icon is not displayed.
Principles of Working With Parallels Desktop
52
Select the Bounce on notifications option if you want the Parallels Desktop icon to bounce in the
Dock each time a notification appears in the virtual machine.
Transition to full screen
This option allows you to set the desired type of animation effect (or none) on switching a
Parallels virtual machine to full screen and back. You can choose one of the following effects:
Disabled, Fade, Zoom, Reveal, Slide, Warp, Cube, Switch, or Flip.
Animate
This group of options defines the animation behavior when you perform certain actions in
Parallels Desktop:
Virtual machine window. Select this option to animate the virtual machine window when it is
open and the virtual machine is stopped or suspended. This animation may considerably
decrease your computer performance.
Transition to Coherence and Crystal. Select this option to animate the transition to the
Coherence or Crystal view mode and back to the Window mode. Clear this check box if you
do not want any animation on switching to the Coherence and Crystal modes.
Transition to Modality. Select this option to animate the transition to the Modality mode and
back to the Window mode. Clear this check box if you do not want any animation on
switching to the Modality mode.
Suspending and resuming. Select this option to animate the operations of suspending and
resuming virtual machines. Clear the check box if you do not want any animation when
performing these operations.
Actions with snapshots. Select this option to animate the actions you perform with
snapshots. Clear the check box if you do not want any animation when performing these
operations.
Closing the windows. Select this option to animate the operation of closing the virtual
machine window. Clear the check box if you do not want any animation when performing
this operation.
Window animation speed
Set the speed of the animation using the slider. All animations set on the tab will be affected.
Locking Parallels Desktop Preferences
If you want to prevent Parallels Desktop Preferences from further unauthorized changes, click
the Lock icon
at the bottom of the window. The next time anybody wants to change the
settings in any pane of Parallels Desktop Preferences, an administrator's password will be
required.
Principles of Working With Parallels Desktop
53
Keyboard and Mouse Preferences
In the Keyboard & Mouse pane of Parallels Desktop Preferences, you can set keyboard shortcuts
for certain commands.
Note: The keyboard shortcuts can be configured individually for each user of your Mac.
Principles of Working With Parallels Desktop
54
The Switch Language option enabled by default allows you to use one and the same shortcut to
change the keyboard layout in your Mac and Windows-based virtual machines. For example, if
you use Cmd+Space to change the keyboard layout in your Mac, you will be able to use the
same key combination in Windows-based virtual machines.
Note: This unified keyboard layout switch is available only for Windows-based virtual
machines with Parallels Tools (p. 97) installed.
Configuring Keyboard Shortcuts
To configure the shortcuts used to perform certain actions, use the Double-click the shortcuts
below for editing list. Using this list, you can remap the Mac OS X shortcuts to Windows
shortcuts that perform similar actions in Parallels Desktop virtual machines.
The shortcuts are divided into two groups: shortcuts for managing the Parallels Desktop
software and shortcuts for working in virtual machines. Shortcuts for Parallels Desktop cannot
be added or removed, while the shortcuts for virtual machines can be added using the Add
button
and removed using the Remove button
To add a shortcut, click the Add button
combination.
.
and specify the rule for translating the key
In the From field, use the buttons to add modifier keys to the Mac keyboard shortcut and
enter the required key into the empty field.
In the To field, specify the PC keyboard shortcut to translate the Mac shortcut to. You can
use the buttons for modifier keys, and type the key into the empty field or select the
necessary PC keyboard key using the arrow button.
Principles of Working With Parallels Desktop
55
To configure a shortcut remapping rule, double-click it and edit by entering the new key
combination.
Important: There are Mac shortcuts that do not have similar shortcuts in Windows, for
example, you can use the F11 key or Fn+F11 combination to see your Mac OS desktop with
Expose, but in Windows there's no keys or key combinations that enable you to to perform the
same action, because there is no Expose in Windows.
The Enable Mac OS X system shortcuts checkbox, which is selected by default, allows you to use
the default (F9/F10/F11/F12) and custom shortcuts for Mac OS X during your work with virtual
machines in Parallels Desktop.
Using profiles
By default, Parallels Desktop contains four profiles that represent sets of key combinations
typical for the following OSs:
Windows
Linux
Mac OS X
Generic (for other guest OSs)
When you create or register a virtual machine, one of these profiles, depending on the guest
operating system, will be assigned to the machine by default.
You can create your own profile and assign it to your virtual machines. To create your custom
keyboard profile or edit the existing profiles, click the Edit profiles button. The dialog for editing
profiles will appear.
Principles of Working With Parallels Desktop
56
To add a new profile, click the Add button . In the Choose base profile window, specify the
new profile name and select the base profile from the list. After the profile is created, you can
submit the changes by clicking OK, return to the Keyboard and Mouse pane of Parallels Desktop
Preferences, select this new profile in the Profile list, and configure its shortcuts.
To remove one of the existing custom profiles, select this profile and click the Remove button
.
To duplicate or rename one of the existing profiles, select this profile, click the button
select the corresponding action from the menu.
, and
Note: You can rename or remove your custom profiles only.
In this window, you can also assign profiles to your virtual machines.
To change a profile assigned to a virtual machine:
1
In the Assign profiles to your virtual machines table, select the virtual machine.
2 In the Profile column, click the corresponding profile field to open the list of available
profiles and choose the profile you want to assign to this virtual machine.
3 Click OK to submit the changes.
Emulating a mouse right-click
To emulate a mouse right-click for a mouse that does not have the right key, choose one of the
following:
Select the To right-click check box and specify the key combination that will be used to
emulate a mouse right-click in the virtual machine.
Select the Click and hold the mouse button check box and configure the time interval when
this option will come into effect by moving the slider in the necessary direction between
Short Delay and Long Delay.
To submit the changes, click OK, otherwise, click Cancel.
Restoring default settings
The Restore Defaults button enables you to restore the default settings for all options available in
this pane.
Locking Parallels Desktop Preferences
If you want to prevent Parallels Desktop Preferences from further unauthorized changes, click
the Lock icon
at the bottom of the window. The next time anybody wants to change the
settings in any pane of Parallels Desktop Preferences, an administrator's password will be
required.
Principles of Working With Parallels Desktop
57
USB Preferences
In the USB pane of Parallels Desktop Preferences, you can specify how to handle USB devices
that are plugged into your Mac.
Principles of Working With Parallels Desktop
58
General Behavior
You can choose a general action to perform when a new USB device is plugged into your Mac
by choosing one of these options:
Connect it to your Mac. If you select this option, the USB device plugged into your Mac will
be connected to your Mac.
Connect it to the active virtual machine. If you select this option, the USB device plugged
into your Mac will be automatically connected to the virtual machine that is currently
running on your Mac. When no virtual machine is running, the USB device will be
connected to the primary OS.
Ask me what to do. If you select this option, you will be prompted to choose how to connect
the USB device each time a new USB device is plugged into your Mac.
Permanent Assignments
You can also set permanent assignments for certain USB devices. These assignments are
displayed in the Permanent assignments list.
To add a new assignment:
1
Click the Add button
below the Permanent assignments list.
2 Click the device field in the USB Device column to choose a USB device from the list.
3 In the Connect To column, double-click the destination field to open the list of available
destinations and choose the virtual machine you want to connect this device to. If you want
to connect this USB device to your Mac, choose Computer.
Note: To be able to use the USB device in a virtual machine, you may need to install the
necessary drivers in its guest OS. By default, such drivers can be obtained from the
manufacturers of this device.
4 Click OK to apply the changes.
Note: You can connect up to eight USB 2.0 devices and up to eight USB 1.1 devices to each
virtual machine.
You can change an assignment by editing the device and destination in the USB Device and
Connect To fields.
To remove an existing assignment, select it in the Permanent assignments list and click the
Remove button
.
For more information about using USB devices in a virtual machine, refer to Connecting USB
Devices to a Virtual Machine (p. 141).
Locking Parallels Desktop Preferences
If you want to prevent Parallels Desktop Preferences from further unauthorized changes, click
the Lock icon
at the bottom of the window. The next time anybody wants to change the
settings in any pane of Parallels Desktop Preferences, an administrator's password will be
required.
Principles of Working With Parallels Desktop
59
Principles of Working With Parallels Desktop
60
Network Preferences
The Network pane of Parallels Desktop Preferences allows you to configure a number of
network-related settings for Parallels Desktop and your virtual machines.
You can configure the range of IP addresses to be assigned to your virtual machines when they
are operating in the shared (p. 228) and host-only (p. 231) networking modes.
To edit the host-only networking settings:
1
Select Host-only networking in the Connection type list.
2 Select Show in System Preferences if you want the Parallels host-only networking adapter to
appear in the network preferences of your Mac.
3 Select the Enable DHCP Server option to enable the Parallels DHCP server. This server will
automatically assign IP addresses to your virtual machines operating in the host-only
networking mode from the IP addresses range defined in the appropriate fields below this
option.
4 If necessary, configure the start and end IP addresses in the Start address and End address
fields and specify the network mask in the Subnet mask field.
For more information on configuring the host-only networking parameters, refer to HostOnly Networking (p. 231).
To edit the shared networking settings:
1
Select Shared networking in the Connection type list.
Principles of Working With Parallels Desktop
61
2 Select Show in System Preferences if you want the Parallels shared networking adapter to
appear in the network preferences of your Mac.
3 Select the Enable DHCP Server option to enable the Parallels DHCP server. This server will
automatically assign IP addresses to your virtual machines operating in the shared
networking mode from the IP addresses range defined in the appropriate fields below this
option.
4 If necessary, configure the start and end IP addresses in the Start address and End address
fields and specify the network mask in the Subnet mask field.
For more information about configuring shared networking, refer to Shared Networking (p.
228).
The Start address and End address values determine the first and the last IP addresses with the
first address usually assigned to the DHCP server itself. The second address is usually given to
the host OS. Other addresses are assigned to virtual machines. The scope of IP addresses defined
should belong to the same subnet.
Port Forwarding in Shared Networking
Normally, virtual machines set to operate in the shared networking mode cannot be accessed
from external computers. The port forwarding functionality allows computers on your local and
other networks to transfer data to any of your virtual machines that use the shared networking
mode. The data sent to a specific port on your Mac will be redirected to a specific port of your
virtual machine according to a port-forwarding rule.
To add a new port forwarding rule:
1
Click the Add button
below Port forwarding list.
2 In the displayed window, do the following:
In the Port Type field, specify the port type you want to use for establishing network
connections. You can choose between the TCP or UDP port types.
In the Incoming Port field, provide the port number on your Mac you want to use for data
transfer.
In the IP Address field, indicate your virtual machine's IP address.
In the Destination Port field, type the virtual machine's port the data will be transferred
to.
Principles of Working With Parallels Desktop
62
3 Click OK to add the rule.
When the rule is added, use the following IP address combination for external connections to
your virtual machine: <you Mac's IP address>:<Source port>.
To edit an existing port forwarding rule, select it in the Port forwarding list table, click the Edit
button
, and modify the necessary parameters in the displayed window.
To remove a port forwarding rule, select it in the Port forwarding list table and click the Remove
button
.
Restoring default settings
The Restore Defaults button enables you to restore the default settings for all options available in
this pane.
Locking Parallels Desktop Preferences
If you want to prevent Parallels Desktop Preferences from further unauthorized changes, click
at the bottom of the window. The next time anybody wants to change the
the Lock icon
settings in any pane of Parallels Desktop Preferences, an administrator's password will be
required.
Principles of Working With Parallels Desktop
63
Memory Preferences
The Memory pane of Parallels Desktop Preferences allows you to adjust the maximum amount of
physical memory (RAM) that the system will reserve for all virtual machines running on your
Mac.
By default, the Automatically option is selected. In this case, the total amount of RAM to be
allocated to all running virtual machines is automatically calculated by the system based on the
following main factors:
the total amount of memory installed on your Macintosh computer and
the amount of memory required by Mac OS X for its operation.
The allocated amount of memory is shared among all running virtual machines. You can
configure the amount of physical memory for a particular virtual machine on the General tab of
Virtual Machine Configuration (p. 169).
You can redefine the default behaviour and manually set the amount of memory to be reserved
for all active virtual machines. To this effect, select the Manually option and specify the needed
value by:
dragging the slider, or
using the spin box arrows, or
typing the value directly into the field
Locking Parallels Desktop Preferences
If you want to prevent Parallels Desktop Preferences from further unauthorized changes, click
the Lock icon
at the bottom of the window. The next time anybody wants to change the
settings in any pane of Parallels Desktop Preferences, an administrator's password will be
required.
Principles of Working With Parallels Desktop
64
Security Preferences
In the Security pane of Parallels Desktop Preferences, you can set restrictions on some Parallels
Desktop operations for non-administrator users.
You can set restrictions on the following operations:
Create a new virtual machine. You will have to provide your administrator password to
create a new virtual machine (p. 76).
Add an existing virtual machine. You will have to provide your administrator password to
add an existing virtual machine to the Parallels Virtual Machines list (p. 112).
Remove a virtual machine. You will have to provide your administrator password to remove
your virtual machines from the Parallels Virtual Machines list (p. 236).
Clone or convert a virtual machine or template. You will have to provide your administrator
password to clone a virtual machine (p. 234), to create a template, to convert a template into
a virtual machine, and to deploy a template into a new virtual machine (p. 237).
Locking Parallels Desktop Preferences
If you want to prevent Parallels Desktop Preferences from further unauthorized changes, click
at the bottom of the window. The next time anybody wants to change the
the Lock icon
settings in any pane of Parallels Desktop Preferences, an administrator's password will be
required.
Principles of Working With Parallels Desktop
65
Speech Preferences
The Speech pane allows you to use spoken commands for managing the virtual machine
behavior. The following spoken commands are available:
Commands
Description
Start
Starts a virtual machine.
Suspend
Suspends a virtual machine.
Shut Down
Shuts down a virtual machine.
Pause
Pauses a virtual machine.
Stop
Stops a virtual machine.
Reset
Resets a virtual machine.
Snapshot
Opens the Snapshot Manager window.
Make
Screenshot
Makes a screenshot of the Guest OS window and stores it on the Mac OS X
Desktop.
Make Clip
Makes a clip.
Switch to
Coherence
Switches to the Coherence view mode.
Switch to Full
Screen
Switches to the Full Screen view mode.
Switch to
Window
Switches to the Window view mode.
Edit
Configuration
Opens the Virtual Machine Configuration dialog.
New
Creates a new virtual machine.
Open
Opens a virtual machine.
Download
Allows you to download a virtual machine appliance available at
http://www.parallels.com/en/ptn/dir.
About Parallels
Desktop
Opens the About Parallels Desktop menu.
Install Parallels
Tools
Launches the installation of Parallels Tools in the running virtual machine.
Report a
Problem
Opens the Parallels Problem Report window.
Open
Opens an existing virtual machine and registers it in Parallels Desktop.
Open Directory
Opens the Parallels Virtual Machines window.
To enable the speech commands, select Enable spoken commands:
Principles of Working With Parallels Desktop
66
To successfully operate your virtual machine by using the speech commands, please make sure
that:
the virtual machine window is active, and
the speech settings are properly tuned on the corresponding tab of the Mac OS X System
Preferences
If the speech settings are not tuned, you will see the 'To enable this option, you
should turn on speakable items in System Preferences' warning
message.
To tune the speech settings, click Open System Preferences.
To submit the changes, click OK, otherwise, click Cancel.
Locking Parallels Desktop Preferences
If you want to prevent Parallels Desktop Preferences from further unauthorized changes, click
the Lock icon
at the bottom of the window. The next time anybody wants to change the
settings in any pane of Parallels Desktop Preferences, an administrator's password will be
required.
Principles of Working With Parallels Desktop
67
iPhone Preferences
In the iPhone pane of Parallels Desktop Preferences, you can allow external connections to
Parallels Desktop and its virtual machines from iPhone.
If you want the Parallels Mobile application to display a list of accounts available on your Mac,
select Send a list of your Mac's accounts to Parallels Mobile.
For more information about Parallels Mobile and using iPhone to manage your virtual machines,
see Managing Virtual Machines From iPhone (p. 244).
Locking Parallels Desktop Preferences
If you want to prevent Parallels Desktop Preferences from further unauthorized changes, click
the Lock icon
at the bottom of the window. The next time anybody wants to change the
settings in any pane of Parallels Desktop Preferences, an administrator's password will be
required.
Principles of Working With Parallels Desktop
68
Update Preferences
In the Update pane of Parallels Desktop Preferences, you can set preferences for the frequency
of the update checks.
Note: The settings available in this pane can be configured individually for each user of the
physical computer.
Principles of Working With Parallels Desktop
69
The Check for updates section defines the policy for updating the Parallels Desktop software. By
default, Parallels Desktop is set to automatically check for available updates once a week,
provided that the Parallels Desktop application is launched and your physical computer is
connected to the Internet. You can specify another interval for updates checking by selecting the
necessary value in the Check for updates list. The following options are available:
Once a day. Select this option if you want Parallels Desktop to perform the update check
every day.
Once a week. Select this option if you want Parallels Desktop to perform the update check
every week.
Once a month. Select this option if you want Parallels Desktop to perform the update check
every month.
Checking for new updates may take some time and, if you do not want to have the process
window on the top of your Desktop, you can hide it to the background. To do that, enable the
Check in background option.
Select the Download updates automatically option if you want all new available updates to be
downloaded at once without showing you the Download dialog.
You can also check for available updates manually at any time you want by clicking the Check
Now button:
If any updates are available for you version of Parallels Desktop, you will see them in the
Download dialog. Choose the updates you want to install and click the Download button.
If your version of Parallels Desktop is up to date, you will see the corresponding message.
Locking Parallels Desktop Preferences
If you want to prevent Parallels Desktop Preferences from further unauthorized changes, click
the Lock icon
at the bottom of the window. The next time anybody wants to change the
settings in any pane of Parallels Desktop Preferences, an administrator's password will be
required.
Principles of Working With Parallels Desktop
70
Feedback Preferences
Using the Feedback pane, you can join the Parallels Customer Experience Program.
If you choose to participate in the program, Parallels will collect information about your host
computer and virtual machines configuration. The collected information will help us to make the
product better fit your needs.
If you join, only the following types of data will be collected:
hardware configuration of your Mac;
software configuration of your Mac and virtual machines (the names and versions of the
operating systems and software installed in them);
configuration files of virtual machines;
Any types of private information like your name, e-mail, address, phone number, and keyboard
input will not be collected.
For more details, visit the Customer Experience Program page at the Parallels website (follow
the link in the pane).
Locking Parallels Desktop Preferences
If you want to prevent Parallels Desktop Preferences from further unauthorized changes, click
the Lock icon
at the bottom of the window. The next time anybody wants to change the
settings in any pane of Parallels Desktop Preferences, an administrator's password will be
required.
71
CHAPTER 5
Setting Up a Virtual Machine
This chapter describes how to create a new virtual machine and install a guest operating system
in it. The chapter includes an overview of the process and complete how-to instructions.
In This Chapter
Overview .............................................................................................................................. 72
Supported Guest Operating Systems..................................................................................... 73
Typical Configurations.......................................................................................................... 75
Creating a Virtual Machine ................................................................................................... 76
Installing a Guest Operating System..................................................................................... 95
Installing Parallels Tools....................................................................................................... 97
Adding an Existing Virtual Machine .................................................................................... 112
Importing Physical Computers and Virtual Machines .......................................................... 114
Downloading Virtual Appliances.......................................................................................... 115
Setting Up a Virtual Machine
72
Overview
Generally, the process of creating a virtual machine includes the following steps:
1
Creating a virtual machine configuration. It's like building a real computer from different
hardware components. This step is performed with the help of New Virtual Machine
Assistant (p. 77). In the Express, Typical, or Custom mode, New Virtual Machine Assistant
creates a virtual machine with the configuration typical for the selected guest OS. For more
details about the installation modes, see Express Windows Installation Mode (p. 79), Express
Linux Installation Mode (p. 84), Typical Installation Mode (p. 88), and Custom Installation
Mode (p. 90).
2 Installing a guest operating system. When you have configured the virtual machine's
hardware, you need an operating system to control it. To install an operating system in your
virtual machine, you should connect the installation CD/DVD disc or its image to the virtual
machine's CD/DVD drive, as you do to install an operating system in a physical computer.
For a list of the supported guest operating systems, see Supported Guest Operating Systems
(p. 73).
For Windows 2003, Windows XP, Windows Vista, Windows 7, Ubuntu Linux, Fedora
Linux, Fedora Core 5 Linux, and Red Hat Enterprise Linux virtual machines, New Virtual
Machine Assistant provides a special Express mode that automatically installs the selected
guest OS in a newly created virtual machine.
3 Installing Parallels Tools in the guest OS. Parallels Tools are available for most of the
Windows and Linux operating systems and can be easily installed in your virtual machine.
For more information, refer to Installing Parallels Tools (p. 97).
After completing these steps, you may proceed with fine tuning of the virtual machine, such as
setting up shared folders, adjusting its screen resolution, or installing applications in it.
Typical Configuration
A typical virtual machine has the following basic virtual hardware:
CPU
memory
hard disk drive
floppy disk drive
sound device (except FreeBSD and MS-DOS virtual machines)
CD/DVD drive
network adapter
USB controller
serial port
printer port connected to the printer set as default in Mac OS.
Note: When the virtual machine is created, you can add new virtual devices to it, using the
Virtual Machine Configuration dialog (p. 168).
Setting Up a Virtual Machine
Supported Guest Operating
Systems
Parallels Desktop officially supports the following 32-bit guest operating systems:
Mac OS X
Mac OS X Snow Leopard Server 10.6
Mac OS X Leopard Server 10.5.x
Windows
Windows 7
Windows Server 2008
Windows Vista® Home, Business, Ultimate, Enterprise SP0, SP1
Windows Server® 2003 SP2, R2
Windows XP Professional SP2, SP3, Home Edition SP2, SP3
Windows 2000 Server SP4, Advanced Server SP4
Windows NT 4.0 Server SP6, Workstation SP6
Windows ME
Windows 98 SE
Windows 95
Windows 3.11
MS-DOS 6.22
Linux
Red Hat® Enterprise Linux 5.x, 4.x
CentOS Linux 5.x, 4.x
Red Hat Linux 9
Fedora™ Linux 10, 9, 8, 7
Fedora Core 5
SUSE® Linux Enterprise Server 10 SP2, 9 SP3
OpenSUSE Linux 11.x, 10.x
Mandriva™ Linux 2009, 2008, 2007
Debian® Linux 5.0, 4.0
Ubuntu® Linux 9.x, 8.x, 7.x
Xandros Business 4.0
Solaris
Solaris® 10, 9
BSD
FreeBSD® 7.x, 6.x
73
Setting Up a Virtual Machine
74
OS/2
OS/2® Warp 4.5
eComStation™ 1.2
This version of Parallels Desktop also supports the following 64-bit guest operating systems:
Windows
Windows 7
Windows Server 2008
Windows Vista Home, Business, Ultimate, Enterprise SP0, SP1
Windows Server 2003 SP2, R2
Windows XP Professional SP2
Linux
Red Hat Enterprise Linux 5.x
CentOS Linux 5.0
Fedora Linux 10, 9, 8
SUSE Linux Enterprise Server 10 SP2, 9 SP3
OpenSUSE Linux 11.x, 10.x
Ubuntu Linux 8.x, 7.x
Mandriva Linux 2009, 2008, 2007
Solaris
Solaris 10
BSD
FreeBSD 7.0
Note: Parallels Desktop does not provide users with OS ISO images or OS installation discs.
You should purchase an OS installation disc or an OS ISO image if you do not have any.
Setting Up a Virtual Machine
75
Typical Configurations
The amount of memory and the size of hard disks vary for different guest OSs. Refer to the table
below to learn the memory and hard disk values that are allocated to a virtual machine
depending on the guest operating system that will be installed in it. Virtual hard disks for typical
virtual machines are always created in the expanding format (p. 218).
Guest
systems
Operating
RAM,
MB
Video
Memory,
MB
Hard Disk, Floppy
MB
Drive
CD/DVD
drive
Network
Adapter
Sound
Device
Mac OS X
1024
16
64,000
*
*
*
Windows 7
512
16
64,000
*
*
*
*
Windows Server 2008
512
16
64,000
*
*
*
*
Windows Vista
512
16
64,000
*
*
*
*
Windows XP
512
16
64,000
*
*
*
*
Windows 2003
512
16
64,000
*
*
*
*
Windows 2000
256
16
64,000
*
*
*
*
Other Windows
256
16
64,000
*
*
*
*
512
3
64,000
*
*
*
*
512
3
64,000
*
*
*
*
512
3
64,000
*
*
*
*
Ubuntu Linux
512
3
64,000
*
*
*
*
Other Linux
512
3
64,000
*
*
*
*
FreeBSD 6.x
256
16
32,000
*
*
*
*
FreeBSD 7.x
256
16
32,000
*
*
*
*
256
16
32,000
*
*
*
*
256
16
8,000
*
*
*
*
Red Hat Linux
SUSE Linux
Debian GNU/Linux
Other FreeBSD
Other Guest OSs
Setting Up a Virtual Machine
76
Creating a Virtual Machine
Virtual machines are created with the help of New Virtual Machine Assistant.
To start New Virtual Machine Assistant, do one of the following:
Choose New Virtual Machine from the File menu.
Choose Virtual Machines List from the Window menu and, in the displayed window, click the
New button
.
Setting Up a Virtual Machine
77
New Virtual Machine Assistant
The assistant offers several installation modes. You can choose the mode that better fits your
needs or your experience with Parallels Desktop. Regardless of what method you select, you
will be able to change the virtual machine configuration later using the Virtual Machine
Configuration dialog (p. 168).
Express Windows or Linux Installation
New Virtual Machine Assistant not only creates a virtual machine configuration, but also
automatically installs the corresponding guest OS in it. It is the easiest way to make a new
virtual machine: you only need to insert the guest OS installation disc or specify the path to its
image file, and New Virtual Machine Assistant will do the rest (including the installation of
Parallels Tools). In this mode, virtual machines are created with typical configurations (see
Typical Configurations (p. 75) for details) and placed to the default folder (see below).
For more information on this installation mode, see Express Windows Installation Mode (p. 79)
and Express Linux Installation Mode (p. 84).
Typical Installation
This installation mode is designed for new users and for fast virtual machine creation. You only
have to specify the type and version of the guest operating system that you wish to install and
where you wish to store the virtual machine files. New Virtual Machine Assistant creates a
typical (for the selected guest OS) virtual machine configuration and starts the installation of the
guest OS as interactive installation.
For more information on this installation mode, see Typical Installation Mode (p. 88).
Custom Installation
This installation mode is intended for experienced users only. It allows the user to create
configurations other than the typical ones. In this mode, the user is prompted to specify such
options for the basic hardware as the amount of RAM, number of CPUs, the size and format of a
virtual hard disk, and networking parameters. Additional devices can be added later, using the
Virtual Machine Configuration dialog (p. 168). After New Virtual Machine Assistant creates a
virtual machine configuration, it starts installing the guest OS if the corresponding option was
selected.
For more information on this installation mode, see Custom Installation Mode (p. 90).
Default Folders for Virtual Machines
By default, Parallels Desktop is configured to create a new virtual machine folder in the home
folder of the user who created it:
/Users/<User_Name>/Documents/Parallels/
where <User_Name> stands for the user's home folder.
However, you can select another folder that will be used as the default folder for your virtual
machines.
Setting Up a Virtual Machine
78
To specify another default destination for saving virtual machines, do the following:
1
Choose Preferences from the Parallels Desktop menu.
2 In the Preferences window, open the General pane (p. 48) and specify the default destination
for new virtual machines in the Default folder for virtual machines field.
Note: You can also specify a folder for a virtual machine during its creation. An existing virtual
machine can also be moved to a different folder after it is created.
Setting Up a Virtual Machine
79
Express Windows Mode
Before creating a virtual machine in the Express Windows mode, make sure that you have an
operating system installation disc or its image.
Note: Parallels Desktop doesn't provide you with the operating system installation discs and
their images. You should purchase the installation disc or its image if you do not have any.
To start New Virtual Machine Assistant, click the New button
Machines list.
in the Parallels Virtual
To create a new virtual machine:
1
Parallels Desktop will try to automatically determine the type and version of your operating
system. In the Operating System Detection window, select the Installation CD/DVD option,
specify the source of installation files, and click Continue. You can specify the following
types of installation media:
A real CD/DVD drive. Click the Installation CD/DVD field, and select the real CD/DVD
drive name from the list if you inserted the installation disc into the optical drive of your
Mac. Click Continue, and go to Step 6.
A CD/DVD image file. Click the Installation CD/DVD field, and select the installation
disc image from the list, or click Choose an image file, and locate the file on your Mac.
Click Continue, and go to Step 6.
Note: Parallels Desktop supports the following types of image files: ISO, CUE, CCD, and
DMG.
You can provide the OS installation disk later after the virtual machine creation. In this case,
click Skip Detection, and go to the next step.
If you have the Boot Camp partition in your Mac and select the Boot Camp Partition option
in this window, the assistant will proceed with the Boot Camp virtual machine creation. For
detailed information, see Creating a Virtual Machine for the Boot Camp Partition (p. 258).
Setting Up a Virtual Machine
80
2 If you clicked Skip Detection on the previous step, select the type and version of the
operating system you would like to install in the virtual machine in the Select Operating
System Type and Version window. To proceed with the Express Windows mode, select the
Windows type and one of the following versions: Windows 7, Windows Vista, Windows
XP, Windows Server 2003. Click Continue.
3 In the Virtual Machine Type window, select the Express Windows mode.
4 In this window, specify the information necessary for the Windows guest OS installation.
Setting Up a Virtual Machine
81
If you click the Advanced button, you can set the number of CPUs and the amount of RAM
of your future virtual machine. Click Continue.
5 In this step, you should define the main parameters for your virtual machine:
6 In this step, define the main parameters for your virtual machine:
Name. Indicate the name to be assigned to the virtual machine. By default, the virtual
machine gets the name of the operating system that you selected to be installed in this
virtual machine. If a virtual machine with this name already exists, you will be prompted
to specify another name. The name must not exceed 50 characters.
Let other Mac users access this virtual machine. Select this option if you want to share
this virtual machine with other users of your Mac. In this case the virtual machine file
(PVM file) will be saved in the /Users/Shared folder on your Mac.
Location. In this field, specify the virtual machine files location.
Sharing. Use this field to configure access to the disks and folders on the physical
computer from inside the virtual machine. After the virtual machine creation, you can
edit these settings in the Shared Folders pane (p. 180) of the Virtual Machine
Configuration.If you click the Advanced button, you can set the number of CPUs and the
amount of RAM of your future virtual machine.
If you click the Advanced button, you can set the number of CPUs and the amount of RAM
of your future virtual machine.
Setting Up a Virtual Machine
82
When finished, click Create. The assistant will create a blank virtual machine.
7 In the Boot Options section of the Prepare to Install Operating System window, provide the
Windows installation disc or CD/DVD image if you have not done it yet. You can specify
the following types of installation media:
A real CD/DVD drive. Click the CD/DVD field and select the real CD/DVD drive name
from the list if you inserted the installation disc into the optical drive of your Mac.
A CD/DVD image file. Click the CD/DVD field and select the installation disc image
from the list, or click Choose an image file and locate the file on your Mac.
Click Start to start the guest operating system installation.
If you have already provided the Windows installation files, you can change the source of
installation files in this window.
Setting Up a Virtual Machine
83
New Virtual Machine Assistant will install the guest operating system and Parallels Tools in
your new virtual machine.
Note: If your copy of Parallels Desktop is not activated, you will be prompted to activate it
when you click Start. For more information about the activation, see Activating Parallels
Desktop (p. 20).
The newly created virtual machine will be accessible through the Parallels Virtual Machines list
(p. 36) that allows you to easily manage your virtual machines.
During the unattended installation, Parallels Desktop creates an administrator account with a
blank password. When the guest OS installation is complete, we recommend that you change the
password in order to protect the safety of your data.
Changing the Administrator Password
To change the administrator password in Windows Vista, click the Start menu, then select
Control Panel > User Accounts and Family Safety > Change your Windows password.
To change the administrator password in Windows XP (Professional Edition):
1
Click the Start menu, then select Control Panel > Administrative Tools > Computer
Management.
2 In the Computer Management window, open System Tools > Local Users and Groups >
Users. Right-click the Administrator account and choose Set Password from the context
menu.
For changing the password in other versions of Windows, refer to the Microsoft Windows Help:
Start > Help and support.
Setting Up a Virtual Machine
84
Express Linux Mode
Before creating a virtual machine in the Express Linux mode, make sure that you have an
operating system installation disc or its image.
Note: Parallels Desktop doesn't provide you with the operating system installation discs and
their images. You should purchase or get anyhow the Linux installation disk or its image if you
do not have any.
To start New Virtual Machine Assistant, click the New button
Machines list.
in the Parallels Virtual
To create a new virtual machine:
1
Parallels Desktop will try to automatically determine the type and version of your operating
system. In the Operating System Detection window, select the Installation CD/DVD option,
specify the source of installation files, and click Continue. You can specify the following
types of installation media:
A real CD/DVD drive. Click the Installation CD/DVD field, and select the real CD/DVD
drive name from the list if you inserted the installation disc into the optical drive of your
Mac. Click Continue, and go to Step 6.
A CD/DVD image file. Click the Installation CD/DVD field, and select the installation
disc image from the list, or click Choose an image file, and locate the file on your Mac.
Click Continue, and go to Step 6.
Note: Parallels Desktop supports the following types of image files: ISO, CUE, CCD, and
DMG.
You can provide the OS installation disk later after the virtual machine creation. In this case,
click Skip Detection, and go to the next step.
If you have the Boot Camp partition in your Mac and select the Boot Camp Partition option
in this window, the assistant will proceed with the Boot Camp virtual machine creation. For
detailed information, see Creating a Virtual Machine for the Boot Camp Partition (p. 258).
Setting Up a Virtual Machine
85
2 If you clicked Skip Detection on the previous step, select the type and version of the
operating system you would like to install in the virtual machine in the Select Operating
System Type and Version window. To proceed with the Express Linux mode, select the
Linux type and version. In the Express Linux mode, the following versions are supported:
Ubuntu Linux, Fedora Linux, Fedora Core 5 Linux, and Red Hat Enterprise Linux. When
finished, click Continue.
3 In the Virtual Machine Type window, select the Express Linux mode.
4 In the Express Linux Installation window, specify the information necessary for the Linux
guest OS installation.
Setting Up a Virtual Machine
86
If you click the Advanced button, you can set the number of CPUs and the amount of RAM
of your future virtual machine. Click Continue.
5 If you have not provided the guest operating system installation files on the second step of
the assistant, the Insert the installation CD ... window will appear. In this window you should
provide the guest operating system installation files. You can specify the following types of
installation media:
A real CD/DVD drive. Click the CD/DVD field, and select the real CD/DVD drive name
from the list if you inserted the installation disc into the optical drive of your Mac.
A CD/DVD image file. Click the CD/DVD field, and select the installation disc image
from the list, or click Choose an image file, and locate the file on your Mac.
6 In the next step, you should define the main parameters for your virtual machine:
Name. Indicate the name to be assigned to the virtual machine. By default, the virtual
machine gets the name of the operating system that you selected to be installed in this
virtual machine. If a virtual machine with this name already exists, you will be prompted
to specify another name. The name must not exceed 50 characters.
Let other Mac users access this virtual machine. Select this option if you want to share
this virtual machine with other users of your Mac. In this case the virtual machine file
(PVM file) will be saved in the /Users/Shared folder on your Mac.
Location. In this field, specify the virtual machine files location.
If you click the Advanced button, you can set the number of CPUs and the amount of RAM
of your future virtual machine.
Setting Up a Virtual Machine
87
When finished, click Create. The assistant will create a blank virtual machine.
7 In the Boot Options section of the Prepare to Install Operating System window, you can
change the OS installation files source if you want.
When finished, click Start. New Virtual Machine Assistant will install the guest operating
system in your new virtual machine. When the installation is complete, install Parallels
Tools if they are available for the guest OS you just installed.
Note: If your copy of Parallels Desktop is not activated, you will be prompted to activate it
when you click Start. For more information about the activation, see Activating Parallels
Desktop (p. 20).
The newly created virtual machine will be accessible through Parallels Virtual Machine List (p.
36) that allows you to easily manage your virtual machines.
Setting Up a Virtual Machine
88
Typical Installation Mode
1
Start Parallels Desktop and launch New Virtual Machine Assistant by choosing New Virtual
Machine from the File menu.
2 In the Operating System Detection window, click Skip Detection.
3 In the Select Operating System Type and Version window, select the guest OS you plan to
install inside your virtual machine and click Continue.
4 In the Virtual Machine Type window, select Typical and click Continue.
5 In the Name and Location window, define the main parameters for your virtual machine:
Name. Indicate the name to be assigned to the virtual machine. By default, the virtual
machine gets the name of the operating system that you selected to be installed in this
virtual machine. If a virtual machine with this name already exists, you will be prompted
to specify another name. The name must not exceed 50 characters.
Let other Mac users access this virtual machine. Select this option if you want to share
this virtual machine with other users of your Mac. In this case, the virtual machine file
(PVM file) will be saved in the /Users/Shared folder on your Mac.
Location. In this field, specify the virtual machine files location.
Sharing (for Windows virtual machines only). Use this field to configure access to the
disks and folders on the physical computer from inside the virtual machine. After the
virtual machine creation, you can edit these settings in the Shared Folders pane (p. 180)
of the Virtual Machine Configuration dialog.
If you click the Advanced button, you can set the number of CPUs and the amount of RAM
of your future virtual machine.
Setting Up a Virtual Machine
89
When finished, click Create. The assistant will create a blank virtual machine
6 After the virtual machine is created, in the Prepare to Install Operating System window,
specify the source of installation files, and click Start. You can specify the following types
of installation media:
A real CD/DVD drive. Click the CD/DVD field, and select the real CD/DVD drive name
from the list if you inserted the installation disc into the optical drive of your Mac.
A CD/DVD image file. Click the CD/DVD field, and select the installation disc image
from the list, or click Choose an image file, and locate the file on your Mac.
Click Start to start the guest operating system installation. If you want to install the guest
operating system later, click Done.
Note: Parallels Desktop does not provide users with OS ISO images or OS installation discs.
You should purchase an OS installation disc or an OS ISO image if you do not have any.
Note: If your Mac OS version is Mac OS Leopard, and you want to use the F8 key when
installing the Windows guest OS, refer to Using F8 Key in Windows Virtual Machine on Mac
OS X (p. 276).
When the installation is complete, install Parallels Tools if they are available for the guest OS
you just installed. Refer to the Installing Parallels Tools section (p. 97).
Setting Up a Virtual Machine
90
Custom Installation Mode
1
Start Parallels Desktop and launch New Virtual Machine Assistant by clicking New Virtual
Machine from the File menu.
2 In the Operating System Detection window, click Skip Detection.
3 In the Select Operating System Type and Version window, select the type and version of the
guest OS you want to install in this virtual machine and click Continue.
You can either select an operating system from the list or select Other in case you cannot
find the required one there.
4 In the Virtual Machine Type window, select Custom and click Continue.
5 In the CPU and Memory Options window, specify the number of CPU(s) and amount of RAM
for the virtual machine, and click Continue. You may use the slider or arrow buttons to set
the value or simply type it into the corresponding field.
Setting Up a Virtual Machine
91
6 In the Hard Disk Options window, select the type of virtual hard disk you want to use and
click Continue. You can create a new hard disk image, use an existing one or a Boot Camp
partition, or create a virtual machine without any hard disk at all.
In the current version of Parallels Desktop, you can use your Boot Camp Windows Vista
(SP1) or Windows XP (SP2 or SP3) partition as a bootable disk or as a data disk in virtual
machines. For more information about using Boot Camp partition as a virtual hard disk for a
virtual machine, see the Using Boot Camp Partition in a Virtual Machine chapter (p. 255).
7 If you have selected the No hard disk option, go to Step 9.
If you chose to create a new virtual hard disk in the previous step, in the New Virtual Hard
Disk window, specify the size and type for the disk, and click Continue. For detailed
information on virtual hard disks types, see Support for Virtual and Real Disks (p. 218).
If you have chosen to use an existing image file or a Boot Camp partition, in the next
window, specify the hard disk image or Boot Camp partition to be connected
correspondingly. Click Continue.
Setting Up a Virtual Machine
92
8 In the Networking Type window, select the type of networking you want to use in the virtual
machine and click Continue.
Shared Networking. If you select this option, the virtual machine will use the host
computer's network connections and will be visible only for the host computer and other
virtual machines registered on this server.
Bridged Networking. If you select this option, the virtual machine will be visible on the
network as a separate computer.
Host-Only Networking. If you select this option, the virtual machine will access only the
host computer and the virtual machines running on it.
No Networking. If you select this option, the virtual machine will have no network
adapter.
Note: You may reconfigure the networking settings after the virtual machine is created,
using the Virtual Machine Configuration dialog (p. 168).
If you selected Bridged Networking, on the next step you will need to select the network
adapter to be used by the virtual machine:
Default Adapter. Select this option to use the adapter specified as default in the primary
OS.
Ethernet. Select this option to use the Ethernet adapter of your Mac.
AirPort. Select this option to use the AirPort adapter of your Mac and be able to connect
to wireless networks from your virtual machine.
Vnic0. Select this option to use the virtual shared networking adapter installed together
with Parallels Desktop.
Vnic1. Select this option to use the virtual host-only networking adapter installed
together with Parallels Desktop.
The host computer network adapters included in this list are also available for selecting.
Select the Connected option if you want the virtual machine to start up with this network
adapter connected.
9 In the Optimization Options window, select the optimization mode you prefer and click
Continue. The available options are:
Virtual machine (Recommended). Select this option to allocate more host computer
resources to the virtual machine and its applications.
Mac. Select this option to allocate more resources to the host computer and its
applications.
10 In the Name and Location window, define the main parameters for your virtual machine:
Name. Indicate the name to be assigned to the virtual machine. By default, the virtual
machine gets the name of the operating system that you selected to be installed in this
virtual machine. If a virtual machine with this name already exists, you will be prompted
to specify another name. The name must not exceed 50 characters.
Let other Mac users access this virtual machine. Select this option if you want to share
this virtual machine with other users of your Mac. In this case the virtual machine file
(PVM file) will be saved in the /Users/Shared folder on your Mac.
Location. In this field, specify the virtual machine files location.
Setting Up a Virtual Machine
93
Sharing (for Windows virtual machines only). Use this field to configure access to the
disks and folders on the physical computer from inside the virtual machine. After the
virtual machine creation, you can edit these settings in the Shared Folders pane (p. 180)
of the Virtual Machine Configuration.
Setting Up a Virtual Machine
94
When finished, click Create. The assistant will create a blank virtual machine.
11 In the Boot Options section of the Prepare to Install Operating System window, provide the
Windows installation disc or CD/DVD image. You can specify the following types of
installation media:
A real CD/DVD drive. Click the CD/DVD field, and select the real CD/DVD drive name
from the list if you inserted the installation disc into the optical drive of your Mac.
A CD/DVD image file. Click the CD/DVD field, and select the installation disc image
from the list, or click Choose an image file, and locate the file on your Mac.
Click Start to start the guest operating system installation. If you want to install the guest
operating system later, click Done.
If you have already provided the Windows installation files, you can change the source of
installation files in this window.
Note: Parallels Desktop does not provide users with OS ISO images or OS installation discs.
You should purchase an OS installation disc or an OS ISO image if you do not have any.
Note: If your Mac OS X version is Mac OS X Leopard, and you want to use the F8 key
when installing the Windows guest OS, refer to Using F8 Key in Windows Virtual Machine on
Mac OS X (p. 276).
When the installation is complete, install Parallels Tools if they are available for the guest OS
you just installed. Refer to the Installing Parallels Tools section (p. 97).
Setting Up a Virtual Machine
95
Installing a Guest Operating System
You can install a guest operating system in a virtual machine from a CD or DVD disc, or from
an image file of such a disc. Some operating systems are available on CD/DVD disc images
only.
In some cases, the installation cannot be performed from a real CD/DVD disc because of disc
reading problems. In such cases, it is recommended that you try to install the operating system
from a CD/DVD disc image of this disc. ISO images of CD/DVD discs can be created using a
third party imaging utility.
Note: MacBook Air users can install guest operating systems from CD/DVD disc images only.
Additionally, you can also install a guest operating system using a PXE server via network.
If you need to install an operating system from floppy disks, you can use images of installation
diskettes or real diskettes inserted into an external USB floppy disk drive. Floppy disk images
can be created using third-party applications.
Installing from a CD/DVD disc or its image
1
Open Parallels Desktop and select the virtual machine in the Parallels Virtual Machines list.
2 To connect the installation medium, open Virtual Machine Configuration by:
right-clicking the machine and choosing Configure from the shortcut menu, or
choosing Configure from the Virtual Machine menu.
3 Open the CD/DVD-ROM settings and configure the virtual CD/DVD-ROM drive settings.
If you are installing from a real CD/DVD:
Select the Real Device option and specify the real drive to connect in the CD/DVD-ROM
list.
Insert the CD/DVD disc with the operating system files into the appropriate drive of the
computer.
If you are installing from an image file:
Select the Image file option and specify the path to the image file in the File field.
Note: You can use ISO and DMG images for installing the guest operating system. CUE and
CCD images may be also supported.
4 Click OK in Virtual Machine Configuration to save the changes.
5 Start your virtual machine by clicking Start
.
The installation will launch soon after the virtual machine is started.
Setting Up a Virtual Machine
96
Note: When installing a Windows guest OS, you may need to press F8 or other function keys in
a virtual machine. If you use MacBook or MacBook Pro keyboard, click inside the virtual
machine window to capture the keyboard and mouse input and press Fn+F8 combination
instead. You can configure Parallels Desktop to use any other key for performing the same
action as F8 does. To release the keyboard and mouse input back to Mac OS X, press Ctrl+Alt.
For more information, refer to Keyboard and Mouse Preferences (p. 53) and Capturing and
Releasing the Keyboard and the Mouse (p. 121).
Installing from the network
1
Choose Configure from the Virtual Machine menu to open Virtual Machine Configuration.
in the bottom part of the Virtual Machine Configuration dialog to
2 Click the Add button
launch Add Hardware Assistant.
Note: The Add button is disabled when the virtual machine is running. You need to shut
down the virtual machine before you can use this button.
3 Add a network adapter to your virtual machine configuration.
4 Open the Boot Order pane in Virtual Machine Configuration and change the boot sequence
to make the virtual network adapter the first device in the sequence. To this effect, select
Network Adapter in the list and use the arrow buttons to move it to the top of the list.
5 Click OK to apply the changes.
6 Start the virtual machine by clicking Start
.
Soon after your virtual machine is started, a list of available PXE servers appears.
During the installation, when the guest OS reboots for the first time, or after the installation,
return the boot sequence to booting from the hard disk.
Installing from a floppy disk image
1
Select the virtual machine and make sure that it is stopped.
2 To connect the installation medium, open Virtual Machine Configuration by:
right-clicking the machine and choosing Configure from the shortcut menu, or
choosing Configure from the Virtual Machine menu.
3 Open the Floppy DIsk pane and specify the path to the floppy image disk file in the Image
File field.
4 Click OK to apply the changes
5 Start the virtual machine by clicking Start
.
The installation will launch soon after the virtual machine is started.
Reinstalling the guest OS
The procedure of reinstalling the guest OS is the same as the procedure of installing the guest
OS: provide the installation media or its image, connect it to the virtual machine, and start the
virtual machine. The reinstallation will launch soon after the virtual machine is started.
Setting Up a Virtual Machine
97
Note: You can reinstall the guest OS of the same type only. However, you are free to choose the
guest OS version.
Keep in mind that in some cases, it is easier just to create a new virtual machine, install the guest
OS, and delete the old machine after moving all the necessary data to the new one.
Installing Parallels Tools
Parallels Desktop includes a set of specially developed utilities that help you use your virtual
machines in the most comfortable and efficient way.
Parallels Tools are located on the disc images that are installed along with Parallels Desktop.
There is a separate Parallels Tools disc image for each type of the supported guest operating
systems.
prl-tools-win.iso - disc image with Parallels Tools for Windows guest operating
systems.
prl-tools-lin.iso - disc image with Parallels Tools for Linux guest operating
systems.
prl-tools-mac.iso - disc image with Parallels Tools for Mac OS X Server Leopard.
These disc images can be found
/Library/Parallels/Tools/.
in
the
following
location
on
your
Mac:
Setting Up a Virtual Machine
98
Parallels Tools Overview
Parallels Tools are a suite of special utilities that help you use your virtual machines in the most
comfortable and efficient way. With Parallels Tools, you can move the mouse seamlessly
outside the guest OS window without pressing any key, change the virtual machine's screen
resolution by simply resizing its window, synchronize your virtual machine's time and date
settings with the time settings of the host computer, and share the host computer disks and
folders with its virtual machines.
Parallels Tools include the utilities listed below. Many of these utilities are available for the most popular
Windows, Linux, and Mac OS X operating systems, but some of them are available for the supported
Windows and Linux operating systems only. All utilities supported by your guest OS are installed in your
virtual machine as a single package when you install Parallels Tools.
Mouse Synchronization Tool
Windows,
Linux, OS/2,
Mac OS X
Time Synchronization Tool
Windows,
Linux,
Mac OS X
Mouse Synchronization Tool captures the mouse
input in the virtual machine each time the pointer
moves over to the guest OS window and
automatically releases the input when the pointer
moves out of the guest OS window.
Time Synchronization Tool enables you to customize
your virtual machine and the host computer time
settings. With this tool, you can:
Automatically synchronize the time settings of
your virtual machine with the host computer time
settings.
Set up and maintain the time difference between
your host computer and the guest OS installed in
your virtual machine.
Drag-and-Drop Tool
Windows
Drag-and-Drop Tool supports copying files between
the guest operating systems and Mac OS X by the
drag-and-drop method.
Clipboard Synchronization
Tool
Windows,
Linux, OS/2
Clipboard Synchronization Tool enables you to easily
exchange texts between:
different virtual machines irrespective of the
guest operating systems installed in them.
a virtual machine and your Mac.
To copy and paste, you should use the standard
procedure for the current operating system. For
example, to copy some text in the Windows
guest OS, select the text, and press Ctrl+C. To
paste this text in Mac OS X, press Cmd+V, or
select Paste from the shortcut menu.
Dynamic Resolution Tool
Windows,
Linux,
Mac OS X
Shared Folders Tool
Windows,
Linux,
Mac OS X
Dynamic Resolution Tool enables you to work with
dynamic resolution. When you resize the guest OS
window by dragging its lower right corner, the guest
OS window resolution changes automatically.
Shared Folders Tool enables you to share the primary
OS folders to access them from the guest OS. With
this tool, you can access the host computer shared
folders from the virtual machine.
Setting Up a Virtual Machine
99
Coherence Tool
Windows
The Coherence tool hides your Windows virtual
machine's window leaving only the virtual machine's
applications windows visible side-by-side with your
Mac OS X applications. This tool enables you to work
in Windows applications coherently with your Mac
OS X applications.
Shared Profile Tool
Windows
Shared Profile Tool enables you to map some of the
folders in your Mac home folder to your user folders
in the virtual machine, which allows you to access
your Mac home folders right from your virtual
machine.
Shared Applications Tool
Windows
Shared Applications Tool enables you to specify
default applications, including those installed in the
virtual machine, for different types of files. With this
tool, you can make some types of files open in the
Mac OS X applications by default, and others in the
Windows applications by default.
Shared Internet Applications
Tool
Windows
Shared Internet Applications Tool enables you to
specify default Internet browsers, including those
installed in the virtual machine, for different types of
Internet pages. For example, you may set the http
pages to open in your default Mac OS X Internet
browser, and ftp pages to open in the Internet
browser installed in your virtual machine.
After the Parallels Tools installation, the following features are available for settings up in
Parallels Desktop.
SmartMount
Windows,
Linux,
SmartMount enables the automatic detection and
mounting of removable devices in your virtual
machines.
Mac OS X
Parallels Tools can be installed in the following Windows guest operating systems:
Windows Server 2008
Windows Vista
Windows XP
Windows Server 2003
Windows 2000
Note: If Parallels Tools are not installed in the aforementioned Windows guest operating
systems, the virtual machines with these guest OSs will not get connected to the network.
Parallels Tools can be installed in Linux guest operating systems that comply with the following
requirements:
glibc 2.3.4 and later
libstdc++ 3.4.6 and later (libstdc++.so.6)
gcc 3.4.6 and later (including C++ support)
make 3.80
X Window System X11R6.7, X11R6.8, X11R6.8.99, X11R7.0, X11R7.1, X11R7.2 (1.3),
X11R7.3 (1.4)
Setting Up a Virtual Machine
100
kernel sources or development package
Note: Some of Parallels Tools, like Shared Folders Tool and Time Synchronization Tool, may
also work in those of the Linux operating systems that do not comply with the requirements
listed above.
Parallels Tools can be installed in the following Mac OS X guest operating systems:
Mac OS X Leopard Server 10.5.x
Setting Up a Virtual Machine
101
In a Windows guest OS
If you created your virtual machine using the Express Windows mode, Parallels Tools were
installed automatically after the installation of the Windows guest operating system.
If your virtual machine was created in the Typical or Custom mode, do the following to install
Parallels Tools in it:
1
Start the virtual machine and log in to the guest operating system.
2 When the guest OS boots up, connect the Parallels Tools ISO image by choosing the Install
Parallels Tools option from the Virtual Machine menu.
Note: If the Install Parallels Tools option is grayed out, make sure that Parallels Tools can be
installed in your guest operating system. To see the list of guest OSs supported by Parallels
Tools, refer to the Parallels Tools Overview section in Parallels Desktop Help available
through the Help menu.
3 In the Welcome window, click Install. The wizard will start the automatic installation.
4 When the installation is complete, click Reboot to exit the wizard and restart the virtual
machine.
You can also install Parallels Tools manually:
1
Start the virtual machine and log in to the guest OS.
2 Connect the Parallels Tools ISO image by right-clicking the CD/DVD drive icon in the
virtual machine's window status bar and choosing Connect Image.
3 In the Finder window, go to the hard disk folder (normally named "Macintosh HD"), select
the /Library/Parallels/Tools/ folder, select the prl-tools-win.iso file,
and click Open to connect it to the virtual machine.
Note: If you cannot find the /Library/Parallels/Tools/ folder, make sure that you
selected the Library folder at the highest level of Macintosh HD, not in your user home
folder.
4 In the virtual machine, open My Computer and double-click the Parallels Tools disc icon to
start the installation. If the installation wizard does not launch automatically, right-click the
disc, choose Open from the shortcut menu, and double-click Setup.exe to launch the
installer.
5 Follow the wizard's instructions to complete the installation.
To edit the settings of Parallels Tools installed in your virtual machine, use the Services pane of
the Virtual Machine Configuration dialog.
Reinstalling Parallels Tools
To reinstall Parallels Tools, start your virtual machine, and select Reinstall Parallels Tools from
the Virtual Machine menu. This option is available only if Parallels Tools are up-to-date. If
Parallels Tools are outdated, you will see the Update Parallels Tools option instead.
How to check if Parallels Tools are installed
Setting Up a Virtual Machine
102
If you are not sure whether Parallels Tools are installed, you can easily check this. Start your
virtual machine and look at the status bar of its window: if the tip "Press Ctrl + Alt to
release the mouse and keyboard" appears in the status bar of the virtual machine's
window, this means that Parallels Tools are not installed. When Parallels Tools are installed,
you do not need to press any key to release the mouse and keyboard - they are released
automatically.
Setting Up a Virtual Machine
103
In a Linux guest OS
Before installing Parallels Tools in a Linux guest OS, perform the following actions:
Close all applications in the guest operating system.
Disable the 3D accelerated window manager if you use any.
Make sure that you have the gcc package and kernel sources installed. If these packages are
not installed, the Parallels Tools installer will inform you about this you. The kernel sources
package name depends on the type of Linux operating system you use: it can be kerneldevel, or kernel-headers, or something else. For more information about the kernel
sources, refer to the Installing the GCC package and Kernel Sources in Linux (p. 278)
section.
Note: To install Parallels Tools in your virtual machine, you must have the root privileges.
Installing Parallels Tools in the most recent versions of Linux guest OSs
If you have one of the most recent versions of Linux OSs (Ubuntu, Fedora) in your virtual
machine, the prl-tools-lin.iso image file will be mounted automatically after you
connect it to the CD/DVD drive. To install Parallels Tools, do the following:
1
Start the virtual machine.
2 When the guest OS boots up, click the Virtual Machine menu and choose Install Parallels
Tools.
Note: If the Install Parallels Tools option is grayed out, make sure that Parallels Tools can be
installed in your guest operating system. To see the list of guest OSs supported by Parallels
Tools, refer to the Parallels Tools Overview section in Parallels Desktop User's Guide.
The prl-tools-lin.iso image file will be connected to the virtual machine's
CD/DVD drive and mounted.
You can connect and mount the Parallels Tools ISO image file manually. Right-click the
CD/DVD drive icon in the virtual machine's window status bar and choose Connect Image.
In the Finder window, go to the hard disk folder (normally named "Macintosh HD"), select
the /Library/Parallels/Tools/ folder, select the prl-tools-lin.iso file,
and click Open to connect it to the virtual machine.
3 Start a terminal in your Linux guest OS. Type the following command to gain the root
privileges:
su
4 Change the directory to the CD/DVD drive directory using
cd /media/cdrom/
Note: In some of the Linux operating systems, the mount point for the virtual CD/DVD
drive may appear as /media/Parallels\ Tools/.
5 In the CD/DVD drive directory, enter the following command to launch Parallels Tools
installation:
./install
6 Follow the Parallels Tools Installer instructions to complete the installation.
7 When the installation of Parallels Tools is complete, restart your virtual machine.
Setting Up a Virtual Machine
104
Installing Parallels Tools in other versions of Linux guest OSs
To install Parallels Tools in the older versions of Linux OSs, you have to mount the prltools-lin.iso image file manually. Do the following:
1
Start the virtual machine.
2 When the guest OS boots up, click the Virtual Machine menu and choose Install Parallels
Tools.
Note: If the Install Parallels Tools option is grayed out, make sure that Parallels Tools can be
installed in your guest operating system. To see the list of guest OSs supported by Parallels
Tools, refer to the Parallels Tools Overview section in Parallels Desktop User's Guide.
The prl-tools-lin.iso image file will be connected to the virtual machine's
CD/DVD drive.
3 Start a terminal in your Linux guest OS. Type the following command to gain the root
privileges:
su
4 Check if the Parallels Tools CD image is mounted by entering
mount | grep iso9660
If this command does not return anything, proceed to the next step.
If this command returns anything like
/dev/cdrom on /media/cdrom type iso9660 (ro,exec,nosuid,nodev,uid=0),
skip the next step and proceed to the following one.
If this command returns anything like
/dev/cdrom on /media/cdrom type iso9660 (ro,noexec,nosuid,nodev,uid=0)
with the noexec option present in parentheses, you need to unmount the disc using the
following command and then proceed to the next step:
umount /dev/cdrom
5 To mount the Parallels Tools installation disc image, enter the following:
mount -o exec /dev/cdrom /media/cdrom
Note: /dev/cdrom is the virtual machine's CD/DVD drive and /media/cdrom is the
mount point for this device. In some of the Linux operating systems the virtual CD/DVD
drive may appear as /dev/hdb and the mount point /mnt/cdrom. Some Linux OSs do
not have the CD/DVD drive mount point. In this case, you should create the mount point
directory manually.
6 When the installation disc image is mounted, change the directory to the CD/DVD drive
directory using
cd /media/cdrom/
7 In the CD/DVD drive directory, enter the following to launch Parallels Tools installation:
./install
Note: You must have the root privileges to run this command.
8 Follow the Parallels Tools Installer instructions to complete the installation.
9 When the installation of Parallels Tools is complete, restart your virtual machine.
Note: If X Server fails to start in your virtual machine, you can install Parallels Tools
manually in text mode (p. 277).
Setting Up a Virtual Machine
105
To edit the settings of Parallels Tools installed in your virtual machine, use the Services pane of
the Virtual Machine Configuration dialog.
Reinstalling Parallels Tools
To reinstall Parallels Tools, remove them (p. 111) first, and then install them again using the
above procedure.
How to check if Parallels Tools are installed
If you are not sure whether Parallels Tools are installed, you can easily check this. Start your
virtual machine and look at the status bar of its window: if the tip "Press Ctrl + Alt to
release the mouse and keyboard" appears in the status bar of the virtual machine's
window, this means that Parallels Tools are not installed. When Parallels Tools are installed,
you do not need to press any key to release the mouse and keyboard - they are released
automatically.
Troubleshooting
Parallels Tools installer can be blocked by SELinux. To solve this problem:
1
Start a terminal and determine your version of kernel by entering
uname -r
2.6.18-8.el5
2.6.18-8.el5 is the version of your kernel.
2 Open the /boot/grub/grub.conf file or /boot/grub/menu.lst (depends on the
version of your Linux operating system) and find the entry that corresponds to your version
of kernel.
title Red Hat Enterprise Linux Server (2.6.18-8.el5)
root (hd0,0)
kernel /vmlinuz-2.6.18-8.el5 ro root=/dev/VolGroup00/LogVol00 rhgb quiet
initrd /initrd-2.6.18-8.el5.img
3 Type the following text at the end of the entry:
selinux=0
and the whole entry will be:
kernel /vmlinuz-2.6.18-8.el5 ro root=/dev/VolGroup00/LogVol00 rhgb quiet
selinux=0
4 Save the file and restart the virtual machine.
After the restart, mount the Parallels Tools disc image and try to install Parallels Tools.
Setting Up a Virtual Machine
106
In Mac OS X
To install Parallels Tools in Mac OS X Server Leopard:
1
Start the virtual machine, and log in to the guest OS.
2 When the guest OS boots up, connect and mount the Parallels Tools ISO image file by
choosing the Install Parallels Tools option from the Virtual Machine menu.
Note: If the Install Parallels Tools option is greyed out, make sure that Parallels Tools
support your guest operating system. To view the list of guest OSs which are supported by
Parallels Tools, refer to the Parallels Tools Overview subsection of Parallels Desktop User's
Guide.
You can connect and mount the Parallels Tools ISO image file manually. Right-click the
CD/DVD-ROM icon in the virtual machine's window status bar and choos Connect Image.
In the Finder window, go to the hard disk folder (normally named "Macintosh HD"), select
the /Library/Parallels/Tools/ folder, select the prl-tools-mac.iso file,
and click Open to connect it to the virtual machine.
3 Open the mounted image of the disk and double-click the Guest OS Tools For Mac OS X icon
to start the installation.
4 In the Welcome window, click Continue.
5 In the Select a Destination window, specify the location for Parallels Tools. Click Continue.
6 In the Standard Install on "Macintosh HD" window, if you need to set a different location for
Parallels Tools, you can do it by clicking Change Install Location. Click Install to continue
the installation. Type the password when prompted.
In the Installation window, you can see the process of Parallels Tools being installed in your
virtual machine.
7 When the installation is complete, click Restart to exit the assistant and restart you virtual
machine.
To edit the settings of Parallels Tools installed in your virtual machine, use the Services pane of
the Virtual Machine Configuration dialog.
Reinstalling Parallels Tools
To reinstall Parallels Tools, remove them (p. 111) first, and then install them again using the
above procedure.
How to check if Parallels Tools are installed
If you are not sure whether Parallels Tools are installed, you can easily check this. Start your
virtual machine and look at the status bar of its window: if the tip "Press Ctrl + Alt to
release the mouse and keyboard" appears in the status bar of the virtual machine's
window, this means that Parallels Tools are not installed. When Parallels Tools are installed,
you do not need to press any key to release the mouse and keyboard - they are released
automatically.
Setting Up a Virtual Machine
107
In OS/2 and eComStation Guest OSs
All of the OS/2 and eComStation tools can be installed from the prl-tools-other.iso
CD image. Network drivers can also be installed from the prl-tools-os2.fdd floppy disk
image file during the operating system installation. The latter is easier in most cases.
Before starting the installation you should connect the CD image with Parallels Tools to your
virtual machine's CD/DVD drive. Choose Install Parallels Tools from the Virtual Machine menu.
Mouse Synchronization Tool Installation
Mouse Synchronization Tool consists of the mouse driver and video filter.
Note: To install Mouse Synchronization Tool, you should have a VESA video driver installed
(e.g. SDD or GENGRADD). For instructions on how to install this video driver, refer to the
OS/2 documentation.
To install Mouse Synchronization Tool:
1
Click the Drives icon on the system panel. Select the CD/DVD drive and locate the <CDROM drive>\Drivers\Mouse\OS2 directory.
Note: When installing the driver on eComStation 1.2, go to the <CD-ROM
drive>\Drivers\Mouse\ECS12 directory.
2 Launch the INSTALL.CMD batch file. INSTALL.CMD copies files and makes necessary
modifications to the CONFIG.SYS file.
3 Restart the guest OS/2 operating system.
Clipboard Synchronization Tool Installation
In OS/2 and eComStation you have to launch Clipboard Synchronization Tool manually. This
tool is an ordinary application and should be treated as such. If you want Clipboard
Synchronization Tool to start automatically when your guest operating system is started, copy
the PrlClip.exe tool file to the virtual machine's hard disk and include it into the autostart
group (startup.cmd file or another file used in the guest operating system for similar
purposes).
Clipboard Synchronization Tool is located in the <CD-ROM
directory on the CD image containing Parallels Tools.
drive>\ClipBrd\OS2
Sound Driver Installation
Before installing Sound Driver, make sure you have the multimedia support installed in the
OS/2 guest OS.
To install Sound Driver:
1
Click the System Setup icon on the system panel.
2 Select Install/Remove line and then select Multimedia Application Install.
Setting Up a Virtual Machine
108
3 In the IBM Multimedia Presentation Manager/2 - Installation window choose the CD/DVD
drive, then the <CD-ROM drive>\Drivers\Sound\OS2 directory. Select the ALC
Codec feature and click the Install button.
4 Restart the OS/2 guest operating system.
Network Driver Installation
To install Realtek RTL8029 driver inside the OS/2 Warp version 4.5:
1
Click the System Setup icon on the system panel.
2 Click the MPTS Network Adapters and Protocol Services icon to open the Multi-Protocol
Transport Services window.
3 Click Configure.
4 In the window that appears, click Configure again.
5 In the Adapter and Protocol Configuration window, click the Other adapters button below the
Network Adapters section.
6 In the Copy Additional Network Adapter Drivers window specify the path to the Parallels
driver on the CD disc image. The path will be like the one below:
<CD-ROM drive>\Drivers\Network\RTL8029\NDIS2OS2
7 Click OK. The Parallels network adapter driver will be copied. After this you can see the
name RTL8029 PCI Ethernet Adapter included in the Network Adapters list. Select this name.
8 Click Change in the Network Adapters section of the window to replace the current network
adapter by the selected one.
9 Click OK when the message "Are you sure you want to change this
network adapter?" is displayed. After you click OK, the RTL8029 PCI Ethernet Adapter
appears in the appropriate field of the Current Configuration section of the window. Now if
you click Edit in the Current Configuration section of the window, you will see that you do
not need to configure any properties for this driver, because it is self-configurable.
10 Click OK when finished.
11 Close both the Configure and Multi-Protocol Transport Services windows.
12 Click Exit in the Update CONFIG.SYS window.
13 Exit the configuration program and restart the guest OS.
Setting Up a Virtual Machine
109
Updating Parallels Tools
The procedure of updating Parallels Tools depends on the guest operating system they are
installed in.
In a Windows guest OS
Parallels Desktop automatically checks for new Parallels Tools updates when you start your
virtual machine.
If a newer version of Parallels Tools is available, you will see the corresponding message
offering you to download and update the tools. Click Yes to download Parallels Tools from the
Parallels Update server and install them into your virtual machine. Updating will start right after
the download finishes and will prompt you to restart the virtual machine when it is complete.
If you do not want to update Parallels Tools or want to do it later, click No. You will be able to
update them later by using the Update Parallels Tools option from the Virtual Machine menu.
Note: If you revert to a snapshot that was made when you had an earlier version of Parallels
Tools in your virtual machine, you will also be offered to update them.
If Parallels Tools are up-to-date but you want to reinstall them, select the Reinstall Parallels
Tools option from the Virtual Machine menu.
In a Linux guest OS
Before updating Parallels Tools, you should perform the following actions:
Close all applications in the guest operating system.
Disable the 3D accelerated window manager if you use any.
In Linux guest operating systems, you should manually check for Parallels Tools updates from
time to time.
To update Parallels Tools:
1
Start the virtual machine.
2 To update Parallels Tools, you should mount the prl-tools-lin.iso image and launch
Parallels Tools Installer. See Installing Parallels Tools in a Linux Guest OS (p. 103) for
detailed information how you can do it.
3 Follow the Parallels Tools Installer instructions. When prompted to choose the action to
perform, select Update and press Enter.
4 When the updating is complete, restart your virtual machine.
In Mac OS X Server Leopard
In Mac OS X guest operating systems, you should manually check for Parallels Tools updates
from time to time.
To install Parallels Tools
Setting Up a Virtual Machine
1
110
Start the virtual machine.
2 When the guest OS boots up, choose Install Parallels Tools from the Virtual Machine menu of
Parallels Desktop.
3 This will connect the prl-tools-mac.iso image to your virtual machine's CD/DVDROM.
4 Open the Parallels Tools CD-ROM mounted on the virtual machine's desktop and doubleclick the Install icon.
5 In the Welcome window, click Continue.
6 In the Select a Destination window, specify the disk for Parallels Tools to be installed to and
click Continue.
7 In the Standard Install on "Macintosh HD" window, click Install. Specify your name and
password when prompted.
When the updating is complete, click Restart to quit the installer and restart your virtual
machine.
Setting Up a Virtual Machine
111
Removing Parallels Tools
Parallels Tools can be removed through a general procedure of removing applications from the
operating system installed in your virtual machine.
Removing from a Windows guest OS
1
Start the virtual machine and log in to the guest OS.
2 From the Windows Start menu, choose Control Panel > Add or Remove Programs. In
Windows Vista, choose Control Panel > Programs and Features.
3 Select Parallels Tools in the list and click Remove.
4 When Parallels Tools are removed, restart the guest operating system.
Removing from a Linux guest OS
Perform the following actions before removing Parallels Tools:
Close all applications in the guest operating system.
Disable the 3D accelerated window manager if you use any.
To remove Parallels Tools:
1
Start the virtual machine.
2 To remove Parallels Tools, you should connect and mount the prl-tools-lin.iso
image and launch Parallels Tools Installer. See Installing Parallels Tools in a Linux Guest OS
(p. 103) for detailed information how you can do it.
3 Follow the Parallels Tools Installer instructions. When prompted to choose the action to
perform, select Remove and press Enter.
4 When Parallels Tools are successfully removed, press Enter to close the window.
Removing from Mac OS X Server Leopard
1
Start the virtual machine, and log in to the guest OS.
2 To remove Parallels Tools, you should connect and mount the prl-tools-mac.iso
image and launch Parallels Tools Installer. See Installing Parallels Tools in Mac OS X (p. 106)
for detailed information how you can do it.
3 Open the mounted image of the disc and double-click the Uninstall Parallels Tools icon to
start the uninstallation.
4 In the Welcome window, click Uninstall. Enter the password when prompted.
5 In the Uninstallation window, you can see the process of Parallels Tools being removed from
your virtual machine.
6 In the Uninstallation Completed window, click Restart to finish the uninstallation and quit the
assistant.
Setting Up a Virtual Machine
112
Adding an Existing Virtual Machine
If you already have a virtual machine stored on your Mac, but it is missing from the Parallels
Virtual Machines list (p. 36), you can easily add it by opening its PVM file in Parallels Desktop.
Parallels Desktop 5 enables you to work with your virtual machines created in Parallels Desktop
and other virtualization products, including VMware Fusion, Microsoft Virtual PC, and
VirtualBox. All you need is to convert them to Parallels Desktop 5 format. The converting is
performed when you add these virtual machines to Parallels Desktop.
To add a virtual machine that already exists on your Mac:
1
Click Open in the File menu, or click the down arrow button
at the lower left corner of
the Parallels Virtual Machines list (p. 36), and choose Open from the menu.
Setting Up a Virtual Machine
113
2 In the Finder window, locate the virtual machine bundle or configuration file, select it, and
click Open.
Parallels Desktop virtual machine bundle has the .pvm extension.
Parallels Desktop 3 and earlier configuration file has the .pvs extension.
VMware configuration file has the .vmx extension.
Virtual PC configuration file has the .vmc extension.
VirtualBox configuration file has the .xml extension.
Note: Parallels Desktop and VMware Fusion virtual machines may be stored in Mac OS X
as bundles of files. The configuration file is stored inside the virtual machine bundle.
3 The next step depends on the virtual machine you selected:
If you selected a virtual machine created in Parallels Desktop 4 or 5, its window will
open. When you start this virtual machine, Parallels Desktop will offer you to update
Parallels Tools.
If you selected a virtual machine created in Parallels Desktop 3 or earlier, its window
will open, and Parallels Desktop will offer you to convert it to the new format. This
process may require significant time.
If you selected a third-party virtual machine, Parallels Transporter will launch to guide
you through the steps of converting this virtual machine to the Parallels Desktop 5
format. For detailed information, see Parallels Transporter User's Guide.
4 If you added a virtual machine created in the previous version of Parallels Desktop or a
third-party application (VMware Fusion, Microsoft Virtual PC, or VirtualBox), you need to
install Parallels Tools in it (p. 97).
Additionally, to add a Parallels virtual machine to Parallels Desktop 5, you can simply locate its
.pvm bundle or .pvs configuration file, and drag it to the Parallels Virtual Machines list (p. 36).
If your copy of Parallels Desktop is not activated, you will be prompted to activate it when the
virtual machine is added to Parallels Desktop 5. For more information about the activation, see
Activating Parallels Desktop (p. 20).
Setting Up a Virtual Machine
114
Importing Physical Computers and
Virtual Machines
Apart from creating a new virtual machine from scratch with the help of New Virtual Machine
Assistant (p. 77, p. 33), you can create it through migration using Parallels Transporter.
Parallels Transporter enables you to migrate selected volumes or the whole of a physical
computer or a VMware, Microsoft Virtual PC, and VirtualBox virtual machine into a Parallels
virtual machine or Parallels virtual disk. Depending on what kind of computer you want to
migrate, you can choose among several migration scenarios. For the detailed description and
functions of these scenarios, refer to Using Parallels Transporter (p. 263) or to Parallels
Transporter User's Guide.
To create a new virtual machine through migration:
1
Launch Parallels Desktop.
2 From the File menu of Parallels Desktop, choose Import. Parallels Transporter opens.
Note: You can also open Parallels Transporter from the following location:
/Applications/Parallels.
3 Follow the assistant's instructions. It will help you choose the migration scenario and will
guide you through the migration process.
Setting Up a Virtual Machine
115
Downloading Virtual Appliances
If you do not have enough time to create a new virtual machine with the required configuration,
you can download a ready-to-use virtual machine with a predefined configuration. Besides the
basic configuration, pre-built virtual machines also may have a set of applications installed in
the guest OS, so that you do not have to spend time on installing and setting up the required
software.
Using Linux Virtual Appliances
Such pre-built Linux virtual machines with target services and applications installed in the guest
OS are called Parallels Virtual Appliances. Linux Virtual appliances are built by the Parallels
experts and are available for downloading at the Parallels Technology Network page. You can
also access the virtual appliances online storage via the Parallels Desktop menu by choosing
Download from the File menu. Parallels Desktop redirects you to the Parallels Technology
Network page where you will be able to choose the virtual machines that suit you most.
To start using a Linux virtual appliance, do the following:
1
On the Parallels Technology Network page, click the virtual appliance's title to view
configuration details and the guest OS administrative credentials.
2 Download the desired virtual appliance to your Mac by clicking the GET APP link and
choosing the download link with the .dmg file format.
3 When the virtual appliance file is downloaded, double-click the the .dmg file to start the
installation.
Using Windows Virtual Appliances
You can also use Windows virtual appliances in Parallels Desktop. Microsoft provides Virtual
PC virtual machines with preinstalled trial Windows XP or Windows Vista. Parallels
Transporter enables you to migrate from a Microsoft Virtual PC to a Parallels virtual machine.
To start using a Windows virtual appliance, do the following:
1
Download the Virtual PC with preinstalled Windows self-extracting archive (.exe) from
the Microsoft website. For Windows Vista, there may be additional .rar files. Download
them to the same directory as the main .exe file.
2 Start Parallels Transporter and migrate from a Virtual PC virtual machine into a Parallels
virtual machine. For detailed information on migrating from third-party virtual machines,
see Parallels Transporter User's Guide.
Parallels Transporter extracts the Virtual PC configuration file and all hard disk files from the
archive and converts them into the Parallels virtual machine configuration file (.pvs) and hard
disk files (.hdd). All data and configuration settings are preserved.
Note: When the trial period for using Windows expires, you will have to activate it to proceed
using it.
116
CHAPTER 6
Working in a Virtual Machine
This chapter provides the information on the main operations you can perform in a running
virtual machine. These operations include:
Starting, stopping, and resetting the virtual machine.
Pausing or suspending the virtual machine.
Using the mouse in the virtual machine (p. 121).
Starting the virtual machine in Safe Mode.
Switching between different view modes and working in Full Screen (p. 125).
Installing applications in the virtual machine.
Using Mac keyboard shortcuts in the virtual machine (p. 127).
Setting Up Parallels Internet Security (p. 129).
Making images of the whole Mac OS X desktop or any of its parts and have them displayed
on top of all windows in the virtual machine.
Enabling/disabling the 3D graphics support in the virtual machine.
Connecting USB devices to and disconnecting them from the virtual machine.
Setting up a printer and synchronizing a USB Palm OS device (p. 144).
Using Touchpad and Gestures (p. 134).
Changing the Configuration at Runtime (p. 145).
In This Chapter
Starting, Stopping, and Resetting a Virtual Machine............................................................ 117
Suspending and Pausing a Virtual Machine.......................................................................... 119
Using Mouse in the Virtual Machine .................................................................................... 121
Changing View Modes.......................................................................................................... 122
Working in Full Screen ......................................................................................................... 125
Using Safe Mode................................................................................................................... 126
Using Keyboard Shortcuts in a Virtual Machine .................................................................. 127
Installing Applications in a Virtual Machine ........................................................................ 128
Setting Up Parallels Internet Security ................................................................................... 129
Getting Acronis Applications................................................................................................ 130
Placing an Image on Top of the Virtual Machine Window .................................................. 131
Using 3D Graphics Applications .......................................................................................... 132
Making Screenshots .............................................................................................................. 133
Using Touchpad Gestures and Apple Remote ...................................................................... 134
Setting Up a Printer in a Virtual Machine............................................................................. 136
Connecting USB Devices to a Virtual Machine ................................................................... 141
Synchronizing a USB Palm OS Device With the Guest OS ................................................. 144
Changing the Configuration at Runtime ............................................................................... 145
Working in a Virtual Machine
117
Starting, Stopping, and Resetting a
Virtual Machine
Starting a Virtual Machine
To start a virtual machine, do one of the following:
near the virtual machine name in the Parallels Virtual Machines
Click the Start button
dialog. For detailed information on this dialog, see Parallels Virtual Machines Dialog (p. 36).
Right-click the virtual machine name in the Parallels Virtual Machines dialog, and choose the
Start option.
Double-click the virtual machine name in the Parallels Virtual Machines dialog, and click the
Start button
in the Parallels Desktop toolbar.
Click the virtual machine in the Parallels Virtual Machines dialog, and choose Start from the
Virtual Machine menu.
After starting the virtual machine, it will boot into the guest operating system installed in this
virtual machine. If no guest operating system is installed in the virtual machine, Operating
System Installation Assistant will start.
Note: 1. You can start virtual machines only if your copy of Parallels Desktop is activated. See
the Activating Parallels Desktop section (p. 20) for details.
2. You can manage the virtual machine content without starting the virtual machine with the
help of Parallels Mounter (p. 267).
Stopping a Virtual Machine
To turn off the virtual machine, use the standard shutdown procedure of the guest operating
in the Parallels Desktop toolbar. If
system installed in it, or click the Shut Down button
the guest operating system cannot be shut down for some reason or other, you can forcibly stop
the virtual machine by doing one of the following:
clicking the Stop button
choosing Stop from the Virtual Machine menu.
in the Parallels Desktop toolbar or
Warning: If you forcibly stop the virtual machine, you may lose all unsaved data.
Resetting a Virtual Machine
If some program error has caused your virtual machine to hang, you may wish to reset the
virtual machine.
Working in a Virtual Machine
118
To reset the virtual machine, do one of the following:
Choose Reset from the Virtual Machine menu.
in the Parallels Desktop toolbar. If this button is absent from
Click the Reset button
the toolbar, refer to the Customizing Toolbar subsection (p. 47).
Warning: If you reset the virtual machine, you may lose all unsaved data.
Setting a Restriction on Changing the Virtual Machine State
If you select the Change virtual machine state option in the Security pane (p. 179) of Virtual
Machine Configuration, you will have to provide your administrator password each time you
want to start, stop, suspend, or otherwise change the virtual machine state.
To edit the security settings of your virtual machine:
1
Select Configure from the Virtual Machine menu to open Virtual Machine Configuration.
2 Click Options at the top of the Virtual Machine Configuration window and select Security in
the list of options.
Working in a Virtual Machine
119
Suspending and Pausing a Virtual
Machine
Starting and shutting down virtual machines may take a considerable amount of time. Instead of
performing these operations, you can suspend or pause a virtual machine for the required time
and quickly resume it later.
Suspending a Virtual Machine
Suspending a virtual machine is similar to putting a real computer into the sleep mode. When
you suspend a virtual machine, you save its current state (including the state of all applications
and processes running in the virtual machine) to a special file on your Mac. When the suspended
virtual machine is resumed, it continues operating at the same point the virtual machine was at
the time of its suspending.
Suspending your virtual machine may prove efficient if you need to restart your Mac, but do not
want to:
quit the applications running in the virtual machine
spend much time on shutting the guest operating system down and then starting it again
To suspend a virtual machine, do one of the following:
choose Suspend from the Virtual Machine menu or
click the Suspend button
in the Parallels Desktop toolbar.
You can see the progress of saving the virtual machine's state.
Warning: If you edit the configuration of a suspended virtual machine, you will not be able
to resume this virtual machine.
To resume a suspended virtual machine, click the Resume button
toolbar or choose Resume from the Virtual Machine menu.
in the Parallels Desktop
Pausing a Virtual Machine
Pausing a virtual machine releases the resources, such as RAM and CPU, currently used by this
virtual machine. The released resources can then be used by the host computer and its
applications or by other virtual machines running on the host computer.
Note: Only the amount of RAM used by the guest OS will be released. The memory used by the
Parallels Desktop application will still be locked.
To pause a virtual machine, do one of the following:
Working in a Virtual Machine
click the Pause button
choose Pause from the Virtual Machine menu.
120
in the Parallels Desktop toolbar or
When a virtual machine is paused, its window is grayed out. To continue running the virtual
machine, click the Start button
the Virtual Machine menu.
in the Parallels Desktop toolbar or choose Resume from
Parallels Desktop is designed to operate like an ordinary computer application. This means that
you do not have to change the virtual machine's state from running to paused, suspended, or
stopped before putting your Mac to sleep. In sleep mode, your Mac does not allocate any
resources to the running applications (including Parallels Desktop and all virtual machines) so
that they are stopped automatically. As you start your Mac, all the applications are automatically
up and running again.
Note: By default, you cannot suspend or pause your Boot Camp virtual machine because this
may damage the Boot Camp partition. For detailed information on suspending your Boot Camp
virtual machine, see Suspending a Boot Camp Virtual Machine (p. 281).
Setting a Restriction on Changing the Virtual Machine State
If you select the Change virtual machine state option in the Security pane (p. 179) of Virtual
Machine Configuration, you will have to provide your administrator password each time you
want to start, stop, suspend, or otherwise change the virtual machine state.
To edit the security settings of your virtual machine:
1
Select Configure from the Virtual Machine menu to open Virtual Machine Configuration.
2 Click Options at the top of the Virtual Machine Configuration window and select Security in
the list of options.
Working in a Virtual Machine
121
Using Mouse in the Virtual Machine
To start working in a virtual machine, you need first to capture the keyboard and mouse input in
the virtual machine. To this effect:
1
move the mouse pointer over the virtual machine window
2 click in the window
When the keyboard and mouse input is captured in the virtual machine, you cannot move the
pointer out of the virtual machine window and all keystrokes and button clicks go to the virtual
machine. To release the keyboard and mouse back, press Ctrl+Alt. The keyboard and mouse will
be released immediately.
Note: The default hot key combinations can be configured on the Keyboard and Mouse pane (p.
53) of the Preferences dialog.
Using SmartMouse
If you want to automatically capture and release the keyboard and mouse input, you should
install Parallels Tools (p. 97) in your virtual machine. The Parallels Tools installation enables
the SmartMouse feature. You can configure or disable this feature in the Services pane (p. 177)
of Virtual Machine Configuration:
If you select On, the mouse input will be automatically captured in the virtual machine
window when the mouse pointer hovers over it and then released when it moves back to
Mac OS, which will make the mouse move seamlessly between your Mac and the virtual
machine.
If you select Off, you will need to click inside the virtual machine window to capture the
mouse input, and press Ctrl+Alt to release it back to your Mac. It may be convenient if you
want the mouse pointer to always stay inside the virtual machine window in the Window
and Modality view modes (p. 122).
Note: Ctrl+Alt is the default key combination. You can define another key combination for
releasing the mouse in the Keyboard and Mouse (p. 53) pane of Parallels Desktop
Preferences.
If you select Auto, the option will automatically become disabled (Off) each time you use a
game, graphic application, or any other program that uses its own mouse pointer instead of
using the operating system pointer. The option will be automatically enabled (On) after you
quit the application.
Mouse Wheel Horizontal Scrolling
In this version of Parallels Desktop, you can use the mouse wheel horizontal scrolling when
working with virtual machine applications windows. This feature is available only if Parallels
Tools (p. 16) are installed in the virtual machine.
Working in a Virtual Machine
122
Changing View Modes
Parallels Desktop provides a number of view modes to make your work with virtual machines
more comfortable and efficient:
Window mode. In this mode the virtual machine screen is displayed as a separate window.
This is the default view mode.
Full Screen mode. In this mode the virtual machine screen is expanded to occupy the whole
of your physical computer's screen.
Coherence mode. In this mode the virtual machine's desktop is invisible so that you can see
the virtual machine's application windows in Mac OS X and work with them side by side
with your Mac OS X applications.
Crystal mode. This mode is similar to the Coherence mode with a few additions -- all
Parallels Desktop control elements, icons, and menus are hidden except for the Parallels
Status icon in the Mac menu bar.
Modality mode. In this mode you can view the virtual machine and the programs running
inside it in a transparent scaled window while working in Mac OS X. By default, this
window appears on top of all opened windows, so you can supervise your virtual machine
during your work in Mac OS X.
For switching between these modes, you can use the View menu commands or toolbar buttons.
Note: You can change the virtual machine view mode only when the virtual machine is running.
Switching to the Full Screen Mode
You can run a guest operating system in the Full Screen mode when the guest operating system
window occupies the whole screen and all Mac OS X and Parallels Desktop controls are hidden.
To see the Mac OS X Dock and the Parallels Desktop menus while working in the Full Screen
mode, press Ctrl+Alt.
To switch to the Full Screen mode, do one of the following:
Click the Full Screen button
Choose Full Screen from the View menu.
Use the appropriate hot key combination (Alt+Cmd+Return by default).
Click the down arrow button
near the Coherence button
status bar (p. 44), and select Full Screen from the menu.
in the Parallels Desktop toolbar.
in the virtual machine
Note: The default hot key combinations can be configured on the Keyboard and Mouse pane
(p. 53) of the Preferences dialog.
You may also choose the type of animation that will be displayed when switching to the Full
Screen mode and back. For details, please refer to Appearance Preferences (p. 50).
To return to the Window mode:
press the appropriate hot key combination (Alt+Cmd+Return by default) or
Working in a Virtual Machine
123
press Ctrl+Alt to display the Parallels Desktop menus and choose Window from the View
menu.
Switching to the Coherence Mode
The Coherence mode provides high level of integration between Mac OS X and your guest
operating system. In this mode, you can have the Mac OS X Dock, Windows taskbar, and any
applications running under these operating systems on one desktop. For more information on the
Coherence mode, see Working in the Coherence Mode (p. 148).
To switch a running virtual machine to operate in the Coherence mode, do one of the following:
Click the Coherence button
in the Parallels Desktop toolbar.
Click the Coherence button
in the virtual machine status bar (p. 44).
Choose Coherence from the View menu.
Use the appropriate hot key combination (Ctrl+Cmd+Return by default).
Note: The default hot key combinations can be configured on the Keyboard and Mouse pane
(p. 53) of the Preferences dialog.
To switch the virtual machine from Coherence to another mode:
choose the Window or Full Screen option from the View menu or
use the appropriate hot key combination (Ctrl+Cmd+Return by default).
Switching to the Crystal Mode
The Crystal mode is similar to Coherence but provides even higher level of integration between
the host and the guest operating systems. In this mode all Parallels Desktop control elements,
icons, and menus are hidden except for the Parallels Status icon in the Mac menu bar. For more
information on the Crystal mode, see Working in the Crystal View Mode (p. 152).
To switch a running virtual machine to operate in the Crystal mode, do one of the following:
Click the Crystal button
Choose Crystal from the virtual machine View menu.
near the Coherence button
Click the down arrow button
status bar (p. 44), and select Crystal.
in the Parallels Desktop toolbar.
in the virtual machine
To switch the virtual machine from Crystal to the Window mode, click the Parallels Status icon
in the Mac menu bar and choose Exit Crystal option.
Note: You can switch from Crystal to the Window mode only. You can then switch from
Window to any other mode.
Switching to the Modality Mode
When you switch to Modality, you can resize the virtual machine windows and place them side
by side with your Mac's applications. A Modality window can be scaled to any size, and its
content will still be active, which allows you to monitor the tasks running inside the virtual
machine while you are working on the Mac's side.
Working in a Virtual Machine
124
In the Modality mode, you can:
Simply resize the virtual machine window by dragging its right corner.
Resize the virtual machine window and change the ratio of its sides by pressing and holding
Alt and dragging the window right corner.
Resize the virtual machine window and dynamically adjust the screen resolution by pressing
and holding Shift and dragging the window right corner.
To switch a running virtual machine to the Modality mode, do one of the following:
Choose Modality from the View menu.
Click the Modality button
Use the appropriate hot key combination (Ctrl+Alt+Cmd+Return by default).
near the Coherence button
Click the down arrow button
status bar (p. 44), and select Modality from the menu.
in the Parallels Desktop toolbar.
in the virtual machine
Note: The default hot key combinations can be configured on the Keyboard and Mouse pane
(p. 53) of the Preferences dialog.
To switch the virtual machine from Modality to another view mode:
Choose Window, Full Screen, or Coherence from the View menu.
Use the appropriate hot key combination (Ctrl+Alt+Cmd+Return by default).
When you switch back from Modality to the Window view mode, the toolbar is hidden. If you
want to add it back to the virtual machine window, choose Show Toolbar from the View menu.
To customize the Modality settings, refer to the Modality pane (p. 198) of Virtual Machine
Configuration.
Working in a Virtual Machine
125
Working in Full Screen
In the Full Screen mode, the guest operating system window occupies the whole screen, and all
Mac OS X and Parallels Desktop controls are hidden.
Note: You can change the virtual machine view mode only when the virtual machine is running.
To switch to the Full Screen mode, do one of the following:
Click the Full Screen button
Choose Full Screen from the View menu.
Use the appropriate hot key combination (Alt+Cmd+Return by default).
Click the down arrow button
near the Coherence button
status bar (p. 44), and select Full Screen from the menu.
in the Parallels Desktop toolbar.
in the virtual machine
Note: The default hot key combinations can be configured on the Keyboard and Mouse pane
(p. 53) of the Preferences dialog.
You may also choose the type of animation that will be displayed when switching to the Full
Screen mode and back. For details, please refer to Appearance Preferences (p. 50).
If you want your virtual machine to use all available displays in the Full Screen mode, select
Use All Displays in Full Screen from the View menu.
To return to the Window mode:
press the appropriate hot key combination (Alt+Cmd+Return by default), or
press Ctrl+Alt to display the Parallels Desktop menus and choose Window from the View
menu, or
click the corresponding active screen corner if you set active screen corners for the Full
Screen Mode.
To set active screen corners or change other Full Screen options, go to the Full Screen pane (p.
196) of Virtual Machine Configuration.
Setting a Restriction on Switching From Full Screen
In the Security pane (p. 179) of Virtual Machine Configuration, you can set a restriction on
switching from the Full Screen mode. If you select the Exit full screen mode option in this pane,
you will have to provide your administrator password each time you want to exit Full Screen.
To edit the security settings of your virtual machine:
1
Select Configure from the Virtual Machine menu to open Virtual Machine Configuration.
2 Click Options at the top of the Virtual Machine Configuration window and select Security in
the list of options.
Working in a Virtual Machine
126
Using Safe Mode
If you do not want a virtual machine to store the changes you make to it during the working
session, you can start this virtual machine in Safe Mode. To be able to start the virtual machine
in Safe Mode, you need to add the Safe Mode button
To this effect:
1
to the Parallels Desktop toolbar first.
Right-click the toolbar in the virtual machine's window, and choose Customize Toolbar (p.
47).
2 Drag the Safe Mode button
to the toolbar and click Done.
to the toolbar, you can use this button for
When you have added the Safe Mode button
starting the virtual machine in Safe Mode. When you shut down a virtual machine operating in
Safe Mode, you will be asked whether you want to discard the changes made to the virtual
machine's hard disk or to apply them:
If you choose to discard the changes, the virtual machine's hard disk will be left intact and
no changes made to it during your work in Safe Mode will be saved.
If you choose to apply the changes, the virtual hard disk will keep all the changes made to it
during your work in Safe Mode. After applying the changes, the virtual machine will not be
able to return to the state it had before you started this virtual machine in Safe Mode.
If you want the virtual machine to permanently work in Safe Mode, you can enable the Undo
Disks option in the Undo Disks pane (p. 192) of Virtual Machine Configuration (p. 168):
1
Choose Configure from the Virtual Machine menu to open the virtual machine configuration.
2 Click Options in Virtual Machine Configuration.
3 Select Undo Disks.
4 In the Undo Disks pane, select the Enable Undo Disk option, and click OK.
Usage Tip
Running the virtual machine in Safe Mode can be useful when testing the behavior of some
applications to make sure that they cannot damage your computer.
Working in a Virtual Machine
127
Using Keyboard Shortcuts in a
Virtual Machine
Parallels Desktop enables you to use Mac keyboard shortcuts in your virtual machine.
If you want to press Ctrl+Alt+Del key combination in a virtual machine, do one of the
following:
Choose Keyboard > Ctrl+Alt+Del from the Devices menu, or
press Ctrl+Alt+Del while the keyboard input is captured inside the virtual machine window.
Using Keyboard shortcuts in MacBook and MacBook Pro
To use the F1-F12 keys in your virtual machine, press the Fn+(F1-F12) key combination
instead.
For additional information, see also Keyboard and Mouse Preferences (p. 53).
Working in a Virtual Machine
128
Installing Applications in a Virtual
Machine
You can install software inside your virtual machine in the same way as you would do on any
other real computer:
using a CD or DVD disc or image file containing the application installation files
using a USB drive containing the application installation files
by downloading the necessary application from the network.
If you want to install an application from a real CD/DVD drive on your Mac, connect it first to
the virtual machine, and then insert the disc into this drive. For detailed information on how to
connect CD/DVD drives to your virtual machine, refer to CD/DVD Settings (p. 206).
If you want to install an application from an existing CD or DVD image file, specify the path to
the image file in Virtual Machine Configuration. For detailed information on connecting image
files to your virtual machine, refer to CD/DVD Settings (p. 206).
If you want to install an application from a USB device, you should first add a USB controller to
the virtual machine using Virtual Machine Configuration. For detailed information on how you
can do it, refer to Adding and Removing Devices (p. 220). Then connect the USB device to your
virtual machine (p. 141).
If you want to install an application through the network, first make sure that your virtual
machine is connected to it. By default, all virtual machines created in the Express or Typical
modes are set to operate in the Shared Networking mode. In this mode, your virtual machine can
access the Internet while being invisible to other computers on the network, except your
Macintosh computer and the other virtual machines running on it. For more information on
connecting virtual machines to the network and available network mode, refer to Networking in a
Virtual Machine (p. 228).
Working in a Virtual Machine
129
Setting Up Parallels Internet
Security
Parallels Desktop includes an antivirus application - Parallels Internet Security powered by
Kaspersky®. It is available for Windows XP, Windows Vista, and Windows 7 virtual machines
with Parallels Tools installed. Parallels Internet Security is provided with a one year free
activation key. When the trial period expires, you can purchase a permanent activation key.
Note: You need the Internet connection to download the Parallels Internet Security package
from the Parallels website.
You can install any other antivirus application you like in your virtual machine. Use the
standard installation procedure for this application.
Setting up Parallels Internet Security
After Parallels Tools installation, you will be offered to install Parallels Internet Security. To
install Parallels Internet Security, click Install, and follow the wizard's instructions.
To install Parallels Internet Security manually:
1
Launch Parallels Desktop, and start the virtual machine from the Parallels Virtual Machines
list (p. 36).
2 When the virtual machine boots up, make sure that you have Parallels Tools (p. 97)
installed. To install them, choose Install Parallels Tools from the Virtual Machine menu.
Note: If you created your virtual machine using the Express Windows mode, Parallels Tools
should have been installed automatically after the installation of the Windows guest
operating system.
The virtual machine will reboot when the installation of Parallels Tools is complete.
3 When you log in after rebooting, choose Install Parallels Internet Security from the Virtual
Machine menu. Parallels Internet Security Installer will launch, offering you to protect your
guest operating system by activating Parallels Internet Security. Please take into account that
it may take some time the installer to start. After the installer has started, click Install, and
Parallels Desktop will download the Parallels Internet Security package and start the
installation. The installation is performed in the unattended mode and the software is
activated automatically. You can view the operation progress in the progress bar.
4 When the installation is complete, click Reboot in the Install Succeed window to close the
wizard and to restart the virtual machine.
Now you have a one year antivirus protection in your virtual machine.
Removing Parallels Internet Security
Working in a Virtual Machine
130
If you do not need Parallels Internet Security in your Windows virtual machine, you can quit the
installer by clicking the Cancel button or, if it is already installed, remove it like any other
Windows application using the Add or Remove Programs dialog. The free trial period starts from
the moment of the first installation, and won't be restarted if you reinstall Parallels Internet
Security later.
Getting Acronis Applications
As an additional benefit, Parallels provides you for free with two more products allowing you to
keep your guest operating systems safe and to have full control over your virtual disk drives:
Acronis True Image 11 Home. This application allows you to easily back up and recover
your guest operating systems, applications, settings, and personal files.
Acronis Disk Director Suite 10.0. This application allows you to perform all the necessary
operations on your virtual disks using the easiest and most convenient partition manager and
hard disk toolkit.
To
download
these
applications,
http://www.parallels.com/download/desktop/
follow
this
link:
Working in a Virtual Machine
131
Placing an Image on Top of the
Virtual Machine Window
Parallels Desktop allows you to create images (also called clips) of the whole Mac OS X
desktop or any of its parts. When taken, these images are automatically placed over your opened
virtual machine window and remain visible irrespective of what applications you run or what
window you open in your virtual machine. For example, you can create a clip containing some
important information and always have this information right before your eyes when working in
the virtual machine. You can also take a clip of some part of an application running on your Mac
and have it displayed when working with another application in your virtual machine without
need to switch between these applications. Using clips may prove especially efficient if you are
running your virtual machine in the full screen mode.
To make a clip:
1
Open the virtual machine.
2 Choose Make Clip from the View menu.
3 Using the left mouse button, select the area you want to capture.
4 When you release the mouse button, the resulting clip will appear on top of all open
window. It will remain visible even if you switch your virtual machine to Full Screen.
Working in a Virtual Machine
132
After the clip has been successfully created, you can manage it as follows:
Save the clip to your Mac OS X desktop by right-clicking it and choosing Save on Desktop.
Close the clip by clicking the close button in the clip window. If the clip was not saved
before, it will be irrevocably removed from your Mac.
Copy the clip to the clipboard by right-clicking it and choosing Copy to Clipboard.
Change the clip size by dragging the lower right corner of the clip window.
Allow the clip to be overlaid by applications and windows that you open in your virtual
machine by right-clicking it and disabling the Always on Top option.
Using 3D Graphics Applications
With Parallels Desktop, you can run games and applications that require video cards with
DirectX or OpenGL support in your virtual machines.
The DirectX9.0 and OpenGL2.1 support can be enabled for Windows-based virtual machines
with Parallels Tools installed. The OpenGL2.1 support can be enabled for Linux-based virtual
machines with Parallels Tools installed.
Note: In Linux-based virtual machines, Xorg should be of version 7.1 or later.
Enabling DirectX and OpenGL support in a virtual machine
If your virtual machine does not have Parallels Tools installed:
1
Start the virtual machine, and choose Install Parallels Tools from the Virtual Machine menu to
launch the installation.
2 When Parallels Tools are installed, shut down the virtual machine.
To enable DirectX and OpenGL support in the virtual machine configuration:
1
Open the virtual machine and choose Configure from the Virtual Machine menu to open the
Virtual Machine Configuration dialog.
2 In the Video pane (the Hardware group of settings), select the Enable 3D acceleration option.
3 Click OK to apply the changes.
Note: If the virtual machine is running, the new settings will come into effect after you restart
the virtual machine.
Optimizing 3D Graphics Performance in MacBook Pro
Some new MacBook Pro computers have two video adapters. By default, the slower video
adapter that saves energy is used. If you want to use the faster video adapter for better 3D
graphics performance, select System Preferences > Energy Saver > Graphics > Higher
performance in the Mac OS X menu.
Working in a Virtual Machine
133
Making Screenshots
If you want to make a screenshot of the guest operating system running in your virtual machine,
choose Make Screenshot from the View menu. The first screenshot file will be named
Parallels Picture.png and placed on the Mac OS X desktop. The next screenshots
will have the same name with an appropriate number added.
Note: This option is not available in the Full Screen (p. 125) and Crystal (p. 152) view modes.
Working in a Virtual Machine
134
Using Touchpad Gestures and
Apple Remote
You can use the touchpad or Apple Remote to control some Windows applications. To use this
functionality, enable the corresponding options in the Gestures and Apple Remote pane (p. 200)
of the Virtual Machine Configuration.
Note: This feature is available for the following guest operating systems: Windows XP,
Windows 2000, Windows Server 2003, Windows Vista, Windows 7, and Windows Server 2008.
In the following table, you can see the list of commands for some popular Windows
applications.
Action
Keyboard and Mouse
Combination
Apple Remote Key
Touchpad Gesture
Microsoft Power Point
Start a slide show
F5
n/a
End a slide show
Esc
n/a
Perform the next animation
or advance to the next slide
N, Enter, Page Down,
Right Arrow, Down
Arrow, Space (or click
the mouse)
Swipe right
Perform the previous
animation or return to the
previous slide
P, Page Up, Left
Arrow, Up Arrow,
Backspace
Swipe left
Zoom in/zoom out
Ctrl+wheel up
/Ctrl+wheel down
n/a
Pinch open/pinch
close
Ctrl+wheel up
/Ctrl+wheel down
n/a
Pinch open/pinch
close
Microsoft Word/Excel
Zoom in/zoom out
Windows Media Player
Start playback/pause
Space
n/a
Skip to the next song
Ctrl+F
Swipe right
Play the previous song
Ctrl+B
Swipe left
Volume up
F8, Up Arrow, wheel
up
n/a
Volume down
F9, Down Arrow,
wheel down
n/a
Media Player Classic (k-lite)
Working in a Virtual Machine
Start playback/pause
Space
n/a
Volume up
F8, Up Arrow, wheel
up
n/a
Volume down
F9, Down Arrow,
wheel down
n/a
Winamp
Start playback/pause
X to start, C to pause
n/a
Volume up
Up Arrow, wheel up
n/a
Volume down
Down Arrow, wheel
down
n/a
Microsoft Internet Explorer
Page back
Backspace, Alt+Left
Arrow
Page forward
Alt+Right Arrow
Zoom in/zoom out
Ctrl+wheel
up/Ctrl+wheel down
Swipe right
n/a or
Swipe left
n/a or
n/a
Pinch open/pinch
close
Mozilla Firefox
Page back
Backspace, Alt+Left
Arrow
Page forward
Alt+Right Arrow
Zoom in/zoom out
Ctrl+wheel
up/Ctrl+wheel down
or Ctrl+"+"/Ctrl+"-"
Swipe right
n/a or
Swipe left
n/a or
n/a
Pinch open/pinch
close
Windows Picture and Fax Viewer
Next image
Right Arrow
Swipe right
Previous image
Left Arrow
Swipe left
Zoom in/zoom out
"+"/"-"
Rotate clockwise
Ctrl+K
n/a
Rotate right
Rotate counterclockwise
Ctrl+L
n/a
Rotate left
or
Pinch open/pinch
close
135
Working in a Virtual Machine
136
Setting Up a Printer in a Virtual
Machine
There are three basic ways to set up printing in a virtual machine. You can:
Share any of the printers connected to your Mac computer via a printer port of your virtual
machine.
Set up a printer via Apple's Bonjour Printer wizard.
Note: Apple's Bonjour printer is available in Windows guest OSs only.
Use a network printer.
You can also connect a USB printer directly to your virtual machine. In this case, the printer will
not be available to Mac OS X. For detailed information see Connecting USB Devices to a Virtual
Machine (p. 141).
Working in a Virtual Machine
137
Sharing a Mac Printer
You can share any printer connected to you Mac with your Windows or Linux virtual machine.
The printer will be available through the virtual machine's printer port.
To share your Mac's printer:
1
Launch Parallels Desktop, and open the virtual machine window.
2 Open the Virtual Machine Configuration dialog by choosing Configure from the Virtual
Machine menu. Make sure that the configuration includes a printer port. If necessary, add it.
See Adding and Removing Devices (p. 220).
3 In the Printer Port pane (p. 212), select Connected if you want the printer to be automatically
connected on the virtual machine startup. Click the Source field, and select the appropriate
printer from the list. You can use the Default printer option if you want to use the default
printer set in the primary OS.
Click OK to close Virtual Machine Configuration.
4 Start the virtual machine.
5 In a Windows guest OS, if you have Parallels Tools installed, the HP Color LaserJet 8500
PS or Apple Color LW 12/660 PS printer is automatically connected to your virtual machine
and you can use it at once. In a Linux guest OS or if you do not have Parallels Tools
installed in your Windows guest OS, no matter what type of printer you have, install either
the HP Color LaserJet 8500 PS, or Apple Color LW 12/660 PS printer driver and then
follow the procedure of adding a printer in a guest OS described bellow.
Warning: Do not install the driver from the installation CD, supplied with your printer, in the
virtual machine.
Adding a printer in a Windows guest operating system
To add a printer in a Windows guest OS:
1
Start the Windows virtual machine and log in as administrator.
2 Open the Windows Start menu, select Control Panel.
3 In the Control Panel window, select the Printers and Faxes (or Printers, or Printers and Other
Hardware) item.
4 Open the Add Printer wizard:
In Windows XP click the Add a printer link.
In Windows 95 /98 /NT /ME /2000 /2003 double-click the Add printer icon.
5 In the Add Printer wizard:
In Windows Vista:
- click Add a local printer,
- select Use an existing port and click Next.
In Windows 2000 /XP /2003:
- click Next in the wizard's first dialog,
Working in a Virtual Machine
138
- in the Local or Network Printer dialog, click Local printer attached to this computer.
In Windows 98/ME:
- click Next in the wizard's first dialog,
- for the How is this printer attached to your computer? select the Local printer option.
In Windows 95/NT:
- click Local printer.
6 Continue with the general installation procedure and install either HP Color LaserJet 8500
PS or Apple Color LW 12/660 PS driver.
Adding a printer in a Linux guest operating system
To add a printer in a Linux guest OS:
1
Start the Linux virtual machine and log in as administrator.
2 Open the /etc/printcap/ configuration file and click the Add option.
3 Select the type of printer to add: Local printer. Click Ok.
4 Printtool will attempt to detect any printers which are attached to your parallel port and
will show you the results. Click Ok.
5 Specify the details about your printer, such as a name of the printer and its related spool
directory, the location of the printer device and other options.
6 The Input Filter contains information about your specific printer and its formatting
requirements. To add your printer's information, click Select. The Configure Filter dialog will
open.
7 Choose the printer type: choose either HP Color LaserJet 8500 PS or Apple Color LW
12/660 PS driver. You can also set here other printing parameters. Click Ok.
Setting Up a Printer via Bonjour
You can set up a network printer via Bonjour only in Windows guest OSs.
To set up a printer using the Bonjour Printer wizard:
1
Launch Parallels Desktop.
2 Start your Windows virtual machine, and log in.
3 In the virtual machine, download the Bonjour for Windows installation package from the
Apple site.
4 Install Bonjour for Windows by launching the BonjourSetup.exe file from the folder to
which it was downloaded.
5 Start the Bonjour Printer wizard either by clicking its icon on the desktop or by selecting
Start -> Programs -> Bonjour -> Bonjour Printer wizard.
6 Follow the installation steps until the Install Bonjour Printer window appears.
7 In the Install Bonjour Printer window, select Generic in the Manufacturer list, and then
Generic / Postscript in the Model list for any printer model you are going to use.
8 Follow the rest of the installation steps.
Working in a Virtual Machine
139
Setting Up a Network Printer
You can install a network printer directly into a guest OS.
Before installing a network printer in a guest OS, make sure that:
Networking in the primary and guest OSs is configured.
The virtual machine network adapter is connected to the corresponding virtual machine and
enabled. To do this:
Select Configure from the Virtual Machine menu.
Click Hardware to see the virtual machine devices.
Click the Network Adapter item in the left pane.
Make sure that the Connected option is selected.
The user account in the guest OS from which you will setup the printer has permissions to
access the network printer.
You know the printer's IP address.
After that, you can log into your guest OS and install a network printer.
In a Windows Guest Operating System
Before adding a network printer to Windows, download and install an appropriate printer driver.
For detailed information on installing the printer driver, refer to the printer's manufacturer
documentation.
The procedure of adding a network printer is almost the same for all Windows guest OSs. To
add a network printer in Windows XP or Windows Vista:
1
Choose Control Panel from the Start menu in your guest OS.
2 Click Printers and Faxes in Windows XP or Printers in Windows Vista.
3 Click the Add printer icon.
4 In the Add Printer wizard introduction window, click Next.
5 In Windows XP, select the Local printer attached to this computer option and disable
Automatically detect and install my Plug and Play printer.
In Windows Vista, choose the Add a Local Printer option.
6 Select Create a new port and specify Standard TCP/IP port as the port type.
Click Next.
7 In the next window, specify the network printer's IP address and click Next.
8 If prompted to specify additional port information, choose Standard and select Generic
Network Card from the list.
9 In the next window, click Finish.
10 In the Install Printer Software window, specify the manufacturer of the driver and select the
model of the network printer.
If the required printer model is not listed, click the Have Disk button and specify the path to
the .inf file in the folder where you installed the printer driver.
Working in a Virtual Machine
140
When finished, click Next.
11 Follow the wizard's instructions to complete the installation.
In a Linux or FreeBSD Guest Operating System
Make sure that the following components are installed in your guest Linux or FreeBSD system:
Common UNIX Printing System (CUPS). Installation instructions can be found at CUPS
site;
Samba service. Installation instructions can be found at Samba site;
A Web browser, since we consider controlling CUPS via web interface;
Note: To set up a network printer, you should have the root privileges.
Before adding a network printer to Linux, download and install an appropriate printer driver.
For detailed information on installing the printer driver, refer to the printer's manufacturer
documentation.
To add a network printer in a Linux or FreeBSD guest OS:
1
Start your Linux or FreeBSD virtual machine.
2 Start Common UNIX Printing System.
In a terminal, type the command:
/etc/init.d/cups start
3 Start a web browser and type either the IP address of your virtual machine or
http://127.0.0.1:631.
4 Click the Add Printer button.
5 In the Add New Printer window, enter a printer name, location, and description.
6 In the Device for <Printer Name> window, select the Windows Printer via Samba.
7 In the Device URI for <Printer Name> window, specify the path to the network printer in the
following format:
smb://<computer name>/<printer name>
8 In the Make/Manufacturer for <Printer Name> window, select the model of your printer.
9 Enter the root password when prompted.
10 CUPS performs installation. If the installation is successful, the "Printer <name> has
been added successfully" message is displayed.
Working in a Virtual Machine
141
Connecting USB Devices to a
Virtual Machine
Parallels Desktop provides you with the possibility to connect up to eight USB 2.0 and eight
USB 1.1 devices to a single virtual machine. This means that you can plug up to eight USB 2.0
devices and eight USB 1.1 devices into your Mac and use them from the virtual machine. To use
this feature, you should add a USB controller to the virtual machine configuration (p. 168). If
the USB controller is already present in the virtual machine configuration, make sure it is
enabled.
By default, when you plug a USB device into your Mac, the New USB Device dialog asks if you
want to connect this device to your Mac or to the virtual machine you are currently working
with.
Click Mac OS if you want to use this USB device in Mac OS X.
Click Virtual Machine if you want to use this USB device in the virtual machine you are
currently working with.
Note: If you select to connect the detected USB device to the virtual machine and then reboot
this virtual machine, the New USB Device dialog will not appear again after the reboot. The USB
device will still be connected to this virtual machine.
If you want Parallels Desktop to remember your choice, select Remember this association. The
next time you plug this USB device into your Mac, it will be automatically connected to the
destination you specified in this dialog. To change the destination, use USB Preferences in the
Preferences dialog (p. 47).
Working in a Virtual Machine
142
If you do not want Parallels Desktop to display this dialog each time a USB device is plugged
into your Mac, configure USB Preferences in the Preferences dialog (p. 47).
To be able to use the USB device in the virtual machine, you may need to install the necessary
drivers in the guest OS. By default, such drivers can be obtained from the manufacturers of this
device.
Note: If you plug a USB 1.1 device into the USB 2.0 port, the port will be identified as USB
1.1.
Connecting iSight camera to a Windows virtual machine
If you have a built-in iSight camera, you can use it in your Windows XP or Windows Vista
virtual machine. Before connecting the camera, you should install the iSight driver for Windows
in your virtual machine. There are several ways to install the driver. For example, you can install
the iSight driver together with the Boot Camp drivers in your virtual machine:
1
Insert the Mac OS X Leopard disc or "Mac OS X Install Disc 1" into your computer.
2 Start your Windows virtual machine.
in the virtual machine status bar, select Real CD/DVD, and
3 Click the CD/DVD icon
connect the Mac OS X installation disc.
4 The Boot Camp drivers installer starts. If the installer does not start automatically, browse
the Mac OS X disc using Windows Explorer and double-click the setup.exe file in the
Boot Camp folder.
5 Follow the installer instructions. When the installation is finished, restart your virtual
machine.
Note: The iSight driver for Windows is suitable for built-in cameras only. External cameras are
not supported.
To connect the iSight camera, click the USB controller icon
and select the iSight camera in the list.
in the virtual machine status bar
Connecting a USB printer to a virtual machine
You can connect a USB printer directly to your virtual machine. In this case, the printer will not
be available to Mac OS X.
Note: If you want the USB printer to be available both to your Mac and the virtual machine, you
should connect the printer to the virtual machine using a printer port. For detailed information,
see Sharing a Mac Printer (p. 137).
To connect a USB printer directly to a virtual machine:
1
Launch Parallels Desktop and choose the virtual machine.
2 Choose Configure from the Virtual Machine menu to open the Virtual Machine Configuration
dialog. Make sure that the configuration includes a USB controller and it is enabled. If
necessary, add it. See the Adding a USB Controller section (p. 220).
Working in a Virtual Machine
143
3 Start the virtual machine, and install the native driver for the printer in the guest operating
system. For detailed information on installing the printer driver, refer to the printer's
manufacturer documentation.
4 Then perform one of the following:
If the USB printer is already connected to your Mac, click the USB controller icon
the virtual machine status bar (p. 44) and select this printer in the list.
If the USB printer is not connected to your computer, connect it to your Mac. The New
USB Device dialog will appear in the guest OS window. Choose to connect it to the
virtual machine.
in
5 In the Windows guest operating system, follow the Add New Hardware wizard instructions.
In the Linux guest operating system, follow the procedure for adding a USB printer specific
for this Linux distribution.
Connecting Common Access Card reader
The Common Access Card (CAC) reader can work simultaneously in Mac OS X and in one
virtual machine.
Connect the CAC reader to your Mac.
In the New USB device window, click Virtual Machine. Parallels Desktop will create a virtual
copy of the CAC reader device in the virtual machine, which will make the CAC reader work in
both Mac OS and the virtual machine.
Working in a Virtual Machine
144
Synchronizing a USB Palm OS
Device With the Guest OS
The process of connecting a USB Palm device to the virtual machine is similar to the process of
connecting other USB devices, but for some minor details.
1
When you plug a USB Palm OS device into your Mac, you should click the Synchronize
button on the Palm device's screen to make it visible to your Mac.
2 Your Mac will recognize the Palm device and displays a message asking whether you want
to connect it directly to the active virtual machine or to use this device with your Mac. To be
able to work with the Palm device in the virtual machine, click Virtual Machine.
If you want Parallels Desktop to remember your choice, select Remember this association.
The next time you plug this USB device into your Mac, it will be automatically connected to
the destination you specified in this dialog. To change the destination, use USB Preferences
(p. 57) in the Preferences dialog available from the Parallels Desktop menu.
Note: Before starting the connection, make sure that you have a synchronization software
installed in your virtual machine.
3 The Palm device appears in the list of USB devices available for usage in the virtual
machine, and the data synchronization process starts.
If you encounter problems when synchronizing the Palm OS device with your virtual machine,
click Cancel on the screen of the Palm device to terminate the process and try to start the
synchronization again.
Note: It is not recommended to change the USB port for the Palm device or connect other USB
devices to your Mac during the synchronization session.
Working in a Virtual Machine
145
Changing the Configuration at
Runtime
Parallels Desktop allows you to connect or disconnect certain devices at runtime or switch some
of them for using other media.
Generally, the following virtual devices can be connected or disconnected at runtime:
Floppy disk drive
CD/DVD-ROM drives
Network adapter
Sound device
USB device
Shared folders
If printer and serial ports are present in the virtual machine configuration, you can also manage
them at runtime.
Note: Only devices enabled in the virtual machine configuration can be connected or
disconnected at runtime.
You can configure any of these devices in one of the following ways:
Use the necessary command from the Devices menu in the menu bar. This menu is available
only when the virtual machine is running.
Click a device icon on the status bar (p. 44) and choose the command from a device shortcut
menu.
The status bar displays the devices information when the virtual machine is running.
Drag an image file (*.iso or *.fdd) or a shared folder on the appropriate device icon in the
status bar. This option is available only for CD/DVD-ROM drives, floppy drives and shared
folders.
Connecting a CD/DVD-ROM or a Floppy Drive
If you have several CD/DVD-ROM drives connected to your virtual machine, in the Devices
menu they are listed in the same order as they were connected. The first CD/DVD-ROM drive
will be CD/DVD-ROM 1, the second will be CD/DVD-ROM 2, and so on.
Connecting a Network Adapter
You can set up any of the three network modes: Shared Networking, Bridged Networking, or
Host-Only Networking.
Connecting a Sound Device
To connect or disconnect a sound device, choose the Activate or Mute options respectively. You
can also choose the type of output and input devices.
Working in a Virtual Machine
146
Connecting a USB Device
Parallels Desktop automatically detects all USB devices plugged into your Mac computer. The
devices that are currently connected to the virtual machine appear in the list from the Device
menu. You cannot use a USB device in Mac OS X while it is being used by the virtual machine.
Connecting a Shared Folder
The Shared Folders options available at runtime are similar to the settings in the Virtual
Machine Configuration (p. 168) dialog.
You can
share all Mac disks or Home Folder only with the virtual machine
share Windows guest operating system disks with Mac OS X
add a new shared folder
Connecting a Serial Port
To connect or disconnect a serial port, do the following:
Click the Devices menu, select the corresponding serial port, and choose the appropriate
command in the displayed menu.
in the status bar (p. 44) to display the shortcut menu, and
Right-click the serial port icon
choose the appropriate command.
Connecting a Printer Port
To connect or disconnect a printer port or to connect a printer or an output file to a printer port,
do the following:
Click the Devices menu, select the corresponding printer port, and choose the appropriate
command in the displayed menu.
in the status bar (p. 44) to display the shortcut menu,
Right-click the printer port icon
and choose the appropriate command.
147
CHAPTER 7
Integrating Mac OS X and Your Virtual
Machine
Parallels Desktop provides a number of features that ensure better integration between Mac OS
X and your virtual machine.
The first step in integrating your virtual machine with Mac OS X is the installation of Parallels
Tools in your virtual machine. Parallels Tools (p. 97) are a set of utilities that provide basic
integration of Mac OS X and the virtual machines. Parallels Tools are available for Windows,
Linux, and Mac OS X guest operating systems.
For Windows virtual machines, Parallels Tools also provide a set of advanced integration
features that make your work with Mac OS and Windows even more coherent. These include
SmartSelect, Coherence, Shared Applications, and others.
In this version of Parallels Desktop, you can use the mouse wheel horizontal scrolling when
working with virtual machine applications windows.
In This Chapter
Coherence.............................................................................................................................. 148
Crystal Mode......................................................................................................................... 152
Using the MacLook Theme in Windows .............................................................................. 154
Sharing Folders and Disks .................................................................................................... 155
Using Shared Profile ............................................................................................................. 159
Using Shared Applications.................................................................................................... 160
Using SmartSelect................................................................................................................. 162
Sharing Web Applications .................................................................................................... 165
Browsing Virtual Hard Disks in Finder ................................................................................ 166
Working With Objects .......................................................................................................... 167
Integrating Mac OS X and Your Virtual Machine
148
Coherence
Coherence is a visual mode of working with a virtual machine that enables you to:
Use your Windows applications side by side with your Mac OS X applications.
Use the Windows taskbar side by side with Mac OS X Dock.
Move the Windows applications windows from one display to another (if you have more
than one display).
When you switch a running virtual machine with one or more running applications into the
Coherence mode, you will see the guest OS applications windows on your Mac OS X desktop
along with the Mac OS X applications windows.
When a Windows guest OS application window is active, you can see the Parallels Desktop
menus in the Mac OS X menubar.
Integrating Mac OS X and Your Virtual Machine
149
The current version of Parallels Desktop provides a close integration between guest OS
applications and Mac OS X:
The Windows file system is accessible from Mac OS X and vice versa.
Transparent file associations in both systems let you open Windows files in Mac OS X
applications and Mac OS X files in Windows applications.
The same default browser and email client can be used in both systems.
The Dock displays both Windows and Mac OS X applications icons.
Windows Start menu can be accessed from the Dock.
Switching to the Coherence Mode
Only a running virtual machine with Parallels Tools (p. 97) installed can be switched to the
Coherence mode.
To switch to the Coherence mode:
Click the
Choose Coherence from the View menu, or
In the Window mode, click the Coherence button
virtual machine window, or
Press Control+Command+Return keys.
icon on the toolbar, or
in the lower right corner of the
Note: To exit the Coherence mode, make your Windows guest OS active by clicking the Start
button icon or anywhere on the Windows toolbar, and select the desired view mode from the
Parallels Desktop View menu.
You can also configure your virtual machine to always start in Coherence by editing the Startup
and Shutdown settings (p. 172) in Virtual Machine Configuration.
Using the Dock in Coherence
You can open Windows guest OS applications directly from the Dock or Mac OS X Desktop by
clicking their icons. As you start a Windows application, its icon appears in the Dock. When the
application is closed, or the virtual machine is stopped, the application icon disappears from the
Dock.
To keep the icon in the Dock:
1
Right-click (Control-click) the Windows application icon in the Dock.
2 Choose Keep in Dock from the shortcut menu.
Clicking a Windows application icon in the Dock starts the virtual machine and the application
in it. The virtual machine is automatically switched to Coherence.
Using the Windows Taskbar
Integrating Mac OS X and Your Virtual Machine
150
By default, both Windows taskbar and Mac OS X Dock are visible. You can use any of the
Windows taskbar elements right from Mac OS X Desktop. You can hide the Windows taskbar
by choosing View > Hide Windows Taskbar. When the Windows taskbar is hidden, it is
convenient to use the Start button icon in the Dock. If you click this icon, the Windows Start
menu appears. To display this icon, select the Use Start button icon in Coherence option in the
Parallels Desktop appearance preferences (p. 50).
Using Application Switcher
You can switch between any of the running Mac OS X and Windows applications by using
Application Switcher.
1
Press Command+Tab on the keyboard, you will see the Application Switcher bar across the
desktop with all applications running in both Windows and Mac OS X.
2 Select the application by clicking its icon in the bar.
Integrating Mac OS X and Your Virtual Machine
151
Using Expose With Your Windows Applications
When working in Coherence, you can use Expose to navigate between the Windows and Mac
OS X applications windows opened on your desktop. To activate Expose, press the F9 key (on
portable Macintosh computers, use the Fn+F9 key combination instead).
If the F9 key doesn't activate Expose, refer to Mac Help for information about changing the Mac
OS X shortcuts.
Sharing your Windows and Mac applications
You can use Mac OS X applications to open the files in your Windows guest OS and vice versa.
The list of Parallels Shared Applications is created during Parallels Tools installation. The list
includes your Mac OS X applications and is available when you choose All Programs > Parallels
Shared Applications from the Windows Start menu. You can select any application from the list
and start it.
Right-click a file in Mac OS X or Windows, and choose any available Mac OS X or Windows
application from the Open With list.
Note: To share your Mac OS X and Windows applications, you need to disable the Isolate Mac
from Windows option in the Security pane (p. 179) of the virtual machine configuration.
Using Mac OS X Trash
You can remove files and folders that you do not need any more by simply dragging them from
your virtual machine to the Trash in Mac OS X. After a file or folder is removed, it is
automatically placed to Windows Recycle Bin and can be viewed by choosing Windows Recycle
Bin from the View menu. You can then restore the file/folder by right-clicking it and selecting
Restore. If you wish to empty the Recycle Bin contents, choose Empty Windows Recycle Bin
from the File menu.
Using SmartSelect
You can choose the application that will always open files of a certain type in Mac OS X, no
matter whether it is a Windows or a Mac OS X application. You can adjust the SmartSelect
associations in the Shared Applications pane (p. 184) of the virtual machine configuration.
Integrating Mac OS X and Your Virtual Machine
152
Crystal Mode
The Crystal mode is similar to the Coherence mode (p. 148) but provides even higher level of
integration between the host and the guest operating systems. In this mode, all Parallels Desktop
controls, icons, and menus are hidden, except for the Parallels icon in the Mac menu bar and
Windows Applications folder in the Dock.
Parallels Menu Bar Icon
This icon is used to control your virtual machine and Parallels Desktop while in the Crystal
Mode.
Click this icon to open a basic menu. It allows you to access the Windows Start menu,
manage the virtual machine's devices, return to Window mode by choosing Exit Crystal, quit
Parallels Desktop, and to switch between the running virtual machines.
Right-click this icon to open the Windows start menu.
Alt-click (or Option-click) this icon to open an extended menu. The extended menu includes
additional options, including Report a Problem, Configure, Preferences, and many others.
Windows Applications Folder in the Dock
If you selected the Show Windows Applications folder in Dock option in the Shared Applications
pane (p. 184) of Virtual Machine Configuration, the folder with all applications installed in your
Windows virtual machine will be displayed in the Dock. You can use this folder to quickly
access your Windows applications.
Integrating Mac OS X and Your Virtual Machine
153
Switching to the Crystal Mode
Only a running virtual machine with Parallels Tools (p. 97) installed can be switched to the
Coherence mode. To start working in the Crystal mode, do one of the following:
Choose Crystal from the virtual machine View menu.
Click the Crystal button
Click the View Mode menu
window, and select Crystal.
in the Parallels Desktop toolbar.
in the lower right corner of the virtual machine
To switch the virtual machine from Crystal to the Window mode, click the Parallels Status icon
in the Mac menu bar and select the Exit Crystal option.
Note: You can switch from Crystal to the Window mode only. You can then switch from
Window to any other mode.
Integrating Mac OS X and Your Virtual Machine
154
Using the MacLook Theme in
Windows
The MacLook theme for your Windows virtual machine is a predefined set of icons, fonts,
colors, and other elements that makes the Windows guest OS look like Mac OS X.
Note: This theme is available for Windows XP and later Windows guest operating systems with
up to date Parallels Tools (p. 97) installed. To be able to use this theme, you need to log in to
Windows as an administrator.
Enabling the MacLook Theme
To enable MacLook for your virtual machine, do one of the following:
Choose Use MacLook from the View menu.
Choose Configure from the Virtual Machine menu, click the Options button, and select the
Use MacLook option in the Services pane.
Once the MacLook theme is enabled, it will be automatically applied to all view modes.
Integrating Mac OS X and Your Virtual Machine
155
Sharing Folders and Disks
A shared folder is a folder on your Mac that can be accessed from your virtual machine. Such
folders can be used for exchanging files between the primary OS (Mac OS X) and the virtual
machine or between several virtual machines. You can also share the Windows virtual machine
disk volumes with Mac OS X - they will be mounted on the Mac OS X Desktop.
In the operating system, where a shared folder resides, it appears as a usual folder, while in the
virtual machine it is shared to, it appears as a network shared folder.
A shared folder or volume resides on the computer (host computer or a virtual machine) to
which it initially belongs. It means, that it occupies space on the hard disk of the computer or
virtual machine it originally belongs to.
Using shared folders is possible in the guest operating systems with Parallels Tools (p. 98)
installed.
Setting up a shared folder requires three steps:
1
Make sure that Parallels Tools are installed in your guest OS. See Installing Parallels Tools
(p. 97) for detailed descriptions on how to do so in a particular guest OS.
2 Make sure that the Isolate Mac from Windows option (or Isolate Mac from Linux for Linux
virtual machines) is disabled in the Security pane (p. 179) of Virtual Machine Configuration.
3 Add a shared folder(s) to your virtual machine configuration. For the instruction on how to
do that, see Shared Folders Settings (p. 180).
Adding a Shared Folder
1
Start Parallels Desktop, and open a virtual machine.
2 Open the Virtual Machine Configuration dialog by:
choosing Configure from the Virtual Machine menu, or
clicking the Configure button on the toolbar of the virtual machine window.
3 In the Virtual Machine Configuration dialog, click the Options button, and select the Shared
Folders pane.
4 Click the Add button
. The dialog for adding user-defined shared folders will appear.
5 In this dialog:
Select the Enabled option.
In the Path field, specify a folder in the Mac OS X file system that will be shared.
in the Name field, specify a name for the folder which will appear in your guest OS.
Provide a description for the shared folder if needed in the Description field.
If you want to restrict writing to this folder from inside the guest OS, select the ReadOnly option. You will be able to save files to this folder in Mac OS X only. Click OK.
Integrating Mac OS X and Your Virtual Machine
156
Integrating Mac OS X and Your Virtual Machine
157
6 The folder appeared in the User-defined Mac OS X folders table. Click OK in the Virtual
Machine Configuration dialog to save the changes, and quit the dialog.
7 Now you can start your virtual machine and view the shared folders in the guest OS.
Viewing Shared Folders in Windows Guest OS
1
After you have created a shared folder, start your Windows virtual machine, and you will
see the Parallels Shared Folders shortcut on the Windows desktop.
2 Double-clicking this shortcut will lead you to the \\.psf directory where all your shared
folders are stored.
Note: To be able to save files to a shared folder from inside the virtual machine, make sure that
the Read-Only option is disabled.
Viewing Shared Folders in Linux Guest OS
1
After you have created a shared folder, start your Linux virtual machine.
2 Shared folders will be automatically mounted to the /media/psf or /mnt/psf directory
upon the virtual machine start.
Sharing Windows Disks to Mac OS
If you want to access your Windows virtual machine's volumes from Mac OS X, you can enable
inverse sharing. To do so:
1
Start Parallels Desktop, and open a virtual machine.
2 Open the Virtual Machine Configuration dialog by:
choosing Configure from the Virtual Machine menu, or
clicking the Configure button on the toolbar of the virtual machine main window.
3 In the Virtual Machine Configuration dialog, click the Options button, and select the Shared
Folders pane.
4 Select the Access Windows folders from Mac option to enable access to all virtual disks and
partitions available in the virtual machine from your Mac. You will be able to find the
virtual machine disks in the virtual machine PVM bundle. Locate the virtual machine bundle
in Finder, right-click its name, select Show Package Contents from the context menu, and
open the Windows Disks folder.
Note:
By
default,
virtual
machines'
bundles
are
stored
in
the
/Users/<Username>/Documents/Parallels/ folder or in the /Users/Shared
folder. To locate the virtual machine bundle, right-click its name in the Parallels Virtual
Machines list, and select Show in Fider from the context menu.
5 You can also select Mount virtual disks to Mac OS X desktop to mount the shared virtual hard
disks to your Mac OS X desktop. After you enable this option, the virtual machine's volumes
will be accessible from the Mac OS X desktop where they will appear as connected
volumes.
Windows network shares cannot be mounted.
Note: If the virtual machine's volumes are not mounted on Mac OS X desktop, go to Finder >
Preferences > General and make sure that the Connected servers option is selected.
Integrating Mac OS X and Your Virtual Machine
158
For more information about accessing the virtual machine's disks from Mac OS, see Browsing
Virtual Hard Disks In Finder (p. 166).
Working With Shared Files and Folders
Parallels Desktop allows you to open some files, located in the virtual machine shared folders
(p. 180), in Mac OS X applications. It may become useful if, for example, you cannot open a file
in the virtual machine applications. Just right-click the file and choose Open on Mac from the
context menu. For example, if you right-click a .txt file and select this command, the file will
be opened in the TextEdit application.
Parallels Desktop also allows you to show the files and folders, located in the virtual machine
shared folders (p. 180), in Finder. It may become useful if you want to perform various actions
on the object, for example, to apply color to it. To display a file or folder in Finder, right-click it
and choose Show in Finder from the context menu.
Integrating Mac OS X and Your Virtual Machine
159
Using Shared Profile
Parallels Desktop provides close integration between your Mac OS and Windows guest OS.
Now you can access certain Mac Home folders directly from Windows and vice versa. To use
this functionality, you should have Parallels Tools (p. 97) installed in the virtual machine and
the Isolate Mac from Windows option disabled in the Security pane (p. 179).
Note: To enable the Shared Profile functionality, you must share all Mac disks or at least your
Mac Home folder. You can configure the necessary sharing settings on the Shared Folders pane
(p. 180) or click OK on this pane to automatically enable Mac OS X Home folder sharing
together with enabling Shared Profiles.
If the Shared Profile functionality is activated, you can choose one of the following options:
Select Desktop to use the Mac desktop as the desktop in your Windows guest OS.
Select Documents to use the Mac Documents folder on your Mac as the My Documents
folder in your Windows guest OS.
Select Pictures to use the Pictures folder on your Mac as the My Pictures folder in
your Windows guest OS.
Select Music to use the Music folder on your Mac as the My Music folder in your
Windows guest OS.
The My Videos folder to the Movies folder on your Mac (for Windows XP/Vista/7 only)
The Downloads folder to the Downloads folder on your mac (for Windows Vista/7
only)
Warning: If you delete any Mac OS X file from the Windows desktop when the Mac OS X
desktop sharing is enabled, you will not be able to find it in Mac OS X Trash or Windows
Recycle Bin. The file will be deleted from your computer permanently.
When Shared Profile is enabled, the virtual machine's desktop will display the icons present on
Mac OS X Desktop, the My Documents folder will contain items stored in the Documents
folder on your Mac. The other folders will behave in a similar way.
To enable and configure Shared Profile, use the Shared Profile pane (p. 182) of Virtual Machine
Configuration.
Disabling Shared Profile
You can disable Shared Profile either by disabling Shared Profile in the Shared Profile pane (p.
182) or by disabling Mac folders sharing at runtime (p. 145) or in Virtual Machine
Configuration (p. 182).
Integrating Mac OS X and Your Virtual Machine
160
Using Shared Applications
You can use Mac OS X applications to open the files in your Windows guest OS and vice versa.
Note: To share your Mac OS X and Windows applications, you need to disable the Isolate Mac
from Windows option in the Security pane (p. 179) of the virtual machine configuration.
Using Mac OS X Applications in Windows Guest OS
The list of Parallels Shared Applications is created during the Parallels Tools installation. The
list includes your Mac OS X applications and is available when you choose All Programs >
Parallels Shared Applications from the Windows Start menu. You can select any application
from the list and start it. To use this functionality, enable the Share Mac OS X applications with
Windows option in the Shared Applications pane (p. 184).
To open a Windows file with the Mac OS X application you prefer, right-click the file and
choose the application from the Open With list. To open a Mac OS X file in a virtual machine's
application, you can drag this file to this application icon on the Windows desktop.
Using Windows Applications in Mac OS X
You can create a list of Windows applications in Mac OS X and run them even when the virtual
machine is stopped. If you start a Windows application when the virtual machine is stopped, the
virtual machine will automatically start and switch to Coherence (p. 148).
To open a file with the application you prefer, irrespective of where the file or the application
belongs to, right-click the file and choose the application from the Open With list. To open a Mac
OS X file in a virtual machine's application, you can drag this file to this application icon on the
Windows desktop.
If you selected the Show Windows Applications folder in Dock option in the Shared Applications
pane (p. 184) of Virtual Machine Configuration, the folder with all applications installed in your
Windows virtual machine will be displayed in the Dock. You can use this folder to quickly
access the needed Windows application.
Integrating Mac OS X and Your Virtual Machine
161
You can also create aliases for your favorite Windows applications on Mac OS Desktop and add
their icons to the Dock.
To create an alias for the application and add its icon to the Dock:
1
Start your Windows virtual machine.
2 Start any of your favorite Windows applications in the virtual machine. When the
application is started, its icon appears in the Dock.
3 To create an alias for your favorite Windows application, right-click the application icon in
the Dock, and select Keep in Dock from its shortcut menu.
The application alias appears on the Mac OS desktop. It will be available from the Dock even
when the virtual machine is stopped. If you double-click this alias when the virtual machine is
turned off, the virtual machine and the corresponding application in it will start automatically.
Sharing Windows System Tray Icons With Mac OS X
To extend the integration between Mac OS X and a Windows guest operating system installed in
the virtual machine, you can share Windows system tray icons with Mac OS X in the Coherence
and Crystal view modes. After sharing, the icons will be displayed in the Mac OS X menu bar in
the Coherence and Crystal view modes and you will be able to use the system tray applications
by clicking these icons.
To share Windows system tray icons, you need to configure the Crystal & Coherence view
modes settings (p. 194).
Integrating Mac OS X and Your Virtual Machine
162
Using SmartSelect
SmartSelect allows you to open files of particular types, stored in Mac OS X, in Windows guest
OS applications. Moreover, you can also open files of particular types, stored in Windows guest
OSs, in Mac OS X applications.
Note: To use SmartSelect, you should install Parallels Tools (p. 97) in the virtual machine and
disable the Isolate Mac from Windows option in the Security pane (p. 179) of the virtual machine
configuration.
SmartSelect is available for the following guest OSs:
Windows 2000
Windows Server 2003
Windows XP
Windows Vista
Windows Server 2008
Windows 7
To enable SmartSelect, you need to configure the Shared Applications (p. 184) settings in
Virtual Machine Configuration.
Opening Files in Mac OS X With Windows Applications
To make the description of opening files in Mac OS X with Windows applications more vivid,
let us assume that you have the doc.txt file stored in Mac OS X and you want to open it with
Notepad.
If you want to open the doc.txt file with Notepad only once, right-click this file, choose
Open With from the shortcut menu, and select Notepad. If there is no Notepad in the context
menu, click Other, and select Windows Applications for Windows > Notepad in Finder.
If you want to open all .txt files stored in Mac OS X with Notepad from now on:
1. Right-click the doc.txt file, choose Open With from the shortcut menu, and select
Notepad.
2. Right-click the Notepad icon in the Dock, and choose SmartSelect from the shortcut
menu.
Integrating Mac OS X and Your Virtual Machine
163
3. A list of SmartSelect file associations will open. You may edit the list by selecting the
applications to open files with particular types of extensions.
4. Find the .txt extension, select the Notepad application, and click OK to save the
associations. From now on, all .txt files stored in Mac OS X will open in Notepad.
Integrating Mac OS X and Your Virtual Machine
164
When trying to open a file stored in Mac OS X with the associated Windows guest OS
application, mind the following:
If the virtual machine containing this application is shut down, suspended, or paused,
double-clicking the file will start or resume this virtual machine. When the guest OS boots
up, the file will open in the application.
If the virtual machine containing this application is deleted or removed from the Parallels
Virtual Machines dialog, you will not be able to open the file with the associated application.
In this case, choose another application to open this file using the Open With list accessible
through the shortcut menu.
The SmartSelect File Associations After You Remove Parallels Desktop
If some types of Mac OS X files are associated with certain Windows applications, after you
remove Parallels Desktop, it will be impossible to open them in the Windows applications they
are associated with. When you try to open such a file after Parallels Desktop is removed, you
will have to choose a Mac application to open this file using the Open With list accessible
through the shortcut menu. To restore the SmartSelect file associations, reinstall Parallels
Desktop on your Mac, and register the virtual machine that has the associated Windows
applications installed.
Opening Files in Windows Guest OS With Mac OS X Applications
To make the description of opening files in Windows guest OSs with Mac OS X applications
more vivid, let us assume that you have the doc.txt file stored in the Windows guest OS and you
want to open it with TextEdit.
If you want to open the doc.txt file with TextEdit only once, right-click this file, choose
Open With from the shortcut menu, and select TextEdit.
If you want to open all .txt files stored in this Windows guest OS with TextEdit from now
on:
1. Right-click the doc.txt file, choose Open With from the shortcut menu, and click Choose
Program.
2. Select TextEdit, choose Always use the selected program to open this kind of file, and
click OK to save the association.
From now on, all .txt files stored in this Windows guest OS will open in TextEdit.
Integrating Mac OS X and Your Virtual Machine
165
Sharing Web Applications
When you work with Mac OS X and Windows applications simultaneously, you may notice that
clicking a hyperlink in a Windows application opens the corresponding web page in the browser
set as default in the Windows guest OS and clicking a hyperlink in a Mac OS X application
opens the web page in the Mac OS X default browser.
With Parallels Desktop, you can set a single web application for opening similar web pages
from both Mac OS X and Windows applications.
You can specify different Internet applications for opening each of the following types of web
pages:
Web pages. Web pages accessible through the HTTP and HTTPS protocols.
Email. Links in the mailto format.
Newsgroups. Links in the news. format.
FTP. Locations accessible through the FTP protocol.
RSS. RSS feeds.
Remote access. Locations accessible through the Telnet and Secure Shell (SSH)
protocols.
For setting up shared web applications, use the Internet Applications pane of the Virtual Machine
Configuration (p. 168) dialog.
To open the Internet Applications pane:
1
Select a virtual machine and open its configuration by choosing Configure from the Virtual
Machine menu.
2 Click the Internet Applications item in the left pane of the Virtual Machine Configuration (p.
168) dialog.
Note: You can specify different shared web applications for each of your Windows virtual
machines that have Parallels Tools installed.
For more information about setting up shared web applications, refer to Internet Applications
Settings (p. 186).
Usage Tip
Sharing the web applications can be useful in software development and web site building to
check the compatibility with different Internet browsers. Create several virtual machines and
install the necessary Internet browsers in each of them. Right-click the file you want to check
and specify the browser to use through Open With.
Note: The Open With list displays only the Internet browsers available through the virtual
machines that are currently running.
Integrating Mac OS X and Your Virtual Machine
166
Browsing Virtual Hard Disks in
Finder
For easy access to the files of your virtual machines, you can mount their hard disks in Mac OS
X Finder together with other disks and storage devices.
If you want your virtual hard disks to be mounted to the Mac OS X desktop when the virtual
machine is running, you should perform the following actions:
1
Open the Shared Folders pane (p. 180) of the Virtual Machine Configuration dialog and
enable the Mount virtual disks to Mac OS X desktop option.
Note: To be able to edit the settings on the Shared Folders pane, you should have Parallels
Tools (p. 98) installed in the virtual machine and the Isolate Mac from Windows option
disabled in the Security pane (p. 179).
2 Open the Finder Preferences, click General on the toolbar and select the Connected servers
option in the list of items displayed on the desktop.
If you want to manage the virtual machine content without starting the virtual machine, you can
mount the virtual hard disks manually using Parallels Mounter (p. 267):
1
Right-click the virtual machine file (PVM), and choose Open with > Parallels Mounter from
the shortcut menu. By default, virtual machines' bundles are stored in the
/Users/<Username>/Documents/Parallels/ folder or the /Users/Shared
folder.
2 To view and work with the contents of a mounted volume, select the volume's icon in the
sidebar of the Finder window.
Note: If you copy files to a Windows virtual machine using Parallels Mounter, you need to
log in to Windows as an administrator to be able to open them inside the virtual machine.
3 To unmount the volume, click the Eject button next to the volume's name in the sidebar.
Note: You can use Parallels Mounter to mount volumes associated with third-party (VMware,
VirtualBox, Virtual PC) virtual machines as well.
Integrating Mac OS X and Your Virtual Machine
167
Working With Objects
For closer integration between Mac OS X and your Windows guest OS, Parallels Desktop
provides the possibility to copy and paste formatted text and pictures and drag and drop files
between Mac OS X and the virtual machine operating system.
Note: To use these functionalities, you should have Parallels Tools (p. 97) installed in the virtual
machine and the Isolate Mac from Windows option disabled in the Security pane (p. 179).
Copying and Pasting Formatted Text
When you work with your Mac and Windows-based virtual machines side by side, you may
need to copy and paste text between them.
Parallels Desktop allows you to copy and paste text of any size between Mac and Windows
applications. This text can be italic/bold/underlined, it can be of various colors/fonts/sizes and
contain spaces.
You can copy and paste text from:
Mac OS X applications to the virtual machine applications (Word, Excel, Outlook, Notepad,
Wordpad, etc)
the virtual machine applications to Mac OS X applications (TextEdit, Safari, Mozilla
Firefox, MS Office for Mac, etc)
Copying and Pasting Pictures
When you work with your Mac and virtual machines side by side, you may need to copy and
paste different pictures between them.
Parallels Desktop allows you to copy and paste pictures between Mac and Windows picture or
graphic editors.
Dragging and Dropping Files
Close integration of Mac and Windows-based virtual machines allows you to drag and drop
different files between them.
168
CHAPTER 8
Configuring a Virtual Machine
This chapter explains how you can edit your virtual machine configuration:
configure general parameters (p. 169) (the name, amount of memory, number of processors,
etc).
edit different virtual machine options (p. 171) (the Optimization, Security, Shared Folders
preferences, etc).
configure the virtual hardware devices (p. 201) currently available inside the virtual machine
and add new devices.
In this chapter, you can also find detailed information about networking in a virtual machine (p.
228).
The configuration of an existing virtual machine can be changed in the Virtual Machine
Configuration dialog. You can open the Virtual Machine Configuration dialog by doing one of the
following:
Click the Configure button on the toolbar of the virtual machine main window.
Choose Configure from the Virtual Machine menu.
In Virtual Machine Directory window, right-click the virtual machine and choose Configure.
In This Chapter
General Settings .................................................................................................................... 169
Options.................................................................................................................................. 171
Hardware Settings ................................................................................................................. 201
Networking in a Virtual Machine ......................................................................................... 228
Configuring a Virtual Machine
169
General Settings
You can view and change the virtual machine name, processors number, amount of memory,
and other general parameters.
Note: Some of these settings can be changed only when the virtual machine is not running.
Configuring a Virtual Machine
170
General Preferences include the following parameters:
The virtual machine name. The Name field displays the name assigned to the virtual
machine. The length of the name is limited to 50 characters. The name of the virtual
machine is displayed on its guest OS window (p. 39).
The guest OS type and version. This field displays the type of the operating system installed
in the virtual machine or declared to be installed in future. The OS type and version fields
should reflect the real operating system type and version installed in the virtual machine.
The number of processors. The Processors field allows you to change the number of virtual
CPUs that will be used to handle the processes running in the virtual machine. The
maximum allowable number of virtual CPUs is automatically calculated by Parallels
Desktop. The calculation is based on the number of physical CPUs available to your Mac
OS X computer.
Note: It is reasonable to use more than one CPU in your guest OS if you are going to use
applications that perform better under multi-core processors.
The main memory amount. In the Main Memory field, you can set the amount of RAM that
will be available to the virtual machine. To configure the main memory limit, drag the slider
or type the value directly into the Main Memory field.
Note: If your Mac has 1 GB of RAM, it is strongly recommended to assign not more than
512 MB to a single virtual machine.
The virtual machine description. The Notes field displays additional information related to
the virtual machine.
Backing up with Time Machine
If you are using Time Machine for backing up your Mac, you may exclude the virtual machine
from the Time Machine backups by selecting the Do not back up with Time Machine option. Time
Machine backups may decrease the performance of your virtual machine when it is running in
parallel with the Time Machine backup. When your virtual machine is not running (when it is
stopped or suspended), the Time Machine backups do not affect it in any way.
For more information about backing up your virtual machines, refer to Backing Up a Virtual
Machine (p. 242).
If you want to prevent Virtual Machine Configuration from further unauthorized changes, click
the Lock icon
at the bottom of the window. The next time someone wants to change the
settings on any pane of Virtual Machine Configuration, an administrator's password will be
required.
Configuring a Virtual Machine
171
Options
The virtual machine options include the following settings:
Startup and Shutdown (p. 172). In this pane, you can define a number of parameters related
to the procedures of starting and shutting down your virtual machine.
Optimization (p. 174). These settings relate to the virtual machine performance.
Services (p. 177). This pane allows you to manage two Parallels Tools-related parameters:
the time synchronization between you virtual machine guest OS and Mac OS X and the
mouse pointer automatic capture and release.
Security (p. 179). The Security settings determine the overall level of virtual machine's
isolation from Mac OS X.
Shared Folders (p. 180). In this pane, you can manage shared folders and their parameters.
Shared Profile (p. 182). These preferences let you access your Mac OS X desktop and some
of Mac Home folders directly from the Desktop and the corresponding folders in your
Windows guest OS.
Shared Applications (p. 184). These settings relate to sharing applications between the guest
Windows OS and Mac OS X.
Internet Applications (p. 186). In this pane, you can set rules to open similar items with the
same Internet applications, no matter to which system they belong.
SmartMount (p. 188). These settings relate to the automatic detection and mounting of
removable devices in your virtual machines.
SmartGuard (p. 190). In this pane, you can schedule the automatic creation of snapshots.
Undo Disks (p. 192). In this pane, you can enable and configure the Undo Disks option.
Crystal & Coherence (p. 194). In this pane, you can configure a number of options related to
the Crystal and Coherence view modes for your virtual machine.
Full Screen (p. 196). In this pane, you can configure a number of options related to the Full
Screen view mode.
Modality (p. 198). In this pane, you can configure a number of Modality-related options for
your virtual machine.
Gestures & Apple Remote (p. 200). After enabling the options in this pane, you can use the
Apple Remote and a touchpad to control some Windows applications in your virtual
machine.
Configuring a Virtual Machine
172
Startup and Shutdown Settings
Using the Startup and Shutdown Settings, you can define a number of parameters related to the
procedures of starting and shutting down your virtual machine.
Configuring a Virtual Machine
173
Starting the Virtual Machine Automatically
The Start automatically option defines the cases in which the virtual machine can be started
automatically.
Select Never if you do not want your virtual machine to be started automatically in any case.
Select When window opens if you want your virtual machine to start automatically when you
open it from the Parallels Virtual Machines list (p. 36).
Select When Parallels Desktop starts if you want your virtual machine to start automatically
every time you start Parallels Desktop.
Startup View
The Startup view option defines the mode in which the virtual machine will work after you select
from the Parallels Virtual Machines list (p. 36) and start. If the Window, Full screen, Coherence,
Crystal, or Modality option is selected, the virtual machine will automatically switch to the
specified view mode (p. 122). If the Same as last time option is selected, the virtual machine will
start in the same mode that was applied to it before it was turned off.
Action on the Virtual Machine Shutdown
The On shutdown option defines the operation to be performed when you stop the virtual
machine.
Select Keep window open if you want the virtual machine window to stay open after the
virtual machine is stopped.
Select the Close window option if you want the virtual machine window to automatically
close after the virtual machine is stopped.
Select Quit Parallels Desktop if you want Parallels Desktop to quit after the virtual machine
is stopped. If there are any other running virtual machines, Parallels Desktop will ask what
to do with them before closing.
Action on Closing the Virtual Machine Window
The On window close option defines the operation to be performed when you close the virtual
machine's window.
Select Suspend if you want the virtual machine to be suspended when you close its window.
Select Stop if you want the virtual machine to be shut down when you close its window.
If you select Ask me what to do, you will be prompted to choose the operation to perform
with the virtual machine each time you close its window.
If you want to prevent Virtual Machine Configuration from further unauthorized changes, click
at the bottom of the window. The next time someone wants to change the
the Lock icon
settings on any pane of Virtual Machine Configuration, an administrator's password will be
required.
Configuring a Virtual Machine
Optimization Settings
Using the Optimization Settings, you can optimize your virtual machine performance.
174
Configuring a Virtual Machine
175
Using Adaptive Hypervisor
Select the Enable Adaptive Hypervisor option to automatically allocate the host computer CPU
resources between the virtual machine and Mac OS X applications depending on what
application you are working with at the moment. If your virtual machine window is in focus, the
priority of this virtual machine processes will be set higher than the priority of the Mac's
processes and as a result more CPU resources will be allocated to the virtual machine, if you
switch to the primary OS window - the priority of its working applications will be set higher and
the CPU resources will be relocated to Mac OS X.
Compressing the Disk Automatically
If you use an expanding (p. 218) virtual hard disk in your virtual machine, its image file size on
the physical hard disk increases as you add new data to the virtual hard disk. When you delete
some data from this virtual hard disk, free unused space appears on the disk but the amount of
space your virtual machine occupies on the hard disk of your Mac does not reduce. To regularly
free the unused space back to Mac, use the Enable AutoCompress option. The virtual hard disk
in an expanding format will be reviewed twice a day and, if the unused space occupies more
than 50 percent of the hard disk image size, it will be compressed and the hard disk image file
size will be decreased. As a result, there will be more free space on your Mac's hard disk.
Note: The AutoCompress option is available for Windows virtual machines only. Compressing
can be performed for virtual machines without snapshots (p. 249) and with the Undo disks
option (p. 192) disabled.
On the Hard Disk pane (p. 208), you can compress the disk manually whenever you want.
Tuning Windows for Speed
You can make your Windows virtual machine work even faster by selecting Tune Windows for
speed. This option disables some of the additional Windows features that tend to slow down the
performance of Windows.
Optimizing Performance
To make your Windows virtual machine boot faster, select the Tune Windows for speed option.
Some additional Windows features causing system overload will be disabled.
Note: This option is available for Windows XP and later Windows virtual machines.
The Optimize performance for option defines the priority of distributing the main physical
computer memory resources:
Click the Optimize performance for field and select Virtual machine to allocate more physical
computer memory resources to the virtual machine and its applications. Selecting this option
may significantly increase the virtual machine performance; however, it may slow down the
productivity of your Mac OS X applications.
Click the Optimize performance for field and select Mac OS X applications to allocate more
memory resources to the physical computer and its applications. In this case, the memory
resources usage will be optimized to provide better performance of your Mac OS X
applications.
Configuring a Virtual Machine
176
Optimizing Power Consumption
This option allows you to control the virtual machine power consumption when Parallels
Desktop is installed on a Mac laptop computer that is running on batteries (for example,
MacBook Pro):
If you select Longer battery life in the Power consumption field, the virtual machine power
consumption will be automatically reduced to provide a longer life for your Mac laptop
battery.
If you select Better performance, the virtual machine and its applications will operate at the
maximum possible speed. However, enabling this option may significantly reduce your Mac
laptop battery life.
If you select the Enable battery in virtual machine option, the battery status will be displayed in
your virtual machine each time your Mac laptop computer runs on batteries. This option is
available only on laptop Macs.
If you want to prevent Virtual Machine Configuration from further unauthorized changes, click
the Lock icon
at the bottom of the window. The next time someone wants to change the
settings on any pane of Virtual Machine Configuration, an administrator's password will be
required.
Configuring a Virtual Machine
177
Services Settings
Using the Services Settings, you can manage two Parallels Tools-related parameters: the time
synchronization between Mac OS X and you virtual machine guest OS and the mouse pointer
automatic capture and release. These options are available only when Parallels Tools are
installed in the virtual machine.
Note: Some of these settings can be changed only when the virtual machine is not running.
Configuring a Virtual Machine
178
SmartMouse
The SmartMouse option makes the mouse smoothly move between the virtual machine and your
Mac. With this option enabled, Parallels Desktop automatically grabs the mouse input when you
move the pointer to the virtual machine, and releases it when you move it back to Mac OS.
If you select On, the mouse input will be automatically captured in the virtual machine
window when the mouse pointer hovers over it and then released when it moves back to
Mac OS, which will make the mouse move seamlessly between your Mac and the virtual
machine.
If you select Off, you will need to click inside the virtual machine window to capture the
mouse input, and press Ctrl+Alt to release it back to your Mac.
Note: Ctrl+Alt is the default key combination. You can define another key combination for
releasing the mouse in the Keyboard and Mouse (p. 53) pane of Parallels Desktop
Preferences.
If you select Auto, the option will automatically become disabled (Off) each time you use a
game, graphic application, or any other program that uses its own mouse pointer instead of
using the operating system pointer. The option will be automatically enabled (On) after you
quit the application.
Modifier Keys Optimization
Select the Optimize modifier keys for games option if you actively use modifier keys (Alt, Ctrl,
Shift) in action games. If you select this option, signals from these keys will be processed faster.
Time Synchronization
Select the Synchronize with Mac option to synchronize the time settings of your virtual machine
with those of your Mac.
If the time zone set in your virtual machine differs from that of your Mac, you can maintain this
time difference by selecting the Allow a different time than on Mac option.
MacLook
MacLook theme (p. 154) is a predefined set of icons, fonts, colors, and other elements that
makes Windows guest OS look like Mac OS X. Select the Use MacLook option if you want use
the MacLook theme in your virtual machine. If you select this option, MacLook theme will be
enabled in all view modes.
Note: This theme is available for virtual machines with Windows XP or later Windows guest
operating systems that have an up-to-date version of Parallels Tools (p. 97) installed.
If you want to prevent Virtual Machine Configuration from further unauthorized changes, click
the Lock icon
at the bottom of the window. The next time someone wants to change the
settings on any pane of Virtual Machine Configuration, an administrator's password will be
required.
Configuring a Virtual Machine
179
Security Settings
You can set restrictions for performing some actions and make your virtual machine isolated
from your Mac using the Security Settings.
If you want isolate your virtual machine from Mac OS X, select the Isolate Mac from Windows
option (Isolate Mac from Linux for Linux virtual machines). This option disables all integration
features, including Shared Folders (p. 180), Shared Profile (p. 182), Shared Applications (p.
184), Internet Applications (p. 186), and SmartMount (p. 188). You will also not be able to copy
or move objects between the virtual machine and your Mac.
You can set restrictions on the following operations for non-administrator users:
Exit full screen mode. An administrator's password will be required to exit the Full Screen
(p. 125) view mode.
Change virtual machine state. An administrator's password will be required to start, stop (p.
117), suspend, or otherwise change the virtual machine state.
Manage snapshots. An administrator's password will be required to create or delete a virtual
machine snapshot (p. 249), or revert to a snapshot.
If you want to prevent Virtual Machine Configuration from further unauthorized changes, click
the Lock icon
at the bottom of the window. The next time someone wants to change the
settings on any pane of Virtual Machine Configuration, an administrator's password will be
required.
Configuring a Virtual Machine
180
Shared Folders Settings
Shared folders can be set up for Windows, Linux, and Mac OS X guest operating systems.
Note: To be able to edit the Shared Folders Settings, you should have Parallels Tools (p. 98)
installed in the virtual machine and the Isolate Mac from Windows option disabled in the Security
pane (p. 179).
You can also change the shared folders settings at runtime. To learn how to do it, refer to the
Changing the Configuration at Runtime section (p. 145)
Configuring a Virtual Machine
181
Sharing Mac OS X Folders to the Guest OS
To configure access to the disks and folders on the physical computer from inside the virtual
machine, click the Share these Mac folders field, and select one of the following:
Select All disks to provide the virtual machine with access to all disks and folders of your
Mac.
Select Home folder to provide the virtual machine with access to the Home folder on the
physical computer.
Select None to disable the Mac folders sharing.
Note: When you share the Mac disks or folders with a virtual machine, they still reside and
occupy space on the Mac's hard disk.
Defining physical computer folders to be shared
In the User-defined Mac OS X folders table, you can manually specify one or more folders on the
physical computer to be shared with the virtual machine.
To add a shared folder:
1
Click the Add button
.
2 In the Add Shared Folder dialog, specify the following settings:
Enabled. Select this option to enable the shared folder.
Path. In this field, type the path to the folder you want to share with the virtual machine.
You can also use the Choose button to locate the folder.
Name. In this field, type the shared folder name under which the folder will be accessible
from inside the virtual machine.
Description. In this field, you can provide a brief description for the shared folder.
Read-only. Select this option if you want the shared folder to have a read-only status
when accessed from inside the virtual machine.
3 Click OK.
To remove a shared folder, select its name and click the Remove button
.
For more information about shared folders, see Sharing Folders and Disks (p. 155).
Sharing Windows disks to Mac OS X
Note: This option is not available for Linux and Mac OS X guest operating systems.
Select the Access Windows folders from Mac option to enable access to all virtual disks and
partitions available in the virtual machine from the physical computer. You will be able to find
the virtual machine disks in the virtual machine PVM bundle. Locate the virtual machine bundle
in Finder, right-click its name, select Show Package Contents from the context menu, and open
the Windows Disks folder.
Configuring a Virtual Machine
182
You can also select Mount virtual disks to Mac OS X desktop to mount the shared virtual hard
disks to your Mac OS X desktop. After you enable this option, the virtual machine's volumes
will be accessible from the Mac OS X desktop where they will appear as connected volumes.
Windows network shares cannot be mounted
Note: If the virtual machine's volumes are not mounted on the Mac OS X Desktop, go to Finder
> Preferences > General and make sure that the Connected servers option is selected.
If you want to prevent Virtual Machine Configuration from further unauthorized changes, click
the Lock icon
at the bottom of the window. The next time someone wants to change the
settings on any pane of Virtual Machine Configuration, an administrator's password will be
required.
Shared Profile Settings
Using the Shared Profile Settings, you can make Mac OS X desktop and some of the Home
folder items accessible directly from the Desktop and the corresponding folders in your
Windows guest OS.
Note: To use the functionality available on the Shared Profile pane, you should have Parallels
Tools (p. 98) installed in the virtual machine and the Isolate Mac from Windows option disabled
in the Security pane (p. 179).
Configuring a Virtual Machine
183
Note: To enable the Shared Profile functionality, you must share all Mac disks or at least your
Mac Home folder. You can configure the necessary sharing settings on the Shared Folders pane
(p. 180) or click OK on this pane to automatically enable Mac OS X Home folder sharing
together with enabling Shared Profiles.
If the Shared Profile functionality is activated, you can choose one of the following options:
Select Desktop to use the Mac desktop as the desktop in your Windows guest OS.
Select Documents to use the Mac Documents folder on your Mac as the My Documents
folder in your Windows guest OS.
Select Pictures to use the Pictures folder on your Mac as the My Pictures folder in
your Windows guest OS.
Select Music to use the Music folder on your Mac as the My Music folder in your
Windows guest OS.
Select Movies to use the Movies folder on your Mac as the My Videos folder in your
Windows guest OS (available for Windows XP/Vista/7 only).
Select Downloads to use the Downloads folder on your Mac as the Downloads folder in
your Windows guest OS (available for Windows Vista/7 only).
Warning: If you delete any Mac OS X file from the Windows desktop when the Mac OS X
desktop sharing is enabled, you will not be able to find it in Mac OS X Trash or Windows
Recycle Bin. The file will be deleted from your computer permanently.
For more information about the Shared Profile functionality, see Using Shared Profile (p. 159).
Note: The Shared Profile functionality is available for Windows guest operating systems only.
If you want to prevent Virtual Machine Configuration from further unauthorized changes, click
the Lock icon
at the bottom of the window. The next time someone wants to change the
settings on any pane of Virtual Machine Configuration, an administrator's password will be
required.
Configuring a Virtual Machine
184
Shared Applications Settings
Using the Shared Applications Settings, you can configure the applications sharing between
Windows and Mac OS.
Note: These options are available only when Parallels Tools are installed in the virtual machine
and the Isolate Mac from Windows option disabled in the Security pane (p. 179).
Configuring a Virtual Machine
185
Windows applications
Select Share Windows applications with Mac OS X to allow using Windows applications for
opening the files in Mac OS X. Before using a Windows application in Mac OS X for the first
time, you should open it once in the virtual machine guest OS. If you enabled this option, you
can configure the following options:
If you select Show Windows Applications folder in Dock, the folder with all applications
installed in your Windows virtual machine will be always displayed in the Dock.
Select the Pause virtual machine when no applications are running option to save your Mac
resources. Pausing a virtual machine releases the resources, such as RAM and CPU,
currently used by this virtual machine. The released resources can then be used by the host
computer and its applications or by other virtual machines running on the host computer.
If you select this option, the virtual machine will be automatically paused provided that:
the virtual machine is running but the virtual machine window (p. 39) is not active over
30 seconds
there are no applications running in the guest operating system (no icons of the guest OS
applications are present in the Dock)
Select Enable SmartSelect to enable the SmartSelect functionality allowing you to associate
certain files with certain applications, irrespective of whether these are Mac or Windows
files, or Mac or Windows applications. To specify applications to open certain types of files,
click SmartSelect Associations... and specify the file extensions and applications to open
them. For detailed information on the SmartSelect functionality, refer to Using SmartSelect
(p. 162).
For more information on working with shared applications, refer to the Using Shared
Applications section (p. 160).
Mac OS X applications
To be able to open Windows files with Mac OS X applications, select Share Mac OS X
applications with Windows.
If you want to prevent Virtual Machine Configuration from further unauthorized changes, click
at the bottom of the window. The next time someone wants to change the
the Lock icon
settings on any pane of Virtual Machine Configuration, an administrator's password will be
required.
Configuring a Virtual Machine
186
Internet Applications Settings
Using the Internet Applications Settings, you can specify the settings for opening different types
of Internet-related files and locations.
Note: To use the functionality available on the Internet Applications pane, you should have
Parallels Tools (p. 98) installed in the virtual machine and the Isolate Mac from Windows option
disabled in the Security pane (p. 179).
Configuring a Virtual Machine
187
You can specify different Internet applications for opening each of the following types of web
pages:
Web pages. Web pages accessible through the HTTP and HTTPS protocols.
E-mail. Links in the mailto format.
Newsgroups. Links in the news. format.
FTP. Locations accessible through the FTP protocol.
RSS. RSS feeds.
Remote access. Locations accessible through the Telnet and Secure Shell (SSH)
protocols.
To set applications for opening these types of web pages and links:
1
Click the box next to the type name.
2 Choose the appropriate Internet application from the list.
Note: This list contains Internet applications installed in Mac OS X and your virtual
machine.
For more information on sharing web applications, refer to Sharing Web Applications (p. 165).
If you want to prevent Virtual Machine Configuration from further unauthorized changes, click
the Lock icon
at the bottom of the window. The next time someone wants to change the
settings on any pane of Virtual Machine Configuration, an administrator's password will be
required.
Configuring a Virtual Machine
188
SmartMount Settings
Using the SmartMount Settings, you can automate the detection and mounting of removable
devices in your virtual machines.
Note: To use options available on this pane, you should have Parallels Tools installed in the
virtual machine and the Isolate Mac from Windows option disabled in the Security pane (p. 179).
Configuring a Virtual Machine
189
To enable the SmartMount feature, you should select Enable SmartMount in this pane, and select
one or several types of devices to mount.
If the SmartMount functionality is enabled and you connect a device of the selected type to Mac
OS X, this device is also automatically mounted to your guest operating system as a network
drive. For example, a USB flash drive plugged in to your Mac will be accessible from both the
/Volumes folder in Mac OS X and My Computer in the Windows virtual machine.
The following devices can be automatically mounted to your virtual machines:
Removable drives. Select this option if you want external storage devices such as USB hard
disks and USB flash drives to be mounted to your guest OS.
CD/DVD drives. Select this option if you want CD and DVD drives or CD/DVD images
(DMG, ISO, and so on) to be mounted to your guest OS.
Network folders. Select this option if you want network shares connected to Mac OS X to be
mounted to your guest OS.
The permissions you will have for managing the mounted device from inside the virtual
machine will coincide with those you have for this device in Mac OS X. So, if you can read
from and write to a USB flash drive in Mac OS X, you will have the same permissions for this
drive from inside the virtual machine. At the same time, if you are connecting a USB flash drive
that is formatted with NTFS, you will have read-only access to it because Mac OS X cannot
write to NTFS volumes.
If you want to prevent Virtual Machine Configuration from further unauthorized changes, click
the Lock icon
at the bottom of the window. The next time someone wants to change the
settings on any pane of Virtual Machine Configuration, an administrator's password will be
required.
Configuring a Virtual Machine
190
SmartGuard Settings
Using the SmartGuard Settings, you can automate snapshots creation. You can find detailed
information on snapshots and how to work with them in the Working with snapshots chapter (p.
249).
Note: When your virtual machine is paused, snapshot can be created neither manually nor
automatically.
Configuring a Virtual Machine
191
To enable the SmartGuard functionality, select the Enable SmartGuard option at the top of the
SmartGuard pane.
Note: The SmartGuard feature is available only when the Undo Disks feature (p. 192) is disabled
and the virtual machine is not running in Safe Mode (p. 126).
If you want to know when it is time to make the next snapshot and to be able to reject the
snapshot creation, enable the Notify me before snapshot creation option.
Setting the Time Interval
Set how often snapshots should be made in the Take a snapshot every field. You can set from
one hour to 48 hours.
If the time interval is less than 24 hours, SmartGuard will allow you to restore the latest hourly,
daily and weekly snapshot. If the time interval is more than 24 hours, you will be able to restore
the latest daily, weekly and monthly snapshot.
To manage the snapshots and restore any of them, use Snapshot Manager (p. 251).
Restricting the Snapshots Number
Use the Number of snapshots to keep field to set the maximum number of snapshots that can be
stored on your Mac. The maximum available value is 100 snapshots. As soon as Snapshots
Manager reaches the limit for snapshots and needs to make a new one over limit, it deletes the
oldest snapshot.
If you want to prevent Virtual Machine Configuration from further unauthorized changes, click
the Lock icon
at the bottom of the window. The next time someone wants to change the
settings on any pane of Virtual Machine Configuration, an administrator's password will be
required.
Configuring a Virtual Machine
Undo Disks Settings
Using the Undo Disk Settings, you can enable and configure the Undo Disks feature.
Note: This option can be enabled or disabled only when the virtual machine is not running.
192
Configuring a Virtual Machine
193
The Enable Undo Disks option allows you to discard or apply the changes you made to the
virtual machine's hard disk during your working session. If you choose to discard them, the
changes will be discarded when you shut down the virtual machine. When you start this virtual
machine again, its virtual hard disk will have the same data it contained before you started the
previous working session. If you choose to apply the changes on the virtual machine shutdown,
the next time you start this virtual machine, its virtual hard disk will store the changes you made
during the previous working session.
Note: When enabled, the Undo Disks feature is applied to all virtual hard disks this virtual
machine uses.
You can choose whether you want to discard the changes you made to the virtual machine's hard
disk or choose the action to perform in the On shutdown field.
Discard changes. Select this option if you want to discard the changes when you shut down
this virtual machine.
Ask me what to do. If this option is selected, you will be prompted to choose the action to
perform with the changes (discard or apply them) each time you shut down the virtual
machine.
Notes: 1. You cannot create snapshots of virtual machines that have this option enabled.
2. This option cannot be enabled for the virtual machines using the Boot Camp partition.
If you want to prevent Virtual Machine Configuration from further unauthorized changes, click
the Lock icon
at the bottom of the window. The next time someone wants to change the
settings on any pane of Virtual Machine Configuration, an administrator's password will be
required.
Configuring a Virtual Machine
194
Crystal & Coherence Settings
Using the Crystal & Coherence Settings, you can configure a number of options related to the
Crystal and Coherence view modes for your virtual machine. These view modes are available
only for Windows virtual machines that have Parallels Tools installed.
Note: For detailed information on the Crystal and Coherence view modes, see Working in the
Crystal View Mode (p. 152) and Working in Coherence (p. 148).
Configuring a Virtual Machine
195
On this pane, you can configure the following options:
Turn off Aero theme in Coherence. This option is available for Windows 7 and Windows
Vista guest operating systems. If you select this option, you will not be able to use the Aero
theme in the Coherence and Crystal view modes. In the other view modes, the Aero theme
will be available.
Bring notification windows to front. Select this option to always display Windows
notifications above the active Mac OS X applications. With this option disabled, you will
see Windows notifications only if you work with the corresponding Windows applications.
Do not use Dock area. Select this option to exclude the Mac OS X Dock from the working
area and to make Windows applications avoid the screen area occupied by the Dock.
Show Windows system tray icons in the Mac menu bar. If you select this option, the Windows
system tray icons will be available from both the Windows taskbar and the Mac OS X menu
bar.
Disable drop shadow. Select this option to disable the shadow frames of running Windows
applications. Switching off shadows may improve the performance of your virtual machine
when operating in the Coherence and Crystal modes.
Do not minimize windows to Dock. Select this option to make minimized Windows
applications appear on the taskbar only. With this option disabled, all minimized Windows
applications will appear both on the taskbar and in the Dock.
Note: If you use several displays, you can arrange how you will see applications when moving
them from one display to another. To this effect, select System Preferences > Displays >
Arrangement on the Mac OS X menu and arrange the available displays in the Displays dialog.
If you want to prevent Virtual Machine Configuration from further unauthorized changes, click
at the bottom of the window. The next time someone wants to change the
the Lock icon
settings on any pane of Virtual Machine Configuration, an administrator's password will be
required.
Configuring a Virtual Machine
196
Full Screen Settings
Using the Full Screen Settings, you can configure the virtual machine's appearance and behavior
when it is running in the Full Screen view mode.
In the Full Screen mode, the guest operating system window occupies the whole screen and all
Mac OS X and Parallels Desktop controls are hidden.
You can configure the Full Screen Settings even when the virtual machine is running.
Configuring a Virtual Machine
197
Active Screen Corners
You can set actions for screen corners in the Full Screen mode. Once you've set an active corner,
move the mouse to the corresponding corner of your screen in the Full Screen mode to see the
result.
To set an action for a screen corner, click the field near this corner, and select the desired action
from the menu:
Window. On clicking the corresponding active corner, the virtual machine will switch to the
Window view mode.
Crystal. On clicking the corresponding active corner, the virtual machine will switch to the
Crystal view mode (p. 152).
Coherence. On clicking the corresponding active corner, the virtual machine will switch to
the Coherence view mode (p. 148).
Modality. On clicking the corresponding active corner, the virtual machine will switch to the
Modality view mode.
Show menu bar. On clicking the corresponding active corner, the Mac OS X menu bar and
Dock will appear.
Adjusting the Host Computer Screen Resolution to the Virtual Machine Resolution in Full
Screen
When you switch the virtual machine to the Full Screen mode, its screen resolution:
changes to the physical computer screen resolution if you have Parallels Tools installed or
remains the same.
In the second case, if the virtual machine screen resolution is lower than that of your physical
computer, in the Full Screen mode, the virtual machine's screen will appear on a black
background. If the virtual machine's screen resolution is higher than that of the host computer, in
the Full Screen mode, the virtual machine's screen will have scroll bars.
To adjust the screen resolution of your physical computer to that of the virtual machine, select
the Adjust Mac resolution in full screen option. In this case your computer will change its screen
resolution each time the virtual machine is switched to the Full Screen mode.
Using All Displays in Full Screen
If you have multiple displays connected to your Mac, the guest operating system can use all
these displays in the Full Screen mode. To enable this feature for the virtual machine, select Use
all displays in full screen. Now if you change the view mode to Full Screen, your guest operating
system will occupy all available displays.
If you want to prevent Virtual Machine Configuration from further unauthorized changes, click
the Lock icon
at the bottom of the window. The next time someone wants to change the
settings on any pane of Virtual Machine Configuration, an administrator's password will be
required.
Configuring a Virtual Machine
198
Modality Settings
Using the Modality Settings, you can configure the virtual machine's appearance and behavior
when it is running in the Modality mode.
In the Modality mode, you can resize the virtual machine windows and place them side by side
with your Mac's applications. A Modality window can be scaled to any size, and its content will
still be active, which allows you to monitor the tasks running inside the virtual machine while
you are working on the Mac's side.
You can configure the settings on this pane even when the virtual machine is running.
Configuring a Virtual Machine
199
In the Modality mode, the virtual machine's window becomes transparent by default. You can
specify the level of visibility in the Opacity field by dragging the slider between Transparent and
Opaque. You can change the level of transparency for your running virtual machine when it is in
the Modality mode.
To manage the behavior of the virtual machine's window in the Modality mode, use the
following options:
Stay on top of other windows. Clear this option if you do not want the virtual machine's
window to appear on top of all other open windows when the virtual machine is in Modality.
Capture keyboard and mouse on click. Clear this option if you do not want the virtual
machine to capture the keyboard and mouse input when in Modality.
By default, both these options are selected.
To learn how to switch to Modality, refer to the Changing View Modes section (p. 122).
If you want to prevent Virtual Machine Configuration from further unauthorized changes, click
the Lock icon
at the bottom of the window. The next time someone wants to change the
settings on any pane of Virtual Machine Configuration, an administrator's password will be
required.
Configuring a Virtual Machine
200
Gestures & Apple Remote Settings
You can use the touchpad or Apple Remote to control some Windows applications in your
virtual machine.
Note: This feature is available for Windows virtual machines that have Parallels Tools installed.
To use these features, enable the following options:
Enable Gestures. Enable this option to use the touchpad (if you have one on your Mac) to
control some Windows applications.
Enable Apple Remote. Enable this option to use the Apple Remote to control some Windows
applications.
For detailed information on using gestures and the Apple Remote, see Using Touchpad Gestures
and the Apple Remote (p. 134).
If you want to prevent Virtual Machine Configuration from further unauthorized changes, click
the Lock icon
at the bottom of the window. The next time someone wants to change the
settings on any pane of Virtual Machine Configuration, an administrator's password will be
required.
Configuring a Virtual Machine
201
Hardware Settings
Using the Virtual Machine Configuration dialog, you can configure the virtual hardware
available in your virtual machine:
Configure the devices currently available inside the virtual machine.
Add or remove devices.
Configure the boot order of your virtual machine.
Boot Order Settings
Using the Boot Order Settings, you can configure the virtual machine boot sequence, that is, the
order in which the virtual machine will try to load the operating system from different boot
devices.
Note: These settings cannot be changed when the virtual machine is running.
Configuring a Virtual Machine
202
The currently supported boot devices are listed below:
Hard Disk. Select this device if you want the virtual machine to boot up from its virtual hard
disk drive.
CD/DVD-ROM. Select this device if you want the virtual machine to boot up from the media
connected to its virtual CD/DVD-ROM drive.
Note: The virtual machine will use the CD/DVD-ROM drive specified as CD/DVD-ROM 1 in
its configuration.
Floppy Disk. Select this device if you want the virtual machine to boot up from a floppy disk
image connected to its virtual floppy disk drive.
Network Adapter. Select this device if you want your virtual machine to boot from a network
adapter using PXE (Pre-Execution Environment).
Note: The virtual machine will use the network adapter specified as Network Adapter 1 in its
configuration.
Every time you start the virtual machine, it tries to boot from the device specified as the first one
in the Boot order list. If the virtual machine cannot boot from the first device (for example, no
media is connected to it), the virtual machine proceeds to the second device in the list and tries
to boot from this device, and so on.
On this pane, you can perform the following operations:
Change the currently set boot sequence by selecting the name of the corresponding boot
device in the Boot order list and moving it up or down using the arrows to the right of the
list.
Remove a boot device from the sequence by clearing the check box next to its name.
If you choose the Select boot device on startup option, you will see the following message at the
virtual machine startup: "Press ESC to select boot device". If you press ESC
pending 5 seconds, you will be able to select a boot devise. If you do not press ESC, the virtual
machine will try to boot from the devices specified in the Boot order list.
Note: Make sure that the device you wish to use for your virtual machine booting (hard disk
drive, CD-ROM drive, floppy disk drive, or network adapter) is available to the virtual machine
and configured properly. If you do not have any boot devices configured in your virtual
machine, you will see the following error message after you start the virtual machine: “No
boot device is available”. In this case, you should stop the virtual machine and
configure at least one boot device for it.
The Boot flags field is intended for specifying the flags that can change the virtual machine
system behavior. The system flags can be used by the Parallels customer support team in cases
when something goes wrong in your virtual machine. It is not recommended to type anything
into this field without being instructed to do so by the customer support staff.
If you want to prevent Virtual Machine Configuration from further unauthorized changes, click
the Lock icon
at the bottom of the window. The next time someone wants to change the
settings on any pane of Virtual Machine Configuration, an administrator's password will be
required.
Configuring a Virtual Machine
203
Video Settings
To view and configure the amount of video memory available to the virtual machine's video
card, use the Video Settings.
Note: These settings cannot be changed when the virtual machine is running.
Configuring a Virtual Machine
204
In the Video memory field, you can set the amount of video memory that will be available to the
virtual machine.
To configure the video memory limit, do one of the following:
drag the slider
use the spin box arrows
type the value directly into the Video memory field
Enabling 3D Acceleration
If you want to use games or applications that require video cards that support DirectX or
OpenGL, select the Enable 3D acceleration option. For more information, refer to Using 3D
Graphics Applications (p. 132).
Enabling Vertical Synchronization
Sometimes in games and 3D applications, a newly rendered frame may overlap a previously
rendered one and then screen tearing happens. This occurs when the video card or the software
using it begins updating the actively-displayed memory in a manner that is out of sync with the
monitor's refresh rate. To prevent screen tearing, select the Enable vertical synchronization
option.
If you want to prevent Virtual Machine Configuration from further unauthorized changes, click
at the bottom of the window. The next time someone wants to change the
the Lock icon
settings on any pane of Virtual Machine Configuration, an administrator's password will be
required.
Configuring a Virtual Machine
205
Floppy Settings
To view and configure the virtual machine floppy disk drive settings, use the Floppy Disk
Settings.
Select the Connected option if you want the floppy disk drive or floppy disk image to be
automatically connected to the virtual machine on its startup.
In the Source field, you should specify the source device or image file that will emulate the
virtual machine floppy disk drive:
If a real floppy disk drive is connected to your Mac and you want to use it in your virtual
machine, click the Source field, and select the real device name from the list.
If you want to use a floppy disk image, click the Source field, and choose the virtual
machine default floppy.fdd file, or click Choose an image file, and specify the path to
the desired floppy disk image file on your Mac.
If you want to prevent Virtual Machine Configuration from further unauthorized changes, click
the Lock icon
at the bottom of the window. The next time someone wants to change the
settings on any pane of Virtual Machine Configuration, an administrator's password will be
required.
Configuring a Virtual Machine
206
CD/DVD Settings
To configure the virtual machine's CD/DVD drive settings, use the CD/DVD Settings. Virtual
CD/DVD drives can be connected either to physical CD/DVD drives or to CD/DVD images.
Note: You can connect up to four IDE devices (hard disks or CD/DVD drives) and 15 SCSI
devices to a virtual machine. Each device is listed separately in the Virtual Machine Configuration
dialog and has its own number.
Configuring a Virtual Machine
207
Select the Connected option if you want the CD/DVD drive to be automatically connected to the
virtual machine on its startup.
To emulate the virtual CD/DVD drive, you can connect one of the real CD/DVD drives on your
physical computer or a CD/DVD image file to the virtual machine.
Note: Parallels virtual machines support ISO and DMG image files and may support CUE and
CCD image files.
In the Source field, the source device or image file that emulates the virtual machine CD/DVD
drive is specified. You can change the source device:
To use a real CD/DVD drive as the virtual machine CD/DVD drive, click the Source field,
and select the real device name from the list.
To use an image file as the virtual machine's CD/DVD drive, click the Source field, and
choose the image file from the list, or click Choose an image file, and specify the path to the
desired image file on your Mac.
In the Location field, you can specify the type of interface for connecting the device:
IDE. Using this interface type, you can connect up to four virtual devices (hard disks or
CD/DVD drives).
SCSI. Using this interface type, you can connect up to 15 virtual devices (hard disks or
CD/DVD drives).
Note: 1. The Mac OS X guest OS does not support the SCSI controller. In the latest Linux
distributions (e.g. RHEL 5.3), the SCSI driver may be not installed. In this case, you should
install this driver in your Linux guest OS to be able to use the SCSI controller.
2. The SCSI 7:0 location is not available for selecting, since it is occupied by the SCSI
controller itself.
If you want to prevent Virtual Machine Configuration from further unauthorized changes, click
the Lock icon
at the bottom of the window. The next time someone wants to change the
settings on any pane of Virtual Machine Configuration, an administrator's password will be
required.
Configuring a Virtual Machine
208
Hard Disk Settings
To view and configure the virtual hard disk settings, use the Hard Disk pane of Virtual Machine
Configuration. The current version of Parallels Desktop allows virtual machines to use hard disk
images in the .hdd format and Windows Boot Camp partitions.
Note: You can connect up to four IDE devices (hard disks or CD/DVD drives) and 15 SCSI
devices to a virtual machine. Each device is listed separately in the Virtual Machine Configuration
dialog and has its own number.
In the Source field, the virtual hard disk file (.hdd) that emulates the virtual machine hard disk
is specified. You can change the hard disk source:
To use the Boot Camp partition (p. 255) as the virtual machine hard disk, click the Source
field, and select the Boot Camp partition name from the list.
To use a virtual hard disk file as the virtual machine hard disk, click the Source field, and
choose the virtual hard disk file from the list, or click Choose an image file, and specify the
path to the desired image file (.hdd) on your Mac.
In the Location field, you can specify the type of interface for connecting the device:
IDE. Using this interface type, you can connect up to four virtual devices (hard disks or
CD/DVD drives).
SCSI. Using this interface type, you can connect up to 15 virtual devices (hard disks or
CD/DVD drives).
Note: 1. The Mac OS X guest OS does not support the SCSI controller. In the latest Linux
distributions (e.g. RHEL 5.3), the SCSI driver may be not installed. In this case, you should
install this driver in your Linux guest OS to be able to use the SCSI controller.
Configuring a Virtual Machine
209
2. The SCSI 7:0 location is not available for selecting, since it is occupied by the SCSI
controller itself.
Compressing the Disk
If you use an expanding (p. 218) virtual hard disk in your virtual machine, its image file size on
the physical hard disk increases as you add new data to the virtual hard disk. When you delete
some data from this virtual hard disk, free unused space appears on the disk, but the amount of
space your virtual machine occupies on the hard disk of your Mac does not reduce. To free the
unused space back to Mac, click the Compress button. The virtual hard disk will be compressed
and the hard disk image file size will be decreased. As a result, there will be more free space on
your Mac's hard disk.
Note: The Compress option is available for Windows virtual machines only. Compressing can
be performed for virtual machines without snapshots (p. 249) and with the Undo disks option (p.
192) disabled.
On the Optimization pane (p. 174) of Virtual Machine Configuration, you can enable regular
automatic disk compression.
Resizing the Disk
If you find that the capacity of your virtual machine's hard disk does not fit your needs anymore,
you can change its size. Click the Resize button, and the dialog for changing the disk size will
appear.
Note: If your virtual machine is running, has snapshots, or uses a Boot Camp partition as a hard
disk, its virtual hard disks cannot be resized.
Configuring a Virtual Machine
210
To change the disk size, drag the slider or type the new size in the Size field. Select the Resize
file system option if you want to change the file system size:
If you select the Resize file system option when increasing the disk size, the additional disk
space will be added to the last volume. If you clear the Resize file system option, the added
space will appear as unallocated space and will be invisible to the guest operating system.
To allocate this space, you will have to either create a new partition or expand an existing
partition. For instructions on allocating the added space, see Initializing the Newly Added
Space (p. 222).
If you select the Resize file system option when decreasing the disk size, the disk will be
decreased via removing the unallocated space and decreasing the size of the disk partitions.
If you clear the Resize file system option when decreasing the disk size, you will be able to
remove the unallocated space of the disk only and the disk partitions will remain untouched.
If you want to prevent Virtual Machine Configuration from further unauthorized changes, click
the Lock icon
at the bottom of the window. The next time someone wants to change the
settings on any pane of Virtual Machine Configuration, an administrator's password will be
required.
Network Adapter Settings
Using the Network Adapter Settings, you can change the type of networking used in your virtual
machine.
Configuring a Virtual Machine
211
Select the Connected option if you want the virtual machine to start up with this network adapter
connected.
You can choose one of the following types of networking for the virtual machine network
adapter:
Shared Networking. Select this option to enable the Network Address Translation (NAT)
feature for the virtual machine. In this case, your virtual machine will share whatever
network connection is currently used by the host computer.
See Shared Networking (p. 228) to learn how to configure this type of networking.
Bridged Networking. Select this option to allow the virtual machine to access the local
network and Internet through one of the network adapters installed on the host computer. In
this case, the virtual machine is treated as a stand-alone computer on the network and should
be configured in the same way as a real one. You can choose the physical adapter where the
virtual machine adapter will be bridged in the list below the Bridged Networking option.
See Bridged Ethernet Networking (p. 230) to learn how to configure this type of networking.
Host-Only Networking. Select this option to allow the virtual machine to connect to the host
computer and the virtual machines residing on it and to make it invisible outside the host
computer.
See Host-Only Networking (p. 231) to learn how to configure this type of networking.
In the MAC address field, you can change the MAC address currently assigned to the virtual
machine. MAC addresses are automatically generated during the virtual machine creation.
However, you can modify the default MAC address by typing another value in the MAC address
field or clicking the Generate button. When entering a new MAC address, make sure that it is
unique within your network.
WiFi Bridging Support
To be able to connect to wireless networks from your virtual machine:
1
Click the Type field.
2 Choose the AirPort adapter from the Bridged Networking list, and click OK to apply the
changes.
After you perform these steps, your virtual machine will be able to connect to the Internet
through the AirPort adapter of your Mac.
When you try to connect to the Internet via WiFi, and the WiFi Access Point has the Validate
DHCP packets option enabled, you may experience problems with connecting to the Internet. In
this case, enable the Send the host's MAC address to DHCP server option to ensure that your
virtual machine gets an IP address for accessing the Internet.
Note: Enabling the Send the host's MAC address to DHCP server option will not work with some
DHCP servers - your virtual machine may get the same IP address as the physical computer has.
If you cannot configure your virtual machine to work in the Bridged Ethernet mode, you can
consider using another networking mode: Shared Networking mode (p. 228) or Host-Only
Networking mode (p. 231).
Configuring a Virtual Machine
212
If you want to prevent Virtual Machine Configuration from further unauthorized changes, click
the Lock icon
at the bottom of the window. The next time someone wants to change the
settings on any pane of Virtual Machine Configuration, an administrator's password will be
required.
Printer Port Settings
Using the Printer Port Settings, you can configure the virtual machine's printer ports settings. A
virtual machine can have up to three printer ports.
Configuring a Virtual Machine
213
Select the Connected option if you want the virtual machine to start up with the printer port
connected.
In the Source field, the source device that emulates this printer port is specified. A printer port
can be emulated by one of the following devices:
Default printer. You can use any of the printers connected to your Mac in your virtual
machine. Click the Source field, and select the appropriate printer from the list.
By default, the HP Color LaserJet 8500 PS printer supporting PostScript is installed in
Windows virtual machines, irrespective of the real printer model and version. In most cases,
modern printers support PostScript and that is why you should disregard the printer name
you see in the Windows printing wizard and complete the procedure.
Real printer port. If your Mac has a physical printer port, you can connect it to your virtual
machine. Click the Source field, and select the physical port name from the list.
Output File. You can emulate the virtual machine printer port by using an output file. Click
the Source field, and choose an output file from the list, or click Choose an output file, and
specify the path to the desired output file on your Mac.
If you want to prevent Virtual Machine Configuration from further unauthorized changes, click
the Lock icon
at the bottom of the window. The next time someone wants to change the
settings on any pane of Virtual Machine Configuration, an administrator's password will be
required.
Configuring a Virtual Machine
214
Serial Port Settings
In the Serial Port pane, you can configure the virtual machine serial port settings.
Using serial ports, you can establish a connection between
the virtual machine and the host computer devices (using a real port) or
between two virtual machines located on the same host computer (using a socket).
If you want to connect your virtual machine to the host computer device, you should create a
serial port emulated by a real port. The Serial Port list comprises the devices on the host
computer that are available for connection. The connected device, being used in any virtual
machine, cannot be used by the host computer. To be able to use it in the host computer, you
should first disconnect it from the virtual machine. To do that, use the virtual machine status bar.
If you want to connect two virtual machines with each other, you need to create a serial port
emulated by a socket in each virtual machine. The names of the serial ports should be identical.
The connection between the virtual machines via serial ports is bidirectional. It means that the
working modes of the sockets set during the port creation can be changed later in the Serial Port
pane.
If you need to log the performance activity of your virtual machine or to record the data from it
and use this information later on, you can connect your virtual machine serial port to an output
file on the physical server. You will be able to view and analyze the activity history of the
virtual machine any time you need it by exploring this file.
You can add a new serial port to your virtual machine using Add Hardware Assistant. For the
instruction on how to create serial ports, refer to Adding and Removing Devices (p. 220).
Note: You can connect up to four serial ports to a virtual machine.
Configuring a Virtual Machine
215
Select the Connected option if you want the virtual machine to start up with the serial port
connected.
In the Source field, the source device that emulates this serial port is specified. Serial ports can
be emulated by the following devices:
Real Port. Select this option to connect the virtual machine serial port to one of the existing
serial ports on the host computer. In this case, you will need to choose the appropriate port
on the host computer in the Serial port list.
Socket. Select this option to connect two virtual machines through the sockets. When
connecting the virtual machine to a socket, you can use the default path to the socket or type
a new one in the Socket field. You can also configure the role the virtual machine will play
in the connection by selecting the necessary role in the Mode list. Selecting Server enables
you to use this virtual machine to direct the other one. Selecting Client enables you to direct
this virtual machine from the other one.
Note: If you change the socket mode of the first virtual machine, make sure that the socket
mode of the second virtual machine is also modified.
Output File. Select this option to connect the virtual machine serial port to an output file.
You can accept the default path or type your own one in the File field. You can also use the
Choose button to locate the necessary file.
If you want to prevent Virtual Machine Configuration from further unauthorized changes, click
at the bottom of the window. The next time someone wants to change the
the Lock icon
settings on any pane of Virtual Machine Configuration, an administrator's password will be
required.
Configuring a Virtual Machine
216
Sound Settings
The Sound pane of Virtual Machine Configuration allows you to configure the virtual machine
sound device parameters.
Select the Connected option to have the sound device automatically connected on the virtual
machine startup.
Use the Input list to choose the necessary device. You can choose one of the following devices:
Default. Select this option if you want to use the input device set as default in Mac OS.
Built-in Input. Select this option if you want to use one of the input devices of your Mac.
Null device. Select this option if you want to mute the input device.
Use the Output list to choose the necessary device. You can choose one of the following devices:
Default. Select this option if you want to use the input device set as default in Mac OS.
Built-in Output. Select this option if you want to use one of the output devices of your Mac.
Null device. Select this option if you want to mute the output device.
If you want to prevent Virtual Machine Configuration from further unauthorized changes, click
the Lock icon
at the bottom of the window. The next time someone wants to change the
settings on any pane of Virtual Machine Configuration, an administrator's password will be
required.
Configuring a Virtual Machine
217
USB Settings
A virtual machine can emulate only one USB controller, which provides you with the possibility
to connect up to eight USB 2.0 and eight USB 1.1 devices to the virtual machine.
In the USB Controller pane, you can see the USB devices currently connected to your virtual
machine.
If you want to prevent Virtual Machine Configuration from further unauthorized changes, click
the Lock icon
at the bottom of the window. The next time someone wants to change the
settings on any pane of Virtual Machine Configuration, an administrator's password will be
required.
Configuring a Virtual Machine
218
Support for Virtual and Real Disks
This section lists the types of disks that can be used by Parallels virtual machines and provides
the information about basic operations you can perform on these disks.
Supported Types of Hard Disks
Parallels virtual machines can use either virtual hard disks or Boot Camp partitions as their hard
disks.
Virtual Hard Disks
The capacity of a virtual hard disk can be set from 100 MB to 2 TB.
Virtual hard disks can be of either plain or expanding format. When you create a virtual
machine in Express Windows or Typical mode (in the New Virtual Machine assistant), the disk is
created in the expanding format.
plain
A plain virtual hard disk image file has a fixed size. The size is determined when the
disk is created. Plain disks can be created with the help of New Virtual Machine assistant
(the Custom mode.)
expanding
An expanding virtual hard disk image file is small initially. Its size grows as you add
applications and data to the virtual hard disk in the guest OS.
Split disks
A virtual disk of either format can be a single-piece disk or a split disk. A split disk is cut into 2
GB pieces and is stored as a single .hdd file.
Boot Camp Partitions
With Parallels Desktop, you can choose how to use your Boot Camp Windows XP, Windows
Vista, or Windows 7 operating system: to boot in it natively (via Boot Camp) or in a virtual
machine (via Parallels Desktop). A Boot Camp Windows partition can be used as a bootable
disk or as a data disk in Parallels virtual machines. For detailed information, see Using the Boot
Camp Partition in a Virtual Machine (p. 255).
Note: You cannot create snapshots or use the Undo Disks option for a virtual machine that uses
the Boot Camp partition.
CD/DVD Discs and Their Images
Parallels Desktop can access real CD/DVD discs and images of CD/DVD discs.
Parallels Desktop has no limitations on using multi-session CD/DVD discs. A virtual machine
can play back audio CDs without any limitations on copy-protected discs.
If your host computer has a recordable optical drive, you can use it to burn CD or DVD discs in
a virtual machine.
Parallels Desktop supports CD/DVD disc images in ISO, CUE, and CCD formats.
Configuring a Virtual Machine
219
Note: DMG disk images made with Mac OS X Disk Utility are also supported by Parallels
Desktop. When creating such an image, make sure you create a read-only and uncompressed
image without any encryption.
Floppy Disks and Floppy Disk Images
Parallels Desktop can use two types of floppy disks:
Real diskettes inserted into a real floppy disk drive that is connected to the virtual machine.
Floppy disk image files having the .fdd extension and connected to the virtual machine.
Parallels Desktop treats floppy disk images like real diskettes. Parallels Desktop supports floppy
disk image files that have the .fdd extension and 1.44 MB size.
With Parallels Desktop, you can also create an image of a blank floppy using the Floppy Disk
pane of the Virtual Machine Configuration dialog.
Note: Parallels Desktop cannot create images of real diskettes.
Configuring a Virtual Machine
220
Adding and Removing Devices
Adding new devices to a virtual machine is easier than connecting new devices to a real
computer. Removing or disconnecting devices is also easy. The following virtual devices can be
added to the configuration or removed from it:
virtual hard disk drive
CD/DVD drive
floppy disk drive
network adapter
serial port
printer port
sound device
USB controller
Any of the aforementioned devices can be added to the corresponding virtual machine only
when it is stopped.
Note: To be able to connect any virtual device to a real one, you should have system privileges
to access the real device. Otherwise, the real device will not appear in the list of available
devices even though it is installed on your computer.
Adding a New Device to a Virtual Machine
1
Choose Configure from the Virtual Machine menu to open Virtual Machine Configuration.
2 Click the Hardware button at the top of the Virtual Machine Configuration dialog to open the
pain for editing hardware devices.
in the bottom part of the Virtual Machine Configuration dialog, and
3 Click the Add button
select the device to be added to your virtual machine.
Note: The Add button is disabled when the virtual machine is running. You need to stop the
virtual machine before you can use this button.
Configuring a Virtual Machine
221
4 If you selected any device except for a hard disk, the corresponding device with a typical
configuration is added at once and ready for use.
If you selected a hard disk, you should specify some parameters:
The hard disk type: a new image file or an existing one. Select Boot Camp if you want to
add an existing Boot Camp partition as a hard disk to your virtual machine.
The hard disk location. Provide the path on your Mac to the existing image file or the
path and name for the new image file. By default, Parallels Desktop offers to save the
new image file in the virtual machine PVM bundle (p. 13).
The hard disk size for the new hard disk image file.
For the new hard disk image file, you can choose one of the following formats:
Expanding or Plain. By default, the hard disk will have the Plain format. To create an
Expanding hard disk, select the Expanding disk option. If you want the virtual hard disk
to be splitted, select the Split the disk image to 2 GB files option. For more information on
hard disk formats, refer to Support for Virtual and Real Disks (p. 218).
Click OK, to add the hard disk. After you added a new virtual hard disk to the virtual
machine configuration, it will be invisible to the operating system installed inside the virtual
machine until the moment you initialize it. For detailed information how to do it, see
Initializing the Newly Added Disk (p. 223).
After the new device is added, you can manage its properties as usual and start using it.
Removing Devices From the Virtual Machine Configuration
1
Choose Configure from the Virtual Machine menu to open Virtual Machine Configuration.
2 Click the Hardware button at the top of the Virtual Machine Configuration dialog to open the
pain for editing hardware devices.
3 Select the device you want to remove, and click the Remove button in the bottom part of the
Virtual Machine Configuration dialog.
, click Cancel in Virtual Machine
Note: If you accidentally click the Remove button
Configuration. Once you click OK, the device will be removed.
Configuring a Virtual Machine
222
Initializing the Newly Added Space
This section provides some general guidelines on initializing new virtual hard disks or new
space added to your existing virtual hard disks.
Configuring a Virtual Machine
223
Initializing the Newly Added Disk
After you added a new virtual hard disk to the virtual machine configuration, it will be invisible
to the operating system installed inside the virtual machine until the moment you initialize it.
Initializing the New Virtual Hard Disk in Windows
To Initialize the new virtual hard disk in a Windows guest OS, you will need the Disk
Management utility available through:
In Windows Vista: Start > Control Panel > System and Maintenance > Administrative Tools >
Create and Format Hard Disk Partitions > Disk Management.
In Windows XP: Start > Control Panel > Administrative Tools > Computer Management >
Storage > Disk Management.
When you open the Disk Management utility, it automatically detects that a new hard disk was
added to the configuration and launches Initialize and Convert Disk Wizard:
1
In the introduction window, click Next.
2 In the Select Disks to Initialize window, select the newly added disk and click Next.
3 In the Select Disks to Convert window, select the newly added disk and click Finish.
The added disk will appear as a new disk in the Disk Management utility window, but its
memory space will be unallocated. To allocate the disk memory, right-click this disk name in
the Disk Management utility window and select New Simple Volume in Windows Vista or New
Volume in Windows XP. The New Simple Volume Wizard/New Volume Wizard window will
appear. Follow the steps of the wizard and create a new volume in the newly added disk.
After that your disk will become visible in Computer/My Computer and you will be able to use it
as a data disk inside your virtual machine.
Initializing the New Virtual Hard Disk in Linux
Initializing the new virtual hard disk in a Linux guest OS comprises two steps: allocating the
virtual hard disk space and mounting this disk in the guest OS.
To allocate the space, you will need to create a new partition on this virtual hard disk, using the
fdisk utility.
Note: To use the fdisk utility, you need the root privileges.
1
Launch Terminal.
2 To list the IDE disk devices present in your virtual machine configuration, enter:
fdisk /dev/hd*
Note: If you added a SCSI disk to the virtual machine configuration, use the fdisk
/dev/sd* command instead.
3 By default, the second virtual hard disk appears as /dev/hdc in your Linux virtual
machine. To work with this device, enter:
fdisk /dev/hdc
Note: If this is a SCSI disk, use the fdisk /dev/sdc command instead.
Configuring a Virtual Machine
224
4 To get extensive information about the disk, enter:
p
5 To create a new partition, enter:
n
6 To create the primary partition, enter:
p
7 Specify the partition number. By default, it is 1.
8 Specify the first cylinder. If you want to create a single partition on this hard disk, use the
default value.
9 Specify the last cylinder. If you want to create a single partition on this hard disk, use the
default value.
10 To create a partition with the specified settings, enter:
w
When you allocated the space on the newly added virtual hard disk, you should format it by
entering the following command in the terminal:
mkfs -t <FileSystem> /dev/hdc1
Note: <FileSystem> stands for the file system you want to use on this disk. It is
recommended to use ext3 or ext2.
When the added virtual hard disk is formatted, you can mount it in the guest OS.
1
To create a mount point for the new virtual hard disk, enter:
mkdir /mnt/hdc1
Note: You can specify a different mount point.
2 To mount the new virtual hard disk to the specified mount point, enter:
mount /dev/hdc1 /mnt/hdc1
When you mounted the virtual hard disk, you can use its space in your virtual machine.
Configuring a Virtual Machine
225
Creating a New Partition in Windows
To create a new partition on the unallocated space of your virtual hard disk, you can use Disk
Management, a Windows build-in utility for partitioning hard disks. The steps below provide
instructions on partitioning the added space in Windows XP. For other Windows operating
systems, the procedure will be very similar to this one.
To create a new partition on Windows XP
1
Start the virtual machine that uses the enlarged virtual disk.
2 To start the Disk Management utility, choose Control Panel from the Start menu. Doubleclick Administrative Tools and open Computer Management. In the Storage section, select
Disk Management
or
choose Run from the Start menu and type:
diskmgmt.msc
Click OK.
3 In the Disk Management window, right-click Unallocated Capacity and choose New Partition
from the shortcut menu.
4 In the New Partition wizard Introduction window, click Next.
5 In the Select Partition Type window, select Primary partition and click Next.
6 Specify the partition size and click Next.
7 Assign a drive letter for the new partition and click Next.
8 In the Format partition window, select Format partition with the following settings. Set File
system to NTFS and Allocation unit size to Default. Type the volume name in the Volume label
field and click Next.
9 Carefully review the settings and click Finish to start formatting.
When the operation is completed, the new volume appears in the Computer Management window
and in My Computer.
Configuring a Virtual Machine
226
Creating a New Partition in Linux
In most Linux systems, you can use the fdisk utility to create a new partition and to do other
disk management operations.
Note: To be able to execute the commands necessary to create a new partition on Linux, you
must have the root privileges.
As a tool with a text interface, fdisk requires typing the commands on the fdisk command
line. The following fdisk commands may be helpful:
Options
Description
m
Displays the available commands.
p
Displays the list of existing partitions on your hda drive. Unpartitioned space is
not listed.
n
Creates a new partition.
q
Exits fdisk without saving your changes.
l
Lists partition types.
w
Writes changes to the partition table.
To create a new partition on Linux
1
Start a terminal.
2 Start fdisk using the following command:
/sbin/fdisk /dev/hda
where /dev/hda stands for the hard drive that you want to partition.
3 In fdisk, to create a new partition, type the following command:
n
When prompted to specify the Partition type, type p to create a primary partition or e to
create an extended one. There may be up to four primary partitions. If you want to create
more than four partitions, make the last partition extended, and it will be a container for
other logical partitions.
When prompted for the Number, in most cases, type 3 because a typical Linux virtual
machine has two partitions by default.
When prompted for the Start cylinder, type a starting cylinder number or press Return to
use the first cylinder available.
When prompted for the Last cylinder, press Return to allocate all the available space or
specify the size of a new partition in cylinders if you do not want to use all the available
space.
By default, fdisk creates a partition with a System ID of 83. If you’re unsure of the
partition’s System ID, use the
l
command to check it.
4 Use the
w
Configuring a Virtual Machine
227
command to write the changes to the partition table.
5 Restart the virtual machine by entering the
reboot
command.
6 When restarted, create a file system on the new partition. We recommend that you use the
same file system as on the other partitions. In most cases it will be either the Ext3 or
ReiserFS file system. For example, to create the Ext3 file system, enter the following
command:
/sbin/mkfs -t ext3 /dev/hda3
7 Create a directory that will be a mount point for the new partition. For example, to name it
data, enter:
mkdir /data
8 Mount the new partition to the directory you have just created by using the following
command:
mount /dev/hda3 /data
9 Make changes in your static file system information by editing the /etc/fstab file in any
of the available text editors. For example, add the following string to this file:
/dev/hda3 /data ext3 defaults 0 0
In this string /dev/hda3 is the partition you have just created, /data is a mount point for
the new partition, Ext3 is the file type of the new partition. For the exact meaning of other
items in this string, consult the Linux documentation for the mount and fstab commands.
10 Save the /etc/fstab file.
Expanding an Existing Partition
If you want to add the unallocated space to a partition that is not the last on this virtual hard
disk, you can use third-party applications designed to easily reorganize the hard disk drive
without losing the data on it (for example, you can use Acronis® Disk Director Suite).
Note: Acronis Disk Director Suite is provided free of charge for registered users of Parallels
Desktop for Mac. You can download the application from the Parallels Download Center
(http://www.parallels.com/download/desktop/pdfm5-en_US) page.
Configuring a Virtual Machine
228
Networking in a Virtual Machine
Parallels Desktop allows you to use three types of networking in your virtual machines:
Shared Networking (p. 228). This type of networking allows the virtual machine to use the
current network connections of your physical computer.
Bridged Ethernet (p. 230). This type of networking allows the virtual machine to use one of
the physical computer's network adapters, which makes it appear as a separate computer on
the network the physical computer belongs to.
Host-only networking (p. 231). This type of networking allows the virtual machine to access
only the physical computer and other virtual machines residing on it.
By default, the virtual machine uses Shared Networking, because configuring it requires
minimal effort from the users. The Bridged Ethernet networking mode is more complex, and
you may need to contact your system administrator to set it up properly.
Detailed information on these types of networking and the way to configure them is provided in
the following subsections.
Shared Networking
By default, all virtual machines created using the Express Windows and Typical modes are set to
work in the Shared Networking mode. In this mode your virtual machine can access other
computers on your local network and the Internet by using the IP address of the physical
computer. The virtual machine itself does not have its own IP address on the network. This
mode allows you to specify port forwarding rules (p. 60) for the virtual machines running on
your Mac, which can be especially useful when running HTTP, FTP, or other types of servers in
virtual machines.
Configuring a Virtual Machine
229
The Shared Networking mode does not require any additional configuration. With this mode
enabled, your virtual machine will share whatever network connection your physical computer
uses at the moment.
You may wish to use the Shared Network mode in the following cases:
your computer accesses the Internet via a modem or another non-Ethernet device
you need to access the Internet from inside your virtual machine but are concerned about
security
you have problems with working in the Bridged Ethernet mode
To configure your virtual machine to use Shared Networking:
1
Choose Configure from the Virtual Machine menu to open the Virtual Machine Configuration
dialog.
2 Click Hardware and select Network Adapter in the list.
3 On the Network Adapter pane, select Shared Networking from the Type list and make sure
that the Connected option is enabled.
Note: In the MAC address field, you can change the MAC address currently assigned to the
virtual machine. MAC addresses are automatically generated during the virtual machine
creation. However, you can modify the default MAC address by typing another value in the
MAC address field or clicking the Generate button. When entering a new MAC address,
make sure that it is unique within your network.
4 Click OK.
For the information about troubleshooting networking problems, refer to the Parallels
knowledge base http://kb.parallels.com/ available at the Parallels website.
Configuring a Virtual Machine
230
Bridged Ethernet Networking
When operating in the Bridged Ethernet mode, your virtual machine appears on the network as a
stand-alone computer with its own IP address and network name.
Note: The Bridged Ethernet networking mode is more complex than the Shared Networking
mode (p. 228), and you may need to contact your system administrator to configure it properly.
To configure your virtual machine to work in the Bridged Ethernet mode:
1
Choose Configure from the Virtual Machine menu to open the Virtual Machine Configuration
dialog.
2 Click Hardware and select Network Adapter in the list.
3 On the Network Adapter pane, select the adapter you want to use from the Type list and make
sure that the Connected option is enabled.
Note: In the MAC address field, you can change the MAC address currently assigned to the
virtual machine. MAC addresses are automatically generated during the virtual machine
creation. However, you can modify the default MAC address by typing another value in the
MAC address field or clicking the Generate button. When entering a new MAC address,
make sure that it is unique within your network.
4 Click OK.
If you cannot configure your virtual machine to function in the Bridged Ethernet mode, you can
consider using another networking mode: Shared Networking (p. 228) or Host-Only Networking
(p. 231).
For the information about troubleshooting networking problems, refer to the Parallels
knowledge base http://kb.parallels.com/ available at the Parallels website.
Configuring a Virtual Machine
231
Host-Only Networking
Parallels Desktop provides a closed network that is accessible only to the primary operating
system and virtual machines running on it. The primary operating system is connected to this
network via the Parallels Host-Only Networking adapter automatically created on the physical
computer during the Parallels Desktop installation. The addresses for the virtual machines
connected to this network are provided by the Parallels DHCP server.
To configure your virtual machine to use Host-Only Networking:
1
Choose Configure from the Virtual Machine menu to open the Virtual Machine Configuration
dialog.
2 Click Hardware and select Network Adapter in the list.
3 On the Network Adapter pane, select Host-Only Networking from the Type list and make sure
that the Connected option is enabled.
Note: In the MAC address field, you can change the MAC address currently assigned to the
virtual machine. MAC addresses are automatically generated during the virtual machine
creation. However, you can modify the default MAC address by typing another value in the
MAC address field or clicking the Generate button. When entering a new MAC address,
make sure that it is unique within your network.
4 Click OK.
For the information about troubleshooting networking problems, refer to the Parallels
knowledge base http://kb.parallels.com/ available at the Parallels website.
Configuring a Virtual Machine
232
Using WiFi in the Virtual Machine
Parallels Desktop provides you with an opportunity to connect your virtual machine to a
wireless network.
Using the Bridged Ethernet mode (p. 230), you can set up a WiFi connection and access the
Internet wirelessly. When operating in this mode, your virtual machine appears on the network
as a stand-alone computer with its own IP address and network name.
To configure your virtual machine to access the Internet through WiFi:
1
Choose Configure from the Virtual Machine menu to open the Virtual Machine Configuration
dialog.
2 Click Hardware and select Network Adapter in list.
3 Select Bridged Networking > AirPort from the Type list and make sure that the Connected
option is enabled.
4 Click OK.
After you perform these steps, your virtual machine will be able to connect to the Internet
through the AirPort adapter of your Mac.
Note: If the WiFi bridging does not work in your virtual machine, try to enable the Send the
host's MAC address to DHCP server option in the Network Adapter pane to ensure that the virtual
machine gets a valid IP address from the WiFi access point for accessing the Internet.
If you cannot configure your virtual machine to function in the Bridged Ethernet mode, you can
consider using another networking mode: Shared Networking (p. 228) or Host-Only Networking
(p. 231).
For the information about troubleshooting networking problems, refer to the Parallels
knowledge base http://kb.parallels.com/ available at the Parallels website.
Bridging a Virtual Machine to VLAN
If your Mac is a VLAN (virtual local area network) member, Parallels Desktop allows you to
bridge the virtual machines running on the Mac to this VLAN.
To bridge a virtual machine to the VLAN, do the following:
1
Choose Configure from the Virtual Machine menu to open the Virtual Machine Configuration
dialog.
2 Click Hardware and select the Network Adapter in the list.
3 Select Bridged Networking > VLAN from the Type list and make sure that the Connected
option is enabled.
4 Click OK.
The virtual machine will be bridged to the selected VLAN.
233
CHAPTER 9
Managing Virtual Machines
This chapter provides the information on how to change a virtual machine configuration and
how to set user preferences for a particular virtual machine or all of them.
In This Chapter
Cloning a Virtual Machine.................................................................................................... 234
Removing a Virtual Machine ................................................................................................ 236
Working With Virtual Machine Templates........................................................................... 237
Backing Up a Virtual Machine ............................................................................................. 242
Compressing Virtual Hard Disks .......................................................................................... 243
Managing Virtual Machines From iPhone ............................................................................ 244
Managing Virtual Machines
234
Cloning a Virtual Machine
An exact copy of a virtual machine can be created using Clone Virtual Machine Assistant. The
clone is a separate virtual machine that includes as many virtual hard disks as were connected to
the original machine. The assistant places the cloned virtual machine into a default folder, but
you may specify a different one.
In the virtual machine clone, the names of all the devices, drivers and virtual hard disk images
remain the same as they were in the original machine. All connections between the devices in
the cloned VM will be the same as in the original virtual machine.
If a device in the original machine was connected to an external resource, this device in the
clone will be connected to the same resource.The only exception is serial/printer port log files. If
such files are used by the original virtual machine, Parallels Desktop creates a new set of empty
log files for the clone.
If the original virtual machine has a snapshot tree, the virtual machine clone will have the same
structure of snapshots.
If a network adapter was enabled in the original configuration, Parallels Desktop generates a
new Mac address for the clone.
You can also make a clone of a clone, and give it a unique name. The resulting clone will have
the same configuration and the same devices connected as the initial clone.
Unlike snapshots (p. 249), a virtual machines and its clones are used separately and there is no
any connection between them after the clones creation. If you need to delete an initial virtual
machine from which you have made clones, you can do it without any threat to the clones.
Before cloning a virtual machine, make sure that:
The virtual machine is turned off. If the virtual machine is running, the Clone option in the
File menu is disabled.
The virtual machine has a guest OS. You cannot clone a virtual machine without a guest OS.
To make a clone of a virtual machine:
1
Open the virtual machine you want to clone.
2 From the File menu, select Clone. The Clone Virtual Machine Assistant window appears. If
you do not want the Introduction window to appear in the future, select Always skip
introduction. Click Continue.
3 In the Name and Location window, specify the name and folder for the virtual machine
clone. The name suggested by the assistant is made by adding "Copy of" to the original
virtual machine name. You can specify another name but it should not be longer than 50
characters.
To specify the location for the virtual machine clone, click the More Options item, and type
the location in the Place virtual machine files to the folder field, or use the Choose button to
locate the virtual machine clone.
Managing Virtual Machines
235
If you want to provide a quick access to the virtual machine clone, select the Create icon on
Desktop option located under the Place virtual machine files to the folder field.
To test the newly created virtual machine clone immediately after its creation, select the
Open copy in new window automatically option.
Click Clone to start cloning the virtual machine.
4 The Cloning Finished window informs you that copying has been completed successfully
and the new machine is ready. Click Done to close the assistant.
Managing Virtual Machines
236
Removing a Virtual Machine
Removing a Virtual Machine From the List
If you do not need one of your virtual machines, you can remove it from the Parallels Virtual
Machines list. You will be able to add it back to the list (p. 112) later.
To remove a virtual machine from the list, stop it if it is running and perform one of the
following actions:
Drag the virtual machine from the Parallels Virtual Machines list.
Right-click the virtual machine name in the Parallels Virtual Machines list, and select
Remove from the context menu. In the window that appeared, click Keep File.
Deleting a Virtual Machine From Your Mac
To delete a virtual machine from your Mac permanently, stop it if it is running and perform one
of the following actions:
Right-click the virtual machine name in the Parallels Virtual Machines list, and select
Remove from the context menu. In the window that appeared, click Move to Trash.
Delete its files from the disk manually. The virtual machine files are stored in the
/Users/<Username>/Documents/Parallels/ folder or in the /Users/Shared
folder by default. Each virtual machine is represented by a single PVM file.
Warning! Before deleting the virtual machine, make sure that none of the virtual machine
files (like virtual hard disk) are used by other virtual machines.
Managing Virtual Machines
237
Working With Virtual Machine
Templates
Parallels Desktop makes your work with virtual machines even more convenient by enabling
you to create templates of Parallels virtual machines.
A template, like a virtual machine, has hardware and may have operating system and software
installed. The only difference is that it cannot be started. A template can be easily converted to
an ordinary virtual machine and vice versa.
Using one template, you can create as many virtual machines as you need and the disk space of
your Mac allows. The virtual machines created using such a template will have the same
hardware configuration, operating system, and software that this template has.
You can convert an existing virtual machine into a template or make a clone of the virtual
machine that will be used as a template and continue using the original virtual machine.
Managing Virtual Machines
238
Creating a Virtual Machine Template
If you need to create a number of virtual machines with same configuration, you can create a
virtual machine template and use it to create new virtual machines.
There are two ways of creating a virtual machine template:
Convert an existing virtual machine into a virtual machine template.
Clone an existing virtual machine to a virtual machine template.
If you choose to convert a virtual machine into a template, this virtual machine will change its
operating system icon to a template icon in the list of virtual machines and it will be available as
a template only. You will not be able to run it as a virtual machine.
If you do not want to convert a virtual machine into a template but need to make a copy of it
with the same configuration, you can make a clone of this virtual machine that will be used as a
template.
To convert an existing virtual machine into a template:
1
Launch Parallels Desktop.
2 Choose the virtual machine you want to convert into a template from the list of Parallels
virtual machines.
3 Choose Convert to Template from the File menu.
4 The virtual machine will become a template and will have a different icon indicating that it
is a template.
To clone a virtual machine to a template:
1
Launch Parallels Desktop.
2 Choose the virtual machine you want to clone to a template from the list of Parallels virtual
machines.
3 Start Clone to Template Virtual Machine Assistant by choosing Clone to Template from the
File menu.
4 In the Introduction window, click Continue. To skip this window next time you start the
assistant, select Always skip introduction.
5 In the Name and Location window, specify the name and location for the virtual machine
template, and click Clone. You can use the Choose button to change the location.
By default, the virtual machine template files will be placed to the following folder on your
Mac:
/Users/UserName/Documents/Parallels/<Virtual
Machine
Template Name>/.
Managing Virtual Machines
6 In the Creation Finished window, click Done to quit the assistant.
239
Managing Virtual Machines
240
Deploying a Virtual Machine Template
A virtual machine template cannot be run as a virtual machine. To be able to run it as a virtual
machine, you should create a virtual machine that will have the same configuration as the
template has.
There are two ways of creating a virtual machine from a template:
Convert a template into a virtual machine.
Deploy a template to a new virtual machine.
If you convert a virtual machine template into a virtual machine, its icon will be moved from the
virtual machines list, and you will be able to use it as a virtual machine.
If you deploy a virtual machine template to a virtual machine, the Deploy Virtual Machine
Template assistant will create a new virtual machine, but the template will not be removed from
the Parallels Virtual Machines list.
To convert a virtual machine template into a virtual machine:
1
Launch Parallels Desktop.
2 In the Parallels Virtual Machines list, right-click the virtual machine template you want to
convert into a virtual machine, and choose Convert to Virtual Machine from the shortcut
menu.
3 The virtual machine template will be processed into a virtual machine and will change its
icon.
To deploy a virtual machine template to a new virtual machine:
1
Launch Parallels Desktop.
2 In the Parallels Virtual Machines list, click the virtual machine template you want to be
deployed to a virtual machine, and click Create or right-click the template name, and choose
Depoly to Virtual Machine from the shortcut menu.
3 Deploy Virtual Machine Template Assistant starts. In the Introduction window, click
Continue. To skip this window next time you start the assistant, select Always skip
introduction.
4 In the Name and Location window, specify the name and location for the virtual machine and
click Deploy. You can use the Choose button to change the location.
By default, the virtual machine files will be placed to the following folder on your Mac:
/Users/UserName/Documents/Parallels/<Virtual Machine Template
Name>/.
Managing Virtual Machines
5 In the Deployment Finished window, click Done to close the assistant.
The resulting virtual machine will have the same configuration that the original template had.
241
Managing Virtual Machines
242
Backing Up a Virtual Machine
Most people don't seriously consider regular backups as a necessity until they have experienced
a significant data loss. You should create your own backup strategy to protect yourself from data
loss. Virtual machines are vulnerable to crashes as well as physical computers.
You can back up your virtual machine using one or several of the following methods:
Copy the virtual machine files manually.
Clone the virtual machine with the help of Clone Virtual Machine Assistant (p. 234). Give a
descriptive name to the clone and save it in a location specially designated for backups.
Include the virtual machine files in the automatic Time Machine backups by editing the
General settings (p. 169) in the virtual machine configuration.
Use third-party backup utilities like Acronis True Image.
Copying the virtual machine files
You can locate your virtual machine in Finder and create a backup copy of the virtual machine
file (PVM).
1
In the Parallels Virtual Machines list, right-click the virtual machine name, and select Show in
Finder from the context menu. In Finder, go to the folder where your virtual machine is
stored.
2 Locate the required virtual machine PVM file.
Note: PVM file is bundle that contains the virtual machine configuration file (PVS), virtual
hard disk file (HDD), and other files. For more information about the virtual machine files,
see Parallels Virtual Machine (p. 14).
3 Copy the virtual machine's PVM file to a safe location.
Cloning the virtual machine
You can create a complete clone of the virtual machine using Clone Virtual Machine Assistant.
For details, see Cloning a Virtual Machine (p. 234).
Backing up your virtual machine using Time Machine
If you choose to back up your virtual machine with Time Machine, your virtual machine's PVM
file will be automatically backed up together with other files stored in Mac OS. As a
consequence, files stored on your virtual machine's hard disk will be also backed up, since the
virtual hard disk file (HDD) is stored inside the virtual machine bundle file (PVM).
Warning: Time Machine backups can guarantee safety only if your Parallels virtual
machines were stopped or suspended during the backup.
If you want to restore some of your Windows files, do the following:
1
Locate the backup copy of your virtual machine's file (PVM).
Managing Virtual Machines
243
2 Right-click the file, and choose Show Package Contents.
3 In the virtual machine contents window, right-click the virtual hard disk file (HDD) that is
usually named <VirtualMachine'sName>.hdd. and choose Open With > Parallels
Mounter.
4 Using Parallels Mounter, browse the contents of your virtual machine's hard disk to find the
files you need to restore.
For more information about Parallels Mounter, refer to Using Parallels Mounter (p. 267).
Using third-party backup utilities
You can use any third-party backup application you like. Registered users of Parallels Desktop
can use Acronis True Image Home for free for backing up their virtual machines. You can
download
this
application
from
Parallels
Download
Center
(http://www.parallels.com/en/download/).
Compressing Virtual Hard Disks
If you use an expanding (p. 218) virtual hard disk in your virtual machine, its image file size on
the physical hard disk increases as you add new data to the virtual hard disk. When you delete
some data from this virtual hard disk, free unused space appears on the disk, but the amount of
space your virtual machine occupies on the hard disk of your Mac does not reduce. To free the
unused space back to Mac, you can compress the virtual hard disk. The hard disk image file size
will be decreased and, as a result, there will be more free space on your Mac's hard disk.
You can compress virtual hard disks either manually or automatically:
To compress the virtual hard disk manually at any time, select Configure from the Virtual
Machine menu, click Hardware, open the hard disk setting (p. 208), and click the Compress
button.
To regularly free the unused space back to Mac, use the AutoCompress option. The virtual
hard disk in an expanding format will be reviewed twice a day, and if the unused space
occupies more than 50 percent of the hard disk image size, it will be compressed and the
hard disk image file size will be decreased. The AutoCompress option can be enabled for all
hard disks of a virtual machine in the Optimization pane (p. 174) of Virtual Machine
Configuration.
Note: Compressing of virtual hard disks can be performed for Windows virtual machines
without snapshots (p. 249) and with the Undo disks option (p. 192) disabled.
Managing Virtual Machines
244
Managing Virtual Machines From
iPhone
With the Parallels Mobile application, you can start, stop, and suspend your virtual machine or
simply view its desktop right from your iPhone when your Mac is out of reach. All you need is
to connect your iPhone to the Internet, launch the Parallels iPhone application, and establish a
connection with your Mac.
Before you try to connect your iPhone to Parallels Desktop on your Mac:
Enable the Allow connections from iPhone option in the General pane of the Parallels
Desktop Preferences (p. 48).
Contact your system administrator or Internet provider to learn the external IP address of
your Mac.
Check your short user name by entering the following command in Terminal:
whoami
Make sure that the port 64001 is not blocked by firewall. (This action is optional, since
firewall does not block port 64001 as usual.) Port 64001 is used by Parallels Desktop for
external connections.
Installing Parallels Mobile
The Parallels Mobile application can be downloaded for free from the App Store and is installed
like any other iPhone application. Just search for "Parallels Mobile" at the App Store.
Starting Parallels Mobile
You can start the Parallels Mobile application by clicking its icon on the iPhone Home screen.
Adding your Mac to the Hosts list
1
Start the Parallels Mobile application and click the add button
.
2 Specify the IP address of your Mac, your user name, and the password.
Host. In this field, specify the external IP address of your Mac.
Note: Parallels Desktop uses port 64001 for external connections. This port shouldn't be
blocked by firewall.
User Name. In this field, specify your short user name.
Password. In this field, type your password and specify if you want to save it for future
connections.
When finished, click the Save button.
Note: The computer you are trying to connect to should be turned on and have a stable
Internet connection.
Managing Virtual Machines
245
3 When the connection to your Mac is established, it will be added to the Hosts list.
Viewing and managing your virtual machines
1
Select your Mac in the Hosts list. This will open a list of virtual machines available on your
Mac.
2 The list of virtual machines displays the names of the virtual machines available on your
Mac and the types of operating systems installed in them. The virtual machines that are
currently running are indicated by this sign:
Select a virtual machine from the list to see its console window.
Managing Virtual Machines
246
3 The appearance of the virtual machine console window depends on its current state:
If the virtual machine is running, you will see its live screen shot. To refresh the screen
shot, click the refresh button
.
If the virtual machine is stopped, its screen will be black.
If the virtual machine is suspended or paused, its screen will be dimmed.
Managing Virtual Machines
247
For managing your virtual machine, use the toolbar buttons that correspond to the actions
you want to perform with this virtual machine:
- Use this button to start the virtual machine if it is stopped or to shut down it if it
is running.
- Use this button to reset the virtual machine.
- Use this button to suspend your virtual machine. When the virtual machine is
suspended, this button changes its appearance to
virtual machine.
- Use this button to pause the virtual machine. When the virtual machine is paused,
this button changes its appearance to
machine.
. Click this button to resume the
. Click this button to resume the virtual
- Use this button to refresh the virtual machine live screen shot.
When supervising applications and processes running in the virtual machine, you will need to
use the Refresh button
, since the virtual machine's screen can be refreshed only manually.
To go back to the list of virtual machines, click Virtual Machines.
Managing Virtual Machines
248
Troubleshooting the Firewall and Network Problems
Editing Firewall Settings
The settings you may need to apply to the firewall application depend on the type of firewall
you use:
Application Firewall (on Mac OS X Leopard). Go to General Preferences > Security >
Firewall and allow incoming connections to Parallels Desktop.
IPFW. Check the firewall rules list and add a new rule that will allow TCP connections to
your 64001 port from any locations.
Intego NetBarrier. Create a new rule that will allow incoming connections from the Internet
(Source) to Parallels Desktop (Service) on your Mac (Destination).
Please contact your system administrator before configuring the firewall.
Establishing a VPN connection from iPhone
If your computer is behind NAT and you have a VPN access to your LAN, you can learn how to
establish a VPN connection from an iPhone using these online resources:
http://support.apple.com/kb/HT1424 (http://support.apple.com/kb/HT1424)
http://www.apple.com/iphone/enterprise/integration.html
(http://www.apple.com/iphone/enterprise/integration.html)
http://manuals.info.apple.com/en_US/iPhone_User_Guide.pdf
(http://manuals.info.apple.com/en_US/iPhone_User_Guide.pdf)
Forwarding TCP traffic to your Mac
If your computer is behind NAT and you don't have VPN access to your LAN, you should set
port forwarding rules on your router to forward TCP traffic from certain port on your router to
64001 port on your Mac. If you want to access several Macs, you should create a separate port
forwarding rule for each Mac.
Please contact your system administrator and read the router configuration guide before
configuring the router.
249
CHAPTER 10
Working With Snapshots
A snapshot is a saved state of the virtual machine. Snapshots can be created manually or
automatically when the virtual machine is running. After you make a snapshot, you can continue
working with the virtual machine and revert to the created snapshot at any time of your work.
Snapshots are stored in the primary OS inside the virtual machine bundle (p. 14), in the
Snapshots subfolder. Each snapshot has a number of files, including the .sav file that
contains the virtual machine's state, the .mem file that contains the memory dump for the virtual
machine, and other different files of the virtual hard disk.
Note: Snapshots are not backup copies or clones (p. 234) of your virtual machine. You cannot
use them alone without your virtual machine or move them from the virtual machine bundle.
You may need to make snapshots in the following cases:
If you are configuring a software that requires a lot of settings, you may want to explore the
settings functions before selecting them. For testing the settings, create snapshots at
branching points.
If you want to mark milestones in the development process. If something goes wrong, you
can always revert to the previous state or create a branch of snapshots starting with the
particular milestone snapshot.
Note: Snapshots cannot be created for virtual machines that use the Boot Camp partition.
In This Chapter
Making Snapshots ................................................................................................................. 250
Managing Snapshots ............................................................................................................. 251
Working With Snapshots
250
Making Snapshots
Snapshots can be created manually or automatically using SmartGuard (p. 190).
Note: You cannot create a snapshot manually or automatically or revert to a snapshot when your
virtual machine is paused.
To make a snapshot manually:
1
Make sure that you completed all operations of installing, downloading, or writing to
external devices before taking a snapshot.
Note: You can create a snapshot at any time. But it is recommended to complete all
operations of installing, downloading, or writing to external devices before taking a
snapshot. You should also complete or cancel any transactions performed via the virtual
machine in external data bases.
2 Choose Take Snapshot from the Virtual Machine menu or use the Take Snapshot button
on the toolbar of your virtual machine's window. If the toolbar does not contain this
button, you can add it to the toolbar. For more information, refer to the Customizing Toolbar
section (p. 47).
Note: To make a snapshot, you can also use Snapshot Manager. Just open the manager by
choosing Snapshot Manager from the Virtual Machine menu and click the New button. A new
snapshot will be created.
3 In the Snapshot Parameters window, you can provide a name and a short description for the
snapshot. This information and the date of creation will be visible in Snapshot Manager
when you hover the pointer over the snapshot icon.
4 Click OK to take a snapshot.
After the snapshot is created, you can continue working with your virtual machine's current state
or use any of its snapshots.
To revert to a snapshot, open Snapshot Manager by choosing Snapshot Manager from the Virtual
Machine menu or by clicking the Snapshot Manager button
machine window.
on the toolbar of the virtual
To create snapshots automatically, configure the SmartGuard settings (p. 190).
Working With Snapshots
251
Managing Snapshots
You can use Snapshot Manager to revert to a specific snapshot, as well as to manage the
snapshots. To open Snapshot Manager:
Choose Snapshot Manager from the Virtual Machine menu, or
Click the Snapshot Manager button
on the toolbar of the virtual machine window.
Note: To add this button in the toolbar, you should customize it. To learn how to do that,
refer to the Customizing Toolbar section (p. 47).
Using Snapshot Manager, you can:
create new snapshots and delete the unused ones
view the snapshot tree of a particular virtual machine
select a snapshot to revert to
Note: You cannot create a snapshot manually or automatically or revert to a snapshot when your
virtual machine is paused.
Working With Snapshots
252
The Virtual Machine Snapshots window consists of the following areas:
The snapshots tree pane.
The snapshots management pane.
Snapshots Tree Pane
Snapshot icons appear as screen shots of the guest OS window if the virtual machine was
running at the time you created a snapshot.
The left icon with a flag is the root of the snapshots tree - it is the initial state of the virtual
machine used as the reference point. You cannot delete the root icon. The root icon is visible if
at least one snapshot exists. If you want to delete a snapshot which is parental for some other
snapshots, you can decide whether to delete only this snapshot or delete it with all the
subsequent snapshots.
All snapshots in the snapshots tree are descendants of the root state of the virtual machine. The
first snapshot contains "differences" with respect to the root state. The second successive
snapshot contains differences with respect to the first snapshot. You may want to return to one
of the previous snapshots and work with it. If you then create a new snapshot, a new snapshots
branch will be created.
An icon that represents the current state of the virtual machine is marked by a red flag.
When you hover the pointer over an item, you will see a tooltip message with a short
description.
Snapshots Management Pane
The snapshots management pane includes the buttons necessary for managing the snapshots.
The New button. Click this button to create a new snapshot for the present state of your
virtual machine.
The Go To button. Select the snapshot you want to go to in the snapshots tree and click this
button to move from the present state of your virtual machine to the state saved in this
snapshot.
Note: Before you go to a specific snapshot, decide what you want to do with the current
state of the virtual machine - by default, it will not be saved. To retain the changes made
since the last snapshot, make a new snapshot.
The Delete button. Select the snapshot you want to delete and click this button. If you delete
an intermediate snapshot, the information it contains will be merged into the subsequent
snapshot.
Note: You cannot delete the root icon. It disappears only when you delete all snapshots in
the tree.
You can also manage snapshots by right-clicking them in the tree:
If you right-click the icon that shows the present state of the virtual machine, you can create
a new snapshot for this state.
If you right-click any other intermediate snapshot, you can choose to go to it, to delete it
alone or with all the subsequent snapshots.
Working With Snapshots
253
Going to a Snapshot
1
Launch Parallels Desktop and open a virtual machine.
2 Open Snapshot Manager by
choosing Snapshot Manager from the Virtual Machine menu, or
clicking the Snapshot Manager icon in the toolbar of the virtual machine main window.
3 In the Virtual Machine Snapshots window, choose the snapshot and click the Go To button.
You can also right-click the snapshot and choose Go to Snapshot from the shortcut menu or
just double-click the snapshot.
Note: If, after the Parallels Desktop update, you decided to revert to one of the snapshots
made before the update, you will see the message that a new Parallels Tools update is
available. We recommend you to install them to work effectively with the virtual machine.
4 If you revert to a snapshot from an unsaved state of the virtual machine, you will see the
notification about that. Click Yes if you want to proceed without saving the state. Click No if
you want to save the state and then go to the needed snapshot.
If you want to revert to the previous snapshot made on the same branch of snapshots, use the
Revert To Snapshot option from the Virtual Machine menu or from the virtual machine main
window toolbar. If you want to know to what exactly snapshot you will revert, you can always
see your snapshots tree in Snapshot Manager (p. 251).
Note: If you revert to the previous snapshot from an unsaved state of the virtual machine, you
will see the notification about that. Click Yes if you want to proceed without saving the state.
Click No if you want to save the state and then revert to the snapshot.
After reverting to a snapshot, it is recommended to update Parallels Tools in the virtual machine.
Deleting a Snapshot
1
Launch Parallels Desktop and choose a virtual machine.
2 Open Snapshot Manager by
choosing Snapshot Manager from the Virtual Machine menu, or
clicking the Snapshot Manager button in the toolbar of the virtual machine window.
3 Select the snapshot you want to delete and click the Delete button if you want to delete only
this snapshot. If you want to delete all the snapshots that come after it, right-click the
snapshot and choose the Delete Snapshot with children option.
If you delete an intermediate snapshot, the information it contains will be merged into the
snapshot that follows it.
Note: You cannot delete the root icon, but it gets automatically deleted after you delete all the
other snapshots.
Merging Snapshots
Merging is performed automatically when you delete any snapshot except the last one in the
branch. When you delete an intermediate snapshot, the information it contains is merged into the
next snapshot of the same branch.
Working With Snapshots
254
If you delete the snapshot belonging to two branches, the information is merged into the next
snapshot of each branch.
Note: If you delete the snapshot that comes after the root icon and that belongs to two branches,
the branches will start from the initial state icon directly.
The snapshots are also merged automatically if you manage the capacity of your virtual hard
disk with the help of Parallels Image Tool. Before applying any changes to the virtual hard disk,
Parallels Image Tool merges and deletes all the snapshots except for the last one. Unlike
merging the snapshots in Snapshot Manager, the results of merging process via Parallels Image
Tool are not reflected in the snapshots tree, and the icons of already deleted snapshots are still
present in the tree.
255
CHAPTER 11
Using the Boot Camp Partition in a
Virtual Machine
This chapter provides the necessary information on using the Boot Camp partition with the
Windows XP, Windows Vista, or Widows 7 installation in a Parallels virtual machine.
In This Chapter
Overview ............................................................................................................................... 256
Creating a Virtual Machine for the Boot Camp Partition ..................................................... 258
Boot Camp Configurations ................................................................................................... 260
Booting via Parallels Virtual Machine .................................................................................. 261
Booting via Boot Camp......................................................................................................... 262
Using the Boot Camp Partition in a Virtual Machine
256
Overview
In the current version of Parallels Desktop, you can use your Boot Camp Windows Vista,
Windows XP, or Windows 7 partition as a bootable disk or as a data disk in virtual machines.
Warning: If your Boot Camp partition does not have the Windows XP, Windows Vista, or
Windows 7 operating system installed, you may damage the Boot Camp partition trying to
use it via Parallels Desktop virtual machine.
Using the Boot Camp Partition as a Data Disk
To use the Boot Camp Windows partition as a data disk, add it as a hard disk to an existing
Windows XP, Windows Vista, or Windows 7 virtual machine. The Windows operating system
will automatically recognize it as a new disk. For detailed information on adding hard disks to
Virtual Machine Configuration, see Adding and Removing Devices (p. 220).
Using the Boot Camp Partition as a Bootable Disk
If you install Parallels Desktop on a Mac computer with a Boot Camp Windows partition, and
Parallels Desktop detects that there are no virtual machines on the computer, it automatically
creates a new virtual machine for this Boot Camp partition and places it to the following
location:
<Username>/Documents/Parallels/My Boot Camp
If the Boot Camp partition is mounted to the Mac's desktop, Parallels Desktop attempts to
recognize the operating system installed on the partition and creates an appropriate virtual
machine for the recognized OS.
If the Boot Camp partition is not mounted to the Mac's desktop, or if Parallels Desktop
cannot recognize the operating system, it creates a virtual machine for Windows XP. If you
have Windows Vista or Windows 7 installed on the Boot Camp partition, you just need to
change the type of the guest OS for the virtual machine from Windows XP to Windows
Vista or Windows 7 correspondingly in the Virtual Machine Configuration (p. 168) dialog.
You can create a virtual machine for Boot Camp with the help of New Virtual Machine
Assistant. For detailed information, see Creating a Virtual Machine for the Boot Camp Partition (p.
258).
Alternatively, you can simply substitute the bootable virtual disk of an existing Windows virtual
machine with the Boot Camp partition. To do that, add the Boot Camp partition as a hard disk to
the virtual machine (p. 220) and change the boot order (p. 201) to make the virtual machine boot
from the Boot Camp disk.
Note: It is important to specify the type of the guest OS in the virtual machine correctly, in
accordance with the operating system installed on the Boot Camp partition.
When you boot into Boot Camp Windows through Parallels Desktop for the first time, Parallels
Desktop installs Parallels Tools (p. 16).
Using the Boot Camp Partition in a Virtual Machine
257
Note: Using Boot Camp Windows via virtual machine may require to re-activate the guest
operating system.
After that, you can use Boot Camp as usually to boot into the Windows partition, or you can
boot into it via Parallels virtual machine, see the Booting via Parallels Virtual Machine section (p.
261).
Limitations for Parallels Virtual Machines Using the Boot Camp Partition
There is a number of limitations for a Parallels virtual machine that uses the Boot Camp
Windows partition either as a bootable volume or as a data disk:
it cannot be suspended or paused
such a virtual machine cannot have snapshots and the Safe Mode feature (p. 126) cannot be
enabled for it
it cannot be compressed
Note: There are no limitations on types of users who can access the Boot Camp Windows
partition from a virtual machine. You can log into Windows even if you don't have administrator
rights.
Using the Boot Camp Partition in a Virtual Machine
258
Creating a Virtual Machine for the
Boot Camp Partition
To create a new virtual machine for using the Boot Camp Windows partition, do the following:
1
Boot into Mac OS X.
2 Start Parallels Desktop, and launch New Virtual Machine Assistant by clicking New in the
File menu.
3 In the Operating System Detection window, select the Boot Camp Partition option, and click
Continue.
4 In this step, define the main parameters for your virtual machine:
Name. Indicate the name to be assigned to the virtual machine. By default, the virtual
machine gets the name of the operating system that you selected to be installed in this
virtual machine. If a virtual machine with this name already exists, you will be prompted
to specify another name. The name must not exceed 50 characters.
Let other Mac users access this virtual machine. Select this option if you want to share
this virtual machine with other users of your Mac. In this case the virtual machine file
(PVM file) will be saved in the /Users/Shared folder on your Mac.
Location. In this field, specify the virtual machine files location.
Sharing. Use this field to configure access to the disks and folders on the physical
computer from inside the virtual machine. After the virtual machine creation, you can
edit these settings in the Shared Folders pane (p. 180) of Virtual Machine Configuration.
Note: If your Boot Camp is divided into several partitions, only the bootable partition will
be added to the virtual machine configuration. If you want to add the other partitions, you
should add them as separate virtual hard disks (p. 220) to Virtual Machine Configuration.
For detailed information, see Boot Camp Configurations (p. 260).
Using the Boot Camp Partition in a Virtual Machine
259
If you click the Advanced button, you can set the number of CPUs and the amount of RAM
of your future virtual machine.
When finished, click Create.
The newly created virtual machine will be accessible through Parallels Virtual Machine List (p.
36) that allows you to easily manage your virtual machines. When you boot into Boot Camp
Windows through Parallels Desktop for the first time, Parallels Desktop will install Parallels
Tools (p. 16).
After that, you can use Boot Camp as usually to boot into the Windows partition (p. 262), or you
can boot into it via the Parallels virtual machine (p. 261).
Using the Boot Camp Partition in a Virtual Machine
260
Boot Camp Configurations
When creating a Boot Camp virtual machine, you can set its configuration. There may be two
types of Parallels Boot Camp configurations:
default Boot Camp configuration and
custom Boot Camp configuration
The default Boot Camp configuration allows using only one Boot Camp partition with Windows
XP, Windows Vista, or Windows 7. The custom Boot Camp configuration allows using several
physical partitions grouped as Boot Camp disks.
If your Boot Camp is divided into several partitions, you can customize the Boot Camp
configuration. You can add one or more (up to total 4 disk drives) custom Boot Camp disks to
your virtual machine. To do that, add the Boot Camp partitions you need as separate hard disks
to Virtual Machine Configuration. For detailed information on adding devices to Virtual
Machine Configuration, see Adding and Removing Devices (p. 220).
Partitioning Schemes
Parallels Boot Camp supports disks with GPT or MBR disk partitioning schemes, but handles
them differently.
GPT is the default disk partitioning scheme used on Mac computers. Parallels Desktop can
connect partitions from such disks into a virtual machine configuration, converting this
partitioning scheme to the MBR scheme. In the virtual machine, you will see only those
partitions that were connected to the virtual machine. Other partitions will not be visible
even if they are present on a real hard disk.
Windows XP and Windows Vista are supported as bootable OSs on GPT disks.
MBR is the default partitioning scheme on personal computers. Parallels Desktop can
connect partitions (including logical disks) from such disks into the virtual machine
configuration. In the virtual machine, you will be able to see all the partitions on a real hard
disk, but will have a read/write access only to the connected ones.
Using the Boot Camp Partition in a Virtual Machine
261
Booting via Parallels Virtual
Machine
When you boot into the Boot Camp Windows partition for the first time, you may notice some
problems with the mouse and keyboard. In this case, wait while Windows configures the driver
settings to enable the devices. Follow the instructions on the first-time booting into Boot Camp
partitions with Windows XP, Windows Vista, or Windows 7.
To boot into Boot Camp partition with Windows:
1
Start your Mac computer, and boot into Mac OS X.
Note: You may be prompted to authenticate using your Mac administrator account.
2 Launch Parallels Desktop, and start the virtual machine created for using the Boot Camp
partition.
3 You may notice some problems with the mouse and keyboard; do nothing, just wait until
they become enabled.
As soon as the mouse and keyboard are enabled, Parallels Desktop initiates the Parallels
Tools installation.
4 When the installation is complete, the guest OS restarts automatically.
5 Upon booting, activate your Windows once again. You will have to reactivate it only once.
Detailed information on how to activate Windows XP and Windows Vista can be found at
http://support.microsoft.com/kb/307890
and
http://support.microsoft.com/kb/940315
correspondingly.
Warning: In case you met an error not related to the guest OS while working with virtual
machine using the Boot Camp Windows installation, restart this Parallels virtual machine
before you try to boot via Boot Camp as usual.
Troubleshooting Windows XP That Misses Drivers
When booting into Boot Camp Windows XP via the virtual machine, you may get the message
saying that Parallels Desktop cannot find necessary drivers. In this case, do the following:
1
Boot into Windows XP via Boot Camp.
2 Insert a Microsoft Windows installation disc that was used for this Windows installation.
3 Locate the folder i368 on the disc and open it. Copy the following files: driver.cab
and sp2.cab to C:\WIndows\Driver Cache\i386.
Using the Boot Camp Partition in a Virtual Machine
262
Booting via Boot Camp
After you have installed Parallels Desktop and booted for the first time into the Boot Camp
Windows partition via a virtual machine, you can continue booting into this partition as usual,
via Boot Camp. The Parallels Tools installation does not affect the Windows operating system
itself, it only helps you work with this operating system via the virtual machine.
To boot via the Boot Camp partition, start your Mac, and perform the usual actions required to
boot into Boot Camp. You'll see Windows starting up.
Warning: Before booting into the partition via Boot Camp, make sure that the Boot Camp
virtual machine is stopped.
Troubleshooting
When booting into Boot Camp, you may get a black screen with the choice of two
configurations:
Parallels
Windows XP/Vista/7
You may get an error message about the computer disk hardware configuration problem.
To troubleshoot this problem:
1
Restart your Macintosh computer, and boot into Mac OS X.
2 Start Parallels Desktop. Start the virtual machine which uses the Boot Camp Windows
installation as a bootable disk.
3 Wait while the guest OS is fully loaded and running. Shut it down.
4 Restart your Mac.
5 Try to boot via Boot Camp again. This time, booting must be successful.
Anyway, you can connect this partition as a data disk to any Windows XP/Vista/7 virtual
machine.
263
CHAPTER 12
Using Parallels Add-ons
In This Chapter
Using Parallels Transporter................................................................................................... 263
Using Parallels Mounter........................................................................................................ 267
Using Parallels Image Tool................................................................................................... 268
Using Parallels Transporter
Parallels Transporter is an easy-to-use application which helps you migrate physical or virtual
computers with the whole information they contain to Parallels virtual machines on your Mac.
This chapter contains an overview of Parallels Transporter usage scenarios and working
principles.
Parallels Transporter is provided as a Parallels Desktop utility and installed automatically during
the Parallels Desktop installation.
For the detailed information, see Parallels Transporter Help.
Parallels Transporter Working Principles
Parallels Transporter enables you to migrate physical and virtual computers or any of their
volumes into Parallels virtual machines and Parallels virtual disks.
The Parallels Transporter package includes two applications: Parallels Transporter and Parallels
Transporter Agent.
Parallels Transporter is installed on the computer that will host the resulting virtual machine
or virtual hard disk (the host computer). This application receives data from Parallels
Transporter Agent and transfers it to Parallels virtual machines or virtual disks. It also
converts third-party virtual machines into Parallels virtual machines.
Parallels Transporter Agent is installed on the remote physical computer you are planning to
migrate (the source computer). It collects essential system data on the source computer and
transfers it to Parallels Transporter using network or an external storage device.
Using Parallels Add-ons
264
Migration Scenarios
Parallels Transporter offers you several typical migration scenarios depending on the purpose of
migration. After you make up your mind and choose the scenario, you can refer to Parallels
Transporter Help for further instructions on the selected scenario of migration.
Using Parallels Transporter, you can migrate:
from a remote computer
from a third-party virtual machine
When migrating from a remote computer, you can use one of the following ways of transferring
information:
Using the Parallels USB cable. The cable is sold separately from Parallels Desktop. This is
the easiest way to perform the migration but the source computer and your Mac should be
located near each other.
Over Network. During the remote migration over network, your source and host computers
should be connected to the same network. You can also connect your computers using the
FireWire cable.
Using an external storage device. This process requires more time than migrating over
network or using the Parallels USB cable but can be useful when there is no way to connect
your source and host computers.
When migrating data from a remote Windows or Linux computer, Parallels Transporter transfers
data from the specified volume(s) of the source computer to a newly created Parallels virtual
hard disk (.hdd) and creates a virtual machine configuration file (.pvs). These two files
constitute a ready-to-use virtual machine. During the remote migration, only the active volume
(the source computer boot volume) is made bootable, and the resulting virtual machine has the
same operating system that was active during the migration. If Parallels Transporter is unable to
identify the source operating system, all source volumes are migrated as data disks.
Migrating Using the Parallels USB Cable
This is the easiest and fastest way of migration. Before starting the migration, you connect your
host and source computers with the help of the Parallels USB cable. The Parallels USB cable is
sold separately from Parallels Desktop. To use this migration scenario, you should buy this
cable. On the source computer, you have Parallels Transporter Agent installed, while the host
computer has Parallels Transporter installed.
Before you start the migration, you need to start Parallels Transporter Agent on the source
computer and Parallels Transporter on the host computer. Parallels Transporter connects to
Parallels Transporter Agent. Transporter Agent collects data on the source computer and
transfers it to Parallels Transporter. Parallels Transporter saves the source computer data in a
Parallels virtual machine or virtual disk on the host computer.
Note: This migration scenario is available for Windows Vista, Windows XP, and Windows 7
(supported experimentally) source physical computers only.
Migrating Over Network
Using Parallels Add-ons
265
Migrating over network assumes that your source computer and your Mac are connected to the
same network. On the source computer, you have Parallels Transporter Agent installed, while
your Mac has Parallels Transporter installed.
Before you start the migration, you need to start Parallels Transporter Agent on the source
computer and Parallels Transporter on your Mac. Parallels Transporter connects to Parallels
Transporter Agent. Transporter Agent collects data on the source computer and transfers it to
Parallels Transporter.
Migrating Using the FireWire Cable
For migrating the Windows XP source computers, you can also use the FireWire connection.
You can try to migrate a source computer with Linux or other Windows operating system using
FireWire, but it may require additional drivers installation or setting some parameters. For
migrating using FireWire, you should have the FireWire cable and FireWire ports in your source
and host computers. The procedure for migrating using FireWire is the same as for migratin
over network.
Migrating From a Remote Computer Using an External Storage Device
In this type of migration, Parallels Transporter Agent migrates data from your physical
Windows or Linux computer to a virtual machine whose files are saved on a USB drive or other
removable storage device connected to the source computer. Then you connect this storage
device to your Mac and launch Parallels Transporter. Parallels Transporter migrates your
resulting virtual machine or virtual disk to your Mac. After that, you open the virtual machine
files in Parallels Desktop and work with your virtual machine or connect the resulting virtual
disk to an existing virtual machine. This process requires more time than migrating over
network, but can be useful when there is no way to connect your source computer to your Mac.
Migrating From a Third-party Virtual Machine
With Parallels Transporter, you can easily migrate data from a Microsoft Virtual PC (including
Virtual PCs with preinstalled trial Windows Vista or Windows XP), VMware, or VirtualBox
virtual machine or virtual hard disk to a bootable Parallels virtual machine or Parallels virtual
hard disk. Parallels Transporter converts the third-party virtual machine files into the Parallels
format, leaving the applications and data intact. During the migration, Parallels Transporter
creates a virtual machine configuration file (.pvs) and virtual hard disk file (.hdd). These files
constitute a ready-to-use virtual machine.
You can also migrate a Microsoft Virtual PC, VMware, or VirtualBox virtual hard disk to a
bootable Parallels virtual machine if the disk has an operating system installed.
Migrating From a Boot Camp Partition
With Parallels Transporter, you can migrate your Boot Camp partition to a bootable Parallels
virtual machine or Parallels virtual hard disk for using in Parallels Desktop for Mac. There are
three methods you can use when migrating from a Boot Camp partition:
migrating within the Boot Camp partition (using an external storage device), or
migrating via the Boot Camp virtual machine, or
migrating from the Boot Camp partition of a remote Mac (the standard remote migration
procedure using the Parallels USB cable, or an external storage device, or over network).
Using Parallels Add-ons
266
Starting Parallels Transporter
Starting Parallels Transporter
To start Parallels Transporter on your Mac:
choose Import from the Parallels Desktop File menu
at the lower left corner of the Parallels Virtual Machines
or click the down arrow button
list, and select Import from the menu.
Starting Parallels Transporter Agent
To start Parallels Transporter Agent on the source computer:
In Windows, click the Windows Start menu and choose All Programs > Parallels > Parallels
Transporter Agent.
In Linux, click the Applications menu and choose System Tools > Parallels Transporter
Agent.
Using Parallels Add-ons
267
Using Parallels Mounter
Parallels Mounter – is a specially designed utility for browsing your Parallels or third-party
(VMware, VirtualBox, Virtual PC) virtual machines and virtual hard disks directly in Finder.
With the help of Parallels Mounter, you can manage the virtual machine content without starting
the virtual machine. Parallels Mounter is provided as a part of the Parallels Desktop package and
does not require separate installation.
Using Parallels Mounter
1
Browse the virtual machine files in Finder. For Parallels virtual machines, right-click the
virtual machine name in the Parallels Virtual Machines list, and select Show in Finder from
the context menu.
The
default
paths
for
storing
Parallels
virtual
machines
/Users/<UserName>/Documents/Parallels/ and /Users/Shared.
are
2 To mount the hard disk of a particular virtual machine, right-click this virtual machine's file,
and choose Open With > Parallels Mounter or Open With > Other > Library > Parallels >
Parallels Mounter from the shortcut menu. You can mount the following virtual machines
and hard disks:
Parallels bundle (.pvm) or configuration file (.pvs) or virtual hard disk file (.hdd).
VMware configuration file (.vmx, .vmwarevm) or virtual hard disk file (.vmdk).
Virtual PC configuration file (.vmc, .vpc7) or virtual hard disk file (.vhd).
VirtualBox configuration file (.xml) or virtual hard disk file (.vdi).
If you choose the PVM file of a Parallels virtual machine or the configuration file of a thirdparty virtual machine that has several virtual hard disks, all its volumes will appear as
mounted in Finder.
If you want to mount a single virtual hard disk, double-click the virtual hard disk file to
mount it with Parallels Mounter. The icon for the selected hard disk appears in the sidebar of
the Finder window, together with other Mac OS X icons.
3 To browse the contents of a volume, click its icon in the sidebar of the Finder window.
You can manage the virtual machine files just as you manage your Mac OS X files in Finder
windows.
Note: If you are browsing the contents of a suspended virtual machine in Finder, you cannot
delete, move, or otherwise modify its files.
4 To unmount the volume, use the Eject button
next to the disk icon.
Note: If a hard disk that has several volumes was mounted, and you want to open it or the
virtual machine using it in Parallels Desktop, you should disconnect its volumes one by one
by clicking the Eject button.
Using Parallels Add-ons
268
Using Parallels Image Tool
Virtual machines use virtual hard disks that are actually hard disk image files. After using your
virtual machine for some time, you may find that your virtual machine hard disk does not fit
your needs anymore, and you want to increase its capacity or change its type and properties.
Parallels designed a special utility for increasing the virtual hard disk capacity and managing its
properties - Parallels Image Tool.
Note: The virtual hard disk image file can be found inside the virtual machine's PVM bundle. In
Mac
OS
X
PVM
bundles
are
stored
in
the
/Users/<Username>/Documents/Parallels/ folder or the /Users/Shared folder
by default. To locate the virtual machine bundle, right-click its name in the Parallels Virtual
Machines list, and select Show in Fider from the context menu.
Parallels Image Tool is installed automatically during the Parallels Desktop installation.
Starting Parallels Image Tool
By default, Parallels Image Tool is installed in the following folder:
/Applications/Parallels. To launch the application, go to Applications > Parallels in
the Finder, and double-click the Parallels Image Tool icon.
Using Parallels Add-ons
269
Increasing the Virtual Hard Disk Capacity
If you find that the capacity of your virtual machine's hard disk does not fit your needs anymore,
you can increase it using Parallels Image Tool.
To increase the capacity of the virtual hard disk:
1
Start Parallels Image Tool (p. 268).
2 In the Introduction window, click Continue.
3 Specify the source virtual disk image file with the .hdd extension in the Source Virtual Disk
window. You may type the path and file name or use the Choose button to locate the file.
The virtual hard disk image file can be found inside the virtual machine's PVM bundle.
PVM bundles are stored by default:
in the /<Username>/Documents/Parallels/ folder or in the /Users/Shared
folder in Mac OS X.
in
the
C:\Documents
and
Settings\<Username>\My
Documents\Parallels\ folder in the Windows primary OS.
in the /<username>/parallels directory in the Linux primary OS.
Note: The virtual machine using this virtual hard disk should be stopped before proceeding.
4 Select the Increase the disk capacity option in the Select Action window.
5 Specify the new capacity for the disk. The Add the unallocated space to the last volume
check box, which is selected by default, means that the additional disk space will be added
to the last volume. If you clear it, the added space will appear as unallocated space. To
allocate this space, you can either create a new partition or expand an existing partition. For
instructions on allocating the added space, see the Using the Added Space section (p. 222).
Note: If you choose a hard disk used by a virtual machine that has snapshots, all snapshots,
except the last one, will be deleted.
To start the process of increasing the disk capacity, click Start. You can view the operation
progress in the Processing the File window. Clicking Cancel terminates the operation.
6 After the disk image has been successfully modified, the Execution is Completed window
appears. Click Finish to close Parallels Image Tool.
Using Parallels Add-ons
270
Managing the Virtual Hard Disk Properties
With Parallels Image Tool, you can manage the properties of your virtual machine hard disk.
You can change the virtual hard disk type from plain to expanding and vice versa, split or merge
the disk parts, or merge snapshots of the virtual machine that uses this virtual hard disk.
To change the type of the virtual hard disk:
1
Start Parallels Image Tool (p. 268).
2 In the Introduction window, click Continue.
3 Specify the source virtual disk image file with the .hdd extension in the Source Virtual Disk
window. You may type the path and file name or use the Choose button to locate the file.
The virtual hard disk image file can be found inside the virtual machine's PVM bundle.
PVM bundles are stored by default:
in the /<Username>/Documents/Parallels/ folder in Mac OS X.
in
the
C:\Documents
and
Settings\<Username>\My
Documents\Parallels\ folder in the Windows primary OS.
in the /<username>/parallels directory in the Linux primary OS.
Note: The virtual machine using this virtual hard disk should be stopped before proceeding.
4 Select the Manage disk properties option in the Select Action window.
5 In the Select Operations window, choose one or several of the following operations to
perform on the disk and click Start:
Note: The operations with the virtual hard disk are irreversible.
If the virtual hard disk image you specified is an expanding virtual hard disk, the Split
virtual hard disk image file option is selected by default.
If it is an expanding disk, you can select the Convert to Plain option.
If it is a plain disk, the Convert to Expanding option is selected by default.
If the hard disk image you selected has snapshots, the Merge snapshots option is selected
by default. You cannot clear this option.
Note: The merging process deletes all the snapshots, except the last one.
Parallels Image Tool needs to merge all the snapshots of the current virtual hard disk before
performing any actions with it. The information from all the snapshots will be merged to the
last one, and all the other snapshots will be deleted. Parallels Image Tool does not change
the snapshots tree in Snapshot Manager, so if you attempt to revert to any snapshot of the
tree, it will be no longer accessible, and you can remove it manually.
You can view the operation progress in the Processing the File window. Clicking Cancel
terminates the operation.
6 After the disk image has been successfully modified, the Execution is Completed window
appears. Click Finish to close Parallels Image Tool.
271
CHAPTER 13
Troubleshooting and Limitations
This chapter describes how to troubleshoot known issues.
In This Chapter
Getting Technical Support .................................................................................................... 271
Reporting a Problem to Parallels Team................................................................................. 272
Checking the Build Number.................................................................................................. 273
Installing Windows 98 as a Guest OS ................................................................................... 274
Using the F8 Key in Windows Virtual Machines on Mac OS X .......................................... 276
Upgrading or Installing Parallels Tools in Text Mode in a Linux Guest OS ........................ 277
Installing the GCC package and kernel sources in Linux ..................................................... 278
Memory Usage Problems ...................................................................................................... 279
Configuring Network in Linux.............................................................................................. 280
Suspending a Boot Camp Virtual Machine........................................................................... 281
Problems With Setting Up Network...................................................................................... 281
Problems With Antivirus Software ....................................................................................... 282
Getting Technical Support
If you have problems using Parallels Desktop, please first view Parallels Desktop FAQs
http://www.parallels.com/en/support/faq/.
Our friendly technical support team is ready to help. Describe your problem and submit a free
support request to the Parallels support team http://www.parallels.com/en/support/desktop/.
To find solutions for common problems, explore Parallels Knowledge Base
(http://kb.parallels.com/). This online resource comprises valuable articles about using Parallels
Desktop.
Telephone support is available on a per incident fee basis. For more information please, visit the
page of the Parallels support team http://www.parallels.com/en/support/desktop/.
Troubleshooting and Limitations
272
Reporting a Problem to Parallels
Team
To help improve the quality of Parallels Desktop, you can send problem reports to Parallels
support team. If a fatal error occurs in a virtual machine, Parallels Desktop automatically opens
the Parallels Problem Report window prompting you to send a report. If you notice an unusual
virtual machine behavior, you can create a report manually by choosing Report a Problem from
the Help menu and filling out the form. Parallels Desktop will create a status report and make a
screen shot of the running virtual machine.
Note: Parallels team collects error reports and uses them for identifying performance issues, but
does not respond to them. If you need assistance in resolving the issue, visit Parallels forum or
Support page, or log us a support call.
Troubleshooting and Limitations
273
In the Specify the problem type field, you can select the type of your problem from the list. In the
next field, you can add a short problem description. These two fields are optional.
The Technical Data option includes the .txt status report file that has been generated for the
error. The status report contains the product version and activation data, primary and guest OSs
information, virtual machine configuration and system data information, processor status, etc.
Click the Technical Data icon to view the .txt file and to choose the sections that will be added
to the report. The file is saved on your Mac. If you want to locate it, click the Go To File button.
The Guest OS Screenshot option includes the session screen shot of the guest OS in a .png
format. This option is available if you create a problem report during the virtual machine
session. Click the Guest OS Screenshot icon to see the screen shot and the path to its location on
your Mac.
The Primary OS Screenshot option includes the session screen shot of the primary OS in a .png
format. This screen shot is made and put on the primary OS desktop whenever you create a
problem report. Click the Primary OS Screenshot icon to see the screen shot.
In the Contact Name and Contact e-mail fields, type your name and e-mail. This information will
be used by the Parallels support team to address you for more technical details if needed.
Sending a Report
After you revise the problem report components, click Send Report. The report will receive its
unique id number and will be sent to the Parallels support team.
Checking the Build Number
If you are not sure what version and build of the Parallels Desktop software you are using, you
may check it on the About Parallels Desktop dialog.
To check your version and the build number:
1
Choose About Parallels Desktop from the Parallels Desktop menu.
2 The About Parallels Desktop window opens. See your version and the build number In the
upper part of the dialog.
Note: The About Parallels Desktop dialog can also provide you with the useful information about
your copy of Parallels Desktop, including the licensing information and a link to the Parallels
support web page.
Troubleshooting and Limitations
274
Installing Windows 98 as a Guest
OS
All Windows 95 and some of Windows 98 installation packages include a bootable floppy (a
startup floppy disk). The floppy is used to perform disk partitioning and formatting by means of
MS-DOS. Since modern Macs have no floppy drives, you will need an external USB floppy
drive or an image of a bootable floppy disk. Such an image can be created using third-party
tools.
If you have a bootable CD with Windows 98 installation, you may use it as is or create an ISO
image of it.
Below we describe the installation procedure for Window 98, for the case when you have a
startup floppy image and a CD with the installation files. The installation of Windows 95 is
similar to that.
Preparing a Virtual Machine for Windows 95/98 Installation
We recommend that you use a virtual machine created with a configuration typical for Windows
98 (128MB RAM and 6GB hard disk). If you created a custom configuration, check that virtual
machine's RAM and hard disk size meet particular OS's requirements.
Note. For Windows 95 do not create virtual hard disks with more than 2 Gb, they are not
supported by the system.
If you have a bootable floppy image, perform the following operations:
1
Create a typical Windows 98 virtual machine using New Virtual Machine Assistant (p. 88).
Be sure to click Done in the last step.
2 Right-click the virtual machine in the virtual machines list and choose Configure from the
context menu.
3 Click Hardware > Boot Order, and set the boot sequence to Floppy Disk, Hard disk, CD/DVD.
4 Click Floppy Disk in the Hardware tab to open the virtual floppy disk drive settings.
5 Make sure that the Connected option is selected. Specify the floppy image in the Source
section of the tab.
6 Click OK to save the virtual machine configuration.
Initial Partitioning and Formatting
1
Start the virtual machine. You will see the black screen and messages indicating the process
of booting to MS DOS.
2 When prompted, enter the following command:
fdisk
Fdisk, which is an MS-DOS utility, is used to partition hard disks and floppy disks.
3 The Fdisk options will be listed. Choose the operation to perform, the default choice is 1,
and press Return (Enter) to continue.
Troubleshooting and Limitations
275
4 Fdisk prompts you to create a partition. Select the Create Primary DOS Partition option if
you are going to have only one partition or less than four, and enter:
1
Other choices are for the case when you want to create more than four partitions.
5 Then Fdisk prompts you to define the size of the primary partition. Press Return (Enter) if
you wish to create a partition of the maximum size available.
To define other size type N and press Return (Enter). You will be prompted to specify the
size.
6 Fdisk creates the partition and then prompts you to restart the computer (virtual machine).
7 Reboot the virtual machine using the same image of the boot floppy disk. That is, press
Ctrl+Alt keys to release the keyboard input and then click the Shut Down button to stop the
virtual machine. Then click the Start button.
8 When the booting is complete, you should format the system drive C:.
Enter the following command:
format c:
Confirm that you want to format the disk C: when prompted. Type y and press
Return(Enter).
You may be prompted to choose how exactly to format your disk. Windows 95/98 supports
FAT16 and FAT32 file systems.
FAT16 partition can not be greater than 2 GB. Larger disks can be formatted with FAT32.
But do not use larger disks if you are going to run legacy applications.
The program starts formatting the disk C:.
Format other disks too (if you created more than one primary partition or if you created a
custom virtual machine with more than one disk). Use E:, F: drive letters.
9 Enter a label for each disk (11 character string). The label is optional, you can press Return
(Enter) to skip this step.
10 Shut down the virtual machine.
Now you are ready to start the installation of the WIndows 98 operating system.
General steps of Windows 98 installation
1
Start the virtual machine using the same bootable floppy image.
2 Insert the Windows 98 installation CD, or connect an ISO image of the installation disc
choosing CD/DVD > Connect Image from the Devices menu.
3 If you created only one primary partition (disk C:), by default, your CD/DVD drive will
have the drive letter D:. Type the command:
D:\setup.exe
and press Return(Enter). The installation starts, and the files are copied from the CD to the
virtual hard disk.
4 Follow the on-screen instructions of the Setup. Note that you can add or remove some
options later.
5 Read and accept the License Agreement. Enter the license key.
6 Confirm the default system directory or specify another one.
Troubleshooting and Limitations
276
7 In the Setup options dialog choose the type of installation. Typical is recommended.
8 (only for Windows 98) If you are going to use networking, select the network card when
prompted.
9 Turn off the virtual machine.
10 Eject the installation CD or disconnect the ISO image.
11 Choose Configure from the Virtual Machine menu, go to Hardware > Boot Order, and set the
boot sequence to Hard Disk, Floppy Disk, CD/DVD. Click OK to save the configuration.
12 Restart the virtual machine. This time, it will boot from the hard disk.
Using the F8 Key in Windows Virtual
Machines on Mac OS X
If you have Mac OS X Leopard as a primary operating system, you may encounter problems
when trying to use the F8 key or Ctrl+Arrow keys combinations in a Windows virtual machine.
It happens, because in Mac OS X Leopard, the F8 key and Ctrl+arrow key combinations are
reserved for the Spaces utility.
Possible solutions:
Click the Keyboard icon on the virtual machine's status bar and choose F8.
Change the Spaces utility hotkeys settings. To learn how to do it, refer to Mac OS X
Leopard documentation.
Troubleshooting and Limitations
277
Upgrading or Installing Parallels
Tools in Text Mode in a Linux Guest
OS
After upgrading to Parallels Desktop 4 or 5, the X Server may fail to start in Linux virtual
machines. To fix the problem, you need to install Parallels Tools in text mode.
1
Start the virtual machine.
2 When you see a message about X Server that failed to start, switch to another virtual console
using Ctrl+Alt+F1 and enter your login details.
3 Choose Install Parallels Tools from the Virtual Machine menu to connect the Parallels Tools
ISO image to your virtual machine.
Note: If the Install Parallels Tools option is grayed out, make sure that Parallels Tools can be
installed in your guest operating system. To see the list of guest OSs supported by Parallels
Tools, refer to the Parallels Tools Overview section in Parallels Desktop User's Guide.
The prl-tools-lin.iso image file will be connected to the virtual machine's
CD/DVD drive.
4 In the virtual machine console, type the following command to gain the root privileges:
su
5 Check if the Parallels Tools CD image is mounted by entering
mount | grep iso9660
If this command does not return anything, proceed to the next step.
If this command returns anything like
/dev/cdrom on /media/cdrom type iso9660 (ro,exec,nosuid,nodev,uid=0),
skip the next step and proceed to the following one.
If this command returns anything like
/dev/cdrom on /media/cdrom type iso9660 (ro,noexec,nosuid,nodev,uid=0)
with the noexec option present in parentheses, you need to unmount the disc using the
following command and then proceed to the next step:
umount /dev/cdrom
6 To mount the Parallels Tools installation disc image, enter the following:
mount -o exec /dev/cdrom /media/cdrom
Note: /dev/cdrom is the virtual machine's CD/DVD drive and /media/cdrom is the
mount point for this device. In some of the Linux operating systems the virtual CD/DVD
drive may appear as /dev/hdb and the mount point /mnt/cdrom. Some Linux OSs do
not have the CD/DVD drive mount point. In this case, you should create the mount point
directory manually.
7 When the installation disc image is mounted, change the directory to the CD/DVD drive
directory using
cd /media/cdrom/
8 In the CD/DVD drive directory, enter the following to launch Parallels Tools installation:
./install
Troubleshooting and Limitations
278
Note: You must have the root privileges to run this command.
9 Follow the Parallels Tools Installer instructions to complete the installation.
10 When the installation of Parallels Tools is complete, restart your virtual machine.
For general information about installing Parallels Tools in Linux, refer to Installing Parallels
Tools in a Linux Guest OS (p. 103).
Installing the GCC package and
kernel sources in Linux
When installing or upgrading Parallels Tools in a Linux virtual machine, you may need to install
the gcc package and kernel sources in your Linux guest OS. Kernel sources can be either
downloaded from the Internet, or installed from Linux distribution disks.
To install the gcc package and kernel sources in the RHEL/Fedora/CentOS Linux distribution,
enter the following command in a terminal:
yum install gcc kernel-devel
make
To install the gcc package and kernel sources in the Debian/Ubuntu Linux distribution, enter the
following command in a terminal:
apt-get install gcc make linux-headers-$(uname -r)
For information how to install the gcc package and kernel sources in other Linux distributions,
refer to the corresponding Linux distribution documentation.
If you still experiencing problems, try to find a solution in Parallels Knowledge Base
(http://kb.parallels.com/)
or
refer
to
the
Parallels
support
team
http://www.parallels.com/en/support/desktop/.
Troubleshooting and Limitations
279
Memory Usage Problems
The amount of the host computer physical memory required for each virtual machine operation
can be represented as follows:
Virtual Machine Memory = Guest OS Memory + Video Memory + Virtual Machine Monitor
Memory
Guest OS Memory is the amount of RAM available to your guest OS. You can configure the
guest OS memory amount in the Memory pane (p. 169) of Virtual Machine Configuration.
Video Memory is the amount of physical memory available to the virtual machine's video
card. You can adjust the video memory amount in the Video pane (p. 203) of Virtual
Machine Configuration.
Virtual Machine Monitor is the module responsible for the guest operating system
virtualization. It consumes memory to peform operations of guest virtual devices and hadle
virtual paging emulation. The amount of memory required for the Virtual Machine Monitor
operation depends on the guest OS and varies from 50 MB to 200 MB.
You can configure the whole amount of physical memory available for all running virtual
machines in the Memory tab (p. 63) of the application Preferences.
Memory Overcommitment
If you have several virtual machines running at a time, and you are trying to start one more
virtual machine, you can come across the memory over commit. The application will inform you
with the corresponding message. This means that all your running virtual machines require more
memory that is configured in the Memory tab (p. 63) of the application Preferences. If you start
one more virtual machine, this may significantly slow down all your virtual machines. To solve
this problem, you can:
stop one or several of your running virtual machines, or
edit your virtual machines' configurations to make them consume less memory, or
edit the application memory preferences to allocate more memory to your virtual machines.
Troubleshooting and Limitations
280
Configuring Network in Linux
When setting up network in Linux, you may need to configure the DHCP client to send the
virtual machine's ID in DHCP requests. For information on how to configure your DHCP client,
refer to the DHCP client documentation.
For example, in Red Hat Linux guest OSs, you need to edit the DHCP client configuration file.
1
Open the dhclient.conf file and make sure that the following lines are present.
interface "eth0" {
send dhcp-client-identifier 1:<MAC address>;
}
2 If there are no such lines, add them manually to the file and save it.
When the dhclient.conf file contains these lines, DHCP client sends the virtual machine's
ID to the DHCP server. The DHCP server sends an IP address in response.
Tip
To locate the dhclient.conf file, in a terminal, enter:
strings /sbin/dhclient | grep etc | grep dhclient.conf
or:
rpm -ql dhclient
Troubleshooting and Limitations
281
Suspending a Boot Camp Virtual
Machine
Be default, you cannot suspend your Boot Camp virtual machine. Booting the operating system
of a suspended Boot Camp virtual machine natively (not through the Boot Camp virtual
machine) will seriously damage the Boot Camp partition, making it unusable. As a result, all
data on your Boot Camp partition may be lost.
If you still want to be able to suspend your Boot Camp virtual machine, do the following:
1
Open the virtual machine configuration (for example, by choosing Virtual Machine >
Configure), click the Hardware button at the top of the Virtual Machine Configuration dialog,
and click Boot Order in the sidebar.
2 Type the following in the Boot flags field:
disp.allow_to_suspend_bootcamp_vm=1
3 Click OK to save the settings.
With this system flag in the virtual machine configuration, you will be able to suspend your
Boot Camp virtual machine.
Warning! Be sure not to use your Windows Boot Camp partition natively when your Boot
Camp virtual machine is suspended: this may damage the Boot Camp partition.
If you want to disable this option, modify the boot flag as follows:
disp.allow_to_suspend_bootcamp_vm=0
Problems With Setting Up Network
After the creation of a Parallels virtual machine, you can connect it to the internet or set up the
desired mode of the network. You can do that using the Virtual Machine Configuration dialog (p.
168). You can also refer to the Networking in a Virtual Machine section (p. 228) for more details.
However, if you meet difficulties with setting up the desired mode or just unable to access the
Internet,
you
can
refer
to
the
Parallels
support
team
http://www.parallels.com/en/support/desktop/ for a qualified assistance.
Troubleshooting and Limitations
282
Problems With Antivirus Software
Because of the close integration with the host operating system, some actions performed by the
Parallels Desktop processes may be detected as malicious by the antivirus software installed on
your Mac.
However, such actions are necessary to ensure the proper functioning of Parallels Desktop. That
is why you should prevent the antivirus software from blocking them. If you do not want the
alerts to appear in future, perform a full system scan using the antivirus software and add these
processes to the list of trusted ones if no viruses are detected. To find out how to do it, refer to
your antivirus software Help.
Note: The names of Parallels Desktop processes usually start with prl or parallels.
Glossary
283
Glossary
This glossary defines terms and spells out abbreviations used in Parallels Desktop
documentation. References to terms defined elsewhere in the glossary appear in italics.
Administrator. A user with administrative privileges.
Activation key. A unique set of symbols that activates the Parallels Desktop application on your
Mac and lets you use the Parallels Desktop functionality to its full extent.
Active operating system. The operating system where Parallels Transporter Agent is launched.
Active volume: The volume of the physical source computer that is used as a boot volume for the
active operating system.
Bootable hard disk. A disk used by the operating system to boot from, usually a disk that has an
operating system installed.
Boot Volume. A hard disk partition from which the operating system boots.
Boot Camp partition. A partition on the hard disk of your Mac that can be used for installing a
Windows operating system on it (for Mac host computers only).
Bridged networking. Virtual machine network connection mode that enables the virtual machine
to appear as any other computer on the network, with it own IP address and network name.
Configuration file. A file specifies the virtual machine's hardware configuration, the devices it
uses, and other settings. It is created automatically when you create a new virtual machine. See
also PVS file.
CPU. Stands for central processing unit. It is an internal part of the computer. See also
Processor.
Disks in the old format. Disks of virtual machines that were created in Parallels Desktop 2.5 and
earlier or Parallels Workstation 2.2.
Disks in the new format. Disks of virtual machines that were created or used in Parallels
hardware virtualization products starting from version 3.0.
Expanding format. A virtual hard disk format. An expanding virtual hard disk image file resides
on your host computer and is small initially. Its size grows as you add applications and data to
the virtual machine.
FireWire connection. A wired connection that enables a high-speed data transmission between
computers.
Guest operating system (guest OS). An operating system installed inside your virtual machine.
Glossary
284
Host computer: The computer that is used to run virtual machines. In case of Parallels Desktop
for Mac, it is your Mac. In case of Parallels Desktop for Windows or Parallels Desktop for
Linux, it is the Windows- or Linux-based physical computer where Parallels Desktop is
installed. In the Parallels Transporter documentation, this term may define the computer that
hosts the result of migration.
Hot key. A user-defined key or combination of keys that provides quick access to applications
and commands. See also Shortcut.
HDD file. During the creation, the virtual machine acquires a virtual hard disk file with the .hdd
extension. See also virtual hard disk file.
Host-only networking. Virtual machine network connection mode that creates a private network
between the host computer and its virtual machines, which makes the virtual machines available
from the host computer only.
ISO Image. A special file that contains the entire contents of a CD or DVD disc commonly used
to install an operating system.
Image file. A single file containing the complete contents and structure of a data storage medium
or device, such as a hard disk drive, CD, or DVD.
IP address. A unique address that is assigned to a physical computer or a virtual machine that
participates in computer networking.
Linux computer. A physical computer that has a Linux operating system installed.
Merged disk. A split disk whose parts were merged into a single disk.
Migration. The process of transferring data from a physical computer or a third-party virtual
machine into a Parallels virtual machine or virtual disk.
OS. An operating system.
Parallels Desktop for Mac. An application that enables you to create, manage, and use virtual
machines on your Mac.
Parallels Desktop for Windows. An application that enables you to create, manage, and use
virtual machines on a Windows-based physical computer.
Parallels Desktop for Linux. An application that enables you to create, manage, and use virtual
machines on a Linux-based physical computer.
Parallels Explorer. An application that enables you to browse and manage the contents of your
virtual machines without starting them.
Parallels Image Tool. An application that enables you to manage the capacity and properties of
your virtual machine's hard disk.
Parallels Mounter. An application that enables you to to browse the contents of your virtual
machines and virtual hard disks directly in Mac OS X Finder.
Parallels Tools. A set of Parallels utilities that ensures a high level of integration between the
primary and the guest operating systems.
Glossary
285
Parallels Transporter. An application that uses data of a physical or virtual computer for creating
a Parallels virtual clone of this physical or virtual computer. The resulting virtual machines can
be used with Parallels Desktop.
Parallels Transporter Agent. An application that collects data on a physical computer and
transfers it to Parallels Transporter installed on your Mac.
Parallels Desktop. An application that enables you to create, manage, and use virtual machines
on a Windows or Linux computer.
PCIe device. A video or network adapter corresponding to the PCI Express computer expansion
card standard introduced by Intel in 2004.
Plain format. A virtual hard disk format. A plain virtual hard disk image file resides on the host
computer and has a fixed size that cannot be changed.
Preboot Execution Environment (PXE). An environment to boot computers using a network
interface independently of available data storage devices (like hard disks) or installed operating
systems.
Primary operating system (primary OS). Operating system that controls the I/O devices of the
computer and that is loaded when the physical computer is turned on. It is the operating system
of the physical computer where the Parallels Desktop application is installed.
Processor. The central processing unit, or CPU. It is an internal part of the computer.
PVS file. A virtual machine configuration file that contains information about the virtual machine
resources, devices and other settings.
Shared networking. Virtual machine network connection mode that allows the virtual machine to
use the host computer network connections. In this mode, the virtual machine is invisible to
other computers on the network the host computer belongs to.
Shortcut. A user-defined key or combination of keys that provides quick access to applications
and commands. See also Hot key.
Snapshot. A copy of the virtual machine state at a particular point of time. The files related to
snapshots are stored in a special subfolder in the virtual machine's folder.
Source computer or source operating system: The computer that you are going to migrate data
from. On physical source computers, Parallels Transporter Agent should be installed.
System disk. A floppy disk that allows your computer to load the operating system.
Split disk. A split disk is cut into 2 GB pieces, but is stored as a single HDD file. Split disks
allow you to transfer the data stored on a split disk piece by piece using a USB drive or other
media that have limited space and cannot store a large virtual hard disk image file.
Terminal. In Mac OS and GNU/Linux operating systems, a utility that enables you to access the
command line.
Virtual hard disk (virtual disk). A file or group of files that emulates the virtual machine's hard
disk.
Glossary
286
Virtual machine. The computer emulated using Parallels Desktop. A virtual machine has its own
virtual hardware and requires an operating system to control its hardware. The installed
operating system and its applications are isolated inside the virtual machine and share physical
hardware resources of the host computer.
Third-party virtual machine. A virtual machine created in a third-party virtualization product, that
can be converted to Parallels virtual machines with the help of Parallels Transporter.
Virtual Machine Configuration. Like any physical computer, a virtual machine has it's own
configuration which is set during the creation and can be later modified. The virtual machine
configuration settings are stored in a PVS file.
Virtual machine files. Files stored in a virtual machine folder. A virtual machine has at least two
files: configuration file and virtual hard disk file.
Virtual hard disk file. During the creation, the virtual machine acquires a virtual hard disk file
with the .hdd extension. This file performs the functions of a real hard disk. See also HDD file.
Virtual machine template. A virtual machine that can be cloned to multiple virtual machines that
will have the same configuration and data that the virtual machine template had.
VM. See Virtual Machine.
Windows computer. A physical computer that has a Windows operating system installed.
287
Index
3
3D acceleration - 132, 203
A
About Parallels Desktop - 8
About Parallels Image Tool - 268
About Parallels Mounter - 267
About Parallels Transporter - 263
About Parallels Transporter Agent - 263
Accessing shared folders - 155
Activating Parallels Desktop - 20
Activation key - 20, 283
Active corners - 196
Active operating system - 73, 95, 283
Active volume - 283
Adaptive hypervisor - 174
Adding
existing virtual machine - 112
hardware devices - 220
new virtual machine - 76
Parallels Desktop icon to the Dock - 30
shared applications - 160
shared folder - 155
web applications - 165, 186
Windows Applications folder to the Dock 184
Adding existing virtual machine - 112
Address
IP address - 60
MAC address - 210
MAC address in cloned virtual machine 234
Adjusting reserved memory - 63
Administrator - 283
Administrator passwords - 64
Aero - 194
Allocating resources - 174
Animation - 50
Appearance preferences - 50
Apple Remote - 134, 200
Automatic snapshots - 190
Automatic update check - 26
B
Backing up virtual machines - 190, 242, 249
Time Machine backup - 169
Bonjour
setting up a Bonjour printer - 138
Boot Camp partition
booting via Boot Camp - 262
booting via virtual machine - 261
creating virtual machine for - 258
customizing Boot Camp configuration - 260
GPT and MBR partitioning schemes - 260
using as bootable disk - 256, 261
using as data disk - 256
Boot sequence - 95, 201
Bootable hard disk - 283
Bridged Ethernet networking - 210, 228, 230,
283
Browsing virtual disks
in Finder - 166
Browsing virtual machines
Show in Finder option - 36
using Parallels Mounter - 267
Build number - 273
C
CAC reader - 141
Camera
iSight - 141
Caps Lock - 53, 127
CD/DVD-ROM drive
adding - 220
removing - 220
setting up - 206
Changing
administrator password - 79
configuration at runtime - 145
default folder for virtual machines - 48
toolbar icons set - 47
view modes - 122
Checking for updates - 25
Clipboard Syncronization Tool - 98
Clips - 131
Cloning virtual machine - 234
Coherence mode
Index
animated transition - 50
Coherence settings - 194
SmartSelect - 148
switching to Coherence mode - 122, 148
using Trash - 148
Configuration file - 14, 283
Configuration of a virtual machine
creating configuration - 76
editing configuration - 168
Connect USB devices automatically - 57, 217
Connecting
CAC reader - 141
CD/DVD-ROM drive - 206
CD/DVD-ROM image - 206
floppy disk drive - 205
printer - 72, 136
serial port - 214
sound device - 216
USB device - 141
Converting to template - 237
Copying - 167
CPU
in virtual machine - 14, 169
Creating
Boot Camp virtual machine - 255
custom virtual machine - 90
typical virtual machine - 88
virtual hard disks - 220
virtual machine - 31, 36, 71
Creating new partition
in Linux - 226
in Windows - 225
Crystal mode - 152
Custom Boot Camp configuration - 256
Custom virtual machine - 90
D
Data disk for Boot Camp partition - 255
Default folder for virtual machines - 48
Default key combinations - 53
Deleting virtual machine - 236
Devices
adding to virtual machine - 220
configuring virtual machine - 201
emulated in virtual machine - 14
removing from virtual machine - 220
DHCP scope - 60, 228
Disk format
changing - 268
checking - 218
Disk size - 208
reducing - 268
Dock
288
adding Parallels Desktop icon - 30, 50
using the Dock in Coherence mode - 148
Documentation feedback page - 12
Dragging files
between OSs - 147, 167
DVD-ROM drive
adding - 220
configuring - 206
connecting and disconnecting at runtime 44, 145
removing - 220
E
Editing virtual machine configuration - 168
Enabling 3D acceleration - 203
Exchanging data - 167
Expanding disks - 218
Expanding partition - 227
Exploring virtual machines - 166, 267
Expose
using with Windows applications - 148
Express guest OS installation - 79, 84
F
F8 key - 276
FDD - 14, 205
Feedback - 12, 70
Files
gragging files and pictures - 167
sharing files - 155
snapshot files - 14
virtual machine files - 14
FireWire connection - 264
Floppy disk drive
connecting - 220
setting up floppy disk - 205
Floppy disk image - 95, 274
using in virtual machine - 14, 218
Folder - 48, 88, 90
default folder for virtual machines - 48, 88
for cloned virtual machine - 234
for custom virtual machine - 90
sharing folder - 155, 180
Windows Applications folder - 184
Folders and files
copying - 167
deleting - 148, 159
opening - 162
Full Screen mode
Index
Active corners - 196
animating transition - 50
key combination for switching - 53
switching to Full Screen - 53, 122
use all displays in full screen - 125
view modes - 122
G
General preferences - 48
Gestures - 134, 200
Getting info - 11
Getting support - 271, 272
Guest operating system - 8
Custom installation - 90
definition - 283
Express Installation - 79, 84
installing Parallels Tools - 97
integrating guest and host OSs - 147
supported guest operating systems - 73, 95
Typical installation - 88
H
Hard disk
adding hard disk - 220
compressing hard disk - 174, 208
configuring hard disk - 208
formats and types - 14, 218
IDE and SCSI interfaces - 208
resizing hard disk - 208
using Boot Camp as hard disk - 208, 258
viewing hard disk content - 267
Hard disk image
creating new hard disk image - 208
expanding hard disk image - 218, 268
types and formats of hard disk image - 218
Hardware - 201, 203, 205, 206, 208, 210, 212,
214, 216, 217, 220
Hardware requirements - 16
HDD file - 14, 218, 283
Help menu - 11, 43
Hidden messages - 48
Host computer
definition - 283
hardware requirements - 16
software requirements - 16
Host-only networking - 231, 283
Hot keys - 53, 127, 283
Installation modes
custom - 90
express - 79, 84
typical - 88
Installing
guest operating system - 95
Parallels Desktop - 17
Parallels Image Tool - 268
Parallels Tools - 97
Parallels Transporter - 263
Windows - 79, 95
Windows 98 - 274
Windows applications - 128
Intel Virtualization Technology (VT-x) - 13
Interface - 35
menubar - 43
status bar - 44
toolbar - 39, 47
virtual machines list - 36
welcome window - 31
Internet access - 228
IP address - 60, 231
iPhone - 67, 244
iSight - 141
K
Key combinations - 53, 127, 276
Keyboard and mouse
capturing and releasing - 121
F8 key in Windows guest OS - 276
keyboard preferences - 53
keyboard shortcuts - 53, 127
mouse preferences - 53
L
Launching
Parallels Image Tool - 268
Parallels Mounter - 267
Parallels Transporter - 266
Linux
creating new partition - 226
Express Linux installation - 84
installing Parallels Tools - 98, 103
printing - 139
supported versions - 73
Local file sharing - 155
Log messages - 48
I
M
IDE devices in virtual machine
CD/DVD-ROM - 206
hard disks - 208
in virtual machine - 53, 127
Increasing hard disk capacity - 269
MAC address
generating address - 210
in cloned virtual machine - 234
in virtual machine - 210
MacLook theme - 154, 177
289
Index
Making screen shots - 131, 133
Making snapshots - 190, 249
Managing hard disk properties - 208, 270
Manual update check - 27
Memory
in virtual machine - 14, 169, 279
limit for all virtual machines - 63
overcommit - 279
required on host computer - 16
video memory - 203
Memory allocation - 63, 169, 203
Microphone USB - 141
Migrating - 263
entire virtual machine - 264
physical computer - 264
single virtual disk - 264
third-party virtual computer - 264
Migrating over network - 264
Migration - 263
Modality
key combination - 122
setting up - 198
Motherboard - 14
Mounting
SmartMount - 188
Windows disks on the Mac OS desktop 155, 166
Mouse
mouse wheel horizontal scrolling - 121
Right-click options - 53
synchronization - 98
Mouse syncronization tool - 98
MS-DOS
supported versions - 73
N
NAT - 228
Network adapter
networking in virtual machine - 228
Parallels network adapter - 210
setting up network adapter - 60, 210
Network preferences - 60
Network printer - 139
Networking
Bridged Ethernet - 210, 230
Host-only - 231
Shared Networking (NAT) - 60, 210, 228
WiFi - 232
O
OpenGL - 132, 203
Operating system
290
guest OSs requirements - 73
installing in virtual machine - 76, 77, 95
primary OSs requirements - 16
P
Parallel port
configuring - 212
Parallels Desktop
activating - 20
installing - 17
menus - 43
preferences - 47
registering - 22
starting - 30
toolbar - 39, 47
uninstalling - 28
updating - 25
Parallels download center - 17
Parallels Image Tool
creating new partition - 225, 226
increasing hard disk capacity - 269
managing hard disk properties - 270
Parallels Internet Security - 129
Parallels network adapter - 210
Parallels Tools
installing in Linux - 103
installing in Mac OS X - 106
installing in Windows - 101
overview - 98
uninstalling - 111
updating - 109
Parallels Transporter
migrating from remote computer - 264
migrating locally - 264
migration scenarios - 264
migrationg from third-party virtual machine
- 264
starting migration - 266
Parallels Virtual Machines list - 36
Partition
Boot Camp partition - 255
creating new in Linux - 226
creating new in Windows - 225
expanding existing parition - 227
Passwords - 64, 84, 179
Pausing virtual machines - 119, 184
Permanent activation key - 20
Plain disks - 218
Port forwarding - 60, 228
Preferences - 47, 119
Index
Appearance preferences - 50
Feedback preferences - 70
General preferences - 48
iPhone preferences - 67
Keyboard and mouse preferences - 53
Memory preferences - 63
Network preferences - 60
Security preferences - 64
Speech preferences - 65
Update preferences - 68
USB preferences - 57
Primary operating system
definition - 283
supported primary OSs - 16
Printer
setting up a Bonjour printer - 138
setting up a network printer - 243
setting up a printer in virtual machine - 136
sharing Mac printer - 137
Printer port - 212
Printing
printing - 139
printing in FreeBSD - 139
printing in Windows - 139
printing with Bonjour - 138
Processor
emulated in virtual machine - 14
required on host computer - 16
PVS file - 14
R
RAM
allocation for Parallels Desktop - 63
in virtual machine - 14
limit for all virtual machines - 63
required on host computer - 16
Registering Parallels Desktop - 22
Releasing keyboard and mouse - 121
Remapping keys - 53
Removing
icons from toolbar - 47
Parallels Desktop - 28
Parallels tools - 111
snapshots - 251
virtual machine - 236
virtual machine from list - 236
Reporting problems - 271, 272
Requirements
system - 16
Resetting virtual machines - 117
Resolution changing tool - 39, 98, 196
Restoring hidden messages - 48
Resuming virtual machines - 117
Right-click options - 53
Running
virtual machines - 116
S
Safe Mode - 126, 192
SAV file - 14, 119
Screen animation - 50
Screen shots
for problem reports - 272
of guest operating system screen - 133
Screen tearing - 203
SCSI devices - 14
Searching Parallels disks - 166
Security settings - 64, 129, 179
Serial port
configuring - 214
Setting preferences - 47
Setting up a printer - 136
Shared Applications - 160, 184
Shared Folders
setting up shared folders - 180
using shared folders - 155
Shared folders tool - 98
Shared networking (NAT) - 228, 283
Shared web applications - 165, 186
Sharing
files and folders - 155
Windows disks to Mac OS - 155, 166
Show applications in the Dock - 50, 184
SmartGuard - 190
SmartMount - 188
SmartMouse - 121, 177
SmartSelect - 148, 162
Snapshot Manager - 251
Snapshots - 249
deleting - 251
making - 250
managing - 251
merging - 251
reverting to the last - 251
snapshot icons in toolbar - 39, 47
working with - 249
Socket - 214
Software license agreement - 17
Software requirements - 16
Sound device - 216
connecting - 220
disconnecting sound device - 220
Sound driver - 98
Sound options - 216
Split disks - 14, 268
Starting
291
Index
migration - 263
Parallels Desktop - 30
Parallels Transporter - 266
virtual machine - 36
Startup mode - 172
Status bar
connecting and disconnecting devices - 44,
145
usage - 39, 44
Stopping virtual machine - 117
Sun Solaris
supported versions - 73
Support - 271
Supported file formats and systems - 218
Supported guest operating systems - 73
Suspending virtual machine - 119
Switching between view modes - 122
Synchronizing
Palm OS device with guest OS - 128
Screen Vertical Synchronization - 203
System requirements - 16
T
Technical support - 271, 272
Third-party images - 264
Time synchronization between OSs - 177
Time Machine - 169, 242
Toolbar - 39
changing the icon set - 39, 47
Touchpad - 134, 200
Transporter - 263
Trial activation key - 20
Troubleshooting - 271
Turning off virtual machine - 117
Typical virtual machines
creating typical virtual machine - 88
U
Update check - 25
Updating Parallels Desktop - 25
automatically - 26
manually - 27
Updating Parallels Tools - 109
Upgrade activation key - 24
URL handling - 186
USB
configuring USB - 217
connecting USB devices - 141
using USB devices in virtual machine - 141
User registration form - 20
V
Video driver, Parallels Tools - 98
View modes - 122, 125, 148, 152
View Mode Menu - 39, 44
Virtual appliance - 115
Virtual hard disk
backing up data - 249
browsing in Mac OS - 166
configuring - 208
creating new virtual hard disk - 208
disk formats - 14
expanding virtual hard disk - 14
HDD file - 14, 283
IDE and SCSI interfaces - 208
increasing capacity - 269
managing properties - 270
mounting in Finder - 155
split hard disk - 218
using Boot Camp - 255
Virtual machine
backing up - 242
booting from Boot Camp - 262
changing default folder - 48
cloning - 234
color - 36
creating - 71
deleting - 236
main window - 39
making snapshots - 249
name - 88, 90, 169
networking - 228
opening - 36
pausing - 119
resetting - 117
resuming - 117
saving state - 249
shutting down - 117
starting - 117
suspending - 119
using USB devices - 141, 217
virtual machine files - 14
Virtual machine technology overview - 13
VirtualPC virtual machine
migrating data from - 114, 263
using in Parallels Desktop - 112
VMware virtual machine
migrating data from - 114, 263
using in Parallels Desktop - 112
W
Web applications - 165
Welcome screen - 31
WiFi - 232
Window view mode - 122
Windows
292
Index
Express installation - 79
printing in Windows - 139
supported versions - 73
Windows applications
Parallels Tools - 98, 101
Windows applications folder - 14, 152, 184
Windows disks folder - 14
Windows taskbar
in Coherence mode - 148
Windows Vista
creating virtual machine in Boot Camp 258
Express installation - 79
Windows XP
creating virtual machine in Boot Camp 258
Express installation - 79
using from Boot Camp - 255
293