1
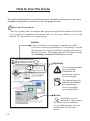
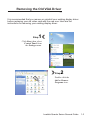
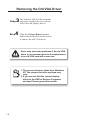
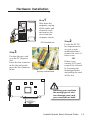
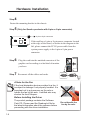
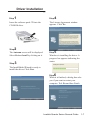
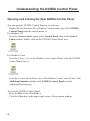
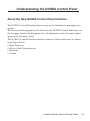
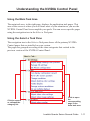
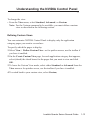
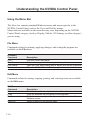
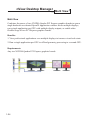
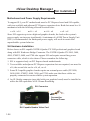
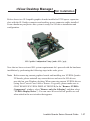
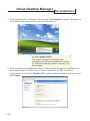
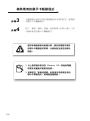
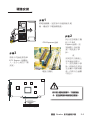
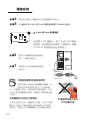
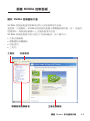
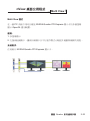
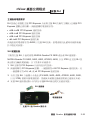
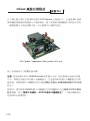
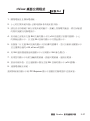
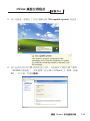
Quadro Series
General Guide
Contents
1-1 Leadtek Quadro Series
General Guide (English)
2-1 麗臺 Quadro 系列通用手冊
(繁體中文)
Copyright
2009 Leadtek Research
Inc. All rights reserved.
No part of this document may be copied
or reproduced in any form or by any
means without the prior written consent of
Leadtek Research Inc.
Leadtek makes no warranties with respect
to this documentation and disclaims any
implied warranties of merchantability,
quality, or fitness for any particular
purpose. The information in this
document is subject to change without
notice. Leadtek reserves the right to make
revisions to this publication without
obligation to notify any person or entity
of any such changes.
Leadtek Research Inc.
Leadtek Taipei
Tel : +886 2 8226 5800
Fax : +886 2 8226 5801
18F 166 Chien-Yi Rd., Chung Ho City,
Taipei County 23511, Taiwan
Web : http://www.leadtek.com
email : [email protected]
Technical Support : [email protected]
Leadtek Shanghai
Leadtek (Shanghai) Research Inc.
5F Block B 1618 Yi-Shan Rd., Shanghai,
China
Tel : +86 21 6406 9880
Fax : +86 21 6406 8991
Leadtek Quadro Series General Guide
Version C
June 2009
P/N: W05G0352
Code: LR26xx
ENGLISH
Leadtek Quadro Series General Guide
Contents
1-2
1-3
1-5
1-7
1-8
How to Use this Guide
Removing the Old VGA Driver
Hardware Installation
Driver Installation
Understanding the NVIDIA
Control Panel
1-17
Accomplishing NVIDIA
Control Panel Tasks
1-24
1-32
nView Desktop Manager
NVIDIA Software for
Professionals
1-33
Appendix
1-33
1-33
1-34
FCC Statement
Technical Support
Recycling Information
Note: The latest user's guide
can be found on the driver CD
or downloaded from
http://www.leadtek.com
Leadtek Quadro Series General Guide
1-1
How to Use this Guide
This guide will familiarize you with the general information necessary for the more
advanced configuration and use of your new graphics card.
Symbols and Conventions
There are symbols and conventions that appear throughout this manual to help draw
your attention to important information and for your more effective use of this
manual. The figure below is a sample page.
Header
There is a header on each page to remind you which
section the current page belongs to. It also helps you find
the information you need without struggling through the
table of contents. This header indicates this page is under
the Switching to Standard VGA Driver section.
Symbols
Before installing your new graphics card,
it is recommended that you set your
display to use the standard VGA driver
before removing your legacy VGA card.
Here are the instructions for setting your
display driver as standard VGA driver:
L
Skip this section if your computer
runs on Windows NT 4.0 or Windows
2000. Only Windows 95/98 users
need to set the Standard VGA driver.
Step
The exclamation mark
gives important
information on
precautions and how
to avoid damage.
1
First click the right key of your mouse
on the desktop. A fly-out will appear on
your desktop as shown in the figure on
the right. Then click on Properties, the
highlighted field in the figure.
Windows 95/98 users
may encounter problems
if the VGA driver is not
changed to the Standard
VGA driver prior to the
installation of a new
VGA card.
Step
The magnifying glass
indicates information
you should take a
closer look before
proceeding further.
2
The Display Properties dialog box
appears on the screen as shown. Now
click on the Settings tab.
Step
3
The Settings sheet turns on
top of the dialog box. Click on
the Advanced button.
Arrow
Step
4
Another dialog box appears. Click on the
Adapter tab to reveal the sheet of display
property that controls the VGA driver.
1-2
The hollow arrow is
intended to impersonate
the cursor on your computer
screen, indicating the area you
should click on with your
mouse.
Removing the Old VGA Driver
It is recommended that you remove or uninstall your existing display driver
before replacing your old video card with the new one. Here are the
instructions for removing your existing display driver:
Step
1
Click Start, then select
Control Panel from
the Settings menu.
Step
2
Double-click the
Add or Remove
Programs icon.
Leadtek Quadro Series General Guide
1-3
Removing the Old VGA Driver
Step
The window will list the programs
3 currently
installed in your system.
Select the old display driver.
Step
4
Click the Change/Remove button.
Follow the instructions on the screen
to remove the old VGA driver.
Users may encounter problems if the old VGA
driver is not removed prior to the replacement
of an old VGA card with a new one.
1. The screen shots are taken from Windows
XP. The screens for other systems may
vary.
2. If you can not find the current display
driver in the ADD or Remove Programs
window, Please ignore this section.
1-4
Hardware Installation
Step
1
Shut down the
computer; unplug
all the cables and
electrical cords;
and remove the
cover from the
computer chassis.
PCI Express slot
Step
3
Position the new card
over the PCI Express
slot.
Insert the bus connector
in the slot and gently
press the bus connector
down.
System motherboard
Step
2
Locate the PCI-E
bus expansion slot
on your system
mortheboard and
remove the cover if
there is one.
OR
If there is an
existing VGA card,
remove the old card
by loosening the
mounting bracket
and pulling the card
off the slot.
Inserting your card into
the wrong type of slot
can damage your card,
your computer or both.
PCI Express slot
Leadtek Quadro Series General Guide
1-5
Hardware Installation
Step
4
Fasten the mounting bracket to the chassis.
Step
5 (Only for Quadro products with 6-pin or 8-pin connector)
6-pin or 8-pin connector
If the card has a 6-pin or 8-pin power connector located
at the edge of the board, as shown in the diagram to the
left, please connect the PCI-E power cable from the
system power supply to the 6-pin or 8-pin power
connector.
6
Plug the cord into the matched connector of the
graphic card according to what kind of monitor
you have.
Step
7
Reconnect all the cables and cords.
r
To onito
m
Step
A Note for the Fan
If the heat dissipation device provided is a fan, it
is subject to damage if not properly handled. It is
important not to put pressure on the axle or
handle the fan by the axle. A shifted axle may
shorten the fan's lifespan.
Before Installing the Driver
The product package contains the Software
Pack CD. Please read the Readme.txt file for
the latest information about the software before
proceeding with the driver installation.
1-6
Do not handle the
fan by the axle.
Driver Installation
Step
1
Insert the software pack CD into the
CD-ROM drive.
Step
Step
4
The License Agreement window
appears. Click Yes.
2
The Autorun screen will be displayed.
Select Driver Install by clicking on it.
Step
3
Step
5
Windows is installing the driver. A
progress bar appears indicating the
status.
The InstallShield Wizard is ready to
install the driver. Click Next.
Step
6
When it is finished, a dialog box asks
you if you want to restart your
computer. Tick Yes and then Finish.
Leadtek Quadro Series General Guide
1-7
Understanding the NVIDIA Control Panel
Opening and Closing the New NVIDIA Control Panel
You can open the NVIDIA Control Panel in several ways:
• Right‐click the Windows XP or Windows Vista desktop, then click NVIDIA
Control Panel from the context menu, or
For Windows XP
• From the Windows Start menu, select Control Panel, then in the Control
Panel window, double‐click on the NVIDIA Control Panel icon.
For Windows Vista
• From the Classic View of the Windows Vista Control Panel, click the NVIDIA
Control Panel icon, or
• From the Control Panel Home view of the Windows Vista Control Panel, click
Additional Options and then click NVIDIA Control Panel from the
Additional Options page.
To close the NVIDIA Control Panel,
• From the File menu, select Exit, or
• Click the Close box in the upper right corner of the program window.
1-8
Understanding the NVIDIA Control Panel
About the New NVIDIA Control Panel Interface
The NVIDIA Control Panel provides an easy-to-use interface for managing your
system.
When you start the program for the first time, the NVIDIA Control Panel opens to
the first page listed in the navigation tree. On subsequent visits, the control panel
opens to the last page visited.
The NVIDIA Control Panel user interface consists of these main areas, as shown
in the figure below:
·
Main Task Area
·
Select a Task Navigation tree
·
Menu bar
·
Toolbar
Leadtek Quadro Series General Guide
1-9
Understanding the NVIDIA Control Panel
Tool Bar
Menu Bar
Select a Task Pane
1-10
Control Panel Main Task Area
Understanding the NVIDIA Control Panel
Using the Main Task Area
The main task area, in the right pane, displays the application task pages. This
area of the screen is where you will focus most of your attention as you use the
NVIDIA Control Panel to accomplish your goals. You can access specific pages
using the navigation tree in the Select a Task pane.
Using the Select a Task Pane
The navigation tree in the Select a Task pane shows all the primary NVIDIA
Control pages that are installed on your system.
The pages are grouped according to the same categories that existed in the
previous version of the NVIDIA Control Panel.
Click to expand
or collapse the
category list.
Click to open
the
corresponding
page in the
main task area.
Leadtek Quadro Series General Guide
1-11
Understanding the NVIDIA Control Panel
Using the Tool Bar
The Toolbar provides quick back and forth navigation between pages, and also
lets you choose a view setting.
Using the Navigation Buttons
The back and forward buttons let you navigate sequentially among pages that you
have visited.
You can also navigate directly to a previously visited page by clicking the list
arrow next to the back button. The drop‐down menu lists all the previously visited
pages in the queue. Click the page that you want.
Working with Views
The currently selected view determines what options are available. There are
three available views:
• Standard
• Advanced
• Custom
Most commands are available for both Standard and Advanced views. However,
some options are available only if the Advanced view is selected before opening
the application category page. Also, task page options may be different depending
on the selected view. If the command you’re looking for is not displayed, return to
the home page, select a different view, and return to the task page.
1-12
Understanding the NVIDIA Control Panel
To change the view:
• From the View menu, select Standard,Advanced,or Custom.
Note: For the Custom command to be available, you must define a custom
view as described in the following section.
Defining Custom Views
You can customize NVIDIA Control Panel to display only the application
category pages you want to see and use.
To specify which the pages to display:
1 Select View > Define Custom View... or for quicker access, use the toolbar if
you have it enabled.
2 On the Create Custom View page, for each application category that appears,
select (check) the check boxes for the pages that you want to view and click
OK.
3 To leave the Custom View mode, select either Standard or Advanced from the
View menu or for quicker access, use the toolbar if you have it enabled.
4 To switch back to your custom view, select Custom.
Leadtek Quadro Series General Guide
1-13
Understanding the NVIDIA Control Panel
Using the Menu Bar
The Menu bar contains standard Windows menus and menus specific to the
NVIDIA Control Panel, such as the View and Profiles menus.
Menus that are available on the menu bar may vary, depending on the NVIDIA
Control Panel category (such as, Display, Mobile, 3D Settings, or other category)
you are using.
File Menu
Commands related to printing, applying changes, and exiting the program are
available on the File menu.
File Menu
Command
Print...
Print Preview...
Print Setup...
Exit
Description
Print the current task page.
Preview the page before sending it to the printer.
Open the Print Setup dialog box to adjust your printer properties
Close the NVIDIA Control Panel program.
Edit Menu
Commands related to cutting, copying, pasting, and selecting items are available
on the Edit menu.
Edit Menu
Command
Cut
Copy
Paste
Select All
1-14
Description
Cut the selected text and place in the clipboard.
Copy the selected text and place in the clipboard.
Paste the text currently in the clipboard to the location of the
Windows cursor.
Select all items on the current page.
Understanding the NVIDIA Control Panel
View Menu
Commands related to viewing the various pages in the NVIDIA Control Panel
application modules are available on the View menu.
View Menu
Command
Standard
Description
Select to view and access the majority of commonly used and
simpler tasks in the NVIDIA Control Panel applications. When
the Standard command appears with a check mark, this means
that the Standard view is currently active on your NVIDIA Control
Panel.
Advanced
Select to view and access certain complex tasks in the NVIDIA
Control Panel applications. These tasks often require some
advanced experience using graphics hardware and software
(drivers). When the Advanced command appears with a check
mark, this means that the Advanced view is currently active on
your NVIDIA Control Panel.
Custom
Select to choose a custom view. This command appears on the
View menu only if you have used the Define Custom Views
command to customize showing / hiding specific screens.
Define Custom View To see only those application pages you want to see and use
based on the application modules (Display, 3D Settings, etc.)
that are installed on your system, select Define Custom Views
from the View menu.
Add Desktop Context This is selected by default, and adds the NVIDIA Control Panel
Menu
menu item to the desktop context menu.
Show Notification
(Windows XP only) Select to show the NVIDIA Control Panel
Tray Icon
notification tray icon in the Windows taskbar notification area.
Clicking the NVIDIA Control Panel notification icon offers a quick
way to configure key NVIDIA Control Panel settings.
Help Menu
Commands related to accessing help, system information, and copyright and
version information are available on the Help menu.
Help Menu Command
NVIDIA Control Panel Help
System Information
About NVIDIA Control Panel
Description
Access the NVIDIA Control Panel online help.
View detailed information about your system and the
NVIDIA Control Panel configuration.
View NVIDIA Control Panel version and copyright
information.
Leadtek Quadro Series General Guide
1-15
Understanding the NVIDIA Control Panel
Category-Specific Menu
The menus appear only when certain category pages are open.
Profiles Menu
Commands related to saving, loading, and deleting profiles are available on the
Profiles menu.
Profiles Menu
Command
Description
Load...
Load a profile of display settings you have previously saved. Click to
open the Load Desktop Profile dialog box and select a .nvp file.
Save...
Save the current configuration to a profile file. Click to open the Save
Desktop Profile and enter a name and path for the .nvp file.
Delete...
Delete a profile. Click to open the Delete Desktop Profile dialog box
and locate a profile to delete.
Display Menu
This menu item appears only when a Display category page is open.
Menu Command
Identify Displays
Description
Select to identify the displays configured with your system.
3D Settings Menu
This menu item appears only when a 3D Settings category page is open.
Menu Command
Description
Show SLI Visual Indicators Select to verify that SLI rendering is enabled and working.
Workstation Menu
This menu item appears only when a Workstation category page is open.
Menu Command
Refresh View
1-16
Description
Select to refresh the graphical representation of the
displays and graphics cards installed on your system.
Accomplishing NVIDIA Control Panel Tasks
Starting the NVIDIA Control Panel
1 Launch the NVIDIA Control Panel:
·
Right-click the Windows desktop, then click NVIDIA Control Panel from
the context menu, or
Under Windows XP:
a From the Windows Start menu, select Control Panel
b In the Control Panel window, double-click the NVIDIA Control
Panel icon.
Under Windows Vista:
a Click the Start icon, then from the Start menu click Control Panel
b From the Classic View of the Windows Vista Control Panel, click the
NVIDIA Control Panel icon, or
From the Control Panel Home view of the Windows Vista Control Panel,
click Additional Options and then click NVIDIA Control Panel from the
Additional Options page.
Leadtek Quadro Series General Guide
1-17
Accomplishing NVIDIA Control Panel Tasks
The categories that appear in the Select a Task pane depend on which NVIDIA
software is installed on your system. For example, the Mobile category is not
available on desktop systems.
2 From the navigation tree in the Select a Task pane, click one of the links to
open a specific task page.
Each category in the navigation tree lists different tasks that you can
accomplish, and each task page provides instructions on how to accomplish
what you want.
Move the cursor over listed options to see a description and typical usage
scenario for that option.
Detailed instructions for each task are also available through the online help.
1-18
Accomplishing NVIDIA Control Panel Tasks
Accomplishing NVIDIA Control Panel Tasks
Guide to Locating Tasks
The following table lists the page in the NVIDIA Control Panel where you can
find controls for accomplishing various graphics driver tasks.
Feature
Advanced Timings
Antialiasing
Application Profiles
Color Depth
Custom Timings
Desktop Color Settings
Driver Settings
Desktop Overlap
Frame Synchronization
HDTV Setup
Multi-display configuration
nView Clone Mode
nView Span Modes
NVIDIA Control Panel
Category - Page
Notes
Display - Manage Custom
Resolutions
3D Settings - Manage 3D
Settings
3D Settings - Manage 3D
Settings
Display - Change Resolution
Display - Manage Custom
Resolutions
Display - Adjust Desktop
Color Settings
3D Settings - Manage 3D
Settings
Workstation - Adjust Edge Not available with
Overlap
Windows Vista.
Workstation - Synchronize Not available with
Displays
Windows Vista.
Requires NVIDIA Quadro
G-Sync card.
Video & Television - Change
the Signal or HD Format
Display - Set Up Multiple
Displays
Display - Set Up Multiple
Displays
Display - Set Up Multiple
Not available with
Displays
Windows Vista.
Leadtek Quadro Series General Guide
1-19
Accomplishing NVIDIA Control Panel Tasks
Feature
NVRotate
Performance and Quality
Settings
PowerMizer
Refresh Rate Settings
Resolution Settings
Screen Position on CRT
Screen Position on TV
SDI (Graphics to SDI Output)
SLI Configuration
Temperature Settings
TV Setup
Video Color Settings
Overclocking
1-20
NVIDIA Control Panel
Category - Page
Notes
Display - Rotate Display
3D Settings - Adjust Image
Settings with Preview
Mobile - Change
Available only with
PowerMizer Settings
notebook computers
Not available with
Windows Vista.
Display - Change Resolution
Display - Change Resolution
Display - Move CRT Screen
Position
Video & Television - Adjust
Screen Size and Position
Workstation - Send
Not available with
Graphics to SDI Output
Windows Vista
3D Settings - Set SLI
Configuration
Performance
Requires NVIDIA System
Tools software
Video & Television - Change
the Signal or HD Format
Video & Television - Adjust
Video Color Settings
Video & Television - Adjust
Video Image Settings
Performance
Requires NVIDIA System
Tools software
Accomplishing NVIDIA Control Panel Tasks
NVIDIA Control Panel Groups
This section provides an overview of the NVIDIA Control Panel groups.
Using the Display Category Pages
Note: For Windows Vista - Support for some features under Windows Vista is
in development and may not be available with your ForceWare graphics
driver version. Consult the release notes for the latest list of unsupported
features.
The actual tasks available on your system depend on your system hardware, such
as the number and type of displays connected. Use the Display category pages to:
• Run the wizard to optimize your display configuration
• Change the display resolution
• Change the scaling on your flat panel display
• Adjust color settings
• Rotate the display
• Adjust custom timings (available under Advanced View)
• Configure multiple displays, including Spanning or Clone modes.
Note: Spanning modes will not be available under Windows Vista.
Leadtek Quadro Series General Guide
1-21
Accomplishing NVIDIA Control Panel Tasks
Using the Video & Television Category Pages
Note: For Windows Vista - Support for some features under Windows Vista is
in development and may not be available with your GeForce graphics
driver version. Consult the release notes for the latest list of unsupported
features.
The actual tasks available on your system depend on your system hardware, such
as whether or not you have a TV connected. Use the Video & Television page to:
• Adjust your television picture quality and video color settings for the
bestpossible viewing in its environment
• Enable full screen video mirroring so that you can view full screen video
content on one display while the other display has the smaller video window
with visible controls
• Change the position and size of the desktop/video to best fit your television or
HDTV (high definition television) screen
• Change the signal format to use for your standard television or HDTV as well
as change country-specific signal or the HDTV format
Using the 3D Settings Category Pages
Note: For Windows Vista - Support for some features under Windows Vista is
in development and may not be available with your ForceWare graphics
driver version. Consult the release notes for the latest list of unsupported
features.
The actual tasks available on your system depend on your system hardware, such
as whether or not you have an SLI‐ready system. Use the 3D Settings page to:
1-22
Accomplishing NVIDIA Control Panel Tasks
• Change the image and rendering settings of your 3D applications and games
that utilize Direct3D and OpenGL technology
• Assign specific 3D settings to a game so that these settings automatically load
when a game is launched (available under Advanced view)
• Set up your SLI or multi-GPU configuration
Note: GPU temperature monitoring and GPU overclocking features are not
included in the 3D Settings page in Release 95 and later. To use this
functionality you must install NVIDIA nTune software.
Using the Workstation Category Pages
The Workstation category is available if you have an NVIDIA Quadro FX
graphics card installed.
Note: For Windows Vista - Workstation features under Windows Vista are in
development and may not be available with your ForceWare graphics
driver version. Consult the release notes for the latest list of unsupported
features.
The actual tasks available depend on which NVIDIA Quadro FX product you
have installed. Use the Workstation page to:
• Synchronize your displays using frame sync or genlock technology
• View a graphical representation of the displays and graphics cards installed on
your system.
• Manage serial digital interface (SDI) output (requires NVIDIA Quadro FX SDI
solution.)
• Overlap the edges of adjacent displays.
Note: Display edge blending is no longer available.
Leadtek Quadro Series General Guide
1-23
nView Desktop Manager
Multi View
Multi View
Combines the power of two NVIDIA Quadro PCI Express graphics boards to span a
single hardware-accelerated OpenGL application window across multiple displays,
run a single application per GPU with multiple display outputs, or enable other
flexible usage of two PCI Express graphics boards.
Benefits:
1. View professional applications over multiple displays to increase visual real estate.
2. Run a single application per GPU to offload geometry processing to a second GPU.
Requirements:
Any two NVIDIA Quadro PCI Express graphics boards.
1-24
nView Desktop Manager
SLI Installation
SLI (Scalable Link Interface) technology allows users to install and benefit from two
PCI Express graphics boards in a single PC.
SLI Frame Rendering
Combines two PCI Express graphics boards with an SLI connector to transparently
scale application performance on a single display by presenting them as a single
graphics card to the operating system.
Benefits:
1. Visual simulation, broadcast, and video applications that are fill rate-limited will
benefit from using the split frame rendering (SFR) mode.
2. SPECviewperf and other applications that are geometry-limited will benefit from
using the alternate frame rendering (AFR) mode.
Requirements:
1. Two identical NVIDIA Quadro FX boards (5800, 5600, 4800, 4700X2, 4600, 3800,
and 3700)
2. SLI connector
SLI FSAA Mode
Combines two PCI Express graphics boards to drive one monitor with higher image
quality.
Benefits:
1. Expand single screen image quality (higher FSAA) : up to 32X FSAA
2. Example applications: VisSim (Flight, Architectural), Product/Industrial Design
review (Auto, Aero), some broadcast apps (VizRT, Brainstorm)
Leadtek Quadro Series General Guide
1-25
nView Desktop Manager
SLI Installation
Motherboard and Power Supply Requirements
To support SLI, your PC motherboard must be PCI Express-based and SLI-capable,
with two available and adjacent PCI Express expansion slots. Both slots must be x16
mechanical with the following allowed electrical slots:
x16 + x16
x16 + x8
x16 + x4
x8 + x8
Since SLI supports up to two high-end graphics boards, the load on the system's
power supply can increase significantly. A minimum of a 450W Power Supply Unit
(PSU) is recommended. An inadequate power supply will result in erratic and
unpredictable system behavior.
SLI Hardware Installation
Below shows an SLI-capable NVIDIA Quadro FX 3800 professional graphics board
along with SLI Hardware Bridge Connector. The NVIDIA Quadro FX 5800, 5600,
4800, 4700X2, 4600, and 3700 also support SLI and require an auxiliary power
connector cable, which is also shown. Please remember the following:
1. SLI is supported only on PCI Express-based motherboards.
2. Two available and adjacent PCI Express expansion slots are required, one must be
x16, the second slot can be x16, x8, or x4.
3. Some SLI capable graphics boards require an external power cable (FX 5800,
5600, 4800, 4700X2, 4600, 3800, and 3700) make sure that these cables are
properly connected to ensure reliable system operation.
4. An SLI bridge connector (provided with your graphics board) must be installed to
utilize the full capabilities of SLI Frame Rendering.
SLI Connector
Connect for
External Power
SLI Capable Quadro Video Card
1-26
nView Desktop Manager
SLI Installation
Below shows two SLI-capable graphics boards installed in PCI Express expansion
slots with the SLI bridge connector and auxiliary power connector cables installed.
From a hardware perspective this system is ready for SLI driver installation and
configuration.
Now that we have reviewed SLI system requirements let's proceed with the hardware
installation by performing the following steps in the order given.
Note: Before removing current graphics boards and installing two NVIDIA Quadro
FX boards, please uninstall any current drivers and save the SLI drivers
provided on your Windows desktop. When removing current NVIDIA drivers
(using Start/Control Panel/Add or Remove Programs), please make sure to
ONLY REMOVE NVIDIA DISPLAY DRIVER (In the "Remove NVIDIA
Components" window, select "Remove only the following" and then select
"NVIDIA Display Driver"). You can erase all saved nView profiles as well
when asked in the next window that appears.
Leadtek Quadro Series General Guide
1-27
nView Desktop Manager
SLI Installation
1. Power off the system and remove the power cord from the power supply.
2. Gently remove or open the systems enclosure (refer to owners manual that came
with your computer if necessary).
3. Perform the installation in a static safe environment and utilize a properly
grounded anti-static wristband. Place any static sensitive components in anti-static
bags.
4. If a non-SLI capable graphics board occupies the x16 expansion slot, carefully
remove it and replace it with your SLI-capable graphics board.
5. Install the second SLI-capable graphics board in the adjacent slot, you may also
need to relocate a card and the chosen slot must be x16, x8 or x4 capable.
6. Connect the two graphics boards with the SLI bridge connector (used for SLI
Frame Rendering only).
7. If your graphics boards have an auxiliary power connector, connect them to the
power supply using the supplied power connector cables.
8. Replace the system's cover and reconnect your display(s) to the SLI-capable
graphics board installed in the x16 expansion slot.
9. Plug the power cable back into the system
If you removed an existing graphics board, or any other PCI Express expansion
boards during this installation place them into antistatic bags/packaging for storage
and safekeeping.
1-28
nView Desktop Manager
SLI Installation
Display Driver Installation and Enabling SLI
Follow the steps listed below to install your driver software:
1. Power on the system and log into Windows.
2. Cancel the Windows "Found New Hardware Wizard" (you should see this
window twice one for each graphics board) and run "setup.exe" in the SLI driver
you saved to your desktop previously to start the software installation process (if
you open the zip file, you should see the "setup.exe" file).
3. Follow the "Next" prompt to proceed with driver installation. You should see the
message "NVIDIA Quadro FX xxxx has not passed Windows Logo testing to
verify its compatibility with Windows XP." This is because the SLI driver was
not included on the Microsoft Windows XP CD. Click "Continue Anyway" to
proceed with driver installation. You should see this message a second time
because the SLI installer will detect the presence of the second graphics board and
install driver software for it as well. If this happens, click "Continue Anyway" a
second time.
4. Once the software has been installed, choose "Yes, I want to restart my computer
now" and select "Finish" to reboot the system.
Leadtek Quadro Series General Guide
1-29
nView Desktop Manager
SLI Installation
5. After logging back to Windows, the message "SLI capable system" will appear at
the bottom right corner of the screen as shown below.
6. Click anywhere on the message above (if the message disappears, right-click the
desktop and select NVIDIA Control Panel, then select Set SLI and PhysX
configuration). Check the "Enable SLI" option as shown in the screen below and
click Apply.
1-30
nView Desktop Manager
SLI Installation
Setting Up For Testing
The system is now setup and configured for SLI. When you log back into Windows,
you will default into SLI Frame Rendering ("single screen") mode. SPECviewperf
benchmarks are run in SLI Frame Rendering mode.
SPECviewperf is the benchmark that NVIDIA currently uses to analyze SLI
performance for NVIDIA Quadro graphics.
Before running the SPECviewperf benchmarks, please ensure the display resolution is
set to 1280 x 1024 (right-click on the desktop and select Properties/Settings).
You will then need to select the appropriate profile in the control panel. You can do
this by selecting Properties/Settings/Advanced/Quadro FX xxxx/Performance &
Quality Settings. In the Active profile drop-down menu, select 3D App-Modeling AFR.
Finally, you need to turn "Vertical sync" off. While still in the Performance &
Quality Settings window, check the "vertical sync" box under Settings for 3D AppModeling AFR. Then un-check the box at the bottom of the window that reads
"Application-controlled".
Select "Apply" and "OK". You are now ready to run the SPECviewperf benchmarks.
You can download the SPECviewperf benchmarks at:
www.spec.org/benchmarks.html#gpc
Leadtek Quadro Series General Guide
1-31
NVIDIA Software for Professionals
NVIDIA® Quadro Drivers provides the best combination of performance,
quality and features. Certified on over 100 professional applications to ensure
longer system uptime in mission critical applications, with one-click driver
installation and enterprise software support, Quadro drivers makes installation,
deployment, and maintenance a simple and easy to manage process.
(http://www.nvidia.com/Download/index.aspx)
NVIDIA MAXtreme™ is a performance driver for Autodesk's 3ds max
software. Developed in close collaboration with Autodesk, MAXtreme is a free,
downloadable software driver capable of delivering dramatic performance
improvements of up to 100% on some tests, when coupled with NVIDIA Quadro
FX professional graphics solutions.
(http://www.nvidia.com/object/maxtreme_workstation.html)
AutoCAD Performance Driver is a new performance driver for Autodesk's
AutoCAD 2009 software. Developed in close collaboration with Autodesk, the
AutoCAD Performance Driver is a free, downloadable software driver capable of
delivering dramatic performance improvements of up to 10 X on some tests, when
coupled with NVIDIA Quadro® FX professional graphics solutions. The
AutoCAD Performance Driver delivers accelerated performance on both
OPENGL and DIRECT3D.
(http://www.nvidia.com/object/AutoCAD_PD_workstation.html)
1-32
Appendix
FCC Statement
FCC Statement
This device complies with Part 15 of the FCC Rules. Operation is subject to the following two conditions:
This device may not cause harmful interference.
This device must accept any interference received, including interference that may cause undesired
operation.
This equipment has been tested and found to comply with the limits for a Class B digital device pursuant
to Part 15 of FCC Rules. These limits are designed to provide reasonable protection against harmful
interference in a residential installation. This equipment generates, uses and can radiate radio frequency
energy and, if not installed and used in accordance with the instructions, may cause harmful interference
to radio communications. However, there is no guarantee that interference will not occur in a particular
installation. If this equipment does cause harmful interference to radio or television reception, which can
be determined by turning the equipment off and on, the user is encouraged to try to correct the
interference by one or more of the following measures:
Reorient or relocate the receiving antenna.
Increase the separation between the equipment and receiver.
Connect the equipment into an outlet on a circuit different from that to which the receiver is connected.
Consult the dealer or an experienced radio/TV technician for help.
Shielded interface cables must be used in order to comply with emission limits. Changes or
modifications not expressly approved by the party responsible for compliance could void the user's
authority to operate the equipment.
!
!
!
!
!
!
!
Technical Support
!
If the attempt of resolving the problem on your own was unsuccessful, please contact your vendor or
E-mail our technical support staff at : [email protected], and provide them in your message with:
product name, software driver version, motherboard manufacturer, BIOS version and chipset,
Computer type and speed, Monitor manufacturer and model, and a detailed description of your
problem.
This product incorporates copyright protection technology that is protected by method claims of certain U.S.
patents and other intellectual property rights owned by Macrovision Corporation and other right owners. Use of
this copyright protection technology must be authorized by Macrovision Corporation, and is intended for home
and other limited viewing uses only unless otherwise authorized by Macrovision Corporation. Reverse
Engineering or disassembly is prohibited.
Leadtek Quadro Series General Guide
1-33
Recycling Information
Thank you for choosing this Leadtek product.
This is an electronic device which may contain hazardous
materials/components which need to be disposed of properly at the end
of the product's life. You can help avoid hazardous risks by not
disposing of the electronic device in your normal domestic waste.
Electric and electronic devices are marked with a rubbish bin with a
diagonal line through it, which indicates that these products should not
be thrown out with usual domestic waste. If such products are disposed
of together with domestic waste, electric and electronic equipment may
have severe impacts on the environment as well as on human health,
not least because of the potentially hazardous materials.
Pursuant to the ElektroG, Leadtek provides an easy and convenient
way of recycling electric and electronic equipment. Please dispose of
your electric and electronic equipment at your local collection site
specially designated for this type of waste. Such disposal is free-ofcharge to you. Together with the management of the local collection
site, Leadtek will then take care of the efficient recycling and treatment
of the electric and electronic waste.
1-34
繁體中文
麗臺 Quadro 系列使用手冊
目錄
2-2
2-3
2-5
2-7
2-8
2-16
2-23
2-31
2-32
如何使用本手冊
移除現有的顯示卡驅動程式
硬體安裝
安裝顯示卡驅動程式
認識 NVIDIA 控制面板
執行 NVIDIA 控制面板工作
nView 桌面公用程式
NVIDIA 支援的專業軟體
附錄
2-32
2-32
美國聯邦通訊委員會規範
技術支援
注意 : 本手冊內容有不夠詳盡或
是 需 要 更 新之處,本公司會在驅動
程 式 光 碟 或網站上提供最新的使用
說 明 供 您 使用。
麗臺 Quadro 系列通用手冊
2-1
如何使用本手冊
這本使用手冊介紹您如何安裝繪圖卡。為了讓您快速熟悉本手冊使用方法,將以
範例說明手冊中出現的標頭題、標誌、和符號的使用訣竅。
標題、標誌與符號
如何藉由標題找到我所需要的內容?手冊中出現的標誌和符號代表著什麼意義?
請見以下範例說明。
標頭
使用手冊中每一頁的最上方都以顯著的標頭表示本頁所
屬的章節,讓你迅速找到所需的內容。
從範例的標頭「標準 VGA 設定模式」可以知道此頁的
內容屬於「標準 VGA 設定模式」此一章節。
標誌
Windows2000 作業系統在
L
更換繪圖卡前不需將驅動
程式變更為標準模式,如
果您所使用的作業系統為
Windows2000 ,請跳過此章。
警告標誌:表示有重
要訊息。請按照內容
指示執行,避免發生
錯誤的安裝設定。
放大鏡標誌:表示在
您進行下一個步驟
前,請先閱讀放大鏡
標誌旁的重要訊息。
箭頭符號
箭頭符號:在對話方
塊或功能表中,此箭
頭標示應以滑鼠點選
的選項或按鈕。
2-2
移除現有的顯示卡驅動程式
在您準備移除原有的 VGA 顯示卡,安裝新的繪圖卡前,建議您先將目前顯示卡的
驅動程式移除,以免在安裝新繪圖卡時發生異常的狀況。以下是移除顯示卡驅動程
式的步驟:
1
步驟
按「開始」 , 然後選擇「設
定」裡面的「控制台」。
2
步驟
在「新增或移除」的圖
示上雙按滑鼠左鍵。
麗臺 Quadro 系列通用手冊
2-3
移除現有的顯示卡驅動程式
3
這個視窗中會列出您的電腦裡面所安裝的程式。選擇原
有顯示卡的驅動程式。
4
按下「變更/移除」按鈕。依照螢幕上的指示進行,即
可移除現有的顯示卡驅動程式。
步驟
步驟
當您準備換裝新的繪圖卡前,請先將電腦中現有
的顯示卡驅動程式移除,以避免發生無法安裝的
問題。
1. 以上操作圖示取自於 Windows XP。其他的電腦
作業系統畫面可能會有差異。
2. 如果您在「新增或移除」的視窗中未發現目前的
顯示卡需動程式,請略過這個章節。
2-4
硬體安裝
1
步驟
將電腦關機,並拔除所有連接線及電
線,繼而拆下電腦機箱蓋。
2
步驟
PCI Expre ss 插 槽
步驟
3
找出在您電腦主機
板上的 PCI
Express 插槽,如
果插槽上有保護
蓋,將此蓋子拿
掉。
或
將新卡的匯流排對準
PCI Express 插槽插
入,並小心地往下 壓
到底。
電腦主機板
如果您的主機板上
原本就插有顯示
卡,請先將舊卡移
除;移除時先將固
定金屬片的螺絲鬆
落,再將卡由插槽
中拔出。
將卡插入錯誤的插槽中,可能損害此
卡,甚至連電腦本身都會受到傷害。
PCI Express 插槽
麗臺 Quadro 系列通用手冊
2-5
硬體安裝
4
步 驟5
步驟
將固定金屬片以螺絲固定在電腦機箱的背板上。
(只適用於有 6-pin 或 8-pin 電源連接頭的 Quadro 產品)
6-pin 或 8-pin 電源接頭
如果顯示卡的邊緣有一個六孔或八孔的電源
連接頭,請將電源供應器的六接腳或八接腳
的 PCI-E 電源線接到此連接頭上。
步驟
6
步驟
7
依顯示器種類將連接線接到
顯示卡對應的接頭上。
再將所有其他連接線和電線
接回去。
示器
接顯
如果隨附散熱裝置為風扇時
風扇的軸心是維持風扇轉動的關鍵,在
安裝或拆卸風扇時如果不小心損傷軸
心,或使軸心移位,會使風扇的壽命縮短,所以
在用手握取或觸摸風扇時,應避免加壓或握住軸
心部位。
安裝驅動程式前的注意事項
本產品包裝中包含一驅動程式光碟。您可以在驅
動程式光碟上的讀我檔案 (README) 中找到最
新資訊。請務必在安裝驅動程式前閱讀此檔案。
2-6
手拿風扇時請勿握住
中央的軸心處
安裝顯示卡驅動程式
步驟1 將驅動程式光碟插入光碟機中。
步驟4 軟體授權合約的視窗出現。按
Yes。
步驟2 自動安裝程式 的畫面會出現在螢幕
上,點選「 Driver Install 」。
步驟5 Windows 正在安裝此驅動程式。
會出現一個進度棒,顯示安裝進
度。
步驟3 安裝精靈準備安裝。按
Next。
步 驟6
安裝完成時,一對話框會問您是
否要重新啟動電腦。點選
「是」,然後再按「完成」。
麗臺 Quadro 系列通用手冊
2-7
認識 NVIDIA 控制面板
開啟與關閉 NVIDIA 控制面板
有好幾種方式可以開啟 NVIDIA 控制面板:
• 在 Windows XP 或 Windows Vista 的桌面上按滑鼠右鍵,然後在選單中按
NVIDIA 控制面板,或者
在 Windows XP 中
• 從 Windows 的開始選單,選擇設定→控制台,然後在控制台的視窗中,
雙按 NVIDIA 控制面板的圖示。
在 Windows Vista 中
• 從 Windows Vista 控制台的傳統檢視中按 NVIDIA 控制面板的圖示,或
• 從 Windows Vista 控制台首頁按額外選項,然後按 NVIDIA 控制面板。
要關閉 NVIDIA 控制面板,
• 從檔案選單選擇結束,或是
• 按下視窗右上角的關閉。
2-8
認識 NVIDIA 控制面板
關於 NVIDIA 控制面板介面
NVIDIA 控制面板提供簡單易用的介面來管理您的系統。
當您第一次啟動時,NVIDIA 控制面板會顯示導覽樹狀圖的第一頁。往後再
度開啟時,控制面板會顯示上次最後使用的頁面。
NVIDIA 控制面板使用者介面由下列區域組成,如下圖所示:
·
主要任務窗格
·
導覽樹狀結構窗格
·
功能表列
·
工具列
工具列
功能表列
導覽樹狀結構窗格
主要任務窗格
麗臺 Quadro 系列通用手冊
2-9
認識 NVIDIA 控制面板
使用主要任務窗格
主要任務窗格是 NVIDIA 圖形驅動程式控制器所在之處。此螢幕區域是您
使用「NVIDIA 控制面板」來達成工作目標時注意力最集中的部份。預設頁
面是傳統導覽樹狀結構中所列的第一個項目。在隨後造訪時,內容窗格會
重新開啟上一次瀏覽的頁面。
使用「選取一個任務」窗格
選取一個任務窗格中的導覽樹狀結構顯示您的系統中安裝的主要 NVIDIA
控制頁面。可點選樹狀結構項目以開啟該頁面。
點選可展開或
折疊各大分類
項目。
2-10
點選可在主要
任務窗格開啟
對應的頁面。
認識 NVIDIA 控制面板
使用工具列
工具列可用來快速存取常見任務,例如在「標準」和「進階」視圖之間切
換,以及導覽任務頁面。
使用導覽按鍵
前進和後退按鈕讓您循序瀏覽已經開啟過的頁面。您也可以按前一頁旁邊
的箭號直接到一個造訪過的頁面。下拉式選單裡面有所有已造訪過的頁
面。直接點選您想要的頁面即可。
關於檢視模式
目前選擇的檢視模式決定有哪些選項會出現。有三種不同的檢視模式:
• 標準
• 進階
• 自訂
大部分的指令在標準和進階模式下都有。但有一些選項要先選擇進階模式
再開啟分類頁面才會出現。另外任務頁面的選項會依照所選的檢視模式而
不同。如果您要尋找的指令沒有出現,請回到首頁,選擇另一個檢視模
式,然後再回到任務頁面。
麗臺 Quadro 系列通用手冊
2-11
認識 NVIDIA 控制面板
要改變檢視模式:
• 從檢視功能表,選擇標準,進階,或自訂。
註:要讓自訂模式出現,您必須先定義自訂檢視,如下方說明。
定義自訂檢視
您可以自訂 NVIDIA 控制面板,只顯示您想看到及使用的分類頁面。
要指定只顯示哪些頁面,請依照下列步驟:
1 選取檢視 > 定義自訂檢視或是使用工具列來快速存取此選項。
2 在定義自訂檢視的頁面中,選取 (核選) 您想要檢視的頁面之核選方塊,
然後按確定。
3 若要離開自訂檢視模式,請從檢視功能表中選取標準或進階檢視,或是使
用已啟用的工具列來快速存取此選項。
4 若要切換回您的自訂檢視,請按一下自訂。
2-12
認識 NVIDIA 控制面板
使用功能表列
功能表列包含了標準 Windows 功能表以及 NVIDIA 控制面板專有的功能
表,像是檢視及設定檔功能表。
功能表列的功能表可能會有所不同,依照您正在使用的 NVIDIA 控制面板
種類而定。
檔案功能表
檔案功能表提供有關於列印,套用變更,以及結束本程式的相關指令。
檔案功能表指令
列印
預覽列印
列印設定
說明
列印目前任務頁面。
預覽目前要列印的頁面。
開啟列印設定對話方塊,調整印表機設定。
結束
離開 NVIDIA 控制面板。
編輯功能表
編輯功能表提供有關於剪下,複製,貼上,以及選擇項目的相關指令。
編輯功能表指令
剪下
複製
貼上
全選
說明
剪下選擇的文字放入剪貼簿。
複製選擇的文字放入剪貼簿。
將剪貼簿中的文字貼到游標所在的位置。
選擇本頁中的所有項目。
麗臺 Quadro 系列通用手冊
2-13
認識 NVIDIA 控制面板
檢視功能表
檢視功能表提供了所有用於檢視「NVIDIA 控制面板」應用程式模組中的各
個頁面的指令。
檢視功能表指令
說明
標準
選取檢視 > 標準以檢視和存取「NVIDIA 控制面板」應用程式中
絕大多數較常用而且簡單的工作。當標準指令顯示一個核選記號
時,這表示「標準」檢視目前在您的「NVIDIA 控制面板」上處
於活動的狀態。
選取檢視 > 進階以檢視和存取「NVIDIA 控制面板」應用程式中
特定的複雜工作。這些工作經常需要在操作圖形硬體和軟體 (驅
動程式) 方面擁有某些進階的經驗。當進階指令顯示一個核選記號
時,這表示「進階」檢視目前在您的「NVIDIA 控制面板」上處
於活動的狀態。
只有當您使用了定義自訂檢視指令來自訂顯示 / 隱藏特定的螢幕
時,自訂指令才會顯示在「檢視」功能表中。
進階
自訂
定義自訂檢視
若只要查看那些您想查看與使用的「NVIDIA 控制面板」頁面,
根據您的系統上所安裝的應用程式模組 (顯示、3D 設定值等) ,
請從「檢視功能表」中選取定義自訂檢視。
新增桌面上下文
功能表
根據預設值,此選項已被選取,並且會將「NVIDIA 控制面板」
功能表項目新增至桌面上下文功能表。
通知托盤圖示
(僅限於 Windows XP) 選擇此項目在 Windows 工作列通知區域中
顯示 NVIDIA 控制面板圖示,按此圖示可快速設定 NVIDIA 控制
面板的主要設定值。
說明功能表
說明功能表提供存取說明, 系統資訊,以及版權與版本資訊的相關指令。
說明功能表指令
NVIDIA 控制面板說明
系統資訊
關於 NVIDIA 控制面板
2-14
說明
存取 NVIDIA 控制面板線上說明。
檢視您的系統詳細資訊以及 NVIDIA 控制面板設定。
檢視 NVIDIA 控制面板版本及版權資訊。
認識 NVIDIA 控制面板
各類別專有的功能表
這些功能表只有在開啟特定的頁面時才會出現。
設定檔功能表
設定檔功能表提供了有關於儲存,載入,以及刪除設定檔的指令。
設定檔功能表指令
載入
儲存
刪除
說明
從儲存的設定檔中載入數值
將目前的設定儲存成設定檔
刪除設定檔
顯示器功能表
本選項只有在開啟顯示類別的頁面時才會出現。
功能表指令
識別顯示器
說明
選擇此項可識別系統中的顯示器。
3D 設定功能表
本選項只有在開啟 3D 設定類別的頁面時才會出現。
功能表指令
說明
顯示 SLI 指示
選擇此項可檢驗 SLI 是否啟動及正常運作。
工作站功能表
本選項只有在開啟工作站類別的頁面時才會出現。
功能表指令
重新整理
說明
選擇此項可重新整理系統中安裝的顯示卡。
麗臺 Quadro 系列通用手冊
2-15
執行 NVIDIA 控制面板工作
啟動 NVIDIA 控制面板
1 啟動 NVIDIA 控制面板:
·
在 Windows 的桌面上按滑鼠右鍵,然後在選單中按 NVIDIA 控制面
板,或者
在 Windows XP 中:
a 從 Windows 的開始選單,選擇設定→控制台
b 然後在控制台的視窗中, 雙按 NVIDIA 控制面板的圖示。
在 Windows Vista 中:
a 按開始圖示,然後從開始選單中按控制台。
b 從 Windows Vista 控制台的傳統檢視中按 NVIDIA 控制面板的圖示,或
從 Windows Vista 控制台首頁按額外選項,然後按 NVIDIA 控制面板。
2-16
執行 NVIDIA 控制面板工作
「選取一個任務」窗格中顯示的類別會依您的系統中安裝的 NVIDIA 軟體
而定。例如,桌上型的系統中不會出現行動的項目。
2 從「選取一個任務窗格」中的導覽樹狀結構按下連結可以開啟特定的任務
頁面。
導覽樹狀結構中的各類別會列出您可以進行的不同任務, 每個任務頁面
會提供如何進行的說明。
將游標移到列出的選項上方,會看到該選項的說明及使用方法。
每個任務的詳細解說也可以參考線上說明。
麗臺 Quadro 系列通用手冊
2-17
執行 NVIDIA 控制面板工作
執行 NVIDIA 控制面板工作
找到您要的工作項目
下表列出了 NVIDIA 控制面板的頁面,您可以找到執行驅動程式工作的控
制項目。
功能
Advanced Timings
Antialiasing
Application Profiles
Color Depth
Custom Timings
Desktop Color Settings
Driver Settings
Desktop Overlap
Frame Synchronization
HDTV Setup
Multi-display configuration
nView Clone Mode
nView Span Modes
2-18
備註
NVIDIA 控制面板類別
- 頁面
Display - Manage Custom
Resolutions
3D Settings - Manage 3D
Settings
3D Settings - Manage 3D
Settings
Display - Change Resolution
Display - Manage Custom
Resolutions
Display - Adjust Desktop
Color Settings
3D Settings - Manage 3D
Settings
Workstation - Adjust Edge Not available with
Overlap
Windows Vista.
Workstation - Synchronize Not available with
Displays
Windows Vista.
Requires NVIDIA Quadro
G-Sync card.
Video & Television - Change
the Signal or HD Format
Display - Set Up Multiple
Displays
Display - Set Up Multiple
Displays
Display - Set Up Multiple
Not available with
Displays
Windows Vista.
執行 NVIDIA 控制面板工作
功能
NVRotate
Performance and Quality
Settings
PowerMizer
Refresh Rate Settings
Resolution Settings
Screen Position on CRT
Screen Position on TV
SDI (Graphics to SDI Output)
SLI Configuration
Temperature Settings
TV Setup
Video Color Settings
Overclocking
NVIDIA 控制面板類別
備註
- 頁面
Display - Rotate Display
3D Settings - Adjust Image
Settings with Preview
Mobile - Change
Available only with
PowerMizer Settings
notebook computers
Not available with
Windows Vista.
Display - Change Resolution
Display - Change Resolution
Display - Move CRT Screen
Position
Video & Television - Adjust
Screen Size and Position
Workstation - Send
Not available with
Graphics to SDI Output
Windows Vista
3D Settings - Set SLI
Configuration
Performance
Requires NVIDIA System
Tools software
Video & Television - Change
the Signal or HD Format
Video & Television - Adjust
Video Color Settings
Video & Television - Adjust
Video Image Settings
Performance
Requires NVIDIA System
Tools software
麗臺 Quadro 系列通用手冊
2-19
執行 NVIDIA 控制面板工作
NVIDIA 控制面板群組
本節提供 NVIDIA 控制面板群組的概述。
使用顯示器類別頁面
註: Windows Vista - 目前對 Windows Vista 的一些功能支援還在開發中,
因此可能不會出現在您的繪圖卡驅動程式裡面。請參考發行注意事項
中列出的未支援功能。
實際出現的工作項目會依照您的系統硬體而定,例如連接的顯示器種類及
數目。您可用顯示器類別頁面來:
• 執行顯示器最佳化精靈
• 變更解析度
• 變更顯示比例縮放
• 調整色彩設定值
• 旋轉顯示畫面
• 管理自訂解析度 (在進階檢視頁面中)
• 設定多台顯示器,包括橫跨與複製模式。
註:Windows Vista 中不支援橫跨模式。
2-20
執行 NVIDIA 控制面板工作
使用視訊與電視類別頁面
註: Windows Vista - 目前對 Windows Vista 的一些功能支援還在開發中,因
此可能不會出現在您的繪圖卡驅動程式裡面。請參考發行注意事項中
列出的未支援功能。
實際出現的工作項目會依照您的系統硬體而定,例如您是否已連接電視。
您可用視訊與電視類別頁面來:
• 調整電視畫面品質和視訊色彩設定值以便獲得在其環境中最佳的觀看體
驗。
• 啟動全螢幕鏡像功能,您可以在一部顯示器觀看全螢幕影像,另一部顯示
器顯示較小的影像視窗及控制介面。
• 變更桌面 / 視訊的位置和尺寸以完美地符合電視或 HDTV (高畫質電視) 螢
幕。
• 變更信號格式以用於標準電視或高畫質電視 (HDTV),以及變更國家特定
的信號或 HDTV 格式。
使用 3D 設定類別頁面
註: Windows Vista - 目前對 Windows Vista 的工作站功能支援還在開發中,
因此可能不會出現在您的繪圖卡驅動程式裡面。請參考發行注意事項
中列出的未支援功能。
實際出現的工作項目會依照您的系統硬體而定,例如是否具備 SLI 能力。
您可用 3D 設定頁面來:
麗臺 Quadro 系列通用手冊
2-21
執行 NVIDIA 控制面板工作
• 改變使用 Direct3D 及 OpenGL 的 3D 應用軟體及遊戲的畫面與成像項設定
• 為每個遊戲指定獨立的 3D 設定,遊戲啟動時會自動載入這些設定 (在進
階檢視模式中)
• 設定您的 SLI 或多重 GPU 組態
註: GPU 溫度監控及 GPU 超頻功能不包含在 95 版本及其後的 3D 設定頁
面中。要使用這些功能,您必須安裝 NVIDIA nTune 軟體。
使用工作站類別頁面
工作站類別在您安裝 NVIDIA Quadro FX 繪圖卡之後會出現。
註: Windows Vista - 目前對 Windows Vista 的工作站功能支援還在開發中,
因此可能不會出現在您的繪圖卡驅動程式裡面。請參考發行注意事項
中列出的未支援功能。
實際出現的工作項目會依照您安裝的 NVIDIA Quadro FX 產品而定。您可用
工作站的頁面來:
• 使用畫面同步或 genlock 技術將您的顯示器同步。
• 檢視系統中安裝的繪圖卡及顯示器圖示。
• 管理序列數位介面 (SDI) 輸出 (需要 NVIDIA Quadro FX SDI 方案。)
• 將鄰近的顯示器邊緣重疊。
註:顯示器邊緣混合的功能已不存在。
2-22
nView 桌面公用程式
Multi View
Multi View 模式
在一個 PC 系統中同時以兩張 NVIDIA Quadro PCI Express 顯示卡於多個螢幕
顯示 OpenGL 應用軟體。
優勢:
1. 多螢幕顯示
2. 支援兩組繪圖卡,讓兩片繪圖卡以平行運作模式大幅提升遊戲與繪圖的效能。
系統需求:
任何兩片 NVIDIA Quadro PCI Express 顯示卡。
麗臺 Quadro 系列通用手冊
2-23
nView 桌面公用程式
安裝SLI
SLI (Scalable Link Interface) 技術: SLI 技術能在一個 PC 系統中同時以兩張繪
圖卡提供最佳的繪圖效能。
SLI 著色模式
SLI 系統皆包含搭載兩組實體連接器的 PCI Express 主機板,能安裝兩片內建
兩顆 NVIDIA 處理器的 PCI Express 繪圖卡。加上 SLI 連結器,可利用兩組繪
圖卡支援一部螢幕,藉此提供前所未有的 PC 效能。
優勢:
1. 分割畫面著色 split frame rendering (SFR) 模式: 適用於影像模擬和影音應用
軟體 。
2. 交替畫面著色 alternate frame rendering (AFR) 模式:適用於 SPECviewperf
和其他幾何學相關的應用軟體。
系統需求:
1. 兩片相同型號 NVIDIA Quadro FX 系列顯示卡 (5800, 5600, 4800, 4700X2,
4600, 3800, 和 3700)
2. SLI 連結器
SLI FSAA 模式
由兩張 PCI Express 繪圖卡連接一個螢幕,提供更優秀的影像畫質。
優勢:
1. 提高單螢幕影像品質 (更高階的 FSAA):最高可達 32X FSAA
2. 應用範例:視覺模擬 (飛行,建築),產品 / 工業設計檢視 (汽車,航太),某
些廣播應用 (VizRT, Brainstorm)
2-24
nView 桌面公用程式
安裝SLI
主機板和電源需求
SLI 技術必須搭配支援 PCI Express 介面與支援 SLI 技術的主機板 (且兩個 PCI
Express 插槽必須相鄰)。兩個插槽的電源需求為:
·
x16 + x16 PCI Express 連結技術
·
x16 + x8 PCI Express 連結技術
·
x16 + x4 PCI Express 連結技術
·
x8 + x8 PCI Express 連結技術
系統最低的電源需求為 450W 以支援 SLI 技術。當電源低於此值時系統將會處
於不穩定的狀態。
SLI 硬體安裝
下圖為支援 SLI 介面的高階 NVIDIA Quadro FX 3800 產品和 SLI 連接器。
NVIDIA Quadro FX 5800, 5600, 4800, 4700X2, 4600, 以及 3700 也支援 SLI 技
術 (需另加輔助電源線)。以下為基本系統需求:
1. SLI 是專為 PCI Express 介面所設計的技術。
2. 兩個相鄰的 PCI Express 插槽。一個插槽為 x16 PCI Express 連結技術,另
一個插槽可為 x16, x8, 或 x4 PCI Express 連結技術。
3. 有些支援 SLI 介面顯示卡產品 (FX 5800, 5600, 4800, 4700X2, 4600, 3800,
以及 3700) 需要外接電源插頭。為確保系統穩定請確認電源已連接至系統。
4. 安裝 SLI 連接器 (顯示卡內附) 可發揮 SLI 著色模式至最佳效能。
SLI 連接器
電源連接線
支援 SLI 的 Quadro 顯示卡
麗臺 Quadro 系列通用手冊
2-25
nView 桌面公用程式
安裝SLI
以下圖片顯示兩片支援 SLI 技術的 PCI Express 介面顯示卡,已透過 SLI 連接
器和輔助電源線把兩張顯示卡連接起來。接下來需要安裝驅動程式和設定系統
,讓兩張顯示卡達到負載平衡,充分發揮平行處理的能力。
接下來請參考以下硬體安裝步驟。
注意: 要安裝兩片新的 NVIDIA Quadro FX 顯示卡前,請先移除目前使用的顯
示卡。移除目前使用中的顯示卡驅動程式,並且儲存新的顯示卡驅動程式於電
腦桌面。當移除顯示卡驅動程式時 (請從開始/控制台/新增或移除程式移除驅動
程式)。
移除時,請勿移除 NVIDIA 顯示卡驅動程式外的驅動程式 (在移除 NVIDIA 物件
程式視窗,按下"移除下列物件-> NVIDIA 顯示卡驅動程式") 。下個步驟會指示
您移除所有相關物件。
2-26
nView 桌面公用程式
安裝SLI
1. 關閉電腦並且移除電源線 。
2. 小心的打開系統外殼( 必要時請參考系統安裝手冊)。
3. 請在安全的環境下執行安裝系統的動作。請戴上防靜電的脕套。將任何敏感
的物件放置於防靜電袋中。
4. 如系統已安裝未支援 SLI 技術的顯示卡於 x16 倍速電子訊號的插槽,小心
的移除此顯示卡。以支援 SLI 技術的顯示卡代替此顯示卡。
5. 安裝第二片支援 SLI 技術的顯示卡於相鄰的插槽中。您可以重新安置顯示卡
並且選擇合適的 x16, x8 or x4 插槽。
6. 用 SLI 連接器連接這兩張顯示卡 (用來顯示 SLI 著色模式) 。
7. 如果您的顯示卡有附加輔助電源線,請連同電源線,連接至電源。
8. 放回系統外殼,並且連接顯示器至支援 SLI 技術的顯示卡 (x16 插槽)。
9. 連接電源線至系統 。
請將移除後的顯示卡和 PCI Express 顯示卡放置於防靜電袋中妥善保管。
麗臺 Quadro 系列通用手冊
2-27
nView 桌面公用程式
安裝SLI
安裝驅動程式和啟動 SLI
請依照下列步驟安裝驅動程式:
1. 啟動電腦,登入系統 。
2. 取消 " 找到新硬體精靈 " ( 此精靈會出現兩次,因為安裝了兩張顯示卡)。啟
動 SLI 顯示卡的 "setup.exe" 程式 (打開 zip 資料夾即可找到此程式)。
3. 請依照"下一步"指示安裝驅動程式。因 SLI 驅動程式並不包含在 Microsoft
Windows XP CD 裡,所以螢幕會出現 "NVIDIA Quadro FX xxxx 還未通過
Windows Logo 的測試,證明此顯示卡與 Windows XP 系統的相容性" 的訊
息。按下 "繼續下一步" 鍵,繼續安裝驅動程式。因為安裝兩張顯示卡的緣
故,所以此訊息會出現兩次。
4. 軟體安裝完畢後,選擇 " 是的,我要重新啟動電腦 " 然後按下 " 完成" 鍵。
2-28
nView 桌面公用程式
安裝SLI
5. 登入系統後,螢幕右下方的位置會出現 "SLI capable system” 的訊息。
6. 按下此訊息的任何位置 (如果訊息已消失,在桌面按下滑鼠右鍵,選擇
「NVIDIA 控制面板」,然後選擇「設定 SLI 及 PhysX」)。選擇「啟動
SLI」,如下圖,然後按套用。
麗臺 Quadro 系列通用手冊
2-29
nView 桌面公用程式
安裝SLI
系統測試
目前已完成系統安裝和設定。當您再次登入系統時,SLI 著色模式的預設值為
"單GPU著色"。SPECviewperf 的基準標則是在 "單GPU著色" 著色模式下所取
得的。
目前,NVIDIA 使用 SPECviewperf 所得到的的基準標來分析 NVIDIA Quadro
顯示卡的 SLI 技術效能。
在執行 SPECviewperf 基準標前,請設定螢幕解析度為1280 x 1024 (在桌面按下
滑鼠右鍵,選擇內容/設定值)。
從控制台調整顯示內容。選擇內容/設定值/進階/Quadro FX xxxx/效能設定。在
"Active Profile" 選項選擇 "3D App-Modeling AFR"。
最後,請關掉 "效能設定/3D App-Modeling AFR設定/Vertical sync" 選項和底
下的 "Application-controlled" 選項。
選擇 "套用" 然後按下 OK 鍵。現在即可開始執行 SPECviewper 基準標。
您可以從網站 www.spec.org/benchmarks.html#gpc下載 SPECviewper 基準
標。
2-30
NVIDIA 支援的專業軟體
NVIDIA® Quadro Drivers 提供效能,品質,以及功能的最佳組合。通過
100 個以上的專業應用軟體認證, 能在重要的應用軟體中確保更長的運作
時間。單鍵安裝驅動程式,支援企業軟體,Quadro 驅動程式讓安裝,部署
,維護成為輕鬆簡易的過程。
(http://www.nvidia.com/Download/index.aspx)
NVIDIA MAXtreme™ 是 Autodesk 3ds max 的高效能驅動程式,與
Autodesk 共同合作開發,可免費下載。配合 NVIDIA Quadro FX 專業繪圖卡
,在某些測試中可大幅提高效能,最高可達 100%。
(http://www.nvidia.com/object/maxtreme_workstation.html)
AutoCAD Performance Driver 是 Autodesk AutoCAD 2009 的高效能驅動程
式,與 Autodesk 共同合作開發,可免費下載,配合 NVIDIA Quadro FX 專
業繪圖卡,在一些測試中效能可增加高達 10 倍。AutoCAD Performance
Driver 對 OPENGL 及 DIRECT3D 均提供加速效能。
(http://www.nvidia.com/object/AutoCAD_PD_workstation.html)
麗臺 Quadro 系列通用手冊
2-31
附錄
美國聯邦通訊委員會規範
本產品符合美國聯邦通訊委員會 FCC 規則的第 15 部份條款規定。在操
作時必須遵守下述兩項情況:
+
此裝置不得引起有害的干擾。
+
此裝置必須接受任何干擾,包括可能引起未預期操作之干擾。
本產品經測試發現完全符合 FCC 法規第 15 份條款的級數 B 數位裝
置限制,這些限制用來提供合理的保護以抵抗家電設備的有害干擾。本
產品會產生、使用並且輻射無線電頻率能量,若未依照指示安裝並使用,
會對無線電通訊產生有害干擾,但不保證在特殊安裝的情況下不會產生
有害干擾。如果本產品對收音機或電視的接收產生有害干擾,而這些干
擾可經由開關設備來確定時,建議使用者利用下列方式來改善干擾現象:
+
重新定位或放置接收天線。
+
拉開本產品與接收機之間的距離。
+
將本產品電源插頭所使用之迴路與接收機連接的迴路分開。
+
洽詢對收音機 / 電視有經驗的經銷商。
+
請使用網狀隔離訊號線以符合電波發射限制,未符合規定條款之
核准,擅自變更或修正設備,得取消使用者的設備操作權利。
技術支援
如果您無法解決所遇到的問題,請連絡我們的技術支援人員,或是 E-mail 至
<[email protected]> ,請在您的 E-mail 中提供下列各種資訊,以便我們
為您服務:產品名稱 , 軟體驅動程式版本 , 主機板廠牌, BIOS 版本和晶片組 ,
電腦類型與速度 , 顯示器製造商與型號並詳細敘述你的問題。
This product incorporates copyright protection technology that is protected by method claims of certain U.S.
patents and other intellectual property rights owned by Macrovision Corporation and other right owners. Use of
this copyright protection technology must be authorized by Macrovision Corporation, and is intended for home
and other limited viewing uses only unless otherwise authorized by Macrovision Corporation. Reverse
Engineering or disassembly is prohibited.
2-32