1
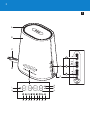
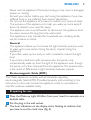
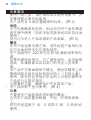
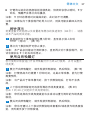
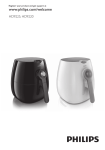
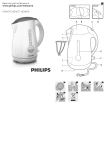
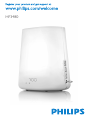
HF3480 2 3 1 A B C 1 䑰 G D 2 3 F E 1 14 13 2 12 3 4 5 6 7 8 9 10 11 MHz. 4 HF3480 English 6 简体中文 20 6 English Table of contents Introduction 6 The effects of the Wake-up Light 7 General description 7 Important 8 Electromagnetic fields (EMF) 9 Preparing for use 9 Setting the clock time 10 Using the appliance 10 Top and bottom dials 10 Middle dial 11 Setting the alarm 11 Using the lamp 13 Radio/volume 14 Dusk simulation function 15 Display brightness function 15 Cleaning and maintenance 15 Environment 16 Guarantee and service 16 Guarantee restrictions 16 Troubleshooting 16 Introduction Congratulations on your purchase and welcome to Philips! To fully benefit from the support that Philips offers, register your product at www.philips. com/welcome. The Philips Wake-up Light helps you wake up more pleasantly. The light intensity of the lamp gradually increases to the set level in the 30 minutes before the set wake-up time. The light gently prepares your body for waking up at the programmed time. To make waking up an even more pleasant experience, you can use natural wake-up sounds or the FM radio. You can use the dusk simulation function to have the Wake-up Light dim the light and sound gradually before they are completely switched off at the time you set. English 7 The effects of the Wake-up Light The Philips Wake-up Light gently prepares your body for waking up during the last half hour of sleep. In the early morning hours our eyes are more sensitive to light than when we are awake. During that period the relatively low light levels of a simulated natural sunrise prepare our body for waking up and getting alert. People who use the Wake-up Light wake up more easily, have a better overall mood in the morning. Because the sensitivity to light differs per person, you can set the light intensity of your Wake-up Light to a level that matches your light sensitivity for an optimal start of the day. For more information about the Wake-up Light, see www.philips.com. General description (Fig. 1) A B C D E Vents Lamp housing Mains cord Antenna Display 1 Light symbol 2 Hour indication of clock time/alarm time 3 Clock time symbol 4 Alarm symbol 5 Radio symbol 6 ’Birds’ sound symbol 7 ‘Beep’ sound symbol 8 ‘African jungle’ sound symbol 9 ‘Wind chimes’ sound symbol 10 Dusk simulation symbol 11 Display brightness symbol 12 Minute indication of clock/alarm time 13 Sound level symbol F Control lever with ‘alarm off ’, ‘alarm on’ and ‘snooze’ positions G Dials on the side of the appliance 1 Top dial: light on/off and light intensity 2 Middle dial: menu and radio frequency 3 Bottom dial: radio on/off and volume 8 English Important -- Read this user manual carefully before you use the appliance and save it for future reference. -- This appliance is double insulated according to Class II (Fig. 2). Danger -- Water and electricity are a dangerous combination. Do not use this appliance in wet surroundings (e.g. in the bathroom or near a shower or swimming pool). -- Do not let water run into the appliance or spill water onto the appliance (Fig. 3). Warning -- Check if the voltage indicated on the appliance corresponds to the local mains voltage before you connect the appliance. -- The appliance is suitable for a mains voltage of 230V and a frequency of 50Hz. -- If the mains cord is damaged, you must have it replaced by Philips, a service centre authorised by Philips or similarly qualified persons in order to avoid a hazard. -- This appliance is not intended for use by persons (including children) with reduced physical, sensory or mental capabilities, or lack of experience and knowledge, unless they have been given supervision or instruction concerning use of the appliance by a person responsible for their safety. -- Children should be supervised to ensure that they do not play with the appliance. -- This appliance is for indoor use only (Fig. 4). Caution -- Do not drop the appliance or expose it to heavy shocks. -- Place the appliance on a stable, level and non-slippery surface. -- Do not use the appliance at room temperatures lower than 10°C or higher than 35°C. -- Make sure the vents in the top and in the bottom of the appliance remain open during use. English 9 -- Never use the appliance if the lamp housing or top cover is damaged, broken or missing. -- Consult your doctor before you start using the appliance if you have suffered from or are suffering from serious depression. -- Do not use this appliance as a means to reduce your hours of sleep. The purpose of this appliance is to help you wake up more easily. It does not diminish your need for sleep. -- The appliance has no on/off switch. To disconnect the appliance from the mains, remove the plug from the wall socket. -- This appliance is only intended for household use, including similar use for instance in hotels. General -- This appliance allows you to choose the light intensity level you want to wake up to (see section ‘Using the lamp’, chapter ‘Using the appliance’). -- If you often wake up too early or with a headache, reduce the light level. -- If you share a bedroom with someone else, this person may unintentionally wake up from the light of the appliance, even though this person is further removed from the appliance. This phenomenon is the result of differences in light sensitivity between people. Electromagnetic fields (EMF) This Philips appliance complies with all standards regarding electromagnetic fields (EMF). If handled properly and according to the instructions in this user manual, the appliance is safe to use based on scientific evidence available today. Preparing for use 1 Place the Wake-up Light 40-50cm from your head, for example on a bedside table. 2 Put the plug in the wall socket. ,, The hour indication on the display starts flashing to indicate that you have to set the clock time (Fig. 5). 10 English Setting the clock time You cannot use the Wake-up Light until you have set the clock time. 1 When the hour indication on the display flashes, move the middle dial up or down to select the hour. 2 Press the middle dial gently and release it to confirm. ,, The minute indication starts flashing (Fig. 6). 3 Move the middle dial up or down to select the minutes. 4 Press the middle dial gently and release it to confirm. ,, The appliance leaves the menu and the display shows the set clock time. The appliance is now ready for use. Note: Every time you remove the plug from the wall socket for more than approximately 15 minutes, you have to set the clock time again by following steps 1 to 4 above. Note:To change the set clock time when the plug is still in the wall socket, press the middle dial gently two times to enter the menu for setting the clock time.You are in the menu when the hour indication flashes.Then follow steps 1 to 4 above. Using the appliance Top and bottom dials -- With the top dial you can switch the lamp on or off and set the light intensity (see section ‘Using the lamp’ in this chapter). -- With the bottom dial you can switch the radio on or off and set the volume (see section ‘Radio/volume’ in this chapter). Note: Press the dial gently and release it to switch on or off the light (top dial) or radio (bottom dial) and move the dial up or down to change the light intensity (top dial) or volume level (bottom dial). English 11 Middle dial The middle dial allows you to choose various functions from the menu. These functions appear in the menu in the following order: -- Clock time -- Alarm time -- Alarm sound -- Dusk simulation function -- Display brightness function You can operate the middle dial in the following way: 1 Press the middle dial gently and release it to enter the menu (Fig. 7). Do not press the dial too hard. If you do, the dial does not work. 2 Move the middle dial up or down to select a function. (Fig. 8) 3 Press the middle dial gently and release it to enter this function. 4 Move the middle dial up or down to select an option in this function. 5 Press the middle dial gently and release it to confirm. If you do not operate the dial for 5 seconds when you are in the menu, the appliance automatically leaves the menu and displays the clock time again. Setting the alarm To set the alarm, you choose an alarm time and the type of sound you want to wake up to. The alarm is set when the alarm symbol and the alarm sound symbol are visible on the display. Note:You can set the light intensity by moving the top dial up or down and you can set the alarm volume by moving the bottom dial up or down. If you do not want to wake up to the lamp or to a sound, select a light intensity or volume level of 0 (shown on the display as ‘OFF’). See sections ‘Using the lamp’ and ‘Radio/volume’ in this chapter. 12 English Tip:When you use the appliance for the first time, set the light intensity to 20.The moment you wake up, check which light intensity level the appliance has reached by slightly moving the top dial up or down.When you do this, the current alarm light intensity level appears on the display. Set the alarm light intensity to this level for the next day. 1 Push the control lever down to the middle position to switch on the alarm. (Fig. 9) ,, The hour indication of the alarm time flashes (Fig. 10). ,, To adjust the alarm time, follow steps 2 to 5 below. If the alarm time is correct, just wait a few seconds. 2 Move the middle dial up or down to select the hour. Note:You can only do this when the hour indication flashes. If this is not the case, push the control lever up and down again to enter the alarm time function. Note:You can also use the middle dial to select the alarm time function and set the alarm time (see section ‘Middle dial’ in this chapter). 3 Press the middle dial gently and release it to confirm. ,, The minute indication of the alarm time starts to flash (Fig. 11). 4 Move the middle dial up or down to select the minutes. 5 Press the middle dial gently and release it to confirm or wait for a few seconds. ,, The appliance leaves the menu and the display shows the clock time. The alarm time is now set. Switching off the alarm To switch off the alarm, push up the control lever to the top position. Note:The lamp stays on. Press the top dial gently and release it to switch off the lamp. Note:The alarm (sound and/or light) automatically switches off after 90 minutes. English 13 Setting the alarm sound Follow steps 1 to 5 in section ‘Middle dial’ in this chapter. You can choose one of the following sounds: -- Radio (Fig. 12) -- Birds (Fig. 13) -- Beep (Fig. 14) -- African jungle (Fig. 15) -- Wind chimes (Fig. 16) Snoozing 1 Push down the control lever to the bottom position when the alarm goes off. (Fig. 17) ,, The lamp continues to be on at the selected intensity level, but the alarm sound stops. After 9 minutes, the wake-up sound is automatically played again. Note:The 9-minute snooze time is fixed.This time cannot be adjusted. Note: If you push down the control lever with too much force, it may jump back to off position. Alarm demonstration If you want to get a quick demonstration (60 seconds) of the gradually increasing light level and sound level, activate the test function of the appliance. 1 Push the control lever down to the bottom position for a few seconds until TEST appears on the display (Fig. 18). 2 Push the control lever down again to stop the demonstration. Note:The appliance continues to run the alarm demonstration until you push down the control lever again.The test automatically stops after 9 hours. Using the lamp You can use the top dial to switch on the lamp as a bedside lamp and to set the light intensity. 1 To switch on the lamp, press the top dial gently and release it. (Fig. 19) 14 English Note: It takes approx. 1 second for the lamp to go on.This is normal, the lamp needs to heat up. Note:The lamp does not go on when you press the top dial while the appliance is in the menu. 2 Move the top dial up or down to select the light intensity level you prefer. (Fig. 20) You can choose a light intensity between 1 and 20. Note:The light intensity you have selected is automatically set as the light intensity level for the alarm as well. 3 To switch off the lamp, press the top dial gently and release it. Note:You can also move the top dial up or down to check and/or select a light intensity level without pressing the top dial first. Radio/volume 1 To switch on the radio, press the bottom dial gently and release it. (Fig. 21) 2 To select the desired radio frequency manually, move the middle dial up or down (Fig. 22). Tip:To scan radio frequencies automatically, press and hold the middle dial for approx. 2 seconds. Tip:To make sure you get a good radio signal, fully unwind the antenna and move it around until you have found a position at which reception is best. 3 To switch off the radio, press the bottom dial gently and release it. Volume 1 To set the volume, move the bottom dial up or down to select the volume level you prefer. You can choose a volume level between 1 and 20. Note:The volume level you select is automatically set as the volume level for the alarm as well. English 15 Dusk simulation function Select the dusk simulation function if you want the light and/or the sound of the Wake-up Light to stay on and dim gradually during a set period of time (15 minutes to 2 hours) before you go to sleep. The lamp and/or sound switch off automatically after the set time. 1 Follow steps 1 to 5 in section ‘Middle dial’ in this chapter to select the dusk simulation function and to set the dusk simulation time. Note:You can choose a time from 15 to 120 minutes (15, 30, 60, 90 or 120 minutes). ,, After the set time, no matter whether the light and/or the radio are on, the appliance switches off both light and sound. Display brightness function Select the display brightness function if you want to adjust the brightness of the display. 1 Follow steps 1 to 5 in section ‘Middle dial’ in this chapter to select the display brightness function and to set the display brightness. You can choose a display brightness from 1 to 4. Cleaning and maintenance Never use scouring pads, abrasive cleaning agents or aggressive liquids such as petrol or acetone to clean the appliance. Regularly remove dust from the outside of the appliance with a dry cloth. 1 Unplug the appliance before you clean it. 2 Clean the outside of the appliance with a dry cloth. Do not let water run into the appliance or spill water onto the appliance (Fig. 23). 16 English Environment -- Do not throw away the appliance with the normal household waste at the end of its life, but hand it in at an official collection point for recycling. By doing this, you help to preserve the environment (Fig. 24). Guarantee and service If you need service or information or if you have a problem, please visit the Philips website at www.philips.com or contact the Philips Consumer Care Centre in your country (you find its phone number in the worldwide guarantee leaflet). If there is no Consumer Care Centre in your country, go to your local Philips dealer. Guarantee restrictions For safety reasons, the lamp of this appliance cannot be replaced. If the appliance or the lamp does not work, please visit the Philips website at www.philips.com or contact the Philips Consumer Care Centre in your country (you find its phone number in the worldwide guarantee leaflet). If there is no Consumer Care Centre in your country, go to your local Philips dealer. Troubleshooting This chapter summarises the most common problems you could encounter with the appliance. If you are unable to solve the problem with the information below, contact the Consumer Care Centre in your country. Problem Solution The appliance does not work at all. Perhaps the plug is not inserted properly in the wall socket. Put the plug properly in the wall socket. Perhaps there is a power failure. Check if the power supply works by connecting another appliance. English 17 Problem Solution The appliance functions properly, but the lamp does not work anymore. Perhaps the lamp has reached the end of its life. The lamp has an expected life of more than 10,000 hours (more than 7 years of normal use). The life depends on the use of the appliance. In case of heavy use, the lamp may not last as long as you expect. The lamp is not replaceable. If the lamp breaks down, contact the Philips Consumer Care Centre in your country. The appliance becomes hot during use. This is normal, as the appliance is heated up by the light of the lamp and the electronics. The appliance does not respond when I try to press or move the dials. Remove the plug from the wall socket and reinsert it. If you reinsert the plug within approximately 15 minutes, the appliance remembers all settings. If you reinsert the plug after a longer period of time, the appliance remembers all settings except the time. The lamp does Perhaps you set a light intensity level that is too low. not go on when Increase the light intensity level. the alarm goes off. Perhaps you switched off the alarm function by setting the control lever to the top position. To switch on the alarm function, set the control lever to the middle position Perhaps the appliance is defective. Contact the Philips Consumer Care Centre in your country. The lamp does not go on right away when I switch it on. It takes approx. 1 second for the lamp to go on. This is normal, the lamp needs to heat up. 18 English Problem Solution I do not hear the alarm sound when the alarm goes off. Perhaps you set a sound level that is too low. To set a higher sound level, see chapter ‘Using the appliance’, section ‘Radio/volume’. Perhaps you switched off the alarm function by setting the control lever to the top position. If you selected the radio as the alarm sound, the radio may be defective. Switch on the radio after you switch off the alarm to check if the radio works. If it does not work, contact the Philips Consumer Care Centre in your country. The radio does not work. The radio may be defective. Contact the Philips Consumer Care Centre in your country. The radio produces a crackling sound. Perhaps the broadcast signal is weak. Move the middle dial up or down to adjust the frequency and/ or change the position of the antenna by moving it around. Make sure you have unwound the antenna completely. The alarm went off yesterday, but it did not go off today. Perhaps you switched off the alarm function by setting the control lever to the top position. Perhaps you set a sound level and/or light intensity level that is too low. Set a higher sound and/or light intensity level. Perhaps there was a power failure that lasted more than approximately 15 minutes. In this case the appliance has remembered all settings except the clock time. The clock time therefore flashes on the display. Set the correct clock time. English 19 Problem Solution The alarm did not go off 9 minutes after I pushed the control lever down to snooze. Perhaps you pushed the control lever down with so much force that it jumped to off position. Perhaps you set the volume level to 0 (shown on the display as ‘OFF’). The light wakes me too early. Perhaps the light intensity level you have set is not appropriate for you. Try a lower light intensity level if you wake up too early. If light intensity 1 is not low enough, move the appliance further away from the bed. The light wakes me too late Perhaps the appliance is positioned at a lower level than your head. Make sure the appliance is located at a height at which the light is not blocked by your bed, duvet or pillow. Also make sure the appliance is not placed too far away. The lamp flashes. Perhaps there has been a power failure. It is normal for the lamp to flash after a power failure. Perhaps the appliance is not suitable for the voltage to which it is connected. Make sure that the voltage indicated on the appliance corresponds to the local mains voltage. 20 简体中文 目录 产品简介 20 自然唤醒灯的功效 21 一般说明 21 注意事项 22 电磁场 (EMF) 23 使用准备 23 设置时钟时间 23 使用本产品 24 顶部和底部旋钮 24 中部旋钮 24 设置闹钟 25 使用自然唤醒灯 26 收音机/音量 27 黄昏模拟功能 28 显示屏亮度调节功能 28 清洁和保养 28 环境 28 保修和服务 28 保修限制 28 故障种类和处理方法 29 产品简介 感谢您的惠顾,欢迎光临飞利浦!为了您能充分享受飞利浦提供 的支持服务,请登陆 www.philips.com/welcome 网站注册您的产 品。 飞利浦自然唤醒灯让您的晨醒过程更愉悦。在所设定的晨醒时间 之前的 30 分钟内,自然唤醒灯的光线亮度会逐渐增加至设定的级 别,给您的身体一个过渡时间,以便您在设定的时刻自然醒来。 为使晨醒过程更加愉悦,您还可使用自然的唤醒声或 FM 收音机。 您可使用黄昏模拟功能,使自然唤醒灯的光线亮度逐渐变暗、音 量逐渐降低,然后在设定的时间完全关闭。 简体中文 21 自然唤醒灯的功效 飞利浦自然唤醒灯可在晨醒前的半小时里,用光线将您轻柔叫 醒。我们的眼睛在早晨比在清醒时对光线更为敏感。在晨醒期 间,自然唤醒灯会以相对较低的光线亮度模拟自然日出,让您的 身体得到提示直至醒来。使用自然唤醒灯,让您更加 轻松和更加 愉悦地醒来。由于每个人对光线的敏感程度不同,您可以设置自 然唤醒灯的光线亮度,使其适合自己的光线敏感程度,从而以最 佳的状态开始新的一天。 有关自然唤醒灯的详细信息,请参阅 www.philips.com。 一般说明 (图 1) A B C D E 通风口 灯罩 电源线 天线 显示屏 1 光线符号 2 时钟时间/闹钟时间的小时显示 3 时钟时间符号 4 闹钟符号 5 收音机符号 6 “鸟鸣”声音符号 7 “蜂鸣”声音符号 8 “非洲丛林”声音符号 9 “风铃”声音符号 10 黄昏模拟定时器符号 11 显示亮度调节符号 12 时钟/闹钟时间的分钟显示 13 音量符号 F 带有“闹钟关”、“闹钟开”和“再响”位置的控制杆 G 产品侧面的旋钮 1 顶部旋钮:灯光开/关和光线亮度 2 中部旋钮:菜单和收音频率 3 底部旋钮:收音机开/关和音量 22 简体中文 注意事项 -- 使用产品之前,请仔细阅读本使用说明书,并 妥善保管以备日后参考。 -- 本产品符合 II 级双重绝缘的标准。 (图 2) 危险 -- 水与电接触是危险的。因此切勿将产品在潮湿 的环境中使用(如在浴室或淋浴间或在游泳池 使用)。 -- 切勿让水进入产品或溅到产品表面。 (图 3) 警告 -- 在将产品连接电源之前,请先检查产品所标电 压与当地的供电电压是否相符。 -- 本产品适用于 220 伏电压和 50 赫兹频率的电 源。 -- 如果电源软线损坏,为了避免危险,必须由制 造商、其维修部或类似部门的专业人员来更 换。 -- 本产品不打算由肢体不健全、感觉或精神上有 障碍或缺乏相关经验和知识的人(包括儿童) 使用,除非有负责他们安全的人对他们使用本 产品进行监督或指导。 -- 应照看好儿童,确保他们不玩耍该产品。 -- 本产品仅限于室内使用。 (图 4) 注意 -- 不要使本产品跌落或受到剧烈震动。 -- 应将本产品放置在稳固、平坦、防滑的表面 上。 -- 切勿在室温低于 10°C 或高于 35°C 的房间 使用。 简体中文 23 -- 请确保顶部和底部的通风口在使用时是打开 的。 -- 如果灯罩或顶盖损坏、破损或丢失,切勿使用 本产品。 -- 如果您患过或正患有严重的抑郁症,请在开始 使用本产品之前咨询医生。 -- 不要将本产品作为减少睡眠时间的途径。本产 品的用途是帮助您更轻松、自然地醒来,它不 能减少您对睡眠的需要。 -- 本产品没有电源开关。要断开产品的电源,请 从电源插座上拔下插头。 -- 本产品仅限于家用(包括用于酒店等相似场 所)。 概述 -- 本产品允许您选择唤您醒来的光线亮度级别( 请参阅“使用本产品”一章中的“使用自然唤 醒灯”部分)。 -- 如果您经常醒的太早或醒来时会头痛,请降低 光线亮度。 -- 如果您与其他人共用一个卧室,他/她可能意外 地被本产品唤醒,尽管此人离产品较远。发生 这种情况是因为人们对光的敏感程度不同。 电磁场 (EMF) 这款飞利浦产品符合关于电磁场 (EMF) 的相关标准。据目前的科 学证明,如果正确使用并按照本用户手册中的说明进行操作,本 产品是安全的。 使用准备 1请将自然唤醒灯置于距离头部 40-50 厘米处,例如放在床头柜 上。 24 简体中文 2将电源插头接入插座。 ,, 显示屏上的小时显示将开始闪烁,表示必须设定时钟时间。 (图 5) 设置时钟时间 设置时钟时间后,方可使用自然唤醒灯。 1当显示屏上的小时显示开始闪烁时,上下移动中部旋钮可选择 小时。 2轻按中部旋钮,然后释放以确认选择。 ,, 分钟显示将开始闪烁。 (图 6) 3上下移动中部旋钮以选择分钟。 4轻按中部旋钮,然后释放以确认选择。 ,, 本产品将退出该菜单,显示屏将显示设置好的时钟时间。 这时本产品已经准备就绪。 注意: 每次从电源插座上拔下插头超过 15 分钟时,您必须按照上 述步骤 1 至 4 重新设置时钟时间。 注意: 在插头仍在插座中时,若想要更改设定的时钟时间,请轻 按两次中部旋钮以进入设置时钟时间的菜单。当小时读数开始闪 烁时,便进入了该菜单。其后,按照上述步骤 1 至 4 进行操作。 使用本产品 顶部和底部旋钮 -- 使用顶部旋钮,您可以打开或关闭灯光和设置光线亮度(请参 阅本章中“使用自然唤醒灯”部分)。 -- 使用底部旋钮,您可以打开或关闭收音机和设置音量(请参阅 本章中“收音机/音量”部分)。 注意: 轻按旋钮并释放,即可打开或关闭灯光(顶部旋钮)或收 音机(底部旋钮),上下移动旋钮可更改光线亮度(顶部旋钮) 或音量级别(底部旋钮)。 简体中文 25 中部旋钮 使用中部旋钮可在菜单中选择各种功能。这些功能将按下列顺序 显示在菜单中: -- 时钟时间 -- 闹钟时间 -- 闹钟声音 -- 黄昏模拟定时功能 -- 显示屏亮度调节功能 您可按以下方式操作中部旋钮: 1轻按中部旋钮然后释放,可进入菜单。 (图 7) 不要用力按压旋钮,如果用力按压,旋钮将不起 作用。 2上下移动中部旋钮可选择功能。 (图 8) 3轻按中部旋钮然后释放,可进入该功能。 4上下移动中部旋钮可选择该功能的选项。 5轻按中部旋钮,然后释放以确认选择。 如果在菜单中持续 5 秒钟未操作旋钮,本产品将自 动退出菜单并再次显示时钟时间。 设置闹钟 要设置闹钟,请选择闹钟时间和要用于唤醒的声音类型。 当闹钟 符号和闹钟声音符号显示在显示屏上时,表明闹钟设置已完成。 注意: 上下移动顶部旋钮,可设置光线亮度;上下移动底部旋 钮,可设置闹钟音量。如果您不想由灯光或声音唤醒,请将光线 亮度或音量级别设置为 0(显示屏上显示为“OFF”(关))。请 参阅本章中“使用自然唤醒灯”和“收音机/音量”部分。 提示: 初次使用本产品时,可将光线亮度设置为 20。醒来后,轻 轻上下移动顶部旋钮便可查看产品达到的光线亮度级别。这时, 当前的闹钟光线亮度级别将显示在显示屏上。将第二天的闹钟光 线亮度设置在该级别。 26 简体中文 1将控制杆向下推至中间位置可打开闹钟。 (图 9) ,, 闹钟时间的小时显示将开始闪烁。 (图 10) ,, 要调整闹钟时间,请遵循下列步骤 2 至 5。如果闹钟时间是正 确的,只需等待几秒钟。 2上下移动中部旋钮可选择小时。 注意: 只能在小时显示闪烁时,才能选择小时。如果没有闪烁, 将控制杆再次上下推可进入闹钟时间功能界面。 注意: 您还可以使用中部旋钮来选择闹钟时间功能和设置闹钟时 间(请参阅本章中“中部旋钮”部分)。 3轻按中部旋钮然后释放可确认选择。 ,, 闹钟时间的分钟显示将开始闪烁。 (图 11) 4上下移动中部旋钮可选择分钟。 5轻按中部旋钮然后释放,或等待几秒钟,以确认选择。 ,, 本产品将退出该菜单,显示屏将显示时钟时间。 此时,闹钟时间设置即已完成。 关闭闹钟 要关闭闹钟,请将控制杆上推至顶部位置。 注意: 灯光将保持打开状态。轻按顶部旋钮然后释放可关闭灯 光。 注意: 在 90 分钟后,闹钟(声音和/或灯光)会自动关闭。 设置闹钟声音 请遵循本章“中部旋钮”部分中的步骤 1 至 5。 您可以选择以下任一种声音: -- 收音机 (图 12) -- 鸟鸣 (图 13) -- 蜂鸣 (图 14) -- 非洲丛林 (图 15) -- 风铃 (图 16) 再响 1当闹钟响铃时,将控制杆下推至底部位置。 (图 17) 简体中文 27 ,, 灯管将以选定的亮度级别持续亮起,但闹钟会停止响铃。9 分 钟后,唤醒声会再次自动播放。 注意: 9 分钟的再响时间是固定的。此时间不可调整。 注意: 如果在向下推控制杆时用力过大,则其可能会跳回关闭位 置。 闹钟演示 若要查看光线亮度以及音量逐渐增加的快速演示(60 秒),请激 活本产品的测试功能。 1将控制杆向下推至底部位置几秒钟,直至显示屏上出现 TEST(测试)。 (图 18) 2再次向下推控制杆可停止演示。 注意: 本产品会持续运行闹钟演示,直至再次向下推控制杆。测 试功能会在 9 小时后自动停止。 使用自然唤醒灯 您可使用顶部旋钮打开自然唤醒灯作为床头灯使用,并可设置光 线亮度。 1要打开自然唤醒灯,请先轻按顶部旋钮,然后释放。 (图 19) 注意: 灯管亮起大约需要 1 秒钟时间。这是正常现象,因为灯管 需要预热。 注意: 当产品处于菜单模式时,按下顶部旋钮后,灯泡不会亮 起。 2上下移动顶部旋钮可选择所需的光线亮度级别。 (图 20) 您在 1 到 20 之间选择光线亮度级别。 注意: 您所选择的光线亮度级别也会自动设置为闹钟的光线亮度 级别。 3要关闭自然唤醒灯,请先轻按顶部旋钮,然后释放。 注意: 您也可通过上下移动顶部旋钮来查看和/或选择光线亮度级 别,而无需先按下顶部旋钮。 28 简体中文 收音机/音量 1要打开收音机,请先轻按底部旋钮,然后释放。 (图 21) 2要手动选择想要的收音频率,请上下移动中部旋钮。 (图 22) 提示: 要自动扫描收音频率,请按住中部旋钮约 2 秒钟。 提示: 为确保获得良好的收音机信号,请完全展开天线并朝各个 方向移动,直至找到接收效果最佳的位置。 3要关闭收音机,请先轻按底部旋钮,然后释放。 音量 1要设置音量,请上下移动底部旋钮以选择所需音量。 您可在 1 至 20 之间选择音量级别。 注意: 您所选择的音量级别也会自动设置为闹钟的音量级别。 黄昏模拟功能 如果您想在睡觉前让自然唤醒灯的灯光和/或声音在设定的时间段 内(15 分钟至 2 小时)保持打开状态并逐渐变暗/降低,请选择黄 昏模拟功能。灯光和/或声音会在设定的时间过后自动关闭。 1请遵照本章“中部旋钮”部分中的步骤 1 至 5 选择黄昏模拟功 能,并设置黄昏模拟时间。 注意: 您可在 15 至 120 分钟(15、30、60、90 或 120 分钟) 之间进行选择。 ,, 在设定的时间过后,无论灯光和/或收音机是否已打开,本产品 都会自动关闭灯光和声音。 显示屏亮度调节功能 如果想调整显示屏的亮度,请选择显示屏亮度调节功能。 1请遵照本章“中部旋钮”部分中的步骤 1 至 5,选择显示屏亮 度调节功能并设置显示屏亮度。 您可在 1 至 4 之间选择显示屏亮度。 简体中文 29 清洁和保养 不要使用钢丝绒、研磨性清洁剂或腐蚀性液体( 例如汽油或丙酮)来清洁产品。 请定期使用干布清除本产品外部的灰尘。 1清洁产品前,务必先将电源插头拔掉。 2用干布清洁产品外表面。 切勿让水进入产品或溅到产品表面。 (图 23) 环境 -- 弃置产品时,请不要将其与一般生活垃圾堆放在一起;应将其 交给官方指定的回收中心。这样做有利于环保。 (图 24) 保修和服务 如果您需要服务或信息,或者有任何疑问,请访问飞利浦网 站:www.philips.com。您也可以与所在国家/地区的飞利浦顾客服 务中心联系(可从全球保修卡中找到其电话号码)。如果您的所 在地没有飞利浦客户服务中心,可与当地的飞利浦经销商联系。 保修限制 出于安全考虑,本产品的灯管不能更换。如果本产品的灯管不能 工作,请访问飞利浦网站 www.philips.com 或与您所在国家/地区 的飞利浦客户服务中心联系(可在全球保修卡中找到其电话号 码)。如果您所在的国家/地区没有飞利浦客户服务中心,请与当 地的飞利浦经销商联系。 30 简体中文 故障种类和处理方法 本章归纳了使用本产品时最可能遇到的问题。如果您无法根据下 面的信息解决问题,请与您所在国家/地区的飞利浦客户服务中心 联系。 问题 解决方法 产品完全无法 工作。 可能没有将插头正确接入电源插座。将插头正 确接入电源插座。 可能存在电源故障。连接其它产品,检查供电 是否正常。 产品功能正 常,但是灯管 不能继续工 作。 灯管可能已达到使用寿命极限。灯泡具有超过 10,000 小时(正常使用情况下超过 7 年)的预 期寿命。其寿命取决于产品的具体使用情况。 在使用频率极高的情况下,灯管寿命可能不能 达到预期。灯管不可更换。如果灯管出现故 障,请与您所在国家/地区的飞利浦客户服务中 心联系。 产品在使用过 程中发热。 这是正常现象,因为灯光和电子元件会使本产 品发热。 在尝试按下或 移动旋钮时, 产品没有反 应。 从电源插座上拔出插头,然后重新插上。如果 在 15 分钟内重新插接插头,产品将会记忆所有 设置。如果在较长时间后重新插接插头,那么 产品将会记住除时间外的所有设置。 当闹钟响铃 时,灯管不 亮。 可能是设置的光线亮度级别过低。请调高光线 亮度级别。 可能是将控制杆设置在了顶部位置,从而关闭 了闹钟功能。要打开闹钟功能,请将控制杆设 置在中间位置 产品可能存在瑕疵。请与您所在国家/地区的飞 利浦客户服务中心联系。 简体中文 31 问题 解决方法 开灯时,灯管 不能立即亮 起。 灯管亮起大约需要 1 秒钟时间。这是正常情 况,因为灯泡需要预热。 当闹钟响铃 时,没有听到 闹钟声。 可能是设置的音量过低。要设置较高的音量, 请参阅“使用本产品”一章中的“收音机/音 量”部分。 可能是将控制杆设置在了顶部位置,从而关闭 了闹钟功能。 如果选择收音机作为闹钟的声音,则可能是收 音机存在问题。关闭闹钟后打开收音机,检查 其是否工作。如果收音机无法工作,请与您所 在国家/地区的飞利浦客户服务中心联系。 收音机无法工 作。 收音机可能存在问题。请与您所在国家/地区的 飞利浦客户服务中心联系。 收音机出现爆 音。 可能是广播信号太弱。上下移动中部旋钮调节 频率和/或朝四周移动以更改天线方向。确保已 完全展开天线。 闹钟在昨天响 铃了,但是今 天没响。 可能是将控制杆设置在了顶部位置,从而关闭 了闹钟功能。 可能是设置的音量和/或光线亮度级别过低。请 设置较高的音量和/或光线亮度级别。 可能是停电时间超过了 15 分钟。在此情况下, 本产品已保存除时间外的所有设置。因此,时 钟时间会在显示屏上闪烁。请设置正确的时钟 时间。 32 简体中文 问题 解决方法 将控制杆推 至“再响”位 置后,闹钟没 有响铃 9 分 钟。 可能是向下推控制杆时用力过大,使其跳回了 关闭位置。 可能已将音量级别设置为 0(显示屏上显示 为“OFF(关)”)。 灯光将我唤醒 得太早。 可能是所设置的光线亮度级别不适合您。如果 醒得太早,请尝试设置较低的光线亮度级别。 如果光线亮度 1 不够低,请让自然唤醒灯离床 铺远一些。 灯光将我唤醒 得太晚。 可能是自然唤醒灯位于比头低的位置。确保自 然唤醒灯位于较高的位置,灯光不会被床铺、 被子或枕头所遮挡。同时确保不要将自然唤醒 灯放得过远。 灯管闪烁。 可能出现过电源故障。如果之前发生了电源故 障,那么灯管闪烁是正常的。 可能所连接的电压不适用于本产品,请确保产 品上的标示电压与当地电源电压相符。 33 2009/10/09 34 2 3 4 5 6 7 8 9 10 11 12 13 14 15 16 17 18 19 20 21 For indoor use only 35 MHz. 22 23 24 www.philips.com u 4222.002.7536.1