1
Xerox WorkCentre C226
User Guide
Warranty
While every effort has been made to make this operation manual as accurate and
helpful as possible, Xerox Corporation makes no warranty of any kind with regard
to its content. All information included herein is subject to change without notice.
Xerox is not responsible for any loss or damages, direct or indirect, arising from or
related to the use of this operation manual.
© Copyright Xerox Corporation 2005. All rights reserved. Reproduction, adaptation or translation without prior written permission is prohibited, except as allowed
under copyright laws.
Trademark information
•
•
•
•
•
•
Microsoft Windows operating system is a registered trademark or trademark
of the Microsoft Corporation in the U.S.A. and other countries.
Windows 98, Windows Me, Windows NT 4.0, Windows 2000, and Windows
XP are registered trademarks or trademarks of Microsoft Corporation in the
U.S.A. and other countries.
Netscape Navigator is a trademark of Netscape Communications Corporation.
Adobe® Reader Copyright© 1987-2005 Adobe Systems Incorporated. All
rights reserved.
Adobe, the Adobe logo, Acrobat, and the Acrobat logo are trademarks of
Adobe Systems Incorporated.
All other company names and product names appearing in this manual are
the trademarks of their respective owners.
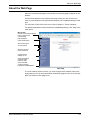
Table of contents
Introduction
Safety Notes . . . . . . . . . . . . . . . . . . . . . . . . . . . . . . . . . . . . . . . xv
WARNING - Electrical Safety Information . . . . . . . . . . . . . . . . . . . . . . . . . . . . . . . . . xvi
Operational Safety Information . . . . . . . . . . . . . . . . . . . . . . . . . . . . . . . . . . . . . . . . . .xvii
Maintenance Information . . . . . . . . . . . . . . . . . . . . . . . . . . . . . . . . . . . . . . . . . . . . . xviii
Ozone Safety Information . . . . . . . . . . . . . . . . . . . . . . . . . . . . . . . . . . . . . . . . . . . . . xviii
For Consumables . . . . . . . . . . . . . . . . . . . . . . . . . . . . . . . . . . . . . . . . . . . . . . . . . . . xviii
Radio Frequency Emissions . . . . . . . . . . . . . . . . . . . . . . . . . . . . . . . . . . . . . . . . . . . . xix
Product Safety Certification . . . . . . . . . . . . . . . . . . . . . . . . . . . . . . . . . . . . . . . . . . . . xix
Regulatory Information for Fax Function . . . . . . . . . . . . . . . . xx
USA . . . . . . . . . . . . . . . . . . . . . . . . . . . . . . . . . . . . . . . . . . . . . . . . . . . . . . . . . . . . . . xx
FAX Send Header Requirements: . . . . . . . . . . . . . . . . . . . . . . . . . . . . . . . . . . . xx
Data Coupler Information . . . . . . . . . . . . . . . . . . . . . . . . . . . . . . . . . . . . . . . . . xxi
Canada . . . . . . . . . . . . . . . . . . . . . . . . . . . . . . . . . . . . . . . . . . . . . . . . . . . . . . . . . . . .xxii
Europe . . . . . . . . . . . . . . . . . . . . . . . . . . . . . . . . . . . . . . . . . . . . . . . . . . . . . . . . . . . .xxii
Certification to 1999/5/EC Radio Equipment &
Telecommunications Terminal Equipment Directive . . . . . . . . . . . . . . . . . . .xxii
Environmental Compliance . . . . . . . . . . . . . . . . . . . . . . . . . xxiii
USA - Energy Star . . . . . . . . . . . . . . . . . . . . . . . . . . . . . . . . . . . . . . . . . . . . . . . . . . xxiii
Canada - Environmental Choice. . . . . . . . . . . . . . . . . . . . . . . . . . . . . . . . . . . . . . . . xxiii
Europe - Energy . . . . . . . . . . . . . . . . . . . . . . . . . . . . . . . . . . . . . . . . . . . . . . . . . . . . xxiv
Illegal Copies . . . . . . . . . . . . . . . . . . . . . . . . . . . . . . . . . . . . . xxiv
USA . . . . . . . . . . . . . . . . . . . . . . . . . . . . . . . . . . . . . . . . . . . . . . . . . . . . . . . . . . . . . xxiv
Canada . . . . . . . . . . . . . . . . . . . . . . . . . . . . . . . . . . . . . . . . . . . . . . . . . . . . . . . . . . . xxv
Other countries . . . . . . . . . . . . . . . . . . . . . . . . . . . . . . . . . . . . . . . . . . . . . . . . . . . . . xxvi
Product Recycling and Disposal . . . . . . . . . . . . . . . . . . . . . xxvi
Xerox WorkCentre C226 User Guide
iii
1 General Information
Before Using the Product . . . . . . . . . . . . . . . . . . . . . . . . . . . . 1-1
Installation Requirements . . . . . . . . . . . . . . . . . . . . . . . . . . . . . . . . . . . . . . . . . . . 1-1
Moving this machine . . . . . . . . . . . . . . . . . . . . . . . . . . . . . . . . . . . . . . . . . . 1-3
Cautions. . . . . . . . . . . . . . . . . . . . . . . . . . . . . . . . . . . . . . . . . . . . . . . . . . . . 1-4
Introduction. . . . . . . . . . . . . . . . . . . . . . . . . . . . . . . . . . . . . . . . . . . . . . . . . . . . . . 1-5
Main Features. . . . . . . . . . . . . . . . . . . . . . . . . . . . . . . . . . . . . . . . . . . . . . . . . . . . 1-7
Energy saving features . . . . . . . . . . . . . . . . . . . . . . . . . . . . . . . . . . . . . . . . 1-8
Part Names and Functions . . . . . . . . . . . . . . . . . . . . . . . . . . . . . . . . . . . . . . . . . . 1-9
Exterior. . . . . . . . . . . . . . . . . . . . . . . . . . . . . . . . . . . . . . . . . . . . . . . . . . . . . 1-9
Interior . . . . . . . . . . . . . . . . . . . . . . . . . . . . . . . . . . . . . . . . . . . . . . . . . . . . 1-11
Part names and functions of peripheral devices . . . . . . . . . . . . . . . . . . . . 1-12
Other optional equipment. . . . . . . . . . . . . . . . . . . . . . . . . . . . . . . . . . . . . . 1-13
Operation panel . . . . . . . . . . . . . . . . . . . . . . . . . . . . . . . . . . . . . . . . . . . . . 1-14
Touch panel . . . . . . . . . . . . . . . . . . . . . . . . . . . . . . . . . . . . . . . . . . . . . . . . 1-16
Auditing Mode. . . . . . . . . . . . . . . . . . . . . . . . . . . . . . . . . . . . . . . . . . . . . . . . . . . 1-18
Managing the Machine. . . . . . . . . . . . . . . . . . . . . . . . . . . . . . 1-21
Loading Paper . . . . . . . . . . . . . . . . . . . . . . . . . . . . . . . . . . . . . . . . . . . . . . . . . . 1-21
Loading paper in Paper Tray 1 . . . . . . . . . . . . . . . . . . . . . . . . . . . . . . . . . 1-21
Changing the paper size in Paper Tray 1 . . . . . . . . . . . . . . . . . . . . . . . . . 1-22
Loading paper in the Bypass Tray . . . . . . . . . . . . . . . . . . . . . . . . . . . . . . . 1-23
Setting envelopes or postcards . . . . . . . . . . . . . . . . . . . . . . . . . . . . .1-26
Loading paper in the stand/1-Tray Unit/3-Tray Unit . . . . . . . . . . . . . . . . . . 1-28
Specifications (stand/1-Tray Unit/3-Tray Unit) . . . . . . . . . . . . . . . . . . . . . . 1-29
Loading paper in the Duplex Module/2-Tray Unit . . . . . . . . . . . . . . . . . . . 1-29
Specifications (Duplex Module/2-Tray Unit). . . . . . . . . . . . . . . . . . . . . . . . 1-30
Specifications for paper trays. . . . . . . . . . . . . . . . . . . . . . . . . . . . . . . . . . . 1-30
More information on plain paper . . . . . . . . . . . . . . . . . . . . . . . . . . . . .1-32
More information on special media that can be used . . . . . . . . . . . . .1-32
Paper that can be used for automatic two-sided printing . . . . . . . . . .1-33
Setting the paper type (except the Bypass Tray). . . . . . . . . . . . . . . . . . . . 1-33
Setting the paper size when an extra size is loaded . . . . . . . . . . . . . . . . . 1-34
Setting the paper type and paper size in the Bypass Tray . . . . . . . . . . . . 1-35
Custom Settings . . . . . . . . . . . . . . . . . . . . . . . . . . . . . . . . . . . . . . . . . . . . . . . . . 1-37
Operation procedure common to all custom settings. . . . . . . . . . . . . . . . . 1-39
About the settings . . . . . . . . . . . . . . . . . . . . . . . . . . . . . . . . . . . . . . . . . . . 1-40
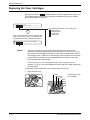
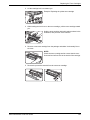
Replacing the Toner Cartridges . . . . . . . . . . . . . . . . . . . . . . . . . . . . . . . . . . . . . 1-42
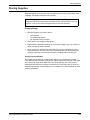
Storing Supplies . . . . . . . . . . . . . . . . . . . . . . . . . . . . . . . . . . . . . . . . . . . . . . . . . 1-45
iv
Xerox WorkCentre C226 User Guide
Proper storage . . . . . . . . . . . . . . . . . . . . . . . . . . . . . . . . . . . . . . . . . .1-45
Misfeed Removal . . . . . . . . . . . . . . . . . . . . . . . . . . . . . . . . . . . . . . . . . . . . . . . . 1-46
Misfeed Removal Guidance. . . . . . . . . . . . . . . . . . . . . . . . . . . . . . . . . . . . 1-47
Misfeed in the paper feed area . . . . . . . . . . . . . . . . . . . . . . . . . . . . . . . . . 1-47
Misfeed in the transport area, fusing area, and exit area. . . . . . . . . . . . . . 1-49
Misfeed in the stand/1-Tray Unit . . . . . . . . . . . . . . . . . . . . . . . . . . . . . . . . 1-52
Misfeed in the 3-Tray Unit . . . . . . . . . . . . . . . . . . . . . . . . . . . . . . . . . . . . . 1-53
Misfeed in the Duplex Bypass/Inverter Unit and Duplex Module/2-Tray Unit 153
Misfeed in the upper or lower tray . . . . . . . . . . . . . . . . . . . . . . . . . . .1-55
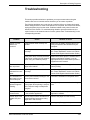
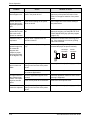
Troubleshooting . . . . . . . . . . . . . . . . . . . . . . . . . . . . . . . . . . . . . . . . . . . . . . . . . 1-56
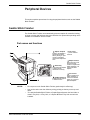
Peripheral Devices . . . . . . . . . . . . . . . . . . . . . . . . . . . . . . . . . 1-59
Saddle Stitch Finisher. . . . . . . . . . . . . . . . . . . . . . . . . . . . . . . . . . . . . . . . . . . . . 1-59
Part names and functions . . . . . . . . . . . . . . . . . . . . . . . . . . . . . . . . . . . . . 1-59
Using the Saddle Stitch Finisher . . . . . . . . . . . . . . . . . . . . . . . . . . . . . . . . 1-60
Staple cartridge replacement and staple jam removal. . . . . . . . . . . . . . . . 1-61
Staple cartridge replacement . . . . . . . . . . . . . . . . . . . . . . . . . . . . . . .1-61
Staple jam removal . . . . . . . . . . . . . . . . . . . . . . . . . . . . . . . . . . . . . . .1-63
Disposal of hole punch scrap (when the punch unit is installed) . . . .1-66
Misfeed in the Saddle Stitch Finisher. . . . . . . . . . . . . . . . . . . . . . . . . . . . . 1-67
Troubleshooting Saddle Stitch Finisher problems . . . . . . . . . . . . . . . . . . . 1-70
Stapling position quick reference guide for duplex output . . . . . . . . . . . . . 1-72
Relation between print image and saddle stitch . . . . . . . . . . . . . . . . . . . . 1-73
High Capacity Feeder. . . . . . . . . . . . . . . . . . . . . . . . . . . . . . . . . . . . . . . . . . . . . 1-74
Part name . . . . . . . . . . . . . . . . . . . . . . . . . . . . . . . . . . . . . . . . . . . . . . . . . 1-74
Loading paper in the High Capacity Feeder . . . . . . . . . . . . . . . . . . . . . . . 1-74
Misfeed in the High Capacity Feeder. . . . . . . . . . . . . . . . . . . . . . . . . . . . . 1-75
2 Copier Operation
Before Making Copies . . . . . . . . . . . . . . . . . . . . . . . . . . . . . . . 2-1
Part Names and Functions (The DADF). . . . . . . . . . . . . . . . . . . . . . . . . . . . . . . . 2-1
Exterior. . . . . . . . . . . . . . . . . . . . . . . . . . . . . . . . . . . . . . . . . . . . . . . . . . . . . 2-1
Touch Panel (main screen of copy mode) . . . . . . . . . . . . . . . . . . . . . . . . . . 2-2
DADF . . . . . . . . . . . . . . . . . . . . . . . . . . . . . . . . . . . . . . . . . . . . . . . . . . . . . . . . . . 2-3
Acceptable originals. . . . . . . . . . . . . . . . . . . . . . . . . . . . . . . . . . . . . . . . . . . 2-3
Size and weight of acceptable originals . . . . . . . . . . . . . . . . . . . . . . . .2-4
Setting Originals . . . . . . . . . . . . . . . . . . . . . . . . . . . . . . . . . . . . . . . . . . . . . . . . . . 2-4
Xerox WorkCentre C226 User Guide
v
When using the DADF . . . . . . . . . . . . . . . . . . . . . . . . . . . . . . . . . . . . .2-4
When using the document glass . . . . . . . . . . . . . . . . . . . . . . . . . . . . . . . . . 2-5
Standard original setting orientation . . . . . . . . . . . . . . . . . . . . . . . . . . .2-7
Automatic copy image rotation - rotation copying . . . . . . . . . . . . . . . . .2-8
Selecting the Original Size . . . . . . . . . . . . . . . . . . . . . . . . . . . . . . . . . . . . . . . . . . 2-8
Storing, Deleting, and Using Original Sizes . . . . . . . . . . . . . . . . . . . . . . . . . . . . 2-10
Storing or deleting an original size . . . . . . . . . . . . . . . . . . . . . . . . . . . . . . . 2-10
Using a Stored Original Size . . . . . . . . . . . . . . . . . . . . . . . . . . . . . . .2-12
Basic Procedure for Making Copies. . . . . . . . . . . . . . . . . . . 2-13
Normal Copying . . . . . . . . . . . . . . . . . . . . . . . . . . . . . . . . . . . . . . . . . . . . . . . . . 2-13
Copying from the DADF. . . . . . . . . . . . . . . . . . . . . . . . . . . . . . . . . . . . . . . 2-13
1-sided copies of 1-sided originals . . . . . . . . . . . . . . . . . . . . . . . . . . .2-13
Automatic two-sided copying from the DADF . . . . . . . . . . . . . . . . . . . . . . 2-19
Copying from the document glass . . . . . . . . . . . . . . . . . . . . . . . . . . . . . . . 2-21
1-sided copies of 1-sided originals . . . . . . . . . . . . . . . . . . . . . . . . . . .2-21
Automatic two-sided copying from the document glass. . . . . . . . . . . . . . . 2-24
Exposure Adjustments . . . . . . . . . . . . . . . . . . . . . . . . . . . . . . . . . . . . . . . . . . . . 2-25
Reduction/Enlargement/Zoom . . . . . . . . . . . . . . . . . . . . . . . . . . . . . . . . . . . . . . 2-28
Automatic selection (auto image). . . . . . . . . . . . . . . . . . . . . . . . . . . . . . . . 2-28
Manual selection . . . . . . . . . . . . . . . . . . . . . . . . . . . . . . . . . . . . . . . . . . . . 2-30
XY Zoom . . . . . . . . . . . . . . . . . . . . . . . . . . . . . . . . . . . . . . . . . . . . . . . . . . 2-33
Special Papers . . . . . . . . . . . . . . . . . . . . . . . . . . . . . . . . . . . . . . . . . . . . . . . . . . 2-35
Convenient Copy Functions . . . . . . . . . . . . . . . . . . . . . . . . . 2-37
Special Modes . . . . . . . . . . . . . . . . . . . . . . . . . . . . . . . . . . . . . . . . . . . . . . . . . . 2-37
Common operation procedure for using the special functions. . . . . . . . . . 2-38
Margin shift . . . . . . . . . . . . . . . . . . . . . . . . . . . . . . . . . . . . . . . . . . . . . . . . 2-39
Erase . . . . . . . . . . . . . . . . . . . . . . . . . . . . . . . . . . . . . . . . . . . . . . . . . . . . . 2-41
Dual page copy . . . . . . . . . . . . . . . . . . . . . . . . . . . . . . . . . . . . . . . . . . . . . 2-42
Centring . . . . . . . . . . . . . . . . . . . . . . . . . . . . . . . . . . . . . . . . . . . . . . . . . . . 2-44
Transparency film with insert sheets . . . . . . . . . . . . . . . . . . . . . . . . . . . . . 2-45
Covers . . . . . . . . . . . . . . . . . . . . . . . . . . . . . . . . . . . . . . . . . . . . . . . . . . . . 2-47
Copying onto a cover . . . . . . . . . . . . . . . . . . . . . . . . . . . . . . . . . . . . .2-47
Not copying onto a cover . . . . . . . . . . . . . . . . . . . . . . . . . . . . . . . . . .2-48
B/W reverse . . . . . . . . . . . . . . . . . . . . . . . . . . . . . . . . . . . . . . . . . . . . . . . . 2-50
Colour Adjustments Menu . . . . . . . . . . . . . . . . . . . . . . . . . . . . . . . . . . . . . . . . . 2-51
RGB Adjust . . . . . . . . . . . . . . . . . . . . . . . . . . . . . . . . . . . . . . . . . . . . . . . . 2-52
Sharpness . . . . . . . . . . . . . . . . . . . . . . . . . . . . . . . . . . . . . . . . . . . . . . . . . 2-53
Suppress background . . . . . . . . . . . . . . . . . . . . . . . . . . . . . . . . . . . . . . . . 2-54
Colour balance. . . . . . . . . . . . . . . . . . . . . . . . . . . . . . . . . . . . . . . . . . . . . . 2-55
vi
Xerox WorkCentre C226 User Guide
Brightness . . . . . . . . . . . . . . . . . . . . . . . . . . . . . . . . . . . . . . . . . . . . . . . . .
Intensity . . . . . . . . . . . . . . . . . . . . . . . . . . . . . . . . . . . . . . . . . . . . . . . . . . .
Image Edit Menu . . . . . . . . . . . . . . . . . . . . . . . . . . . . . . . . . . . . . . . . . . . . . . . .
Single colour . . . . . . . . . . . . . . . . . . . . . . . . . . . . . . . . . . . . . . . . . . . . . . .
Mirror image. . . . . . . . . . . . . . . . . . . . . . . . . . . . . . . . . . . . . . . . . . . . . . . .
Photo Repeat . . . . . . . . . . . . . . . . . . . . . . . . . . . . . . . . . . . . . . . . . . . . . . .
Multi shot . . . . . . . . . . . . . . . . . . . . . . . . . . . . . . . . . . . . . . . . . . . . . . . . . .
A3 (11" x 17") Full-bleed . . . . . . . . . . . . . . . . . . . . . . . . . . . . . . . . . . . . . .
Multi-page enlargement . . . . . . . . . . . . . . . . . . . . . . . . . . . . . . . . . . . . . . .
Pamphlet copy . . . . . . . . . . . . . . . . . . . . . . . . . . . . . . . . . . . . . . . . . . . . . .
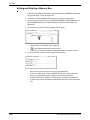
Job Program Memory . . . . . . . . . . . . . . . . . . . . . . . . . . . . . . . . . . . . . . . . . . . . .
Storing a job program . . . . . . . . . . . . . . . . . . . . . . . . . . . . . . . . . . . . . . . .
Recalling a job program . . . . . . . . . . . . . . . . . . . . . . . . . . . . . . . . . . . . . . .
Deleting a stored job program . . . . . . . . . . . . . . . . . . . . . . . . . . . . . . . . . .
Interrupting a Copy Run . . . . . . . . . . . . . . . . . . . . . . . . . . . . . . . . . . . . . . . . . . .
2-57
2-58
2-59
2-60
2-61
2-62
2-64
2-66
2-68
2-71
2-73
2-73
2-74
2-75
2-77
Machine Maintenance (for Copying) . . . . . . . . . . . . . . . . . . 2-79
Removing an Original Misfeed . . . . . . . . . . . . . . . . . . . . . . . . . . . . . . . . . . . . . .
Removing a misfed original from the DADF. . . . . . . . . . . . . . . . . . . . . . . .
User Maintenance (for copying) . . . . . . . . . . . . . . . . . . . . . . . . . . . . . . . . . . . . .
Cleaning the Original Scanning Area . . . . . . . . . . . . . . . . . . . . . . . . . . . . . . . . .
Troubleshooting . . . . . . . . . . . . . . . . . . . . . . . . . . . . . . . . . . . . . . . . . . . . . . . . .
2-79
2-79
2-81
2-82
2-83
3 Printer Operation
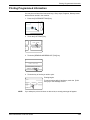
Basic Printing Procedures . . . . . . . . . . . . . . . . . . . . . . . . . . . 3-1
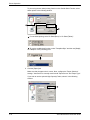
Setting the Printer Drivers . . . . . . . . . . . . . . . . . . . . . . . . . . . . . . . . . . . . . . . . . . 3-1
Printer driver settings in Windows (selecting and setting print conditions) . 3-1
Windows 95 / 98 / Me . . . . . . . . . . . . . . . . . . . . . . . . . . . . . . . . . . . . . .3-1
Windows NT4.0 / 2000 / XP / Server 2003 . . . . . . . . . . . . . . . . . . . . . .3-2
Selecting a Color Mode setting . . . . . . . . . . . . . . . . . . . . . . . . . . . . . . .3-2
Using the Help file to view explanations of the settings . . . . . . . . . . . . . . . . 3-3
Opening Help in Windows . . . . . . . . . . . . . . . . . . . . . . . . . . . . . . . . . .3-3
Printing in black and white . . . . . . . . . . . . . . . . . . . . . . . . . . . . . . . . . . . . . . 3-4
Automatic switching between colour and black and white . . . . . . . . . . . . . . 3-7
Printing in colour . . . . . . . . . . . . . . . . . . . . . . . . . . . . . . . . . . . . . . . . . . . . 3-10
Printing using optional peripheral equipment. . . . . . . . . . . . . . . . . . . . . . . 3-12
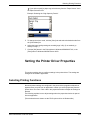
Setting the Printer Driver Properties . . . . . . . . . . . . . . . . . . 3-15
Xerox WorkCentre C226 User Guide
vii
Selecting Printing Functions . . . . . . . . . . . . . . . . . . . . . . . . . . . . . . . . . . . . . . . . 3-15
Frequently used settings . . . . . . . . . . . . . . . . . . . . . . . . . . . . . . . . . . . . . . 3-16
Saddle stitch function . . . . . . . . . . . . . . . . . . . . . . . . . . . . . . . . . . . . .3-20
Staple sort mode . . . . . . . . . . . . . . . . . . . . . . . . . . . . . . . . . . . . . . . .3-20
Hole punching (only if a Hole Punch Module is installed) . . . . . . . . . .3-22
Offset mode . . . . . . . . . . . . . . . . . . . . . . . . . . . . . . . . . . . . . . . . . . . .3-22
Paper settings . . . . . . . . . . . . . . . . . . . . . . . . . . . . . . . . . . . . . . . . . . . . . . 3-26
Advanced settings . . . . . . . . . . . . . . . . . . . . . . . . . . . . . . . . . . . . . . . . . . . 3-29
PCL5c . . . . . . . . . . . . . . . . . . . . . . . . . . . . . . . . . . . . . . . . . . . . . . . . .3-29
PostScript . . . . . . . . . . . . . . . . . . . . . . . . . . . . . . . . . . . . . . . . . . . . . .3-31
Watermark settings . . . . . . . . . . . . . . . . . . . . . . . . . . . . . . . . . . . . . . . . . . 3-33
Color settings . . . . . . . . . . . . . . . . . . . . . . . . . . . . . . . . . . . . . . . . . . . . . . . 3-35
Web Pages in the Printer. . . . . . . . . . . . . . . . . . . . . . . . . . . . 3-40
Printer Configuration Through the Network . . . . . . . . . . . . . . . . . . . . . . . . . . . . 3-40
Environment required for accessing Web pages . . . . . . . . . . . . . . . . . . . . 3-40
Accessing Web pages and displaying help . . . . . . . . . . . . . . . . . . . . . . . . 3-40
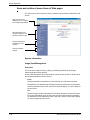
Items and outline of menu frame of Web pages . . . . . . . . . . . . . . . . . . . . 3-42
System Information . . . . . . . . . . . . . . . . . . . . . . . . . . . . . . . . . . . . . . .3-42
Device Setup . . . . . . . . . . . . . . . . . . . . . . . . . . . . . . . . . . . . . . . . . . .3-43
Network Setup . . . . . . . . . . . . . . . . . . . . . . . . . . . . . . . . . . . . . . . . . .3-44
Printer Configuration Settings . . . . . . . . . . . . . . . . . . . . . . . 3-44
Making Configuration Settings . . . . . . . . . . . . . . . . . . . . . . . . . . . . . . . . . . . . . . 3-44
Operation procedure common to all printer configuration settings . . . . . . 3-45
Default settings . . . . . . . . . . . . . . . . . . . . . . . . . . . . . . . . . . . . . . . . . . . . . 3-46
Copies . . . . . . . . . . . . . . . . . . . . . . . . . . . . . . . . . . . . . . . . . . . . . . . .3-46
Orientation . . . . . . . . . . . . . . . . . . . . . . . . . . . . . . . . . . . . . . . . . . . . .3-46
Default paper size . . . . . . . . . . . . . . . . . . . . . . . . . . . . . . . . . . . . . . . .3-46
Default output tray . . . . . . . . . . . . . . . . . . . . . . . . . . . . . . . . . . . . . . .3-46
Default paper type . . . . . . . . . . . . . . . . . . . . . . . . . . . . . . . . . . . . . . .3-47
PCL settings. . . . . . . . . . . . . . . . . . . . . . . . . . . . . . . . . . . . . . . . . . . . . . . . 3-47
PCL symbol set setting . . . . . . . . . . . . . . . . . . . . . . . . . . . . . . . . . . . .3-47
PCL font settings . . . . . . . . . . . . . . . . . . . . . . . . . . . . . . . . . . . . . . . .3-47
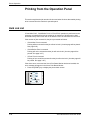
Printing from the Operation Panel . . . . . . . . . . . . . . . . . . . . 3-48
Hold Job List. . . . . . . . . . . . . . . . . . . . . . . . . . . . . . . . . . . . . . . . . . . . . . . . . . . . 3-48
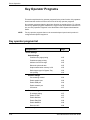
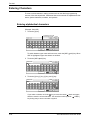
Key Operator Programs. . . . . . . . . . . . . . . . . . . . . . . . . . . . . 3-50
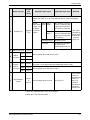
Key operator program list . . . . . . . . . . . . . . . . . . . . . . . . . . . . . . . . . . . . . . . . . . 3-50
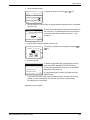
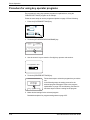
Procedure for using key operator programs . . . . . . . . . . . . . . . . . . . . . . . . . . . . 3-52
viii
Xerox WorkCentre C226 User Guide
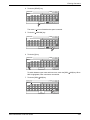
Key operator program menu . . . . . . . . . . . . . . . . . . . . . . . . . . . . . . . . . . . 3-54
Description of Setting Programs. . . . . . . . . . . . . . . . . . . . . . . . . . . . . . . . . . . . . 3-55
Printer settings . . . . . . . . . . . . . . . . . . . . . . . . . . . . . . . . . . . . . . . . . . . . . . 3-55
Default settings . . . . . . . . . . . . . . . . . . . . . . . . . . . . . . . . . . . . . . . . . .3-55
Interface settings . . . . . . . . . . . . . . . . . . . . . . . . . . . . . . . . . . . . . . . .3-56
Network settings . . . . . . . . . . . . . . . . . . . . . . . . . . . . . . . . . . . . . . . . .3-57
Colour adjustments . . . . . . . . . . . . . . . . . . . . . . . . . . . . . . . . . . . . . . .3-58
Initialize and/or store settings . . . . . . . . . . . . . . . . . . . . . . . . . . . . . . .3-59
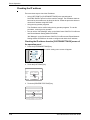
Troubleshooting. . . . . . . . . . . . . . . . . . . . . . . . . . . . . . . . . . . 3-61
Additional information on selecting the paper type for the Bypass Tray when using the printer function . . . . . . . . . . . . . . . . . . . . . . . . . . . . . . . . . . . . . . 3-63
Checking the IP address . . . . . . . . . . . . . . . . . . . . . . . . . . . . . . . . . . . . . . 3-64
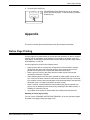
Appendix. . . . . . . . . . . . . . . . . . . . . . . . . . . . . . . . . . . . . . . . . 3-65
Notice Page Printing. . . . . . . . . . . . . . . . . . . . . . . . . . . . . . . . . . . . . . . . . . . . . . 3-65
Print Area . . . . . . . . . . . . . . . . . . . . . . . . . . . . . . . . . . . . . . . . . . . . . . . . . . . . . . 3-66
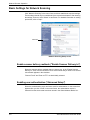
4 Network Scanner Operation
Introduction. . . . . . . . . . . . . . . . . . . . . . . . . . . . . . . . . . . . . . . . . . . . . . . . . . . . . . 4-1
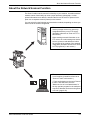
About the Network Scanner Function. . . . . . . . . . . . . . . . . . . . . . . . . . . . . . . . . . 4-3
Settings and Programming Required for the Network Scanner
Feature . . . . . . . . . . . . . . . . . . . . . . . . . . . . . . . . . . . . . . . . 4-4
Accessing Web Pages . . . . . . . . . . . . . . . . . . . . . . . . . . . . . . . . . . . . . . . . . . . . . 4-4
About the Web Page . . . . . . . . . . . . . . . . . . . . . . . . . . . . . . . . . . . . . . . . . . . . . . 4-5
Basic Settings for Network Scanning . . . . . . . . . . . . . . . . . . . . . . . . . . . . . . . . . . 4-6
Enable scanner delivery methods ("Enable Scanner Delivery to") . . . . . . . 4-6
Enabling user authentication ("Advanced Setup") . . . . . . . . . . . . . . . . . . . . 4-6
Select the method for assigning a file name to a scanned image ("File Naming")
4-7
Selecting an e-mail subject ("E-mail Subject": only used for Scan to E-mail) 47
E-mail Server and DNS Server Settings . . . . . . . . . . . . . . . . . . . . . . . . . . . 4-7
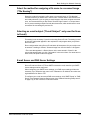
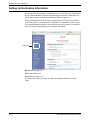
Setting Up Destination Information. . . . . . . . . . . . . . . . . . . . . . . . . . . . . . . . . . . 4-10
Storing destinations for Scan to E-mail . . . . . . . . . . . . . . . . . . . . . . . . . . . 4-11
Storing destinations for Scan to FTP . . . . . . . . . . . . . . . . . . . . . . . . . . . . . 4-12
Storing Groups (Scan to E-mail) . . . . . . . . . . . . . . . . . . . . . . . . . . . . . . . . 4-14
Editing and deleting programmed transmission destinations. . . . . . . . . . . 4-15
Xerox WorkCentre C226 User Guide
ix
Storing Sender Information (Scan to E-mail) . . . . . . . . . . . . . . . . . . . . . . . . . . .
Editing and deleting programmed sender's information. . . . . . . . . . . . . . .
Storing a Custom Directory . . . . . . . . . . . . . . . . . . . . . . . . . . . . . . . . . . . . . . . .
Protecting Information Programmed in the Web Page ("Passwords") . . . . . . . .
4-16
4-17
4-17
4-18
Condition Setting Screen of Scanner Mode . . . . . . . . . . . . 4-18
Condition setting screen . . . . . . . . . . . . . . . . . . . . . . . . . . . . . . . . . . . . . . 4-19
Address directory screen . . . . . . . . . . . . . . . . . . . . . . . . . . . . . . . . . . . . . . 4-21
Sending an Image . . . . . . . . . . . . . . . . . . . . . . . . . . . . . . . . . 4-23
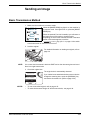
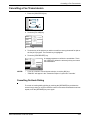
Basic Transmission Method . . . . . . . . . . . . . . . . . . . . . . . . . . . . . . . . . . . . . . . .
Destination Input Methods . . . . . . . . . . . . . . . . . . . . . . . . . . . . . . . . . . . . . . . . .
Destination address manual entry . . . . . . . . . . . . . . . . . . . . . . . . . . . . . . .
Destination address entry with global address search. . . . . . . . . . . . . . . .
Scanning and Transmitting a Two-sided Original. . . . . . . . . . . . . . . . . . . . . . . .
4-23
4-27
4-27
4-30
4-32
Scanning Settings . . . . . . . . . . . . . . . . . . . . . . . . . . . . . . . . . 4-34
Manually Setting the Scanning Size . . . . . . . . . . . . . . . . . . . . . . . . . . . . . . . . . .
Selecting the Exposure. . . . . . . . . . . . . . . . . . . . . . . . . . . . . . . . . . . . . . . . . . . .
Change the exposure. . . . . . . . . . . . . . . . . . . . . . . . . . . . . . . . . . . . . . . . .
Selecting the Resolution. . . . . . . . . . . . . . . . . . . . . . . . . . . . . . . . . . . . . . . . . . .
Change the resolution . . . . . . . . . . . . . . . . . . . . . . . . . . . . . . . . . . . . . . . .
Selecting the File Format . . . . . . . . . . . . . . . . . . . . . . . . . . . . . . . . . . . . . . . . . .
4-34
4-36
4-36
4-37
4-37
4-38
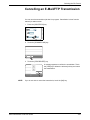
Cancelling an E-Mail/FTP Transmission . . . . . . . . . . . . . . . 4-41
Storing, Editing, and Deleting from the Touch Panel . . . . . 4-42
Storing One-Touch Keys (Only Addresses for Scan to E-mail) . . . . . . . . . . . . .
Editing and Deleting One-Touch Keys . . . . . . . . . . . . . . . . . . . . . . . . . . . . . . . .
Programming a Group Key. . . . . . . . . . . . . . . . . . . . . . . . . . . . . . . . . . . . . . . . .
Editing and Deleting Group Keys . . . . . . . . . . . . . . . . . . . . . . . . . . . . . . . . . . . .
Storing Sender Information. . . . . . . . . . . . . . . . . . . . . . . . . . . . . . . . . . . . . . . . .
Editing and Deleting Sender Information . . . . . . . . . . . . . . . . . . . . . . . . . . . . . .
Storing a Group Index . . . . . . . . . . . . . . . . . . . . . . . . . . . . . . . . . . . . . . . . . . . .
Printing Programmed Information. . . . . . . . . . . . . . . . . . . . . . . . . . . . . . . . . . . .
4-42
4-46
4-48
4-50
4-52
4-53
4-54
4-55
Troubleshooting. . . . . . . . . . . . . . . . . . . . . . . . . . . . . . . . . . . 4-57
If Your E-Mail Is Returned . . . . . . . . . . . . . . . . . . . . . . . . . . . . . . . . . . . . . . . . .
If a Transmission Error Occurs. . . . . . . . . . . . . . . . . . . . . . . . . . . . . . . . . . . . . .
Error Code Table . . . . . . . . . . . . . . . . . . . . . . . . . . . . . . . . . . . . . . . . . . . .
Checking the IP Address . . . . . . . . . . . . . . . . . . . . . . . . . . . . . . . . . . . . . . . . . .
Important Points When Using Scan to E-Mail . . . . . . . . . . . . . . . . . . . . . . . . . .
x
4-59
4-59
4-59
4-60
4-62
Xerox WorkCentre C226 User Guide
Key Operator Programs. . . . . . . . . . . . . . . . . . . . . . . . . . . . . 4-63
Key Operator Program List. . . . . . . . . . . . . . . . . . . . . . . . . . . . . . . . . . . . . . . . . 4-63
Using the Key Operator Programs . . . . . . . . . . . . . . . . . . . . . . . . . . . . . . . . . . . 4-64
Setting Programs . . . . . . . . . . . . . . . . . . . . . . . . . . . . . . . . . . . . . . . . . . . . . . . . 4-65
Network scanner settings. . . . . . . . . . . . . . . . . . . . . . . . . . . . . . . . . . . . . . 4-65
Default display settings . . . . . . . . . . . . . . . . . . . . . . . . . . . . . . . . . . . .4-66
The number of direct address keys displayed setting . . . . . . . . . . . .4-66
Initial resolution setting . . . . . . . . . . . . . . . . . . . . . . . . . . . . . . . . . . . .4-66
Scan complete sound setting . . . . . . . . . . . . . . . . . . . . . . . . . . . . . . .4-67
Default sender set . . . . . . . . . . . . . . . . . . . . . . . . . . . . . . . . . . . . . . .4-67
Compression mode at broadcasting . . . . . . . . . . . . . . . . . . . . . . . . . .4-67
Initial file format setting . . . . . . . . . . . . . . . . . . . . . . . . . . . . . . . . . . . .4-67
Maximum size of e-mail attachments . . . . . . . . . . . . . . . . . . . . . . . . .4-68
Scanner mode timeout after last scan . . . . . . . . . . . . . . . . . . . . . . . .4-68
Default exposure settings . . . . . . . . . . . . . . . . . . . . . . . . . . . . . . . . . .4-68
Disable of address direct entry . . . . . . . . . . . . . . . . . . . . . . . . . . . . . .4-69
Specifications. . . . . . . . . . . . . . . . . . . . . . . . . . . . . . . . . . . . . 4-70
Scanning margins. . . . . . . . . . . . . . . . . . . . . . . . . . . . . . . . . . . . . . . . . . . . . . . . 4-71
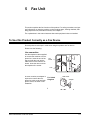
5 Fax Unit
To Use this Product Correctly as a Fax Device . . . . . . . . . . . . . . . . . . . . . . . . . . 5-1
Important Safety Information . . . . . . . . . . . . . . . . . . . . . . . . . . . . . . . . . . . . 5-2
Before Using the FAX Feature . . . . . . . . . . . . . . . . . . . . . . . . 5-3
Points to Check and Program After Installation . . . . . . . . . . . . . . . . . . . . . . . . . . 5-3
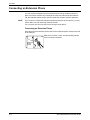
Connecting an Extension Phone . . . . . . . . . . . . . . . . . . . . . . . . . . . . . . . . . . . . . 5-4
A Look at the Operation Panel . . . . . . . . . . . . . . . . . . . . . . . . . . . . . . . . . . . . . . . 5-5
Fax Mode (Condition Settings Screen). . . . . . . . . . . . . . . . . . . . . . . . . . . . . . . . . 5-6
Originals that Can Be Faxed . . . . . . . . . . . . . . . . . . . . . . . . . . . . . . . . . . . . . . . 5-10
Loading a Document . . . . . . . . . . . . . . . . . . . . . . . . . . . . . . . . . . . . . . . . . . . . . 5-11
Using the DADF . . . . . . . . . . . . . . . . . . . . . . . . . . . . . . . . . . . . . . . . . . . . . 5-11
Using the Document Glass . . . . . . . . . . . . . . . . . . . . . . . . . . . . . . . . . . . . 5-11
Checking the Size of a Loaded Original . . . . . . . . . . . . . . . . . . . . . . . . . . . . . . . 5-12
Manually Setting the Scanning Size . . . . . . . . . . . . . . . . . . . . . . . . . . . . . . . . . . 5-13
Selecting Resolution and Exposure Settings . . . . . . . . . . . . . . . . . . . . . . . . . . . 5-14
Selecting the Resolution . . . . . . . . . . . . . . . . . . . . . . . . . . . . . . . . . . . . . . 5-14
Selecting the Exposure . . . . . . . . . . . . . . . . . . . . . . . . . . . . . . . . . . . . . . . 5-16
Xerox WorkCentre C226 User Guide
xi
Convenient Dialing Methods. . . . . . . . . . . . . . . . . . . . . . . . . . . . . . . . . . . . . . . . 5-17
Basic Operations . . . . . . . . . . . . . . . . . . . . . . . . . . . . . . . . . . 5-19
Sending a Fax . . . . . . . . . . . . . . . . . . . . . . . . . . . . . . . . . . . . . . . . . . . . . . . . . .
Basic Procedure for Sending Faxes . . . . . . . . . . . . . . . . . . . . . . . . . . . . .
Transmission by Auto-Dialing
(One-Touch Dialing and Group Dialing) . . . . . . . . . . . . . . . . . . . . . . . .
Faxing a Two-Sided Original . . . . . . . . . . . . . . . . . . . . . . . . . . . . . . . . . . .
Priority Transmission of a Stored Job. . . . . . . . . . . . . . . . . . . . . . . . . . . . . . . . .
Cancelling a Fax Transmission . . . . . . . . . . . . . . . . . . . . . . . . . . . . . . . . . . . . .
Cancelling On-Hook Dialing . . . . . . . . . . . . . . . . . . . . . . . . . . . . . . . . . . . .
Receiving Faxes . . . . . . . . . . . . . . . . . . . . . . . . . . . . . . . . . . . . . . . . . . . . . . . . .
5-19
5-19
5-22
5-23
5-26
5-27
5-27
5-28
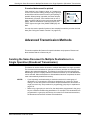
Advanced Transmission Methods . . . . . . . . . . . . . . . . . . . . 5-29
Sending the Same Document to Multiple Destinations in a
Single Operation (Broadcast Transmission) . . . . . . . . . . . . . . . . . . . . . . . . .
Using Broadcast Transmission. . . . . . . . . . . . . . . . . . . . . . . . . . . . . . . . . . . . . .
Automatic Transmission at a Specified Time
(Timer Transmission) . . . . . . . . . . . . . . . . . . . . . . . . . . . . . . . . . . . . . . . . . . .
Setting Up a Timer Transmission. . . . . . . . . . . . . . . . . . . . . . . . . . . . . . . .
Transmission and Reception Using the Polling Function . . . . . . . . . . . . . . . . . .
Using the Polling Function . . . . . . . . . . . . . . . . . . . . . . . . . . . . . . . . . . . . .
Using Polling Memory . . . . . . . . . . . . . . . . . . . . . . . . . . . . . . . . . . . . . . . .
Own Number Sending . . . . . . . . . . . . . . . . . . . . . . . . . . . . . . . . . . . . . . . . . . . .
Faxing a Divided Original (Dual Page Scan) . . . . . . . . . . . . . . . . . . . . . . . . . . .
Programming Frequently Used Operations . . . . . . . . . . . . . . . . . . . . . . . . . . . .
Using a Program . . . . . . . . . . . . . . . . . . . . . . . . . . . . . . . . . . . . . . . . . . . .
Transferring Received Faxes to Another Machine When
Printing Is Not Possible (Forwarding Function) . . . . . . . . . . . . . . . . . . . . . . .
Using the Transfer Function. . . . . . . . . . . . . . . . . . . . . . . . . . . . . . . . . . . .
5-29
5-30
5-32
5-33
5-34
5-36
5-38
5-42
5-43
5-44
5-45
5-46
5-47
Transmission Using F-Codes . . . . . . . . . . . . . . . . . . . . . . . . 5-49
Transmission Between Machines Supporting F-codes . . . . . . . . . . . . . . . . . . .
Memory Boxes and Sub-Addresses/Passcodes
Required for F-code Transmission . . . . . . . . . . . . . . . . . . . . . . . . . . . .
Entering (Dialing) a Fax Number with a
Sub-Address and Passcode . . . . . . . . . . . . . . . . . . . . . . . . . . . . . . . . .
Creating a Memory Box for F-Code Transmission. . . . . . . . . . . . . . . . . . .
F-Code Polling Memory . . . . . . . . . . . . . . . . . . . . . . . . . . . . . . . . . . . . . . . . . . .
Using F-Code Polling Memory . . . . . . . . . . . . . . . . . . . . . . . . . . . . . . . . . .
Procedure for F-Code Polling . . . . . . . . . . . . . . . . . . . . . . . . . . . . . . . . . .
F-Code Confidential Transmission . . . . . . . . . . . . . . . . . . . . . . . . . . . . . . . . . . .
xii
5-49
5-49
5-51
5-52
5-52
5-53
5-54
5-56
Xerox WorkCentre C226 User Guide
F-Code Confidential Transmission. . . . . . . . . . . . . . . . . . . . . . . . . . . . . . .
Printing a Document Received to an F-Code
Confidential Memory Box. . . . . . . . . . . . . . . . . . . . . . . . . . . . . . . . . . . .
F-Code Relay Broadcast Transmission . . . . . . . . . . . . . . . . . . . . . . . . . . . . . . .
Using the F-Code Relay Broadcast Function. . . . . . . . . . . . . . . . . . . . . . .
Using the F-Code Relay Request Function . . . . . . . . . . . . . . . . . . . . . . . .
5-57
5-57
5-59
5-60
5-61
Convenient Methods of Use . . . . . . . . . . . . . . . . . . . . . . . . . 5-61
Using an Extension Phone . . . . . . . . . . . . . . . . . . . . . . . . . . . . . . . . . . . . . . . . .
Sending a Fax after Talking (Manual Transmission) . . . . . . . . . . . . . . . . .
Using an Extension Phone to Receive a Fax. . . . . . . . . . . . . . . . . . . . . . .
Receiving a Fax After Talking (Manual Reception) . . . . . . . . . . . . . . . . . .
5-61
5-62
5-63
5-64
Programming . . . . . . . . . . . . . . . . . . . . . . . . . . . . . . . . . . . . . 5-66
Storing, Editing, and Deleting Auto Dial Keys and Programs. . . . . . . . . . . . . . .
Storing One-Touch Keys . . . . . . . . . . . . . . . . . . . . . . . . . . . . . . . . . . . . . .
Editing and Deleting One-Touch Keys. . . . . . . . . . . . . . . . . . . . . . . . . . . .
Storing a Group Key . . . . . . . . . . . . . . . . . . . . . . . . . . . . . . . . . . . . . . . . .
Editing and Deleting Group Keys. . . . . . . . . . . . . . . . . . . . . . . . . . . . . . . .
Storing a Program . . . . . . . . . . . . . . . . . . . . . . . . . . . . . . . . . . . . . . . . . . .
Editing and Deleting Programs . . . . . . . . . . . . . . . . . . . . . . . . . . . . . . . . .
Storing a Group Index . . . . . . . . . . . . . . . . . . . . . . . . . . . . . . . . . . . . . . . . . . . .
Programming, Editing, and Deleting F-Code Memory Boxes. . . . . . . . . . . . . . .
Programming an F-Code Memory Box . . . . . . . . . . . . . . . . . . . . . . . . . . .
Setting for F-Code Polling Memory Boxes (Polling Times) . . . . . . . . . . . .
Setting for F-Code Confidential Transmission Memory Boxes (Print PIN)
Setting for F-Code Relay Broadcast Memory Boxes (Recipient) . . . . . . . .
Editing and Deleting a Memory Box. . . . . . . . . . . . . . . . . . . . . . . . . . . . . .
Printing Programmed Information. . . . . . . . . . . . . . . . . . . . . . . . . . . . . . . . . . . .
Entering Characters . . . . . . . . . . . . . . . . . . . . . . . . . . . . . . . . . . . . . . . . . . . . . .
Entering alphabetical characters . . . . . . . . . . . . . . . . . . . . . . . . . . . . . . . .
Entering numbers and symbols . . . . . . . . . . . . . . . . . . . . . . . . . . . . . . . . .
5-66
5-68
5-72
5-74
5-76
5-78
5-80
5-80
5-81
5-82
5-84
5-85
5-86
5-88
5-89
5-90
5-90
5-93
Troubleshooting. . . . . . . . . . . . . . . . . . . . . . . . . . . . . . . . . . . 5-95
When a Transaction Report Is Printed . . . . . . . . . . . . . . . . . . . . . . . . . . . . . . . . 5-95
Viewing the Communication Activity Report. . . . . . . . . . . . . . . . . . . . . . . . . . . . 5-98
When an Alarm Sounds and a Warning Message Is Displayed . . . . . . . . . . . . . 5-98
Problems and Solutions . . . . . . . . . . . . . . . . . . . . . . . . . . . . . . . . . . . . . . . . . . 5-100
Index . . . . . . . . . . . . . . . . . . . . . . . . . . . . . . . . . . . . . . . . . I-1
Xerox WorkCentre C226 User Guide
xiii
xiv
Xerox WorkCentre C226 User Guide
Introduction
Safety Notes
Read these safety notes carefully before using this product to ensure you operate the equipment safely.
Your Xerox product and recommended supplies have been designed and tested to meet strict safety
requirements. These include safety agency approval, and compliance to established environmental
standards. Please read the following instructions carefully before operating the product and refer to them as
needed to ensure the continued safe operation of your product.
The safety and environment testing and performance of this product have been verified using Xerox
materials only.
WARNING:
Any unauthorized alternation, which may include the addition of new functions or connection of
external devices, may impact the product certification. Please contact your authorized local dealer
for more information.
Warning Markings
All warning instructions marked on or supplied with the product should be followed.
Warning
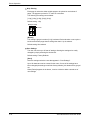
This WARNING alerts users to areas of the product where there is the possibility of personal injury.
Warning
This WARNING alerts users to areas of the product where there are heated surfaces, which should not be
touched.
Xerox WorkCentre C226 User Guide
xv
Electrical Supply
This product shall be operated from the type of electrical supply indicted on the product 's data plate label. If
you are not sure that your electrical supply meets the requirements, please consult your local power
company for advice.
WARNING
This product must be connected to a protective earth circuit.
This product is supplied with a plug that has a protective earth pin. This plug will fit only into an earthed
electrical outlet. This is a safety feature. To avoid risk of electric shock, contact your electrician to replace
the electrical outlet if you are unable to insert the plug into it. Never use an earthed adapter plug to connect
the product to an electrical outlet that lacks an earth connection terminal.
Operator Accessible Areas
This equipment has been designed to restrict operator access to safe areas only. Operator access to
hazardous areas is restricted with covers or guards, which would require a tool to remove. Never remove
these covers or guards.
Maintenance
Any operator product maintenance procedures will be described in the user documentation supplied with the
product. Do not to carry out any maintenance on this product, which is not described in the customer
documentation.
Cleaning Your Product
Before cleaning this product, unplug the product from the electrical outlet. Always use materials specifically
designated for this product, the use of other materials may result in poor performance and may create a
hazardous situation. Do not use aerosol cleaners, they may be explosive and flammable under certain
circumstances.
WARNING - Electrical Safety Information
•
•
•
•
•
•
xvi
Use only power cord supplied with this equipment.
Plug the power cord directly into a grounded electrical outlet. Do not use an extension cord. If you do
not know whether or not an outlet is grounded, consult a qualified electrician.
This equipment is to be operated from the type of electrical supply indicated on the product data plate
label. If this machine needs to be moved to a different location, contact a Xerox service representative
or your authorized local representative or service support organization.
Improper connection of the equipment-grounding conductor can result in electrical shock.
Do not place this equipment where people might step on or trip on the power cord.
Do not place objects on the power cord.
Xerox WorkCentre C226 User Guide
•
•
•
•
Do not override or disable electrical or mechanical interlocks.
Do not obstruct the ventilation openings.
Never push objects of any kind into slots or openings on this equipment
If any of the following conditions occur, switch off the power to the machine immediately and disconnect the power cord from the electrical outlet. Call an authorized local service representative to correct
the problem.
-The equipment emits unusual noise or odors.
-The power cord is damaged or frayed.
-A wall panel circuit breaker, fuse, or other safety device has been tripped.
-Liquid is spilled into the copier/printer.
-The equipment is exposed to water.
-Any part of the equipment is damaged.
Disconnect Device
The power cable is the disconnect device for this equipment. It is attached to the back of the machine as a
plug-in device. To remove all electrical power from the equipment, disconnect the power cable from the
electrical outlet.
Operational Safety Information
To ensure the continued safe operation of your Xerox equipment, follow these safety guidelines at all times.
Do These:
•
Always connect equipment to a correctly grounded power outlet. If in doubt, have the outlet checked
by a qualified electrician.
•
This equipment must be connected to a protective earth circuit.
This equipment is supplied with a plug that has a protective earth pin. This plug will fit only into an
earthed electrical outlet. This is a safety feature. To avoid risk of electric shock, contact your
electrician to replace the electrical outlet if you are unable to insert the plug into it. Never use a plug
that lacks an earth connection terminal to connect the product to an electrical outlet.
- Always follow all warnings and instructions that are marked on or supplied with the equipment.
- Always exercise care when moving or relocating equipment. Please contact your local Xerox Service
Department, or your local support organization to arrange relocation of the product to a location
outside of your building.
- Always locate the equipment in an area that has adequate ventilation, and the room for servicing. See
Install guide for minimum dimensions.
- Always use materials and supplies specifically designed for your Xerox equipment. Use of unsuitable
materials may result in poor performance.
- Always unplug this equipment from the electrical outlet before cleaning.
Xerox WorkCentre C226 User Guide
xvii
Do Not Do These:
•
•
•
•
•
•
•
•
Never use a plug that lacks an earth connection terminal to connect the product to an electrical outlet.
Never attempt any maintenance function that is not specifically described in this documentation.
This equipment should not be placed in a built-in installation unless proper ventilation is provided,
please contact your Authorized local dealer for further information.
Never remove covers or guards that are fastened with screws. There are no operator serviceable
areas within these covers.
Never locate the equipment near a radiator or any other heat source.
Never push objects of any kind into the ventilation openings.
Never override or "cheat" any of the electrical or mechanical interlock devices.
Never operate the equipment if you notice unusual noises or odors. Disconnect the power cord from
the electrical outlet and contact your local Xerox Service Representative or Service Provider immediately.
Maintenance Information
Do not attempt any maintenance procedure that is not specifically described in the documentation that is
supplied with your copier/printer.
•
Do not use aerosol cleaners. The use of cleaners that are not approved may cause poor performance
of the equipment, and could create a dangerous condition.
•
Use supplies and cleaning materials only as directed in this manual. Keep all of these materials out of
the reach of children.
•
Do not remove covers or guards that are fastened with screws. There are no parts behind these covers that you can maintain or service.
•
Do not perform any maintenance procedures unless you have been trained to do them by an authorized local dealer or unless a procedure is specifically described in the user manuals.
Ozone Safety Information
This product will produce ozone during normal operation. The ozone produced is heavier than air and is
dependent on copy volume. Providing the correct environmental parameters as specified in the Xerox
installation procedure will ensure that the concentration levels meet safe limits.
If you need additional information about ozone, please request the Xerox publication Ozone by calling 1800-828-6571 in the United States and Canada. In other markets please contact your authorized local
dealer or Service Provider.
For Consumables
Store all consumables in accordance with the instructions given on the package or container.
•
Keep all consumables away from the reach of children.
•
Never throw toner, toner cartridges or toner containers into an open flame
xviii
Xerox WorkCentre C226 User Guide
Radio Frequency Emissions
United States, Canada, Europe
Note: This equipment has been tested and found to comply with the limits for a class A digital device,
pursuant to Part 15 of the FCC Rules. These limits are designed to provide reasonable protection against
harmful interference when the equipment is operated in a commercial environment. This equipment
generates, uses, and can radiate radio frequency energy and, if not installed and used in accordance with
the instruction manual, may cause harmful interference to radio communications. Operation of this
equipment a residential area is likely to cause harmful interference in which case the user will required to
correct the interference at his own expense.
Changes and modifications to this equipment not specifically approved by Xerox may void the user's
authority to operate this equipment.
Shielded interface cables must be used with this equipment to maintain compliance with worldwide EMC
regulations."
Product Safety Certification
This product is certified by the following Agency using the Safety standards listed.
Agency
Standard
Underwriters Laboratories Inc.
UL60950 3rd Edition (USA/Canada)
NEMKO
IEC60950 3rd Edition (1999)
This product was manufactured under a registered ISO9001 Quality system.
Xerox WorkCentre C226 User Guide
xix
Regulatory Information for Fax
Function
CE Mark
The CE mark applied to this product symbolizes Xerox's declaration of conformity with the following
applicable Directives of the European Union as of the dates indicated:
January 1, 1995: Council Directive 72/23/EEC amended by Council directive 93/68/EEC, approximation of
the laws of the member states related to low voltage equipment.
January 1, 1996: Council directive 89/336/EEC, approximation of the laws of the member states related to
electromagnetic compatibility.
March 9, 1999: Council Directive 99/5/EC, on radio equipment and telecommunications terminal equipment
and the mutual recognition of their conformity.
A full declaration of conformity, defining the relevant directives and referenced standards, can be obtained
from your Authorized local dealer.
WARNING:
In order to allow this equipment to operate in proximity to Industrial Scientific and Medical (ISM)
equipment, the external radiation from the ISM equipment may have to be limited or special
mitigation measures taken.
WARNING:
This is a Class A product. In a domestic environment the product may cause radio frequency
interference, in which case the user may be required to take adequate measures.
USA
FAX Send Header Requirements:
The Telephone Consumer Protection Act of 1991 makes it unlawful for any person to use a computer or
other electronic device, including FAX machines, to send any message unless such message clearly
contains in a margin at the top or bottom of each transmitted page or on the first page of the transmission,
the date and time it is sent and an identification of the business or other entity, or other individual sending
the message and the telephone number of the sending machine or such business, other entity, or individual.
(The telephone number provided may not be a 900 number or any other number for which charges exceed
local or long-distance transmission charges.)
In order to program this information into your FAX machine refer to “Own number and name set” in the “Fax
Unit” section of your Xerox WorkCentre C226 System Administration Guide and follow the steps provided.
xx
Xerox WorkCentre C226 User Guide
Data Coupler Information
This equipment complies with Part 68 of the FCC rules and the requirements adopted by the Administrative
Council for Terminal Attachments (ACTA). On the rear of this equipment is a label that contains, among
other information, a product identifier in the format US:XRXMM07BZSA1. If requested, this number must be
provided to the Telephone Company.
A plug and jack used to connect this equipment to the premises wiring and telephone network must comply
with the applicable FCC Part 68 rules and requirements adopted by the ACTA.
A compliant telephone cord and modular plug is provided with this product. It is designed to be connected to
a compatible modular jack that is also compliant.
WARNING:
Ask your local Telephone Company for the modular jack type installed on your line. Connecting this
machine to an unauthorized jack can damage Telephone Company equipment. You, not Xerox,
assume all responsibility and/or liability for any damage caused by the connection of this machine
to an unauthorized jack.
You may safely connect the machine to the following standard modular jack: USOC RJ-11C using the
compliant telephone line cord (with modular plugs) provided with the installation kit.
The Ringer Equivalence Number (or REN) is used to determine the number of devices that may be
connected to a telephone line. Excessive RENs on a telephone line may result in the devices not ringing in
response to an incoming call. In most but not all areas, the sum of RENs should not exceed five (5.0). To be
certain of the number of devices that may be connected to a line, as determined by the total RENs, contact
the local Telephone Company. For products approved after July 23, 2001, the REN for this product is part of
the product identifier that has the format US:XRXMM07BZSA1. The digits 07 are the REN without a decimal
point (e.g., 07 is a REN of 0.7). For earlier products, the REN is separately shown on the label.
If this Xerox equipment causes harm to the telephone network, the Telephone Company will notify you in
advance that temporary discontinuance of service may be required. But if advance notice isn't practical, the
Telephone Company will notify the customer as soon as possible. Also, you will be advised of your right to
file a complaint with the FCC if you believe it is necessary.
The Telephone Company may make changes in its facilities, equipment, operations or procedures that could
affect the operation of the equipment. If this happens the Telephone Company will provide advance notice in
order for you to make necessary modifications to maintain uninterrupted service.
If trouble is experienced with this Xerox equipment, for repair or warranty information, please contact the
Xerox Welcome Center telephone number 800-821-2797. If the equipment is causing harm to the telephone
network, the Telephone Company may request that you disconnect the equipment until the problem is
resolved.
Repairs to the machine should be made only by a Xerox representative or an authorized Xerox service
agency. This applies at any time during or after the service warranty period. If unauthorized repair is
performed, the remainder of the warranty period is null and void.
This equipment must not be used on party lines. Connection to party line service is subject to state tariffs.
Contact the state public utility commission, public service commission or corporation commission for
information.
If your office has specially wired alarm equipment connected to the telephone line, ensure the installation of
this Xerox equipment does not disable your alarm equipment. If you have questions about what will disable
alarm equipment, consult your Telephone Company or a qualified installer.
Xerox WorkCentre C226 User Guide
xxi
Canada
This product meets the applicable Industry Canada technical specifications.
'The Ringer Equivalence Number (REN) is an indication of the maximum number of devices allowed to be
connected to a telephone interface. The termination on an interface may consist of any combination of
devices subject only to the requirement that the sum of the RENs of all the devices does not exceed five.
The REN value may be found on the label located on the rear of the equipment.
Repairs to certified equipment should be made by an authorized Canadian maintenance facility designated
by the supplier. Any repairs or alterations made by the user to this equipment, or equipment malfunctions,
may give the telecommunications company cause to request the user to disconnect the equipment.
Users should ensure for their own protection the electrical ground connections of the power utility, telephone
lines and internal metallic water pipe system, if present, are connected together. This precaution may be
particularly important in rural areas.
CAUTION:
Users should not attempt to make such connections themselves, but should contact the appropriate
electric inspection authority or electrician, as appropriate.
Europe
Certification to 1999/5/EC Radio Equipment &
Telecommunications Terminal Equipment Directive
This Xerox product has been self-certified by Xerox for pan-European single terminal connection to the
analogue public switched telephone network (PSTN) in accordance with Directive 1999/5/EC.
The product has been designed to work with the national PSTNs and compatible PBXs of the following
countries:
Austria
Germany
Luxembourg
Sweden
Belgium
Greece
Netherlands
Switzerland
Denmark
Iceland
Norway
United Kingdom
France
Ireland
Portugal
Finland
Italy
Spain
Czech Republic
Poland
Bulgaria
Romania
In the event of problems, you should contact your local Xerox representative in the first instance.
This product has been tested to and is compliant with TBR21, a technical specification for terminal
equipment for use on analogue-switched telephone networks in the European Economic Area.
The product may be configured to be compatible with other country networks. Please contact your Xerox
representative if it needs to be reconnected to another country's network. There are no user-adjustable
settings in the product.
NOTE:
Although this product can use either loop disconnect (pulse) or DTMF (tone) signaling it is recommended
that it is set to use DTMF signaling. DTMF signaling provides reliable and faster call setup.
Modification, connection to external control software or to external control apparatus not authorized by
Xerox, will invalidate its certification.
xxii
Xerox WorkCentre C226 User Guide
Environmental Compliance
USA - Energy Star
As an ENERGY STAR partner, Xerox Corporation has determined that (the basic configuration of) this
product meets the ENERGY STAR guidelines for energy efficiency.
The ENERGY STAR and ENERGY STAR MARK are registered United States trademarks.
The ENERGY STAR Office Equipment Program is a team effort between U.S., European Union and
Japanese governments and the office equipment industry to promote energy-efficient copiers, printers, fax,
multifunction machine, personal computers, and monitors. Reducing product energy consumption helps
combat smog, acid rain and long-term changes to the climate by decreasing the emissions that result from
generating electricity.
Xerox ENERGY STAR equipment is preset at the factory to enter a "low power" state and/or shut off
completely after a specified period of use. These energy-saving features can reduce product energy
consumption in half when compared to conventional equipment.
Canada - Environmental Choice
Terra Choice Environmental Serviced, Inc. of Canada has verified that this product conforms to all
applicable Environmental Choice EcoLogo requirements for minimized impact to the environment.
As a participant in the Environmental Choice program, Xerox Corporation has determined that this product
meets the Environmental Choice guidelines for energy efficiency.
Environment Canada established the Environmental Choice program in 1988 to help consumers identify
environmentally responsible products and services. Copier, printer, digital press and fax products must
meet energy efficiency and emissions criteria, and exhibit compatibility with recycled supplies. Currently,
Environmental Choice has more than 1600 approved products and 140 licensees. Xerox has been a leader
in offering EcoLogo approved products.
Xerox WorkCentre C226 User Guide
xxiii
Europe - Energy
Xerox Corporation has designed and tested this product to meet the energy restrictions required to establish
Group for Efficient Appliances (GEA) compliance and have notified the registration authorities.
Illegal Copies
USA
Congress, by statute, has forbidden the reproduction of the following subjects under certain circumstances.
Penalties of fine or imprisonment may be imposed on those guilty of making such reproductions.
1.
Obligations or Securities of the United States Government, such as:
Certificates of Indebtedness National Bank Currency
Coupons from Bonds
Federal Reserve Bank Notes
Silver Certificates
Gold Certificates
United States Bonds
Treasury Notes
Federal Reserve Notes
Fractional Notes
Certificates of Deposit
Paper Money
Bonds and Obligations of certain agencies of the government, such as FHA, etc.
Bonds. (U.S. Savings Bonds may be photographed only for publicity purposes in connection with the
campaign for the sale of such bonds.)
Internal Revenue Stamps. (If it is necessary to reproduce a legal document on which there is a
canceled revenue stamp, this may be done provided the reproduction of the document is performed for
lawful purposes.)
Postage Stamps, canceled or uncanceled. (For philatelic purposes, Postage Stamps may be
photographed, provided the reproduction is in black and white and is less than 75% or more than 150%
of the linear dimensions of the original.)
Postal money Orders.
Bills, Checks, or Draft of money drawn by or upon authorized officers of the United States.
Stamps and other representatives of value, of whatever denomination, which have been or may be
issued under any Act of Congress.
xxiv
2.
Adjusted Compensation Certificates for Veterans of the World Wars.
3.
Obligations or Securities of any Foreign Government, Bank, or Corporation.
4.
Copyrighted materials, unless permission of the copyright owner has been obtained or the
reproduction falls within the "fair use" or library reproduction rights provisions of the copyright law.
Further information of these provisions may be obtained from the Copyright Office, Library of
Congress, Washington, D.C. 20559. Ask for Circular R21.
Xerox WorkCentre C226 User Guide
5.
Certificates of Citizenship or Naturalization. (Foreign Naturalization Certificates may be
photographed.)
6.
Passports. (Foreign Passports may be photographed.)
7.
Immigration Papers.
8.
Draft Registration Cards.
9.
Selective Service Induction Papers that bear any of the following Registrant's information:
Earnings or Income
Dependency Status
Court Record
Previous military service
Physical or mental condition
Exception: United States military discharge certificates may be photographed.
10. Badges, Identification Cards, Passes, or Insignia carried by military personnel, or by members of the
various Federal Departments, such as FBI, Treasury, etc. (unless photograph is ordered by the head
or such department or bureau.)
Reproducing the following is also prohibited in certain states:
Automobile Licenses - Drivers' Licenses - Automobile Certificates of Title.
The above list is not all inclusive, and no liability is assumed for its completeness or accuracy. In case of
doubt, consult your attorney.
Canada
Parliament, by statute, has forbidden the reproduction of the following subjects under certain circumstances.
Penalties of fine or imprisonment may be imposed on those guilty of making such reproductions.
1.
Current bank notes or current paper money.
2.
Obligations or securities of a government or bank.
3.
Exchequer bill paper or revenue paper.
4.
The public seal of Canada or of a province, or the seal of a public body or authority in Canada, or of a
court of law.
5.
Proclamations, orders, regulations or appointments, or notices thereof (with intent to falsely cause
same to purport to have been printed by the Queen's Printer for Canada, or the equivalent printer for a
province).
6.
Marks, brands, seals, wrappers or designs used by or on behalf of the Government of Canada or of a
province, the government of a state other than Canada or a department, board, Commission or agency
established by the Government of Canada or of a province or of a government of a state other than
Canada.
7.
Impressed or adhesive stamps used for the purpose of revenue by the Government of Canada or of a
province or by the government of a state other than Canada.
8.
Documents, registers or records kept by public officials charged with the duty of making or issuing
certified copies thereof, where the copy falsely purports to be a certified copy thereof.
9.
Copyrighted material or trademarks of any manner or kind without the consent of the copyright or
trademark owner.
The above list is provided for your convenience and assistance, but it is not all-inclusive, and no liability is
assumed for its completeness accuracy. In case of doubt, consult your solicitor.
Xerox WorkCentre C226 User Guide
xxv
Other countries
Copying certain documents may be illegal in your country. Penalties of fine or imprisonment may be
imposed on those found guilty of making such reproductions.
•
Currency notes
•
Bank notes and cheques
•
Band and government bonds and securities
•
Passports and identification cards
•
Copyright material or trademarks without the consent of the owner
•
Postage stamps and other negotiable instruments
This list is not inclusive and no liability is assumed for either its completeness or accuracy. In case of doubt,
contact your legal counsel.
Product Recycling and Disposal
Xerox operates a worldwide equipment takeback and reuse/recycle program. Contact your Xerox sales
representative (1-800-ASK-XEROX) to determine whether this Xerox product is part of the program. For
more information about Xerox environmental programs, visit www.xerox.com/environment.
If you are managing the disposal of your Xerox product, please note that the product contains lead other
materials whose disposal may be regulated due to environmental considerations. The presence of Lead is
fully consistent with global regulations applicable at the time that the product was placed on the market. For
recycling and disposal information, contact your local authorities. In the United States, you may also refer to
the Electronic Industries Alliance web site: www.eiae.org."
xxvi
Xerox WorkCentre C226 User Guide
1
General Information
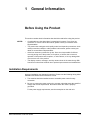
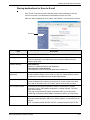
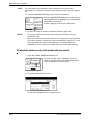
Before Using the Product
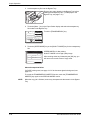
This section contains basic information that should be read before using the product.
NOTES:
•
•
•
•
Considerable care has been taken in preparing this manual. If you have any
comments or concerns about the manual, please contact your nearest Xerox
Representative.
This product has undergone strict quality control and inspection procedures. In the
unlikely event that a defect or other problem is discovered, please contact your
dealer or nearest Xerox Representative.
Aside from instances provided for by law, Xerox is not responsible for failures
occurring during use of the product or its options, or failures due to incorrect
operation of the product and its options, or other failures, or for any damage that
occurs due to use of the product.
The display screens, messages, and key names shown in the manual may differ
from those on the actual machine due to product improvements and modifications.
Installation Requirements
Improper installation may damage this product. Please note the following during initial
installation and whenever the machine is moved.
1. The machine should be installed near an accessible power outlet for easy
connection.
2. Be sure to connect the power cord only to a power outlet that meets the specified
voltage and current requirements. Also make certain the outlet is properly
grounded.
For the power supply requirements, see the name plate on the main unit.
Xerox WorkCentre C226 User Guide
1-1
General Information
3. Do not install your machine in areas that are:
1-2
•
damp, humid, or very dusty
•
exposed to direct sunlight
•
poorly ventilated
•
subject to extreme temperature
or humidity changes, e.g., near
an air conditioner or heater.
Xerox WorkCentre C226 User Guide
Installation Requirements
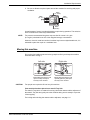
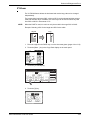
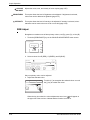
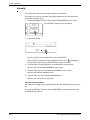
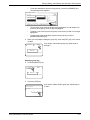
4. Be sure to allow the required space around the machine for servicing and proper
ventilation.
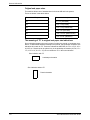
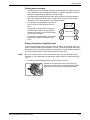
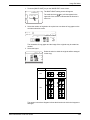
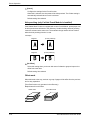
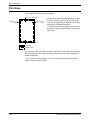
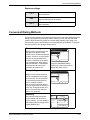
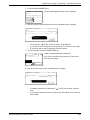
30cm
(11-13/16")
60cm
(23-5/8")
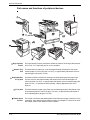
80cm
(31-1/2")
60cm
(23-5/8")
A small amount of ozone is produced within the copier during operation. The emission
level is insufficient to cause any health hazard.
NOTE:
The present recommended long term exposure limit for ozone is 0.1 ppm
(0.2 mg/m3) calculated as an 8 hr. time-weighted average concentration.
However, since the small amount that is emitted may have an objectionable odor, it is
advisable to place the copier in a ventilated area.
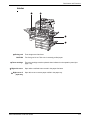
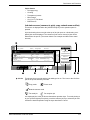
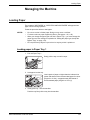
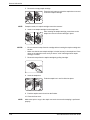
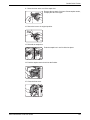
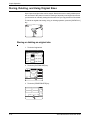
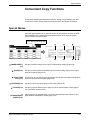
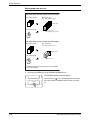
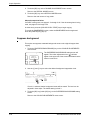
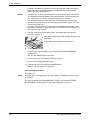
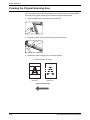
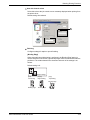
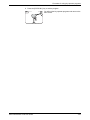
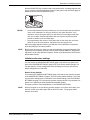
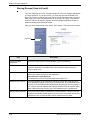
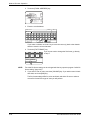
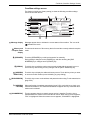
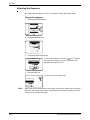
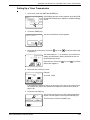
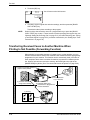
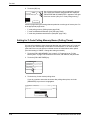
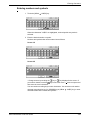
Moving this machine
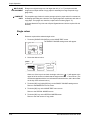
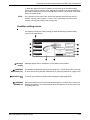
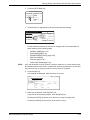
Pull out the four handles as shown below, grasp them firmly, and keep the machine
horizontal while moving it.
Left side
Right side
Exit
tray
Bypass
tray
Handles
Before lifting the machine, fold
up the exit tray and tape it
securely to the machine.
CAUTION:
Handles
Before lifting the machine, fold
up the Bypass Tray and tape it
securely to the machine.
Two people are required to lift and carry this machine.
If the machine has been placed on a stand/1-Tray Unit:
The stand/1-Tray Unit is on casters for moving. Unlock the casters and the adjusters of
the stand/1-Tray Unit and gently move the machine taking care to steady it to prevent
it from toppling.
For locking and unlocking the casters and the adjusters, see page 1-4.
Xerox WorkCentre C226 User Guide
1-3
General Information
If the machine is to be left unused for a long time
If the machine is to be left unused for a month or longer, follow the procedure on
page 1-27 to release the pressure on the fusing roller.
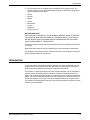
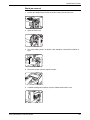
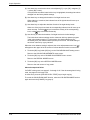
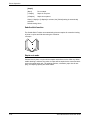
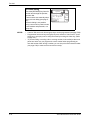
Cautions
1. Do not touch the photoconductive drum. Scratches or smudges on the drum will
cause dirty prints.
2. The fusing unit is extremely hot. Exercise care
in this area.
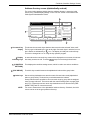
Fusing unit
3. Do not look directly at the light source. Doing so
may damage your eyes.
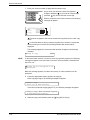
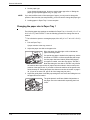
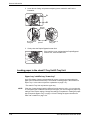
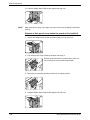
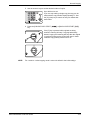
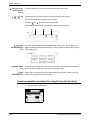
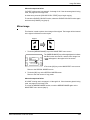
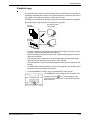
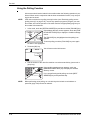
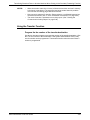
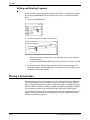
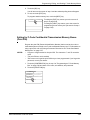
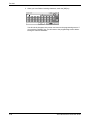
4. Four adjusters are provided on all optional
stand/paper tray units. These adjusters should
be lowered until they contact the floor.
When moving the machine with the optional
stand/paper tray, be sure to raise the adjusters.
Also, unlock the two casters at the front of the
optional stand/paper tray. After moving the
machine, lower the four adjusters until they
reach the floor and lock the two casters.
Adjuster
Caster
Release
Lock
Lock
Release
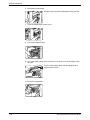
5. Do not make any modifications to this machine.
Doing so may result in personal injury or
damage to the machine.
6. Since this machine is heavy, it is recommended that it be moved by more than one
person to prevent injury.
7. When connecting this machine to a computer, be sure to first turn both the
computer and the machine off.
1-4
Xerox WorkCentre C226 User Guide
Introduction
8. Do not make copies of anything which is prohibited from copying by law. The
following items are normally prohibited from printing by national law. Other items
may be prohibited by local law.
•
•
•
•
•
•
•
•
Money
Stamps
Bonds
Stocks
Bank drafts
Checks
Passports
Driver's licences
BATTERY DISPOSAL
THIS PRODUCT CONTAINS A LITHIUM PRIMARY MEMORY BACK-UP BATTERY
THAT MUST BE DISPOSED OF PROPERLY. PLEASE CONTACT YOUR LOCAL
XEROX DEALER OR AUTHORISED SERVICE REPRESENTATIVE FOR ASSISTANCE IN DISPOSING OF THIS BATTERY.
This product utilizes tin-lead solder, and a fluorescent lamp containing a small amount
of mercury.
Disposal of these materials may be regulated due to environmental considerations.
For disposal or recycling information, please contact your local authorities or the Electronics Industries Alliance: www.eia.org.
Introduction
To gain the maximum benefits in using this product, it is recommended that the user
read this section to become familiar with all the features and functions of the basic
product and the precautionary information contained in the manual.
This product is a high speed Digital full colour copier/printer that can be expanded to
become multifunctional through the installation of optional peripheral devices. The
product can be extended to include printer, network scanning or network printing capabilities. This section describes the basic use of the product as a copier and does not
contain information on using any of the optional peripheral devices. Separate operation manuals are included with each of the optional peripheral devices. Refer to these
manuals for their operation.
Xerox WorkCentre C226 User Guide
1-5
General Information
Original and paper sizes
This machine allows use of standard sizes in both the AB and inch systems.
These are shown in the tables below.
Sizes in the AB system
Sizes in the inch system
A3
11" x 17" (LEDGER)
B4
8-1/2" x 14" (LEGAL)
A4
8-1/2" x 13" (FOOLSCAP)
B5
8-1/2" x 11" (LETTER)
A5
7-1/4" x 10-1/2" (EXECUTIVE)
5-1/2" x 8-1/2" (INVOICE)
The meaning of "R" in original and paper size indications
Some original and paper sizes can be placed in either the portrait or landscape orientations. To differentiate between landscape and portrait, the landscape orientation size
indication will contain an "R". These are indicated as A4R, B5R, 8-1/2" x 11"R, 5-1/2" x
8-1/2"R, etc. Sizes that can be placed only in the landscape orientation (A3, B4, 11" x
17", 8-1/2" x 14", 8-1/2" x 13") do not contain the "R" in their size indication.
Size indication with “R”
Landscape orientation
Size indication without “R”
Portait orientation
1-6
Xerox WorkCentre C226 User Guide
Main Features
Main Features
1. Full-colour copies with vivid colours based on digital technology
Photos, colour text, and other originals are scanned by full-colour CCD sensors,
and the acquired image information is output in vivid full colour at a resolution of
600 dpi using digital image processing technology.
The machine can also be used as a full-colour network printer, and a network
scanner function can further be added as an option.
2. A range of optional units to enhance productivity
A range of optional equipment is available to enhance productivity, such as duplex
units for producing two-sided output, additional paper tray units to increase the
number of available paper sizes and paper capacity, and paper output units that
are capable of stapling and saddle stitch binding.
3. Advanced image processing features based on digital technology
The scanned image data is converted to digital data, enabling the following
advanced image processing features:
•
Photo Repeat :
Up to 24 full-size copies of a photo image can be made on a single sheet of
paper (page 2-62).
•
Multi shot :
Up to four original pages can be copied onto a single sheet (page 2-64).
•
Pamphlet copy* :
Copies of original pages are arranged in proper order for copying so that the
copies can be centre-stapled and folded into a pamphlet (page 2-71).
* Pamphlet copy requires the Duplex Module/2-Tray Unit and Duplex Bypass/
Inverter Unit options. If a Saddle Stitch Finisher is installed, copies can be
stapled in two positions along the centre of copies and folded at the centre.
4. Image processing manual exposure adjustment for optimal copying
Image processing is optimized for the type of original being copied (text, photo,
mixed text and photo or map). This along with the ability to manually adjust
exposure makes it possible to obtain copies that are faithful to the original.
5. Standard offset function makes it easy to distinguish between sets of copies
As sets of copies are delivered to the centre tray, each set is offset from the
previous set for easy separation.
Xerox WorkCentre C226 User Guide
1-7
General Information
6. PostScript compatible
Installation of an optional PS kit gives PostScript compatibility (PostScript 3).
As an ENERGY STAR® Partner, Xerox has determined
that this product meets the ENERGY STAR® guidelines
for energy efficiency.
Energy saving features
This product has the following two power reducing modes to help conserve natural
resources and reduce environmental pollution.
Preheat mode
Preheat mode automatically reduces the temperature of the fusing unit after the time
set in the key operator programs elapses when the machine is on standby. This allows
the machine to use less power while on standby. The machine automatically returns to
normal operation when a key is pressed on the operation panel, or when an original is
placed to make a copy or send a fax.
Auto power shut-off mode
Auto power shut-off mode automatically shuts off power to the fusing unit after the time
set in the key operator programs elapses when the machine is on standby. This minimizes the power used by the machine while on standby. When this mode activates,
the touch panel screen turns off.
To return the machine to normal operation, press the mode select key (the indicator of
this key will be lit).
Auto power shut-off mode can be configured in the key operator programs. The mode
is initially set (factory default setting) to activate after 60 seconds elapses.
If a print job or fax is received while auto power shut-off mode or preheat mode is activated, the machine automatically returns to normal operation.
The Environmental Choice Program guidelines are applied to the
products only in Canada. The products that meet the Environmental
Choice Program guidelines carry the logo shown above. The products
without the logo may not meet the Environmental Choice Program
guidelines.
1-8
Xerox WorkCentre C226 User Guide
Part Names and Functions
Part Names and Functions
Exterior
Left tray
Left side cover
DADF
Power switch
Front cover
Finished sheets are deposited here (see page 2-18).
Open this cover when a paper misfeed occurs in the fusing unit or the transfer unit.
Duplex Automatic Document Feeder. This automatically feeds originals to be
scanned. The feeder can turn the original over and scan the back side as well as the
front side for support of two-sided originals.
Press to turn power on and off.
Open to replace toner cartridge.
Operation panel
Centre tray
Finished sheets are deposited here (see page 2-18).
Xerox WorkCentre C226 User Guide
1-9
General Information
Bypass Tray
Special papers (including transparency film) and copy paper can be fed from the
Bypass Tray.
Stand/1-Tray
Unit*
(See page 1-28)
3-Tray Unit*
(See page 1-28)
Duplex Module/
2-Tray Unit*
(See page 1-30)
Paper tray
Left side cover
release
Duplex Bypass/
Inverter Unit and
exit tray*
Each tray can hold approximately 500 sheets of the recommended paper for colour
(80 g/m2 or 21 lbs.), or approximately 500 sheets of Xerox standard paper (80 g/m2 or
21 lbs.).
Push this release up to open the left side cover.
(See page 1-10.)
* , , , and
page 1-10.
1-10
are peripheral devices. For a description of these devices, see
Xerox WorkCentre C226 User Guide
Part Names and Functions
Interior
Fusing unit
CAUTION
Toner cartridge
Right side cover
Right cover of
paper tray
Toner images are fused here.
The fusing unit is hot. Take care in removing misfed paper.
The toner cartridge must be replaced when indicated on the operation panel (see
page 1-42).
Open when a misfeed has occurred in the paper feed area.
Open this cover to remove paper misfed in the paper tray.
Xerox WorkCentre C226 User Guide
1-11
General Information
Part names and functions of peripheral devices
High Capacity
Feeder
Stand/1-Tray
Unit
The High Capacity Feeder provides the added convenience of having 3,500 sheets of
A4 or 8-1/2" x 11" paper (80 g/m2 or 21 lbs.) available.
This stand has one paper tray. It can hold approximately 500 sheets of the recommended paper for colour (80 g/m2 or 21 lbs.), or approximately 500 sheets of Xerox
standard paper (80 g/m2 or 21 lbs.).
Duplex Module/
2-Tray Unit
This stand includes a module for automatic two-sided printing and two paper trays.
The two trays can hold approximately 500 sheets of the recommended paper for
colour (80 g/m2 or 21 lbs.), or approximately 500 sheets of Xerox standard paper (80
g/m2 or 21 lbs.). To perform two-sided printing, a Duplex Bypass/Inverter Unit is
required.
3-Tray Unit
This stand has three paper trays. Each tray can hold approximately 500 sheets of the
recommended paper for colour (80 g/m2 or 21 lbs.), or approximately 500 sheets of
Xerox standard paper (80 g/m2 or 21 lbs.).
Saddle Stitch
Finisher
1-12
The finisher can deliver sets saddle stitched and folded at the paper centreline to form
a pamphlet, edge stapled in three different modes or unstapled. For two-hole or threehole output, a hole Punch Module must be installed.
Xerox WorkCentre C226 User Guide
Part Names and Functions
Exit tray
Duplex Bypass/
Inverter Unit
The exit tray is installed on the output outlet of the machine or the Duplex Tray /
Inverter Unit.
This module is required to automatically turn paper over within the machine for automatic two-sided printing.
Other optional equipment
Scan Kit
This kit is required to add the network scanner function*.
* To use the network scanner function, the scan kit, scanner interface board, and 256
MB or more of optional memory must be installed.
PS Kit
This kit provides compatibility of PostScript level 3 to the printer.
To use this function, 256 MB x2 optional memory must be installed.
Fax Unit
This kit must be installed to use the fax function.
Fax Expansion Memory (8 MB)
This adds memory for use by the fax function.
256 MB Memory Kit
This adds memory that is used for the copy function, printer function, and scanner
function.
Face-up and face-down output
After printing, the paper is delivered to the exit tray. This product has two exit trays
(centre tray and left tray). The paper specifications and output conditions differ for
each tray; however, if the paper and output conditions are such that the paper can be
delivered to either tray, you can select the tray to which the paper will go.
•
•
Paper exits to the centre tray face-down only.
Paper exits to the left tray face-up only. However, if a Duplex Bypass/Inverter Unit
has been installed, face-down output is also possible. In this case, face-up or facedown output is automatically selected according to the paper and output conditions (it is not possible to manually select face-up or face-down.)
Xerox WorkCentre C226 User Guide
1-13
General Information
Operation panel
1
2
/
3
Touch panel
4
5 6
7
8
9
10 11
The machine status, messages and touch keys are displayed on the panel. Selections
made with the keys are confirmed by a "beep"* that is sounded when a key is touched,
and highlighting of the selection key.
* If a key that cannot be selected is touched, double-beep will sound.
Keys that are greyed out cannot be selected.
When using the touch panel, first change the display to the mode that you wish to use:
printer mode, copy mode, network scanner mode*1, or fax mode*2. For details see
page 1-16.
Mode select
keys and indicators
Use to change modes and the corresponding display on the touch panel.
[PRINT] key/
READY indicator/
DATA indicator
Press to enter the printer mode.
READY indicator
Print data can be received when this indicator is lit.
DATA indicator
Lights up or blinks when print data is being received. Also lights up or blinks when the
machine is printing.
/ [IMAGE SEND]
key/LINE indicator/
DATA indicator
Press this key to switch the display between network scanner mode*1 and fax mode*2.
(See the sections for network scanner and fax.)
[COPY] key
Press to select the copy mode. If this key is pressed and held while the main screen of
the copy mode is displayed, the total output count will be displayed.
1-14
Xerox WorkCentre C226 User Guide
Part Names and Functions
[JOB STATUS]
key
[CUSTOM
SETTINGS] key
Numeric keys
[ ] key ([ACC.#C] key)
[#/P] key
[C] key
Press to display the current job status. (See page 1-17.)
Use to adjust the contrast of the touch panel or to set key operator programs. (See
page 1-37.)
Use to select the number of copies and to make numerical entries for setting operations.
This is used when the copy, network scan*1, and fax*2 functions are used. If the auditing mode has been set, press this key to close an open account after finishing a copy
job. For setting of the auditing mode, see page 1-18.
This is used as a program key when using the copy function, and to dial when using
the fax function*2.
Press to clear a copy quantity entry. If this key is pressed while the DADF is being
used, any originals in progress will be automatically output.
This key is used in copy mode, network scanner mode*1, and fax mode*2.
[BLACK COPY
START (
)] key
[CLEAR ALL]
key
[COLOUR COPY
START (
)]
key
This is used to make black and white copies and to scan a black and white original
when the network scan function is used. This is also used to scan an original to be
faxed using the fax function*2.
This key is used in copy mode, network scanner mode*1, and fax mode*2. This returns
all copy mode settings to the default settings. However, the touch panel display mode
will not be changed. When beginning a copy job, press this key.
This is used to make full-colour or single-colour copies and to scan a colour original
when the network scanner function is used.
*1 When the network scanner option is installed.
*2 When the fax option is installed.
Xerox WorkCentre C226 User Guide
1-15
General Information
Touch panel
Using the touch panel
[Example 1]
Job Queue
Sets / Pro
Copy
003 / 00
Suzuki
003 / 00
0666211221
010 / 00
Items on the touch panel are easily selectable by touching the key associated with the item with a finger. Selection of an item will be accompanied with a beep tone to
confirm the item was selected. Also, the key area for the
item will be highlighted for visual confirmation.
Beep
tone
[Example 2]
1/13
Complete
Keys which are greyed out on any screen are not selectable. If a greyed out key is touched, a double beep will
be sounded.
The confirmation beeps can be disabled by a key operator program.
The touch panel screens shown in this manual are printed images, and may appear
different from the actual screens.
Selection of function
[Example 1]
Cancel
OK
Left
Binding
Right
Binding
Items which are highlighted at the time a screen appears
are already selected and will be registered to function if
the [OK] key is touched.
[Example 2]
Dual Page
Copy
When the machine is used in the copy mode, the functions shown below can only be set or cancelled on the
special feature screen by alternate touches of the function keys on the panel.
Transparency
Inserts
1-16
Xerox WorkCentre C226 User Guide
Part Names and Functions
Copier feature
•
•
•
•
•
•
Dual page copy
Centring
Transparency inserts
Mirror image
A3 (11"x17") Full-bleed
B/W Reverse
Job status screen (common to print, copy, network scan and fax)
This screen is displayed when the [JOB STATUS] key on the operation panel is
pressed.
A job list showing the current job at the top of the job queue or a list showing completed jobs can be displayed. The contents of jobs can be viewed or jobs can be
deleted from the queue. (The screen below is an example and differs from actual
screens.)
Job Queue
Sets / Progress
Job Queue
Status
Copy
003 / 000
Paper Empty*
Suzuki
003 / 000
Waiting
1/1
Complete
Detail
001 / 000
066211221
Waiting
Priority
Stop/Delete
Print Job
Job list
Scanner Job
Fax Job
This shows the current job and the jobs waiting to be run. The icons to the left of the
jobs in the queue show the job mode.
Copy mode
Printer mode
Network scanner mode
Fax send job
Fax reception job
The displayed jobs in the job list are themselves operation keys. To cancel printing or
to give a job the highest print priority, touch the relevant job key to select the job and
execute the desired operation using the keys described in 5 and 6.
Xerox WorkCentre C226 User Guide
1-17
General Information
* "PAPER EMPTY"
in the job status
display
Mode select key
When a job status display indicates "PAPER EMPTY", the specified paper size for the
job is not loaded in any of the trays.
When the [DETAIL] key appears, the key of a job in the job queue can be touched followed by the [DETAIL] key to change the paper size selection to a different paper size
(only in printer mode).
This only appears in the job status screen of fax mode. The key is used to switch the
job list display between "JOB QUEUE" and "COMPLETE".
"JOB QUEUE": Shows stored jobs and the job in progress.
"COMPLETE": Shows finished jobs.
[PRINT JOB] key
Use to display the print job list for printer, copy and fax mode.
[SCANNER JOB]
key
This displays a list of jobs that only used the network scanner function. (Only when the
network scanner function is added.)
[FAX JOB] key
This displays the transmission/reception status and finished jobs of fax mode when the
fax option is installed.
Display
switching keys
Use to switch the page of the displayed job list.
[STOP/DELETE]
key
Use to cancel or delete the current job or delete the selected reserved job. Note that a
fax print job cannot be cancelled or deleted.
[PRIORITY] key
This only appears in the job status screen of fax mode. Touch this key to give priority
to a job that has been selected in the job queue.
[DETAIL] key
The key is only effective for computer print jobs and only appears in the job status
screen of the printer mode. It is used to display detailed information of a selected print
job and to change the paper size for the print job.
Auditing Mode
When the account counter function is turned on, a count is kept of the number of copy
sheets used by each account (maximum of 200 accounts). The counts can be displayed and totaled as needed.
The key operator programs can be used to enable auditing mode separately for copy
mode, fax mode, network scanner mode, and printer mode.
1-18
Xerox WorkCentre C226 User Guide
Auditing Mode
Using the machine when the auditing mode is enabled
The procedure for using the machine for copying functions when the Auditing Mode
has been enabled for the copier functions is explained below.
NOTES:
•
•
When the account counter is turned on for fax or network scanner functions, a
message will appear prompting you to enter your account number each time the
touch panel is changed to the main screen of the function. Enter your account
number as explained below and then proceed with the job.
When the account counter is turned on for the printer function, you must enter
your account number in the setting screen of the printer driver on your computer in
order to print.
When the account counter is turned on, the following messages appear on the touch
panel. There are two types of prompts, depending on whether the account counter
was turned on for both the colour copy and the black and white copy modes, or only
for colour copy mode.
Account counter enabled for both the colour copy and the black and white copy
modes
Enter Your Account Number.
The account counter is enabled only for the colour copy mode
When the [ ] key ([ACC.#-C] key) or the [COLOUR COPY START] key is pressed,
this message appears.
Enter Your Account Number For The Colour Mode.
Press [Cancel] To Change To B/W Mode.
CANCEL
Auditing Mode For Colour
In this case, enter your 5-digit account number as explained on page 1-20 to gain
access to the copier functions.
Xerox WorkCentre C226 User Guide
1-19
General Information
7. Enter your account number (5 digits) with the numeric keys.
As you enter your account number, the hyphens ( )
change to asterisks ( ). If you enter an incorrect digit,
press the
key and re-enter the correct digit.
When a correct account number is entered, the following
message will appear.
Account Status:Copies Made/Remaining
B/W
S.Colour
F.Colour
This does not appear if the account counter has only been set for colour copy
mode.
If a limit has been set by key operator program for the number of copies that
can be made by the account, the remaining number that can be made is
displayed.
This message appears for several seconds and then changes to the following
message.
Ready To Copy.
NOTE:
If "Account number security" is turned on in the key operator programs, the following
message will appear in the event that an incorrect account number is entered three
times in a row.
Please See Your Key Operator For
Assistance.
While this message appears (for about one minute), no other operations can be
performed.
8. Follow the appropriate steps to perform the copy job.
When copying is begun, the following message will appear.
Ready To Copy.
Press [Acc.#] When Finished.
In the case of interrupt copying (page 2-77), the following message will appear.
Ready To Copy. When Interrupt Copying
Is Finished Press [Cancel].
9. When the copy job is finished, press the [ ] key ([ACC.#-C] key)
1-20
Xerox WorkCentre C226 User Guide
Loading Paper
Managing the Machine
Loading Paper
The message "ADD PAPER" or "OPEN TRAY AND ADD PAPER" will appear when
paper runs out during operation.
Follow the procedure below to load paper.
NOTES:
•
•
•
•
Do not use curled or folded paper. Doing so may cause a misfeed.
For best results use paper supplied by Xerox. (See pages 1-30, 1-45.)
When you change the paper type and size in Paper Tray 1, you must change the
paper type and size settings as explained in “Setting the paper type (except the
Bypass Tray)” on page 1-33).
Do not place heavy objects or press hard on any tray which is pulled out.
Loading paper in Paper Tray 1
1. Pull out Paper Tray 1.
Gently pull the tray out until it stops.
2. Load paper into the tray.
Load a stack of paper no higher than the indicator line
(about 500 sheets of the recommended paper for colour
(80 g/m2 or 21 lbs.), or approximately 500 sheets of
Xerox standard paper (80 g/m2 or 21 lbs.)).
3. Gently push tray 1 into the machine.
Push the tray firmly all the way into the machine.
Xerox WorkCentre C226 User Guide
1-21
General Information
4. Set the paper type.
If you change the paper type, be sure to set the paper type refer to “Setting the
paper type (except the Bypass Tray)” on page 1-33.
NOTE:
If you load a different size of the same type of paper, you only need to change the
position of the size slide (see step 2 below); you do not need to change the paper type.
5. Loading paper in Paper Tray 1 is now complete.
Changing the paper size in Paper Tray 1
The following paper size settings are available for Paper Tray 1: A3 to A5 (11" x 17" to
8-1/2" x 5-1/2"), and "EXTRA"*1. Use the following procedure to change the size as
needed.
*1 This is limited to square or rectangular paper, A3 to A5 (11" x 17" to 8-1/2" x 5-1/2")
size.
1. Pull out Paper Tray 1.
If paper remains in the tray, remove it.
2. Adjust the paper size slide to the paper size.
Move the paper size slide right or left to indicate the
paper size being loaded.
If a special size paper is loaded in the paper tray, set the
size slide to "EXTRA" to inform the machine that a special size paper has been loaded. (When INCH-based
size paper is loaded, move the size slide to "EXTRA".)
Note that setting the size slide to "EXTRA" only informs
the machine that a special size of paper has been loaded; it does not inform the
machine of the specific size. If you wish to inform the machine of the specific size,
follow the steps in “Setting the paper size when an extra size is loaded” on page 134. (If you do not set a size, part or all of the image may not print.)
3. Adjust the guide plates A and B by squeezing their lock levers and sliding them to
the paper size to be loaded.
The guide plates A and B are slidable. Adjust them to
the paper size to be loaded while squeezing their lock
levers.
1-22
Xerox WorkCentre C226 User Guide
Loading Paper
4. Load paper into the tray.
5. Gently push tray 1 into the machine.
Push the tray firmly all the way into the machine.
6. Set the paper type of the paper that was loaded in the 1st tray.
If you loaded a different type of paper from the previous paper, be sure to set the
new paper type as explained in “Setting the paper type (except the Bypass Tray)”
on page 1-33.
Changing paper size in Paper Tray 1 is now complete.
NOTE:
If the size slide position (step 2 of page 1-22) is not set correctly after changing the
paper size, or if the paper type (page 1-33) is not set correctly, incorrect paper
selection or paper misfeeding may occur.
Loading paper in the Bypass Tray
The Bypass Tray can be used to feed the same paper specified for Paper Tray 1 or for
special papers. For paper types that can be used in the Bypass Tray, see the specifications for the Bypass Tray in the paper tray specifications (page 1-30).
Up to 250 sheets of Xerox standard paper or up to 100 postcards can be set in the
Bypass Tray.
NOTES:
•
•
After loading the paper in the Bypass Tray, be sure to set the paper type and size
(step 4) if these were changed.
Do not use inkjet paper. This may cause misfeeds in the fusing unit.
Xerox WorkCentre C226 User Guide
1-23
General Information
1. Open the Bypass Tray.
When loading paper that will extend past the end of the
tray, pull out the tray extension to support the paper and
to allow the paper sensors to properly sense the paper
size.
Be sure to pull the tray extension all the way out. If the tray extension is not pulled
all the way out, the size of the paper loaded in the Bypass Tray may not display
correctly.
To support papers that extend past the tray extension,
pull out the wire extension.
2. Set the Bypass Tray guides to the width of the copy paper.
3. Insert the copy paper all the way into the Bypass Tray. (Do not force the paper in.)
Place the copy paper face up. If the Bypass Tray guides
are set wider than the copy paper, the inside of the
machine may become soiled, resulting in smudges on
succeeding copies.
Special purpose papers other than Xerox-recommended
transparency film must be fed individually. Multiple
sheets of Xerox-recommended transparency film can be
loaded in the Bypass Tray.
1-24
Xerox WorkCentre C226 User Guide
Loading Paper
4. Set the type and size of the paper loaded in the Bypass Tray.
If you loaded a different type of paper from the previous paper, be sure to set the new
paper type as explained in “Setting the paper type and paper size in the Bypass Tray”
on page 1-35. If you loaded a special size of paper in the Bypass Tray, set the paper
size as explained in “Setting the paper type and paper size in the Bypass Tray” on
page 1-35.
(If you do not set a size, part or all of the image may not print.)
This completes the procedure for loading paper in the Bypass Tray.
NOTE:
NOTES:
When loading paper in the Bypass Tray or closing the
tray, close the paper cover as shown.
•
Be sure to load A6 paper, A5 paper, 5-1/2" x 8-1/2" paper, and postcards as shown
in the diagram below.
A6 paper, post cards.
A5 paper, 5-1/2" x 8-1/2" paper.
•
•
•
•
•
When loading plain paper other than paper recommended for colour, Xerox
standard paper, special media other than postcards, Xerox-recommended
transparency film, or paper to be printed on the back, the paper must be loaded
one sheet at a time. Loading more than one sheet at a time will cause misfeeds.
Before loading heavy paper, straighten any curling in the paper.
When adding paper, remove any paper remaining in the tray, combine it with the
paper to be added, and reload as a single stack.
Do not use paper that has already been printed on by a plain paper fax machine or
a laser printer. This may cause printed images to become dirty.
When printing on transparency film, be sure to remove each sheet as it exits the
machine. Allowing sheets to stack in the output tray may cause curling.
Xerox WorkCentre C226 User Guide
1-25
General Information
•
Use only Xerox-recommended transparency film. Insert the film so that the
rounded corner is on the left for horizontal loading, or on the right for vertical
loading.
Horizontal Vertical
loading
loading
•
When loading multiple sheets of transparency film in the Bypass Tray, fan the
sheets several times before loading.
Setting envelopes or postcards
When setting envelopes or postcards in the Bypass Tray, set them in the orientation
shown below.
Loading postcards
Insert the postcard with the side to be printed on facing up. The postcard should be
oriented as shown in the diagram.
Loading envelopes
Only the front side of envelopes can be printed. Insert the envelope with the front side
facing up.
Printing onto envelopes or postcards
•
•
•
1-26
Attempting to print onto both sides of envelopes or postcards may result in misfeeds or poor prints.
Do not use pre-printed envelopes.
Before inserting a postcard or envelope, straighten any curled edges. Curled
edges may cause creases, colour deviations, misfeeds, and poor quality images.
Xerox WorkCentre C226 User Guide
Loading Paper
Printing onto envelopes
•
•
•
•
•
•
Attempting to print on envelopes that have metal clasps, plastic snaps, string closures, windows, linings, self-adhesive patches or synthetic materials may cause
misfeeds, inadequate toner adherence or other trouble.
Envelopes with embossed surfaces may cause the prints to become smudged.
Use only envelopes which are flat and crisply folded. Curled or poorly formed
envelopes may be poorly printed or may cause misfeeds.
Print quality is not guaranteed in the area 10
mm or 13/32" from the edges of the envelope.
Print quality is not guaranteed on parts of
envelopes where there is a large step-like
Can be used
change of thickness, such as on three-layer
or four-layer envelopes.
Print quality is not guaranteed on envelopes
Cannot be used
having peel off flaps for sealing the envelopes.
Fusing unit pressure adjusting levers
In some cases damage to the envelopes, colour deviations, or smudging may occur
even if envelopes within the specifications are used. This problem may be reduced by
shifting the fusing unit pressure adjusting levers from their normal pressure position to
the lower pressure position. Follow the procedure on page 1-28.)
NOTE:
Be sure to return the lever to the normal position when you have finished feeding
envelopes. If not, inadequate toner adherence, paper misfeeds or other trouble may
occur.
1. Unlatch the Duplex Bypass/Inverter Unit and slide it to the left.
Unlatch the unit and gently move it away from the
machine. If the machine is not equipped with a Duplex
Bypass/Inverter Unit, open the side cover similarly.
Xerox WorkCentre C226 User Guide
1-27
General Information
2. Lower the two fusing unit pressure adjusting levers marked A and B in the
illustration.
A
B
Normal
position
B: Front side of
fusing unit
Lower pressure
position
A: Rear side of
fusing unit
3. Gently close the Duplex Bypass/Inverter Unit.
If the machine is not equipped with a Duplex Bypass/
Inverter Unit, close the side cover.
Loading paper in the stand/1-Tray Unit/3-Tray Unit
Upper tray / middle tray / lower tray*
Up to 500 sheets of paper recommended for colour or Xerox-recommended plain
paper can be loaded in these trays. The method of loading paper is the same as for
Paper Tray 1 in the main unit (see the explanation on page 1-21).
* The stand/1-Tray Unit only has the upper tray.
NOTE:
1-28
If the size of paper being loaded is different from the previous size, or is an extra size,
or if the paper type is different from the previous type, you must change the paper tray
settings in the custom settings. Change the settings as explained in “Setting the paper
type (except the Bypass Tray)” on page 1-33 and “Setting the paper size when an
extra size is loaded” on page 1-34.
Xerox WorkCentre C226 User Guide
Loading Paper
Specifications (stand/1-Tray Unit/3-Tray Unit)
Name
Paper size/weight
Paper capacity
Stand/1-Tray Unit
A3, B4, A4, A4R, B5, B5R, A5, Extra. (11" x 17", 8-1/2" x 14", 8-1/2" x 13",
8-1/2" x 11", 8-1/2" x 11"R, 7-1/4" x 10-1/2"R, 5-1/2" x 8-1/2")
/ 64 to 105 g/m2 or 17 to 28 lbs.
Paper recommended for colour (80 g/m2 or 21 lbs.): 500 sheets;
Xerox standard paper (80 g/m2 or 21 lbs.): 500 sheets
Power supply
Dimensions
3-Tray Unit
Supplied from the main unit
600 mm (W) x 642 mm (D) x 403 mm (H) (23-5/8" (W) x 25-9/32" (D) x 15-7/8" (H))
(not including the adjuster)
Weight
Approximately 22.5 kg or 49.6 lbs.
Approximately 29.5 kg or 65.0 lbs.
Specifications are subject to change for improvement without notice.
Loading paper in the Duplex Module/2-Tray Unit
Upper tray:
The upper tray contains a Duplex Module that automatically turns print paper over for
automatic two-sided printing.
Middle and lower paper trays:
The middle and lower trays are paper trays.
Up to 500 sheets of paper recommended for colour or Xerox-recommended plain
paper can be loaded in these trays. The method of loading paper is the same as for
Paper Tray 1 in the main unit. See the explanation on page 1-21.
NOTE:
If the size of paper being loaded is different from the previous size, or is an extra size,
or if the paper type is different from the previous type, you must change the paper tray
settings in the custom settings. Change the settings as explained in “Setting the paper
type (except the Bypass Tray)” on page 1-33 and “Setting the paper size when an
extra size is loaded” on page 1-34.
Xerox WorkCentre C226 User Guide
1-29
General Information
Specifications (Duplex Module/2-Tray Unit)
Name
Duplex Module/2-Tray Unit
Paper size/weight
A3, B4, A4, A4R, B5, B5R, A5, Extra. (11" x 17", 8-1/2" x 14", 8-1/2" x 13",
8-1/2" x 11", 8-1/2" x 11"R, 7-1/4" x 10-1/2"R, 5-1/2" x 8-1/2")
/ 64 to 105 g/m2 or 17 to 28 lbs.
Paper capacity
Paper recommended for colour (80 g/m2 or 21 lbs.): 500 sheets;
Xerox standard paper (80 g/m2 or 21 lbs.): 500 sheets
Power supply
Supplied from the main unit
Dimensions
600 mm (W) x 642 mm (D) x 403 mm (H) (23-5/8" (W) x 25-9/32" (D) x 15-7/8" (H))
(not including the adjuster)
Weight
Approximately 31 kg or 68.3 lbs.
Duplex Module
Size of plain paper
A3, B4, A4, A4R, B5, B5R, A5, 11" x 17", 8-1/2" x 14", 8-1/2" x 13", 8-1/2" x 11",
8-1/2" x 11"R, 7-1/4" x 10-1/2R", 5-1/2" x 8-1/2"‘
Weight of plain
paper
64 to 200 g/m2 or 17 to 54 lbs.
Number of sheets
One sheet (single pass type)
Specifications are subject to change for improvement without notice.
Specifications for paper trays
The specifications for the types and sizes of paper that can be loaded in the paper
trays are shown below.
Paper tray type
Tray No.
(tray
name)
Applicable paper types
Applicable paper sizes
A3, B4, A4, A4R, B5,
B5R, A5, Extra.
(11"x17", 8-1/2"x14",
Paper recommended for colour 8-1/2"x13", 8-1/2"x11",
8-1/2"x11"R,
5-1/2"x8-1/2",
7-1/4"x10-1/2"R)
A
Paper Tray 1
See “Storing
Supplies” on
page 1-45.
Tray 1
Plain paper
1-30
Remarks
A3, B4, A4, A4R, B5,
B5R, A5, Extra.
(11"x17", 8-1/2"x14",
8-1/2"x13", 8-1/2"x11",
8-1/2"x11"R,
5-1/2"x8-1/2",
7-1/4"x10-1/2"R)
See “More
information on
plain paper”
on page 1-32.
Xerox WorkCentre C226 User Guide
Loading Paper
Paper tray type
Tray No.
(tray
name)
Applicable paper types
Applicable paper sizes
Remarks
Same as paper types and sizes in row A
* Paper size A3W (12" x 18") and A6R can also be used in the Bypass
Tray.
B
Bypass Tray
Heavy Heavy
Special
paper (Refer paper paper 1
to page 1-32
for applicaBypass ble special
Heavy
papers.)
Tray
paper 2
See “More
A6R - A3W (5-1/2"x8-1/2" information on
- 12"x18"), Special (paper special media
weight: 201 to 300 g/m2
that can be
(54 to 80 lbs.))
used” on
page
1-32.
Transparency film Transparency film
Envelopes
C
D
E
F
Stand/1-Tray Unit
Tray 2
Upper
Tray 2
Stand/
Middle
3-Tray Unit
Lower
Tray 4
Upper
Duplex
Duplex
Module/
Middle
2-Tray Unit
Lower
High Capacity
Feeder
A6R - A3W (5-1/2"x8-1/2"
- 12"x18"), Special (paper
weight: 106 to 200 g/m2
(28 to 54 lbs.)), Postcard
Standard-size envelopes
that can be used:
COM10,Monarch,DL,C5
Same as paper types and sizes in row A
Tray 3
Duplex Module
(See page 1-30 for paper sizes and weights that can be used.)
Tray 2
Same as paper types and sizes in row A
Tray 3
Tray 4*1
or
Same as paper types in row A
2
Tray 5*
A4 (8-1/2"x11")
See the specifications in
“High Capacity
Feeder” on
page 1-74,
and “More
information on
plain paper”
on page 1-32.
*1 When the Duplex Module/2-Tray Unit is installed.
*2 When the 3-Tray Unit is installed.
Xerox WorkCentre C226 User Guide
1-31
General Information
More information on plain paper
The following restrictions apply to plain paper. Be sure to load the paper correctly.
Incorrect loading may result in skewed feeding or misfeeds.
Xerox standard paper
Plain
paper
Restrictions on paper
other than Xerox standard paper
Paper in AB system
Paper in inch system
A6R - A3W*
5-1/2"x8-1/2" - 12"x18"*
80g/m2
21 lbs.
64 to 105g/m2 or 17 to 28 lbs.
Recycled, coloured, pre-punched, pre-printed and letterhead papers must conform to the same conditions as
above.
* In the High Capacity Feeder, only A4 size paper can be used when using AB sizes,
and only 8-1/2" x 11" can be used when using inch sizes.
More information on special media that can be used
The following restrictions apply to special media. The use of incorrect media may
result in fusing problems (weak adhesion of toner to paper or toner smudging when
rubbed), skewed feeding, misfeeds, or other failures.
Type
heavy paper 1
Heavy
paper
Special
paper
heavy paper 2
For paper sizes from A6R to A3W (5-1/2" x 8-1/2" to 12" x 18"),
paper weights from 106 to 200 g/m2 (28 to 54 lbs.) can be used.
Postcards can be used.
Do not use folded postcards, picture postcards, or postcards with a
coated front. These may cause misfeeds or a dirty printed image.
For paper sizes from A6R to A3W (5-1/2" x 8-1/2" to 12" x 18"),
paper weights from 201 to 300 g/m2 (54 to 80 lbs.) can be used.
Transparency film
Use Xerox recommended transparencies.
Envelopes
Applicable standard envelopes: COM-10, Monarch, DL, C5
Envelopes can only be fed from the Bypass Tray. Applicable paper
stock weight for envelopes is 75 to 90 g/m2 or 20 to 23 lbs.
•
•
1-32
Remarks
Special paper such as heavy paper 2, transparency film, and envelopes cannot be
output to the centre tray.
Paper that cannot be output to the centre tray is output face-up to the left tray.
Xerox WorkCentre C226 User Guide
Loading Paper
Paper that can be used for automatic two-sided printing
Paper used for automatic two-sided printing (paper that can be fed through the Duplex
Module) must meet the following conditions:
Paper type:
Plain paper as specified on page 1-30.
Paper size:
Must be one of the following standard sizes: A3, B4, A4, A4R, B5,
B5R or A5 (11" x 17", 8-1/2" x 14", 8-1/2" x 13", 8-1/2" x 11", 8-1/2" x
11"R, 7-1/4" x 10-1/2" or 5-1/2" x 8-1/2")
Paper weight: 64 to 200 g/m2 or 17 to 54 lbs.
NOTES:
•
•
•
Special papers as described above cannot be used for automatic two-sided
printing. Heavy paper up to 200 g/m2 (54 lbs.) can be used.
The image quality and toner fusibility of special papers may change due to
ambient conditions, operating conditions, and paper characteristics, resulting in
image quality inferior to that of Xerox standard paper.
Various types of plain paper and special paper are sold. Some of these cannot be
used in the machine. Please consult your retailer or your dealer when buying
paper.
Setting the paper type (except the Bypass Tray)
Follow these steps to change the paper type setting when the paper type has been
changed in a paper tray. For the paper types that can be used in each tray, see
page 1-30. To change the paper type setting for the Bypass Tray, see page 1-35.
1. Press the [CUSTOM SETTINGS] key.
The custom setting menu screen will appear.
/
2. Touch the [TRAY SETTINGS] key.
Total Count
Contra
Tray Settings
Addres
Contro
Keyboard
Select
Key
Xerox WorkCentre C226 User Guide
The paper tray selection screen will appear.
1-33
General Information
3. Select the paper tray for which the setting is to be made. (For the tray numbers,
see the tray specifications on page 1-30.)
Type / Size
Tray 1
Plain /
Tray 2
Plain /
If the desired tray is not on the display, use
to scroll the display until it appears.
or
key
4. Select the type of paper that was loaded in the tray.
The currently selected paper type will be highlighted. To
change the setting, touch the desired type.
NOTE:
Plain
Letter Head
Pre-Printed
Pre-Punched
Recycled
Colour
Special paper such as transparency film, envelopes, and postcards can only be used
in the Bypass Tray.
5. Touch the [OK] key to complete the setting.
Setting the paper size when an extra size is loaded
When a paper tray is set to "extra", this informs the machine that an extra size is being
used. It does not inform the specific size. To enter the specific size of the paper
loaded, follow the steps below.
For example, if 8-1/2" x 11" size paper is loaded in the tray (with the size slide set to
"extra"), you can use this procedure to set the paper size recognized by the machine
to 8-1/2" x 11" size. If you loaded an irregular size of paper, you can enter the dimensions of the paper.
To set the paper size when an extra size of paper is loaded in the Bypass Tray, see
page 1-35.
1. Perform steps 1 through 4 of "Setting the paper type" at left.
2. Touch the
key to display the paper size setting screen.
Custom Settings
Tray 3 Type/Size Setting
OK
Extra Size
A3
A5
B5R
11X17
1/
2
1/
2
5 X8
1-34
A4
B4
8K
1/
2
1/
2
8 X14
8 X13
1/
4
EXTRA
1/
2
7 X10 R
A4R
B5
16K
16KR
1/
2
8 X11
2/3
81/2X11R
Xerox WorkCentre C226 User Guide
Loading Paper
3. When the loaded paper size appears in the display (if you loaded an INCH-based
size such as 8-1/2" x 11"), touch the size key to highlight it, and then touch the
[OK] key to complete the procedure.
4. If an irregular size of paper was loaded after the [EXTRA] key was touched, touch
the
key in the screen of step 2 to display the following screen.
X
139
(139
mm
432)
Y
182
(182
mm
297)
When the screen opens the X key will be highlighted. Use the and touch keys to
enter the X dimension. Next touch the Y key to highlight it and enter the
dimensions for Y.
The permitted range for the X dimension is 139 to 432 mm (5-1/2 to 17 inches),
and the permitted range for the Y dimension is 182 to 297 mm (7-1/4 to 11-3/4
inches).
When both have been entered, touch the [OK] to complete the operation.
Setting the paper type and paper size in the Bypass Tray
Follow the steps below to set the type and size of the paper loaded in the Bypass Tray.
1. For copy mode or printer mode, touch the appropriate key.
(When copy mode is selected)
Touch the [More...] key in the Paper Select display of the
main screen of copy mode.
(When printer mode is selected)
A4
Paper Select
Touch the [PAPER SELECT] key in the main screen of
printer mode.
Condition
Settings
Xerox WorkCentre C226 User Guide
1-35
General Information
2. Touch the key for the desired paper type.
(When copy mode is selected)
AUTO
Exposure
The key for the selected paper type will be highlighted.
Plain
Heavy Paper
Transparency
Envelope
Paper Select
100%
Copy Ratio
(When printer mode is selected)
Plain
Heavy Paper
Paper Select
Transparency
Condition
Settings
Envelope
The steps that follow differ depending on the paper type selected. Follow the steps for
the selected type.
•
•
•
•
If you touched [PLAIN], go to step 6.
If you touched [HEAVY PAPER], go to step 3.
If you touched [TRANSPARENCY], go to step 4.
If you touched [ENVELOPE], go to step 5.
3. Touch [HEAVY PAPER 1] or [HEAVY PAPER 2], and go to step 6.
Heavy Paper1
106g/m2
200g/m2
Heavy Paper2
201g/m2
300g/m2
For the types of heavy paper that can be used, see page 1-32.
4. Touch [SPEED MODE] or [QUALITY MODE] for the transparency film, and go to
step 7.
Speed Mode
Quality Mode
•
•
1-36
SPEED MODE is for fast printing.
QUALITY MODE is for a high quality image.
Xerox WorkCentre C226 User Guide
Custom Settings
5. Touch the type of envelope, and go to step 7.
OK
Com-10
C5
Monarch
DL
6. If you inserted a non-standard size of paper in the Bypass Tray, remove the
checkmark from "ENABLE AUTO SIZE DETECTION" and then touch the [EXTRA
SIZE] tab. When the screen opens, the X key will be highlighted. Use the
and
touch keys to enter the X dimension. If you inserted a standard size of paper in
the Bypass Tray, make sure that a checkmark appears in the [ENABLE AUTO
SIZE DETECTION] checkbox.
Enable Auto Size Detection
Extra Size
OK
X
139
(139
mm
Y
100
(100
mm
Extra Size
432)
297)
Basic Setting
Next touch the
key to highlight it and enter the
dimensions for Y.
The permitted range for the X dimension is 139 to 432
mm (5-1/2 to 17 inches), and the permitted range for the
Y dimension is 100 to 297 mm (4 to 11-3/4 inches).
Basic Setting
7. Touch the [OK] key to complete the setting.
Custom Settings
The items that can be set with the custom settings are shown below.
Total count
The number of pages processed by the machine and
optional equipment can be displayed. (See page 1-40.)
Display contrast
Used to adjust the contrast of the operation panel display.
(See page 1-41.)
List print
Used to print a list of machine settings. (See page 1-41)
Clock adjust
Used to set the date and time of the built-in clock of the
machine. (See page 1-39.)
Xerox WorkCentre C226 User Guide
1-37
General Information
Tray settings
The paper type, paper size and automatic tray switching can
be set for each tray. Automatic tray switching allows feeding
to switch between trays loaded with the same type and size
of paper. If one tray runs out of paper during printing, printing
will continue from the other tray. (See page 1-41.)
For the detailed descriptions and use of the settings listed below, see
Chapter 5, “Fax Unit” and Chapter 4, “Network Scanner Operation”.*
Address control
Use this to store fax destinations (fax numbers). This is
also used to store groups, memory boxes, and user
indexes.
If the network scanner function is available, e-mail
addresses, user indexes, and scanner senders can
also be stored.
Receive mode
Use this to configure fax reception settings (auto/manual).
Fax data forward
Faxes received to memory can be forwarded to another
destination.
Keyboard select
When using the fax function or network scanner function, you can switch the arrangement of the letter keys
in the display keyboard used for storing and editing
destinations in the English character entry screen.
Key operator program These are programs that are used by the key operator
(administrator of the machine) to configure machine settings. A key appears for these settings in the custom settings menu screen. For information on these settings, see
“Key Operator Programs” in the WorkCentre C226 System
Administration Guide.
* These settings can be configured if the fax function or network scanner function is
available.
1-38
Xerox WorkCentre C226 User Guide
Custom Settings
Operation procedure common to all custom settings
1. Press the [CUSTOM SETTINGS] key.
The custom setting menu screen will appear.
/
More information on setting procedures
In the following type of screen, a setting is turned on
when a checkmark ( ) appears next to the key. A checkmark will appear or disappear by alternate touches of the
checkmark box. In the following screen, Tray 1 can be
used in print, copy, and fax modes. Tray 2 can only be
used in the copy mode.
Custom Settings
OK
Tray Settings
Type / Size
Print
Fax
Copy
1/2
Tray 1
Plain /
Tray 2
Plain /
2. Touch the key of the desired item to display its setting screen.
The settings accessed by touching the [CLOCK] key are explained here.
Custom Settings
Exit
Total Count
Display
Contrast
List Print
Clock
Tray Settings
Address
Control
Receive Mode
FAX DATA
Forward
Keyboard
Select
Key Operator Programs
Detailed descriptions for program settings start on page 1-40.
Xerox WorkCentre C226 User Guide
1-39
General Information
The procedure for setting the clock is shown below as an example.
Custom Settings
Clock Adjust
OK
YEAR
Year
MONTH
Month
DAY
Day
HOUR
Hour
Minute
MINUTE
2004
11
01
00
00
Date Format
Daylight Saving Time Setting
3. Touch the year, month, day, hour or minute key, and then use the or key to adjust
the setting.
•
•
If you select a non-existent date (for example, Feb. 30), the [OK] key will grey
out to prevent entry of the date.
Select [DAYLIGHT SAVING TIME SETTING] checkbox to have the time automatically change at the beginning and end of daylight saving time.
4. Touch the [OK] key.
5. To finish the setting operation, touch the [EXIT] key.
Custom Settings
Exit
Total Count
Display
Contrast
List Print
Clock
Tray Settings
Address
Control
Receive Mode
Fax Data
Forward
Keyboard
Select
Key Operator Programs
About the settings
Total count
This displays the following sheet counts:
The number of sheets printed in copy, print, and fax modes.
The number of sheets transmitted using the fax function and scanned using the
network scanner function.
The number of sheets used by optional equipment such as the DADF and the
Duplex Module of the Duplex Module/2-Tray Unit, and the number of sheets stapled by
the Saddle Stitch Finisher.
In the case of
•
•
1-40
only:
Each sheet of paper that is A3 (11" x 17") size or larger is counted as two sheets.
Each sheet of paper used for automatic two-sided copying is counted as two
sheets (A3 (11" x 17") paper is counted as four sheets). (When an optional Duplex
Module/2-Tray Unit and a Duplex Bypass/Inverter Unit are installed.)
Xerox WorkCentre C226 User Guide
Custom Settings
Display contrast
Screen contrast adjustment is used to make the LCD touch panel easier to view under
various lighting conditions. Touch the [LIGHTER] key to make the screen lighter, or the
[DARKER] key to make the screen darker.
List print
Used to print a list of the settings configured in the fax, printer and network scanner
function.
Clock adjust
Use this to set the date and time in the machine's built-in clock. This clock is used by
functions that require date and time information. The format of the printed date can
also be changed.
Tray settings
The paper type, paper size, enabled modes and automatic tray switching can set for
each tray. See page 1-33 for details on setting the paper type and paper size. Automatic tray switching to another paper tray is used to automatically switch to another
tray with the same size and type of paper in the event that the paper runs out during
continuous printing. This requires that the trays be loaded with the same size of paper.
To enable any function, touch the check box key so that a checkmark ( ) appears.
Keyboard select
When using the fax function or network scanner function, you can switch the arrangement of the letter keys in the display keyboard that appear in the character entry
screen when storing or editing destinations. Select the arrangement of the letter keys
that you find easiest to use.
The following three alphabet keyboard configurations are available:
•
•
•
Keyboard 1 (QWERT... configuration)*
Keyboard 2 (AZERTY...configuration)
Keyboard 3 (ABCDEF...configuration)
* The default setting is "Keyboard 1".
(Example: Character entry screen when Keyboard 3 is selected)
CANCEL
DESTINATION NAME
OK
SPACE
Xerox WorkCentre C226 User Guide
1-41
General Information
Replacing the Toner Cartridges
When toner runs low, "[
] TONER SUPPLY IS LOW" appears in the display. It is
recommended that you keep a set of new toner cartridges so that you can replace
them quickly when toner runs out.
Ready To Copy.
([
]Toner Supply Is Low.)
If you continue to use the toner cartridge, the
toner will eventually run out, the machine will
stop and the following message will appear.
This indicates the colour of toner that is low.
Y = Yellow toner
M = Magenta toner
C = Cyan toner
Bk = Black toner
Change The Toner Cartridge.
([
])
NOTES:
•
There may be cases that copy images become light or uneven before the
message is displayed, depending on the way the machine is used. If this occurs,
take out the toner cartridge by following the same steps as replacement, shake it
horizontally to even out the toner in the cartridge, and re-insert the toner cartridge.
If copy images do not improve even after following this procedure, replace the
toner cartridge with a new cartridge.
•
If one of the toners is out, including black toner, colour copying will not be
possible. If Y, M, or C runs out but BK toner remains, black and white copying will
still be possible.
Follow these steps to replace the toner cartridge that is out of toner.
1. Open the front cover.
Yellow
Magenta
Cyan
Black
1-42
Arrangement of colour
toner cartridges
Xerox WorkCentre C226 User Guide
Replacing the Toner Cartridges
2. Lift the cartridge lock lever toward you.
Example: Replacing the yellow toner cartridge
3. While holding the lock lever on the toner cartridge, pull the toner cartridge toward
you.
Hold the toner cartridge with both hands as shown in the
illustration, and pull it out of the machine.
4. Remove a new toner cartridge from the package and shake it horizontally five or
six times.
NOTE:
Shake the toner cartridge well to ensure that the toner
flows well and will not stick to the inside of the cartridge.
5. Remove the protective material from the new toner cartridge.
Xerox WorkCentre C226 User Guide
1-43
General Information
6. Insert the new toner cartridge.
Align the insert holes as shown and then push the
cartridge in.
NOTE:
A toner cartridge of a different colour cannot be installed. For instance, a yellow
cartridge cannot be installed in the cyan position.
7. Push the cartridge in until it locks securely in place.
NOTE:
Do not push the white area shown in the illustration. The
lock lever may come down.
8. Return the cartridge lock lever.
9. Close the front cover.
After the toner cartridge is replaced, the machine automatically enters resolution adjustment mode. (In some
cases, this may take about 5 minutes.)
CAUTION:
1-44
•
•
Do not throw the toner cartridge into a fire. Toner may fly and cause burns.
Store toner cartridges out of the reach of small children.
Xerox WorkCentre C226 User Guide
Storing Supplies
Storing Supplies
Standard supplies for this product that can replaced by the user include paper, toner
cartridges, and staple cartridges for the finisher.
For best copying results, be sure to use only Xerox Genuine Supplies which are
designed, engineered, and tested to maximize the life and performance of Xerox
products. Look for the Genuine Supplies label on the toner package.
Proper storage
1. Store the supplies in a location that is:
•
•
•
clean and dry,
at a stable temperature,
not exposed to direct sunlight.
2. Store paper in the wrapper and lying flat.
3. Paper stored in packages standing up or out of the wrapper may curl or become
damp, resulting in paper misfeeds.
4. Store a new toner cartridge box horizontally. Do not store it standing on end. If
stored standing on end, the toner may not distribute well even after shaking the
cartridge vigorously, and will remain inside the cartridge without flowing out.
Supply and Consumables
The supply of spare parts for a repair of the appliance is guaranteed for at least 7
years following the termination of production. Spare parts are those parts of the apparatus which may break down within the scope of the ordinary use of the product whereas those parts which normally exceed the life of the product are not to be considered as spare parts. Consumables too, are available for 7 years following the termination of production.
Xerox WorkCentre C226 User Guide
1-45
General Information
Misfeed Removal
When a misfeed has occurred during printing, the message "MISFEED HAS
OCCURRED." will appear in the touch panel display of the operation panel and printing output will stop. The approximate locations of possible misfeeds are indicated by
" " in the illustration below. The page numbers for detailed information for misfeed
removal for each are also shown.
Misfeed in the fusing area,
and exit area (page 1-50)
Misfeed in the Bypass Tray
(page 1-48)
Misfeed in the Duplex Bypass
/Inverter Unit (page 1-53)
Misfeed in the 1-Tray Unit
(page 1-47)
Misfeed in the Saddle Stitch
Finisher (page 1-67)
Misfeed in the Duplex
Module/2-Tray Unit (page 155)
Misfeed in the DADF
(see page 2-79 in the “Copier
Operation” section)
Misfeed in the transport area
(page 1-49)
NOTE:
NOTES:
Misfeed in the stand/1-Tray
Unit or the 3-Tray Unit
(page 1-53
Misfeed in the High Capacity
Feeder (page 1-75)
Received faxes are all temporarily stored in memory. If a paper misfeed occurs,
received faxes cannot be printed. When the misfeed is removed, the received faxes
will print out automatically.
•
•
•
Be careful not to tear the misfed paper during removal.
If paper is accidentally torn during removal, be sure to remove all pieces.
Take care not to damage or leave fingerprints on the transfer belt when removing
the misfed paper.
CAUTION
The fusing unit is hot. Take care in removing paper.
Upper fusing unit
1-46
Fusing unit paper guide
Transfer belt
Xerox WorkCentre C226 User Guide
Misfeed Removal
Misfeed Removal Guidance
Misfeed removal guidance can be displayed by touching the [INFORMATION] key on
the touch panel after a misfeed has occurred.
Information
Misfeed in the paper feed area
NOTE:
Paper misfed from a paper tray may be extending out of the tray into the right side
cover area. In this case if the tray is drawn out of the machine, the paper may become
torn and difficult to remove. To prevent this from happening, always open the right side
cover first and remove the misfed paper if it is extending into that area.
Misfeed in Tray 1
1. Open the upper side cover.
Push the lever upward and gently open the cover.
NOTE:
If paper is loaded in the Bypass Tray, temporarily remove the paper and close the
Bypass Tray before opening the side cover.
2. Remove the misfed paper.
Be careful not to tear the misfed paper during removal.
NOTE:
The misfeed may have occurred inside the machine. Check carefully and remove it.
Xerox WorkCentre C226 User Guide
1-47
General Information
3. If misfed paper is not found in step 2, pull out Paper Tray 1 and remove the misfed
paper.
Be careful not to tear the misfed paper during removal.
4. Gently close the paper tray.
Push the tray firmly all the way into the machine.
5. Gently close the upper side cover.
After closing, confirm that the misfeed message has
been cleared and the normal display appears.
Misfeed in the Bypass Tray
1. Remove the misfed paper from the Bypass Tray.
Be careful not to tear the misfed paper during removal.
2. After removing the misfed paper, open and close the Duplex Bypass/Inverter Unit
to reset.
Grasp the finger hold and gently open the unit.
1-48
Xerox WorkCentre C226 User Guide
Misfeed Removal
After closing, confirm that the misfeed message has
been cleared and the normal display appears. If the
Duplex Bypass/Inverter Unit is not installed, close the
side cover in the same way.
Misfeed in the transport area, fusing area, and exit area
Transport area
1. Open the upper side cover and check for a misfeed.
Push the lever upward and gently open the cover.
NOTE:
If paper is loaded in the Bypass Tray, temporarily remove the paper and close the
Bypass Tray before opening the side cover.
Be careful not to tear the misfed paper during
removal.
NOTE:
The misfeed may have occurred inside the machine. Check carefully and remove it.
2. Gently close the upper side cover.
NOTE:
Even after clearing a misfeed, paper may remain inside the machine on the transfer
belt where it is not visible. In this case, after visible misfeeds are removed, the paper
on the transfer belt will be automatically moved to a position where it is visible and a
misfeed will be indicated once again on the display. Clear the misfeed as explained in
“Misfeed in the transfer unit” (step 3 on page 1-51). For this reason, it may be
necessary to perform the "Misfeed in the transfer unit" procedure twice.
Xerox WorkCentre C226 User Guide
1-49
General Information
Exit area
Models with an exit tray attached to the Duplex
Bypass/Inverter Unit:
Gently remove the misfed paper as shown in the illustration, taking care not to tear the paper.
Models without the Duplex Bypass/Inverter Unit:
Gently remove the misfed paper as shown in the illustration, taking care not to tear the paper.
Upper exit tray:
Gently remove the misfed paper as shown in the illustration, taking care not to tear the paper.
Fusing area
1. Open the Duplex Bypass/Inverter Unit.
Grasp the finger hold and gently open the unit.
2. Remove the misfed paper as shown in the illustrations below.
If paper is misfed in the transport area, turn roller rotating knob A in the direction of the arrow to remove the
misfed paper.
1-50
Xerox WorkCentre C226 User Guide
Misfeed Removal
CAUTION
The fusing unit is hot. Take care in removing paper. (Do not touch any metal parts.)
If you do not find a misfeed, open the cover of the fusing
unit and check for a misfeed inside the fusing unit.
CAUTION
The fusing unit is hot. Take care in removing paper. (Do not touch any metal parts.)
3. Misfeed in the transfer unit
If paper is misfed on the transfer belt, remove it gently
without touching the transfer belt. Do not pull out the
transfer unit.
CAUTION
The transfer unit is hot. Take care in removing paper. (Do not touch any metal parts.)
4. Gently close the Duplex Bypass/Inverter Unit.
After closing, confirm that the misfeed message has
been cleared and the normal display appears. If the
Duplex Bypass/Inverter Unit is not installed, close the
side cover in the same way.
Xerox WorkCentre C226 User Guide
1-51
General Information
Misfeed in the stand/1-Tray Unit
NOTE:
Paper misfed from a paper tray may be extending out of the tray into the right side
cover area. In this case if the tray is drawn out of the machine, the paper may become
torn and difficult to remove. To prevent this from happening, always open the right side
cover first and remove the misfed paper if it is extending into that area.
1. Open the upper and lower side covers.
Push the lever upward and
gently open the cover.
NOTE:
If paper is loaded in the Bypass Tray, temporarily remove the paper and close the
Bypass Tray before opening the side cover.
2. Remove the misfed paper.
Be careful not to tear the
misfed paper during
removal.
NOTE:
The misfeed may have occurred inside the machine. Check carefully and remove it.
3. If misfed paper is not found in step 2, pull out Paper Tray 1 and remove the misfed
paper.
Be careful not to tear the misfed paper during removal.
4. Gently push the paper tray into the machine.
Push the tray firmly all the way into the machine.
1-52
Xerox WorkCentre C226 User Guide
Misfeed Removal
5. Gently close the upper and lower side covers.
After closing, confirm that the misfeed message has been cleared and the normal
display appears.
Misfeed in the 3-Tray Unit
To remove a misfeed in the upper, middle, or lower tray, follow steps 1 through 5 above
of “Misfeed in the stand/1-Tray Unit”.
Misfeed in the Duplex Bypass/Inverter Unit and Duplex Module/2Tray Unit
NOTE:
Paper misfed from a paper tray may be extending out of the tray into the right side
cover area. In this case if the tray is drawn out of the machine, the paper may become
torn and difficult to remove. To prevent this from happening, always open the right side
cover first and remove the misfed paper if it is extending into that area.
1. Perform steps 1 and 2 of “Misfeed in the stand/1-Tray Unit” on page 1-52.
2. Open the upper cover of the Duplex Bypass/Inverter Unit.
3. Remove the misfeed from the upper part of the Duplex Bypass/Inverter Unit.
Hold the upper cover of the unit open while removing the
misfed paper.
Xerox WorkCentre C226 User Guide
1-53
General Information
4. Close the upper cover of the Duplex Bypass/Inverter Unit.
5. Lift the exit tray if one is installed and open the cover of the Duplex Bypass/
Inverter Unit.
6. Remove the misfed paper.
While holding the exit tray up, remove the misfed paper
as shown in the illustration. Be careful not to tear the
misfed paper during removal.
7. Close the cover of the Duplex Bypass/Inverter Unit and return the exit tray to its
original position.
8. Remove a misfeed from the bottom of the Duplex Bypass/Inverter Unit.
Gently remove the misfed paper from the bottom of the
Duplex Bypass/Inverter Unit as shown in the illustration,
taking care not to tear the paper.
1-54
Xerox WorkCentre C226 User Guide
Misfeed Removal
Make sure that there is no misfed paper in the machine.
9. Pull out the Duplex Module of the Duplex Module/2-Tray Unit.
10. Remove the misfed paper from the Duplex Module.
Be careful not to tear the
misfed paper during
removal.
11. Gently close the Duplex Module.
Push the tray firmly all the way into the machine.
12. Gently close the Duplex Bypass /Inverter Unit.
Misfeed in the upper or lower tray
To remove misfed paper from the upper tray or lower tray, follow steps 1 through 5 of
“Misfeed in the stand/1-Tray Unit” beginning on page 1-52.
Xerox WorkCentre C226 User Guide
1-55
General Information
Troubleshooting
Check the following troubleshooting list before requesting service as many problems
can be fixed by the user. If you are unable to solve the problem by checking the list,
turn off the power switch, unplug the power cord.
Problems related to general use of the machine are described below. For problems
related to the copy function, see page 2-83. For fax, printer, and network scanner
problems, see the manuals for those functions. For peripheral device problems, see
the explanation of the device.
If the message "CALL FOR SERVICE. CODE:**-**" appears in the touch panel,
turn off the power switch, wait about 10 seconds, and then turn the power switch
back on. If the message still appears after turning the switch off and on several
times, it is likely that a failure has occurred and maintenance would be required.
In this event, stop using the machine, unplug the power cord, and contact your
Xerox dealer.
Note: Letters and numbers appear in "**-**" above. When you contact your
Xerox dealer, please tell your dealer what letters and numbers appear.
Problem
The machine does
not operate.
Copying/printing is
not possible.
Incorrect Bypass
Tray paper size.
1-56
Check
Solution or cause
Printer plugged in?
Plug the printer into a grounded outlet.
Power switch on?
Turn on the power switch.
READY indicator off?
The printer is warming up. (Warm-up time
is approximately 99 seconds.) Wait until
the READY indicator lights up.
Message indicating need to load paper
displayed?
Load paper. (page 1-21)
Message indicating need to replace the
toner cartridge displayed?
Replace the toner cartridge.(page 1-42)
Message indicating a paper misfeed displayed?
Remove misfed paper. (page 1-46)
A message appears saying that the
power must be turned off and then turned
on.
Turn off the power switch, wait about 10
seconds, and then turn on the switch
again. If the same message appears after
turning the power switch off and on several times, it is possible that the machine
needs service. In this event, contact your
dealer.
A message appears saying that this type
of paper cannot be used for two-sided
copying.
Two-sided printing is not possible on special paper. Use paper that can be used for
automatic two-sided printing. (page 1-33)
Incorrect display of paper sizes A3W, A3,
B4, A4R, 12" x 18", 11" x 17", 8-1/2" x
14",
8-1/2" x 13", or 8-1/2" x 11"R only.
When loading sizes A3W, A3, B4, A4R,
12" x 18", 11" x 17", 8-1/2" x 14", 8-1/2" x
13", or 8-1/2" x 11"R, be sure to open the
tray extension.
Xerox WorkCentre C226 User Guide
Troubleshooting
Problem
Check
Solution or cause
The number of sheets placed on the
Bypass Tray exceeds the maximum number.
Do not place more than the maximum
number of sheets.
The Bypass Guide is not adjusted to the
size of the loaded paper.
Adjust the Bypass Guide to the size of the
loaded paper.
The paper size and paper type have not
been set.
Be sure to set the paper size and paper
type when using special size or special
type papers. (page 1-35)
The number of sheets placed on the
Bypass Tray exceeds the maximum number.
Do not place more than the maximum
number of sheets.
The Bypass Guide is not adjusted to the
size of the loaded paper.
Adjust the Bypass Guide to the size of the
loaded paper.
If too many pages collect on the output
tray, the tray full sensor activates and
stops printing.
Remove the paper from the output tray.
You have run out of paper.
Load paper. (page 1-21)
Smudges on
printed sheets.
Does a message appear indicating the
need for maintenance?
Please contact the your dealer as soon
as possible.
Colour deviations
occur.
When printing in colour, character and
colour deviations appear.
Perform colour registration as explained
in the “Key Operator Programs” section of
the WorkCentre C226 System Administration Guide.
The displayed
paper size differs
from the loaded
paper size.
The display of the tray's paper size slide
differs from the paper size in the tray.
When you change the paper size in the
tray, be sure to adjust the paper size slide
on the tray to the new paper size.
(page 1-22)
The paper size setting is not set correctly
in the paper tray settings of the custom
settings.
When using a special size of paper, set
the correct paper size in millimetres in the
paper tray settings of the custom settings
(see page 1-33). If the paper size setting
is not correct, part or all of the image may
not print (this depends on the options
installed).
The paper size is not set correctly in the
special size settings for the Bypass Tray.
When using a special size of paper, set
the correct paper size in millimetres as
explained in step 6 on page 1-37. If the
paper size setting is not correct, part or all
of the image may not print (this depends
on the options installed).
Copying/printing
on paper from the
Bypass Tray is
skewed.
Paper from the
Bypass Tray misfeeds.
Printing stops
before the job is
finished.
When printing on a
special size of
paper, part of the
printed image is
missing.
When printing on a
special size of
paper using the
Bypass Tray, part
of the printed
image is missing.
Xerox WorkCentre C226 User Guide
1-57
General Information
Problem
Check
Is paper other than Xerox-recommended
paper being used?
Paper curled or damp?
Is the paper curled and does it frequently
misfeed in the Duplex Module/2-Tray Unit
or Saddle Stitch Finisher?
Paper misfeeds
frequently.
Solution or cause
Use Xerox-recommended paper.
Do not use curled or crimped paper. If
you do not use paper for a long time,
store paper in the wrapper in a dry location.
Paper may be curled when output
depending on the paper type and quality.
In some cases turning the paper over in
the tray will reduce misfeeding due to
curling.
Multiple sheets of paper fed simultaneously?
Remove the paper from the paper tray or
the Bypass Tray, fan the paper as shown
in the illustration, and then load it again.
Printed paper is
wrinkled or the
image rubs off
easily.
The contrast on
the touch panel is
too high or too low.
1-58
Is paper other than Xerox-recommended
paper being used?
Use Xerox-recommended paper.
Is paper size or weight out of the allowable range?
Use paper in the allowable range.
Do wrinkles appear when printing envelopes?
Moving the pressure adjusting levers of
the fusing unit from the normal position to
a weaker pressure position may help alleviate this problem. (page 1-27)
Is the pressure adjustment lever of the
fusing unit out of position?
Return the pressure adjusting levers of
the fusing unit to the normal position.
(page 1-28)
Paper damp?
Be sure to store paper in the wrapper in a
dry location and do not store paper in a
location that is humid at a high temperature or an extremely low temperature.
Is LCD contrast properly adjusted?
Adjust the contrast using "DISPLAY
CONTRAST" of custom settings.
(page 1-37)
Xerox WorkCentre C226 User Guide
Saddle Stitch Finisher
Peripheral Devices
This section explains procedures for using the peripheral devices such as the Saddle
Stitch Finisher.
Saddle Stitch Finisher
The Saddle Stitch Finisher can automatically place two staples for centreline binding
of prints or copies and fold them along the centreline. An optional hole punching unit is
available for installation into the finisher.
Part names and functions
Top cover
Stapler compiler
Paper to be stapled is Open for misfeed
removal.
stacked temporarily.
When printing on post
cards or envelopes,
remove the output from
here.
Stapler section
Open the front cover
and pull out this
section to replace the
Offset tray
staple cartridge or to
Output which is stapled remove jammed
or offset will be
staples.
delivered to this tray.
Front cover
Open to replace the
staple cartridge, to
Saddle stitch tray remove the misfed
Saddle stitched output paper, or to remove
is delivered here.
jammed staples.
NOTES:
•
•
•
Do not press on the Saddle Stitch Finisher (particularly the offset tray).
Use caution when near the offset tray during printing as the tray moves up and
down.
To install the Saddle Stitch Finisher, a Duplex Bypass/Inverter Unit and either a
stand/1-Tray Unit, a 3-Tray Unit, or a Duplex Module/2-Tray Unit must also be
installed.
Xerox WorkCentre C226 User Guide
1-59
General Information
Using the Saddle Stitch Finisher
Touch the [More...] key in the Output display on the main screen of copy mode to display the screen that allows selection of sort, staple sort, centreline stapling, group
function, and the output tray.
Output
Sort
OK
Offset
Finisher
Tray
Centre
Tray
Staple
Sort
Saddle
Stitch
Punch
Group
[GROUP] key
[STAPLE SORT]
key
[SORT] key
[FINISHER
TRAY] key
[OFFSET] key
[CENTRE TRAY]
key
[OK] key
[SADDLE
STITCH] key
When Group is selected, all copies of the same original will be grouped.
When Staple Sort is selected, sorted sets will be stapled and delivered to the offset
tray. (They will not be offset stacked.)
When Sort is selected, sets of copies will be sequentially delivered.
When the offset function is selected, output goes to the offset tray. (The offset tray is
automatically selected when the staple sort function is turned on.)
The offset function operates when "Yes" is selected, and doesn't operate when "No" is
selected. (The offset checkmark is automatically cleared when the staple sort function
is turned on.)
If the centre tray is selected, output paper will be delivered to the exit tray located
above the main unit.
Touch to close the [OUTPUT] screen and to return to the main screen.
When saddle stitching is selected, the copies will be stapled at the centre and delivered to the saddle stitch tray.
Touch this key to display the pamphlet copy setting screen (page 2-71). (This is only
possible when a checkmark appears in the checkbox of the [AUTOMATIC SADDLE
STITCH] key operator program)
[PUNCH] key
If the Saddle Stitch Finisher is equipped with a hole Punch Module, printed paper can
be hole punched and delivered to the offset tray.
* When one of the functions is selected, it is highlighted.
1-60
Xerox WorkCentre C226 User Guide
Saddle Stitch Finisher
Staple cartridge replacement and staple jam removal
When the staple cartridge becomes empty or staples become jammed, a message will
appear in the message display of the operation panel.
Follow the procedure below to replace the staple cartridge or remove jammed staples.
Staple cartridge replacement
1. Open the front cover.
2. Pull out the stapler section.
3. Turn roller rotating knob A in the direction of the arrow to move the staple unit to
the front.
Turn the roller rotating knob until the triangle mark is
aligned with the index.
Roller rotating
knob A
Staple unit
4. Remove the empty staple box.
Xerox WorkCentre C226 User Guide
1-61
General Information
5. Remove the empty staple cartridge.
Press the lock button to unlock the staple box cover and
remove the staple cartridge.
NOTE:
If staples remain, the staple cartridge cannot be removed.
6. Insert a new staple cartridge into the staple box.
After inserting the staple cartridge, press down on the
staple box cover to lock the cartridge in place.
NOTES:
•
•
Do not remove the tape from the cartridge before inserting the staple cartridge into
the box.
Make sure that the new staple cartridge is locked securely in the staple box. Press
down on the staple box cover until you hear a "click" indicating that the staple
cartridge is locked.
7. Remove the tape from the staple cartridge by pulling it straight.
8. Insert the staple box.
Push the staple box in until it clicks into place.
9. Push the stapler section back into the finisher.
10. Close the front cover.
NOTE:
1-62
Make a test print or copy in the staple sort mode to ensure that stapling is performed
properly.
Xerox WorkCentre C226 User Guide
Saddle Stitch Finisher
Staple jam removal
1. Unlatch the Saddle Stitch Finisher and slide it away from the main unit.
2. Open the front cover.
3. Turn roller rotating knob C as shown in the illustration until the blue indication is
seen.
Roller rotating
knob C
Blue
4. Remove the paper from the stapler compiler.
5. If saddle stitching was selected, open the saddle stitch section cover.
Xerox WorkCentre C226 User Guide
1-63
General Information
6. Remove the misfed paper.
Be careful not to tear the misfed paper during removal.
7. Close the saddle stitch section cover.
8. Pull out the stapler section.
9. Turn roller rotating knob A in the direction of the arrow to move the staple unit to
the front.
Turn the roller rotating knob until the triangle mark is
aligned with the index.
Roller rotating
knob A
Staple unit
10. Remove the staple box.
1-64
Xerox WorkCentre C226 User Guide
Saddle Stitch Finisher
11. Raise the lever at the end of the staple box.
Remove the top staple if it is bent. If bent staples remain,
a staple jam will occur again.
12. Return the lever to its original position.
13. Reinstall the staple box.
Push the staple box in until it clicks into place.
14. Push the stapler section back into the finisher.
15. Close the front cover.
Xerox WorkCentre C226 User Guide
1-65
General Information
16. Push the Saddle Stitch Finisher back against the main unit.
NOTE:
Make a test print or copy in the staple sort mode to ensure that stapling is performed
properly.
Disposal of hole punch scrap (when the punch unit is installed)
1. Unlatch the Saddle Stitch Finisher and slide it away from the main unit.
2. Pull out the punch scrap collecting container and empty it.
Discard the punch scraps in a plastic bag or other container, taking care not to let the scraps scatter.
3. Return the punch scrap collecting container to its original position.
4. Push the Saddle Stitch Finisher back against the main unit.
1-66
Xerox WorkCentre C226 User Guide
Saddle Stitch Finisher
Misfeed in the Saddle Stitch Finisher
When a misfeed occurs in the Saddle Stitch Finisher, remove the misfed paper following the procedure below.
1. Unlatch the Saddle Stitch Finisher and slide it away from the main unit.
NOTE:
The Saddle Stitch Finisher and the machine are connected at the rear. Exercise
caution when pulling them apart.
2. Remove the misfed paper from the main unit.
After removing the misfed paper, open and close the
Duplex Bypass/Inverter Unit to reset the jam indicator.
(“Misfeed in the transport area, fusing area, and exit
area” step 1 of “Fusing area” on page 1-50 or step 4 on
page 1-51.)
3. If there was no misfed paper in step 2, pull roller rotating knob B on the punch unit
towards you and rotate it. (Only when an optional punch unit is installed.)
Roller rotating
knob B
Rotating roller rotating knob B releases the caught
paper.
4. Open the top cover.
Xerox WorkCentre C226 User Guide
1-67
General Information
5. Remove the misfed paper.
Remove the paper gently, taking care not to tear it.
6. Close the top cover.
7. Remove the misfed paper from the stapler compiler.
Be careful not to tear the misfed paper during removal.
8. Open the saddle stitch section cover.
9. Remove the misfed paper.
Be careful not to tear the misfed paper during removal.
1-68
Xerox WorkCentre C226 User Guide
Saddle Stitch Finisher
10. Open the front cover.
11. Turn roller rotating knob in the direction of the arrow.
12. Remove any misfed paper from the saddle stitch tray.
Be careful not to tear the misfed paper during removal.
13. Close the saddle stitch section cover.
14. Close the front cover.
Xerox WorkCentre C226 User Guide
1-69
General Information
15. Push the Saddle Stitch Finisher back against the main unit.
Troubleshooting Saddle Stitch Finisher problems
Check the list below before calling for service.
Problem
Stapling position is
not correct (including saddle stitch).
The Saddle Stitch
Finisher does not
operate.
Stapling cannot be
performed (including saddle stitch).
The punch hole
positions are not
correct*1
1-70
Check
Solution or cause
Stapling position not set properly?
Check the stapling position setting. (See
pages 1-72 and 1-73.)
Are any Saddle Stitch Finisher covers
open?
Close all covers. (See pages 1-68 and 169.)
Message indicating need to remove
paper from the stapler compiler displayed?
Remove all remaining paper from the
stapler compiler referring to step 4 on
page 1-63.
Message to check the staple unit displayed?
Remove jammed staples. (See page 163.)
Message to add staples displayed?
Replace the staple cartridge. (See
page 1-61.) Check that a staple cartridge
has been installed. (See page 1-61.)
Different size paper included?
Stapling cannot be performed onto different size paper.
Is the paper badly curled, preventing stapling?
Differences in paper quality and type
may result in bad curling of output paper.
Take the paper out of the tray or Bypass
Tray, turn it around, and reload it so that
the top and bottom edges are reversed.
The punch function is not set to the correct punch positions.
Check the allowed hole punch positions.
Xerox WorkCentre C226 User Guide
Saddle Stitch Finisher
Problem
Cannot be
punched.*
Check
Solution or cause
Message to check the Punch Module
displayed?
Dispose of punch scraps. (See page 166.)
Mixed paper sizes?
Punching is not possible when different
paper sizes are mixed together.
Paper is badly curled and the output
paper is not punched.
Differences in paper quality and type
may result in bad curling of output paper.
Take the paper out of the tray or Bypass
Tray, turn it around, and reload it so that
the top and bottom edges are reversed.
* When a hole Punch Module is installed
Xerox WorkCentre C226 User Guide
1-71
General Information
Stapling position quick reference guide for duplex output
The orientation of the copy paper, original, scanned original data, and binding position
selection are all interrelated. The table below shows these relationships.
Orientation of original or original data
Page 1
Page 2
Page 1 & Page 2
Duplexed
Output result
One-position stapling
Two-position stapling
Left binding
Two-position stapling along
the shorter edge is not
possible.
Two-position stapling
Top binding with two-position
stapling is not possible.
Top binding
Portrait orientation printing
One-position stapling
One-position stapling
Two-position stapling
Right binding
Two-position stapling along
the shorter edge is not
possible.
One-position stapling
Left binding
Left binding with two-position
stapling is not possible.
Top binding
Landscape orientation printing
One-position stapling
Two-position stapling
Two-position stapling along
the shorter edge is not
possible.
One-position stapling
Right binding
1-72
Right binding with twoposition stapling is not
possible.
Xerox WorkCentre C226 User Guide
Saddle Stitch Finisher
Relation between print image and saddle stitch
The orientation of the copy paper, original, scanned original data, and binding position
selection are all interrelated. The table below shows these relationships.
Orientation of original or original data
Left binding
Page 2
Page 1 & Page 2
Duplexed
Page 3
Page 4
Page 3 & Page 4
Duplexed
Right binding
Portrait orientation printing
Page 1
Output result
Same as above
Left binding
Right binding
Landscape orientation printing
Page 1
Page 2
Page 1 & Page 2
Duplexed
Page 3
Page 4
Page 3 & Page 4
Duplexed
Same as above
Xerox WorkCentre C226 User Guide
1-73
General Information
High Capacity Feeder
The High Capacity Feeder can hold approximately 3,500 sheets (80 g/m2 (21 lbs.)) of
A4 (8-1/2" x 11") size paper.
(For the types of paper that can be loaded in the High Capacity Feeder, see “High
Capacity Feeder” in the tray specifications (page 1-31).)
Part name
Top cover
Open for misfeed removal.
Release lever
NOTES:
•
•
Do not place heavy objects on the High Capacity Feeder or press down hard on
the tray.
To install the High Capacity Feeder, the optional Duplex Module/2-Tray Unit or the
3-Tray Unit must also be installed.
Loading paper in the High Capacity Feeder
1. Pull the tray out until it stops.
When the tray is in operation, do not use excessive force
to pull the tray out. This may damage the tray.
1-74
Xerox WorkCentre C226 User Guide
High Capacity Feeder
2. Place the paper in the centre of the paper table.
The paper stack must not be higher than the indicator
line (up to 3,500 sheets of Xerox standard paper (80 g/
m2 (21 lbs.))
If the paper type was changed, be sure to change the
appropriate settings as explained in “Setting the paper
type (except the Bypass Tray)” (See page 1-33).
3. Push the tray firmly all the way into the machine.
The paper table will automatically rise to the paper feed
position.
Misfeed in the High Capacity Feeder
When a misfeed occurs in the High Capacity Feeder, remove the misfed paper, following the procedure below.
1. While holding the tray release lever, carefully slide the High Capacity Feeder away
from the main unit until it stops.
Release lever
2. Remove any misfed paper from the main unit and the High Capacity Feeder.
Upper right
side cover
If the misfed paper is stuck inside the machine and cannot be removed, open the
side cover and then remove the misfed paper. (See “Misfeed in the transport area,
fusing area, and exit area” on page 1-49.)
Xerox WorkCentre C226 User Guide
1-75
General Information
3. Open the top cover.
4. Remove the misfed paper.
Be sure not to tear the misfed paper during removal.
After removing the misfed paper, close the top cover.
5. Push the High Capacity Feeder towards the main unit and latch it into place.
Gently push the High Capacity Feeder back in until it
stops.
6. If misfed paper is not found in step 2, pull the tray out.
7. Remove the misfed paper.
1-76
Xerox WorkCentre C226 User Guide
High Capacity Feeder
8. Gently push the tray back into place.
The paper feed table automatically rises to the paper
feed position. Make sure that the paper misfeed screen
is cleared and the normal message screen appears.
Xerox WorkCentre C226 User Guide
1-77
General Information
1-78
Xerox WorkCentre C226 User Guide
2
Copier Operation
Before Making Copies
This chapter provides basic information necessary for using the copier functions of the
machine. Please read this chapter before making copies.
Part Names and Functions (The DADF)
Exterior
DADF exit area
DADF tray
Finished originals are output here.
Set the originals here for automatic feeding (page 2-4).
Xerox WorkCentre C226 User Guide
2-1
Copier Operation
Original guides
Adjust to the size of the originals (page 2-4).
Document
feeding area cover
DADF right side
cover
Reversing tray
Document
glass
Open to remove misfed originals in this area (page 2-79).
Open to remove misfed originals (page 2-79).
Pull out to remove misfed originals.
All originals which cannot be copied from the DADF tray must be copied here.
Touch Panel (main screen of copy mode)
The main screen of copy mode shows messages and keys necessary for copying and
settings that can be selected. Touch a key to make a selection. The main screen of the
copy mode will be displayed when the [COPY] key is pressed.*
* Except when the custom settings screen is displayed.
/
1
2
3
The screen at left shows the
machine with the Duplex
Module/2-Tray Unit and the
Duplex Bypass/Inverter Unit
installed.
B5
The image will vary depending on the equipment
installed.
A4
DUPLEX
A4
4
5
Message
display
[INTERRUPT]
key display area
2-2
6 7
8
9
10
Basic status messages are displayed here.
When interrupt copy is available, the [INTERRUPT] key will be displayed here. When
an interrupt copy job is being run, a [CANCEL] key will be displayed here to be used
for cancelling the interrupt copy job.
Xerox WorkCentre C226 User Guide
DADF
Copy quantity
display
Copy Ratio
display
Exposure tab
Paper Select
display
Displays the selected number of copies before the [START] key is pressed or the number of remaining copies after the [START] key is pressed. A single copy can be made
when "0" displayed.
Use to select the copy ratio (page 2-30).
Touch to adjust the copy exposure (page 2-25).
Use to select the paper size (page 2-14, 2-22). The display shows the location of the
paper trays, the size of the paper in the trays and the approximate amount of paper
loaded in each tray. The approximate amount of paper in a tray is indicated by
Original tab
2-Sided Copy
display
Touch this tab to manually enter the original size (page 2-8).
Use to select the duplex copy mode setting (pages 2-19, 2-24).
Special Modes
tab
Touch to display the Special Modes screen (page 2-37).
Output display
Use to select sort, group, and staple sort, (pages 2-14, 2-23).
NOTE:
.
For a description of the Operation Panel, see page 1-14.
DADF
The DADF can be used to automatically feed originals for continuous copying. Both
sides of two-sided sheet originals can be scanned without having to manually turn the
originals over. This feature is convenient for making copies of a large number of originals.
Acceptable originals
When the DADF is used, up to 40 originals of the same size can be set in the feeder
(maximum stack thickness of 4 mm (11/64"), or 30 originals of weight 90 g/m2 (24
lbs.)).
Xerox WorkCentre C226 User Guide
2-3
Copier Operation
Size and weight of acceptable originals
Original size:
A5 or
5-1/2" x 8-1/2"
(148 x 210 mm)
A3 or
11" x 17"
(297 x 420 mm)
Weight (thickness):
56g/m 2 or 15 lbs.
90g/m 2 or 24 lbs.
g/m 2 ... Weight of a sheet of paper of 1 m 2
Notes on use of the DADF
•
•
•
•
Use originals within the specified size and weight ranges. Use of originals out of
the specified range may cause an original misfeed.
Before loading originals into the DADF tray, be sure to remove any staples or
paper clips.
If originals have damp spots from correction fluid, ink or glue from pasteups, be
sure they are dried before they are fed. If not, the interior of the DADF or the document glass may be soiled.
To prevent incorrect original size detection, original misfeeds or smudges on copies, use the following as a guide for feeding originals.
Transparency film, tracing paper, carbon paper, thermal paper or originals printed
with thermal transfer ink ribbon should not be fed through the DADF. Originals to
be fed through the feeder should not be damaged, crumpled or folded or have
loosely pasted paper on them or cutouts in them.
Setting Originals
When using the DADF
1. Adjust the original guides to the size of the originals.
2-4
Xerox WorkCentre C226 User Guide
Setting Originals
2. Place the originals face up in the DADF tray.
Set the originals all the way into the feed slot. Do not
exceed the maximum height line marked on the original
guide.
When using the document glass
Open the document cover, place the original face down on the document glass, and
then gently close the document cover.
Original size detector
NOTES:
•
•
Do not place any objects under the original size detector, because they may
damage it or the original size may not be detected properly.
If an original has been placed in the DADF tray of the DADF, remove it. Otherwise
the original in the DADF tray will be scanned instead of the original on the
document glass.
[ How to place the original ]
Place the original in the appropriate position shown below according to its size. (Centre the original on the centring scale.)
Original scale
Centring scale
A4 or 8½x11
A3 or 11x17
B4 or
8½x14
Original scale
Centring scale
A4 R or
8½x11 R
A5 or
5½x8½
Xerox WorkCentre C226 User Guide
2-5
Copier Operation
NOTE:
Original size detection function
One of the four groups of standard original sizes shown below can be selected for
detection by the original size detection function. The factory default setting is "AB-1
(INCH-1)". The setting can be changed using “Original size detector setting” in the key
operator programs.
Detectable original sizes
Group
DADF tray (for reversing single pass feeding) or document glass
1
INCH - 1
11" x 17", 8-1/2" x 14", 8-1/2" x 11", 8-1/2" x 11"R, 5-1/2" x 8-1/2"*
2
INCH - 2
11" x 17", 8-1/2" x 13", 8-1/2" x 11", 8-1/2" x 11"R, 5-1/2" x 8-1/2"*
3
AB - 1
A3, A4, A4R, A5, B4, B5, B5R
4
AB - 2
A3, A4, A4R, A5, B5, B5R, 8-1/2" x 13"
* When the DADF is used, these sizes are only supported for one-sided originals.
2-6
Xerox WorkCentre C226 User Guide
Setting Originals
Standard original setting orientation
Place originals in the DADF tray or on the document glass so that the top and bottom
of the original is positioned as shown in the illustration. If not, staples will be incorrectly
positioned and some special features may not give the expected result.
[Example 1]
DADF tray
Document glass
Top
Top
Bottom
Bottom
[Example 2]
DADF tray
Bottom
Document glass
Top
Top
Bottom
* When the original is placed as shown in example 2 and stapling is to be performed, orient the
top of the original as shown below.
DADF tray
Top
Xerox WorkCentre C226 User Guide
Document glass
Bottom
Bottom
Top
2-7
Copier Operation
Automatic copy image rotation - rotation copying
If the orientation of the originals and copy paper are different, the original image will be
automatically rotated 90° and copied. (When an image is rotated, a message will be
displayed.) If a function is selected that is not suitable for rotation, such as enlarging
the copy to greater than A4 (8-1/2" x 11") size or staple sorting with the Saddle Stitch
Finisher, rotation will not be possible.
[Example]
Orientation of original Orientation of paper
Face down
Copy after rotation
Face down
This function operates in both the auto paper select or auto image mode. (Rotation
copying can be disabled with a key operator program.)
Selecting the Original Size
When the correct original size is not detected or the original size is not displayed, you
can manually specify the original size.
By causing the machine to recognize the original size, you can have the automatic
ratio selection function (page 2-28) automatically set a suitable enlargement or reduction ratio for the selected paper size.
Place the original in the DADF tray or on the document glass and then follow the steps
below.
1. Touch the Original tab.
2-8
Xerox WorkCentre C226 User Guide
Selecting the Original Size
2. Enter the original size.
If the original size is a standard size, touch the appropriate original size key.
A4
A5R
A4R
AB
B5
B4
Inch
B5R
A3
Standard Size
[MANUAL] and the original size key you touched are
highlighted.
OK
A5
Size Input
If you wish to select an inch size, touch the [AB/INCH] key and then touch the
desired original size key.
81/2 X13
51/2X81/2R
81/2 X14
AB
11X17
Inch
1/
2
8 X11
[INCH] is highlighted and inch size keys are displayed.
To return to the AB palette, touch the [AB/INCH] key
once again.
OK
51/2X81/2
81/2X11R
Standard Size
Size Input
If the original size is a non-standard size, touch the [SIZE INPUT] tab and then
enter the X (width) and Y (length) dimensions of the original with the
or
key.
X
The X dimension (width) is initially selected.
OK
Y
X
420
(64 432)
mm
Y
297
(64 297)
mm
Standard Size
Touch the Y (
(length).
Size Input
) key and enter the Y dimension
The range of original sizes that can be entered is as follows.
Using the DADF
Using the document glass
X (horizontal
direction)
143 to 432 mm
(5-3/4" to 17")
64 to 432 mm
(2-1/2" to 17")
Y (vertical
direction)
130 to 297 mm
(5-1/8" to 11-3/4")
64 to 297 mm
(2-1/2" to 11-3/4")
3. Touch the [OK] key.
You will return to the initial screen.
Xerox WorkCentre C226 User Guide
2-9
Copier Operation
Storing, Deleting, and Using Original Sizes
Up to 9 special original sizes can be stored. Stored sizes can be easily called up and
are not erased if the power is turned off. Storing a frequently used original size saves
you the trouble of manually setting the size each time you copy that size of document.
To cancel an original size storing, using, or deleting operation, press the [CLEAR ALL]
key.
Storing or deleting an original size
1. Touch the Original tab.
2. Touch the [CUSTOM SIZE] key.
AB
Auto
Inch
Manual
Custom
Size
e Input
Auto
Exposure
Auto
A4
Paper Sele
100%
Copy Rati
3. Touch the [STORE/DELETE] key.
Auto
Manua
Custo
Size
l
2-10
Store/Delete
Xerox WorkCentre C226 User Guide
Storing, Deleting, and Using Original Sizes
4. Touch the original size key (
X68
) that you wish to store or delete.
To store an original size, touch a key that does not show
Y78
a size (
).
Keys that already have an original size stored will show
the stored size (
X68
Y78
).
Store/Delete
Recall
To delete or change a stored size, touch the key that
shows the size that you wish to delete or change.
•
•
If you are storing an original size, go to step 5.
To delete or change an original size, go to step 7.
5. Enter the X (width) and Y (length) dimensions of the original with the
X
Cancel
OK
Y
A
X
420
(64 432)
mm
Y
297
(64 297)
mm
Recall
keys.
X (width) is initially selected.
Enter X and then touch the (
) key to enter Y. A width
of 64 to 432 mm can be entered in X, and a length of 64
to 297 mm can be entered in Y.
Store/Delete
6. Touch the [OK] key.
The original size entered in step 5 is stored in the key selected in step 4.
To exit, touch the [OK] key.
7. When you touch a key that shows an original size in step 4, a message screen
appears that contains the keys [CANCEL], [DELETE], and [STORE].
•
•
•
To cancel the procedure, touch the [CANCEL] key.
To delete the selected original size, touch the [DELETE] key.
To change the original size stored in the key, touch the [STORE] key. The
screen of step 5 will appear to let you change the size.
8. To exit, touch the [OK] key.
Xerox WorkCentre C226 User Guide
2-11
Copier Operation
Using a Stored Original Size
1. Follow steps 1 to 2 of “Storing or deleting an original size”.
2. Touch the original size key that you wish to use.
X68
Y78
Recall
Store/Delete
3. Touch the [OK] key.
The stored original size is called up.
2-12
Xerox WorkCentre C226 User Guide
Normal Copying
Basic Procedure for Making Copies
This section explains the procedures for using basic copy functions, including making
normal copies and enlarging/reducing copies.
Normal Copying
This section describes the normal copying procedure.
Copying from the DADF
NOTE:
Certain restrictions exist depending on the amount of memory installed and the copy
settings. (See “Copy mode output restrictions” on page 2-16 and “Guidelines for the
number of scannable originals during sort copying” on page 2-17.)
1-sided copies of 1-sided originals
Original
Copy
1. Place the originals in the DADF tray. (pages 2-4 to 2-10)
Xerox WorkCentre C226 User Guide
2-13
Copier Operation
2. Ensure that the 1 Æ 1 Sided copy mode is selected.
3. Ensure that paper of the same size as the originals is automatically selected.
(*Note)
The selected tray will be highlighted or the message
"LOAD xxxxxx PAPER." will appear. If the message
appears, load paper in a paper tray with paper of the
required size.
Even if the message above is displayed, copying can be
performed onto the currently selected paper.
(*Note) The following requirements must be satisfied:
Originals of a standard size (A3, B4, A4, A4R, B5, B5R or A5 (11" x 17", 8-1/2" x
14", 8-1/2" x 11", 8-1/2" x 11"R or 5-1/2" x 8-1/2")) are set and the auto paper
select function is enabled.
A4
Plain
B4
Recycled
A3
Plain
If originals of a size other than the sizes above are to be
copied, manually select the desired paper size by touching the [More...] key in the Paper Select display, and
then touching the desired paper size selection key.
The selected key will be highlighted and the paper
selection screen will close. To close the paper selection
screen without making a selection, touch the [OK] key.
4. Select the desired output mode (see page 2-18).
The sort mode is the default mode.
2-14
Xerox WorkCentre C226 User Guide
Normal Copying
5. Use the numeric keys to set the desired number of copies.
Up to 999 can be set.
If you are only making a single copy, the copy can be
made with the copy number display showing "0". Use
the [C] (clear) key to cancel an entry if a mistake has
been made.
6. Press the [COLOUR COPY START (
key.
)] or [BLACK COPY START (
)]
If the [C] key is pressed while originals are being
scanned, scanning will stop. If copying had already
started, copying and scanning will stop after the original
in progress is output to the original exit area. In these
cases the copy quantity will be reset to "0".
NOTE:
The 1-sided to 1-sided copying mode is set as the default in the initial settings.
Xerox WorkCentre C226 User Guide
2-15
Copier Operation
Copy mode output restrictions
Twosided
copying
mode
original/paper size
No added memory
Memory added
(128 MB or 256 MB)
Sort
Sort
Group
Group
Output mode
Up to A3 (11" x 17")
Onesided
copying
Colour copying
A3W (12" x 18")*
Black and
white copying
Up to A3 (11" x 17")
A3W (12" x 18")*
Up to A4 (8-1/2" x 11")
Automatic
two-sided
copying
Colour copying
B4, A3 (8-1/2" x 14", 11" x 17")
A3W (12" x 18")*
Black and
white copying
Up to A3 (11" x 17")
A3W (12" x 18")*
: Copying possible using selected settings
: Copying not possible
* The DADF cannot be used to copy an A3W (12" x 18") size original.
2-16
Xerox WorkCentre C226 User Guide
Normal Copying
Guidelines for the number of scannable originals during sort
copying
When using sort copy mode, the number of pages shown in the table below will all be
scanned into memory and the set number of copies made.
(Note that the numbers shown below are general guidelines. The actual number of
original pages that can be scanned into memory will vary depending on the content of
the originals.)
Output
mode
Original type
Full colour original (mostly text)
Colour
copying
Full colour original (text and
photos)
Full colour original (photo)
Black
and
white
copying
Text original
Xerox WorkCentre C226 User Guide
Original size
Added memory
No added
memory
128 MB
256 MB
Up to A4 (8-1/2" x 11")
100
180
B4, A3
(8-1/2" x 14", 11" x
17")
50
90
A3W (12" x 18")
41
74
Up to A4 (8-1/2" x 11")
37
64
B4, A3
(8-1/2" x 14", 11" x
17")
18
32
A3W (12" x 18")
15
26
Up to A4 (8-1/2" x 11")
21
37
B4, A3
(8-1/2" x 14", 11" x
17")
10
18
A3W (12" x 18")
8
15
Up to A4 (8-1/2" x 11")
400
680
B4, A3
(8-1/2" x 14", 11" x
17")
200
340
A3W (12" x 18")
165
280
2-17
Copier Operation
Copy output (sort and group)
1. Place your original onto the document glass or the DADF tray.
2. On the numeric keys, enter the desired number of copies (<n>).
3. In the Output display, touch the [SORT] key or the [GROUP] key.
NOTE:
•
•
"Sort" is automatically selected when the original is placed on the DADF tray of the
DADF.
"Group" is automatically selected when the original is placed on the document
glass.
4. Press the [COLOUR COPY START] key or the [BLACK COPY START] key.
Your copies are printed.
•
•
If “Sort” was selected, <n> sets of copies will print.
If “Group” was selected, <n> copies of each page will print.
About the offset function
This function offsets each set of copies from the previous set in the output tray, making
it easy to separate sets of copies.
(Offset can function for output to the centre tray or in the offset tray of the Saddle Stitch
Finisher.)
Offset function "ON"
Offset function "OFF"
1. Touch the [More...] key in the Output display.
2. Touch [CENTRE TRAY].
Ready To Copy.
Sort
0
Interrupt
Output
Offset
Left Tray
OK
Centre
Tray
Group
2-18
Xerox WorkCentre C226 User Guide
Normal Copying
3. Touch [OFFSET].
4. Touch [OK].
Ready To Copy.
Sort
0
Interrupt
Output
Offset
Left Tray
OK
Centre
Tray
Group
Selecting the output tray
When the [LEFT TRAY] key in the above illustration is highlighted, copies are output to
the tray on the left side of the machine (the left tray). When the [CENTRE TRAY] key is
highlighted, copies are output to the centre tray. Touch the key of the tray you wish to
use for copy output.
Turning on the offset function
The offset function operates when a checkmark appears in the [OFFSET] checkbox,
which is displayed by touching the [CENTRE TRAY] key. (If a checkmark doesn't
appear, touch the checkbox.)
Offset width: Approximately 30 mm (1-3/10")
(A3W (12" x 18") paper cannot be offset.)
Automatic two-sided copying from the DADF
When a Duplex Module/2-Tray Unit and a Duplex Bypass/Inverter Unit are installed,
the following automatic two-sided copy functions are possible. The copy paper is
turned over automatically, allowing easy two-sided copying.
NOTE:
Certain restrictions exist depending on the amount of memory installed and the copy
settings. (See “Copy mode output restrictions” on page 2-16 and “Guidelines for the
number of scannable originals during sort copying” on page 2-17.)
Xerox WorkCentre C226 User Guide
2-19
Copier Operation
Original
Copy
The following two-sided modes can be
selected
1.Automatic two-sided copying from one-sided
originals
2.Automatic two-sided copying from two-sided
originals
3.Automatic one-sided copying from two-sided
originals
This function can be used even if a Duplex
Module/2-Tray Unit and/or a Duplex Bypass/
Inverter Unit are not installed.
1. Place the originals in the DADF tray. (pages 2-4 to 2-10)
2. In the 2-Sided Copy display, select a duplex copy mode.
Note: If 2 Æ 1 Sided copy mode is desired, you must
first touch the [More...] key.
3. Select the desired duplex copy mode.
Ready To Copy.
Interrupt
Sided Copy
OK
Binding
Change
The left screen shows the display when a DADF, a
Duplex Module/2-Tray Unit, and a Duplex Bypass/
Inverter Unit are installed. The display will vary depending on the equipment installed.
If a copy key is touched for a mode that cannot be
selected, a double beep will be sounded.
Example of a
portrait-oriented
original
2-20
Example of a
landscape-oriented
original
Xerox WorkCentre C226 User Guide
Normal Copying
4. The image to be copied onto the second side of 2-sided copies can be inverted so
that the resultant 2-sided copies are in the correct orientation for binding at the
top. For top binding, touch the [BINDING CHANGE] key on the 2-sided copy
selection screen.
5. Touch the [OK] key.
OK
Binding
Change
Make selections and proceed as in steps 3 to 6 on pages 2-14 and 2-15.
Copying from the document glass
When copying originals which cannot be fed from the DADF such as thick originals,
open the document cover and copy the originals from the document glass.
NOTE:
Certain restrictions exist depending on the amount of memory installed and the copy
settings. (See “Copy mode output restrictions” on page 2-16 and “Guidelines for the
number of scannable originals during sort copying” on page 2-17.)
1-sided copies of 1-sided originals
Original
Copy
1. Set an original on the document glass (pages 2-4 to 2-10).
Original size detector
NOTE:
Do not place any objects under the original size detector, because they may damage it
or the original size may not be detected properly.
Xerox WorkCentre C226 User Guide
2-21
Copier Operation
[ How to place the original ]
Place the original in the appropriate position shown below according to its size.
( Centre the original on the centring scale.)
Original scale
Centring scale
A4 or 8½x11
Original scale
Centring scale
A3 or 11x17
B4 or
8½x14
A4 R or
8½x11 R
A5 or
5½x8½
2. Ensure that the 1 Æ 1 Sided copy mode is selected.
3. Ensure that paper of the same size as the original is automatically selected (set on
the Original tab). (See note*.)
The selected tray will be highlighted or the message
"LOAD xxxxxx PAPER." will appear. If the message
appears, load paper in a paper tray with paper of the
required size. Even if the message above is displayed,
copying can be performed onto the currently selected
paper.
(*Note) The following requirements must be satisfied:
Originals of a standard size (A3, B4, A4, A4R, B5, B5R or A5 (11" x 17", 8-1/2" x
14", 8-1/2" x 11", 8-1/2" x 11"R or 5-1/2" x 8-1/2")) are set and the auto paper
select function is enabled.
2-22
A4
Plain
B4
Recycled
A3
Plain
If originals of a size other than the sizes above are to be
copied, manually select the desired paper size by touching the [More...] key in the Paper Select display, and
then touching the desired paper size selection key.
The selected key will be highlighted and the paper
selection screen will close. To close the paper selection
screen without making a selection, touch the [OK] key.
Xerox WorkCentre C226 User Guide
Normal Copying
4. Select the desired output mode. (See page 2-18.)
When a document is detected on the document glass, the
group mode will be automatically selected.
To select sort copy, touch the [More...] key in the Output
display, then touch the [SORT] key on the displayed
screen, and then touch the [OK] key.
NOTE:
If the [SORT] or [GROUP] key is touched, its corresponding icon is highlighted. To
clear the icon display, press the [CLEAR ALL] key. Note that all selections made to
that point will be cancelled.
5. Use the numeric keys to set the desired number of copies.
Up to 999 can be set.
If you are only making a single copy, the copy can be
made with the copy number display showing "0".
Use the [C] (clear) key to cancel an entry if a mistake
has been made.
6. Press the [COLOUR COPY START (
key.
)] or [BLACK COPY START (
)]
Replace the original with the next original and press the [START] key. Repeat this
operation until all originals have been scanned.
7. Touch the [READ-END] key.
If you selected "Sort" for the output in step 4, it is necessary to touch the [READ-END] key.
Place Next Original. Press [Start].
When Finished, Press [Read-End].
Read-End
Xerox WorkCentre C226 User Guide
2-23
Copier Operation
Automatic two-sided copying from the document glass
When a Duplex Module/2-Tray Unit and a Duplex Bypass/Inverter Unit are installed,
the following automatic two-sided copy function is possible. The copy paper is turned
over automatically, allowing easy two-sided copying.
NOTE:
Certain restrictions exist depending on the amount of memory installed and the copy
settings. (See “Copy mode output restrictions” on page 2-16 and “Guidelines for the
number of scannable originals during sort copying” on page 2-17.)
Original
Copy
1. Place an original on the document glass. (pages 2-4 to 2-10)
2. On the 2-Sided Copy display, touch the [2 Æ 2 SIDED COPY] key.
3. In the 2-Sided Copy display, touch the [1 Æ 2 Sided] key.
Example of a
portrait-oriented
original
Example of a
landscape-oriented
original
When making automatic two-sided copies of a one-sided A3 (11" x 17") or B4 (8-1/2" x
14") size portrait original, or when the front and back side of a two-sided original are
copied backwards:
2-24
a)
In the 2-Sided Copy display, touch the [More...] key.
b)
Touch the [BINDING CHANGE] key.
Xerox WorkCentre C226 User Guide
Exposure Adjustments
4. Touch the [OK] key.
OK
Binding
Change
Make selections and proceed as in steps 3 to 7 on pages 2-22 and 2-23.
Exposure Adjustments
This copier has seven exposure modes to choose from: AUTO, TEXT/PRTD. PHOTO,
TEXT/PHOTO, TEXT, PHOTO, PRINTED PHOTO and MAP.
[AUTO]
This is the standard initial setting for this copier. When a black and white copy is made,
the exposure is automatically adjusted to obtain the best image quality. When a fullcolour copy is made, the image is adjusted in the same way as when [TEXT/
PRTD.PHOTO] (initial settings) is selected.
[TEXT/PRTD. PHOTO, TEXT/PHOTO, TEXT, PHOTO, PRINTED PHOTO and MAP.]
The exposure can be manually adjusted in 9 steps.
1. Touch the Exposure tab.
2. Select [AUTO], [TEXT/PRTD. PHOTO], [TEXT/PHOTO], [TEXT], [PHOTO],
[PRINTED PHOTO], or [MAP] depending upon the original type.
Ready To Copy.
OK
Auto
Copy
Of Copy
Text/
Prtd.Photo
Text/Photo
Text
Photo
Printed
Photo
Map
Xerox WorkCentre C226 User Guide
A
Pa
C
Colour Tone
Enhancement
Manual
Example:
Auto
Text/
Prtd.Photo
The [TEXT/PRTD.PHOTO]
key is selected.
Text
Printed
Photo
2-25
Copier Operation
NOTES:
•
Selecting the resolution
Six resolution settings are available for both colour copying and black and white
copying, depending on the contents of the original.
2-26
Original type
Contents of the original
AUTO
Normally this setting is selected. When
a black and white copy is made, the
exposure is automatically adjusted to
obtain the best image quality. When a
full-colour copy is made, the image is
adjusted in the same way as when
[TEXT/PRTD.PHOTO] (initial settings)
below is selected.
TEXT/PRTD.
PHOTO
This mode provides the best balance
for copying an original which contains
both text and printed photographs.
TEXT/PHOTO
This mode provides the best balance
for copying an original which contains
both text and photographs.
TEXT
This mode is useful in enhancing very
low density areas of an original or in
suppressing unusually high-density
background areas.
PHOTO
This mode provides the best copies of
photographs with fine details.
PRINTED
PHOTO
This mode is useful for copying printed
photographs.
MAP
This mode is useful to provide the best
shading and fine details found on most
maps.
Xerox WorkCentre C226 User Guide
Exposure Adjustments
•
Making a copy of a copy
When making a copy of a copy made on this machine, touch the checkbox for
COPY OF COPY to select the mode. Three resolution settings are available when
this mode is selected: "TEXT/PRINTED PHOTO", "TEXT", and "PRINTED
PHOTO".
•
For brighter colours in colour copies, touch the COLOUR TONE ENHANCEMENT
checkbox. The following restrictions apply when colour tone enhancement is
selected:
Colour tone enhancement cannot be selected at the same time as COPY OF
COPY mode (above).
Brightness adjustment (page 2-57) and single colour copying (page 2-60) are not
possible.
The DADF cannot be used. (It can be used when making black and white copies.)
3. If a setting other than "AUTO" has been selected in step 2, manually adjust the
copy exposure.
Manual
1
NOTES:
•
3
Text
5
Prin
Phot
Touch the
key to make darker copies.
Touch the
key to make lighter copies.
Recommended exposure levels for the text mode
1 to 2: Dark originals such as newspaper
3: Normal density originals
4 to 5: Originals written with pencils or light colour characters
•
Colour adjustment menu
As special functions for colour copying, the following colour image adjustments
can be made (page 2-51).
- RGB ADJUST
- SHARPNESS
- SUPPRESS BACKGROUND
- COLOUR BALANCE
- BRIGHTNESS
- INTENSITY
Xerox WorkCentre C226 User Guide
2-27
Copier Operation
4. Use the numeric keys to set the desired number of copies.
5. Press the [Colour Copy Start (
)] or [Black Copy Start (
)] key.
To return to the automatic exposure mode, touch the Exposure tab and select [AUTO].
NOTE:
The exposure level for automatic exposure adjustment can be changed using the
“Image quality adjustment” key operator program.
Reduction/Enlargement/Zoom
Reduction and enlargement ratios can be selected either automatically or manually as
described in this section.
Automatic selection (auto image)
The reduction or enlargement ratio will be selected automatically based on the original
size and the selected paper size.
1. Place the original in the DADF tray or on the document glass (pages 2-4 to 2-10).
NOTE:
Automatic ratio adjustment can only be used for the following original and paper sizes.
It cannot be used for other sizes. However, in the case of non-standard original and
paper sizes, the sizes can be entered to make automatic ratio adjustment possible for
those sizes. (page 2-8)
Original sizes: A3, B4, A4, A4R, B5, B5R, A5 (11" x 17", 8-1/2" x 14", 8-1/2" x 11", 8-1/
2" x 11"R, 5-1/2" x 8-1/2")
Paper size:
2-28
A3, B4, A4, A4R, B5, A5 (11" x 17", 8-1/2" x 14", 8-1/2" x 13", 8-1/2" x
11", 8-1/2" x 11"R, 5-1/2" x 8-1/2")
Xerox WorkCentre C226 User Guide
Reduction/Enlargement/Zoom
2. Touch the appropriate key in the Paper Select display to select the desired paper
size.
NOTE:
1.
A4
Recycled
2.
A3
Plain
3.
A4R
Plain
If paper of the desired size is not loaded in any tray, load paper of the required size in
a paper tray or the Bypass Tray.
3. On the Copy Ratio display, touch the [More...] key.
4. Touch the [AUTO IMAGE] key.
5. Touch [OK].
The [AUTO IMAGE] key will be highlighted and the best reduction or enlargement ratio
for the original size and the selected paper size will be selected and displayed in the
copy ratio display.
NOTE:
If the message "ROTATE ORIGINAL FROM
TO " is displayed, change the
orientation of the original as indicated in the message. When the message above is
displayed, copying can be done without changing the orientation, but the image will
not fit the paper correctly.
6. Use the numeric keys to set the desired number of copies.
Up to 999 can be set.
If you are only making a single copy, the copy can be
made with the copy number display showing "0".
Use the [C] (clear) key to cancel an entry if a mistake has been made.
Xerox WorkCentre C226 User Guide
2-29
Copier Operation
7. Press the [COLOUR COPY START (
key.
)] or [BLACK COPY START (
)]
If you placed the original on the document glass, set the
output to "Sort", you must touch the [READ-END] key
after all pages of the original have been scanned (step 7
on page 2-23).
To cancel the auto image mode, touch [More...] on the Copy Ratio display, then
touch the [AUTO IMAGE] key again to clear the highlighted display.
Manual selection
The preset ratios (maximum 400%, minimum 25%) can be selected with the enlargement and reduction keys. In addition, the zoom keys can be used to select any ratio
from 50% to 200% in increments of 1%.
NOTE:
When the DADF is used, the ratio can only be set within the range 50% to 200%.
1. Place the original in the DADF tray or on the document glass (pages 2-4 to 2-10).
2. Touch the [More...] key in the Copy Ratio display.
3. Use the [MENU] key to select menu "
" or menu "
" for copy ratio selection.
Menu
Ready To Copy.
0
100
OK
%
Zoom
B4
A3
B5
B4
B5 70%
A4
A4 115%
A3
XY Zoom
•
•
2-30
B5
B4
A5
A4
A5 81%
A4
B5 122%
B4
Menu
A4
A3
B5
A4
B5 86%
B4
B4 141%
A3
1
2
Auto
Original
AUTO
Exposure
100%
Auto Image
Auto
A4
Paper Select
Copy Ratio
A. Preset reduction copy ratios are:
70%, 81% and 86% (for the AB system).
77% and 64% (for the inch system).
B. Preset enlargement copy ratios are:
115, 122% and 141% (for the AB system).
121% and 129% (for the inch system).
Xerox WorkCentre C226 User Guide
Reduction/Enlargement/Zoom
Menu
Ready To Copy.
0
100
OK
%
Zoom
50%
200%
25%
400%
Auto
Exposure
100%
XY Zoom
•
Auto
Original
Menu
1
Auto Image
2
Auto
A4
Paper Select
Copy Ratio
A. Preset reduction copy ratios are:
50% and 25%*.
B. Preset enlargement copy ratios are:
200% and 400%*.
•
* When the DADF is used, the ratio can only be set within the range 50% to 200%.
(The custom ratios set by the key operator appear in ratio menu 2.)
4. Use the reduction, enlargement, and [ZOOM] keys on the touch panel to set the
desired copy ratio.
100
%
Zoom
B4
A3
B5
B4
B5 70%
A4
A4 115%
A3
B5
B4
A5
A4
A5 81%
A4
B5 122%
B4
XY Zoom
A4
A3
B5
A4
B5 86%
B4
B4 141%
A3
Menu
100
1
2
Zoom ratios: Any ratio from 50% to 200% can be set in
1% increments.
%
Zoom
B5 70% B5
A4
B4
A4 115% A5
A3
A4
XY Zoom
NOTES:
•
•
•
A5 81% A4
A4
A3
B5 122% B5
B4
A4
Menu
B5 86%
B4
B4 141%
A3
1
2
1
Touch the [
] key to increase the ratio, or the [
]
key to decrease the ratio. If you continue to touch either
key for 3 seconds, the ratio begins to change quickly.
Auto
Touch a reduction or enlargement key to set the approximate ratio, then touch the
[
] key to decrease the ratio or the [
] key to increase the ratio.
The message "IMAGE IS LARGER THAN COPY PAPER." may appear, indicating
that the selected copy ratio is too large for the copy paper size. However, if you
press the [START] key, a copy will be made.
To set the horizontal and vertical copy ratios separately, use the XY ZOOM
feature. See page 2-33.
Xerox WorkCentre C226 User Guide
2-31
Copier Operation
5. Ensure that the desired paper size has been automatically selected based on the
selected copy ratio or select another size as needed.
6. Touch the [OK] key.
86
%
OK
Zoom
B5 86%
1% A4
A3 B4
B4
2% B5
A4 A3 141%
NU
100%
Au
Pa
AUTO IMAGE
7. Use the numeric keys to set the desired number of copies.
Up to 999 can be set.
If you are only making a single copy, the copy can be
made with the copy number display showing "0".
Use the [C] (clear) key to cancel an entry if a mistake has been made.
8. Press the [COLOUR COPY START (
key.
)] or [BLACK COPY START (
)]
If you placed the original on the document glass, set the
output to "Sort", you must touch the [READ-END] key
after all pages of the original have been scanned (step 7
on page 2-23).
To return the ratio to 100%
To return the ratio setting to 100%, touch the [100%] key in the Copy Ratio display.
2-32
Xerox WorkCentre C226 User Guide
Reduction/Enlargement/Zoom
XY Zoom
The XY ZOOM feature allows the horizontal and vertical copy ratios to be changed
independently.
The preset ratios (maximum 400%, minimum 25%) can be selected with the enlargement and reduction keys. In addition, the zoom keys can be used to select any ratio
from 50% to 200% in increments of 1%.
NOTE:
When the DADF is used, the ratio can only be set within the range 50% to 200%.
Example: Selecting 100% for the length and 50% for the width
Original
Copy
1. Place the original in the DADF tray or on the document glass. (pages 2-4 to 2-10)
2. Touch the [More...] key in the Copy Ratio display on the touch panel.
3. Touch the [XY ZOOM] key.
READY TO COPY.
0
100
OK
%
ZOOM
B4
A3
B5
B4
B5 70% B5
A4
B4
A4 115% A5
A3
A4
A5 81% A4
A4
A3
B5 122% B5
B4
A4
XY Zoom
Menu
B5 86%
B4
B4 141%
A3
1
Auto
Exposure
100%
Auto Image
2
Auto
Original
Auto
A4
Paper Select
Copy Ratio
4. Touch the [X] key.
%
%
A
X
100
%
1
Y
100
%
2
ZOOM
%
Xerox WorkCentre C226 User Guide
4
2-33
Copier Operation
5. Use the reduction, enlargement, and ZOOM ([
copy ratio in the horizontal (X) direction.
A
64%
], [
]) keys to change the
A fixed ratio key will not become highlighted when
touched.
Y
Zoom
50%
When the DADF is used, the ratio can only be set within
the range 50% to 200%.
XY Zoom
%
%
A
X
50
%
1 The zoom keys can be used to change the ratio from
Y
100
%
2
50% to 200% in increments of 1%.
Touch the [
] key to increase the ratio, or the [
]
key to decrease the ratio. If you continue to touch either
4
key for 3 seconds, the ratio begins to change quickly.
Zoom
%
Cancel
XY Zoom
NOTE:
Touch a reduction key or an enlargement key to set the approximate ratio, then touch
the [
] key to decrease the ratio or [
] key to increase the ratio.
6. Touch the [Y] key.
%
%
A
X
50
%
1
Y
100
%
2
Zoom
4
%
CANCEL
XY ZOOM
7. Use the reduction, enlargement, and ZOOM ([
], [
]) keys to change the
copy ratio in the vertical (Y) direction as you did for (X) in step 5.
0%
70%
64%
X
A
4%
A
Y
X
50
%
1
Y
70
%
2
Zoom
0%
4
Zoom
50%
XY Zoom
Cancel
Either copy ratio can be changed for fine-tuning until the next step is performed.
2-34
Xerox WorkCentre C226 User Guide
Special Papers
8. Touch the [OK] key.
%
141%
OK
Or
25%
%
200%
Ex
400%
Auto
Pape
100%
9. In the Paper Select display, select the paper tray with the desired paper size.
Original
Plain Paper
Auto
Exposure
Heavy Paper
ransparency
Envelope
If the AUTO PAPER SELECT mode is on, the appropriate copy paper size will have been automatically
selected based on the original size and selected copy
ratios.
Paper Select
X-50% Y-100%
Copy Ratio
10. Make all other desired settings such as exposure, paper size and number of
copies and then press the [COLOUR COPY START (
)] or [BLACK COPY
START (
)] key.
To cancel this function, touch the [CANCEL] key or the [XY ZOOM] key again as in
step 3 on page 2-33 or step 5 on page 2-34. This must be done before you touch [OK]
in step 8.
Special Papers
Special papers including transparency film, postcards and envelopes must be fed
through the Bypass Tray.
1. Place the original in the DADF tray or on the document glass (pages 2-4 to 2-10).
Xerox WorkCentre C226 User Guide
2-35
Copier Operation
2. Load the special paper in the Bypass Tray.
See pages 1-29 and 1-30 for the specifications of paper
that can be used in the Bypass Tray.
For the paper loading instructions see “Loading paper in
the Bypass Tray” on page 1-23.
3. Touch the [More...] key in the Paper Select display, and then select the Bypass
Tray.
4. Select the type of paper that you inserted in the Bypass Tray.
5. Touch the [OK] key.
6. Make all other desired settings such as exposure or the number of copies, and
press the [COLOUR COPY START (
)] or [BLACK COPY START (
)]
key.
If you placed the original on the document glass, set the
output to "Sort", you must touch the [READ-END] key
after all pages of the original have been scanned (step 7
on page 2-23).
NOTES:
•
Output location for copies on heavy paper 2, transparencies, and envelopes
Copies on these types of paper will be output face-up to the tray on the left side of
the machine.
They cannot be delivered to the centre tray. Face-down delivery is not possible for
these papers.
•
Colour adjustment menu
As special functions of colour copying, the following colour image adjustments are
available (page 2-51).
•
•
•
•
•
•
2-36
RGB ADJUST
SHARPNESS
SUPPRESS BACKGROUND
COLOUR BALANCE
BRIGHTNESS
INTENSITY
Xerox WorkCentre C226 User Guide
Special Modes
Convenient Copy Functions
This chapter explains special-purpose functions, storing of copy settings, and other
convenient functions. Please select and read sections of this chapter as needed.
Special Modes
When the Special Modes tab on the main screen of copy mode is touched, the SPECIAL MODES screen containing several special function touch keys will appear.
These functions are shown below.
Touch the [Special Modes]
Touchkey
the Special Modes tab.
in the main screen
Ready To Copy.
SPECIAL
Special MODES
Modes
Plain
A4
2-Sided Copy
A4
Output
[MARGIN SHIFT]
key
0
Interrupt
ORIGINAL A4
Original
Duplex
A4
A3
OK
Special Modes
Auto
Original
Auto
Exposure
Margin Shift
Erase
Dual Page
Copy
Covers
Transparency
Inserts
Auto
A4
Paper Select
100%
Copy Ratio
Centring
Use this to shift the image on the copy to create binding margins (page 2-39).
[ERASE] key
Use this to erase peripheral shadows that occur when making copies of books and
other thick originals (page 2-41).
[DUAL PAGE
COPY] key
This is useful to copy the left and right pages of bound documents without shifting the
document on the document glass (page 2-42).
[CENTRING] key
[COVERS] key
[TRANSPARENCY
INSERTS] key
Use this to centre the copied image on the paper (page 2-44).
Use this to insert a different type of paper for use as front and back covers (page 247). (The DADF must be used.)
When copying onto transparencies, use this to automatically insert a sheet of copy
paper between transparency sheets (page 2-45).
Xerox WorkCentre C226 User Guide
2-37
Copier Operation
[OK] key on the
special modes
screen
/
key
Touch the [OK] key to return to the main screen of the copy mode.
Touch these keys to switch between the special modes menu screens.
The special modes menu consists of two screens.
Touch the
key
to switch to the screen below.
The special modes below can be selected in the second screen (2/2).
OK
Special Modes
Colour
Adjustments
[COLOUR
ADJUSTMENTS]
key
Image Edit
B/W
Reverse
Touch this key to display the colour adjustments menu screen. This allows you to
select the special functions shown below for colour adjustment when making colour
copies (page 2-51).
OK
Colour Adjustments
RGB Adjust
Sharpness
Suppress
Background
Colour
Balance
Brightness
Intensity
[IMAGE EDIT]
key
Touch this key to display the image edit menu screen. This allows you to select the
special functions shown below for image editing (page 2-59).
[B/W
REVERSE] key
A copy can be made with black and white reversed (page 2-50). (This function can
only be used for black and white copying.)
Common operation procedure for using the special functions
1. Touch the Special Modes tab.
2-38
Xerox WorkCentre C226 User Guide
Special Modes
2. Touch the key for the desired special mode.
Example:
To set the margin shift function
Margin Shift
Centring
If you touch the menu keys for colour adjustment or image editing, you will go to
the menu screen for selection of the corresponding functions.
Setting procedures for modes requiring setting screens start on page 2-39.
The dual page copy, centring, transparency film with insert sheets, B/W reverse, mirror
image and A3 (11" x 17") full-bleed functions do not require setting screens.
Margin shift
The margin shift function will automatically shift the text or image on the copy paper
approximately 10 mm (1/2") in its initial setting.
One-sided copying
Original
Image shifted
to the right
Margin
Image shifted
to the left
The shift direction can be selected from right or
left shift as shown in the illustration.
Margin
Two-sided copying
Original
Image shifted
to the right
Image shifted
to the left
Or
Margin
Xerox WorkCentre C226 User Guide
Margin
2-39
Copier Operation
1. Touch the [MARGIN SHIFT] key on the SPECIAL MODES screen.
The margin shift setting screen will appear.
Margin Shift
The margin shift icon ( ) will also appear in the upper
left of the screen to indicate that the function is turned
on.
Centring
2. Select the shift direction.
Right
Touch a shift direction key to select right or left. The
selected key will be highlighted.
Left
3. Set the shift amount as needed and touch the lower [OK] key.
Use the
and the
keys to set the shift amount. The
shift amount can be set from 0 to 20 mm in 1 mm increments.
OK
Cancel
Side 1
10
(0
mm
OK
Side 2
20)
10
(0
mm
20)
If a Duplex Module/2-Tray Unit and Duplex Bypass/
Inverter Unit are not installed, the margin shift setting for
back-side copies will not be displayed.
4. Touch the [OK] key on the SPECIAL MODES screen.
Return to the main screen of copy mode.
About the steps that follow
If a DADF is being used, see pages 2-13 through 2-19. If the document glass is being
used, see pages 2-21 through 2-24.
To cancel the margin shift function, touch the [CANCEL] key on the margin shift setting
screen. This must be done before you touch [OK] in step 4.
2-40
Xerox WorkCentre C226 User Guide
Special Modes
Erase
The erase function is used to erase the shadow lines on copies produced when copying thick originals or books. The erase modes that can be selected are shown below.
The erase width is approximately 10 mm (1/2") in it's initial setting.
Original
Copy
EDGE ERASE
Eliminates shadow lines around the edges of copies caused when heavy paper or a
book is used as an original.
CENTRE ERASE
Eliminates shadow lines produced by the bindings of bound documents.
EDGE + CENTRE ERASE
Eliminates shadow lines around the edges of copies and eliminates the shadow at the
centre of copies.
1. Touch the [ERASE] key on the SPECIAL MODES screen.
The erase setting screen will appear.
The erase icon ( ) will also appear in the upper left of
the screen to indicate that the function is turned on.
Erase
Covers
Xerox WorkCentre C226 User Guide
T
2-41
Copier Operation
2. Select the desired erase mode.
Erase
Edge
Erase
Centre
Erase
Edge+Centre
Erase
Select one of the three erase modes. The selected key
will be highlighted.
3. Adjust the amount of erase and touch the [OK] key.
Cancel
OK
Use the
and the
keys to adjust the erase width
and then touch the [OK] key.
Edge
10
(0
mm
20)
4. Touch the [OK] key on the SPECIAL MODES screen.
Return to the main screen of copy mode.
About the steps that follow
If a DADF is being used, see pages 2-13 through 2-19. If the document glass is being
used, see pages 2-21 through 2-24.
To cancel the erase function, touch the [CANCEL] key on the erase setting screen.
Dual page copy
The dual page copy function produces separate copies of two documents placed side
by side on the document glass. It is especially useful when copying books and other
bound documents.
[Example] Copying right and left pages of a book
•
Book original
Dual page copy
•
•
2-42
The dual page copy function can be used
with reduction copying but cannot be
used with enlargement copying.
The dual page copy function can be done
only from the document glass. The DADF
cannot be used with this function.
Only A4 (8-1/2" x 11") paper can be used.
Xerox WorkCentre C226 User Guide
Special Modes
1. Touch the [DUAL PAGE COPY] key on the SPECIAL MODES screen.
The [DUAL PAGE COPY] key will be highlighted to indicate that the function is turned on, and the dual page
Dual Page
Copy
copy icon (
) will appear in the upper left of the SPECIAL MODES screen.
Transparency
Inserts
2. Touch the [OK] key on the SPECIAL MODES screen.
OK
Page
Return to the main screen of copy mode.
3. Place the originals on the document glass.
This page is
copied first.
Centre line
of original
Index
8½x11
A4
When copying book originals:
When copying a thick book, press down lightly on the book to flatten it against the
document glass.
Xerox WorkCentre C226 User Guide
2-43
Copier Operation
4. Ensure that A4 (8-1/2" x 11") size paper is selected.
If A4 (8-1/2" x 11") size paper is not selected, touch the
appropriate key in the Paper Select display to select A4 (81/2" x 11") size paper.
About the steps that follow
For two-sided copying, follow steps 2 through 4 beginning on page 2-24 and then follow steps 4 through 7 beginning on page 2-23.
For one-sided copying, follow steps 4 through 7 beginning on page 2-23.
To cancel the dual page copy function, touch the [DUAL PAGE COPY] key on the special modes screen (step 1). (The highlighted display will be cancelled.)
NOTE:
To erase shadows caused by document binding, use the edge erase function (page 241). (Centre Erase and Edge + Centre Erase cannot be used in combination.)
Centring
When the original and copy paper are of different sizes, CENTRING is used to shift the
image to the centre of the copy paper but only in the left to right direction.
[Example]
•
Original
Copy
•
This function can be used to reduce a larger sized original image and centre it on a copy of smaller paper size,
as well as centre a smaller original onto a larger sized
copy.
This function will not work when non-standard size originals or copy paper are used. This function cannot be
selected when enlargement copying has been selected.
1. Touch the [CENTRING] key on the SPECIAL MODES screen.
Margin Shift
The [CENTRING] key is highlighted to indicate that the
function is turned on, and the centring icon (
appear in the upper left of the screen.
) will
Centring
2. Touch the [OK] key on the SPECIAL MODES screen.
Return to the main screen of copy mode.
2-44
Xerox WorkCentre C226 User Guide
Special Modes
About the steps that follow
If a DADF is being used, see pages 2-13 through 2-19. If the document glass is being
used, see pages 2-21 through 2-24.
To cancel the CENTRING function, touch the [CENTRING] key again on the SPECIAL
MODES screen (step1).
Transparency film with insert sheets
When copying onto transparency film, blank insert sheets can be placed between
transparent sheets.
Example: Inserting insert sheets between transparencies
•
•
Originals (1-sided)
4
3
4
2
1
•
3
2
•
1
Originals (2-sided)
Insert sheets •
For two-sided originals,
this is only possible when
using a DADF.
•
Insert sheets cannot be copied on in any mode.
This mode can be selected only in the 1-sided to
1-sided and 2-sided to 1-sided modes.
A multiple number of copies cannot be selected
in this mode.
Transparency film must be fed from the Bypass
Tray.
Insert sheets must be the same size (A4 or A4R
(8-1/2" x 11" or 8-1/2" x 11"R)) as the transparency film.
For best results, use Xerox-recommended transparency film.
Before performing the following procedure, touch the [More...] key in the Output display of the main screen of copy mode to display the OUTPUT settings screen (page 218), and then touch the [LEFT TRAY] key* to set the output tray to the left tray*.
* If the optional Saddle Stitch Finisher is installed, touch the [FINISHER TRAY] key to
set the output tray to the finisher tray.
1. Touch the [TRANSPARENCY INSERTS] key on the SPECIAL MODES screen of
the Special Modes tab.
Copy
Transparency
Inserts
The [TRANSPARENCY INSERTS] key is highlighted to
indicate that the function is turned on, and the transparency inserts icon (
the screen.
, etc.) appears in the upper left of
2. Touch the [OK] key on the SPECIAL MODES screen.
Return to the main screen of copy mode.
Xerox WorkCentre C226 User Guide
2-45
Copier Operation
3. Load transparency film into the Bypass Tray.
Remove any paper already in the Bypass Tray before
loading the transparency film. (To load paper in the
Bypass Tray, see page 1-23.)
4. Touch the [More...] key in the Paper Select display and select the transparency
film loaded in the Bypass Tray.
Auto
Original
A4
Plain
Touch the [TRANSPARENCY] key.
Auto
Exposure
Heavy Paper
Transparency
Paper Select
Envelope
100%
Copy Ratio
5. Touch the [SPEED MODE] key or the [QUALITY MODE] key for the transparency
film.
Please Select Transparency Mode.
OK
Speed Mode
Quality Mode
Extra Size
SPEED MODE is for fast printing.
QUALITY MODE is for a high quality image.
After touching either key followed by the [OK] key, you
will return to the main screen of copy mode.
Basic Setting
About the steps that follow
If a DADF is being used, see page 2-13. If the document glass is being used, see
page 2-21.
To cancel the TRANSPARENCY INSERTS function, touch the [TRANSPARENCY
INSERTS] key again on the SPECIAL MODES screen.
NOTE:
2-46
When the copy job is finished, remove any transparencies that remain in the Bypass
Tray.
Xerox WorkCentre C226 User Guide
Special Modes
Covers
The COVERS mode is used to place covers on the front, back, or both the front and
back of multipage documents.
This function can only be used when the originals are placed in the DADF tray of the
DADF. (The document glass cannot be used.)
Copying onto a cover
One-sided copies from one-sided or two-sided originals
One-sided originals
One-sided copies
(copying onto a cover)
4
3
4
2
3
1
2
Back cover
(no copying)
1
SHARP
Cover original
SHARP
Front cover
(can copy onto front side)
Two-sided originals
5
4
4
5
2
3
3
Back cover
(no copying)
1
2
1
SHARP
Cover original
SHARP
Front cover
(can copy onto front side)
Two-sided copies from one-sided or two-sided originals
One-sided originals
Two-sided copies
(copying onto a cover)
4
3
2
Back cover
(no copying)
1
SHARP
3
4
1
2
Cover original
Two-sided originals
SHARP
3
2
4
1
SHARP
Front cover
(can copy onto front side)
(Back side of cover is blank)
Cover original
Selections for front cover, back cover, or front and back
cover can be made.
Back cover sheets cannot be copied on, either on the
front side or on the back side.
Xerox WorkCentre C226 User Guide
2-47
Copier Operation
Not copying onto a cover
One-sided copies from one-sided or two-sided originals
One-sided originals
4
One-sided copies
(not copying onto a cover)
3
2
4
1
3
Back cover
2
1
Two-sided originals
3
Front cover
(not copying onto a cover)
2
4
1
Two-sided copies from one-sided or two-sided originals
One-sided originals
4
One-sided copies
(not copying onto a cover)
3
2
1
Back cover
3
2
4
1
Two-sided originals
3
Front cover
2
4
1
Selections for front cover, back cover, or front and back
cover can be made.
1. Touch the [COVERS] key on the SPECIAL MODES screen.
Erase
Covers
2-48
The COVERS setting screen will appear.
The covers icon (
, etc.) will also appear in the upper
left of the screen to indicate that the function is turned
on.
Xerox WorkCentre C226 User Guide
Special Modes
2. Select cover placement.
OK
Special Modes
CANCEL
Covers
Front
Back
OK
Print On Front Cover?
Yes
No
Front+Back
Select [FRONT], [BACK] or [FRONT+BACK] on the touch panel.
3. Indicate whether the front cover sheets are copied on or not.
Cancel
OK
Print On Front Cover?
No
Yes
Select [YES] or [NO] on the touch panel. If [YES] is
selected, the first page of the document will be copied
onto the front cover sheet.
4. Touch the [OK] key on the COVER setting screen.
Return to the SPECIAL MODES screen.
5. Touch the [OK] key on the SPECIAL MODES screen.
Return to the main screen of copy mode.
6. Load the cover paper to be used into the Bypass Tray.
Load the same size of paper as the paper to be used for
the copy job. If the Saddle Stitch Finisher is to be used
for stapling, heavy stock cannot be used for the covers
(see page 1-32). Paper within the range of the stapler
must be used.
About the steps that follow
See pages 2-13 through 2-19.
NOTE:
Be sure to place the originals in the DADF tray of the DADF.
The document glass cannot be used for this function.
NOTES:
•
•
During cover copying, the stream feeding mode will not function even if it is turned
on by the program.
During cover copying, the pamphlet copy function (page 2-71) and the saddle
stitch (pamphlet staple) function will not operate.
To cancel the COVERS function, select the COVERS function again and touch the
[CANCEL] key (step 2).
Xerox WorkCentre C226 User Guide
2-49
Copier Operation
B/W reverse
Black and white are reversed in the copy to create a negative image. (This function
can only be used for black and white copying.)
NOTE:
Original
B/W reverse copy
1. Touch the
Originals with large black areas (which use a large amount of
toner) can be printed with black/white reverse to reduce toner
consumption.
key to switch to the second SPECIAL MODES screen.
Dual Page
Copy
Transparency
Inserts
2. Touch the [B/W REVERSE] key in the second SPECIAL MODES screen.
Image Edit
B/W
Reverse
The [B/W REVERSE] key will be highlighted to indicate
that the function is selected. In addition, the B/W reverse
icon ( ) will appear in the upper left-hand corner of the
screen.
3. Touch the [OK] key on the SPECIAL MODES screen.
Return to the main screen of copy mode.
About the steps that follow
If a DADF is being used, see pages 2-13 through 2-19. If the document glass is being
used, see pages 2-21 through 2-24.
To cancel the B/W reverse function, touch the [B/W REVERSE] key in the SPECIAL
MODES screen (the screen of step 2).
2-50
Xerox WorkCentre C226 User Guide
Colour Adjustments Menu
Colour Adjustments Menu
The [COLOUR ADJUSTMENTS] menu in [SPECIAL MODES] enables the following
parameters to be adjusted to modify the characteristics of a colour copy.
Settings adjusted with the colour adjustments menu do not affect black and white
copying.
OK
Special Modes
Margin Shift
Centring
Erase
Dual Page
Copy
Covers
Transparency
Inserts
key to switch to the
second SPECIAL MODES screen.
OK
Special Modes
Colour
Adjustments
1 Touch the
B/W
Reverse
Image Edit
2 Touch the [COLOUR ADJUSTMENTS] key
in the second SPECIAL MODES screen.
OK
Colour
Adjustments
Rgb Adjust
Sharpness
Suppress
Background
Colour
Balance
Brightness
Intensity
RGB ADJUST
Strengthens or weakens one of three primary colours, R (red), G (green), or B (blue)
(page 2-52).
SHARPNESS
Sharpens or softens image outlines (page 2-53).
SUPPRESS
BACKGROUND
Suppresses copying of lighter background areas (page 2-54.
Xerox WorkCentre C226 User Guide
2-51
Copier Operation
COLOUR
BALANCE
BRIGHTNESS
INTENSITY
Adjusts the colour, tone, and density of colour copies (page 2-55).
This copier allows the level of brightness to be adjusted. If brightness is selected,
colour tone can be darkened or lightened (page 2-57).
This copier allows the level of intensity to be adjusted. If intensity is selected, colour
saturation can be made to be more vivid or more dull (page 2-58).
RGB Adjust
Strengthens or weakens one of three primary colours, red (R), green (G), or blue (B).
1. Touch the [RGB ADJUST] key on the COLOUR ADJUSTMENTS menu screen.
olor Adjustments
Rgb Adjust
Sh
Colour
Balance
Br
2. Select a colour from R (RED), G (GREEN), and B (BLUE).
Colour
Adjustments
OK
Cancel
Rgb Adjust
OK
Only One Colour Can Be Adjusted.
-2
R(Red)
G(Green)
-1
0
1
2
B(Blue)
Only one primary colour can be adjusted.
3. Adjust the selected colour.
Cancel
-2
-1
0
Touch the [+] to strengthen the selected colour or touch
the [-] key to weaken the colour.
OK
1
2
When the key is touched, the colour adjustments menu icon ( ) will appear at
the upper left of the screen to indicate that the function is turned on.
2-52
Xerox WorkCentre C226 User Guide
Colour Adjustments Menu
4. Touch the [OK] key (inside [OK] key) on the RGB ADJUST setting screen.
Return to the COLOUR ADJUSTMENTS menu screen.
5. Touch the [OK] key on the COLOUR ADJUSTMENTS menu screen.
Return to the SPECIAL MODES screen.
6. Touch the [OK] key on the SPECIAL MODES screen.
Return to the main screen of copy mode.
About the steps that follow
If a DADF is being used, see pages 2-13 through 2-19. If the document glass is being
used, see pages 2-21 through 2-24.
In either case, press the [COLOUR COPY START] key to begin copying.
To cancel the RGB ADJUST function, select the RGB ADJUST function again and
touch the [CANCEL] key (step 2 or 3).
Sharpness
Sharpens or softens image outlines.
1. Touch the [SHARPNESS] key on the COLOUR ADJUSTMENTS menu screen.
t
Sharpness
Su
Bac
Brightness
Int
The SHARPNESS setting screen will appear. The colour
adjustments icon ( ) will also appear in the upper left
of the screen to indicate that the function is turned on.
2. Touch the [SOFT] key to soften image outlines or touch the [SHARPEN] key to
sharpen them.
Colour
Adjustments
OK
Cancel
Sharpness
Soft
OK
Sharp
3. Touch the [OK] key (inside [OK] key) on the SHARPNESS setting screen.
Return to the COLOUR ADJUSTMENTS menu screen.
Xerox WorkCentre C226 User Guide
2-53
Copier Operation
4. Touch the [OK] key on the COLOUR ADJUSTMENTS menu screen.
Return to the SPECIAL MODES screen.
5. Touch the [OK] key on the SPECIAL MODES screen.
Return to the main screen of copy mode.
About the steps that follow
If a DADF is being used, see pages 2-13 through 2-19. If the document glass is being
used, see pages 2-21 through 2-24.
In either case, press the [COLOUR COPY START] key to begin copying.
To cancel the SHARPNESS function, select the SHARPNESS function again and
touch the [CANCEL] key (step 2).
Suppress background
This copier can suppress unwanted background areas on the original images when
copying.
1. Touch the [SUPPRESS BACKGROUND] key on the COLOUR ADJUSTMENTS
menu screen.
The SUPPRESS BACKGROUND setting screen will
appear. The colour adjustments icon ( ) will also
appear in the upper left of the screen to indicate that the
function is turned on.
OK
s
Suppress
Background
ss
Intensity
2. Use the [+] and [-] keys to select the desired background suppression level.
Colour
Adjustments
OK
Cancel
Suppress Background
OK
Light Areas Of The Original May Be Suppressed As Background.
1
3
If level 1 is selected, darker background areas will be erased. The level can be
adjusted in three steps. The default setting is level 3.
3. Touch the [OK] key (inside [OK] key) on the SUPPRESS BACKGROUND setting
screen.
Return to the COLOUR ADJUSTMENTS menu screen.
2-54
Xerox WorkCentre C226 User Guide
Colour Adjustments Menu
4. Touch the [OK] key on the COLOUR ADJUSTMENTS menu screen.
Return to the SPECIAL MODES screen.
5. Touch the [OK] key on the SPECIAL MODES screen.
Return to the main screen of copy mode.
About the steps that follow
If a DADF is being used, see pages 2-13 through 2-19. If the document glass is being
used, see pages 2-21 through 2-24.
In either case, press the [COLOUR COPY START] key to begin copying.
To cancel the SUPPRESS BACKGROUND function, select the SUPPRESS BACKGROUND function again and touch the [CANCEL] key (step 2).
Colour balance
This function is used to adjust the colour, tone, and density of colour copies.
1. Touch the [COLOUR BALANCE] key on the COLOUR ADJUSTMENTS menu
screen.
The COLOUR BALANCE setting screen will appear.
RGB Adjust
Sh
Colour
Balance
Bri
2. Use the keys indicated in the illustration below to adjust the colour balance
settings.
(B)
Colour
Adjustments
OK
Cancel
Colour Balance
1
Y
M
C
(B)
2
3
4
5
6
7
8
OK
ALL
+
+
0
0
-
-
Bk
(A)
(C) (D)
The Colour Balance setting allows you to adjust the densities of four colours:
cyan, magenta, yellow, and black.
The density range is divided into eight levels for each colour, from 1 (lowest
density areas) to 8 (highest density areas). The density can be adjusted one level
at a time or eight levels at once.
Xerox WorkCentre C226 User Guide
2-55
Copier Operation
(A) Use these keys to select the colour to be adjusted ([C] = cyan, [M] = magenta, [Y]
= yellow, [Bk] = black).
If only the area around the letter inside a key is highlighted, the settings have been
changed from the factory default settings.
(B) Use these keys to change the densities of all eight levels at once.
When either key is touched, the indicator lines of all eight levels will move up or
down one step.
(C) Use these keys to adjust the densities of each of the eight density levels.
When one of the keys is touched, the corresponding indicator line will move up or
down one step. Touch the
key to increase the density of the corresponding
level, or the
key to decrease the density.
(D) Use this key to return the densities of all eight levels to the initial settings.
The initial colour balance settings are the values set with key operator program
"Initial colour balance setting". For this reason, the initial settings may not
necessarily be 0 (the middle indicator position) for all levels. The initial setting of
each level is shown by a grey indicator.
When the colour balance setting is adjusted, the colour adjustments menu icon ( )
will appear at the upper left of the screen to indicate that the function is turned on.
3. Touch the [OK] key (inside [OK] key) on the COLOUR BALANCE setting screen.
Return to the COLOUR ADJUSTMENTS menu screen.
4. Touch the [OK] key on the COLOUR ADJUSTMENTS menu screen.
Return to the SPECIAL MODES screen.
5. Touch the [OK] key on the SPECIAL MODES screen.
Return to the main screen of copy mode.
About the steps that follow
If a DADF is being used, see pages 2-13 through 2-19. If the document glass is being
used, see pages 2-21 through 2-24.
In either case, press the [COLOUR COPY START] key to begin copying.
To cancel the COLOUR BALANCE function, select the COLOUR BALANCE function
again and touch the [CANCEL] key (step 2).
2-56
Xerox WorkCentre C226 User Guide
Colour Adjustments Menu
Brightness
This copier allows the level of brightness of images to be adjusted.
1. Touch the [BRIGHTNESS] key on the COLOUR ADJUSTMENTS menu screen.
Sharpness
Su
Bac
Brightness
Int
t
The BRIGHTNESS setting screen will appear.
2. Adjust the brightness.
Colour
Adjustments
OK
Cancel
Brightness
-2
0
OK
2
Use the [-] and [+] keys to adjust the level of the BRIGHTNESS.
When the key is touched, the colour adjustments menu icon ( ) will appear at
the upper left of the screen to indicate that the function is turned on.
3. Touch the [OK] key (inside [OK] key) on the BRIGHTNESS setting screen.
Return to the COLOUR ADJUSTMENTS menu screen.
4. Touch the [OK] key on the COLOUR ADJUSTMENTS menu screen.
Return to the SPECIAL MODES screen.
5. Touch the [OK] key on the SPECIAL MODES screen.
Return to the main screen of copy mode.
About the steps that follow
If a DADF is being used, see pages 2-13 through 2-19. If the document glass is being
used, see pages 2-21 through 2-24.
In either case, press the [COLOUR COPY START] key to begin copying.
To cancel the BRIGHTNESS function, select the BRIGHTNESS function again and
touch the [CANCEL] key (step 2).
Xerox WorkCentre C226 User Guide
2-57
Copier Operation
Intensity
This copier allows the level of intensity of images to be adjusted.
This function can only be used when the original is placed on the document glass.
(The DADF cannot be used.)
1. Touch the [INTENSITY] key on the COLOUR ADJUSTMENTS menu screen.
ess
Suppress
Background
ess
Intensity
The INTENSITY setting screen will appear.
2. Adjust the intensity.
Colour
Adjustments
OK
Cancel
Intensity
-2
0
OK
2
Use the [-] and [+] keys to adjust the level of the INTENSITY.
When the key is touched, the colour adjustments menu icon ( ) will appear at
the upper left of the screen to indicate that the function is turned on.
3. Touch the [OK] key (inside [OK] key) on the INTENSITY setting screen.
Return to the COLOUR ADJUSTMENTS menu screen.
4. Touch the [OK] key on the COLOUR ADJUSTMENTS menu screen.
Return to the SPECIAL MODES screen.
5. Touch the [OK] key on the SPECIAL MODES screen.
Return to the main screen of copy mode.
About the steps that follow
See pages 2-21 through 2-24, press the [COLOUR COPY START] key to begin copying.
To cancel the INTENSITY function, select the INTENSITY function again and touch
the [CANCEL] key (step 2).
2-58
Xerox WorkCentre C226 User Guide
Image Edit Menu
Image Edit Menu
To use the following convenient copy functions, touch the [IMAGE EDIT] key in [SPECIAL MODES].
OK
Special Modes
Margin Shift
Centring
Erase
Dual Page
Copy
Covers
Transparency
Inserts
key to switch to the
second SPECIAL MODES screen.
OK
Special Modes
Colour
Adjustments
1 Touch the
Image Edit
B/W
Reverse
2 Touch the [IMAGE EDIT] key in the second
SPECIAL MODES screen.
OK
Image Edit
Single Colour
A3
Full-Bleed
SINGLE
COLOUR
Mirror
Image
Photo Repeat
Multi-Page
Enlargement
Pamphlet Copy
Multi Shot
Produces copies with a selected single colour (page 2-60).
MIRROR IMAGE
A mirror image of the original is printed (page 2-61).
PHOTO REPEAT
Produces repeated images of a photo on a single sheet of copy paper (page 2-62).
MULTI SHOT
The multi shot function is used to copy up to four originals, collectively in a specified
order, per sheet of copy paper in any one of four layout patterns (page 2-64).
A3 FULL-BLEED
Produces A3 (11" x 17") full image copies onto A3W (12" x 18") copy paper (page 266).
Xerox WorkCentre C226 User Guide
2-59
Copier Operation
MULTI-PAGE
ENLARGEMENT
PAMPHLET
COPY
Enlarges an original image to a size larger than A3 (11" x 17") and prints divided
images onto multiple sheets of copy paper for assembly into large composite copy
(page 2-68).
The pamphlet copy function is used to arrange copies in proper order for eventual centre-stapling and folding into a booklet. Two original pages are copied onto each side of
copy paper. Four pages are, therefore, copied onto one sheet (page 2-71).
(A Duplex Module/2-Tray Unit and a Duplex Bypass/Inverter Unit are required for this
function.)
Single colour
Produces copies with a selected single colour.
1. Touch the [SINGLE COLOUR] key on the IMAGE EDIT screen.
The SINGLE COLOUR setting screen will appear.
Image Edit
Single Colour
M
I
A3
Full-Bleed
Mult
Enla
2. Select the desired colour.
Image Edit
OK
-1
Cancel
Single Colour
1.Red
2.Green
3.Blue
4.Yellow
5.Magenta
6.Cyan
OK
When one of the keys is touched, the single colour icon ( -1 ) will appear at the
upper left of the screen to indicate that the single colour function is turned on. (The
number that appears with the icon indicates the selected colour, and is the number
on the key of the selected colour.)
3. Touch the [OK] key (inside [OK] key) on the SINGLE COLOUR setting screen.
Return to the IMAGE EDIT menu screen.
4. Touch the [OK] key on the IMAGE EDIT menu screen.
Return to the SPECIAL MODES screen.
5. Touch the [OK] key on the SPECIAL MODES screen.
Return to the main screen of copy mode.
2-60
Xerox WorkCentre C226 User Guide
Image Edit Menu
About the steps that follow
If a DADF is being used, see pages 2-13 through 2-19. If the document glass is being
used, see pages 2-21 through 2-24.
In either case, press the [COLOUR COPY START] key to begin copying.
To cancel the SINGLE COLOUR function, select the SINGLE COLOUR function again
and touch the [CANCEL] key (step 2).
Mirror image
This function is used to print a mirror image of the original. The images will be inverted
in the right to left direction on the copies.
Original
Copy
1. Touch the [MIRROR IMAGE] key on the IMAGE EDIT menu screen.
The [MIRROR IMAGE] key will be highlighted to indicate
that the function is turned on, and the mirror image icon
our
eed
Mirror
Image
Phot
Multi-Page
Enlargement
Pamp
(
) will appear in the upper left of the screen.
2.Touch the [OK] key on the IMAGE EDIT menu screen.
Return to the SPECIAL MODES screen.
3. Touch the [OK] key on the SPECIAL MODES screen.
Return to the main screen of copy mode.
About the steps that follow
IIf a DADF is being used, see pages 2-13 through 2-19. If the document glass is being
used, see pages 2-21 through 2-24.
To cancel the MIRROR IMAGE function, touch the MIRROR IMAGE again on the
IMAGE EDIT menu screen (step 2).
Xerox WorkCentre C226 User Guide
2-61
Copier Operation
Photo Repeat
PHOTO REPEAT is used to produce repeated images of a photo on a single sheet of
copy paper.
•
•
•
•
Up to 24 repeats can be made on a single copy sheet. The number of copies on a
single sheet depends on the original size and copy paper size.
Reduction or enlargement cannot be selected with this function. If reduction or
enlargement has been selected, the copy ratio will be reset to 100% when this
function is selected.
This function will not work when non-standard size paper is used.
This function can only be used with A4 (8-1/2" x 11") or A3 (11" x 17") paper.
Original size (to 130 x 90 mm (3" x 5"))
Four copies are made on a
sheet of A4 (8-1/2" x 11")
size paper.
Eight copies are
made on a sheet
of A3 (11" x 17")
size paper.
Original size (to 70 x 100 mm (2-1/2" x 4"))
Eight copies are made on a
sheet of A4 (8-1/2" x 11")
size paper.
16 copies are
made on a sheet
of A3 (11" x 17")
size paper.
Original size (to 100 x 150 mm (5" x 7"))
Two copies are made on a
sheet of A4 (8-1/2" x 11")
size paper.
Four copies are
made on a sheet of
A3 (11" x 17") size
paper.
Original size (to 65 x 70 mm (2-1/2" x 2-1/2"))
12 copies are made on a
sheet of A4 (8-1/2" x 11")
size paper.
24 copies are
made on a sheet of
A3 (11" x 17") size
paper.
Original size (to 57 x 100 mm (2-1/8" x 3-5/8"))
10 copies are made on a
sheet of A4 (8-1/2" x 11")
size paper (95% ratio).
2-62
Xerox WorkCentre C226 User Guide
Image Edit Menu
1. Touch the [PHOTO REPEAT] key on the IMAGE EDIT menu screen.
The PHOTO REPEAT setting screen will appear.
R
Photo Repeat
ge
nt
Mu
Pamphlet Copy
2. Touch the key for the desired combination of original type and paper size.
OK
Image Edit
Cancel
Photo Repeat
Original Size
E/L Size Post Card
148x105mm
3 x 5"
OK
1/5
Repeat Type
A4/8½x11
4
A3/11x17
8
When any one of the keys is touched, the photo repeat icon (
, etc.) will appear
at the upper left of the screen to indicate that the function is turned on.
If the key for the desired combination doesn't appear, touch the
or
key to
scroll, and then touch the desired repeat type key (A4 (8-1/2" x 11") or A3 (11" x
17")).
When making repeat copies of an original size (to 57 x 100 mm (2-1/8" x 3-5/8")),
only A4 (8-1/2" x 11") can be selected for the paper size.
3. Touch the [OK] key (inside [OK] key) on the PHOTO REPEAT setting screen.
Return to the IMAGE EDIT menu screen.
4. Touch the [OK] key on the IMAGE EDIT menu screen.
Return to the SPECIAL MODES screen.
5. Touch the [OK] key on the SPECIAL MODES screen.
Return to the main screen of copy mode.
About the steps that follow
See pages 2-21 through 2-24.
NOTES:
•
Be sure to place the original on the document glass, The DADF cannot be used
for this function.
Xerox WorkCentre C226 User Guide
2-63
Copier Operation
•
Place ~70 x 100mm (2-1/2" x 4"), ~65 x 70mm (2-1/2" x 2-1/2") and ~57 x 100mm
(2-1/8" x 3-5/8") originals as shown below.
Centring Scale
Placing a
~70 x 100mm
(2 ½" x 4") or
~57 x 100mm
(2 1/8 " x 3 5/8 ")
original
Centring Scale
Placing a
~65 x 70mm
(2 ½" x 2 ½")
original
To cancel the PHOTO REPEAT function, select the PHOTO REPEAT function again
and touch the [CANCEL] key (step 2).
Multi shot
The multi shot function is used to copy up to four originals, collectively in a specified
order, per sheet of copy paper in any one of four layout patterns.
[Example] Copying seven originals using the 4 in 1 MULTI SHOT selection in a layout
pattern starting from the upper left to lower right.
One-sided copies
from one-sided
originals
Copies
One-sided copies
from two-sided
originals
•
•
2-64
When using the multi shot function, place the originals, select the desired paper
size, and select the copying mode before selecting the multi shot function on the
special modes screen.
When using the multi shot function, the appropriate copy ratio will be automatically
set based on the original size, paper size, and the number of originals to be copied
onto one sheet. The minimum possible reduction ratio is 25%. Depending on the
original size, paper size, and the number of originals to be copied onto one sheet,
the copy ratio required to fit the original images onto one sheet may be smaller
than 25%. In this case, a ratio of 25% will be used, and parts of the original images
may be cut off.
Xerox WorkCentre C226 User Guide
Image Edit Menu
1. Touch the [MULTI SHOT] key on the IMAGE EDIT menu screen.
The MULTI SHOT setting screen will appear.
OK
at
The multi shot icon ( , etc.) will also appear in the
upper left of the screen to indicate that the function is
turned on.
Multi Shot
opy
2. Select the number of originals to be copied onto one sheet of copy paper on the
multi shot selection screen.
OK
Image Edit
Cancel
Multi Shot
OK
Layout
2in1
4in1
Border Line
The orientation of copy paper and the image of the originals may be rotated as
needed.
3. Select the layout.
Cancel
O
Layout
Select the order in which the originals will be arranged
on the copy.
Border
Shot number
Layout
2in1
4in1
The arrows in the above diagram indicate the directions in which the images are
arranged.
Xerox WorkCentre C226 User Guide
2-65
Copier Operation
4. Select whether or not to add borderlines.
Cancel
OK
yout
When the BORDER LINE checkbox is selected, borderlines are added around the borders of the images.
Border Line
5. Touch the [OK] key (inside [OK] key) on the MULTI SHOT setting screen.
Return to the IMAGE EDIT menu screen.
6. Touch the [OK] key on the IMAGE EDIT menu screen.
Return to the SPECIAL MODES screen.
7. Touch the [OK] key on the SPECIAL MODES screen.
Return to the main screen of copy mode.
About the steps that follow
If a DADF is being used, see pages 2-13 through 2-19. If the document glass is being
used, see pages 2-21 through 2-24.
To cancel the multi shot function, touch the [CANCEL] key on the multi shot setting
screen (step 2).
A3 (11" x 17") Full-bleed
In other copy modes, image loss will occur along the copy edges. When the A3 (11" x
17") FULL-BLEED function is used, the full image of an A3 (11" x 17") size original will
be copied onto A3W (12" x 18") size copy paper.
The A3 (11" x 17") FULL-BLEED function can only be used when the original is placed
on the document glass. (The DADF cannot be used.)
Reduction or enlargement cannot be selected with this function. If reduction or
enlargement has been selected, the copy ratio will be reset to 100% when this function
is selected.
Automatic two-sided copying is not possible.
Original (A3 (11" x 17")) size
2-66
Copy (A3W (12" x 18")) size
Xerox WorkCentre C226 User Guide
Image Edit Menu
1. Touch the [A3 FULL-BLEED] key on the IMAGE EDIT menu screen.
The [A3 FULL-BLEED] key will be highlighted to indicate
that the function is turned on, and the full-bleed icon
Single Colour
(
A3
Full-Bleed
) will appear in the upper left of the screen.
Mult
Enla
2. Touch the [OK] key on the IMAGE EDIT menu screen.
Return to the SPECIAL MODES screen.
3. Touch the [OK] key on the SPECIAL MODES screen.
Return to the main screen of copy mode.
4. Load A3W (12" x 18") copy paper into the Bypass Tray.
Adjust the Bypass Guide to A3W width before loading
the paper. Remove any paper remaining in the tray.
Pull out the tray extension and wire extension (see
page 1-23).
5.Touch the [More...] key in the Paper Select display and
then select the paper type in the Bypass Tray.
Ready To Copy.
0
Interrupt
A3W
Auto
Original
Plain
Auto
Exposure
1.
A4
Plain
2.
B4
Recycled
3.
A3
Colour
Heavy Paper
4.
A4R
Plain
Transparency
Paper Select
Envelope
100%
Copy Ratio
Touch the [PLAIN] key or the [HEAVY PAPER] key.
If you touched the [HEAVY PAPER] key, touch the [HEAVY PAPER1] key or the
[HEAVY PAPER2] key as appropriate for the weight of the paper you loaded (see
step 3 on page 1-36).
About the steps that follow
See page 2-21.
Extend the copy receptacle and then begin copying.
To cancel the A3 (11 x 17) FULL-BLEED function, touch the [A3 FULL-BLEED] key
again on the IMAGE EDIT menu screen (step 1).
Xerox WorkCentre C226 User Guide
2-67
Copier Operation
Multi-page enlargement
This function is used to enlarge an original image to a size larger than A3 (11" x 17")
and print divided images onto multiple sheets of copy paper.
[Example]
Copy (enlarged image
on 8 sheets of A3 (11" x
17") paper)
Overlap of sections of image
•
Original
(A4 (8-1/2" x
11") size)
•
There will be a margin around the edges of each
copy.
The original image will be divided and copied onto
multiple sheets of paper. Areas for overlapping the
copies will be made along the leading and trailing
edges of each copy.
1. Touch the [MULTI-PAGE ENLARGEMENT] key on the IMAGE EDIT menu screen.
or
Mirror
Image
Phot
leed
Multi-Page
Enlargement
Pamp
The MULTI-PAGE ENLARGEMENT setting screen will
appear.
2. Select the size system for multi-page enlargement.
Touch the
or
key to display the size settings of the desired size system.
A system
OK
Image Edit
Cancel
Multi-Page Enlargement
Enlargement Size
(A Size)
A2
A1
A0
A0x2
OK
1/3
Original Size &
Orientation
A3
A4
A5
B system
OK
IMAGE Edit
Image
EDIT
Cancel
Multi-Page Enlargement
Enlargement Size
(B Size)
B2
B3
B1
2-68
Original Size &
Orientation
B4
B5
OK
2/3
B0
Xerox WorkCentre C226 User Guide
Image Edit Menu
Inch system
OK
Image Edit
Cancel
Multi-Page Enlargement
Enlargement Size
(Inch)
22x34
22x17
34x44
44x68
OK
3/3
Original Size &
Orientation
11x17
8½x14
8½x11
3. Set the enlargement size and the original size.
The order of selection can begin from the enlargement size or the original size.
When the enlargement size and original size are set, the multi-page enlargement
icon ( ) will appear in the upper left of the screen to indicate that the function is
turned on.
The combinations of original size and enlargement size for which multi-page
enlargement is possible are as follows.
Enlargement size
A system
B system Inch system
A2
A1
A0
A0 x 2*
B3
B2
B1
B0
22 x 17
22 x 34
34 x 44
44 x 68
Original size
A3/A4/A5
A3/A4/A5
A3/A4
A3
B4/B5
B4/B5
B4/B5
B4
11 x 17/8-1/2 x 14/8-1/2 x 11
11 x 17/8-1/2 x 14/8-1/2 x 11
11 x 17/8-1/2 x 14/8-1/2 x 11
11 x 17/8-1/2 x 14/8-1/2 x 11
Multi-page enlargement is not possible of an A-system size original to a B-system
enlargement size, nor of a B-system size original to an A-system enlargement
size.
*Indicates the size that is twice A0 size.
NOTES:
•
•
If an original size is selected first, a message will indicate the enlargement sizes
that can be selected. If an enlargement size is selected first, a message will
indicate the original sizes that can be selected.
If a combination is selected for which multi-page enlargement is not possible,
invalid selection beeps will be sounded.
4. Check the placement orientation and the number of copies
Example: Enlargement size = A2 (22" x 17"),
original size = A4 (8-1/2" x 11")
OK
Image Edit
Cancel
Multi-Page Enlargement
Enlargement Size
(A Size)
A2
A1
A0
Xerox WorkCentre C226 User Guide
A0x2
Original Size &
Orientation
A3
A4
OK
1/3
A5
2-69
Copier Operation
A suitable orientation for placement of the original and the number of sheets of
paper required for the enlarged image are displayed based on the selected
original size and enlargement size.
NOTES:
•
•
•
The paper size, number of sheets required for the enlarged image, and the ratio
are automatically selected based on the selected original size and enlargement
size. (The paper size and ratio cannot be selected by the operator.)
The relations between the original size and enlargement size selected by the
operator and the automatically selected paper size, number of sheets, and ratio
are shown on page 2-68.
If no paper trays have the size of paper that was automatically selected, "Load
XXX paper" will appear. Change the paper in one of the trays or the Bypass Tray
to the indicated size of paper.
5. Place the original on the document glass in accordance with the indicated
orientation. (page 2-4)
Multi-page enlargement is only possible using the document glass.
6.The DADF cannot be used for this function.
7. Touch the [OK] key (inside [OK] key) on the MULTI-PAGE ENLARGEMENT
setting screen.
Return to the IMAGE EDIT menu screen.
8. Touch the [OK] key on the IMAGE EDIT menu screen.
Return to the SPECIAL MODES screen.
9. Touch the [OK] key on the SPECIAL MODES screen.
Return to the main screen of copy mode.
About the steps that follow
See page 2-21.
NOTE:
Be sure to place the original on the document glass. The DADF cannot be used for
this function.
To cancel the MULTI-PAGE ENLARGEMENT function, select the MULTI-PAGE
ENLARGEMENT function again and touch the [CANCEL] key (step 4).
2-70
Xerox WorkCentre C226 User Guide
Image Edit Menu
Pamphlet copy
The pamphlet copy function is used to arrange copies in proper order for eventual centre-stapling and folding into a booklet. Two original pages are copied onto each side of
copy paper. Four pages are, therefore, copied onto one sheet.
This function is convenient for arranging copies into an attractive booklet or pamphlet.
[Example] Copying eight originals in the pamphlet copy mode
The finished copies
can be folded.
Originals
(one-sided)
Left binding
1
2
3
4
5
First page
6
7
8
Originals
(two-sided)
2
4
6
8
Right binding
1
3
First page
5
7
•
•
•
•
•
Scan the originals in order from the first page to the last page. The order of copying will be automatically adjusted by the machine.
Either left binding (opening from right to left) or right binding (opening from left to
right) can be selected.
Four originals will be copied onto one sheet. Blank pages may be automatically
added at the end, depending on the number of the originals.
A Duplex Module/2-Tray Unit and Duplex Bypass/Inverter Unit are required for this
function.
If a Saddle Stitch Finisher is installed, copies can be stapled in two positions along
the centre of copies and folded at the centre.
1. Touch the [PAMPHLET COPY] key on the IMAGE EDIT menu screen.
r
ge
ent
The PAMPHLET COPY setting screen will appear. The
Photo Repeat
Pamphlet Copy
Xerox WorkCentre C226 User Guide
Mu
pamphlet copy icon
(, etc.) will also appear in the
upper left corner of the screen to indicate that the function is turned on.
2-71
Copier Operation
2. Designate the type of originals to be copied: 1-sided or 2-sided.
Cancel
Pamphlet Copy
Original
1-Sided
2-Sided
Left
Binding
OK
Right
Binding
Select the [2-SIDED] key when you are using the DADF to scan a two-sided
original.
3. Select the binding position (left binding or right binding) and touch the [OK] key
(inside [OK] key) on the PAMPHLET COPY setting screen.
Cancel
ed
Left
Binding
OK
Return to the IMAGE EDIT menu screen.
Right
Binding
4. Touch the [OK] key on the IMAGE EDIT menu screen. Return to the SPECIAL
MODES screen.
5. Touch the [OK] key on the SPECIAL MODES screen. Return to the main screen of
copy mode.
6. Place the original in the DADF tray or on the document glass. (pages 2-4 to 2-10)
7. Ensure that the desired paper size has been automatically selected based on the
original size.
To select another size paper, touch the [More...] key in the Copy Ratio display,
then select the desired size and touch the [AUTO IMAGE] key. The appropriate
copy ratio will be selected automatically based on the original size and the paper
size. (See step 2 on page 2-29.)
8. Make all other desired settings such as exposure or the number of copies, and
press the [START] key.
When using the DADF:
Copying will start after all originals have been scanned. (The next step is not
needed.)
When using the document glass:
Replace the original with the next original and press the [START] key. Repeat this
operation until all originals have been scanned. Then touch the [READ-END] key.
When the pamphlet copy function is set, the two-sided copying mode will be automatically selected.
To cancel the pamphlet copy function, touch the [CANCEL] key on the pamphlet copy
setting screen (step 2).
2-72
Xerox WorkCentre C226 User Guide
Job Program Memory
Job Program Memory
Frequently used job programs can be stored in each of ten storage registers. This is
convenient for quick job recall without losing time manually reprogramming each
aspect of a job. Job programs can be recalled with ease, and the programs are
retained even when the power is turned off. By programming frequently used copy settings, you can eliminate the bother of selecting the settings each time you use them for
a copy job.
•
•
Selection for functions stored as part of a job program, will not be recalled as part
of the program if the function has been disabled or changed by a key operator program.
To exit the job memory mode, press the [CLEAR ALL] key on the operation panel
or touch the [EXIT] key on the touch panel.
Storing a job program
1. Press the [#/P] key.
2. Touch the [STORE/DELETE] key to obtain the storage register screen.
M Number.
Recall
Store/Delete
3. Touch a number key from 1 to 10 on the storage register screen.
Highlighted storage register numbers are registers which
already have programs stored.
Programs
ess Program Number.
Recall
Xerox WorkCentre C226 User Guide
Store/
2-73
Copier Operation
4. Make all copier selections to be stored.
The number of copies cannot be stored.
To Store, Make Selections And Press
[OK], To Delete, Press [Cancel].
Special Modes
Pla
B
2-Sided Copy
A4
Duplex
Output
A4
A3
5. Touch the [OK] key.
And Press
ncel].
Cancel
OK
Auto
Original
Plain
B5
The selected settings will be stored under the register
number selected in step 3.
Auto
Exposure
Auto
A4
Paper Select
A4
Duplex
A4
A3
100%
Copy Ratio
If a number key is selected in step 3 that has already been programmed.
A setting confirmation screen will appear. To replace the existing program with the
new program, touch the [STORE] key and continue from step 4. If you do not wish
to replace the existing program, touch the [CANCEL] key to return to the screen of
step 3 and select a different number key.
NOTE:
If overwriting of programmed copy settings has been prohibited in the key operator
programs, you will not be able to store a job program.
Recalling a job program
1. Press the [#/P] key.
2. Touch the desired storage register number key to recall the job from memory.
Job Programs
Press Program Number.
When a number key is touched, the selection screen will
be closed and the stored job program will be recalled. A
number for which no job program has been stored cannot be selected.
Recall
2-74
Xerox WorkCentre C226 User Guide
Job Program Memory
3. Set the number of copies as needed and press the [COLOUR COPY START
(
)] or [BLACK COPY START (
)] key.
Copying will start with the settings of the recalled job
program.
NOTE:
If any settings related to the contents of a job program were changed in the key
operator programs after the job program was stored, the changed settings will not be
included when the job program is recalled.
Deleting a stored job program
1. Press the [#/P] key.
2. Touch the [STORE/DELETE] key to obtain the storage register screen.
M Number.
Recall
Store/Delete
3. Select a storage register number of the program to be deleted.
Exit
If a number key for which no job program has been
stored is selected, the screen will change to the screen
of step 4 on page 2-74 (for storing a job program).
Store/Delete
Xerox WorkCentre C226 User Guide
2-75
Copier Operation
4. Touch the [DELETE] key.
A Job Program Has Been Already Stored.
Store Another Program?
Cancel
Recall
NOTE:
2-76
Delete
Store
Store/Delete
When the [DELETE] key is touched, the screen in step 3
will return and the program will be deleted. If the [CANCEL] key is touched, the screen in step 3 will return but
the program will not be deleted. If no other programs are
to be deleted, touch the [EXIT] key on the screen displayed in step 3 to exit the job program mode.
If overwriting of programmed copy settings has been prohibited in the key operator
programs, you will not be able to clear a job program.
Xerox WorkCentre C226 User Guide
Interrupting a Copy Run
Interrupting a Copy Run
INTERRUPT can be used to temporarily stop a long copy run so that another copy job
can be run.
It is not possible to interrupt an automatic two-sided copy job.
1. Touch the [INTERRUPT] key.
If the [INTERRUPT] key does not appear, interrupt copying is not possible.
Cancel
NOTES:
•
•
•
When the [INTERRUPT] key is touched in step 1, the
[INTERRUPT] touch key will be replaced by the [CANCEL] key as shown in the illustration.
If you touch the [INTERRUPT] key when the account counter function is turned on,
the display will prompt you to enter your account number. Enter your account
number with the numeric keys. The copies you make will be added to the count of
the entered account number.
If the [INTERRUPT] key is touched while an original is being scanned, the
interrupt state will begin after scanning is completed. If the [INTERRUPT] key is
touched during copying, the interrupt state will begin after the copy is completed.
Interrupt copying is not possible during automatic two-sided copying using the
optional Duplex Module/2-Tray Unit. In addition, automatic two-sided copying is
not possible during interrupt copying.
2. Place the original for the interrupt copy job in the DADF or on the document glass
(pages 2-4 to 2-10).
If a black and white copy job is being interrupted to run
another black and white copy job, the number of originals that can be copied in the interrupt job is 35. (based
on text original (A) on page 2-17)
Xerox WorkCentre C226 User Guide
2-77
Copier Operation
3. Make all other desired settings such as exposure, paper size and number of
copies and then press the [COLOUR COPY START (
)] or [BLACK COPY
START (
)] key.
When making black and white copying using the document glass in the sort mode,
replace the original with the next original and press the [BLACK COPY START]
key. Repeat this operation until all originals have been scanned. Then, touch the
[READ-END] key.
4. When the interrupt copy job is finished, touch the [CANCEL] key to turn off the
interrupt copy state.
Cancel
5. Resume the interrupted copy job.
If a colour copy job was interrupted, replace the originals that have not yet been
copied and resume copying.
If a black and white copy job was interrupted, replace the originals that have not
yet been copied and press the [BLACK COPY START] key to resume copying.
2-78
Xerox WorkCentre C226 User Guide
Removing an Original Misfeed
Machine Maintenance (for Copying)
This section explains procedures for removing misfeeds in a DADF, cleaning the
machine, and troubleshooting.
Removing an Original Misfeed
Removing a misfed original from the DADF
If an original misfeed occurs in the DADF, follow the steps below to remove the misfed
original.
NOTES:
•
•
For misfeed removal in the main unit and other peripheral devices, see page 1-46.
When a misfeed occurs, touch the [INFORMATION] key to display detailed
information for misfeed removal.
Check locations A, B, and C in the diagram
at left to remove the original.
1. Removing misfeeds from each location
Check location A
Document feeding area cover
Xerox WorkCentre C226 User Guide
Open the document feeding area cover and gently
remove the misfed original from the DADF tray. Close
the document feeding area cover.
2-79
Copier Operation
Check location B
Open the DADF and rotate the two release rollers in the
direction of the arrow to make the original feed out.
Close the DADF and gently remove the original.
Release roller
DADF right side
cover
If the misfed original is small (such as an A5 original), or
if the misfeed occurred in the reversing tray, open the
DADF right side cover and gently remove the original.
Close the DADF right side cover.
Check location C
Remove the misfed original from the exit area.
Reversing tray
If the misfed original cannot be easily removed from the
exit area, open the moveable part of the DADF tray and
remove the reversing tray and then remove the original.
After removing a misfed original from the exit area, be sure to attach the reversing tray
securely to the exit area.
2-80
Xerox WorkCentre C226 User Guide
User Maintenance (for copying)
2. Open and close the DADF cover.
Opening and closing the cover clears the misfeed display. Copying cannot be resumed until this step is performed.
A message may appear indicating the number of originals which must be returned
to the DADF tray. Return the originals to the DADF tray and press the [START] key
for colour or black and white copying as appropriate for the job being resumed.
User Maintenance (for copying)
To ensure good service from this product over a long period of time, it is recommended
that the following maintenance procedures be performed on a regular basis.
CAUTION
Do not use flammable spray to clean the machine. If gas from the spray comes in
contact with hot electrical components or the fusing unit inside the machine, fire or
electrical shock may result.
Wipe with a clean, soft cloth.
If necessary, moisten the cloth with water or a small
amount of neutral detergent. When finished, wipe dry
with a clean cloth.
NOTE:
When cleaning, do not use thinner, benzene, or similar volatile cleaning agents. These
may degrade or discolour the housing.
If you find that a dirty image results when a copies are
made using the DADF, wipe the original scanning area
(the area that contains the long narrow glass shown at
left).
Xerox WorkCentre C226 User Guide
2-81
Copier Operation
Cleaning the Original Scanning Area
If you find that black (or white) lines appear when you make copies using the DADF,
use the accessory glass cleaning tool to clean the original scanning area.
1. Open the DADF and remove the glass cleaning tool.
2. Clean the original scanning area with the glass cleaning tool.
3. Replace the glass cleaning tool in its storage position.
Example of dirty print image
Black lines
White lines
Original feed direction
2-82
Xerox WorkCentre C226 User Guide
Troubleshooting
Troubleshooting
Whenever the machine stops or operation is not possible, check the operation panel
display for messages. In most cases, these messages will give sufficient information to
return the machine to an operating condition. In cases where this information is not
enough, check the list below for more information. This section describes problems
concerning copier features. For troubleshooting specific problems related to the
printer, network scanner, and fax features, see the separate manuals provided for
these features. For problems related to other peripheral devices, see page 1-56.
Problem
Check
Solution or cause
Machine does not
operate.
Are the [START] keys indicators off?
If the indicators are not on, the machine
may be warming up. Warm-up should be
completed in 99 seconds or less.
Copies are too dark
or too light.
Is the original image too dark or too light?
Select an appropriate resolution setting
for the original being copied and adjust
the copy exposure (see page 2-25).
Is the exposure mode set to "AUTO"?
The exposure level for "AUTO" can be
adjusted using the "Exposure adjustment" key operator program. Contact
your key operator.
An appropriate resolution setting for the
original has not been selected.
Change the resolution setting to "AUTO"
or manually select an appropriate resolution setting (see page 2-25).
Text is not clear on
a copy.
An appropriate resolution setting for the
original has not been selected.
Change the resolution setting to "TEXT"
Moiré appears on a
copy of a magazine, catalogue, or
other printed material.
An appropriate resolution setting for the
original has not been selected.
Change the resolution setting to
"PRINTED PHOTO".
Text overlaying a
photo is not clear
on a copy of a map,
magazine or other
printed material.
An appropriate resolution setting for the
original has not been selected.
Change the resolution setting to "MAP".
Smudges appear
on copies.
Document glass or document cover
dirty?
Clean the surface of the document glass,
and the original scanning area and original presser part of the DADF (see
page 2-82).
Black or white line appear on copies
when the single pass feeding function is
used.
Clean the original scanning area (see
page 2-82).
Original smudged or blotchy?
Use a clean original.
Xerox WorkCentre C226 User Guide
2-83
Copier Operation
Problem
Check
Solution or cause
Image cannot be
rotated.
Is the auto paper select or auto image
function set?
Rotation copy functions only if the
machine is either in the auto paper select
mode or in the auto image mode (see
page 2-8).
Part of original
image is not copied.
Is the original positioned correctly?
Set the original properly (page 2-4).
Is the copy ratio proper for the original
and paper sizes?
Use the auto image function to select the
appropriate copy ratio based on the original and copy sizes (see page 2-28).
Blank copies
Is the original placed correctly?
When using the document glass, place
the original face down.
When using the DADF, place original
face up.
Order of copies
incorrect
Is the order of originals correct?
When using the document glass, set the
originals from the first page one sheet at
a time.
When using the DADF, set the originals
with the first page up.
Job cancellation
needed
Is a message requesting cancellation of
job displayed?
Press the [CLEAR ALL] key to cancel the
current job.
Scanning of originals is incomplete.
Is a message indicating memory is full
displayed?
If the data amount exceeds the limit
when using the pamphlet copy or multi
shot copy which requires scanning of all
originals, scanning will be cancelled and
copying will not be performed.
If you install an additional memory, the
storage capacity will increase.
The selected number of sets of copies is not printed.
For an interrupt copy job, are you
attempting colour copying in sort mode?
When colour copying is performed in sort
mode for an interrupt copy job, only one
set of copies can be made. If more than
one set is needed, replace the original
and repeat the copy procedure for each
set needed.
Not all pages are
copied
When making copies, the memory
became full during scanning of the originals and a message appears asking you
whether you want to continue copying or
cancel.
When the memory becomes full during
scanning of the originals, you can select
whether you want to continue the job and
print only those originals that were
scanned, or cancel the job. If you continue the job, copies will only be made of
the originals that were scanned, and thus
all originals cannot be copied at once.
2-84
Xerox WorkCentre C226 User Guide
3
Printer Operation
Basic Printing Procedures
This section explains how to configure printer driver settings at your computer, and
provides basic information on printing.
NOTE:
For printer driver installation, see the Xerox WorkCentre C226 Quick Start Guide.
Setting the Printer Drivers
This section describes the method of changing the printer driver settings from your
computer. If you have not yet installed the printer driver (PCL5c or PostScript), read
the “Printer Installation” section in the WorkCentre C226 System Administration Guide
and install the printer driver from the CD-ROM.
NOTE:
The WorkCentre C226 comes standard with a WorkCentre C226 PCL Print Drivers
and Printer/Network Utilities CD-ROM. The WorkCentre C226 PS Driver CD-ROM is
available with the purchase of the optional PostScript Kit.
Printer driver settings in Windows (selecting and setting print
conditions)
Change the settings using the printer properties.
Windows 95 / 98 / Me
The procedure for adjusting the settings in Windows Me is explained in the following.
1. On the [Start] menu, select [Settings] and then [Printers].
2. Right-click the installed printer driver and select [Properties].
Xerox WorkCentre C226 User Guide
3-1
Printer Operation
3. Set each item.
For setting items, see the printer driver help. For information on viewing Help, see
page 3-3. An example showing how to set [Color Mode] to [Automatic] printing is
given on page 3-2.
4. Click the [OK] button.
Windows NT4.0 / 2000 / XP / Server 2003
The procedure for adjusting the settings in Windows XP is explained in the following.
1. Select [Printers and Faxes] from the [Start] menu.
2. Right-click the installed printer driver and select [Printing Preferences...].
3. Set each item.
For setting items, see the printer driver help. For information on viewing Help, see
page 3-3. An example showing how to set [Color Mode] to [Automatic] printing is
given on page 3-2.
4. Click the [OK] button.
NOTE:
Settings for the Duplex Module/2-Tray Unit, Saddle Stitch Finisher, 3-Tray Unit, and
other optional peripheral equipment can be accessed by right-clicking the installed
printer driver, selecting [Properties], and then selecting the [Configuration] tab. If you
use this product as a network printer and you have installed the Xerox Print Status
Monitor, the configuration of peripheral devices will be automatically set by clicking
[Auto Configuration]. If you click the [Update Tray Status] button in the [Tray Status]
dialog box of the [Paper] tab, the current tray information (paper size, paper type, and
quantity of paper remaining) will be displayed.
Selecting a Color Mode setting
The following example shows how to set [Color Mode] to [Automatic] printing in the
Color tab of the printer driver properties.
1. Follow steps 1 and 2 on page 3-1.
2. Click the [Color] tab.
3-2
Xerox WorkCentre C226 User Guide
Setting the Printer Drivers
3. Select [Automatic] from the [Color Mode] list.
When [Color Mode] is set to [Automatic], the print driver
identifies the colours in each page, and automatically
switches to [Color] mode when colours other than black
and white are used in a page, or [Gray Scale] when only
black and white are used. To turn on automatic switching, select [Automatic] for the [Color Mode] setting.
When [Automatic] is selected and mixed black and
colour pages are printed, a slower printing speed will result.
4. Click the [Apply] button.
5. Click the [OK] button.
Printing in [Color Mode] will now always take place [Automatic].
Using the Help file to view explanations of the settings
To view on-screen explanations of the settings in the printer driver, open the Help file.
Opening Help in Windows
The example screen shows the Xerox PCL5c in Windows Me.
Click [Help] to display the
Click [Help] to display the Help
Help screen.
You can search for information using va
You
can search
using
methods
from for
theinformation
tabs.
various methods from the tabs.
Xerox WorkCentre C226 User Guide
3-3
Printer Operation
Printing in black and white
The procedure for printing in black and white is explained below using WordPad*1 as
an example. If you do not have any documents created in WordPad, create a document that can be used for test printing.
To print in black and white, select [Gray Scale] for the [Color Mode] setting. [Gray
Scale] uses only Bk (black) toner to produce a black and white image. Colour documents are also printed in black and white.
*1 This is a standard accessory program in Windows.
1. Open a document created in WordPad.
2. Select [Print] from the [File] menu of WordPad.
The Print window appears.
Print window in Windows Me
3-4
Xerox WorkCentre C226 User Guide
Setting the Printer Drivers
Print window in Windows XP
3. In Windows 95/98/Me/NT 4.0, click the [Properties] button.
In Windows 2000, click the displayed tab. In Windows XP/Server 2003, click the
[Preferences] button.
NOTE:
For detailed explanations of the following settings, see “Setting the Printer Driver
Properties” on page 3-15.
4. Click the [Color] tab and select [Gray Scale] for the [Color Mode] setting.
Xerox WorkCentre C226 User Guide
3-5
Printer Operation
NOTE:
[Print Priority] lets you select whether priority is given to quality or speed during
printing (page 3-38). Select the mode that is most suitable for your needs.
5. If you need to adjust the black and white image quality (print contrast), perform the
following step. If you do not need to adjust the image quality, go directly to step 6.
To adjust the black and white image quality (print contrast), click the [Color
Adjustment] button. The following screen will appear. Adjust the brightness and
contrast in the [Image] field at left (page 3-38). When finished, go to step 6.
6. Click the [Paper] tab.
Make sure that the paper size is correct. Next, configure the "Paper Selection"
settings. "Auto Select" is normally used for both "Paper Source" and "Paper Type".
When you have completed the settings, click the [OK] button to close the printer
properties window.
NOTE:
Using the Bypass Tray
When the paper source is set to the Bypass Tray, be sure to set the paper size and
paper type on the machine's operation panel. This procedure is explained on page 123).
7. Click the [OK] button in the Print window in Windows 95/98/Me/NT 4.0, or the
[Print] button in Windows 2000/XP/Server 2003.
3-6
Xerox WorkCentre C226 User Guide
Setting the Printer Drivers
Automatic switching between colour and black and white
The procedure for printing a document using automatic switching between colour and
black and white is explained here using WordPad*1 as an example. If you do not have
any documents created in WordPad, create a document that can be used for test printing.
You can have the print driver identify the colours in each page, and automatically
switch to [Color] mode when colours other than black and white are used in a page, or
[Gray Scale] when only black and white are used. To turn on automatic switching,
select [Automatic] for the [Color Mode] setting.
*1 This is a standard accessory program in Windows.
1. Open a document created in WordPad.
2. Select [Print] from the [File] menu of WordPad.
The Print window appears.
Print window in Windows Me
Xerox WorkCentre C226 User Guide
3-7
Printer Operation
Print window in Windows XP
3. In Windows 95/98/Me/NT 4.0, click the [Properties] button.
In Windows 2000, click the displayed tab. In Windows XP/Server 2003, click the
[Preferences] button.
NOTE:
For detailed explanations of the following settings, see “Setting the Printer Driver
Properties” on page 3-15.
4. Click the [Color] tab and select [Automatic] for the [Color Mode] setting.
NOTE:
3-8
Select the [Original Type] setting that most closely matches your document to obtain
the best image quality (page 3-35).
Xerox WorkCentre C226 User Guide
Setting the Printer Drivers
5. If you need to adjust the colour image quality and/or the black and white image
quality (print contrast), perform the following step. If you do not need to adjust the
image quality, go directly to step 6.
To adjust the colour image quality and/or black and white image quality (print
contrast), click the [Color Adjustment] button. The following screen will appear.
Use the [Color Balance] field to adjust the saturation of colour images, and
strengthen or weaken the RGB (red, green, and blue) colour components.
Use the [Image] field to adjust the brightness and contrast of both colour and black
and white images (page 3-38).
When finished, go to step 6.
6. Click the [Paper] tab.
Make sure that the paper size is correct. Next, configure the "Paper Selection"
settings. "Auto Select" is normally used for both "Paper Source" and "Paper Type".
When you have completed the settings, click the [OK] button to close the printer
properties window.
NOTE:
Using the Bypass Tray
When the paper source is set to the Bypass Tray, be sure to set the paper size and
paper type on the machine's operation panel. This procedure is explained on page 123.
Xerox WorkCentre C226 User Guide
3-9
Printer Operation
7. Click the [OK] button in the Print window in Windows 95/98/Me/NT 4.0, or the
[Print] button in Windows 2000/XP/Server 2003.
Printing in colour
The procedure for printing a document in colour is explained here using WordPad*1 as
an example. If you do not have any documents created in WordPad, create a document that can be used for test printing.
To print in colour, set the [Color Mode] setting to [Color]. Both colour and black and
white documents will be printed using Y (yellow), M (magenta), C (cyan), and Bk
(black) toner.
*1 This is a standard accessory program in Windows.
1. Open a document created in WordPad.
2. Select [Print] from the [File] menu of WordPad.
The Print window appears.
Print window in Windows Me
3-10
Xerox WorkCentre C226 User Guide
Setting the Printer Drivers
Print window in Windows XP
3. In Windows 95/98/Me/NT 4.0, click the [Properties] button.
In Windows 2000, click the displayed tab. In Windows XP/Server 2003, click the
[Preferences] button.
NOTE:
For detailed explanations of the following settings, see “Setting the Printer Driver
Properties” on page 3-15.
4. Click the [Color] tab and select [Color] for the [Color Mode] setting.
NOTE:
Select the [Original Type] setting that most closely matches your document to obtain
the best image quality (page 3-35).
Xerox WorkCentre C226 User Guide
3-11
Printer Operation
5. If you need to adjust the colour image quality, perform the following step. If you do
not need to adjust the image quality, go directly to step 6.
To adjust the colour image quality, click the [Color Adjustment] button. The
following screen will appear. Use the [Color Balance] field to adjust the saturation
of colour images, and strengthen or weaken the RGB (red, green, and blue) colour
components.
Use the [Image] field to adjust the brightness and contrast of colour images.
(page 3-38)
When finished, go to step 6.
6. Click the [Paper] tab.
Make sure that the paper size is correct. Next, configure the "Paper Selection"
settings. "Auto Select" is normally used for both "Paper Source" and "Paper Type".
When you have completed the settings, click the [OK] button to close the printer
properties window.
NOTE:
Using the Bypass Tray
When the paper source is set to the Bypass Tray, be sure to set the paper size and
paper type on the machine's operation panel. This procedure is explained on page 123).
7. Click the [OK] button in the Print window in Windows 95/98/Me/NT 4.0, or the
[Print] button in Windows 2000/XP/Server 2003.
Printing using optional peripheral equipment
The procedure for printing from WordPad *1 using optional peripheral equipment is
explained below. If you do not have any documents created in WordPad, create a document that can be used for test printing.
*1 This is a standard accessory program in Windows.
1. Open a document created in WordPad.
3-12
Xerox WorkCentre C226 User Guide
Setting the Printer Drivers
2. Select [Print] from the [File] menu of WordPad.
The Print window appears.
Print window in Windows Me
Print window in Windows XP
3. In Windows 95/98/Me/NT 4.0, click the [Properties] button.
In Windows 2000, click the displayed tab. In Windows XP/Server 2003, click the
[Preferences] button.
NOTE:
For detailed explanations of the following settings, see “Setting the Printer Driver
Properties” on page 3-15.
Xerox WorkCentre C226 User Guide
3-13
Printer Operation
To print using the two-sided printing function or the Saddle Stitch Finisher, select
these options in the following window.
For two-sided printing, select "2-Sided (Book)" or "2-Sided (Tablet)".
To use the saddle stitch function, select "Pamphlet Style" and then set [Staple]
to "2 Staples" in the [Finishing] field.
4. Click the [Paper] tab.
Make sure that the paper size is correct. Next, configure the "Paper Selection"
settings. "Auto Select" is normally used for both "Paper Source" and "Paper Type".
If you wish to use the optional High Capacity Feeder, select it in the following
window.
3-14
Xerox WorkCentre C226 User Guide
Selecting Printing Functions
If you wish to specify a paper tray, select the tray from the "Paper Source" list in
the Paper Selection field.
Example: Selecting the "High Capacity Feeder"
HCF
HCF
5. To change the colour mode, click the [Color] tab and select the desired mode from
the [Color Mode] list.
6. Adjust the image quality settings as needed (page 3-38). (If not needed, go
directly to step 7.)
7. Click the [OK] button in the Print window in Windows 95/98/Me/NT 4.0, or the
[Print] button in Windows 2000/XP/Server 2003.
Setting the Printer Driver Properties
This section explains how to configure settings in the printer driver. The settings are
changed in the software application.
Selecting Printing Functions
Almost all printer settings are configured in the printer driver properties window that
appears when you print from an application or when you select [Properties] from the
printer driver icon menu. Click a tab in the properties window to adjust the settings on
that tab.
The following explains how to adjust settings when the properties window is opened
from an application.
(The windows that are shown are the PCL5c printer driver in Windows Me.)
Xerox WorkCentre C226 User Guide
3-15
Printer Operation
The printer driver window shown in the following explanation has the following options
installed:
Duplex Module/2-Tray Unit + Duplex Bypass/Inverter Unit + Saddle Stitch Finisher +
Punch Module
Frequently used settings
The following screen appears when the Main tab is selected. The settings and buttons
in the screen are explained below.
1
2
3
4
Copies
Set the number of copies.
Any number from 1 to 999 can be set.
Default setting: 1
Colour mode display
This displays the selected colour mode for printing. Three colour modes are
available: "Automatic", "Color", and "Gray Scale" (see
on page 3-37).
Collate
Select this checkbox to collate the copies.
When the staple function or punch function is turned on, a checkmark
automatically appears in the checkbox.
Default setting: Selected
3-16
Xerox WorkCentre C226 User Guide
Selecting Printing Functions
Document Style
Select one-sided or two-sided printing.
[1-Sided]
Print on one side of the paper.
[2-Sided (Book)] Print on both sides of the paper and bind at the side.
[2-Sided (Tablet)] Print on both sides of the paper and bind at the top.
[Pamphlet Style]*1 Print on both sides of the paper and bind down the middle.
Default setting: 1-Sided
*1 The following two formats can be selected for middle binding.
[Tiled Pamphlet]
Print on paper double the size of the document size selected in the application.
The page order will be rearranged as required for the middle binding format.
[2-Up Pamphlet]
The document size selected in the application will be reduced in the same way as
in 2-Up printing, and printing will take place using the selected paper size.
The page order will be rearranged as required for the middle binding format.
6
5
7
Xerox WorkCentre C226 User Guide
3-17
Printer Operation
N-Up Printing
Each page is reduced to allow multiple pages to be printed on each sheet of
paper. The pages are printed in "Z" order on each sheet.
The following five settings are available:
[1-Up], [2-Up], [4-Up], [6-Up], [8-Up].
Default setting: 1-Up
Example: 4-Up
Border
[Border]
This setting is greyed out when [1-Up] is selected. Select whether or not to print a
border around each page when a setting other than 1-Up is selected.
Default setting: Not selected
User Settings
The user can store up to 30 sets of settings, allowing the settings to be easily
changed by simply selecting the desired set.
Default setting: Factory Defaults
[Save]
Save the settings under the name that appears in "User Settings".
Up to 20 characters can be entered for the name. If none of the settings have
been changed (the settings are still the factory defaults), this button will be greyed
out.
When [Delete] appears in the button, it can be clicked to delete a stored set of
user settings.
3-18
Xerox WorkCentre C226 User Guide
Selecting Printing Functions
Auto Job Control review
Select this to have the job control screen constantly displayed when printing from
the printer driver.
Default setting: Not selected
8
Finishing
Configure settings for staple or punch finishing.
[Binding Edge]
When automatic two-sided printing is performed, the [Binding Edge] setting is
used to determine how the left, right and top edges of the front and back sides are
positioned. The relation between the document and each of the settings is as
follows:
Default setting: Left
Original image
[Left]
Left binding
[Right]
Right binding
[Top]
Top binding
Binding edge
Binding edge
Xerox WorkCentre C226 User Guide
Binding edge
3-19
Printer Operation
[Staple]
[None]
Do not staple.
[1 Staple]
Staple in one place.
[2 Staples]
Staple in two places.
When [1 Staple] or [2 Staples] is selected, the [Collate] setting is automatically
activated.
Default setting: None
Saddle stitch function
The Saddle Stitch Finisher can automatically place two staples for centreline binding
of prints or copies and fold them along the centreline.
<Example>
6
4
2
7
9
11
Staple sort mode
Collated sets of prints or copies will be stapled and delivered to the offset tray. When
saddle stitching is selected, the prints or copies will be stapled at the centre and delivered to the saddle stitch tray. The stapling positions, orientation, paper size for stapling, and stapling capacity are shown below.
3-20
Xerox WorkCentre C226 User Guide
Selecting Printing Functions
Stapling positions
Portrait orientation
Top left
corner of
printouts
Available paper sizes:
A4, B5 and 8-1/2" x 11"
Stapling capacity:
For each size, up to 30
sheets can be stapled
Lower left
corner
of printouts
Same as above
Centre left
two
positions of
printouts
Same as above
Saddle
stitch on
centrefold
line.
Paper in the portrait
direction cannot be
saddle stitched.
Landscape orientation
Top left
corner of
printouts
Available paper sizes: A3, B4,
A4R, 11" x 17", 8-1/2" x 14",
8-1/2" x 13" and 8-1/2" x 11" R
Stapling capacity: Up to 30
sheets of A4R or 8-1/2" x 11"R
paper can be stapled, up to 25
sheets of other paper sizes
Lower left
corner
of printouts
Same as above
Centre left
two positions
of printouts
Same as above
Saddle
stitch on
centrefold
line.
Available paper sizes:
A3, B4, A4R, 11" x 17"
and 8-1/2" x 11"R
Stapling capacity: For
each size, up to 10
sheets can be stapled
9
10
Xerox WorkCentre C226 User Guide
3-21
Printer Operation
[Punch]
Configure the settings for the Punch function.
When this is selected, the document will be hole-punched. The Collate setting is
automatically activated when Punch is selected.
Default setting: Not selected
Hole punching (only if a Hole Punch Module is installed)
If the Saddle Stitch Finisher is equipped with a Hole Punch Module, printed paper can
be hole punched and delivered to the offset tray. Saddle stitching and hole punching
cannot be selected at the same time. The automatic image rotation will not function
when the hole punching function is used.
<Example>
Original 1
Original 2
(Punch positions)
(Punch positions)
[No Offset]
Select this setting when you do not wish sets of collated or grouped output to be
offset from each other.
Default setting: Not selected
Offset mode
When delivered to the tray, each set or group of pages will be offset from the previous
set for easy separation.
(The offset function only operates in the offset tray.)
Stapled sets will not be offset.
Offset mode
3-22
Non-offset mode
Xerox WorkCentre C226 User Guide
Selecting Printing Functions
Retention
[Normal Print]
When selected, it is not necessary to use the operation panel on the machine to
begin printing. This setting is used for basic printing. As long as the machine is
operating properly, printing can be executed entirely from the computer.
[Hold After Print]
When selected, the print job is retained in the machine's hold job list after being
printed. This allows the user to print the job again if necessary, or delete the job if
no longer needed.
[Hold Before Print]
This setting is used to prevent print jobs from being misplaced. When a print job is
executed, the machine stores it in the hold job list rather than printing it. The user
can then initiate printing from the machine's operation panel, or delete the job as
needed.
[Proof Print]
This setting is used to prevent misprints when printing large numbers of copies.
When printing is executed, the machine prints only one trial set of copies and then
stores the remainder of the job in the hold job list. After the user has verified that
the copies are acceptable, the job can be resumed from the machine's operation
panel. (The trial set of copies is included in the total number of sets.) If the copies
are not acceptable, the job can be deleted without printing.
Xerox WorkCentre C226 User Guide
3-23
Printer Operation
[PIN] (5-digit identification number)
A PIN number can be programmed in the printer driver for increased security
when printing jobs from the hold job list. When this is done, the PIN number must
be entered at the machine's operation panel to print a job in the job hold list.
•
"Hold After Print" mode with password:
Password entry on the operation panel of the printer is needed for additional
printing of the hold job.
•
"Hold Before Print" mode with password:
Password entry on the operation panel of the printer is needed to start
printing.
•
"Proof Print" mode with password:
Password entry on the operation panel of the printer is needed to print the
remaining sets after printing one set. The first set is printed without password
entry.
Default setting: Normal Print
Notify Job End
Select whether or not you wish to be notified about printing completed.
This function only operates when the Xerox Print Status Monitor is running. Even if
selected, the function will not operate when the Xerox Print Status Monitor is not
running.
Default setting: Selected
Defaults
Returns the settings in the job control window to the default settings.
3-24
Xerox WorkCentre C226 User Guide
Selecting Printing Functions
Account Number
When the "AUDITING MODE" of the key operator program is turned on, a count
can be kept of the number of sheets printed by each account. Account numbers
for this purpose are programmed using the key operator program for the printer
sheet count. To program an account number, see "Key operator programs".
When the "ACCOUNT LIMIT SETTING" (key operator program) is turned on,
printing is not permitted after the page count reaches the limit.
When the "CANCEL JOBS OF INVALID ACCOUNTS" of the key operator
program is turned on, printing will not take place if an invalid account number is
entered, or if printing is executed without entering an account number. If you want
printing be allowed even if a valid account number is not entered, turn this setting
off. In this case, pages printed by an invalid account number will be included in the
"OTHERS" count.
Default Job ID
Use this setting to select the default user name and job name that appear in the
machine's operation panel. Note that if "Always Use This ID" is not selected, the
Windows login name and the job name set in the application will be automatically
used.
The names that appear here will also appear in the operation panel in the dialog
box that appears when printing is executed.
[User Name]
Use this setting to select the default "User Name" that appears in the machine's
operation panel. If "Always Use This ID" is selected, the name entered here will
appear in the machine's operation panel. If "Always Use This ID" is not selected,
the Windows login name will be automatically used.
Up to 16 characters can be entered.
Default setting: User name unknown
Xerox WorkCentre C226 User Guide
3-25
Printer Operation
[Job Name]
Use this setting to select the default "Job Name" that appears in the machine's
operation panel. If "Always Use This ID" is selected, the name entered here will
appear in the machine's operation panel. If "Always Use This ID" is not selected,
the job name set in the application will be automatically used.
Up to 30 characters can be entered.
Default setting: Job name unknown
[Always Use This ID]
This allows you to select whether to automatically obtain the "User Name" and
"Job Name" displayed in the machine's operation panel, or whether to use the
names entered in this dialog box.
Not selected
The Windows login name will be automatically used for the "User
Name", and the job name set in the application will be
automatically used for the "Job Name".
Selected
The names entered in this dialog box will appear in the machine's
operation panel.
Default setting: Not selected
Paper settings
The following screen appears when the Paper tab is selected. The settings and buttons in this screen are explained below.
1
2
3
Paper Size
Select the size of paper to be printed on.
Click one of the paper sizes that appear in the box.
Default setting: A4
3-26
Xerox WorkCentre C226 User Guide
Selecting Printing Functions
[Custom]
A custom paper size can also be set.
Only one custom paper size can be stored.
Click this button to open the window for setting the custom paper size.
When printing with a custom paper size, there is limitation on paper orientation.
To print with a custom paper size, set the paper in horizontal orientation.
Correct
Wrong
Horizontal loading
Vertical loading
Fit To Paper Size
This field is used for the Fit to Page function. This function automatically enlarges
or reduces the printed image to match the paper being used. Enlargement or
reduction takes place with the image centred on the page.
To use this function, select the "Fit to Page" checkbox and then select the size of
paper to be used.
NOTE:
Printing normally takes place using the paper size set in the application, regardless of
the paper size selected in the printer driver. When the paper size is not specified in the
application, the paper size setting in the printer driver is used.
[Fit To Page]
When this checkbox is selected, the print image corresponding to the paper size
selected in [Paper Size] is automatically reduced or enlarged to fit the paper
selected in [Fit To Paper Size].
Default setting: Not selected
Image Orientation
Set the orientation of the document.
Click the radio button for [Portrait] or the radio button for [Landscape].
[Portrait]
Select portrait orientation.
[Landscape]
Select landscape orientation.
Default setting: Portrait
[Rotate 180 degrees]
Rotate the image 180° before printing. This function rotates the image to enable
correct printing on envelopes and other paper with flaps.
Default setting: Not selected
Xerox WorkCentre C226 User Guide
3-27
Printer Operation
4
5
6
7
Paper Selection
Select the paper tray and paper type in this item.
[Paper Source]
Select the paper tray. When [Auto Select] is selected, the tray containing the paper
specified in [Paper Size] and [Paper Type] is automatically used. If a setting other
than [Auto Select] is selected, paper will be drawn from the selected source
regardless of the [Paper Size] and [Paper Type] settings.
Default setting: Auto Select
[Paper Type]
Set the paper type. It is also necessary to set the paper type at the operation panel
on the machine.
Default setting: Auto Select
[Tray Status]
Click this button to display the paper size, paper type, and paper remaining in the
machine's paper trays.
This function operates when the Xerox Print Status Monitor is running in the user's
PC and the printer is used on a network.
Output
This sets the exit tray for the printed output.
This cannot be selected when the staple function is turned on.
Default setting: Center Tray
Different Paper
This sets the paper tray from which the paper for the first page is drawn.
Click this button to open the window for selection of cover sheet settings.
3-28
Xerox WorkCentre C226 User Guide
Selecting Printing Functions
Transparency Inserts
Select this setting when you wish to insert a different type of paper between
pages.
Click this button to open the window for selection of transparency insert settings.
This cannot be selected when two-sided printing, the staple function, or the punch
function is selected.
Originals
4
3
4
2
1
3
2
1
Insert sheets
Advanced settings
PCL5c
The following screen appears when the Advanced tab is selected. The settings and
buttons in this screen are explained below.
Image Quality
This item is used to select the [Resolution Settings] and [Graphics Mode] for
printing.
Xerox WorkCentre C226 User Guide
3-29
Printer Operation
[Resolution Settings]
Select 300 dpi or 600 dpi.
Default setting: 600 dpi
[Graphics Mode]
Select [Raster] or [HP-GL/2]. Select [Raster] to print using raster graphics. Select
[HP-GL/2] to print using HP-GL/2 commands.
Default setting: HP-GL/2
Margin Shift
Use this setting to shift the document image to move the margin at the left, right, or
top of the paper. Select from [None], [10 mm.], [20 mm.], or [30 mm.].
Default setting: None
One-sided copying
Original image
Image shifted
to the right
Image shifted Image shifted
to the left
to the bottom
Margin
Margin
Margin
Two-sided copying
Original image
Image shifted
to the right
Image shifted Image shifted
to the left
to the bottom
Margin
Margin
3-30
Margin
Xerox WorkCentre C226 User Guide
Selecting Printing Functions
Page Protection
If an error occurs because there is too much print data, selecting this checkbox
may enable printing to take place. Try selecting this checkbox when a print error
occurs. (If only standard memory is installed (128 MB), this setting cannot be
selected.)
Default setting: Not selected
Overlays
Select this setting to print the document as an overlay on a previously created
form. The form must have been previously stored.
Default setting: No Overlay
[Edit]
Click this button to open the overlay settings screen. The form selected in this
screen will be used for the overlay.
Font
Click this button to change the font settings.
PostScript
The following screen appears when the Advanced tab is selected. The settings and
buttons in this screen are explained below.
PS Pass-through
Default setting: Selected
Margin Shift
See the explanation for “Margin Shift” on page 3-30.
Xerox WorkCentre C226 User Guide
3-31
Printer Operation
Compress Options
Select the [Job Compression] and [Bitmap Compression] options here. Using
these options allow for smaller file sizes going across the network, thus reducing
bandwith drain.
[Job Compression]
Use this option to compress the entire job.
Default setting: Medium
[Bitmap Compression]
Use this option to compress bitmap images without compressing the entire job.
Bitmap compression is similar to JPEG and/or G3/G4 (Fax) compression.
Default setting: Very High Quality
Overlays
See the explanation for “Overlays” on page 3-32
Font
See the explantion for “Font” on page 3-31.
3-32
Xerox WorkCentre C226 User Guide
Selecting Printing Functions
Watermark settings
The following screen appears when the Watermarks tab is selected. The settings and
buttons in this screen are explained below.
Watermark preview
The watermark function is used to print a watermark (a faint, shadowlike text
image) on the paper. This shows a preview of the currently selected watermark.
The position of the watermark can be adjusted by directly dragging the image with
your mouse, or by using the scrollbars at the right and bottom of the preview
screen.
Default setting: x: 0, y: 0
NOTE:
The image that appears in the Watermark Preview is an approximate representation of
what will appear in the print.
[Center]
Select this setting to have the watermark printed in the centre of the paper.
Watermark
Select a watermark from the watermarks that appear in the box.
Default setting: None
[Add]
Click this button to create a custom watermark.
[Update]
Click this button to adjust the size or angle of the text of a stored watermark.
[Delete]
Click this button to delete a stored watermark.
Xerox WorkCentre C226 User Guide
3-33
Printer Operation
Text
When you wish to create a custom watermark, enter the text of the watermark
here. Up to 100 characters can be entered. To store the entered text as a
watermark, click the [Add] button explained in above.
Size
Use this setting to adjust the size of the characters of the currently selected
watermark.
Any number from 6 point to 300 point can be selected.
Default setting: 100 (point)
Angle
Use this setting to adjust the angle of the text of the currently selected watermark.
Select any angle from -90° to 90°.
Default setting: 45°
Edit Fonts
Use this setting to select the font of the currently selected watermark.
Edit Color
Use this setting to adjust the colour of the font of the currently selected watermark.
Transparency Text
Select this checkbox when you wish to have the characters of the watermark
printed faintly in the background of the text.
Default setting: Selected
On First Page Only
Select this checkbox when you want to have a watermark printed on only the first
page of a print job.
Default setting: Not selected
As Outline Only
Select this checkbox when you want to print only the outline of the characters of a
watermark.
Default setting: Not selected
This setting cannot be selected when setting is selected.
3-34
Xerox WorkCentre C226 User Guide
Selecting Printing Functions
Color settings
When the Color tab is selected, the following screen appears. The settings and buttons in this screen are explained below.
1
2
3
Original Type
This displays the currently selected document type and an explanation. When
[Gray Scale] is selected in setting
on page 3-37, this setting cannot be
selected.
Default setting: Standard (The selected settings are the default settings.)
The default settings for the document types are as follows:
Original Type
Color
Rendering
*1
UCR
Selection
*2
Black
Overprint*3
Screening*4
Pure Black
Text*5
Standard
Xerox Color Standard
On
Automatic
On
Graphics
Saturation
Match
High
Black
On
Text/
Graphics
Off
Photo
Perceptual
Match
(Photo)
Low Black
Off
Photo
Off
Drawing
(Thin line)
Saturation
Match
High
Black
On
Automatic
On
Web Page
Perceptual
Match
(Web)
Standard
Off
Automatic
On
Custom
Xerox Color Standard
On
Automatic
On
*1 Colour Rendering
Select colour matching settings.
*2 UCR (Under Colour Removable) Selection
Set the proportion of black toner to be used.
Xerox WorkCentre C226 User Guide
3-35
Printer Operation
*3 Black Overprint
Select whether or not black characters are overprinted on a colour background.
*4 Screening
Select halftone settings.
*5 Pure Black Text
Select whether to print black characters with black toner, or with 4-colour CMYK
toner.
Custom
Use these settings when you wish to change the default settings for each
document type.
Preview of document type
This shows a preview of the document type selected in
.
Table of document type previews
Color Mode
Color
Gray Scale
Automatic
Standard
Graphics
Original Type
Photo
Drawing
(Thin line)
Web
Page
Custom
3-36
Xerox WorkCentre C226 User Guide
Selecting Printing Functions
4
5
6
Color Mode
Select thecolour mode for printing.
When Automatic is selected, a decision is made page by page. If colours other
than black are used, colour printing takes place. If only black is used, black and
white printing takes place. This is convenient when colour and black and white
pages are mixed together, however, the print speed is slower.
Default setting: Color
The image of the page layout in
the colour mode setting.
on page 3-16 varies as follows depending on
(Displayed on tabs other than the Watermarks and Color tabs.)
When set to [Automatic]
When set to [Color]
When set to [Gray Scale]
Xerox WorkCentre C226 User Guide
3-37
Printer Operation
Print Priority
Select whether priority is given to speed or quality when printing.
[Quality]*1 Select this when you want a high-quality image
even if more time is required for printing.
*1 This cannot be selected if only standard memory (128 MB) is installed. This can
only be selected when the [Color Mode] ( above) is set to [Gray Scale].
[Speed]
Select this when you wish to print quickly even if the image quality is
inferior.
Default setting: Speed
All Text to Black
When you wish to have all colour text printed in black, select this checkbox.
Default setting: Not selected
Image
Use this item to adjust the brightness and contrast.
[Brightness]
This indicates the brightness of colours. The brightness can be set to a value from
0 to 100. Colours appear closer to white as the value is increased.
Default setting: 50
3-38
Xerox WorkCentre C226 User Guide
Selecting Printing Functions
[Contrast]
This shows the amount of contrast between white and black. The contrast can be
set to a value from 0 to 100. The contrast increases as the value is increased.
Default setting: 50
Defaults
Returns the image adjustment settings to the default settings.
Color Balance
This item is used to adjust the colour saturation and strengthen or weaken the R
(red), G (green), and B (blue) components of colour.
[Saturation]
This adjusts the colour saturation. Select a value between 0 and 100.
Default setting: 50
[Red Strength]
Strengthens or weakens red.
Default setting: 50
[Green Strength]
Strengthens or weakens green.
Default setting: 50
[Blue Strength]
Strengthens or weakens blue.
Default setting: 50
NOTE:
These cannot be changed if the colour mode was set to [Gray Scale] in step
page 3-37.
Xerox WorkCentre C226 User Guide
on
3-39
Printer Operation
Web Pages in the Printer
This section explains various functions that allow you to access the Web pages in the
printer from your computer.
Printer Configuration Through the Network
You can access the Web pages of the printer from your computer using a Web
browser such as Netscape Navigator or Internet Explorer. This will allow you to adjust
various settings through the network.
Environment required for accessing Web pages
The following equipment and programs are needed to access the Web pages in the
printer:
Print server card (network interface card)
Recommended Web browser
Internet Explorer: 5.5 or higher (Windows), 5.1 or higher (Macintosh)
Netscape Navigator: 6.0 or higher (or equivalent)
NOTE:
The following characters cannot be input in the Web pages when setting the Web
pages in the Web server located in this product. Input characters are case-sensitive.
•
•
Characters that cannot be input:
< > " & #
Examples of improper input: <abc> <abc "abc" "abc abc"
Accessing Web pages and displaying help
Use the following procedure to access the Web pages. If the help button under the
menu frame is clicked, the help screen for description of various function settings that
can be operated remotely from the Web pages for this product through the network will
appear. For the setting of each function, see the detailed description.
1. Open the Web browser on your computer.
3-40
Xerox WorkCentre C226 User Guide
Printer Configuration Through the Network
2. Input the IP Address previously specified for this product to the ADDRESS field of
the browser.
Input the IP address previously specified in this product.
If you do not know the IP address, see page 3-64.
When the connection is completed, the Web page information of this product will be displayed.
(The Web page information is explained on page 3-42.)
3.Click the [Help] button under the menu frame.
For details of each function setting, see the help under
the menu frame. The configuration settings are
described in detail.
4. Close the help.
Select the setting or function you wish to use from inside
the menu frame. When you have finished accessing the
Web page, click the button in the upper right-hand corner of the window.
Xerox WorkCentre C226 User Guide
3-41
Printer Operation
Items and outline of menu frame of Web pages
The optional scan kit is required to use the network scanner function described in this
section.
Menu frame
Click the menu items
displayed here to configure
the corresponding settings.
Store destinations and
configure settings for the
network scanner function.
Configure settings for
management of the
machine.
Configure network
settings.
System Information
Image Send Management
Destination
This is the home page for storing, editing, and deleting destinations for images
scanned with the network scanner.
A total of 500 destinations (including all types) can be stored. (A total of 100 file server
and desktop destinations can be stored.)
E-mail
Sets the destination information for E-mail delivery from the network scanner.
Destination E-mail addresses and file types as well as information for destination
control (destination name, index, name for front panel display, etc.) are configured
by this control.
FTP
Sets the storage location information for file server storage of network scan data.
File server information (such as host name) and file types as well as information
for destination control (destination name, user index, name for front panel display,
etc.) are configured by this control.
3-42
Xerox WorkCentre C226 User Guide
Printer Configuration Through the Network
Group
Multiple e-mail destinations can be stored in one of the one-touch keys displayed
in the touch panel. This is called storing a group. When sending an e-mail, the
stored destinations can be selected by simply touching the one-touch key. This is
convenient when you wish to send the same e-mail to multiple destinations.
Sender
The sender of E-mail transmissions from the network scanner is configured. The
sender will be set as the "From" item of the E-mail header. Up to 20 senders can be
registered and a sender can be selected among them from the operation panel.
Network Scanning
Setup
Basic setting screen for the network scanner. E-mail subject for scanner delivery,
file name, etc. are set. To use the network scanner, you must set up SMTP Setup
and DNS Setup. This screen displays the SMTP and DNS settings and provides a
link to SMTP Setup and DNS Setup.
Custom Directory
User index names in the display list on the operation panel are set.
Device Setup
Information
Configure machine identification information for the status & alert E-mail function.
Password
The settings and programmed information in the Web page can be protected by clicking [Passwords] in the menu frame and establishing passwords. The administrator
should change the initial password set at the factory to a new password. In addition,
take care to remember the new password, as it must be entered the next time you
open the Web page.
Two types of passwords can be established: one for users and one for the administrator.
When the Web page is accessed using the user password, the "Device Setup" and
"Network Setup" cannot be configured.
The password is initially set to "Xerox". When you first establish the passwords, enter
"Xerox" in "Administrator Password" and then enter the new password for the administrator and the password for users (maximum of 7 characters per password; passwords
are case sensitive). Click [Submit] to save the new passwords. After setting the new
passwords, turn off and then turn on the machine power.
The next time you open the Web page, you will be prompted to enter your password.
When accessing the Web page as a user, enter "user" in "User Name". When accessing the Web page as an administrator, enter "admin" in "User Name".
Xerox WorkCentre C226 User Guide
3-43
Printer Operation
Log
Status Message
Use this to set up a schedule for sending specified count information such as the
total count and the output counts for the printer and copy functions. The e-mail
addresses of the recipients and the schedule must be entered.
Alerts Message*
This is used to send information on error conditions such as when the machine
runs out of paper or toner, or a misfeed or failure occurs. The e-mail addresses of
the recipients of the information must be entered.
* This function cannot be used if the optional Fax Unit is installed.
Network Setup
Network Card
A link to the network card Web page for configuring the print server card (network
interface card) is provided. The Admin password is the same as the Web Page password of the network card.
Services
Configure information concerning the e-mail system.
LDAP
This is used to configure advanced settings when using an LDAP server and user
authentication.
Printer Configuration Settings
This section explains the printer configuration settings.
Making Configuration Settings
The printer configuration settings are used to configure basic printer settings. The following settings are available.
•
•
3-44
Default settings: Basic settings used in printing (page 3-46)
PCL settings: Set the PCL symbol set and fonts (page 3-47)
Xerox WorkCentre C226 User Guide
Making Configuration Settings
Operation procedure common to all printer configuration settings
These items can be set from the operation panel.
1. Touch the [CONDITION SETTINGS] key on the printer screen to display the
configuration setting menu screen.
A4
Paper Select
Any print jobs held in the printer and any job currently
transmitted to the printer will be listed in the former print
conditions.
Condition
Settings
2. Touch the key of the desired item to display its setting screen.
Exit
Condition Settings
Default Settings
PCL Settings
Detailed descriptions for configuration settings start on page 3-46.
3. Touch the desired setting item on the screen and touch the [OK] key.
OK
Default Settings
1
Copies
Default Paper Size A4
Default Paper Type
Orientation
P
Default Output Tray
DISABLE BLANK PAGE
PRINT
To set another item, repeat steps 2 and 3.
4. To finish the setting operation, touch the [EXIT] key.
Exit
Xerox WorkCentre C226 User Guide
3-45
Printer Operation
Default settings
The default settings are used to set specific print conditions for printing in an environment where the print driver is not used (such as printing from MS-DOS or from a computer that does not have the provided print driver installed).
NOTE:
When some items can be set both in the printer driver and on the operation panel, the
values set in the printer driver override those set on the operation panel. For items that
can be set in the printer driver, perform the settings in the printer driver.
The following settings are available:
Copies
COPIES sets the number of print to make.
Default setting: 1
The number of copies can be set from 1 to 999.
Orientation
ORIENTATION allows portrait orientation or landscape orientation to be selected for
printing.
Default setting: PORTRAIT
PORTRAIT or LANDSCAPE can be set.
Default paper size
The paper size to be used for printing under normal conditions is set.
Printing will be performed on the specified size of paper unless otherwise specified.
Default setting: A4 or 8-1/2X11
A3W, A3, B4, A4, B5, A5, 11X17, 8-1/2X14, 8-1/2X13, 8-1/2X11, 7-1/4X10-1/2, 5-1/
2X8-1/2, 8K or 16K can be set.
Default output tray
The output tray to be used for printing under normal conditions is set. Printed sheets
will be output to the specified tray unless otherwise specified by application software.
Default setting: CENTRE TRAY
The trays that can be selected depend on installation of peripheral devices.
3-46
Xerox WorkCentre C226 User Guide
Making Configuration Settings
Default paper type
The paper type to be used for printing under normal conditions is set. Printing will be
performed on the specified type of paper unless otherwise specified.
Default setting: PLAIN
PLAIN, PRE-PRINTED, RECYCLED, LETTER HEAD, PRE-PUNCHED or COLOUR
can be set.
PCL settings
PCL symbol set setting
This setting is used to select which country's characters are used for certain of the
symbols in the character code table of the PCL symbol set. (Use this setting when you
need to select symbols that differ by country.)
Default setting: "1" (Roman-8)
See page 3-67 for the symbol set settings.
You can also print the "PCL SYMBOL SET LIST" in "LIST PRINT" (see page 1-41) for
a table that shows correspondences between numeric values and symbol sets.
PCL font settings
This setting is used to select the font for printing.
Default setting: "1" (Courier)
You can also print the "PCL FONT LIST" in "LIST PRINT" (see page 1-41) for a table
that shows correspondences between numeric values and fonts.
Xerox WorkCentre C226 User Guide
3-47
Printer Operation
Printing from the Operation Panel
This section explains the job retention function and other functions that enable printing
to be executed from the machine's operation panel.
Hold Job List
If "Hold After Print", "Hold Before Print" or "Proof Print" operation is performed on the
computer, print data will be held as a hold job. A maximum of 99 jobs can be held.
Print data held by this function will not be erased even if the main switch is turned off.
If the number of jobs exceeds 99, the job is processed as follows.
•
If Hold After Print is executed:
Printing will be executed but the job will not be held. (A notice page will be printed.
See page 3-65.)
•
If Hold Before Print is executed:
Printing will not be executed and the job will not be held. (A notice page will be
printed. See page 3-65.)
•
If Proof Print is executed:
Printing of one set will be executed but the job will not be held. (A notice page will
be printed. See page 3-65.)
If the above error occurs and the Xerox Print Status Monitor has been installed, the
error message will appear in the Xerox Print Status Monitor.
1. Press the [PRINT] key to display the printer basic screen.
/
3-48
Xerox WorkCentre C226 User Guide
Hold Job List
2. Select the desired data.
To switch the screen, touch the
Print Hold Job List
Xerox001
Microsoft Word -
Xerox002
Microsoft PowerPo
Xerox003
product_informati
Xerox004
cost.xls
or
key.
3. Use the [Numeric] keys to enter the 5-digit password (required only if a password
has been set).
Be sure to enter the password that has been entered on
the computer. If no password has been set, this step is
not needed. Each time a number is entered, "–" will
change to " ".
B.
ob List
Enter Pin Via The 10-Key.
Cancel
cost.xls
4. Ensure that the desired number of prints is set.
Number Of Prints
1
(1
The number of prints can be changed by using the
key.
or
999)
5. Execute printing.
To delete the print data after completing the print job,
touch the [PRINT AND DELETE THE DATA] key.
product_information.pdf
Cancel
To keep the print data after printing, touch the [PRINT
AND SAVE THE DATA] key.
Print And Delete The Data
Print And Save The Data
Delete
To cancel printing and clear the print data, touch the
[DELETE] key.
If you select execution of the print job, printing will start. If another job is being
printed, your job will be stored as a print job. Your job will be printed after
preceding jobs are completed.
Operation is now complete.
Xerox WorkCentre C226 User Guide
3-49
Printer Operation
Key Operator Programs
This section explains the key operator programs for the printer function. Key operators
should read this section to ensure correct use of the key operator programs.
Key operator programs related to the printer function are explained here. For information on key operator programs related to the copy function, and network scanner function, see “Key Operator Programs” in the WorkCentre C226 System Administration
Guide.
NOTE:
The key operator programs that can be accessed depend upon how the product is
configured with optional equipment.
Key operator program list
Program name
Page
Printer Settings
Default Settings
Prohibit notice page printing
3-55
Prohibit test page printing
3-55
A4/letter size auto change
3-55
Delete the print hold data
3-55
Output method when memory is full
3-55
Default paper type for Bypass Tray
3-56
Job queuing
3-56
Interface settings
Port switching method
3-56
Enable parallel port
3-56
Enable USB port
3-56
Enable network port
3-56
I/O timeout
3-57
Network settings
IP address setting
3-57
Enable TCP/IP
3-57
Enable NetWare
3-57
Enable EtherTalk
3-58
Enable NetBEUI
3-58
Reset the NIC
3-58
Colour adjustments
3-50
Xerox WorkCentre C226 User Guide
Key operator program list
Program name
Auto colour calibration
Page
3-58
Initialize and/or store settings
Restore factory defaults
3-59
Store current configuration
3-60
Restore configuration
3-60
Xerox WorkCentre C226 User Guide
3-51
Printer Operation
Procedure for using key operator programs
The procedure for using key operator programs is explained here, using the
"PRINTER SETTINGS" program as an example.
Follow the same steps to use the programs explained on page 3-55 and following.
1. Press the [CUSTOM SETTINGS] key.
/
2. Touch the [KEY OPERATOR PROGRAMS] key.
Address
Control
ADDRESS
Receive
Mode
CONTROL
Key Operator Programs
3. Use the numeric keys to enter the five-digit key operator code number.
Key Operator Code
4. Touch the [PRINTER SETTINGS] key.
Follow these steps to select the program that you wish to
use.
Printer
Settings
Key Operator
In the following steps, the setting screens for the
selected program will appear. Refer to the program
explanations on page 3-55 and following, and then follow these steps to select a setting for the program.
5. Make desired settings for the selected program.
Detailed descriptions for program settings start on page 3-55.
3-52
Xerox WorkCentre C226 User Guide
Procedure for using key operator programs
6. Press the [CLEAR ALL] key to exit the program.
You will exit the key operator programs and return to the
main screen.
Xerox WorkCentre C226 User Guide
3-53
Printer Operation
Key operator program menu
The key operator programs are accessed via the following menu structure.
Refer to this menu when changing the settings explained on the following pages.
Level 1
Level 2
Enter Key Operator Code
DEFAULT SETTINGS
Level 3
PROHIBIT NOTICE PAGE PRINTING
PROHIBIT TEST PAGE PRINTING
A4/LETTER SIZE AUTO CHANGE
DELETE THE PRINT HOLD DATA
OUTPUT METHOD WHEN MEMORY IS FULL
DEFAULT PAPER TYPE FOR BYPASS TRAY
JOB QUEUING
INTERFACE SETTINGS
PORT SWITCHING METHOD
ENABLE PARALLEL PORT
ENABLE USB PORT
ENABLE NETWORK PORT
I/O TIMEOUT
NETWORK SETTINGS
IP ADDRESS SETTING
ENABLE TCP/IP
ENABLE NetWare
ENABLE NetBEUI
RESET THE NIC
COLOUR ADJUSTMENTS
AUTO COLOUR CALIBRATION
INITIALIZE AND/OR STORE SETTINGS
RESTORE FACTORY DEFAULTS
STORE CURRENT CONFIGURATION
RESTORE CONFIGURATION
PRINTER SETTINGS
For information on the following settings, see the indicated manuals.
General settings/copy settings
KEY OPERATOR'S GUIDE
Network scanner settings
OPERATION MANUAL (for network scanner)
3-54
Xerox WorkCentre C226 User Guide
Description of Setting Programs
Description of Setting Programs
The key operator programs related to the printer function are explained here.
Printer settings
Default settings
These programs are used to adjust the settings of various printer functions.
Prohibit notice page printing
This program is used to disable notice page printing.
Turn on this program when you do not want the machine to print the notice page
explained in “Notice Page Printing” on page 3-65.
Prohibit test page printing
This program is used to disable test page printing.
When the program is turned on, the PRINTER TEST PAGE in the user settings cannot
be printed. (See page 1-41)
A4/letter size auto change
If this program is set, and printing onto 8-1/2" x 11" size paper is selected but not available, the printer will automatically substitute A4 size paper in place of 8-1/2" x 11"
paper if A4 paper is available.
* 8-1/2" x 11" paper cannot be automatically selected in place of A4.
NOTE:
When 8-1/2" x 11" size is specified for a document attached to an E-mail that has been
transmitted from a foreign country and A4 size paper is not installed in the printer,
printing cannot be done without operator intervention. If this program is set, printing
will be executed without intervention if a paper tray is loaded with A4 paper.
Delete the print hold data
Use this program to manually delete all stored data from the hard disk.
When you touch this key, a message will appear to confirm that you want to delete the
data. Check the message and then proceed with the deletion. If you are using the job
retention function (page 3-48), exercise caution when using this program.
Output method when memory is full
When the internal memory becomes full with printer data, further printing is not possible, thus the print data stored to that point is printed. This program is used to set the
condition for printing. The factory default setting is "1 SET".
Xerox WorkCentre C226 User Guide
3-55
Printer Operation
Default paper type for Bypass Tray
This program is used to set the default paper type for paper loaded in the Bypass Tray
in printer mode. "NONE" (a default paper type is not selected), "PLAIN", "HEAVY
PAPER", or ''TRANSPARENCY" can be selected. If "HEAVY PAPER" is selected,
select "HEAVY PAPER 1" or "HEAVY PAPER 2". If "TRANSPARENCY" is selected,
select "SPEED MODE" or "QUALITY MODE".
The factory default setting is "NONE".
Job queuing
This program is used to allow new print jobs to be received while a print job is in
progress. Normally the program is enabled so that new print jobs can be received.
Interface settings
These programs are used to control data transmitted to the parallel port or network
port of this printer.
Port switching method
The machine can use the three ports shown below for printing. This program is used to
select when switching between ports will take place. "SWITCH AT END OF JOB" or
"SWITCH AFTER I/O TIMEOUT" can be selected. When "SWITCH AT END OF JOB"
is selected, the port will be automatically selected after each print job is completed.
When "SWITCH AFTER I/O TIMEOUT" is selected, the port will be automatically
selected if the time set in the I/O Timeout program elapses.
•
•
•
Parallel port
USB port
Network port
Enable parallel port
This program is used to enable or disable printing from the parallel port.
Default setting: Enable
Enable USB port
This program is used to enable or disable printing from the USB port.
Default setting: Enable
Enable network port
This program is used to enable or disable printing from the network port.
Default setting: Enable
3-56
Xerox WorkCentre C226 User Guide
Description of Setting Programs
I/O timeout
This program is used to set the length of time to wait for an I/O to complete a job on
the parallel port or the network port. If the data stream to the port does not transmit
data for a length of time exceeding the timeout, the job will cancel and the next job will
start processing.
The I/O timeout setting is used to set the amount of time after which an I/O timeout will
occur when waiting for print data.
Default setting: 20 seconds
NOTE:
The allowable range of the time is 1 to 999 seconds.
Network settings
These programs are set when this product is used as a network printer.
After you complete the setting for one program, you must exit the key operator programs, turn off the main switch, wait briefly, and then turn on the main switch again
before any other programs can be set. The program that was set will be effective after
the power is turned on.
NOTE:
For setting and modification of "Network settings", be sure to consult with the network
administrator.
IP address setting
When using this product in a network that uses the TCP/IP protocol, use this program
to set the IP address (IP address, IP subnet mask, and IP gateway) of this product.
The program is set to ENABLE DHCP by factory default setting, which obtains the IP
address setting automatically. When using this product on a TCP/IP network, be sure
to turn on the "Enable TCP/IP" program below.
If DHCP is used, the IP address assigned to the machine may be changed
automatically on occasion. If this happens, printing will not be possible.
Enable TCP/IP
When using this product in a network that uses the TCP/IP protocol, set this program.
Also set the IP address using the program "IP address setting" above.
Default setting: Enable
Enable NetWare
When using this product in a network that uses the NetWare protocol, set this program.
Default setting: Enable
Xerox WorkCentre C226 User Guide
3-57
Printer Operation
Enable EtherTalk
When using this product in a network that uses the EtherTalk protocol, set this program.
Default setting: Enable
Enable NetBEUI
When using this product in a network that uses the NetBEUI protocol, set this program.
Default setting: Enable
Reset the NIC
This program is used to reset all setting items of NIC (Network Interface Card, namely
Print Server Card) of this product to the factory default settings.
NOTE:
If any of the [NETWORK SETTINGS] were changed prior to execution of this program,
you must turn off the main switch after exiting the key operator program, wait briefly,
and then turn on the main switch to make the factory default settings take effect.
Colour adjustments
This program is used to automatically adjust the colour tone of each colour (cyan,
magenta, yellow, and black).
Auto colour calibration
The Auto Colour Calibration program enables automatic colour gradation correction
when the colour is off.
NOTE:
The colour gradation may not be sufficiently corrected after one correction cycle. If so,
execute the program again.
When the [AUTO COLOUR CALIBRATION] key is touched, the following display will
appear.
Key Operator Programs
Auto Colour Calibration
OK
Use 11"X17" Or A3 Paper For This Adjustment.
Press [Execute] To Print The Test Patch.
Execute
3-58
Xerox WorkCentre C226 User Guide
Description of Setting Programs
After the [EXECUTE] key is touched and a test patch printed, a message appears asking you to begin automatic adjustment. Place the test patch on the document glass as
shown below and touch the [EXECUTE] key.
Black
NOTES:
•
•
Yellow
Magenta
Cyan
Correct adjustment will not be possible if you use the test patch that is printed for
"Auto colour calibration" for the copy function or any other document. If you
attempt to use the wrong test patch, you will return to the message screen that
asks you to begin automatic adjustment. Be sure to place only the test patch
printed out above on the document glass.
Lay approximately five sheets of copy paper that are the same size as the test
patch on top of the set test patch, and gently close the original cover.
When a message appears informing you that auto colour calibration is completed,
touch the [OK] key to end the procedure.
NOTE:
Before using this program, make sure that the registration is correctly adjusted. If the
registration is not correctly adjusted, perform [AUTO ADJUSTMENT] in “Registration
adjustment” in the “Key Operator Programs” section of the WorkCentre C226 System
Administration Guide.
Initialize and/or store settings
You can restore the CONDITION SETTINGS (page 3-44) and the key operator program of the PRINTER SETTINGS of (page 3-55) to the factory default settings. You
can also store the current configuration of these settings in memory, and restore a
stored configuration at a later time.
Restore factory defaults
This restores the CONDITION SETTINGS (page 3-44) and the key operator program
of the PRINTER SETTINGS of (page 3-55) to the factory default settings. If you need
a record of the settings prior to restoration of the default settings, print the CUSTOM
SETTINGS list (page 1-37) and the key operator program list (see “Key Operator Programs” in the WorkCentre C226 System Administration Guide).
This does not affect "Colour adjustments" in the PRINTER SETTINGS.
NOTE:
After this program is set, exit the key operator program, turn off the main switch, and
then turn on the main switch again after at least 3 seconds. The program will be
effective at this time.
Xerox WorkCentre C226 User Guide
3-59
Printer Operation
Store current configuration
This program is used to store the CONDITION SETTINGS (page 3-44) and the key
operator program PRINTER SETTINGS of (page 3-55) in memory. The stored settings
will remain in memory even if the main switch is turned off. To read the stored settings,
use the following [RESTORE CONFIGURATION] program.
This does not affect "Colour adjustments" in the PRINTER SETTINGS.
Restore configuration
This program is used to read the configuration that was stored using the [STORE
CURRENT CONFIGURATION] program and restore it as the current configuration.
The currently set configuration will change to the configuration read from memory.
3-60
Xerox WorkCentre C226 User Guide
Description of Setting Programs
Troubleshooting
This section provides solutions to problems you may encounter when using the
machine. Be sure to read this section whenever you encounter a problem.
The following problems may not be due to a machine failure, so please check again
before calling for service. In the event that service is required, turn off the main switch,
unplug the power plug from the outlet. Problems related to the printer function are
described in this section. For troubleshooting related to general machine use, the
copier function or the network scanner function, please read "Troubleshooting" in the
corresponding manuals.
Problem
Printer is on but
data is not
received.
Check
Solution or cause
Is the interface cable correctly connected?
Make sure the USB or parallel cable is correctly connected to the machine and your
computer.
Has the printer driver been installed
correctly?
Install the appropriate printer driver. (See
the “Printer Installation” section in the WorkCentre C226 System Administration Guide.)
Is the printer driver correctly selected?
/ Has it been configured in the network
(when using as a network printer)?
Make sure that this printer is selected in the
software application software or use an
appropriate utility to check that the printer is
registered on the network.
Data is received
but not printed.
Has the specified size and type of
paper been loaded?
Load paper, select another paper size or
cancel printing.
Printer cannot be
selected from computer.
Has the printer driver been installed
correctly?
Install the appropriate printer driver. (See
the “Printer Installation” section in the WorkCentre C226 System Administration Guide.)
The orientation of
the image is incorrect on the print.
Are the print orientation settings in the
printer driver correct?
Correct the orientation in the printer driver.
The edges of the
printed image are
missing.
There are margins around the edges
of the paper where printing is not possible. Does the image overlap those
margins?
Change the print area or reduce the image
size.
Printer prints in
reverse order.
Has reverse page order been selected
in the software application?
Cancel the reverse order printing in the
application software.
Printer stops in the
middle of a print
job.
Has the tray full sensor activated and
stopped printing because too many
pages are in the exit tray?
Remove the paper from the exit tray.
Is the tray out of paper?
Load paper. (See page 1-21.)
Xerox WorkCentre C226 User Guide
3-61
Printer Operation
Problem
Check
Printing is not on
desired paper size.
Has paper selection been set to Automatic in the printer driver?
Ensure that the desired paper is set in a
paper tray of the printer and select "Auto
Select" in the paper selection of the printer
driver.
Printer write error
occurs when printing from the parallel
port.
Is the timeout setting for the printer
driver too short?
Set a longer time in the timeout setting in
the printer driver.
A notice page is
printed when a print
job is sent to the
printer for retention.
Has the number of hold jobs reached
99?
Delete unneeded hold jobs. If you wish to
delete all hold jobs, use the [DELETE THE
PRINT HOLD DATA] key operator program
(page 3-55).
Password entry is
requested.
Did you enter a password for the
retention function?
Password is needed when executing printing. If the password is not known, printing
cannot be executed.
In some cases the
printed image may
be rotated 90
degrees with
respect to paper
placed horizontally
in the Bypass Tray.
Did you run out of paper during printing?
When using the Bypass Tray, it is recommended that paper be placed vertically.
Colour documents
print in black and
white.
Is the [Color Mode] setting set to
[Color] in the Color tab of the printer
driver?
Set the [Color Mode] to [Color] (page 3-37).
Is the correct printer driver selected in
the software application?
Select the correct printer driver.
Though selected in
the software application, colour printing does not take
place.
Does the application support colour
printing?
Read the application manual to see if colour
printing is supported.
Is the correct printer driver selected?
Select the correct printer driver.
The colour balance
cannot be adjusted.
Is the [Color Mode] setting set to
[Color] in the Color tab of the printer
driver?
Set the [Color Mode] to [Color] (page 3-37).
3-62
Solution or cause
Landscape
orientation
Portrait
orientation
Xerox WorkCentre C226 User Guide
Description of Setting Programs
Additional information on selecting the paper type for the Bypass
Tray when using the printer function
To set the paper type and size for the Bypass Tray, see page 1-23.
The procedure for setting the paper type for the Bypass Tray when using the printer
function is explained here.
Touch the [PAPER SELECT] key in the main screen of printer mode to display the
paper type selection screen. If the desired paper type is not selected, touch the
desired paper type to highlight it.
Plain
Heavy Paper
Paper Select
Transparency
Condition
Settings
Envelope
Paper types and keys to select are as follows:
Paper type
Keys
PLAIN
LETTER HEAD
PRE-PRINTED
Select the [PLAIN] key.
PRE-PUNCHED
RECYCLED
COLOUR
POSTCARD
Touch the [HEAVY PAPER] key and then
select [HEAVY PAPER1].
TRANSPARENCY
Touch the [TRANSPARENCY] key and then
select [SPEED MODE] or [QUALITY MODE].
ENVELOPE
Touch the [ENVELOPE] key and then select
the envelope type.
If the paper type setting in the "Paper Settings" screen of the printer driver is different
from the paper type setting in the machine, printing will not take place. In this event,
select the job key in the job status screen (page 1-17) and then touch the [DETAIL]
key. Touch the [PAPER] key in the screen that appears and then either change the
machine's paper type setting for the Bypass Tray or select a different paper tray.
Xerox WorkCentre C226 User Guide
3-63
Printer Operation
Checking the IP address
There are three ways to check the IP address:
•
Using [LIST PRINT] in [CUSTOM SETTINGS] in the operation panel
Select NIC PAGE to print a list of the machine settings. The IP address that has
been set for the machine can be found in this list. Follow the procedure below to
check the IP address using NIC PAGE.
•
Using the key operator programs
The IP address can be verified using the key operator programs. To use this
procedure, consult your key operator.
•
How to use the "NIC Manager" utility on the WorkCentre C226 PCL Print Drivers
and Printer/Network Setting Utilities CD-ROM
"NIC Manager" on the WorkCentre C226 PCL Print Drivers and Printer/Network
Setting Utilities CD-ROM can be used to configure and check the IP address.
Checking the IP address from the [CUSTOM SETTINGS] screen of
the operation panel
1. Press the [CUSTOM SETTINGS] key.
The custom setting menu screen will appear.
/
2. Touch the [LIST PRINT] key.
play
rast
List Print
C
ess
rol
Receive Mode
Fax
Fo
3. Touch the [PRINTER TEST PAGE] key.
Printer Test Page
Sending Address List(Fax)
Sending Address List(Scanner)
3-64
Xerox WorkCentre C226 User Guide
Notice Page Printing
4. Touch the [NIC PAGE] key.
Printer
Settings List
PCL
PROCESSING PRINT DATA appears in the message
screen and printing begins. To cancel printing, touch the
[CANCEL] key.
NIC Page
Appendix
This section contains product specifications and other technical information.
Notice Page Printing
A notice page will be printed when the current print job cannot be run due to a system
limitation and an explanation of the limitation is too lengthy to be shown in the message display. A notice page will describe the limitation and other possible ways instead
of possibilities to run the job.
A notice page will be printed in the following cases.
•
•
•
•
•
When the print data of a single job is so large that it cannot be held in memory.
(When there are other jobs occupying memory, notice pages may tend to be
printed more frequently even for jobs with small amounts of data.)
When a print job is sent to the printer and the number of print hold jobs has
reached the maximum of 99 jobs.
When different paper sizes have been selected for printing within a print job and
one or more of the sizes cannot be delivered to the selected exit tray or to the stapler compiler. In these cases printed paper will be delivered partly to the specified
destination (tray or compiler) and partly to another exit tray.
When a function is selected that has been disabled using the key operator programs, such as disabling of two-sided printing, disabling of the staple function, or
disabling of a specified exit tray.
An invalid account number is entered when the auditing mode has been set.
Disabling of notice page printing
You can use the "PROHIBIT NOTICE PAGE PRINTING" of the key operator program
to disable notice page printing (see page 3-55).
Xerox WorkCentre C226 User Guide
3-65
Printer Operation
Print Area
The print area of this product is shown below.
Approx. 4.3 mm (11/64")
Approx. 4.3 mm
(11/64")*
Approx. 4.3 mm
(11/64")*
The print area is the entire page excluding a margin
of 4.3 mm (11/64") at each edge. The actual print
area may vary depending on the printer driver used
and the type of software application.
* The print area of A3 wide paper is the entire page
excluding a margin of approximately 3 mm (1/8") at
each edge.
Approx. 4.3 mm (11/64")
Paper size
Printable area
The print area is the entire page excluding a margin of 4.3 mm (11/64") at each edge.
The actual print area may vary depending on the printer driver used and the type of
software application.
* The print area of A3 wide paper is the entire page excluding a margin of approximately 3 mm (1/8") at each edge.
3-66
Xerox WorkCentre C226 User Guide
Print Area
PCL symbol set
No.
symbol set
No.
symbol set
1
Roman-8
21
Pi Font
2
ISO 8859-1 Latin 1
22
ISO 8859-2 Latin 2
3
PC-8
23
ISO 8859-9 Latin 5
4
PC-8 Danish/Norwegian
24
ISO 8859-10 Latin 6
5
PC-850
25
PC-852
6
ISO 6 ASCII
26
PC-775
7
Legal
27
PC Turkish
8
ISO 21 German
28
MC Text
9
ISO 17 Spanish
29
Windows 3.1 Latin 1
10
ISO 69 French
30
Windows 3.1 Latin 2
11
ISO 15 Italian
31
Windows 3.1 Latin 5
12
ISO 60 Norwegian v1
32
Windows Baltic (not 3.1)
13
ISO 4 United Kingdom
33
Windows 3.0 Latin 1
14
ISO 11 Swedish : names
34
Symbol
15
PC1004 (OS/2)
35
Wingdings
16
DeskTop
17
PS Text
18
Microsoft Publishing
19
Math-8
20
PS Math
These symbol sets are trademarks or registered trademarks of their respective
owners.
Xerox WorkCentre C226 User Guide
3-67
Printer Operation
3-68
Xerox WorkCentre C226 User Guide
4
Network Scanner Operation
Introduction
An option is available that enables the machine to be used as a network scanner. This
section explains only the network scanner functions of the product. For information on
loading paper, replacing toner cartridges, clearing paper misfeeds, handling peripheral
units, and other copier-related information, please refer to Chapter 1, “General Information” and Chapter 2, “Copier Operation”.
NOTES:
•
•
•
•
Before using the network scanner feature, several settings must be established
from the Web page. These settings are explained from page 4-3 on. The settings
must be established by the network administrator. Such settings must be effected
by the system administrator who has the special network related backgrounds.
The explanations in this section assume that the person who will install the
product and the users of the product have a working knowledge of Microsoft
Windows.
For information on the operating system, please refer to your operating system
manual.
This section assumes that several options have been installed.
Options required to use the network scanner function
•
•
Scan kit
Memory
To use the network scanner function in colour up to 300 dpi or B/W mode up to
600 dpi
For printer controller: Add one 256-MB module
Xerox WorkCentre C226 User Guide
4-1
Network Scanner Operation
To use the network scanner function in colour or B/W modes up to 600 dpi
For printer controller: Add two 256-MB modules.
For image memory: Add one 256-MB module
4-2
Xerox WorkCentre C226 User Guide
About the Network Scanner Function
About the Network Scanner Function
The Scan Kit adds network scanner functionality to your machine. A machine with the
network scanner functionality can scan a paper document, photograph, or other
printed information into a data file, and send the file to a file server or personal computer over a corporate network (intranet) or the Internet.
You can select from the following two transmission methods, depending on where you
wish to send the scanned image data.
1. The scanned information can be sent to a
memory storage device on a network (a
designated directory on an FTP server).
(Hereafter referred to as "Scan to FTP" in
this section.)
When sending scanned information to an
FTP server, an e-mail message can also be
sent to a preset e-mail address to inform
the recipient of the location of the scanned
image data. (Hereafter referred to as "Scan
to FTP (Hyperlink)" in this section.)
3. The scanned information can be sent to an
e-mail recipient. (Hereafter referred to as
"Scan to E-mail" in this section.)
* There are limitations to the use of Scan to
E-mail. A limit has been set in the
"Maximum size of e-mail attachments" of
the key operator program for the maximum
amount of data that can be sent using Scan
to E-mail (page 4-68)
Xerox WorkCentre C226 User Guide
4-3
Network Scanner Operation
Settings and Programming Required for
the Network Scanner Feature
To use the Network Scanner feature, settings for the E-mail server, DNS server, and
destination addresses must be established.
To establish the settings, use a computer that is connected to the same network as the
machine to access the machine's Web page. The Web page can be displayed with
your Web browser (Internet Explorer 5.5 or later (Windows)/5.1 or later (Macintosh), or
Netscape Navigator 6.0 or later).
Accessing Web Pages
Use the following procedure to access the Web pages.
1. Open the Web browser on your computer.
Supported browsers:
•
•
Internet Explorer 5.5 or later (Windows)/5.1 or later (Macintosh)
Netscape Navigator 6.0 or later
2. In the "Address" field of your Web browser, enter the IP address of the machine as
a URL.
Input the IP address previously specified for this product.
If you do not know the IP address, see page 4-60.
When the connection is completed, the following Web page will appear in your
Web browser.
4-4
Xerox WorkCentre C226 User Guide
About the Web Page
About the Web Page
When you access the Web page in the machine, the following page will appear in your
browser.
A menu frame appears on the left side of the page. When you click an item in the
menu, a screen appears in the right frame that allows you to establish settings for that
item.
For overviews of each of the menu items, refer to Chapter 3, “Printer Operation”.
For detailed explanations of the procedures for establishing settings, click "Help" in the
menu frame.
Menu Frame
Click the menu items displayed
here to configure the
coresponding
Edit and delete
stored transmission
Store various types
of transmission
Store the sender’s
name and E-mail
Configure basic
settings for the
Some transmission
methods require
that the E-mail
server and DNS
Configure settings
required for Global Address
Web Page
To use the network scanner function, you must configure basic network scanner settings (pages 4-6 to 4-9), store transmission destinations (pages 4-10 to 4-16), and program your sender's name (page 4-16).
Xerox WorkCentre C226 User Guide
4-5
Network Scanner Operation
Basic Settings for Network Scanning
Click "Network Scanning" in the menu frame, and then establish the required settings.
These settings should only be established by the network administrator. After entering
the settings, be sure to click "Submit" to store them. For detailed information on setting
procedures, refer to "Help".
Click here.
Network Scanning Setup screen
Enable scanner delivery methods ("Enable Scanner Delivery to")
Select the scanner delivery methods that you want to use. In the "Enable Scanner
Delivery to:" field, click the checkbox next to each method that you want to use so that
a checkmark appears in the checkbox.
"Scan to E-mail" and "Scan to FTP" are both initially selected.
Enabling user authentication ("Advanced Setup")
Select the authentication server and items used for authentication. In the screen that
appears after you click "LDAP" in the menu frame, the authentication server is
selected from the servers that have been stored in the Global Address Books List .
4-6
Xerox WorkCentre C226 User Guide
Basic Settings for Network Scanning
Select the method for assigning a file name to a scanned image
("File Naming")
Select the method for assigning a file name to a scanned image. In "File Naming",
click the items that you wish to use in the file name. "Sender Name" and "Date & Time"
are initially selected. If you are going to send images to the same recipient more than
once, we recommend that you also select "Session Page Counter" or "Unique Identifier" to prevent sending multiple files with the same name, which would result in each
successive file overwriting the previous file.
Selecting an e-mail subject ("E-mail Subject": only used for Scan
to E-mail)
This setting is not necessary if you will not be using Scan to E-mail. The setting is used
to enter the subject that appears in the recipient's e-mail program when you perform
Scan to E-mail.
Enter a subject when using Scan to E-mail within 80 characters. Only one subject can
be entered. If nothing is entered, "Scanned image from <Device Name>" will appear.
* The name that appears in <Device Name> is the name stored in "Name" in the
screen that appears when you click "Information" in the menu frame. If a name has not
been stored, the product name will appear.
E-mail Server and DNS Server Settings
Scan to E-mail and Scan to FTP use SMTP to transmit e-mail, therefore your SMTP
server settings must be configured.
When configuring your SMTP server settings, your DNS server settings will also be
necessary if you entered a host name in the "Hostname or IP Address" box when storing destinations for Scan to FTP.
To configure your e-mail server and DNS server settings, click "SMTP Setup" or "DNS
Setup" in the Network Scanning Setup screen (see “Network Scanning Setup screen”
on page 4-6), or click "Services" in the menu frame.
Xerox WorkCentre C226 User Guide
4-7
Network Scanner Operation
When you have completed all of the entries, click "Submit". The entries will be stored.
Click here.
SMTP Setup
Item
Description
Primary SMTP Server
Enter an IP address for the primary e-mail server or a host name*. (If you will be
using Scan to E-mail, be sure to enter this information.)
Secondary SMTP Server
Enter an IP address for the secondary e-mail server or a host name. No need to
enter if a secondary e-mail server is not set up.
Port Number
Enter a Port Number for SMTP.
The default is 25.
Timeout [seconds]
Enter a time out period, from 0-60 seconds, that the system will wait for as it
attempts to connect to the primary server. The default is 20 seconds. If no connection is made, the system will then look for the secondary server if it has been
set up. If not, the system will stop attempting to connect.
Reply E-mail Address
Enter an e-mail address to which the machine returns an unsuccessful delivery
message when the distribution has failed. Only 1 e-mail address can be
entered. The entered e-mail address is also used for the sender e-mail address.
Time Zone
Select the time zone of the place to use this Network Scanning System. A specific time zone is set after the selection.
SMTP Authentication
Select this checkbox if an SMTP server that authenticates users during SMTP
authentication will be used. After selecting the checkbox, the User Name and
Password text boxes under the checkbox are enabled. Enter the information
necessary for authentication in these text boxes.
4-8
Xerox WorkCentre C226 User Guide
Basic Settings for Network Scanning
Item
Description
POP before SMTP
Select this checkbox if an SMTP server that authenticates users during the
"POP before SMTP" procedure will be used. After selecting the checkbox, the
POP3 Server, Port Number, APOP, User Name, and Password text boxes under
the checkbox can be entered. Enter the information necessary for authentication in these text boxes.
* If you are entering a host name, be sure to enter the IP address of your DNS server
in the DNS settings below.
DNS Setup
Item
Description
Primary DNS Server
Enter the IP address of your primary DNS server here if required.
Secondary DNS Server
Enter the IP address of your secondary DNS server here if required.
Timeout [seconds]
Enter a time out period, from 0-60 seconds, that the system will wait for as it
attempts to connect to the primary server. The default is 20 seconds. If no connection is made, the system will then look for the secondary server if it has been
set up. If not, the system will stop attempting to connect.
Domain Name
Enter the Domain Name of the DNS Server to be used to search for host names
within 64 characters.
Xerox WorkCentre C226 User Guide
4-9
Network Scanner Operation
Setting Up Destination Information
To store the name and address of a destination as a one-touch key, click "Destination"
or one of the transmission methods in the Web page menu frame. "Destination" can
also be used to edit or clear stored destinations. (Refer to page 4-15.)
A total of 500 destinations can be stored, including E-mail, FTP, and Group destinations. Among these, a combined total of 100 Scan to FTP destinations can be stored.
The stored destinations appear as one-touch keys in the touch panel of the machine
when you send an image, allowing you to select the destination.
Click here.
E-mail: Refer to page 4-11.
FTP: Refer to page 4-12.
Group: Refer to page 4-14.
For detailed information on setting up, editing, and deleting destinations, refer to
"Help".
4-10
Xerox WorkCentre C226 User Guide
Setting Up Destination Information
Storing destinations for Scan to E-mail
Click "E-mail" in the menu frame of the Web page to store destinations. Use this
screen to enter the e-mail addresses of destinations for Scan to E-mail.
When you have completed all of the entries, click "Submit". The entries will be stored.
Click here.
Item
Description
Full Name (Required)
Enter the full name of the destination (up to 36 characters).
Initial (Optional)
Enter the initial character of the stored destination name. This initial is used to
place the destination in the ABC index of the machine's address directory
screen. (page 4-23)
Custom Directory
Drop down list:
Select one custom directory for this destination.
Check box for Frequently-Used:
The destination is set as Frequently-Used when checked on.
E-mail Address
(Required)
Enter one address as an e-mail destination (up to 64 characters).
If Global Address Search can be used, you can click "Global Address Search"
to select an e-mail address from the Global Address Book.
Display Name (Optional)
Enter a key name (no more than 18 characters) for the destination. The key
name will appear in the machine's touch panel. If you don't enter a key name,
the initial 18 characters of the "Full Name" will be stored as the key name.
File Format for Colour
Select the file format and compression mode for transmission of images
scanned in colour. "PDF Middle compression" is initially selected. The selections are as follows:
PDF High compression/PDF Middle compression/PDF Low compression/
JPEG High compression/JPEG Middle compression/JPEG Low compression
File Format for B/W
Select the file format and compression mode for transmission of images
scanned in black and white. "PDF G4" is initially selected. The selections are as
follows:
PDF uncompressed/PDF G3/PDF G4/TIFF uncompressed/TIFF G3/TIFF G4
Xerox WorkCentre C226 User Guide
4-11
Network Scanner Operation
Scan to E-mail destinations can also be stored, edited, and cleared from the touch
panel of the machine. (pages 4-42 to 4-48)
To perform Scan to E-mail, the e-mail server settings must first be established. (Refer
to page 4-7.)
Storing destinations for Scan to FTP
Click "FTP" in the menu frame of the Web page to store destinations.
Configure the settings for the destination FTP server for Scan to FTP in this screen.
When you have completed all of the entries, click "Submit". The entries will be stored.
Click here.
*1
Item
Description
Full Name (Required)
Enter the full name of the destination (up to 36 characters).
Initial (Optional)
Enter the initial character of the stored destination name. This initial is used to
place the destination in the ABC index of the machine's address directory
screen. (page 4-21)
Custom Directory
Drop down list:
Select one custom directory for this destination.
Check box for Frequently-Used:
The destination is set as Frequently-Used when checked on.
Hostname or IP Address
(Required)*1
Enter the IP address of the FTP file server or the host name (maximum of 255
characters).
Display Name (Optional)
Enter a key name (within 18 characters) for the destination. The key name will
appear in the machine's touch panel. If you don't enter a key name, the initial 18
characters of the "Full Name" will be stored as the key name.
4-12
Xerox WorkCentre C226 User Guide
Setting Up Destination Information
Item
Description
File Format for Colour
Select the file format and compression mode for transmission of images
scanned in colour. "PDF Middle compression" is initially selected. The selections are as follows:
PDF High compression/PDF Middle compression/PDF Low compression/
JPEG High compression/JPEG Middle compression/JPEG Low compression
File Format for B/W
Select the file format and compression mode for transmission of images
scanned in black and white. "TIFF G4" is initially selected. The selections are as
follows:
PDF uncompressed/PDF G3/PDF G4/TIFF uncompressed/TIFF G3/TIFF G4
FTP User Name
(Optional)
Character field for the FTP user name within 50 characters.
Password (Optional)
Character field for the FTP password within 50 characters.
Directory (Optional)
Character field to specify a directory on the FTP server within 200 characters.
Enable Hyperlink to FTP
server to be e-mailed
(Checkbox)*2
When you send a scanned file to an FTP server, you can have a transmission
notification automatically sent to the file recipient by e-mail. To have transmission notifications sent, select the checkbox. The FTP server name will appear in
the transmission notification as a hyperlink.
E-mail Destination
Select the recipient that you wish to notify of the file transmission to the FTP
server. To select a recipient here, the recipient's e-mail address must have been
previously stored. (page 4-12)
*1 If you entered a host name in "Hostname or IP Address", you will need to enter the
DNS server settings. (Refer to page 4-11.)
*2 To perform Scan to FTP (Hyperlink), you must also enter the settings under "SMTP
Setup" for the e-mail server.
If you select the "Enable Hyperlink to FTP server to be e-mailed" checkbox and select
a previously stored recipient (page 4-11) from "E-mail Destination", you are able to
have an e-mail sent to the recipient informing them of the file format and location of the
scanned image data. A hyperlink to the file server to which the scanned image data
was sent appears in the e-mail, and the recipient can click the hyperlink to go directly
to the location where the image data is stored.
Xerox WorkCentre C226 User Guide
4-13
Network Scanner Operation
Storing Groups (Scan to E-mail)
If you are using Scan to E-mail, a scanned image can be sent to multiple destinations
in a single operation. To use this function, you must first store the destinations in a
group. Click "Group" and then select the Scan to E-mail destinations that you wish to
store in the group. Up to 300 destinations can be stored in one group. Only destinations for E-mail can be stored in a group. Note that multiple destinations cannot be
entered manually when sending an image.
When you have completed all of the entries, click "Submit". The entries will be stored.
Click here.
Item
Description
Full Group Name
(Required)
Enter the full group name of the destination (up to 36 characters).
Initial (Optional)
Enter the initial character of the stored destination name. This initial is used to
place the destination in the ABC index of the machine's address directory
screen. (page 4-21)
Custom Directory
Drop down list:
Select one custom directory for this destination.
Check box for Frequently-Used:
The destination is set as Frequently-Used when checked on.
Address(es) (Required)
Select the address of the destination from the e-mail list box. Programmed email destinations appear in each of the destination lists. To select multiple destinations, click each address while holding down the [Ctrl] key on the keyboard. If
you need to cancel an address that has been selected, click the address again
while holding down the [Ctrl] key. Up to 300 addresses can be programmed.
Display Name (Optional)
Enter a key name (within 18 characters) for the destination. The key name will
appear in the machine's touch panel. If you don't enter a key name, the initial 18
characters of the "Full Group Name" will be stored as the key name.
4-14
Xerox WorkCentre C226 User Guide
Setting Up Destination Information
Editing and deleting programmed transmission destinations
To edit or delete programmed destinations, click "Destination" in the menu frame of the
Web page.
1. Click "Destination" in the menu frame of the Web page.
2. In the Destinations List, click the button of the destination that you want to edit or
delete.
3. To edit the selected destination, click "Edit" under the Destinations List.
The programming screen of the destination selected in
step 2 appears. Edit the information in the same way as
you initially stored it.
When finished, be sure to click "Submit" to save your changes.
To delete the selected destination, click "Delete" under the Destinations
List.
A message appears asking you to confirm the deletion.
Click "Yes" to delete.
Xerox WorkCentre C226 User Guide
4-15
Network Scanner Operation
NOTE:
If you attempt to edit or delete a programmed destination in the following situation, a
warning message will appear and editing/deletion will not be possible.
The destination is included in a group.
If the destination is being used for a current transmission, cancel the transmission or
wait until it is completed and then edit or delete the destination. If the destination is
included in a group, delete the destination from the group and then edit or delete the
destination.
Storing Sender Information (Scan to E-mail)
To store the sender information (Sender Name, E-mail Address) that is displayed
when the recipient receives your e-mail, click "Sender" in the menu frame and then
click "Add". Information for up to 20 different senders can be stored. Select a sender
from the stored senders using the touch panel of the machine when you send an
image (page 4-23). The selected sender appears in the sender column of the recipient's e-mail software program.
NOTE:
If you do not select a sender when sending an image, the default sender information
stored with the key operator program "Default sender set" is automatically sent.
(page 4-67)
1. Click "Sender" in the menu frame of the Web page.
2. Click "Add" under "New Sender".
The sender programming screen appears.
3. Enter the name and e-mail address of the new sender. Be sure to click "Submit"
after entering this information.
4-16
Xerox WorkCentre C226 User Guide
Storing a Custom Directory
Editing and deleting programmed sender's information
1. Click "Sender" in the menu frame of the Web page.
2. Click the sender that you wish to edit or delete from the "Sender List" menu so that
it is highlighted, and then click "Edit" or "Delete".
If you clicked "Edit", edit the information in the same way
that you initially programmed it and then click "Add" to
save your changes. If you clicked "Delete", a message
will appear asking you to confirm the deletion. Click
"Yes" to delete.
Storing a Custom Directory
Programmed destinations appear as one-touch keys in the Address directory screen
of the touch panel (page 4-21), and are normally included in the ABC index. Two types
of indexes are available: the ABC index and group indexes (custom directories).
Group indexes allow you to assign any index name to the destination for easy searching. Six group indexes are available, and a name up to six characters long can be
assigned to each.
Click "Custom Directory" in the menu frame of the Web page to display the following
screen. Group index names can be programmed and edited in this screen. Enter
names for indexes 1 through to 6 and then click "Submit". If you wish to change a previously programmed name, enter the new name and save it.
For information on grouping destinations in a group index, see the appropriate pages
for programming the transmission methods. For information on switching between the
ABC index and group indexes, see page 4-22.
NOTE:
You can also store indexes in the Custom Directory from the touch panel of the
machine. (page 4-54)
Xerox WorkCentre C226 User Guide
4-17
Network Scanner Operation
Protecting Information Programmed in the Web Page
("Passwords")
Passwords can be set to restrict Web page access and protect settings. Note that it is
not necessary to set passwords; the network scanner functionality can also be used
without passwords.
A password can be set for the administrator and passwords can be set for each user. If
you use a user password to access the Web page, you will be able to establish, edit,
and delete destinations in the Scanner Destination Management menu; however, you
will not be able to establish settings in the Setup menu.
The passwords for "user" and "admin" are both initially set to "Xerox". If you wish to
change the passwords when first establishing the settings, enter "Xerox" in "Old Admin
Password" before you establish the settings. A password must consist of alphanumeric characters and be no more than seven characters long. Passwords are case
sensitive. After entering a password, click "Submit" to set it. After setting the password,
turn the machine power off and then back on.
When a password is set, you will be prompted for the password when you attempt to
access a Web page with protected settings. For the "User name", enter "user" if you
are accessing the page as a user, or "admin" if you are accessing the page as an
administrator. For detailed information on setting passwords, refer to "Help".
Condition Setting Screen of Scanner
Mode
The condition setting screen of scanner mode is displayed by pressing the [IMAGE
SEND] key (refer to page 1-14) while the print mode, copy mode, or job status screen
appears in the touch panel*1. In the explanations that follow, it is assumed that the initial screen that appears after pressing the [IMAGE SEND] key is the condition setting
screen (shown below). If you have set the display to show the address directory
(page 4-21) when the [IMAGE SEND] key is pressed, touch the [CONDITION SETTINGS] key in the address directory to display the condition setting screen.
The key operator program "Default display settings" can be used to set the display to
show either the condition setting screen (shown below) or the Address directory
screen (page 4-21) when the [IMAGE SEND] key is pressed (refer to page 4-66).
4-18
Xerox WorkCentre C226 User Guide
Protecting Information Programmed in the Web Page ("Passwords")
*1 When the optional Fax Unit is installed, you will return to the condition setting
screen of fax mode or scan/fax mode, depending on which mode was last selected. If
the condition setting screen of fax mode appears, touch the key to switch to the base
screen of scan/fax mode.
NOTE:
For information on the parts of the unit and the operation panel that are used for
network scanning, refer to pages 1-13 and 1-14. For parts that are used for both
network scanning and printing, refer to page 3-40.
Condition setting screen
The display is initially set (factory setting) to show the following condition setting
screen as the initial screen.
Ready To Send.
Auto
Exposure
Lower
Resolution
Address
Directory
E-Mail Address
Programmed
File Format
Auto
Original
Message
display
[ADDRESS
DIRECTORY] key
[SENDER LIST]
key
[ADDRESS
REVIEW] key
Sender List
Address Review
Scanner
Fax
Messages appear here to indicate the current status of the machine.
This displays the Address Directory screen (page 4-21). Touch this key when you wish
to use a one-touch key that has a destination (or group) programmed in it (page 4-25).
Touch this key to select the sender when sending an image (page 4-24).
When performing Scan to E-mail broadcast transmission, touch this key to check your
selected destinations. Your selected destinations will appear as a list, and the list can
be edited (page 4-30.
Xerox WorkCentre C226 User Guide
4-19
Network Scanner Operation
Scanner
Fax
When the optional Fax Unit is installed, touch this key to switch between scanner
mode and fax mode.
key
[E-MAIL
ADDRESS] key
Two-sided
scanning icon
display
When performing Scan to E-mail, touch this key if you wish to enter the e-mail address
of the recipient manually instead of using an one-touch key (page 4-28).
Icons appear here when you touch the [ORIGINAL] key and select two-sided scanning. The icons can be touched to open function selection screens (page 4-32).
[ORIGINAL] key
Touch this key when you wish to manually set the size of the original to be scanned or
scan both sides of the original (page 4-32).
[FILE FORMAT]
key
Touch this key to set the file format of scan images that you transmit. The selected file
format setting will be highlighted above the key. The initial factory setting is "PROGRAMMED" (page 4-39).
[RESOLUTION]
key
Touch this key to change the resolution setting for the original to be scanned. The
selected resolution setting will be highlighted above the key. The initial factory setting
is "LOWER" (page 4-37).
[EXPOSURE]
key
Touch this key to change the exposure setting for the original to be scanned. The
selected exposure setting will be highlighted above the key. The initial factory setting is
"AUTO" (page 4-36).
4-20
Xerox WorkCentre C226 User Guide
Protecting Information Programmed in the Web Page ("Passwords")
Address directory screen
Touch the [ADDRESS DIRECTORY] key in the Condition setting screen (page 4-19) to
display the screen shown below at right.
If you have set the initial screen to the address directory screen using the key operator
program, the initial screen will appear as follows.
Destinations stored using the Web page are grouped in indexes ( ) according to the
letter entered in "Initial" for each destination, and the name entered in "Display Name"
is displayed in the one-touch key ( ).
READY TO SEND.
TO
CC
CONDITION
SETTINGS
BCC
TEST1
TEST2
TEST3
TEST4
TEST5
TEST6
GLOBAL
ADDRESS SEARCH
ADDRESS REVIEW
FREQUENT USE
ABCD
EFGHI
JKLMN
OPQRST
UVWXYZ
ABC
GROUP
ABC
GROUP
E-mail Destination Management page
USER 1
USER 2
USER 3
USER 4
USER 5
USER 6
[TO] key
When selecting a destination for Scan to E-mail, make sure this key is highlighted
(page 4-29). (If the key is not highlighted, touch it so that it is highlighted.)
[CC] key
If you wish to send "CC" ("Carbon Copy") copies of a Scan to E-mail transmission to
other recipients in addition to the main recipient, touch this key so that it is highlighted
and then select the "CC" destinations (page 4-29).
[BCC] key
If you wish to send "BCC" ("Blind Carbon Copy") copies of a Scan to E-mail transmission to other recipients in addition to the main recipient, touch this key so that it is highlighted and then select the "BCC" destinations. Other recipients will not be informed
that a copy was sent to the "BCC" recipients (page 4-29).
One-touch key
display
This shows the one-touch keys that have been stored on the selected "index card".
The key type is indicated by the icon at the right.
: Scan to E-mail (TO)
: Scan to E-mail (CC)
: Scan to E-mail (BCC)
: Scan to FTP
Xerox WorkCentre C226 User Guide
4-21
Network Scanner Operation
This can be changed to 6 ,8, or 12 using the key operator program, “The number of
direct address keys displayed setting” (page 4-66).
NOTE:
If desired, you can use the key operator program, “Default display settings” (page 466), to set the default screen to the group address directory.
Display
switching keys
In cases where the one-touch keys cannot all be displayed on one screen, this shows
how many screens are left. Touch the "
""
" keys to move through the screens.
[CONDITION
SETTINGS] key
This displays the Condition setting screen (page 4-19), which is used to set various
conditions.
[GLOBAL
ADDRESS
SEARCH] key
This feature makes it possible to search for an e-mail address in an Internet or intranet
directory database (page 4-30).
To use this function, the IP address (or network name) of the LDAP server must be
set, as well as an account name and password. These settings are configured by
accessing the Web server in the machine from a computer. Click "LDAP" in the Web
page menu frame to display the LDAP Setup screen.
Touch this key to switch between the alphabetical index and the group index.
[ABC
GROUP]
key
Index keys
One-touch key destinations are stored on each of these index cards (alphabetical
index or group index). Touch an index key to display the card.
Group indexes make it possible to store one-touch keys by group with an assigned
name for easy reference. This is done with the custom settings (refer to page 4-17).
Frequently used one-touch key destinations can be stored on the FREQUENT USE
card for convenient access.
4-22
Xerox WorkCentre C226 User Guide
Basic Transmission Method
Sending an Image
Basic Transmission Method
1. Make sure the machine is in scanner mode.
/
When the [IMAGE SEND] key light is on, the machine is
in scanner mode. If the light is not on, press the [IMAGE
SEND] key.
When the optional Fax Unit is installed, you will return to
the base screen of fax mode or scan/fax mode,
depending on which mode was last selected. If the base
screen of fax mode appears, touch the
Fax
Scanner
key (see *1 on page 4-19 to switch
to the base screen of scan/fax mode.
2. Load the original.
For detailed information on loading an original, refer to
page 2-4.
NOTE:
You cannot load documents in both the DADF and on the document glass and send
them in a single transmission.
3. Check the original size.
Lower
Resolution
The original size is automatically detected.
Programmed
File Format
If you loaded a non-standard size document or wish to
change the scanning size, touch the [ORIGINAL] key
and set the document size. (Refer to page 4-34.)
Auto
A4
Original
NOTES:
•
•
To scan a two-sided original, refer to page 4-32.
To rotate the document image 90° before transmission, see page 4-34.
Xerox WorkCentre C226 User Guide
4-23
Network Scanner Operation
4. If required, adjust the resolution setting. (Refer to page 4-37.)
Exposure
The initial factory setting is "LOWER".
Lower
Resolution
Programmed
File Format
Auto
A4
Original
5. If required, adjust the exposure setting. (Refer to page 4-36.)
The initial factory setting is "AUTO".
Auto
Exposure
Lower
Resolution
Programmed
File Format
Auto
A4
6. If needed, select the file format. (Refer to page 4-38.)
Exposure
The initial factory setting is "PROGRAMMED".
Lower
Resolution
Programmed
File Format
Auto
A4
Original
7. Touch the [SENDER LIST] key.
Directory
-Mail Address
This step is not necessary for Scan to FTP. Go directly to
step 10 (page 4-25).
Sender List
Address Review
Scanner
NOTES:
•
•
Fax
You can omit selection of a sender (go directly to step 10). In this case, the default
sender information stored with the key operator program is automatically
transmitted. (page 4-67)
Up to 20 senders can be stored using the Web page. (page 4-16)
8. Touch a key to select a sender.
der List
ABCD PPD
1 Group
The touched key is highlighted. If you made a mistake,
touch the correct key. The highlighting will move to the
new key.
2 Group
The selected sender will be the sender of the e-mail.
4-24
Xerox WorkCentre C226 User Guide
Basic Transmission Method
9. Touch the [OK] key.
OK
1 Group
10. Touch the [ADDRESS DIRECTORY] key.
The address directory screen appears.
Address
Directory
-Mail Address
Sender List
Address Review
11. Touch the one-touch key for the desired destination.
The key you touched is highlighted. If you touch the
wrong key, touch the key again to cancel the selection.
The key display will return to normal.
Ready To Send.
To
CC
BCC
Test1
Test2
Test3
Test4
Test5
Test6
Frequent Use
ABCD
EFGHI
JKLMN
OPQRS
When transmitting by Scan to E-mail
Make sure that the [TO] key is highlighted and then touch the one-touch key of the
destination. If you wish to perform a broadcast transmission, "CC" or "BCC"
copies, touch the [CC] or [BCC] key and then touch the one-touch keys of the
"CC" or "BCC" recipients.
NOTES:
•
•
•
Refer to pages 4-10 to 4-15 for information on programming one-touch key
destinations.
When touching a one-touch key, corresponding information from the email
destination screen is shown in the message display. Up to 36 characters can be
displayed in the message screen, regardless of the number of characters that
have been entered (up to 50 characters of an e-mail address are displayed).
You can also manually enter the address of a Scan to E-mail destination, or select
multiple destinations for a broadcast transmission. (page 4-27)
Xerox WorkCentre C226 User Guide
4-25
Network Scanner Operation
About pressing the [START] key in the following procedure
If you are scanning a colour original in colour, press the [COLOUR COPY START]
key. If you are scanning a colour or black and white original in black and white,
press the [BLACK COPY START] key.
Using the DADF
12. Press the [COLOUR COPY START] key or the [BLACK COPY START] key.
Scanning begins.
If scanning is completed normally, the machine sounds a
beep and the image is transmitted.
Using the document glass
12. Press the [COLOUR COPY START] key or the [BLACK COPY START] key.
The original is scanned and the [READ-END] key
appears.
13. If you have another page to scan, change pages and then press the [START] key.
Repeat this sequence until all pages have been scanned. You can change the
exposure setting as needed for each page (refer to page 4-36).
If no action is taken for one minute, scanning automatically ends and the image is
transmitted.
The time to transmission can be set using “Scanner mode timeout after last scan”
(page 4-68) in the key operator programs. If the time is set to 0 seconds, the
following step is not necessary.
14. After the final page is scanned, touch the [READ-END] key.
(Pg.No.
3)
The machine sounds a beep and the image is transmitted.
Open the document glass cover and remove the document.
ead-End].
Read-End
4-26
Xerox WorkCentre C226 User Guide
Destination Input Methods
NOTES:
•
Cancelling transmission
To cancel transmission while the [SCANNING ORIGINAL...] appears in the display
or before the [READ-END] key is touched, press the [CLEAR ALL] key. To cancel
a job after scanning is finished and transmission has begun, press the [JOB
STATUS] key and cancel the job as explained on page 4-41.
•
Important points when using Scan to E-mail
Be very careful not to send image data files that are too large. Your mail server's
system administrator may have placed a limit on the amount of data that can be
sent in one e-mail transmission. If this limit is exceeded, the e-mail will not be
delivered to the recipient. Even if there is no limit and your e-mail is successfully
delivered, a large data file may take a long time to be received and place a heavy
burden on the recipient's network, depending on the recipient's network (Internet)
connection environment. If large image data files are repeatedly sent, the resulting
burden on the network may slow down the speed of other, unrelated data
transmissions and in some cases, may even cause the mail server or network to
go down. In cases where you need to send multiple documents, try such
measures as lowering the resolution mode.
•
•
You can use the key operator program, “Maximum size of e-mail attachments”
(page 4-68), to set a limit for the size of image files sent by Scan to E-mail.
If the power is turned off or a power failure occurs while a document is being
scanned in the DADF, the machine will stop and a document misfeed will occur.
After the power is restored, remove the document as explained on page 2-79.
Destination Input Methods
In the section “Basic Transmission Method”, a destination is specified with a one-touch
key (steps 10 to 11). This machine, however, provides the following destination input
methods.
•
•
Manual entry: Enter the e-mail address directly. (only for Scan to E-mail)
Global address search: Search for an e-mail address in an Internet or intranet
directory database.
You can also enter multiple addresses for a broadcast transmission.
Destination address manual entry
1. Perform steps 1 through 9 of “Basic Transmission Method” on page 4-23.
Xerox WorkCentre C226 User Guide
4-27
Network Scanner Operation
2. Touch the [E-MAIL ADDRESS] key.
Add
Dir
E-Mail Address
Sen
Addr
3. Enter the e-mail address.
E-MAIL ADDRESS
CANCEL
OK
[email protected]
ABC
FILE FORMAT
SPACE
AB/ab
abc
12#$%
If you make a mistake, touch the key to move the cursor (n) back to the mistake
and then enter the correct character.
4. Touch the [FILE FORMAT] key.
If you do not need to change the file format, go directly
to step 7.
File Format
NOTE:
The initial file format setting can be changed with the key operator program “Initial file
format setting” (page 4-67).
5. If you wish to scan in colour, touch the [COLOUR] key. If you wish to scan in black
and white, touch the [B/W] key.
The file format settings differ for colour and black and white. Be sure to select a
correct file format for the type of scan you will perform.
4-28
Xerox WorkCentre C226 User Guide
Destination Input Methods
6. Select the file type and the compression mode.
Scanning in colour
E-Mail Address
Cancel
OK
[email protected]
OK
File Format
File Type
Compression Mode
JPEG
PDF
Low
Medium
High
B/W
Colour
The file format is initially set to "File type: PDF, Compression mode: MEDIUM".
Scanning in black and white
Colour
B/W
High(G4)
PDF
Medium(G3)
None
TIFF
File Type
Compression Mode
File Format
OK
[email protected]
Cancel
E-Mail Address
OK
The file format is initially set to "File type: PDF, Compression mode: HIGH (G4)".
7. Touch the outer [OK] key.
Cancel
OK
The destination selection screen will appear.
OK
ression Mode
8. Select where you put the destination.
Select Addressee Type.
To
CC
BCC
Normally touch the [TO] key. However, if you are performing a broadcast
transmission and wish to "CC" or "BCC" the document to the entered e-mail
address, touch the [CC] or [BCC] key.
After touching one of the keys, you will return to the initial screen.
9. If you wish to enter another e-mail address, repeat steps 2 through 8.
If you are not performing a broadcast transmission, go directly to step 11.
Xerox WorkCentre C226 User Guide
4-29
Network Scanner Operation
NOTE:
If you frequently use broadcasting to send documents to the same group of
destinations, it is convenient to program those destinations into a group key. (page 414)
10. Touch the [ADDRESS REVIEW] key and check the destinations.
Address
Directory
-Mail Address
Sender List
When the [ADDRESS REVIEW] key is touched, only the
entered destinations are displayed. If you need to delete
a destination, touch its key.
Touch the [OK] key to return to the initial screen.
Address Review
Scanner
Fax
11. Continue from step 12 of “Basic Transmission Method” (page 4-26).
NOTES:
•
•
To cancel a broadcast transmission when selecting destinations, press the
[CLEAR ALL] key.
When you perform a broadcast transmission, the compression mode set with the
key operator program, “Compression mode at broadcasting” (page 4-67), is used
as the file compression mode for all destinations. The default settings are
"MEDIUM" for colour scanning and "HIGH (G4)" for black and white scanning.
Destination address entry with global address search
1. Touch the [GLOBAL ADDRESS SEARCH] key.
Settings
Global
Address Search
The server change screen is displayed. If only one
LDAP server has been set, the global address search
screen is displayed. Proceed to step 4.
Address Review
T
ABC
UVWXYZ
Group
2. Touch the desired LDAP server key.
Server Change
Document division 1
Cancel
OK
1/2
Document division 2
A1210 project team
Software development centre
To search the highlighted server, proceed to step 3.
4-30
Xerox WorkCentre C226 User Guide
Destination Input Methods
3. Touch the [OK] key.
OK
Cancel
1/2
4. Enter a keyword for search.
Global Address Search
Cancel
Search
q
w
e
r
t
y
u
i
o
p
a
s
d
f
g
h
j
k
l
@
_
z
x
c
v
b
n
m
-
.
ABC
abc
Space
AB/ab
12#$%
ÀÄÂ/àäâ
5. Touch the [SEARCH] key.
Cancel
Search
TO
CC
tanaka
i
o
p
k
l
@
_
BCC
DETAIL
tanaka a
[email protected]
tanaka b
[email protected]
tanaka c
[email protected]
Condition
Settings
Address Review
Search Again
Address Book
The search results appear as destination keys.
If matching addresses are not found, a message indicating the result is displayed.
In this case, touch the [OK] key and touch the [SEARCH AGAIN] key to return to
step 4.
6. Touch the desired destination key.
tanaka
To display the remaining destinations, touch the [
key.
]
tanaka a
tana
tanaka b
tana touch the [DETAIL] key. You can also register the destitana nation to the address book by touching the [REGISTER]
tanaka c
For detailed information on the selected destination,
key.
Xerox WorkCentre C226 User Guide
4-31
Network Scanner Operation
7. Select the destination type.
To
Normally touch the [TO] key. However, if you are performing a broadcast transmission and wish to "CC" or
"BCC" the document to the entered address, touch the
[CC] or [BCC] key.
CC
tanaka
tanaka a
tana
tanaka b
tana
8. If you wish to enter another address, repeat steps 6 and 7.
For Scan to FTP, multiple destinations cannot be specified.
9. Touch the [CONDITION SETTINGS] key.
You will return to the condition setting screen.
Detail
bcd.c
Condition
Settings
Address Review
Search Again
bcd.c
Scanning and Transmitting a Two-sided Original
A two-sided original can be automatically scanned and transmitted using the DADF.
Follow the steps below.
1. Make sure the machine is in scanner mode and then load the document in the
DADF.
2. Touch the [ORIGINAL] key.
Lower
Resolution
When you touch the [ORIGINAL] key, check the original
size displayed in the key.
Programmed
File Format
Auto
A4
Original
3. Touch the [2-SIDED BOOKLET] key or the [2-SIDED TABLET] key as appropriate
for the original you loaded.
If necessary, touch the [MANUAL] key and set the original size. (page 4-34)
Size
OK
Manual
2-Sided
Booklet
4-32
2-Sided
Tablet
Xerox WorkCentre C226 User Guide
Scanning and Transmitting a Two-sided Original
4. Touch the [OK] key.
You will return to the initial screen.
OK
L
ED
A two-sided original icon appears next to the [ORIGINAL] key.
(Example: The icon that appears when the [2-SIDED BOOKLET] key is touched.)
Exposure
Lower
Resolution
Programmed
File Format
Auto
A4
Original
5. Continue from step 4 of “Basic Transmission Method” (page 4-24).
NOTES:
•
Booklets and tablets
Two-sided originals that are bound at the side are booklets, and two-sided
originals that are bound at the top are tablets.
•
Two-sided scanning turns off when transmission is finished. Pressing the [CLEAR
ALL] key will also cancel two-sided scanning.
Xerox WorkCentre C226 User Guide
4-33
Network Scanner Operation
Scanning Settings
When sending an image, you can adjust the original size, exposure, resolution, and
file format settings as needed.
Manually Setting the Scanning Size
If you load an original that is not a standard size (such as an inch size), or if you wish
to change the scanning size, touch the [ORIGINAL] key and set the original size manually.
Perform the following steps after loading the document in the DADF or on the document glass.
NOTE:
Standard sizes that can be detected are as follows:
A3, B4, A4, A4R, B5, B5R, A5. (11"x17", 8-1/2"x14", 8-1/2"x11", 8-1/2"x11"R, 5-1/2"x81/2")
If a non-standard size original is loaded (including special sizes), the closest standard
size may be displayed, or the original size may not appear at all.
1. Touch the [ORIGINAL] key.
Lower
Resolution
Programmed
File Format
Auto
A4
Original
2. Touch the [MANUAL] key.
The sizes that can be selected are displayed.
Original Size
O
uto
Manual
1-Sided
2-Sided
Booklet
[AUTO] is no longer highlighted. [MANUAL] is highlighted.
2-Sid
Table
Rotate The Image 90 Degrees
NOTE:
4-34
If you wish to rotate the original 90° when creating an image file, click the "ROTATE
THE IMAGE 90 DEGREES" checkbox (a checkmark should appear in the box).
Xerox WorkCentre C226 User Guide
Manually Setting the Scanning Size
3. Touch the desired original size key.
The original size key you touched are highlighted.
Original Size
Auto
OK
OK
Manual
A5
A5R
A4
B5
A4R
B5R
B4
AB
A3
Inch
Extra Size
If you wish to select an inch size, touch the [INCH] key and then touch the desired
original size key.
[INCH] is highlighted and inch size keys are displayed.
Original Size
Auto
OK
OK
Manual
51/2 X81/2
51/2 X81/2 R
81/2 X11
81/2 X13
81/2 X14
11X17
Inch
AB
To return to the AB palette, touch the [AB] key once
again.
81/2 X11R
Extra Size
If you wish to select a custom size, touch the [EXTRA SIZE] key and enter the size
of the original.
Original Size
Auto
OK
OK
Manual
X
210
(10 432)
mm
Y
297
(10 297)
mm
Inch
AB
Extra Size
Touch the [X] key and use the
or
keys to set the
length in the X direction, and then touch the [Y] key and
do the same for the Y direction.
The length can be within the range 10 to 432 mm (1/2" to
17") in the X direction and 10 to 297 mm (1/2" to 11-5/8")
in the Y direction, set in increments of 1 mm (1/8").
Depending on the amount of memory installed, it may not be possible to scan
some original sizes (page 4-1).
4. Touch the outer [OK] key.
You will return to the initial screen.
OK
OK
MANUAL
Manual
B5
Touching the inner [OK] key in the step above returns
you to step 2.
B5R
The selected size appears in the top half of the [ORIGINAL] key.
Lower
Resolution
Programmed
File Format
A4
Original
NOTE:
You can return to automatic detection by pressing the [CLEAR ALL] key.
Xerox WorkCentre C226 User Guide
4-35
Network Scanner Operation
Selecting the Exposure
You can adjust the exposure manually to match the type of original. After loading the
original in scanner mode, follow the steps below. The default setting for the exposure
is "AUTO".
Change the exposure
1. Touch the [EXPOSURE] key.
Auto
Exposure
Lower
Resolution
Programmed
File Format
Auto
2. Select [AUTO] or [MANUAL].
OK
Moiré
Reduction
Text/
Prtd.Phot
Auto
Manual
Text/Photo
If you selected [AUTO], the exposure will be adjusted
automatically. (Only for black and white scanning. If
[AUTO] is selected for colour scanning, scanning will
place at exposure level "3" of the manual settings.)
Text
Reduction
Text/
Prtd.Ph
Manual
Text
If you selected [MANUAL], touch the
or
key to
adjust the exposure. (For darker contrast, touch the
key. For lighter contrast, touch the
key.)
Printe
Photo
3. Selecting the original type.
Touch the appropriate key for the type of original to be scanned. The image will be
processed according to the selected type.
When [AUTO] is selected in step 2
OK
Text/
Prtd.Photo
Text
PRINTED
PHOTO
4-36
Text/Photo
If "AUTO" is selected in step 2, you can select the original type from "TEXT/PRTD. PHOTO", "TEXT/PHOTO"
or "TEXT".
PHOTO
MAP
Xerox WorkCentre C226 User Guide
Selecting the Resolution
When [MANUAL] is selected in step 2
OK
Text/
Prtd.Photo
Text/Photo
Text
Photo
Printed
Photo
Map
OK
Moiré
Reduction
Text/
Prtd.Photo
Manual
If "MANUAL" is selected, you can also select from
"PHOTO", "PRINTED PHOTO" or "MAP", in addition to
the selections available for AUTO.
In the event that moiré occurs in the scanned image,
touch the [MOIRÉ REDUCTION] checkbox to select it.
This will help reduce the occurrence of moiré.
Text/Phot
Text
Photo
Printed
Photo
Map
4. Touch the [OK] key.
OK
Text/
Prtd.Photo
Text
Printed
Photo
You will return to the initial screen.
Text/Photo
Photo
Map
Selecting the Resolution
The resolution for scanning an original can be selected. Load the original in scanner
mode and then follow the steps below. The default setting for the resolution is
"LOWER".
Change the resolution
1. Touch the [RESOLUTION] key.
Exposure
Lower
Resolution
Programmed
File Format
Auto
Original
Xerox WorkCentre C226 User Guide
4-37
Network Scanner Operation
2. Touch the desired resolution key.
Auto
Exposure
B/W
Colour
Lowest
150x150dpi
100x100dpi
Lower
200x200dpi
150x150dpi
Standard
300x300dpi
200x200dpi
Higher
400x400dpi
300x300dpi
Highest
600x600dpi
600x600dpi
OK
Resolution
Programmed
File Format
Auto
Original
Five selections are available for the resolution. Touch the desired resolution key
under black and white or colour, depending on the original to be scanned.
The selected key is highlighted.
NOTE:
To use colour 600 x 600 dpi, one 256-MB and one 128-MB memory module (or two
256-MB memory modules) must be added to the printer controller, and one 128-MB or
256-MB memory module must be added for image memory. For more information, see
page 4-1.
3. Touch the [OK] key.
Colour
NOTES:
pi
100x100dpi
pi
150x150dpi
pi
200x200dpi
pi
300x300dpi
•
•
OK
You will return to the initial screen.
The initial factory resolution setting is LOWER. If desired, you can change the
initial setting to a different setting using the key operator program, “Initial
resolution setting” (page 4-66.
The resolution setting cannot be changed once scanning has begun.
Selecting the File Format
When you send an image to one or more recipients using Scan to E-mail or Scan to
FTP, the [FILE FORMAT] key enables you to temporarily override the individual file format settings (FILE TYPE / COMPRESSION MODE) stored for each recipient and
send the image to all of the recipients using a single file format setting.
"PROGRAMMED" is initially selected, which means that the file format settings stored
for each recipient are used.
4-38
Xerox WorkCentre C226 User Guide
Selecting the File Format
1. Touch the [FILE FORMAT] key.
Exposure
Lower
Resolution
Programmed
File Format
Auto
Original
2. Remove the checkmark from the "PROGRAMMED" checkbox.
Programmed
File Type
TIFF
PDF
T
3. Select the file type and the compression mode.
The settings are selected separately for colour scanning and black and white
scanning. Touch the [COLOUR] key or the [B/W] key to select the appropriate
setting screen.
File format settings for colour scanning
Auto
Exposure
OK
Programmed
Lower
Resolution
One Page Per File
File Type
JPEG
PDF
File Format
Compression Mode
Low
Medium
High
Auto
Original
B/W
Colour
File format settings for black and white scanning
Auto
Exposure
OK
Programmed
Lower
Resolution
File Type
PDF
TIFF
File Format
Auto
Original
Xerox WorkCentre C226 User Guide
One Page Per File
Compression Mode
None
Medium(G3)
High(G4)
B/W
Colour
4-39
Network Scanner Operation
NOTES:
•
•
When the "ONE PAGE PER FILE" checkbox is not selected, all scanned pages
are combined into a single file. When the checkbox is selected, one file is created
per page.
If the file format is set to "JPEG" in the file format settings for colour scanning, a
checkmark automatically appears in the "ONE PAGE PER FILE" checkbox and
one file is created for each page.
4. Touch the [OK] key.
OK
You will return to the initial screen.
One Page Per File
Compression Mode
Low
Medium
High
NOTES:
•
•
4-40
The initial file format setting can be changed with the key operator program “Initial
file format setting” (page 4-67).
Even if you change the settings in the FILE FORMAT setting screen, you can
return to the settings stored for each recipient by selecting "PROGRAMMED"
once again.
Xerox WorkCentre C226 User Guide
Selecting the File Format
Cancelling an E-Mail/FTP Transmission
You can cancel a transmission job that is in progress. Cancellation is done from the
scanner job status screen.
1. Press the [JOB STATUS] key.
/
2. Touch the [SCANNER JOB] key.
Scanner-Job
3. Touch the [STOP/DELETE] key.
A message appears to confirm the cancellation. Touch
the [YES] key to delete the selected job key and cancel
the transmission.
PRIORITY
Stop/Delete
NOTE:
If you do not wish to cancel the transmission, touch the [NO] key.
Xerox WorkCentre C226 User Guide
4-41
Network Scanner Operation
Storing, Editing, and Deleting from the
Touch Panel
One-touch and group keys for Scan to E-mail, group indexes, and senders can also be
stored, edited and deleted from the touch panel of the machine.
Storing One-Touch Keys (Only Addresses for Scan to E-mail)
The touch panel of the machine can also be used to store destinations for Scan to Email. (Scan to FTP destinations must be stored using the Web page (page 4-12).)
1. Press the [CUSTOM SETTINGS] key.
/
2. Touch the [ADDRESS CONTROL] key.
Address
Control
Key Operator Pro
3. Touch the [DIRECT ADDRESS] key.
Direct Address
Custom Index
E-Mail Sender
4-42
Xerox WorkCentre C226 User Guide
Storing One-Touch Keys (Only Addresses for Scan to E-mail)
4. Touch the [INDIVIDUAL] key.
Direct Address
Store
Individual
Group
5. Touch the [NAME] key.
The "No." that automatically appears is the lowest number from 001 to 500 that has not yet been programmed.
When [NAME] is touched, the letter-entry screen
appears. Enter up to 36 characters for the name.
Direct Address / Individual
No.001
Name
Index
Add
Key Name
6. Touch the [INITIAL] key.
Next
Exit
Initial
7. Touch a letter key.
The first letter (initial) of the name entered in step 5 is initially selected and is highlighted. If you wish to change
the letter, touch a different letter key.
Direct Address / Individual
No.001
Initial
NOTE:
The initial you enter here determines the position of the one-touch key in the ABC
index. For information on the ABC index, refer to page 4-22.
8. Touch the [OK] key.
Next
Exit
OK
Others
Xerox WorkCentre C226 User Guide
4-43
Network Scanner Operation
9. Touch the [INDEX] key.
Direct Address / Individual
Name
ABCD CORPORATION
Addre
Index
Key Name
10. Touch an index key.
Next
Direct Address / Individual
Exit
OK
Index
Select The Custom Index Where You Register This Address.
User 1
User 2
User 3
User 4
User 5
User 6
Do You Register This Address At The [Frequent Use], Too?
Yes
No
Select one of the upper row of keys ([USER 1] through [USER 6]) to determine the
location of the one-touch key when the GROUP index is displayed instead of the
ABC index (refer to page 4-22).
The lower keys are for selecting whether to include the one-touch key in the
[FREQUENT USE] index.
If you touch the wrong key, simply touch the correct key.
11. Touch the [OK] key.
12. Touch the [ADDRESS] key.
The E-mail address entry screen appears.
P Corporation
Address
13. Enter the e-mail address of the destination.
E-Mail Address
Cancel
OK
[email protected]
ABC
Space
AB/ab
abc
12#$%
Up to 64 characters can be entered.
If you make a mistake, touch the
then enter the correct character.
4-44
key to move the cursor back one space and
Xerox WorkCentre C226 User Guide
Storing One-Touch Keys (Only Addresses for Scan to E-mail)
14. Touch the [OK] key.
You will return to the one-touch key programming screen.
REGISTRATION IS COMPLETED will appear highlighted to the right of "No.".
NOTE:
The "ADDRESS" line only shows 32 digits, regardless of how many digits were
actually programmed.
15. Check the key name.
The characters appearing next to the [KEY NAME] key will be displayed in the key.
Only the first 18 characters of the name entered in step 5 will be displayed.
If you need to change the name that will be displayed in the key, touch the [KEY
NAME] key.
Direct Address / Individual
No.001 Registration Is Completed.
Name
Index
Key Name
File Format
If you do not wish to change the name, this step is not
necessary.
ABCD CORPORATION
USER 3
Address
ABCD CORPORATION
B/W
PDF /Hig
16. Check the file format and the compression mode.
No.001 Registration Is Completed.
Name
Index
Key Name
File Format
ABCD CORPORATION
USER 3
Addre
ABCD CORPORATION
B/W
If you need to change these settings, touch the [FILE
FORMAT] key.
If you do not need to change the settings, this step is not
necessary.
PDF /HI
Settings for colour scanning
File type: PDF*/JPEG
Compression mode: LOW/MEDIUM*/HIGH
Settings for black and white scanning
File type: PDF*/TIFF
Compression mode: NONE/MEDIUM (G3)/HIGH (G4)*
The default setting is indicated by an asterisk (*).
When you have completed the settings, touch the [OK] key.
Xerox WorkCentre C226 User Guide
4-45
Network Scanner Operation
17. When you have finished programming the one-touch key, touch the [EXIT] key.
If you wish to program another one-touch key, touch the [NEXT] key.
Exit
Next
Initial
Touching the [EXIT] key returns you to the screen of
step 4 on page 4-43.
A
[email protected]
s
R(G4)
COLOUR
Editing and Deleting One-Touch Keys
If you wish to delete a one-touch key or change the E-mail address, name, or other
information programmed in a one-touch key, perform the following procedure.
1. Press the [CUSTOM SETTINGS] key, touch the [ADDRESS CONTROL] key, and
then touch the [DIRECT ADDRESS] key (refer to steps 1 to 3 on page 4-42).
2. Touch the [AMEND/DELETE] key.
Amend/Delete
3. Touch the one-touch key you wish to edit or delete.
Exit
Direct Address / Amend/Delete
Select Address To Amend/Delete.
ABCD CORPORATION
TPS
ABCD GROUP
Frequent Use
•
•
•
4-46
ABCD
EFGHI
JKLMN
OPQRST
UVWXYZ
ABC
Group
To edit a one-touch key, follow steps 4 and 5.
To delete a one-touch key, follow steps 6 and 7.
When you have finished editing or deleting, touch the [EXIT] key.
Xerox WorkCentre C226 User Guide
Editing and Deleting One-Touch Keys
4. Touch the key corresponding to the information you wish to change (change the
information in the same way as you stored the information on pages 4-42 to 4-46).
Delete
Direct Address / Amend/Delete
Exit
No.001
Name
Index
Key Name
File Format
ABCD CORPORATION
USER 3
Initial
Address
A
[email protected]
ABCD CORPORATION
B/W
: PDF / High(G4)
Colour : PDF / Medium
5. Make sure that your changes are correct, and then touch the [EXIT] key.
If you wish to change another one-touch key, repeat
steps 3 through 5.
Exit
Delete
Initial
A
.com
The following steps are for deleting a one-touch key
6. Touch the [DELETE] key.
Exit
Delete
Initial
A
.com
7. Touch the [YES] key.
If you wish to delete another one-touch key, repeat steps
3, 6, and 7.
Delete The Address?
ABCD CORPORATION
No
B/W
: PDF / High (G4)
Xerox WorkCentre C226 User Guide
Yes
·Colour
:
4-47
Network Scanner Operation
NOTES:
•
If you cannot edit or delete a one-touch key
If you attempt to edit or delete a one-touch key in the following situation, a warning
message will appear and editing/deletion will not be possible. In this event, delete
the one-touch key from the group or cancel or change the hyperlink e-mail
selection.
The one-touch key is included in a group key.
The one-touch key is included as a hyperlink e-mail destination for Scan to FTP.
•
Destinations for Scan to FTP that are stored in one-touch keys cannot be edited or
deleted from the touch panel of the machine. Use the Web page to edit or delete
these destinations. (page 4-15)
Programming a Group Key
Scan to E-mail destinations that have been stored in one-touch keys can be stored in
group keys. Up to 300 destinations can be stored in a group key.
To program a group key from the Web page, refer to page 4-14.
NOTE:
Only one-touch key destinations can be stored in a group key. If you wish to store a
destination that is not programmed in a one-touch key, first program the E-mail
destination in a one-touch key (refer to pages 4-42 to 4-46) and then store it in the
group key.
1. Press the [CUSTOM SETTINGS] key, touch the [ADDRESS CONTROL] key, and
then touch the [DIRECT ADDRESS] key (refer to steps 1 to 3 on page 4-42).
2. Touch the [GROUP] key.
Direct Address
Store
Individual
Group
3. Follow steps 5* through 11 of "Storing one-touch keys" (pages page 4-43 to 4-44)
to enter a GROUP NAME, INITIAL, and INDEX.
* In step 5, touch the [GROUP NAME] key instead of the [NAME] key.
4. Touch the [ADDRESS] key.
ame
ABCD Group
x
Group2
Address
me
4-48
Xerox WorkCentre C226 User Guide
Programming a Group Key
5. Touch the index and keys as required, and then touch the one-touch keys of the
destinations that you wish to store in the group.
Direct Address / Group
OK
Select Address.
A
B
C Group
ABCD CORPORATION
TPS
Address Review
Frequent Use
ABCD
EFGHI
JKLMN
OPQRST
UVWXYZ
Group
ABC
One-touch keys that have been touched are highlighted.
If you touch the wrong key, simply touch it again to cancel the highlighting and
remove the destination from the group.
NOTE:
One group key cannot be stored in another group key. Group keys appear greyed out
and cannot be selected.
6. To check the destinations that you have stored in the group, touch the [ADDRESS
REVIEW] key.
OK
A list of your selected destinations is displayed.
You can delete a displayed destination by touching it.
When a message appears asking if you want to delete
the destination, touch the [YES] key.
on
Address Review
OPQRST
UVWXYZ
ABC
Group
7. Touch the outer [OK] key.
Direct Address / Group
Select Address To Delete.
OK
Group Name : ABCD Group
ABCD CORPORATION
OK
TPS
The number of destinations in the group appears to the right of the [ADDRESS]
key.
8. Check the name of the key (refer to step 15 on page 4-45).
The characters appearing next to the [KEY NAME] key will be displayed in the
group key. To change these characters, touch the [KEY NAME] key. This step is
not necessary if you do not wish to change the characters.
9. Touch the [EXIT] key when you have finished programming the group key.
If you wish to program another group key, touch the [NEXT] key.
When you touch the [EXIT] key, you will return to the screen of step 2.
Xerox WorkCentre C226 User Guide
4-49
Network Scanner Operation
Editing and Deleting Group Keys
If you need to delete group key or change its name or one of its stored destinations,
perform the following procedure.
1. Press the [CUSTOM SETTINGS] key, touch the [ADDRESS CONTROL] key, and
then touch the [DIRECT ADDRESS] key (refer to steps 1 to 3 on page 4-42).
2. Touch the [AMEND/DELETE] key.
Amend/Delete
3. Touch the group key you wish to edit or delete.
Exit
Direct Address / Amend/Delete
Select Address To Amend/Delete.
ABCD CORPORATION
TPS
ABCD GROUP
Frequent Use
•
•
•
ABCD
EFGHI
JKLMN
OPQRST
UVWXYZ
ABC
Group
To edit a group key, follow steps 4 and 5.
To delete a group key, follow steps 6 and 7.
When you have finished editing or deleting, touch the [EXIT] key.
4. Touch the key of the item you wish to change (to edit the item, follow the same
steps as for one-touch keys on page 4-42).
Direct Address / Amend/Delete
Delete
Exit
002
Group Name
Index
Key Name
4-50
ABCD Group
Group2
Initial
Address
A
2 Addresses
ABCD Group
Xerox WorkCentre C226 User Guide
Editing and Deleting Group Keys
To edit a destination stored in a group key, touch the [ADDRESS] key. The
following screen appears.
Direct Address / Group
OK
Select Address.
A
B
C Group
ABCD CORPORATION
TPS
Address Review
Frequent Use
ABCD
EFGHI
JKLMN
OPQRST
UVWXYZ
ABC
Group
The one-touch keys stored in the group are highlighted. To add another one-touch
key to the group, touch the key to highlight it.
To delete a one-touch key from the group, touch the key so that it is no longer
highlighted.
5. Make sure the edited information is correct, and then touch the [EXIT] key.
Delete
Exit
Initial
If you wish to change another group key, repeat steps 3
through 5.
A
The following steps are for deleting a group key
6. Touch the [DELETE] key.
Delete
Exit
Initial
A
7. Touch the [YES] key.
If you wish to delete another group key, repeat steps 3,
6, and 7.
Delete The Address?
ABCD Group
No
Xerox WorkCentre C226 User Guide
Yes
4-51
Network Scanner Operation
NOTE:
If you cannot edit or delete a group key
If you attempt to edit or delete a group key in the following situation, a warning
message will appear and editing/deletion will not be possible.
The one-touch key you wish to change or delete is currently being used for
transmission.
If the key is being used for a current transmission, cancel the transmission or wait until
it is completed and then edit or delete the key.
Storing Sender Information
Use this procedure to store the sender information (sender name and e-mail address)
that is displayed when the recipient receives your e-mail. Information for up to 20 different senders can be stored. Select a sender from the stored senders using the touch
panel of the machine when you send an image (page 4-23). The selected sender
appears in the sender column of the recipient's e-mail software program.
If you prefer to store sender information from the Web page, refer to page 4-16.
1. Press the [CUSTOM SETTINGS] key, and then touch the [ADDRESS CONTROL]
key (refer to steps 1 and 2 on page 4-42).
2. Touch the [E-MAIL SENDER] key.
Direct Address
Custom Index
E-Mail Sender
3. Touch the [STORE] key.
l Sender
Store
4. Touch the [SENDER NAME] key.
Sender Name
The "No." that automatically appears is the lowest number from 01 to 20 that has not yet been programmed.
When [SENDER NAME] is touched, the letter-entry
screen appears. Enter up to 20 characters for the name.
RE.Address
4-52
Xerox WorkCentre C226 User Guide
Editing and Deleting Sender Information
5. Touch the [RE.ADDRESS] key.
The display changes to the address entry screen when
Sender Name
1 Group you touch the [RE.ADDRESS] key. Up to 64 characters
ÄÞ·-ÒÝÄ‘
can be entered for the sender's e-mail address. When
finished, touch the [OK] key to return to the original
screen.
RE.Address
6. If you have finished storing senders, touch the [EXIT] key. If you wish to store
another sender, touch the [NEXT] key.
Editing and Deleting Sender Information
Use this procedure when you need to edit sender information or delete a sender.
1. Perform steps 1 and 2 of “Storing Sender Information”.
2. Touch the [AMEND/DELETE] key.
O
The stored senders appear.
Amend/Delete
3. Touch the one-touch key of the sender that you wish to edit or delete.
List
The edition/deletion screen of the touched sender
appears.
1 Group
2 Group
Xerox WorkCentre C226 User Guide
4-53
Network Scanner Operation
4. Edit or delete the sender.
E-Mail Sender
Delete
Sender Name
1 Group
ÄÞ·-ÒÝÄ‘æ1
RE.Address
[email protected]
Exit
Edit sender information in the same way that you stored it. When finished, touch
the [EXIT] key to return to the screen of step 3.
To delete the sender, touch the [DELETE] key. A message appears asking you to
confirm your selection. Touch the [YES] key to delete the sender and return to the
screen of step 3.
Storing a Group Index
You can assign any name up to 6 characters long to each of the USER indexes
([USER 1] to [USER 6]).
To perform this procedure from the Web page, refer to page 4-17.
1. Press the [CUSTOM SETTINGS] key, and then touch the [ADDRESS CONTROL]
key (refer to steps 1 and 2 on page 4-42).
2. Touch the [CUSTOM INDEX] key.
Direct Address
Custom Index
E-Mail Sender
3. Touch an index key ([USER 1] to [USER 6]).
You can enter a name for the selected index.
Custom Settings
Custom Index
OK
Select The Key To Be Custom Named.
User 1
User 2
User 3
User 4
User 5
User 6
When touched, the letter entry screen appears.
4-54
Xerox WorkCentre C226 User Guide
Printing Programmed Information
4. Enter a maximum of 6 characters for the index name.
Use the
key to clear the displayed name and then enter the desired name.
When finished, touch the [OK] key. The new name appears in the screen of step 3.
5. If you wish to program another index name, repeat steps 3 and 4.
When finished, touch the [OK] key.
Printing Programmed Information
You can print out lists of the one-touch keys and group keys that have been stored in
the machine.
1. Press the [CUSTOM SETTINGS] key.
/
2. Touch the [LIST PRINT] key.
y
st
List Print
s
l
Receive Mode
3. Touch the [SENDING ADDRESS LIST (SCANNER)] key.
Printer Test Page
Sending Address List (Fax)
Sending Address List (Scanner)
Xerox WorkCentre C226 User Guide
4-55
Network Scanner Operation
4. Touch the key of the list you wish to print.
[PROCESSING PRINT DATA] appears in the message
display and printing begins.
Individual
List
NOTE:
4-56
Group List
To cancel printing, touch the [CANCEL] key.
If you attempt to print a list when no data exists, a warning message will appear.
Xerox WorkCentre C226 User Guide
Printing Programmed Information
Troubleshooting
If a problem or question arises, try to solve the situation using the following information
before contacting your authorised Xerox dealer.
The image cannot be scanned.
Cause:
The original is loaded upside down.
Solution:
If you are using the document glass, the original must be placed face down. If you are using the
DADF, the original must be inserted face up.
A moiré (stripe pattern) appears on the scanned image.
Cause:
A slight amount of moiré sometimes appears when printed originals are scanned.
Solution:
The screen that appears when the [EXPOSURE] key is touched includes a [MOIRÉ REDUCTION] checkbox. Selecting this checkbox can reduce the occurrence of moiré. (page 4-36) If you
are using the document glass, also try shifting the position and/or angle of the original on the
document glass.
The scanned image is fuzzy or has smudges.
Cause:
The document glass or the underside of the document cover is dirty.
Solution:
To clean the document glass and the underside of the document cover, see page 2-81.
The scanned image is clipped.
Cause:
The set original scanning size is smaller than the actual original size.
Solution:
Set the actual original size. (page 4-34)
If you have intentionally set a smaller size than the actual original size, place the original taking
into account the guides for the set original size. For example, when scanning an A4 (8-1/2" x 11")
original using a B5 (5-1/2" x 8-1/2") setting, align the original using the scale at the left edge to fit
the area you wish to scan into the B5 (5-1/2" x 8-1/2") scanning area.
The scanned image is upside down or on its side.
Cause:
The original was not placed in the correct orientation.
Solution:
Place the original in the correct orientation. (Refer to page 2-7.)
You wish to rotate the scanned image 90°.
Cause:
The orientation of the placed document cannot be changed.
Solution:
Use the "ROTATE THE IMAGE 90 DEGREES" checkbox. (page 4-34)
The scanned image range is on the opposite side of the selected image range.
Cause:
The original was placed with the left and right sides reversed.
Xerox WorkCentre C226 User Guide
4-57
Network Scanner Operation
Solution:
Place the original in the correct orientation. (Refer to page 2-4.)
The received image data cannot be opened.
Cause:
The viewer program used by the recipient does not support the format of the received image
data.
Solution:
Try selecting a different file type (TIFF, JPEG, or PDF) and/or a different compression format
(NONE, MEDIUM (G3), or HIGH (G4)) when sending the image data. (Refer to page 4-38.)
The recipient does not receive transmitted data.
Cause:
An incorrect destination was selected.
Otherwise, there is a mistake in the information stored for the destination (e-mail address or FTP
server information).
Solution:
Select the correct destination and make sure the correct information is stored for the destination.
(Refer to page 4-10.)
If delivery by e-mail (Scan to E-mail) is unsuccessful, an error message such as "Undelivered
Message" may be sent to the designated administrator's e-mail address. This information may
help you determine the cause of the problem.
The recipient does not receive data sent by e-mail (Scan to E-mail).
Cause:
A limit has been set in the "Maximum size of e-mail attachments" of the key operator program for
the maximum size of an image file that can be sent using Scan to E-mail (the initial setting is 2
MB).
Solution:
The limit can be set from 1 MB to 10 MB in the key operator program. Consult your key operator
and select a suitable limit.
Cause:
The amount of data that can be sent in one e-mail transmission is sometimes limited by the
administrator of the mail server. Even if the amount of data sent is within the limit setting
explained above, if it exceeds the limit set by the administrator of the mail server, the data will not
be delivered to the recipient.
Solution:
Decrease the amount of data sent in the e-mail transmission (reduce the number of pages
scanned). (Ask your mail server administrator what the data limit is for one e-mail transmission.)
(Refer to page 4-62.)
Transmission takes a long time.
Cause:
4-58
When there is a large amount of image information, the data file is also large and transmission
takes a long time.
Xerox WorkCentre C226 User Guide
If Your E-Mail Is Returned
Solution:
In order to select resolution and data compression settings that are suited to the purpose of
transmission and create image data that is well-balanced in terms of resolution and file size, pay
attention to the following points:
Resolution ("STANDARD", "HIGHER", "HIGHEST")
The default setting is "LOWER". If the original does not contain photographs, illustrations, or
other halftone images, "STANDARD" mode will give you a more workable scanned image.
"HIGHER" or "HIGHEST" should only be selected when the original includes a photograph and
you want to give priority to the quality of the photograph. Note that scanning in "HIGHER" or
"HIGHEST" mode will produce a larger file size than the other modes.
If Your E-Mail Is Returned
If a Scan to E-mail is not successfully transmitted, an e-mail informing you of this fact
is sent to the sender selected at the time of transmission. If this happens, read the email and determine the cause of the error, and then repeat the transmission.
If a Transmission Error Occurs
If a transmission error occurs when you send a scanned image, a message informing
you of the error and an error code will appear in the touch panel on the machine.
Error Code Table
Error Code
Description of the Error
CE-01
The optional network interface card (Print Server Card) is not installed or is out of order.
CE-02
Cannot find the specified mail server or FTP server.
CE-03
The server was unavailable during the scanning of the original.
CE-04
An invalid account name or password for the FTP server has been entered.
CE-05
An invalid directory of the FTP server has been entered.
CE-06
Cannot find the specified mail server (POP3 server).
CE-07
The account name or password for the POP3 server is invalid.
CE-00
An error other than the above has occurred.
Xerox WorkCentre C226 User Guide
4-59
Network Scanner Operation
Checking the IP Address
There are three ways to check the IP address:
1. Using [LIST PRINT] in [CUSTOM SETTINGS] in the operation panel
Select NIC PAGE to print a list of the machine settings. The IP address that has
been set for the machine can be found in this list. Follow the procedure below to
check the IP address using NIC PAGE.
2. Using the key operator programs
The IP address can be verified using the key operator programs. To use this
procedure, consult your key operator. (The key operator programs cannot be used
when DHCP is being used.)
3. How to use the "NIC Manager" utility on the "Software" CD-ROM
"NIC Manager" on the "Software" CD-ROM can be used to configure and check
the IP address.
For detailed instructions, see the online manual (Print Server Card Users Manual)
on the "Software" CD-ROM. To view the online manual (Print Server Card Users
Manual), specify the following path (substitute the letter of your CD-ROM drive for
"R"):
R:/Tool/Manual/English
Checking the IP address from the [CUSTOM SETTINGS] screen of the operation
panel
1. Press the [CUSTOM SETTINGS] key.
/
The custom setting menu screen will appear.
2. Touch the [LIST PRINT] key.
4-60
play
rast
List Print
C
ess
rol
Receive Mode
Fax
Fo
Xerox WorkCentre C226 User Guide
Checking the IP Address
3. Touch the [PRINTER TEST PAGE] key.
Printer Test Page
Sending Address List(Fax)
Sending Address List(Scanner)
4. Touch the [NIC PAGE] key.
Printer
Settings List
PCL
PROCESSING PRINT DATA appears in the message
screen and printing begins. To cancel printing, touch the
[CANCEL] key.
NIC Page
Xerox WorkCentre C226 User Guide
4-61
Network Scanner Operation
Important Points When Using Scan to E-Mail
Be very careful not to send image data files that are too large.
Your mail server's system administrator may have placed a limit on the amount of data
that can be sent in one e-mail transmission. If this limit is exceeded, the e-mail will not
be delivered to the recipient. Even if there is no limit and your e-mail is successfully
delivered, a large data file may take a long time to be received and place a heavy burden on the recipient's network, depending on the recipient's network (Internet) connection environment.
If large image data files are repeatedly sent, the resulting burden on the network may
slow down the speed of other, unrelated data transmissions and in some cases, may
even cause the mail server or network to go down.
The example images below will produce the following file sizes when scanned as A4
(8-1/2" x 11") size originals:
Resolution
File size of text original A
when scanned
File size of photo original B when scanned
Black and white scanning
Colour scanning
[LOWER]
Approx. 26 KB
(TIFF HIGH (G4) format)
Approx. 300 KB
(TIFF HIGH (G4) format)
Approx. 1200 KB
(JPEG MEDIUM compression)
[HIGHER]
Approx. 43 KB
(TIFF HIGH (G4) format)
Approx. 700 KB
(TIFF HIGH (G4) format)
Approx. 3500 KB
(JPEG MEDIUM compression)
If multiple images are scanned, the file size will be approximately (Size of each
image as indicated above) x (Number of images scanned).
Although the actual limitation depends on your network environment, a general guideline for the maximum file size for Scan to E-mail is 2000 KB. In cases where you need
to send multiple documents, try such measures as lowering the resolution mode.
4-62
Xerox WorkCentre C226 User Guide
Key Operator Program List
Key Operator Programs
This section explains the key operator programs that are related to the network scanner feature of the machine. For key operator programs that are related to the printer
and copy functions of the machine, refer to the Chapter 3, “Printer Operation”, and
WorkCentre C226 System Administration Guide.
Key Operator Program List
Program name
Page
Network scanner settings
Default display settings
The number of direct address
keys displayed setting
Initial resolution setting
Scan complete sound setting
Default sender set
Compression mode at broadcasting
Initial file format setting
Maximum size of e-mail attachments
Scanner mode timeout after last scan
Default exposure settings
Disable of address direct entry
Xerox WorkCentre C226 User Guide
4-63
Network Scanner Operation
Using the Key Operator Programs
Follow the steps below to use the key operator programs.
1. Press the [CUSTOM SETTINGS] key.
/
2. Touch the [KEY OPERATOR PROGRAMS] key.
Address
Control
ADDRESS
Receive
Mode
CONTROL
Key Operator Programs
3. Use the numeric keys to enter the five-digit key operator code number.
Each time a number is entered, the dashes (-) in the display will change to asterisks ( ).
Key Operator Code
4. Touch the [N/W SCANNER SETTINGS] key, depending on the program you wish
to use.
Energy Save
Operation
Settings
Printer
Settings
N/W Scanner
Settings
Key Operator
Code Change
Product Key
5. Make desired settings for the selected program.
Detailed descriptions for program settings start on page 4-65.
4-64
Xerox WorkCentre C226 User Guide
Setting Programs
6. Touch the [OK] key to return to the screen of step 4.
If you wish to use another program, touch the key for
that program in the screen of step 4.
OK
7. Press the [CLEAR ALL] key to exit the program.
Setting Programs
The setting programs for the network scanner feature of the machine are explained
here.
Network scanner settings
The following programs are available:
•
•
•
•
•
•
•
•
•
•
•
Default display settings
The number of direct address keys displayed setting
Initial resolution setting
Scan complete sound setting
Default sender set
Compression mode at broadcasting
Initial file format setting
Maximum size of e-mail attachments
Scanner mode timeout after last scan
Default exposure settings
Disable of address direct entry
Xerox WorkCentre C226 User Guide
4-65
Network Scanner Operation
Default display settings
You can select the initial display that appears when you press the [IMAGE SEND] key
to change to scanner mode or when you press the [CLEAR ALL] key in scanner mode.
Normally the initial display is set to the Condition setting screen (page 4-19).
The following three selections are available:
•
•
•
Condition setting screen
Address directory (ABC)
Address directory (Group)
When an address directory (ABC or Group) is selected, the selected index of that
address directory (page 4-22) is set as the initial screen.
When [SWITCH AUTOMATICALLY TO COPY MODE SCREEN] is selected, the display will automatically switch to the copy mode screen if no action is taken in the scan/
fax mode screen for 20 seconds.
The number of direct address keys displayed setting
The number of one-touch keys displayed in each address directory screen can be
changed from 6 (the normal setting) to 4 or 9.
Touch [4], [6], or [9] to select the desired number.
NOTE:
For the key name that appears in each one-touch key, a maximum of 18 characters
can appear when the number of one-touch keys displayed is set to 4 or 6. A maximum
of 10 characters can appear when the number of one-touch keys displayed is set to 9.
Initial resolution setting
This is used to change the default resolution setting for transmission in network scanner mode. The default resolution is initially set to "LOWER". To change the setting,
touch the desired resolution key.
•
[LOWEST]
(B/W: 150 x 150dpi, Colour: 100 x 100dpi)
•
[LOWER]
(B/W: 200 x 200dpi, Colour: 150 x 150dpi)
•
[STANDARD]
(B/W: 300 x 300dpi, Colour: 200 x 200dpi)
•
[HIGHER]
(B/W: 400 x 400dpi, Colour: 300 x 300dpi)
•
[HIGHEST]
(B/W: 600 x 600dpi, Colour: 600 x 600dpi)
4-66
Xerox WorkCentre C226 User Guide
Setting Programs
Scan complete sound setting
This program is used to set the volume of the beep sound that informs you that the
original has been scanned. Two volume levels are available, or the beep can be
turned off.
Default sender set
If you do not select a sender when performing a Scan to E-mail operation, the sender
information stored with this setting is automatically used. You can check the stored
sender information by printing the SENDER list.
1. Touch the [SENDER NAME] key and then enter the sender name.
The sender name entry screen appears
Up to 20 characters can be entered.
2. Touch the [OK] key.
3. Touch the [RE.ADDRESS] key and then enter the return address.
Up to 64 characters can be entered.
4. Touch the [OK] key.
The entered return address appears. Check the address to make sure it is correct.
Compression mode at broadcasting
This setting selects the compression mode for broadcasting using Scan to E-mail. The
compression mode set here is used for all destinations regardless of their individual
compression mode settings.
The initial settings are as follows:
•
•
Black and white scanning: HIGH (G4)
Colour scanning: MEDIUM
Initial file format setting
These programs are used to set the file format of the transmitted image and the number of images per file.
•
The file type and compression mode is set in "FILE FORMAT (FILE TYPE / COMPRESSION MODE)". The setting takes effect in the following situations:
• A file format is not selected when sending a image.
• A file format setting was not included when the destination was stored.
• If the file format is set when sending an image or storing a destination, the settings apply to the default file format settings.
Xerox WorkCentre C226 User Guide
4-67
Network Scanner Operation
•
•
The "ONE PAGE PER FILE (YES/NO)" setting is used to select how files are created when multiple pages are scanned. Select "YES" to have an individual file created for each scanned page (so that multiple files are created). Select "NO" to
have all scanned pages combined into a single file.
The initial settings for the above programs are as follows
• Black and white scanning
File type: PDF
Compression mode: HIGH (G4)
One page per file: No
•
Colour scanning
File type: PDF
Compression mode: MEDIUM
One page per file: No
Maximum size of e-mail attachments
To prevent the size of image files transmitted by Scan to E-mail from becoming too
large, you can set a size limit.
If the total size of the image files created by scanning the original exceeds the limit, the
image files are discarded. The limit can be set from 1 MB to 10 MB in increments of 1
MB. The initial setting is 2 MB. The limit cannot be disabled.
Scanner mode timeout after last scan
If no action is taken after scanning an original from the document glass, transmission
of the original will begin automatically after the time set with this program. The time
can be set from 0 to 60 seconds in increments of 10 seconds. When "0" is selected,
transmission begins immediately after scanning from the document glass ends. The
default setting is 60 seconds. This setting cannot be disabled.
Default exposure settings
This program is used to configure the default exposure settings.
The default settings are initially configured as follows:
•
•
•
Exposure: AUTO
Original type: TEXT
MOIRÉ REDUCTION: Not selected
To change the "MOIRÉ REDUCTION" setting, touch the checkbox.
When the exposure is set to "AUTO", the original type can be set to [TEXT/PRTD.
PHOTO], [TEXT/PHOTO], or [TEXT].
4-68
Xerox WorkCentre C226 User Guide
Setting Programs
When the exposure is set to "MANUAL", the exposure can be adjusted to one of nine
levels from "1" to "5". "1" is light and "5" is dark. [TEXT/PRTD. PHOTO], [TEXT/
PHOTO], [TEXT], [PHOTO], [PRINTED PHOTO] or [MAP] can be selected for the
original type.
Disable of address direct entry
This program is used to disable direct entry of e-mail addresses when performing email transmission. To disable direct entry of e-mail addresses, touch the checkbox so
that a checkmark appears. When direct entry of e-mail addresses is disabled, only
stored e-mail addresses can be used as destinations. This allows e-mail destinations
to be restricted and prevents accidental transmission to the wrong address due to
incorrect entry of an address. The following operations are also disabled:
•
•
NOTE:
Storing, editing, and deleting one-touch keys at the operation panel.
Storing, editing, and deleting groups at the operation panel.
To prohibit direct entry of destinations in the Web page, select the "Enable Password
Protection of this Web Site" checkbox in the screen that appears when "Passwords" is
selected in the menu frame. Enter the administrator password in the "Old Admin
Password" text box and click the "Submit" button.
Xerox WorkCentre C226 User Guide
4-69
Network Scanner Operation
Specifications
Type
Colour scanner
Two-sided originals
Possible
Optical resolution
600dpi
Output resolution
Colour: 100 x 100, 150 x 150, 200 x 200, 300 x 300, 600 x 600dpi
Black and white: 150 x 150, 200 x 200, 300 x 300, 400 x 400, 600 x 600dpi
Output modes
1bit/pixel (Black and white)
24bit/pixel (Colour: 8 bits per colour)
Halftone processing
Error dispersion (Black and white 150/200/300/400/600dpi)
File format
Colour scanning
File type: PDF/JPEG
Compression mode: LOW/MEDIUM/HIGH
Black and white
File type: PDF/TIFF
scanning
Compression mode: NONE/MEDIUM (G3)/HIGH (G4)
File creation method*1
One page per file/One file for all pages
Scan destinations
Scan to FTP
Scan to E-mail
Supported client PC
operating systems
Windows 95/Windows 98/Windows Me/Windows NT Workstation 4.0 (Service Pack 6 or later)/Windows 2000 Professional/Windows XP Home Edition/Windows XP Professional/Windows Server 2003
Management system
Uses built-in Web server
Web browser
Internet Explorer 5.5 or later (Windows)/5.1 or later (Macintosh), Netscape
Navigator 6.0 or later
Network protocol
TCP/IP, UDP/IP
LAN connectivity
10Base-T/100Base-TX
Supported mail system
Mail servers supporting SMTP
Number of destinations
500 maximum*2
Number of senders
20 maximum
4-70
Xerox WorkCentre C226 User Guide
Scanning margins
Scanning margins
When scanning an original, the area indicated in the following diagram cannot be
scanned.
Approx. 3mm (1/8")
Approx. 3mm (1/8")
Approx. 3mm (1/8")
Scanning
margins
Area that can
be scanned
Scan size
setting
Approx. 3mm (1/8")
Scan size
setting
Xerox WorkCentre C226 User Guide
4-71
Network Scanner Operation
4-72
Xerox WorkCentre C226 User Guide
5
Fax Unit
This section explains the fax functions of the product. For safety precautions and general information on using the machine such as loading paper, clearing misfeeds, handling peripheral units, and other functions, see Chapter 1.
The explanations in this manual assume that certain peripheral units are installed.
To Use this Product Correctly as a Fax Device
Several points must be kept in mind when using this product as a fax device.
Please note the following:
Line connection
Use the telephone cable supplied
to connect the machine to a telephone line. Insert the end of the
line cord with the core into the
LINE socket on the machine as
shown. Insert the other end into
the telephone line socket.
Line
socket
Core
In some countries, an adapter is
required to connect the telephone line cable to the wall telephone socket, as shown in the
illustration.
For United
Kingdom
Wall socket
Adapter
For Australia
Xerox WorkCentre C226 User Guide
5-1
Fax Unit
Fax power switch
When using the machine, be sure to keep
the fax power switch turned on at all times.
The fax power switch must be turned on to
receive faxes at night or send timer transmission faxes at night.
ON
OFF
Fax power switch
Settings and programming
Information about settings and programming that are required before the fax functionality can be used is located in “Points to Check and Program After Installation” on
page 5-3 of this manual. Please read this section and perform the required settings
and programming.
Lithium battery
A lithium battery inside the machine keeps key operator program settings for the fax
function in memory.
When the battery dies, settings and programmed information will be lost. Be sure to
keep a written record of the settings and programmed information. (Refer to page 589.)
The life of the lithium battery is approximately 5 years if the machine power switch and
fax power switch are kept continually off.
Other information
If a thunderstorm occurs, we recommend that you unplug the power cord from the
power outlet. Information will be retained in memory even if the power cord is
unplugged.
Important Safety Information
•
•
•
•
•
5-2
If any of your telephone equipment is not operating properly, you should immediately remove it from your telephone line, as it may cause harm to the telephone
network.
The AC power outlet shall be installed near the equipment and shall be easily
accessible.
Never install telephone wiring during a lightning storm.
Never install telephone jacks in wet locations unless the jack is specifically
designed for wet locations.
Never touch uninsulated telephone wires or terminals unless the telephone line
has been disconnected at the network interface.
Xerox WorkCentre C226 User Guide
Points to Check and Program After Installation
•
•
•
•
Use caution when installing or modifying telephone lines.
Avoid using a telephone (other than a cordless type) during an electrical storm.
There may be a remote risk of electric shock from lightning.
Do not use a telephone to report a gas leak in the vicinity of the leak.
Do not install or use the machine near water, or when you are wet. Take care not
to spill any liquids on the machine.
Before Using the FAX Feature
This section contains basic information about using the fax features of this product.
Please read this section before using the fax features.
Points to Check and Program After Installation
After installing the unit and before using it as a fax machine, check the following points
and program the required information.
Make sure the fax power switch is turned on
In addition to the machine power switch, the machine also has a fax power switch (see
page 5-2). When using the machine, be sure to keep the fax power switch turned on at
all times.
Make sure the correct date and time have been set
Make sure the correct date and time have been programmed in the unit. If the date
and time are wrong, please correct them (see page 1-39).
It is important to set the correct date and time because they are used for such features
as Timer Transmission (page 5-32).
Program the sender's name and sender's number
The name and fax number of the user of the machine is programmed in “Own number
and name set” in the “Fax Unit” section of the Xerox WorkCentre C226 System Administration Guide.
The programmed name and number are printed at the top of each transmitted fax
page. The sender's number is also used as an identification number when you use the
Polling function to request transmission from another fax machine (See “Using the
Polling Function” on page 5-36.)
NOTE:
You can check your programmed name and number by printing out the Sender List.
Xerox WorkCentre C226 User Guide
5-3
Fax Unit
Connecting an Extension Phone
You can connect a telephone to the machine and use it as an extension phone to
place and receive calls like any normal phone. When the other party has made the
call, the extension phone can be used to activate fax reception (remote operation).
NOTE:
If you connect a combination telephone/answering machine to the machine, you will
not be able to use the answering machine function.
You can place calls from the phone even during a power failure.
Connecting an Extension Phone
Insert the end of the extension phone cord into the extension phone socket on the rear
of the machine.
Make sure you hear a "click" sound indicating that the
cord is securely connected.
Extension
phone
socket
5-4
Xerox WorkCentre C226 User Guide
A Look at the Operation Panel
A Look at the Operation Panel
1
3
2
4
5
/
6
1
Touch panel
•
•
•
2
3
Mode select
keys
Numeric keys
4
[C] Clear
7
8
9
Messages and keys appear on the touch panel. Key input is accomplished by
touching the keys.
When a key in the touch panel is touched, a beep sounds and the key is highlighted.
Keys that cannot be selected in a screen are greyed out. If touched, a doublebeep will sound to alert you that the key cannot be selected.
Use these keys to change modes. (See step 1 on page 5-19.)
Use to enter fax numbers, sub-addresses, passcodes, and numerical settings (see
page 5-49.)
Use to clear a mistake when entering fax numbers, sub-addresses, passcodes, and
numerical settings. One digit is cleared each time you press the key.
When an original is being scanned, this key can also be used to cancel scanning.
5
[COLOR COPY
START]
Not used when using the machine as a fax machine. (For information on this key, see
page 1-9.)
6
[IMAGE SEND]
Press to switch to fax mode. The initial screen of fax mode will appear.
When the network scanner option is installed, touch this key to return to the initial
screen of fax mode or scanner mode, whichever mode was selected last. (Pressing
the [IMAGE SEND] key in a copy screen or printer screen returns you to the initial
screen of fax mode.) To switch to the initial screen of fax mode from the initial screen
of scanner mode, touch the [SCANNER/FAX] key (see page 5-7).
7
[
]
This is used to produce tone signals when you are on a pulse dial line.
Xerox WorkCentre C226 User Guide
5-5
Fax Unit
[BLACK COPY
START]
8
9
[CLEAR ALL]
Press to begin scanning an original for fax transmission.
Use to cancel a transmission or programming operation. When this key is pressed, the
operation is cancelled and you return to the initial screen described on the page 5-6.
This key is also used to cancel a resolution, paper size, or special function setting that
was selected when sending a fax.
NOTE:
For the names and functions of the parts of the machine, see page 1-14.
Fax Mode (Condition Settings Screen)
The condition settings screen of fax mode is displayed by pressing the [IMAGE SEND]
key while the print mode, copy mode, or job status screen appears in the touch panel.
In the explanations that follow, it is assumed that the initial screen that appears after
pressing the [IMAGE SEND] key is the condition settings screen (page 5-7). If you
have set the display to show the address directory screen (page 5-9) when the
[IMAGE SEND] key is pressed, touch the [CONDITION SETTINGS] key in the
address directory screen to display the condition settings screen.
“Default display settings” in the “Fax Unit” section of the WorkCentre C226 System
Administration Guide can be used to select whether the condition settings screen
appears or the address directory screen appears as the initial screen when the
[IMAGE SEND] key is pressed.
NOTE:
5-6
When the network scanner option is installed, you will return to the initial screen of fax
mode or scanner mode, whichever mode was selected last. (Pressing the [IMAGE
SEND] key in a copy screen or printer screen returns you to the initial screen of fax
mode.)
Xerox WorkCentre C226 User Guide
Fax Mode (Condition Settings Screen)
Condition settings screen
The display is initially set (factory setting) to show the following condition settings
screen as the initial screen.
2
1
Ready To Send.
Speaker
14
13
Auto
Exposure
12
Standard
Resolution
11
Auto
Original
3
Fax Memory:100%
Auto Reception
Special Modes
Scanner
10
1
Message display
2 Memory and
reception mode
display
[SPEAKER]
3
4
Redial
Address
Directory
5
Sub Address
6
Address Review
7
Fax
8
9
Messages appear here to indicate the current status of the machine. The icon at left
( ) indicates fax mode.
This shows the amount of fax memory that is free and the currently selected reception
mode.
Touch the [SPEAKER] key to dial and transmit a fax manually.
During dialing it changes into the [PAUSE] key, and after touching the [SUB
ADDRESS] key it changes into the [SPACE] key.
4
[REDIAL]
[ADDRESS
DIRECTORY]
Touch this key to display the address directory screen. Touch this key when you want
to use an auto-dial number (one-touch dialing or group dialing).
[SUB ADDRESS]
Touch this key to enter a sub-address and passcode when using F-code transmission
(page 5-56).
[ADDRESS
REVIEW]
When performing a broadcast transmission (page 5-30), touch this key to check your
selected destinations. The selected destinations will appear and any unneeded destinations can be deleted.
[SCANNER/FAX]
This key appears when the network scanner option is installed. Touch the key to
switch between the scanner screen and the fax screen. When the fax screen appears,
"FAX" is highlighted. When the scanner screen appears, "SCANNER" is highlighted.
5
6
7
8
Touch this key to redial the number most recently dialed with the numeric keys or a
one-touch key. After dialing, this key changes into the [NEXT ADDRESS] key.
Xerox WorkCentre C226 User Guide
5-7
Fax Unit
9
[SPECIAL
MODES]
Two-sided
original icon
display
10
5-8
Timer transmission (page 5-32)
Polling (page 5-34)
Dual page scan (page 5-43)
Program (page 5-44)
Memory box (page 5-38)
Icons appear here when you touch the [ORIGINAL] key and select two-sided scanning. The icons can be touched to open function selection screens.
Touch this key when you wish to manually set the size of the original to be scanned or
scan both sides of the original.
[RESOLUTION]
Touch this key to change the resolution setting for the original to be scanned. The
selected resolution setting will be highlighted above the key. The initial factory setting
is [STANDARD].
[EXPOSURE]
Touch this key to change the exposure setting for the original to be scanned. The
selected exposure setting will be highlighted above the key. The initial factory setting is
[AUTO].
Special function
icon display
When a special function such as polling or dual page scan is selected, a special function icon appears here.
13
14
•
•
•
•
•
[ORIGINAL]
11
12
Touch this key to set one of the following special functions:
Xerox WorkCentre C226 User Guide
Fax Mode (Condition Settings Screen)
Address directory screen (alphabetically ordered)
The screen below appears initially when the address directory is set as the initial
screen using “Default display settings” in the “Fax Unit” section of the WorkCentre
C226 System Administration Guide.
2
Ready To Send.
Speaker
A
B
C
D
E
F
G
H
Condition
Settings
1
ABCD
Address Review
EFGHI
5
JKLMN
OPQRST
UVWXYZ
ABC
Group
4
One-touch key
display
This shows the one-touch keys that have been stored on the selected "index card".
The key type is indicated by the icon at the right. One-touch keys in which a fax number is stored are indicated by a " " icon. The display is initially set to show 8 keys.
This can be changed to 6 or 12 using the key operator program.
2 Display
switching keys
In cases where the one-touch keys cannot all be displayed on one screen, this shows
how many screens are left. Touch the
keys to move through the screens.
3
4
3
Sub Address
Frequent Use
1
Redial
[CONDITION
SETTINGS]
[ABC GROUP]
5
Index keys
This displays the condition settings screen, which is used to set various conditions.
Touch this key to switch between the alphabetical index and the group index.
One-touch key destinations are stored on each of these index cards (alphabetical
index or group index). Touch this key to switch between the indexes.
Group indexes make it possible to store one-touch keys by group with an assigned
name for easy reference. This is done with the custom settings (refer to pages 5-68
and 5-74). Frequently used one-touch key destinations can be stored on the [FREQUENT USE] card for convenient access.
NOTE:
The screen shown above is the alphabetical address directory. If desired, the initial
screen can be set to the group address directory.
Xerox WorkCentre C226 User Guide
5-9
Fax Unit
Originals that Can Be Faxed
Original sizes
NOTE:
In table below, width is the first measurement, and length is the second.
Minimum original size
Using the DADF
Using the document
glass
NOTE:
•
•
•
•
Maximum original size
297 mm x 800 mm*
11" x 31-1/2"*
* Long documents can be loaded.
A5: 210 mm x 148 mm
8-1/2" x 5-1/2"
A5R: 148 mm x 210 mm
5-1/2" x 8-1/2"
297 mm x 432 mm
11" x 17"
Originals that are not a standard size (A5, B5, B5R, A4, A4R, B4, A3, 5-1/2"x8-1/2", 81/2"x11", 8-1/2"x11"R, 8-1/2"x14", 11"x17") can also be faxed.
Scanning area of original
Note that the edges of an original cannot be
scanned.
Area that cannot be scanned:
2mm ± 2mm from the edges of the original.
Automatic reduction of faxed document
If the size (width) of the faxed document is greater than the receiving machine's paper
size, the size will be automatically reduced.
Faxed document
width
Receiving machine's
paper width
Reduced size
Ratio (Area ratio)
A3 (11"x17")
B4 (8-1/2"x14")
B4 (8-1/2"x14")
1 : 0.78 (1 : 0.64)
A3 (11"x17")
A4 (8-1/2"x11")
A4R (8-1/2"x11"R)
1 : 0.5 (1 : 0.5)
A document can also be faxed without reducing its size. In this case, the left and right
edges will not be transmitted.
5-10
Xerox WorkCentre C226 User Guide
Loading a Document
Loading a Document
A document can be loaded in the DADF or on the document glass. Use the DADF
when faxing a large number of sheet originals. Use the document glass to fax originals
that cannot be scanned using the DADF such as thick or thin sheet originals or bound
originals such as books.
Using the DADF
1. Lift the document glass cover and make sure a
document is not placed on the document glass.
Gently close the cover.
2. Adjust the document guides on the DADF tray to
the width of the document.
3. Align the edges of the document pages and then
insert the stack in the DADF tray so that the first
page is face up.
Insert the stack into the DADF tray until it stops.
NOTE:
Use the DADF for long originals. The document glass cannot be used.
Using the Document Glass
Open the document glass cover, and place the document face down on the document glass. Gently close
the cover.
Original size detector
Xerox WorkCentre C226 User Guide
5-11
Fax Unit
NOTE:
Do not place any objects under the original size detector plate. Closing the document
glass cover with an object underneath may damage the original size detector plate
and prevent correct detection of the document size.
Regardless of the size of the original, place the original on the left side of the document glass. (Align the original with the document glass scale and centering mark.)
Place the original in the appropriate position for its size as shown below.
Document glass scale
mark
A4
B5
Document glass scale
mark
A3
B4
B5
A5
R
A4
R
R
A5
Checking the Size of a Loaded Original
When a standard-size* original is placed, the original size is automatically detected (automatic original detection function) and displayed in the top half
of the [ORIGINAL] key. Check the key to make
sure that the original size has been correctly
detected.
Standard
Resolution
AUTO
A4
Original
1 : [AUTO] appears when the automatic original
detection function is operating.
2
: Displays the original size.
If a non-standard size original is placed or if you wish to change the scanning size, follow the steps below to manually set the original scanning size
NOTE:
* Standard sizes that can be detected are as follows:
A5, B5, B5R, A4, A4R, B4, A3, 5-1/2"x8-1/2", 8-1/2"x11", 8-1/2"x11"R, 8-1/2"x14",
11"x17". If a non-standard size original is loaded (including special sizes), the closest
standard size may be displayed, or the original size may not appear at all.
5-12
Xerox WorkCentre C226 User Guide
Manually Setting the Scanning Size
Manually Setting the Scanning Size
If you load an original that is not a standard size (such as a long original or an INCH
size), or if the size is not detected correctly, you must touch the [ORIGINAL] key and
set the original size manually. Perform the following steps after loading the document
in the DADF tray or on the document glass (see the previous page).
1. Touch the [ORIGINAL] key.
If the address directory screen appears, touch the [CONDITION SETTINGS] key to display the condition settings
screen.
Standard
Resolution
Auto
A4
Original
2. Touch the [MANUAL] key.
The sizes that can be selected are displayed
Original Size
O
Manual
ided
2-Sided
Booklet
3. Touch the desired original size key.
Speaker
Redial
Ok
Original Size
Manual
Auto
A5
B5R
[AUTO] is no longer highlighted. [MANUAL] and the original size key you touched are highlighted.
Ok
A5R
B5
A4
A4R
AB
To select B4 (8x1/2"x14"), A3 (11"x17"), or "LONG
SIZE", touch the
key and then touch the appropriate
original size key.
Inch
To select an inch size, touch the [INCH] tab.
Speaker
Redial
Ok
Original Size
Auto
Manual
A5
B5R
Ok
A5R
B5
A4
A4R
AB
Inch
Speaker
Redial
Ok
Original Size
Auto
Manual
51/2 X81/2
8 1/2X11R
Ok
51/2 X81/2 R
81/2 X11
81/2 X14
11X17
AB
Xerox WorkCentre C226 User Guide
Touch the appropriate inch original size key. The
selected key is highlighted. To return to the AB original
size palette, touch the [AB] tab.
Inch
5-13
Fax Unit
4. Touch the outer [OK] key.
Ok
ual
You will return to the initial screen. (Touching the inner
[OK] key in the step above returns you to step 2.)
Ok
81/2 X11
11X17
5. The selected size appears in the top half of the [ORIGINAL] key.
Standard
Resolution
81/2 X11
Original
Selecting Resolution and Exposure Settings
After loading an original, you can adjust the resolution and exposure settings to match
the condition of the original --for example, if it has small or faint characters, or if it is a
photo. After loading the original in fax mode, adjust the settings as explained below.
Selecting the Resolution
The initial resolution setting is STANDARD. To change the setting, follow these steps:
Change the resolution.
1. Touch the [RESOLUTION] key.
Standard
Resolution
Auto
A4
Original
2. Touch the [STANDARD] key, [FINE] key, [SUPER FINE] key, or [ULTRA FINE] key.
The selected key is highlighted.
Standard
Fine
Super Fine
Half Tone
If you touched the [FINE] key, [SUPER FINE] key, or
[ULTRA FINE] key, you can also select halftone by
touching the [HALF TONE] key.
Ultra Fine
5-14
Xerox WorkCentre C226 User Guide
Selecting Resolution and Exposure Settings
3. Touch the [OK] key.
You will return to the initial screen.
Ok
dard
ne
Fine
Half Tone
Fine
NOTES:
•
•
•
The factory default setting for the initial resolution is [STANDARD]. The initial
resolution can be changed to a different setting in the key operator programs .
When using the DADF, the resolution setting cannot be changed once scanning
has begun.
When a fax is sent at [ULTRA FINE], [SUPER FINE], or [FINE] resolution, a lower
resolution will be used if the receiving machine does not have that resolution.
Resolution settings
Standard
Touch this key if your original consists of normal-sized
characters (like those in this manual).
Fine
Touch this key if your original has small characters or
diagrams. The original will be scanned at twice the
resolution of the [STANDARD] setting.
Super fine
Touch this key if your original has intricate pictures or
diagrams. A higher-quality image will be produced
than with the [FINE] setting.
Ultra fine
Touch this key if your original has intricate pictures or
diagrams. This setting gives the best image quality.
However, transmission will take longer than with the
other settings.
Half-tone
Touch this key if your original is a photograph or has
gradations of colour (such as a colour original). This
setting will produce a clearer image than [FINE],
[SUPER FINE], or [ULTRA FINE] used alone. Half
tone cannot be selected if [STANDARD] has been
selected.
Xerox WorkCentre C226 User Guide
5-15
Fax Unit
Selecting the Exposure
The initial exposure setting is AUTO. To change the setting, follow these steps:
Change the exposure.
1. Touch the [EXPOSURE] key.
Auto
Exposure
Standard
Resolution
Auto
Original
2. Touch the [MANUAL] key.
AUTO
MANUAL
3. Touch the desired exposure key.
To darken the exposure, touch the
key. To lighten
the exposure, touch the
key. To return to auto
exposure, touch [AUTO].
AUTO
MANUAL
4. Touch the [OK] key.
OK
You will return to the initial screen.
AUTO
MANUAL
NOTE:
5-16
When using the document glass to scan pages, the exposure setting can be changed
each time you change pages. When using the DADF, the exposure setting cannot be
changed once scanning has begun.
Xerox WorkCentre C226 User Guide
Convenient Dialing Methods
Exposure settings
1 to 2
Select this setting if your original consists mostly of
dark characters.
Auto
This setting automatically adjusts the exposure for
light and dark parts of the original.
4 to 5
Select this setting if your original consists mostly of
faint characters.
Convenient Dialing Methods
The fax function includes a convenient auto dial feature (one-touch dialing and group
dialing). By programming frequently dialed numbers, you can call and send documents to these locations by means of a simple dialing operation (see page 5-22).
There are two types of auto-dialing: one-touch dialing and group dialing. To program
auto-dial numbers, refer to pages 5-68 and 5-74.
One-touch dialing
Simply press a one-touch key and
then press the [BLACK COPY
START] key to dial the programmed
location. A name of up to 36 characters can be programmed for the
location (a maximum of 18 characters are displayed). When using Fcode transmission, a sub-address
and passcode can also be programmed (see page 5-49).
Group dialing
Multiple one-touch dial locations
can be programmed into a single
one-touch key. This is convenient
for successively sending a document to multiple locations.
Full fax numbers entered with the
numeric keys cannot be stored in a
group key. First program the number in a one-touch key and then
store it in a group key.
No.001:Xerox Corportation
0666211221
Xerox Corportation
Corpo.Tps
Xerox Group
Frequent Use
ABCD
EFGHI
JKLMN
OPQRS
Touch the [ADDRESS DIRECTORY] key in the initial screen to
display the above screen.
No.005:Xerox Group
Group:025
Xerox Corporation
Corpo.Tps
Xerox Group
Frequent Use
ABCD
EFGHI
JKLMN
OPQRST
Redialing
The machine keeps the last fax
number dialed with the numeric
keys in memory. You can redial the
last number dialed by simply touching the [REDIAL] key.
aker
y:100%
eption
Redial
Address
Directory
Sub Address
Xerox WorkCentre C226 User Guide
5-17
Fax Unit
On-hook dialing
Touch the [SPEAKER] key, listen for
the dial tone through the speaker,
and then dial.
Faxes must be sent manually when
using on-hook dialing (see page 562).
On-hook dialing is not possible
using a one-touch key that includes
a sub-address and passcode, or a
group key.
NOTES:
•
•
•
5-18
Speaker
Fax Memory:100%
Auto Reception
Re
Addr
Dire
Sub
A total of 500 one-touch dial and group keys can be programmed (see page 5-66).
Programmed one-touch keys and group keys are stored on "index cards". A onetouch key or group key can be easily accessed by touching the index key. (Refer
to page 5-9.)
To prevent calling or sending a fax to a wrong number, look carefully at the touch
panel and make sure you program the correct number when programming an
auto-dial number. After storing a number, you can also print out the stored number
(see page 5-89) to make sure it was stored correctly.
Xerox WorkCentre C226 User Guide
Sending a Fax
Basic Operations
This section explains basic operations such as sending and receiving faxes.
Sending a Fax
Basic Procedure for Sending Faxes
1. Make sure the machine is in fax mode.
When the [IMAGE SEND] key light is on, the machine is
in fax mode. If the light is not on, press the [IMAGE
SEND] key.
/
When the network scanner option is installed, touch this
key to return to the initial screen of fax mode or scanner
mode, whichever mode was selected last. To switch to
fax mode from scanner mode, touch the [SCANNER/
FAX] key (see page 5-7).
2. Load the original.
•
•
Using the DADF: page 5-11
Using the document glass: page 5-11
If you are using the document glass to send multiple pages, load the first page first.
NOTE:
You cannot load documents in both the DADF tray and on the document glass and
send them in a single fax transmission.
3. Check the original size.
EXPOSURE
Standard
Resolution
Auto
A4
Original
Xerox WorkCentre C226 User Guide
If the address directory screen appears, touch the [CONDITION SETTINGS] key to display the condition settings
screen.
If the original is not a standard size or the size was not
detected correctly, touch the [ORIGINAL] key to specify
the original size. (See “Manually Setting the Scanning
Size” on page 5-13.)
5-19
Fax Unit
4. If needed, adjust the resolution setting (see page 5-14).
OSU
Standard
Resolution
Auto
A4
Original
5. If needed, adjust the exposure setting (see page 5-16.)
Auto
Exposure
Standard
Resolution
Auto
Original
6. Dial the fax number.
The number that you entered appears in the message
display. If it is not correct, press the [C] key and re-enter
the number. You can also use the [REDIAL] key or an
auto-dial number
Entering a Pause
If you need to insert a pause between digits when dialPause
Fax Memory:100%
Auto Reception
Next Add ing out from a PBX or when dialing an international num-
ber, touch the [PAUSE] key in the upper right corner of
Address the screen.
Directo
Each time you touch the [PAUSE] key, a hyphen ("-")
appears and a 2-second pause* is inserted.
Sub Add
The [PAUSE] key is also be used to link numbers together (this is called chain
dialing). Enter a number, touch the [PAUSE] key to enter a hyphen "-", and then
enter another number with the numeric keys or by pressing a one-touch key. The
linked numbers will be dialed as one number.
* The duration of each pause can be changed with the key operator program.
5-20
Xerox WorkCentre C226 User Guide
Sending a Fax
Using the DADF
7. Press the [BLACK COPY START] key.
Scanning begins.
If there are no previous jobs in progress and the line is
free, the machine will dial the receiving machine and
begin transmission as soon as the first page is scanned.
Transmission will take place while any remaining pages
are scanned (See “Quick On-line” on page 5-24).
If there is a previously stored job or a job is in progress, or if the line is being used, all
pages of the document are scanned into memory and stored as a transmission job.
(This is called memory transmission: the destination is automatically called and the
document transmitted after previously stored jobs are completed.)
If scanning is completed normally, the machine makes a beep sound to inform you that
the transmission job is stored and "JOB STORED." appears in the message display.
Using the document glass
7. Press the [BLACK COPY START] key.
The original is scanned and the [READ-END] key
appears in the touch panel.
8. If you have another page to scan, change pages and then press the [BLACK
COPY START] key.
Repeat this sequence until all pages have been scanned. You can change the
resolution and exposure settings as needed for each page (see pages 5-15 and 517).
If the [BLACK COPY START] key is not pressed within approximately one minute,
scanning will end automatically and the transmission will be stored.
9. After the last page is scanned, touch the [READ-END] key.
al.
(Pg.No.2)
ess [Read-End]
Read-End
Xerox WorkCentre C226 User Guide
The machine makes a beep sound to inform you that the
transmission job is stored and "JOB STORED." appears
in the message display. (The destination is automatically
called and the document transmitted after previously
stored jobs are completed.) Open the document glass
cover and remove the document.
5-21
Fax Unit
NOTES:
•
Cancelling transmission
To cancel transmission while "SCANNING ORIGINAL." appears in the display or
before the [READ-END] key is touched, press the [C] key or the [CLEAR ALL] key.
To cancel a transmission job that is already stored, press the [JOB STATUS] key
and cancel the job as explained on page 5-27.
•
•
•
If the machine makes two beeps during or at the end of transmission and an error
message appears in the message display, refer to page 5-98 to fix the problem.
If the power is turned off or a power failure occurs while a document is being
scanned in the DADF, the machine will stop and a document jam will occur. After
power is restored, remove the document.
A job number appears in the screen together with "JOB STORED." when a
transmission job is stored. If you make a note of this number after performing a
broadcast transmission, you can use the number to check the results of the
transmission for each destination in the transaction report or activity report.
Transmission by Auto-Dialing
(One-Touch Dialing and Group Dialing)
To dial by touching an auto dial key (one touch key or group key) instead of pressing
the numeric keys, follow the steps below. To use an auto dial number, the name and
fax number of the destination must first be stored. For information on auto dial numbers, see page 5-17. To store an auto dial number, see pages 5-68 and 5-74.
1. Perform steps 1 through 5 of “Basic Procedure for Sending Faxes” on page 5-19.
2. Touch the [ADDRESS DIRECTORY] key.
aker
The address directory screen appears.
Redial
ry:100%
eption
This step is not necessary if the address directory
already appears. Go to step 3.
Address
Directory
Sub Address
3. Touch the one-touch key for the desired destination.
Ready To Send.
Xerox Corporation
S
Corpo.Tps
The key you touched is highlighted. If you touch the
wrong key, touch the key again to cancel the selection.
The key display will return to normal.
Xerox Group
Frequent Use
(Refer to page 5-9 for information on using the address
directory screen.)
ABCD
EFGHI
JKLMN
OPQRS
4. Continue from step 7 of “Basic Procedure for Sending Faxes” (page 5-21).
5-22
Xerox WorkCentre C226 User Guide
Sending a Fax
Faxing a Two-Sided Original
Follow the steps below to automatically send a two-sided document.
1. Make sure the machine is in fax mode.
When the [IMAGE SEND] key light is on, the machine is
in fax mode. If the light is not on, press the [IMAGE
SEND] key.
/
When the network scanner option is installed, touch this
key to return to the initial screen of fax mode or scanner
mode, whichever mode was selected last. (Pressing the
[IMAGE SEND] key in a copy screen or printer screen
returns you to the initial screen of fax mode.) To switch to fax mode from scanner
mode, touch the [SCANNER/FAX] key (see 8 on page 5-7).
2. Place the original in the DADF tray (see“Using the DADF” on page 5-11).
3. Touch the [ORIGINAL] key.
EXPOSURE
If the address directory screen appears, touch the [CONDITION SETTINGS] key to display the condition settings
screen.
Standard
Resolution
When you touch the [ORIGINAL] key, check the original
size that appears in the key. If the size was not detected
correctly, specify the correct size. (See “Manually
Setting the Scanning Size” on page 5-13.)
Auto
A4
Original
4. Touch the [2-SIDED BOOKLET] key or the [2-SIDED TABLET] key as appropriate
for the original you loaded.
Speaker
Redial
al Size
Ok
Manual
2-Sided
Booklet
2-Sided
Tablet
5. Touch the [OK] key.
You will return to the initial screen.
ker
Redial
Ok
L
ED
Xerox WorkCentre C226 User Guide
2 SIDED
5-23
Fax Unit
EXPOSURE
Standard
Resolution
Auto
A4
Original
A two-sided original icon appears next to the [ORIGINAL] key.
Example:
The icon that appears when the [2-SIDED BOOKLET]
key is touched.
6. Continue from step 4 of “Basic Procedure for Sending Faxes” (page 5-20).
NOTES:
•
•
•
Booklets and tablets
Two-sided originals that are bound at the
side are booklets, and two-sided originals
that are bound at the top are tablets.
Two-sided scanning turns off after the
document is stored in memory. Pressing the
[CLEAR ALL] key will also cancel two-sided
scanning.
Booklet
Tablet
Quick On-line
When you use the DADF to send a multi-page document and there are no previously
stored jobs waiting or in progress (and the line is not being used), the machine dials
the destination after the first page is scanned and begins transmitting scanned pages
while the remaining pages are being scanned. This transmission method is called
Quick On-line. The messages "SCANNING ORIGINAL." and "SENDING." both appear
until scanning of the final page is completed.
If the receiving party is busy, the transmission will switch to a memory transmission.
(Refer to the following section, “Storing transmission jobs (memory transmission)”.)
NOTE:
The machine is initially set (factory setting) to perform Quick On-line transmission. If
desired, you can turn off this function with the key operator program.
When a document is transmitted using the following methods, the job will be stored in
memory (Quick On-line transmission will not be performed):
•
•
•
Sending from the document glass l broadcast transmission (page 5-30)
Timer transmission (page 5-32)
F-code transmission (page 5-49)
Storing transmission jobs (memory transmission)
When a document is sent from the document glass, or when the telephone line is in
use, the document is scanned into memory and then automatically transmitted after
previously stored transmission jobs are completed. (This is called memory transmission.) This means that transmission jobs can be stored in memory by performing a
transmission operation while the machine is occupied with another transmission/
reception operation. This is called storing transmission, and up to 50 jobs can be
stored in memory at once. After transmission, the scanned document data is cleared
from memory.
5-24
Xerox WorkCentre C226 User Guide
Sending a Fax
NOTES:
•
•
•
You can check transmission jobs stored in memory in the job status screen. (Refer
to page 1-17.)
If the memory becomes full while a document is being scanned, a message will
appear in the display. You can cancel the transmission by touching the [CANCEL]
key, or send only the pages already scanned by touching the [SEND] key. The
page that was being scanned when the memory became full will be cleared from
memory. If the memory becomes full while scanning the first page of a document,
the transmission job is automatically cancelled.
The number of jobs that can be stored will depend on the number of pages in each
job and the transmission conditions. The number of storable jobs will increase if
the optional expansion memory is installed.
If the receiving party is busy
If the receiving party is busy, the transmission is temporarily cancelled and then automatically re-attempted after a brief interval (two attempts are made at intervals of 3
minutes*). If you do not want the machine to re-attempt the transmission, press the
[JOB STATUS] key and cancel the job (see page 5-27).
* This setting can be changed with the key operator program.
If a transmission error occurs
If an error occurs that prevents transmission or the receiving machine does not answer
the call within 45 seconds*, then transmission is stopped and then automatically reattempted later. (two recall attempts are made at an interval of 1 minute*) Automatic
recalling can be stopped by pressing the [JOB STATUS] key and cancelling as
explained on page 5-26. This machine also supports error correction mode (ECM) and
is set to resend any part of a fax that is distorted due to noise on the line.
* The settings can be changed in the key operator programs. (See “Call timer at memory sending” and “Recall in case of communication error” in the “Fax Unit” section of
the WorkCentre C226 System Administration Guide.)
Image rotation
The machine is initially set to rotate a vertically-placed ( )document 90° so that it is
oriented horizontally( ) before transmission (A4 (8-1/2"x11") originals are rotated to
A4R (8-1/2"x11"R) and B5R or A5R (5-1/2"x8-1/2"R) originals are rotated to B5 or A5
(5-1/2"x8-1/2")). A4R (8-1/2"x11"R) originals and B5 or A5 (5-1/2"x8-1/2") originals
are not rotated. If desired, you can turn this function off with the key operator program
as explained in “Rotation sending setting” in the “Fax Unit” section of the WorkCentre
C226 System Administration Guide.
NOTE:
Place A5 (5-1/2"x 8-1/2") size originals so that they are oriented vertically ( ). If
oriented horizontally, ( A5R (5-1/2"x 8-1/2"R) orientation), the original size will be
detected as a different size, and thus it will be necessary to touch the [ORIGINAL] key
and specify the correct original size (touch the [A5R] ([5-1/2"x 8-1/2"R]) key). (See
“Manually Setting the Scanning Size” on page 5-13.)
Xerox WorkCentre C226 User Guide
5-25
Fax Unit
Priority Transmission of a Stored Job
If you have an urgent transmission job and multiple transmission jobs have already
been stored, you can give priority to the urgent job so that it will be transmitted immediately after the job currently being executed. This is done from the job status screen.
1. Press the [JOB STATUS] key.
/
2. Touch the [FAX JOB] key.
Waiting
Detail
Waiting
Waiting
Stop/Delete
Fax Job
3. Touch the key of the job to which you wish to give priority. The touched key is
highlighted.
4. Touch the [PRIORITY] key.
The selected job moves up to the next position after the
job currently being executed.
AITING
AITING
AITING
Priority
Stop/Delete
When the current job is completed, execution begins of
the job selected in step 3.
AX JOB
NOTE:
5-26
If the job in progress is a broadcast transmission job (see page 5-30) or a serial polling
job (see page 5-35), the priority job will temporarily interrupt the job after the
transmission currently in progress is finished. When the priority job is finished, the
broadcast transmission or serial polling job will resume. However, if the priority job is
also a broadcast transmission or serial polling operation, the job is begun after all
transmissions of the current broadcast or serial polling job are completed.
Xerox WorkCentre C226 User Guide
Cancelling a Fax Transmission
Cancelling a Fax Transmission
1. Press the [JOB STATUS] key.
/
2. Touch the [FAX JOB] key.
Waiting
Detail
Waiting
Waiting
Stop/Delete
Fax Job
3. Touch the key of the job that you wish to cancel from among the stored fax jobs or
the fax job in progress. The touched key is highlighted.
4. Touch the [STOP/DELETE] key.
A message appears to confirm the cancellation. Touch
the [YES] key to delete the selected job key and cancel
the transmission.
aiting
aiting
aiting
Priority
Stop/Delete
ax Job
NOTES:
•
•
If you do not wish to cancel the transmission, touch the [NO] key.
"CANCEL" will appear in the Transaction Report of a job that is cancelled
Cancelling On-Hook Dialing
To cancel on-hooking dialing (dialing by touching the [SPEAKER] key and then the
numeric keys) when you need to redial the number or because transmission was interrupted, touch the [SPEAKER] key once again.
Xerox WorkCentre C226 User Guide
5-27
Fax Unit
Receiving Faxes
When another fax machine sends a fax to your machine, your machine will ring*, automatically receive the fax, and begin printing (this is called automatic reception).
NOTES:
•
•
You can store a transmission job while fax reception is in progress (See “Storing
transmission jobs (memory transmission)” on page 5-24.)
To receive faxes, sufficient paper must be loaded in the paper tray. Refer to
“Loading Paper” on page 1-21 for information on loading appropriate paper.
Incoming faxes that are A4 (8x1/2"x11") or B5 size will be automatically rotated to
match the orientation of the paper, so there is no need to load both horizontally
( ) and vertically ( ) oriented A4 (8-1/2"x11") and B5 paper.
However, if you receive a fax that is smaller than A4 (8-1/2"x11") or B5 size, the
paper size used to print the fax will depend on how the original was oriented
(vertically or horizontally) in the sending fax machine.
Receiving a Fax
1. The machine will ring* and reception will automatically begin.
*Number of rings
The machine has been set to ring twice before beginning automatic reception. You can
use the key operator program to change the number of rings to any number from 0 to
15*1.
If the number of rings is set to 0*2, the machine will receive faxes without ringing.
*1 The number varies by region.
*2 In some regions "0" cannot be selected.
2. Reception ends.
When reception ends, the machine makes a "beep"
sound.
The received fax is delivered to the top tray.
NOTES:
•
•
5-28
If the machine has multiple output trays, the key operator program can be used to
change the output tray for fax reception.
Each fax is offset from the previous fax in the output tray to allow easy separation.
Xerox WorkCentre C226 User Guide
Sending the Same Document to Multiple Destinations in a Single Operation (Broadcast Transmission)
If received data cannot be printed
If the machine is out of paper or toner, or if a paper jam
occurs or the machine is busy printing a copy or print job,
received faxes will be stored in memory until printing is
possible. When printing is possible, the faxes will print
automatically (however, if the machine has run out of
paper, touch the [OK] key in the touch panel after adding
paper). When a received fax is stored in memory, the
"DATA" light to the right of the [IMAGE SEND] key will
blink.
/
You can also use the transfer function to have another fax machine print the received
data. (See “Using the Transfer Function” on page 5-47.)
Advanced Transmission Methods
This section explains fax features for special situations and purposes. Please read
those sections that are of interest to you.
Sending the Same Document to Multiple Destinations in a
Single Operation (Broadcast Transmission)
This feature is used to send a document to multiple destinations in a single operation.
The document to be transmitted is scanned into memory and then successively transmitted to the selected destinations. This feature is convenient for such purposes as
distributing a report to company branches in different locations. Up to 100 destinations
can be selected. When transmission to all destinations has been completed, the document is automatically cleared from memory.
NOTES:
•
•
If you frequently use broadcasting to send documents to the same group of
destinations, it is convenient to store those destinations in a group key. Group
dialing is an auto dial function that enables multiple destinations to be stored in a
single one-touch key The procedure for programming group keys is explained on
page 5-74.
When using a group key to send a fax, the destinations programmed in the group
key are counted as broadcasting destinations. For example, if five destinations are
programmed in a group key and the key is touched for a broadcast transmission,
the broadcast transmission will have five destinations.
Xerox WorkCentre C226 User Guide
5-29
Fax Unit
Beep
Destination A
(recipient)
Sender
Reception
USE
NEXT ADDRESS
Y:100%
EPTION
Successive
transmission
ADDRESS
DIRECTORY
Beep
Destination B
(recipient)
SUB ADDRESS
Successively enter
destination numbers
The document is scanned
into memory
Reception
Beep
Destination C
(recipient)
Reception
Using Broadcast Transmission
1. Perform steps 1 through 5 of “Basic Procedure for Sending Faxes” (page 5-19).
2. Dial the fax number of the first destination or touch an auto-dial key (one-touch
key or group key). (Refer to page 5-22.)
Spe
If the condition settings screen appears, touch the
[ADDRESS DIRECTORY] key to display the address
directory screen.)
Corpo.Tps
Xerox Group
5-30
An auto-dial key is highlighted when touched.
Xerox WorkCentre C226 User Guide
Using Broadcast Transmission
3. Touch the [NEXT ADDRESS] key and then dial the fax number of the next
destination or touch an auto-dial key.
Repeat this step for each of the remaining destinations.
se
Next Address
Condition
Settings
Sub Address
NOTES:
•
If you enter an incorrect number
If you make a mistake while entering a number, press the [C] key and then reenter the correct digit(s).
If you have already completed entry of a fax number, you can delete the number
using steps 4 and 5.
•
If you select an incorrect auto-dial key
Simply touch the incorrect key one more time to cancel the selection.
•
The [NEXT ADDRESS] key only needs to be touched when successively dialing
fax numbers with the numeric keys.
Example:
XXXX NEXT ADDRESS XXXX
Dial
Dial
Cannot be omitted.
XXXX NEXT ADDRESS One-touch NEXT ADDRESS One-touch
Dial
Can be omitted.
Can be omitted.
If desired, you can use the key operator program to set the machine so that the
[NEXT ADDRESS] key must always be touched.
4. Touch the [ADDRESS REVIEW] key to display the list of destinations.
Condition
Settings
When the [ADDRESS REVIEW] key is touched, only the
entered and selected destinations are displayed.
Sub Address
Address Review
Xerox WorkCentre C226 User Guide
5-31
Fax Unit
5. Check the destinations.
When you have finished checking the destinations, touch
the [OK] key to return to the screen of step 4.
Select Address To Delete.
Address Review
0666211221
Corpo.Tps
Sharp Group
Delete The Address?
0666211221
No
Yes
If you wish to delete a destination, touch the displayed
one-touch key. A message will appear to confirm the
deletion. Touch [YES] and the destination will be deleted
from the destination list. To cancel instead of deleting,
touch the [NO] key.
6. Continue from step 7 of “Basic Procedure for Sending Faxes” (page 5-19).
NOTE:
To cancel a broadcast transmission
To cancel a broadcast transmission when selecting destinations, press the [CLEAR
ALL] key. To cancel after all steps of the transmission have been completed, see
“Cancelling a Fax Transmission” on page 5-27.
Automatic Transmission at a Specified Time
(Timer Transmission)
This feature enables you to set up a transmission or polling operation to be performed
automatically at a specified time up to a week in advance. This is convenient when you
will be out of the office or for transmission at off-peak nighttime rates. A combined total
of 50 timer transmission and memory transmission jobs can be stored.
NOTES:
•
•
•
•
5-32
After a timer transmission is performed, the information (image, destination, etc.)
is automatically cleared from memory.
To perform a timer transmission, the document must be scanned into memory. It is
not possible to leave the document in the DADF tray or on the document glass
and have it scanned at the specified time of transmission.
To set the date and time in the machine, refer to page 1-39 . You can check the
machine's currently set time in the screen of steps 3 and 4 below.
Only one polling timer operation can be set up at a time. If you wish to set up
multiple timer polling operations, combine the machines to be polled into a serial
polling operation with a timer setting (see page 5-34).
Xerox WorkCentre C226 User Guide
Automatic Transmission at a Specified Time (Timer Transmission)
Setting Up a Timer Transmission
1. In fax mode, touch the [SPECIAL MODES] key.
Add
Dire
Auto Reception
Sub Ad
Special Modes
If the address directory screen appears, touch the [CONDITION SETTINGS] key to display the condition settings
screen.
Address
2. Touch the [TIMER] key.
The timer transmission screen appears.
Special Modes
Timer
3. Select the day of the week. (Touch the
is selected.)
imer
Day Of The Week
key or the
key until the desired day
The initial setting is "---" (no selection). If you select this
setting, the transmission will be performed as soon as
the specified time arrives.
Select the time. (Touch the
desired time appears.)
key or the
key until the
4. Select the time in 24-hour format.
Example:
Cancel
11:00 P.M. 23:00
Time
00
HH.
00
mm.
The current time appears at the top of the screen. If the time is not correct, press
the [CLEAR ALL] key to stop operation and adjust the date and time. (Refer to
page 1-39.)
5. Touch the outer [OK] key.
Cancel
00
Ok
You will return to the screen of step 1 and a timer transmission icon will appear next to the [EXPOSURE] key.
Ok
To cancel timer, touch the [CANCEL] key.
mm.
Xerox WorkCentre C226 User Guide
5-33
Fax Unit
6. Perform the desired transmission operation.
The steps that follow will depend on the type of transmission. The following
operations can be performed in a timer transmission:
•
•
•
•
•
•
•
NOTES:
•
•
Normal transmission
Broadcast transmission
Polling
Serial polling
F-code polling
F-code confidential transmission
F-code relay request transmission
Other operations can be performed after a timer transmission is set up. If another
operation is in progress when the specified time arrives, the timer transmission will
begin when the job in progress is completed.
If a timer transmission job is given priority in the fax job status screen (see “Priority
Transmission of a Stored Job” on page 5-26), the time setting will be cancelled
and the job performed as soon as the current job is completed.
Transmission and Reception Using the Polling Function
This function can only be used if the other machine is a Super G3 or G3 machine and
supports the polling function. The polling function allows your machine to call a fax
machine that has document data set and initiate reception of the document. You can
also perform the reverse operation: scan a document into the memory of your machine
so that another machine can call your machine and initiate reception of the document.
This function whereby your machine calls the sending machine and asks the sending
machine to begin transmission of a loaded document is called the polling function.
Scanning a document into memory and automatically sending it when the receiving
machine calls and "polls" your machine is called polling memory.
NOTE:
5-34
For information on polling and polling memory using F-codes, refer to “F-Code Polling
Memory” on page 5-52. This section only explains normal polling and normal polling
memory.
Xerox WorkCentre C226 User Guide
Transmission and Reception Using the Polling Function
Polling
This function allows your machine to call a sending machine and initiate reception of a
document loaded in that machine. A timer setting can also be established to have the
operation take place at night or another specified time (see page 5-33).
Your machine
The other machine
2) Permits polling of.
1) Polling (ask other machine
to send document)
4) Document data is automatically
sent to your machine
Serial Polling:
NOTE:
3) Document data previously
scanned into memory
Group keys and the broadcast transmission function (page 5-30) can be used to successively poll multiple fax machines in a single operation. Up to 100 machines can be
polled. In this case, the sequence of operations in the above diagram is successively
repeated for each sending machine selected.
The receiving machine bears the expense (phone charges) of polling transmission.
Polling memory
This feature allows your machine to automatically send a document previously
scanned into memory when another machine calls and polls your machine.
Your machine
The other machine
2) Permits polling of.
1) Polling
(request transmission)
3) Document data previously
scanned into memory
Xerox WorkCentre C226 User Guide
4) Document data is
automatically sent to
other machine
5-35
Fax Unit
Using the Polling Function
A document should not be loaded in the machine when the following operation is performed. When used in conjunction with the timer transmission function, only one polling job can be stored.
NOTE:
If the other machine has a polling security function (see “Restricting polling access
(polling security)” on page 5-42), use the key operator program to program your own
fax number, and ask the operator of the other machine to appropriately program your
fax number in that machine.
1. In fax mode, touch the [SPECIAL MODES] key and then touch the [POLLING] key.
Special Modes
Address Review
Polling
Dual Page
Scan
If the address directory screen appears, touch the [CONDITION SETTINGS] key to display the condition settings
screen.
The [POLLING] key is highlighted and the polling icon
appears.
Program
To cancel polling, touch the [POLLING] key once again
so that it is not highlighted.
2. Touch the [OK] key.
aker
You will return to the initial screen.
Redial
Ok
ber
3. Dial the number of the other fax machine or touch an auto-dial key (one-touch or
group key).
Spe
If the condition settings screen appears, touch the
[ADDRESS DIRECTORY] key to display the address
directory screen.
Corpo.Tps
Xerox Group
NOTE:
5-36
If you are performing serial polling, touch the [NEXT
ADDRESS] key and repeat this step.
When performing serial polling, an auto-dial key that includes a sub-address or
passcode (page 5-49) cannot be selected.
Xerox WorkCentre C226 User Guide
Transmission and Reception Using the Polling Function
4. When you have finished entering the destination(s), press the [BLACK COPY
START] key.
"JOB STORED." appears in the touch panel.
The fax is received from the other machine and printed
out.
NOTE:
To cancel the operation
Press the [JOB STATUS] key and then cancel the operation. (See “Cancelling a Fax
Transmission” on page 5-27.)
Manual Polling
A document should not be loaded in the machine when the following operation is performed. Manual polling is begun on the signal of the other party.
1. Touch the [SPEAKER] key in fax mode, and dial the number of the other machine.
A one-touch key or the [REDIAL] key can also be used.
Re
Speaker
Fax Memory:100%
Auto Reception
Addr
Dire
Sub
2. Touch the [SPECIAL MODES] key.
Add
Dire
Auto Reception
Sub Ad
Special Modes
If the address directory screen appears, touch the [CONDITION SETTINGS] key to display the condition settings
screen.
Address
3. When you hear the fax tone from the other machine, touch the [POLLING] key.
"JOB STORED." appears in the touch panel.
er
Polling
l Page
Scan
Program
Polling reception begins.
Your machine prints the fax after receiving it from the sending machine.
NOTE:
Serial polling cannot be performed manually. When polling reception ends, repeat
steps 1 through 4.
Xerox WorkCentre C226 User Guide
5-37
Fax Unit
Using Polling Memory
This function sends a document previously scanned into memory to a receiving
machine when the receiving machine calls and polls your machine. (If desired, you
can restrict polling to fax machines whose fax number you have programmed in your
machine. This machine has "memory box", which is memory used for such functions
as the normal polling memory function, F-code polling memory, F-code confidential
transmission, and F-code relay transmission (see “Memory Boxes and SubAddresses/Passcodes Required for F-code Transmission” on page 5-49). The polling
memory function explained here uses a memory box called the "PUBLIC BOX".
NOTE:
When using the polling memory function, do not set the reception mode to MANUAL
RECEPTION (see “Using an Extension Phone to Receive a Fax” on page 5-63).
Scanning a document into memory (Public Box) for polling
memory
This procedure is for scanning a document into the Public Box. If other document data
has already been stored in the Public Box, the new document will be added after that
data. If the previous document data is no longer needed, delete that data first (see
“Deleting document data from the Public Box” on page 5-41) and then follow the steps
below.
1. Make sure the machine is in fax mode.
When the [IMAGE SEND] key light is on, the machine is in
fax mode. If the light is not on, press the [IMAGE SEND]
key.
/
When the network scanner option is installed, touch this
key to return to the initial screen of fax mode or scanner
mode, whichever mode was selected last. To switch to fax
mode from scanner mode, touch the [SCANNER/FAX]
key.
2. Place the original in the DADF tray.
3. In fax mode, touch the [SPECIAL MODES] key and then touch the [MEMORY
BOX] key.
Special Modes
OK
Address Review
OWN NUMBER
SENDING
If the address directory screen appears, touch the [CONDITION SETTINGS] key to display the condition settings
screen.
To cancel the operation, touch the [CLEAR ALL] key.
Memory Box
5-38
Xerox WorkCentre C226 User Guide
Transmission and Reception Using the Polling Function
4. Touch the [DATA STORE] key.
Pollin
Data Store
Print
5. Touch the [PUBLIC BOX] key.
This specifies that the document will be scanned into the
Public Box.
Public Box
6. Set the original size, resolution, exposure and other scanning conditions as
needed. (See “Manually Setting the Scanning Size” on page 5-13.)
7. Press the [BLACK COPY START] key.
The document is scanned. If other document data has
previously been stored, the new data will be added on
after the old data.
If you used the document glass and have another page to scan, change the pages
and then press the [BLACK COPY START] key again. Repeat this procedure until
all pages have been scanned, and then touch the [READ-END] key that appears
in the message screen. When the document data has been stored in the Public
Box, "JOB STORED." appears on the screen, after which you will return to the
initial screen.
NOTE:
To cancel scanning
To cancel scanning of a document while scanning is in progress, press the [C] key. To
delete a document that has already been scanned, see “Deleting document data from
the Public Box” on page 5-41.
NOTE:
The machine has been initially set to automatically clear document data from the
Public Box after polling takes place and the data is sent to the polling machine. You
can use the key operator program to change this setting so that the data is not
automatically cleared and polling can take place repeatedly.
Xerox WorkCentre C226 User Guide
5-39
Fax Unit
Printing document data in the Public Box
To check a document that is stored in the public box, follow these steps to print it out.
If no documents have been stored, the [PUBLIC BOX] key will be greyed out.
1. In fax mode, touch the [SPECIAL MODES] key and then touch the [MEMORY
BOX] key.
Special Modes
OK
Address Review
If the address directory screen appears, touch the [CONDITION SETTINGS] key to display the condition settings
screen.
OWN NUMBER
SENDING
Memory Box
2. Touch the [PRINT DATA] key.
Polling Memory
ore
Print Data
3. Touch the [PUBLIC BOX] key.
Touching the [CANCEL] key will return you to the screen
of step 2.
Public Box
4. Press the [BLACK COPY START] key.
The message screen appears and the Public Box data is
stored as a print job.
To cancel printing, touch the [CANCEL] key.
5-40
Xerox WorkCentre C226 User Guide
Transmission and Reception Using the Polling Function
Deleting document data from the Public Box
This procedure is used to delete document data from the Public Box when it is no
longer needed.
1. In fax mode, touch the [SPECIAL MODES] key and then touch the [MEMORY
BOX] key.
Special Modes
OK
Address Review
If the address directory screen appears, touch the [CONDITION SETTINGS] key to display the condition settings
screen.
OWN NUMBER
SENDING
Memory Box
2. Touch the [DELETE DATA] key.
Memory
Data
Delete Data
3. Touch the [PUBLIC BOX] key.
The message screen appears.
Public Box
4. Touch the [YES] key.
All data in the Public Box is deleted and you return to the
screen of step 2.
Delete The Data In The Memory Box?
Public Box
No
Xerox WorkCentre C226 User Guide
If you touch the [NO] key, you will return to the screen of
step 2 without deleting the data.
Yes
5-41
Fax Unit
Restricting polling access (polling security)
If you wish to prevent unauthorised fax machines from polling your machine, turn on
the polling security function. When this function is turned on, polling permission will
only be granted if the fax number of the polling machine (as programmed in that
machine) matches one of the fax numbers you have programmed in your machine as
passcode numbers. Up to 10 fax numbers can be programmed as passcode numbers.
To turn on the polling security function and program passcode numbers, use the key
operator program as explained in “Passcode number setting” in the “Fax Unit” section
of the WorkCentre C226 System Administration Guide.
NOTES:
•
•
If you do not use the polling security function, the document will be sent to any fax
machine that polls you.
To use polling memory with polling security enabled, the sender's number of the
polling machine must be programmed in that machine and in your machine.
Own Number Sending
This function prints the date, time, your programmed name, your programmed fax
number, and the transmitted page number at the top centre of each page that you fax.
All pages that you fax include this information.
Example of fax page printed out by the receiving machine
11/JUN/2004/FRI 15:00
XEROX PLANNING DIV.
(1)
(2)
FAX No. 0666211221
(3)
P. 001/001
(4)
(1) Date and time: programmed in the custom settings (see “Custom Settings” on
page 1-37).
(2) Own name: programmed with the key operator program. (See the “Fax Unit” section of the WorkCentre C226 System Administration Guide.)
(3) Own fax number: programmed with the key operator program.
(4) Transmitted page number: 3-digit number appearing in the format, "page number/
total pages" (only the page number appears if you use manual transmission or
Quick On-Line transmission). If desired, you can use the key operator program to
omit the page number.
5-42
Xerox WorkCentre C226 User Guide
Faxing a Divided Original (Dual Page Scan)
Position of sender's information
The key operator program can be used to select whether the sender's information is
added outside the original data or inside the data. (See the “Fax Unit” section of the
WorkCentre C226 System Administration Guide). The initial factory setting is outside
the data.
Outside scanned data
None of the transmitted
image is cut off; however,
the transmitted data is
longer than the scanned
data, and thus when both
the sender and the
receiver use the same size
of paper, the printed fax
may either be reduced or
split up and printed on two
pages.
Length of
transmitted data
Direction of transmission
Length of
scanned data
Length of
transmitted data
Length of
scanned data
Direction of transmission
Inside scanned data
The top edge of the
scanned data will be cut off
by the sender's information; however, when both
the sender and the
receiver use the same size
of paper, the printed fax
will neither be reduced nor
split up and printed on two
pages.
Faxing a Divided Original (Dual Page Scan)
When an open book is scanned and faxed, you can use this function to divide the two
open pages of the book into two separate fax pages.
This function can only be used when the original is scanned using the document glass.
The other machine
Your machine
Book or sheet original
Printed out as
two separate pages
Transmission to
other machine
When page division is set,
[Example]
Scanned original size Transmitted document
A3 (11"x17")
Two A4 (8-1/2"x11") pages
the original is divided
into two pages when
scanned into memory
Xerox WorkCentre C226 User Guide
5-43
Fax Unit
Selecting Dual Page Scan
Follow the steps below and then send the fax.
1. In fax mode, touch the [SPECIAL MODES] key and then touch the [DUAL PAGE
SCAN] key.
Special Modes
Address Review
If the address directory screen appears, touch the [CONDITION SETTINGS] key to display the condition settings
screen.
Polling
Dual Page
Scan
Program
2. Touch the [OK] key.
aker
Redial
You will return to the initial screen.
Ok
ber
3. Place the original on the document glass, and perform the transmission operation.
If you have more originals to scan after pressing the [BLACK COPY START] key
and scanning the first original, change originals and repeat scanning until all
originals have been scanned. When finished, touch the [READ-END] key that
appears in the message display.
NOTE:
To cancel Dual Page Scan:
Press the [CLEAR ALL] key.
Programming Frequently Used Operations
This function allows you to store the steps of an operation, including the destination
and scanning settings, into a program. This function is convenient when you frequently
send documents, such as a daily report, to the same destination. Up to eight programs
can be stored.
Programs can be stored using the custom settings, and a name up to 18 characters
long can be assigned.
For information on storing, editing, and deleting programs, refer to “Storing a Program”
on page 5-78, and “Editing and Deleting Programs” on page 5-80.
5-44
Xerox WorkCentre C226 User Guide
Programming Frequently Used Operations
The following settings can be stored in a program:
•
•
•
•
Destination fax number
Polling
Dual Page Scan
Resolution and exposure
Auto-dial keys (one-touch or group keys) are used to store the destination fax number.
A full number cannot be entered using the numeric keys. When storing a broadcast
transmission or serial polling operation in a program, up to 100 destination fax numbers can be stored.
NOTES:
•
A program differs from a timer transmission in that it is not cleared from memory
after transmission takes place. A program thus allows you to repeatedly perform
the same type of transmission. Note, however, that programs do not allow you to
establish a timer setting for transmission.
With the exception of polling, reception operations cannot be stored in a program.
•
Using a Program
1. In fax mode, load the document.
Do not load a document if you are performing a polling
operation.
/
If you are going to use Dual Page Scan, place the document on the document glass.
2. Touch the [SPECIAL MODES] key and then the [PROGRAM] key.
Special Modes
Address Review
If the address directory screen appears, touch the [CONDITION SETTINGS] key to display the condition settings
screen.
Polling
Dual Page
Scan
Program
3. Touch the program key you wish to execute. Make sure the key is highlighted and
then touch the [OK] key.
Ok
g.
The program key you touched is selected and you return
to the screen of step 2.
The [PROGRAM] key is highlighted.
ram1
Xerox WorkCentre C226 User Guide
5-45
Fax Unit
4. Touch the [OK] key.
aker
Redial
You will return to the initial screen.
Ok
ber
5. If needed, set the original size and other settings, and then press the [BLACK
COPY START] key.
Transmission takes place according to the program.
NOTE:
Select functions that cannot be stored in a program before you press the [BLACK
COPY START] key in step 5. These functions include specifying the original size (see
“Manually Setting the Scanning Size” on page 5-13), two-sided scanning (see “Faxing
a Two-Sided Original” on page 5-23), and timer transmission (see “Setting Up a Timer
Transmission” on page 5-33.)
Transferring Received Faxes to Another Machine When
Printing Is Not Possible (Forwarding Function)
When printing is not possible because of a paper, toner, or other problem, you can
transfer received faxes to another fax machine if that machine has been appropriately
programmed in your machine. This function can be conveniently used in an office or
other workplace where there is another fax machine connected to a different phone
line. When a fax has been received to memory, the DATA light to the right of the
[IMAGE SEND] key blinks. (See “If received data cannot be printed” on page 5-29.)
1) Fax transmission
to your machine
Transfer destination
3) "Transfer" instruction
using custom settings
5-46
Other machine
Your machine
2) Printing not possible because of
paper or toner problem
4) Automatic dialing and
transmission to programmed
transfer destination
5) Printing
Xerox WorkCentre C226 User Guide
Transferring Received Faxes to Another Machine When Printing Is Not Possible (Forwarding Function)
NOTES:
•
•
•
When the transfer instruction is issued, all data that has been received in memory
to that point is transferred. The page that was being printed when the problem
occurred and all following pages will be transferred.
Data cannot be selected for transfer. Data received to a confidential memory box
cannot be transferred. (See “F-Code Confidential Transmission” on page 5-56.)
The result of transfer is indicated on an activity report. (See "“Viewing the
Communication Activity Report” on page 5-98.)
Using the Transfer Function
Program the fax number of the transfer destination
Use the key operator program to program the number of the transfer destination. (See
the “Fax Unit” section of the WorkCentre C226 System Administration Guide.) Only
one fax number can be programmed. The transfer function cannot be used unless a
number is programmed.
Xerox WorkCentre C226 User Guide
5-47
Fax Unit
Transferring received data
1. Press the [CUSTOM SETTINGS] key.
/
2. Touch the [FAX DATA FORWARD] key.
int
Clock
ive
gs
Fax Data
Forward
If there is no data to transfer or a transfer number has not
been programmed (See the “Fax Unit” section of the
WorkCentre C226 System Administration Guide.), a
message will appear and transfer will not be possible.
3. Touch the [YES] key.
Transfer The Received Data To Another
Device?
The machine automatically dials the transfer destination
programmed with the key operator program and begins
transfer.
If you do not wish to transfer the data, touch the [NO] key.
No
NOTES:
•
Yes
To cancel transfer
Press the [JOB STATUS] key, and then cancel the transfer in the same way as a
transmission. (See “Cancelling a Fax Transmission” on page 5-27.)
The data that was going to be transferred will return to print standby status in your
machine.
•
5-48
If the transfer is not possible because the line is busy or a transmission error
occurs, the data returns to print standby status in your machine.
Xerox WorkCentre C226 User Guide
Transmission Between Machines Supporting F-codes
Transmission Using F-Codes
This section explains F-code transmission, which gives you a convenient means of
performing advanced operations such as relay broadcast transmission and confidential transmission. Normally these functions require that the other fax machine be
a similar Xerox machine; however, F-code transmission enables these functions to
be performed with any other machine that supports F-code transmission. Please
read those sections which are of interest to you.
Transmission Between Machines Supporting F-codes
This machine supports the "F-code" standard as established by the ITU-T*.
Operations such as relay broadcast transmission and confidential transmission previously could only be performed with another Xerox fax machine; however, F-Code
communication makes it possible to perform these operations with fax machines of
other manufacturers that support F-Code communication.
Before using the functions explained in this section, make sure that the other fax
machine supports F-Code communication and has the same functions as your
machine. (the other machine may use a different name for the function).
* The ITU-T is a United Nations organization that establishes communications standards. It is a department of the International Telecommunication Union (ITU), which
coordinates global telecommunications networks and services.
Memory Boxes and Sub-Addresses/Passcodes
Required for F-code Transmission
"Memory boxes" can be created in the memory of fax machines that support F-Code
communication. These boxes are used to store faxes received from other machines
and documents to be transmitted when a polling request is received.
Fax machines that support F-code transmission enable the creation of a "memory
box" in the unit's memory. Up to 50 memory boxes can be created for a variety of purposes, and a name can be assigned to each box. A "sub-address" that indicates the
box's location in memory must be programmed, and if desired, a passcode can also
Xerox WorkCentre C226 User Guide
5-49
Fax Unit
be programmed to control access to the box. (A sub-address must be programmed,
however, a passcode can be omitted.)
MEMORY
0001
11245
7732123
XEROX
Document
Group 1
Product Planning
Dept.
3321
1115
7732123
Product Planning
Dept.
1115
3333
4444
010
Department
Manager
Reports
Section
Manager
11111111
123456
7732123
Sub-address (location in memory)
Select any number up to 20 digits.
Product
Planning
Dept.
Box name (used to manage
boxes in your machine)
Select a name of up to 18
characters.
Passcode (key)
Select any number up to 20 digits.
(Not required)
1115
Public Box*
* The Public Box is used for normal serial polling (see“Using Polling Memory” on
page 5-38).
When communication occurs involving a memory box, the communication will only
take place if the sub-address and passcode that the other machine sends match the
sub-address and passcode programmed in your machine for that box. Therefore, to
allow communication, you must inform the other party of the sub-address and passcode of the memory box. Likewise, to send a document to a memory box in another
machine or use polling to retrieve a document from that memory box, you must know
the sub-address and passcode of that memory box. (Box names are used only to manage boxes in the machine; you do not need to inform the other party of a box name the
other party only needs to know the sub-address and passcode.)
This machine uses the term "sub-address" for the location of the memory box and the
term "passcode" for the authorization number of the memory box; however, the products of other manufacturers may use different terms. When asking the other party for a
sub-address and passcode, you may find it useful to refer to the 3-character alphabetical terminology used by the ITU-T.
This machine
ITU-T
F-code polling memory
box
F-code Confidential box
F-code Relay Broadcast
Function
Sub-address
SEP
SUB
SUB
Passcode
PWD
SID
SID
5-50
Xerox WorkCentre C226 User Guide
Transmission Between Machines Supporting F-codes
Entering (Dialing) a Fax Number with a
Sub-Address and Passcode
When transmitting to a memory box in another fax machine, the sub-address and
passcode must be entered after the other machine's fax number. Enter the other
machine's fax number as explained for a normal transmission or for a polling operation
(see “Using the Polling Function” on page 5-36), and then enter the sub-address and
passcode as follows:
1. Dial the fax number of the other machine, or touch a one-touch key.
Spe
If the condition settings screen appears, touch the
[ADDRESS DIRECTORY] key to display the address
directory screen.
Corpo.Tps
Xerox Group
If the sub-address and passcode have been programmed into the one-touch key, the following steps are
not needed.
2. Touch the [SUB ADDRESS] key.
Condition
Settings
When the [SUB ADDRESS] key is touched, a slash "/"
appears at the end of the fax number. If you make a mistake, press the [C] key to clear the mistake.
Sub Address
Address Review
3. Use the numeric keys to enter the sub-address of the other machine's memory
box (max. 20 digits).
If you make a mistake, press the [C] key and re-enter the
correct digit(s).
4.Touch the [SUB ADDRESS] key once again.
A slash "/" appears at the end of the sub-address.
5.Use the numeric keys to enter the passcode of the
other machine's memory box (max. 20 digits)
If a passcode has not been established for the other box, this step is not
necessary.
NOTES:
•
•
You can program a sub-address and passcode into a one-touch key along with the
fax number (see “Storing One-Touch Keys” on page 5-68).
Manual transmission (on-hook dialing) using a sub-address and Passcode Is Not
Possible.
Xerox WorkCentre C226 User Guide
5-51
Fax Unit
Creating a Memory Box for F-Code Transmission
Operations that use F-Code memory boxes include F-Code polling memory (page 552), F-Code confidential transmission (page 5-56), and F-Code relay broadcast transmission (page 5-59). To perform these operations, a memory box for each type of
transmission must be created.
Memory boxes are created in the custom settings. Up to 50 boxes can be created.
The information programmed in each memory box varies slightly depending on
the type of operation. Refer to pages 5-81 to 5-88 for the procedures for creating,
editing, and deleting memory boxes.
After you have programmed a memory box, inform the other party of the box's subaddress and passcode.
NOTE:
If you attempt to create a box when 50 boxes have already been created, a message
will appear and you will not be able to create the box. First delete an unused box (see
“Editing and Deleting a Memory Box” on page 5-88), and then create the new box.
F-Code Polling Memory
F-code polling memory allows one fax machine to call another fax machine and activate reception of a document that has been scanned into the other machine's F-code
polling memory box. Calling another machine and activating reception is called F-code
polling, and scanning a document into a memory box for another machine to retrieve
by polling is called F-code polling memory. This function is approximately the same as
normal polling explained on page 5-34; however, it uses an F-code polling memory
box and is always protected by means of the sub-address and passcode.
How F-code polling memory works
Your machine
The other machine
1) F-code polling
(transmission request)
Sub-address and passcode
are transmitted to your machine
2) Check sub-address
and passcode
Do not match
Match
Sub-address
3) Polling memory
box opens
5-52
x
Passcode
Product Planning
4) Automatic transmission
of document data
to other machine
Xerox WorkCentre C226 User Guide
F-Code Polling Memory
F-code polling is when your machine calls another machine and retrieves a document
that was scanned into the polling memory box of that machine (the reverse of the
above diagram).
NOTES:
•
•
•
•
To perform polling or polling memory without using an F-code, refer to page 5-34.
To create an F-code memory box for polling memory, refer to page 5-81 and
“Setting for F-Code Polling Memory Boxes (Polling Times)” on page 5-84.
Unlike normal polling, the other machine's fax number is not programmed as a
passcode for F-code polling memory. The sub-address and passcode of the
polling memory box are always used for polling security.
The receiving machine bears the expense (phone charges) of the transmission.
Using F-Code Polling Memory
In order for another machine to retrieve a document from your machine, you must first
scan the document into the F-code polling memory box.
You can check scanned document data by printing it out (refer to “Checking and clearing document data in a memory box” on page 5-54).
NOTE:
When using F-code polling memory, do not set the reception mode to manual
reception.
Scanning a document into an F-code polling memory box
The procedure for scanning a document into an F-Code polling memory box (page 582) is similar to the procedure for scanning a document into the polling memory public
box. Instead of touching the [PUBLIC BOX] key in step 5 of “Scanning a document into
memory (Public Box) for polling memory” on page 5-38, touch the key of the memory
box into which you wish to scan the document. If document data has already been
stored in that box, a new document data will be added on to the existing data. If you no
longer need the existing data, delete it as explained in “Checking and clearing document data in a memory box” on page 5-54.
When you touch the memory box into which you wish to
scan the document, the key is highlighted and selected
as the scanning destination.
Canc
Marketing Group
Xerox Branch Ex
Public Box
NOTE:
When creating the memory box, you can select whether to have the scanned
document data automatically cleared after polling, or left it in the box to allow repeated
polling.
Xerox WorkCentre C226 User Guide
5-53
Fax Unit
Checking and clearing document data in a memory box
The procedure for checking document data in an F-code polling memory box by printing it and the procedure for clearing data from a box are almost the same as the procedures for printing and clearing document data from the Public Box.
Instead of touching the [PUBLIC BOX] key in step 3 of “Printing document data in the
Public Box” on page 5-40 or “Deleting document data from the Public Box” on page 541, touch the key of the desired memory box.
If a document icon (
) appears to the right of a memory box key, document data has been stored in that box
and you can print it out.
ta
Marketing Group
Xerox Branch Ex
However, the contents cannot be printed or deleted
while the memory box is being used for transmission.
Public
Procedure for F-Code Polling
Make sure that a document has not been loaded in the DADF tray or on the document
glass, and then follow the steps below.
NOTES:
•
•
You must know the sub-address (SEP) and passcode (PWD) of the other
machine's F-code polling memory box.
Serial polling (selecting multiple fax machines to be polled using a group key or by
touching the [NEXT ADDRESS] key) is not possible with F-code polling.
1. In fax mode, touch the [SPECIAL MODES] key and then the [POLLING] key.
Special Modes
Address Review
Polling
Dual Page
Scan
Program
If the address directory screen appears, touch the [CONDITION SETTINGS] key to display the condition settings
screen.
The [POLLING] key is highlighted and the polling icon
appears.
To cancel polling, touch the [POLLING] key once again
so that it is not highlighted.
2. Touch the [OK] key.
aker
Redial
You will return to the initial screen.
Ok
5-54
Xerox WorkCentre C226 User Guide
F-Code Polling Memory
3. Enter the fax number, sub-address, and passcode of the other fax machine.
Spe
Spe
Corpo.Tps
Corpo.Tps
Xerox
Xerox Group
Group
To use a one-touch key, touch the [ADDRESS DIRECTORY] key to display the address directory.
Refer to steps 2 through 5 of “Entering (Dialing) a Fax
Number with a Sub-Address and Passcode” on page 551 for the procedure for entering sub-addresses and
passcodes.
4.Press the [BLACK COPY START] key.
"JOB STORED." appears on the screen.
After communicating with the other machine, your
machine prints the received document data.
NOTES:
•
•
•
Cancelling a transmission
Press the [JOB STATUS] and cancel the transmission in the same way as when
cancelling a stored transmission. (See “Cancelling a Fax Transmission” on
page 5-27.)
Only one F-code polling timer operation can be stored (see page 5-33).
Xerox WorkCentre C226 User Guide
5-55
Fax Unit
F-Code Confidential Transmission
F-Code confidential transmission provides a secure means of faxing confidential documents. The sub-address and passcode programmed in the memory box restrict the
recipients of the fax, and once received in the memory box, the fax can only be printed
by someone who knows the print passcode (see “Setting for F-Code Confidential
Transmission Memory Boxes (Print PIN)” on page 5-85).
This function is convenient when sending important documents that you only want a
specific person to see, or when multiple departments share a single fax machine.
The other machine
Your machine
When data is printed
1) Document data, together
with a sub-address and passcode,
are sent to your machine.
4-1)
Enter print PIN.
(4-digit number)
Sub-address
x
Match
Passcode
Do not match
2) Check sub-address
and passcode
MARK
3) Data is read into the confidential
memory box (reception is permitted)
4-2)
Data is only
printed if correct
passcode is entered.
MARK
As the above diagram shows, receiving document data to the machine's F-code confidential memory box is called F-code confidential reception, and sending document
data to another machine's F-code confidential memory box is called F-code confidential transmission.
NOTES:
•
•
5-56
Refer to pages 5-81 through 5-88 for the procedures for creating, editing, and
deleting F-code confidential memory boxes.
Take care not to forget the print PIN. programmed in the F-code confidential
memory box. If you forget the passcode, consult your dealer.
Xerox WorkCentre C226 User Guide
F-Code Confidential Transmission
F-Code Confidential Transmission
F-code confidential transmission is performed in the same way as a normal transmission; however, you must enter the sub-address (SUB) and passcode (SID) after the
fax number of the other machine. (You can omit the passcode if the other machine
does not use a passcode.)
For the procedure for entering sub-addresses and passcodes, see “Entering (Dialing)
a Fax Number with a Sub-Address and Passcode” on page 5-51.
F-code confidential reception is performed in the same way as normal reception (see
“Basic Operations”); however, you must inform the other party of the sub-address
(SUB) and passcode (SID) of your confidential memory box. (If a passcode is not programmed in the confidential memory box, only inform the other party of the subaddress (SUB).)
NOTE:
An F-code confidential transmission can be used in combination with the broadcast
transmission function (page 5-30) or timer transmission function(page 5-33), and can
be stored in a program (page 5-85).
Printing a Document Received to an F-Code
Confidential Memory Box
Faxes received in an F-Code confidential memory box are printed out by entering the
PRINT PIN 4-digit passcode (0000 to 9999) that was programmed when the box was
created.
NOTES:
•
•
•
You can have a transaction report printed each time a fax is received in an F-Code
confidential box to inform you of the reception. This setting is enabled in the key
operator programs (see the “Fax Unit” section of the WorkCentre C226 System
Administration Guide).
Document data received to an F-code confidential memory box is automatically
cleared after printing.
When a new fax is received to an F-code confidential box while a previously
received fax is still stored in the box, the new fax is added on after the previous
fax.
1. In fax mode, touch the [SPECIAL MODES] key and then touch the [MEMORY
BOX] key.
Special Modes
OK
Address Review
If the address directory screen appears, touch the [CONDITION SETTINGS] key to display the condition settings
screen.
The memory box menu screen appears.
Memory Box
Xerox WorkCentre C226 User Guide
To cancel the operation, touch the [CANCEL] key.
5-57
Fax Unit
2. Touch the [PRINT DATA] key.
Confidential
Reception
Data
Print Data
3. Touch the memory box key that has the document data you wish to print.
Select Memory Box.
Memory Box - Confidential Reception
Sla Scanner Team
Marketing Group
SLA SCANNER TEAM
SHARP BRANCH EX
A
mark appears to the right of memory boxes that
have received document data.
A memory box cannot be selected while it is being used
for transmission.
4. Press the numeric keys to enter the 4-digit print PIN.
As each digit is entered, "-" changes to "
".
If the print PIN you entered is correct, the message
"PRESS [START] TO PRINT DATA." appears.
Enter Pin Via The 10-Key.
Cancel
If the print PIN is not correct, the message "PIN IS NOT
VERIFIED." appears and you return to the entry screen.
To return to the screen of step 3, touch the [CANCEL]
key.
5. Press the [BLACK COPY START] key.
Printing begins.
NOTE:
5-58
If received data remains in an F-code confidential memory box, the memory box
cannot be deleted.
Xerox WorkCentre C226 User Guide
F-Code Relay Broadcast Transmission
F-Code Relay Broadcast Transmission
The F-Code relay broadcast function allows the machine to act as a relay machine for
a broadcast transmission. The end receiving machines are stored in the machine's FCode relay memory box, and when the machine receives a relay request from another
F-Code machine, it will relay the fax to all of the stored end receiving machines.
The relay machine and the originating machine that requests the relay transmission
must both support F-codes; however, the end receiving machines programmed in the
F-code relay broadcast memory box do not need to support F-codes.
2) Check sub-address
and passcode
Sub-address
x
Passcode
S.F.
Does not match
1) Document is sent from
machine requesting
relay transmission
Relay machine (your machine)
Match
Relay request machine (sends document)
3) Document data is
read into relay broadcast
memory box
(reception is permitted).
4) Document is automatically transmitted
to end receiving machines programmed
in the relay broadcast memory box.
Receiving machine A
Receiving machine B
Receiving machine C
The machine that originally sends the document is called the relay request machine,
and the machine that has a memory box containing the end receiving machines and
which relays the received document to those machines is called the relay machine.
The relay machine also prints the document sent by the relay request machine.
For example, corporate headquarters in Seattle wants to send the same document to
branch offices in San Francisco, Oakland, Berkeley, and San Jose. If the San Francisco office creates a relay broadcast memory box and programs the Oakland, Berkeley, and San Jose offices as end receiving destinations, the overall phone charges will
be lower than if the Seattle office uses the normal broadcast transmission function
(page 5-30). This function can also be combined with a timer setting (page 5-33) to
take advantage of off-peak rates, allowing a further reduction in phone charges.
Xerox WorkCentre C226 User Guide
5-59
Fax Unit
Transmission by the relay machine is called "F-code relay broadcast transmission",
and transmission from the relay request machine to the relay machine is called "relay
request transmission".
NOTES:
•
•
To create an F-code relay broadcast memory box and program, edit, and delete
end receiving machines, refer to pages 5-81 to 5-88. When creating a box, a
passcode (SID) can be omitted.
The relay request machine only bears the expense of sending the document to the
relay machine. The relay machine bears the expense of sending the document to
each of the end receiving machines.
Using the F-Code Relay Broadcast Function
(your machine is the relay machine)
When a document is received from a relay request machine, the F-code relay broadcast function transmits the document to the end receiving machines using a memory
box only if the sub-address and passcode sent by the relay request machine are correct.
Refer to pages 5-81 through 5-88 for the procedures for creating, editing, and
deleting memory boxes.
Up to 30 end receiving machines (30 one-touch keys or group keys) can be programmed in the F-code relay broadcast memory box.
A document received from a relay request machine is initially stored in the memory
box of your machine. Your machine (the relay machine) also prints the document, thus
the document is first stored as a print job and then as transmission jobs to each of the
programmed end receiving machines. The document data is automatically cleared
after transmission to all end receiving machines is completed.
NOTE:
5-60
End receiving machines are programmed using auto-dial keys (one-touch keys or
group keys). If you need to program an end receiving machine that has not been
programmed in a one-touch key, program the number in a one-touch key first and then
create the memory box.
Xerox WorkCentre C226 User Guide
Using an Extension Phone
Using the F-Code Relay Request Function
(your machine requests a relay broadcast)
Ask the operator of the other F-Code machine (the relay machine) to create an FCode relay broadcast memory box that contains the end receiving machines to which
you wish to send a fax, and ask for the sub-address (SUB) and passcode (SID) of that
box.
When you dial the relay machine to send the fax, enter the sub-address and passcode
after the fax number. The fax will be stored in the relay machine's memory box, and
the relay machine will call each of the programmed end receiving machines and relay
the fax to those machines. (If a passcode (SID) is not programmed in the memory box,
enter only the sub-address when dialing.)
Aside from the method of dialing the relay machine, the transmission procedure
is the same as for a normal transmission.
Refer to “Entering (Dialing) a Fax Number with a Sub-Address and Passcode”
on page 5-51 for the procedure for entering a sub-address and passcode after
the fax number of the other machine.
Convenient Methods of Use
This section explains functions that widen the scope of use of the fax machine.
Please read those sections that are of interest to you.
Using an Extension Phone
You can connect a telephone to the machine and use it as an extension phone to
place and receive calls like any normal phone. You can also activate fax reception
from the phone (remote operation).
NOTE:
If you connect a combination telephone/answering machine to the machine, you will
not be able to use the answering machine function.
Xerox WorkCentre C226 User Guide
5-61
Fax Unit
Sending a Fax after Talking (Manual Transmission)
If the other fax machine is set to manual reception, you can talk to the other party and
then send a fax without breaking the connection. This procedure is called manual
transmission.
NOTE:
Automatic redialing (see “If the receiving party is busy” on page 5-25) will not take
place if the line is busy.
1. Make sure the machine is in fax mode.
When the [IMAGE SEND] key light is on, the machine is
in fax mode. If the light is not on, press the [IMAGE
SEND] key.
/
When the network scanner option is installed, touch this
key to return to the initial screen of fax mode or scanner
mode, whichever mode was selected last. To switch to
fax mode from scanner mode, touch the [SCANNER/
FAX] key.
2. Load the original.
NOTE:
If you have loaded the original on the document glass, you can only send one page by
manual transmission.
3. Set the original size, resolution, exposure and other scanning conditions as
needed.
•
•
•
Manually Setting the Scanning Size (see page 5-13)
Selecting the Resolution (see page 5-14)
Selecting the Exposure (see page 5-16)
4. Lift the extension phone.
The [SPEAKER] key can also be used. (See “One-touch dialing” on page 5-17.)
5. Dial the number of the other party or touch a one-touch key.
Spe
If the condition settings screen appears, touch the
[ADDRESS DIRECTORY] key to display the address
directory screen.
Corpo.Tps
Xerox Group
You cannot use a group key or a one-touch key that
includes a sub-address and passcode.
6. Speak to the other party when they answer.
If you used the [SPEAKER] key to dial, lift the extension phone to talk.
5-62
Xerox WorkCentre C226 User Guide
Using an Extension Phone
7. After the other party switches to fax reception, press your [BLACK COPY START]
key.
Transmission begins.
8. Replace the extension phone.
Using an Extension Phone to Receive a Fax
The machine normally receives faxes automatically after ringing (page 5-28); however,
when an extension phone is connected, you can set the reception mode to "MANUAL
RECEPTION". This will allow you to talk to the other party first and then receive a fax.
This is convenient when you only have one telephone line and receive more voice
calls than faxes. You must answer all calls on the extension phone, and activate fax
reception after you verify that a call is a fax transmission.
NOTE:
The reception mode is initially set to "AUTO RECEPTION". If you have not connected
an extension phone, keep the reception mode set to "AUTO RECEPTION".
Changing the reception mode to "MANUAL RECEPTION"
1. Press the [CUSTOM SETTINGS] key.
/
2. Touch the [RECEIVE MODE] key.
List Print
Receive Mode
Xerox WorkCentre C226 User Guide
5-63
Fax Unit
3. Touch the [MANUAL RECEPTION] key.
The [MANUAL RECEPTION] key is highlighted.
Auto Reception
Manual Reception
4. Touch the [OK] key.
The reception mode is set to "MANUAL RECEPTION".
Ok
Reception
Reception
NOTE:
To return the reception mode to AUTO RECEPTION, touch the [AUTO RECEPTION]
key in step 3 above.
Receiving a Fax After Talking (Manual Reception)
When an extension phone is connected to the machine and you have set the reception
mode to "MANUAL RECEPTION" (page 5-63), you can talk to a person sending a fax
manually and then begin fax reception without breaking the connection.
When the extension phone is in Fax mode
A fax can be received manually even when transmission is in progress.
1. When the extension phone rings, lift the extension phone and speak.
If you hear a fax tone through the extension phone, do not speak and proceed to the
next step.
2. With the extension phone still lifted, touch the [FAX RECEIVE] key.
Fax Memory:100%
Address
Directory
Reception begins when the other party begins transmission.
Fax Receive
Special Modes
5-64
Xerox WorkCentre C226 User Guide
Using an Extension Phone
3. Replace the extension phone.
A beep sounds when reception ends. The received fax is printed.
NOTES:
•
•
If there are stored print jobs, the fax is printed after the stored print jobs.
You can also talk on the extension phone and manually receive a fax while the
machine is printing.
If the extension phone rings during printing, lift the extension phone and speak. To
receive a fax, press the [IMAGE SEND] key with the extension phone still lifted.
When you hear a fax tone through the extension phone, touch the [FAX RECEIVE]
key.
Activating fax reception from an extension phone (remote
reception)
After speaking on the extension phone, you can activate fax reception from the extension phone. This is called "remote reception". After speaking, or when you hear a fax
tone through the extension phone, perform the following procedure with the extension
phone still lifted. ("Remote reception" is only possible when the call is made by the
other party.)
NOTE:
The following procedure is not possible if you are on a pulse dial line and your
extension phone cannot produce tone signals. To find out whether your extension
phone can produce tone signals, refer to the manual for your extension phone.
1. If you are on a pulse dial line, set your phone to issue tone signals.
Refer to your phone's manual to set the phone to issue tone signals.
If your phone is already set to issue tone signals, proceed to the next step.
2. Press the
twice.
key on the extension phone's keypad, and then press the
key
Fax reception is activated.
3. Replace the extension phone.
NOTE:
The one-digit number that is used to activate fax reception from an extension phone
(initially set to "5") is called the "remote reception number". You can change this
number to any number from 0 to 9 with the key operator program. (See the “Fax Unit”
section of the WorkCentre C226 System Administration Guide.)
Xerox WorkCentre C226 User Guide
5-65
Fax Unit
Programming
This section explains the procedures for programming and the information programmed in auto dial keys (one-touch and group keys), programs, user indexes, and
memory boxes.
Auto dial keys (one-touch keys and group keys), user indexes, and memory boxes are
stored, edited and deleted at the operation panel of the machine. This section explains
the procedures for storing, editing, and deleting using the operation panel.
Storing, Editing, and Deleting Auto Dial Keys and Programs
This section explains the procedures for storing, editing, and deleting auto-dial keys
(one-touch keys and group keys) and programs, which simplify the transmission procedure. (The procedure for using one-touch keys and group keys is explained in
“Transmission by Auto-Dialing (One-Touch Dialing and Group Dialing)” on page 5-22
and the procedure for using programs is explained in “Using a Program” on page 545.)
A combined total of 500 one-touch keys and group keys can be stored, and eight programs can be stored. If you attempt to store more than this, a warning message will
appear. In this case, delete any auto-dial keys or programs that are no longer needed
(one-touch keys: page 5-72; group keys: page 5-76; programs: page 5-80), and then
store the new auto-dial key or program.
NOTE:
To cancel a storing, editing, or deleting operation, press the [CLEAR ALL] key. You will
return to the initial screen.
To store, edit, or delete an auto-dial key (one-touch key or group key) or program, first
follow steps 1 through 4 below. In the screen of step 4, touch the appropriate key for
storing, editing, or deleting.
/
5-66
1. Press the [CUSTOM SETTINGS] key.
Xerox WorkCentre C226 User Guide
Storing, Editing, and Deleting Auto Dial Keys and Programs
2. Touch the [ADDRESS CONTROL] key.
Address
Control
Re
Key Operator Prog
3. Touch the [DIRECT ADDRESS / PROGRAM] key.
The direct address / program menu appears.
Direct Address / Program
Custom Index
F-Code Memory Box
4. Touch the desired key and perform the programming operation.
Refer to the pages indicated below for the operation you wish to perform.
Custom Settings
Direct Address / Program
Ok
Store
Individual
Group
[INDIVIDUAL] key
Store a one-touch
key (page 5-68)
Program
[PROGRAM] key
Store a program
(page 5-78)
[GROUP] key
Store a group key
(page 5-74)
NOTE:
Amend/Delete
[AMEND/DELETE] key
•
One-touch key
(page 5-72)
•
Group key
(page 5-76)
•
Program
(page 5-80)
One-touch keys are used to select destinations for group dialing and programs. If no
one-touch keys have been stored, the [GROUP] key and [PROGRAM] key will be
greyed out and it will not be possible to store a group or a program.
Xerox WorkCentre C226 User Guide
5-67
Fax Unit
Storing One-Touch Keys
Follow the steps below to store a one-touch key after you have completed steps 1
through 4 beginning on page 5-66.
1. Touch the [NAME] key.
The "No." that automatically appears is the lowest number from 001 to 500 that has not yet been programmed.
When [NAME] is touched, the letter-entry screen
appears. Enter up to 36 characters for the name.
Direct Address / Individual
Name
Index
Fax
Refer to page 5-90 for the procedure for entering letters.
Key Name
2. Touch the [INITIAL] key.
Initial
Mode
3. Touch a letter key.
The first letter (initial) of the name entered in step 1 is initially selected and is highlighted. If you wish to change
the letter, touch a different letter key.
Direct Address / Individual
Initial
NOTE:
The initial you enter here determines the position of the one-touch key in the ABC
index. For information on the ABC index, refer to
Index keys on page 5-9.
4. Touch the [OK] key.
Next
Exit
Ok
Other
5-68
Xerox WorkCentre C226 User Guide
Storing, Editing, and Deleting Auto Dial Keys and Programs
5. Touch the [INDEX] key.
Name
Xerox Corporation
Fax No
Index
Key Name
6. Touch an index key.
Next
Direct Address / Individual
Exit
Ok
Index
Select The Custom Index Where You Register This Address.
User 1
User 2
User 3
User 4
User 5
User 6
Do You Register This Address At The [Frequent Use], Too?
Yes
•
•
•
No
Select one of the upper row of keys ([USER 1] through [USER 6]) to determine the location of the one-touch key when the GROUP index is displayed
instead of the ABC index (refer to page 5-9).
The lower keys are for selecting whether to include the one-touch key in the
[FREQUENT USE] index.
If you touch the wrong key, simply touch the correct key.
7. Touch the [OK] key.
8. Touch the [FAX No.] key.
The fax number entry screen appears.
Corporation
Fax No.
Mode
Xerox WorkCentre C226 User Guide
5-69
Fax Unit
9. Use the numeric keys to enter the fax number.
Direct Address / Individual
Fax No.
Next
Exit
Cancel
Ok
Enter The Fax No. Via The 10-Key Pad, Then Press [Ok].
Pause
0666211221
Sub Address
To insert a pause between digits of the number, touch the [PAUSE] key. The pause
appears as a hyphen "-". Refer to “Pause time setting” in the “Fax Unit” section of the
WorkCentre C226 System Administration Guide to set the duration of the pause.
If you make a mistake, press the [C] key to clear one digit at a time, and then enter the
correct digit(s).
If you are not going to enter a sub-address and passcode after the fax number, proceed to step 12.
NOTES:
•
•
For information on sub-addresses and passcodes, see “Transmission Between
Machines Supporting F-codes” on page 5-49.
A maximum of 64 digits can be entered, including the fax number, sub-address,
passcode, any pauses (hyphens), and slashes "/" (to separate the sub-address
and passcode).
10. If you need to enter a sub-address, touch the [SUB ADDRESS] key and then enter
the sub-address with the numeric keys.
Cancel
Ok
n Press [Ok].
Pause
Sub Address
When you touch the [SUB ADDRESS] key, a slash is
entered after the fax number. Continue by entering the
sub-address (max. 20 digits).
If you do not wish to enter a passcode, proceed to step
12.
11. If you wish to enter a passcode, touch the [SUB ADDRESS] key once again and
enter the passcode with the numeric keys.
No. Via The 10-Key Pad, Then Press [Ok
When you touch the [SUB ADDRESS] key, a slash is
entered after the sub-address. Continue by entering the
passcode (max. 20 digits).
0666211221/3456/
5-70
Xerox WorkCentre C226 User Guide
Storing, Editing, and Deleting Auto Dial Keys and Programs
12. Touch the [OK] key.
You will return to the one-touch key programming screen. "REGISTRATION IS
COMPLETED" will appear highlighted to the right of "No.".
NOTE:
The "FAX No." line only shows 32 digits, regardless of how many digits actually
programmed.
13. Check the key name.
The characters appearing next to the [KEY NAME] key will be displayed in the key.
Only the first 18 characters of the name entered in step 1 will be displayed. If you
need to change the name that will be displayed in the key, touch the [KEY NAME]
key.
Registration Is Completed.
Name
Xerox Corporation
Index
User 3
Key Name
Fax No.
Xerox Corporation
If you do not wish to change the name, this step is not
necessary.
Refer to page 5-90 for the procedure for entering characters.
14. Check the transmission settings.
The initial transmission settings are "TRANSMISSION SPEED: 33.6 kbps" and
"INTERNATIONAL CORRESPONDENCE MODE: NONE". To change either of the
settings, touch the [MODE] key.
ration
FAX No.
Initial
0666211221/3456/987654
Mode
33.6 kbps/None
If you do not wish to change the settings, this step is not
necessary.
After touching the [MODE] key, you can change either of
the two settings. When finished, touch the [OK] key.
ration
Transmission speed
Speed selections are 33.6 kbps, 14.4 kbps, 9.6 kbps, and 4.8 kbps. The higher the
number, the faster the transmission speed.
NOTE:
Set the transmission speed only when you know what speed is most suitable, such as
when you are sending a fax to a foreign country and telephone line conditions are bad.
If you do not know the line condition, do not change this setting.
Xerox WorkCentre C226 User Guide
5-71
Fax Unit
International correspondence mode
Selections are NONE, MODE 1, MODE 2, and MODE 3.
NOTES:
•
•
When sending a fax to a foreign country, telephone line conditions can sometimes
distort the fax or interrupt the transmission. Selecting the right international
correspondence mode can help alleviate these problems.
If errors frequently occur when sending a fax to a foreign country, try each of
modes 1 to 3 and select the mode that enables the best transmission.
15. When you have finished programming the one-touch key, touch the [EXIT] key. If
you wish to program another one-touch key, touch the [NEXT] key.
Next
Exit
Initial
.
S
0666211221/3456/987654
Mode
Touching the [EXIT] key returns you to the screen of step
2 on page 5-67.
Touching the [NEXT] key returns you to the screen of
step 1 on page 5-68.
33.6 kbps/NONE
Editing and Deleting One-Touch Keys
If you wish to delete a one-touch key or change the fax number, name, or other information programmed in a one-touch key, follow steps 1 through 3 beginning on page 567 and then perform the following procedure.
1. Touch the [AMEND/DELETE] key.
Amend/Delete
2. Touch the one-touch key that you wish to edit or delete.
Exit
Direct Address / Amend/Delete
Select Address To Amend/Delete.
Xerox Corporation
Corpo.Tps
Xerox Group
D
E
F
G
H
Frequent Use
•
•
•
5-72
Program
ABCD
EFGHI
JKLMN
OPQRST
UVWXYZ
ABC
Group
To edit a one-touch key, follow steps 3 and 4.
To delete a one-touch key, follow steps 5 and 6.
When you have finished editing or deleting, touch the [EXIT] key.
Xerox WorkCentre C226 User Guide
Storing, Editing, and Deleting Auto Dial Keys and Programs
3. Touch the key corresponding to the information you wish to change (change the
information in the same way as you stored the information on page 5-68).
Delete
Direct Address / Amend/Delete
Name
Initial
Xerox Corporation
Index
Key Name
User 3
Fax No.
Xerox Corporation
Exit
S
0666211221/3456/987654
Mode
33.6 kbps/None
4. Make sure that your changes are correct, and then touch the [EXIT] key.
Exit
Delete
You will return to the screen of step 2.
If you wish to change another one-touch key, repeat
steps 2 through 4.
Initial
S
5. Touch the [DELETE] key.
Delete
Exit
Initial
S
6. Touch the [YES] key.
You will return to the screen of step 2.
If you wish to delete another one-touch key, repeat steps
2, 5, and 6.
Delete The Address?
Xerox Group
No
Yes
If you cannot edit or delete a one-touch key
If you attempt to edit or delete a one-touch key in the following situations, a warning
message will appear and editing/deletion will not be possible.
•
The one-touch key you wish to edit or delete is currently being used for
transmission or is used in a currently stored transmission job (including a timer
transmission). (See “Cancelling a Fax Transmission” on page 5-27.)
Xerox WorkCentre C226 User Guide
5-73
Fax Unit
•
•
•
•
The one-touch key is included in a group key. (See “Editing and Deleting Group
Keys” on page 5-76.)
The one-touch key is included in a group of end receiving machines for an F-code
relay broadcast operation. (See “Editing and Deleting a Memory Box” on page 588.)
The one-touch key is included in a program. (See “Editing and Deleting Programs”
on page 5-80.)
If the key is being used for a transmission currently in progress or a stored
transmission, cancel the transmission or wait until it is completed and then change
or delete the key. If the key is included in a group, delete the key from the group
and then change or delete it.
Storing a Group Key
Up to 100 destinations can be stored in a group key.
To program a group key, follow steps 1 through 3 beginning on page 5-66, touch the
[GROUP] key in step 4, and then follow these steps.
NOTE:
Only one-touch key destinations can be stored in a group key. If you wish to store a
destination that is not programmed in a one-touch key, first program the destination in
a one-touch key and then store it in the group key.
1. Follow the same steps 1 through 7 of “Storing One-Touch Keys” (page 5-68) to
enter a [GROUP NAME], [INITIAL], and [INDEX].
* In step 1 on page 5-68, touch the [GROUP NAME] key instead of the [NAME]
key.
2. Touch the [ADDRESS] key.
ame
Group-Digital Document
X
User 2
Address
me
5-74
Xerox WorkCentre C226 User Guide
Storing, Editing, and Deleting Auto Dial Keys and Programs
3. Touch one-touch keys of the destinations that you wish to store in the group.
Touch index keys and the
keys as needed.
Direct Address / Group
Select Address.
A
B
C Group
Xerox Corporation
Corpo.Tps
Address Review
Frequent Use
•
•
NOTE:
ABCD
EFGHI
JKLMN
OPQRST
UVWXYZ
ABC
Group
One-touch keys that have been touched are highlighted.
If you touch the wrong key, simply touch it again to cancel the highlighting and
remove the destination from the group.
Keys that are greyed out are group keys. Group keys cannot be selected.
•
To check the destinations that you have stored in the group, touch the
[ADDRESS REVIEW] key.
A list of the destinations appears.
To delete a destination, touch the key of the destination
and then touch the [YES] key in the message that
appears.
N
Address Review
OPQRST
UVWXYZ
ABC
Group
4. Touch the [OK] key in the screen of step 3.
You will return to the screen of step 2. The number of selected destinations will
appear next to the [ADDRESS] key.
5. Check the name of the key (refer to step 13 on page 5-71).
The characters appearing next to the [KEY NAME] key will be displayed in the
group key. To change these characters, touch the [KEY NAME] key. This step is
not necessary if you do not wish to change the characters.
The procedure for entering characters is explained on page 5-90.
6. Touch the [EXIT] key when you have finished programming the group key.
If you wish to program another group key, touch the [NEXT] key.
When you touch the [EXIT] key, you will return to the screen of step 4 on page 567.
To store another group, touch the [NEXT] key.
Xerox WorkCentre C226 User Guide
5-75
Fax Unit
Editing and Deleting Group Keys
If you need to delete a group key or change its name or a one of its stored destinations
in a group key, first follow steps 1 through 3 beginning on page 5-66, and then perform
the following procedure.
1. Touch the [AMEND/DELETE] key.
Amend/Delete
2. Touch the group key that you wish to edit or delete.
Exit
Direct Address / Amend/Delete
Select Address To Amend/Delete.
Xerox Corporation
Corpo.Tps
Xerox Group
D
E
F
G
Program
H
Frequent Use
•
•
•
ABCD
EFGHI
JKLMN
OPQRST
UVWXYZ
ABC
Group
To edit a group key, follow steps 3 and 4.
To delete a group key, follow steps 5 and 6.
When you have finished editing or deleting, touch the [EXIT] key.
3. Touch the key of the item you wish to change (to edit the item, follow the same
steps as for one-touch keys on page 5-72).
Direct Address / Amend/Delete
Delete
Exit
002
Group Name
Index
Key Name
5-76
Xerox Group
User 2
Initial
Address
S
2 Addresses
Xerox Group
Xerox WorkCentre C226 User Guide
Storing, Editing, and Deleting Auto Dial Keys and Programs
•
To edit the destinations stored in the group key, touch the [ADDRESS] key.
The following screen appears.
Direct Address / Group
Select Address.
A
B
C Group
Xerox Corporation
Corpo.Tps
Address Review
Frequent Use
•
ABCD
EFGHI
JKLMN
OPQRST
UVWXYZ
ABC
Group
The one-touch keys stored in the group are highlighted. To add another onetouch key to the group, touch the key to highlight it.
To delete a one-touch key from the group, touch the key so that it is no longer
highlighted.
To show a list of the destinations stored in the group key, touch the
[ADDRESS REVIEW] key.
•
•
4. When you have finished editing the group key, touch the [EXIT] key in the screen
of step 3.
Delete
Exit
Initial
If you wish to edit another group key, repeat steps 2
through 4.
S
ES
Deleting a group key
5. Touch the [DELETE] key.
Delete
Exit
Initial
S
ES
6. Touch the [YES] key.
If you wish to delete another group key, repeat steps 2,
5, and 6.
Delete The Address?
Xerox Group
No
Xerox WorkCentre C226 User Guide
Yes
5-77
Fax Unit
NOTE:
If you cannot edit or delete a group key
If you attempt to edit or delete a group key in the following situations, a warning
message will appear and editing/deletion will not be possible.
If the group is being used for a transmission currently in progress or a stored
transmission, cancel the transmission or wait until it is completed and then change or
delete the group. If the group is included in a group of end receiving machines for the
F-code relay broadcast function or a program, delete the group from the end receiving
machines or the program and then change or delete it.
•
•
•
The one-touch key you wish to change or delete is currently being used for
transmission or is used in a currently stored transmission job (including a timer
transmission). (See “Cancelling a Fax Transmission” on page 5-27.)
The group key is included in the end receiving machines for an F-code relay
broadcast operation. (See “Editing and Deleting a Memory Box” on page 5-88.)
The group key is included in a program. (See “Editing and Deleting Programs” on
page 5-80.)
Storing a Program
You can store a destination fax number, polling, dual page scan, and resolution and
exposure settings in a program. This enables you to call up the program and perform
the transmission by means of a simplified operation. (See “Using a Program” on
page 5-45.)
To store a program, follow steps 1 through 3 beginning on page 5-66, touch the [PROGRAM] key in step 4, and then follow these steps.
NOTE:
A timer setting (page 5-33) cannot be included in a program.
When storing a program for an F-Code operation, one touch keys for destinations
must include sub-addresses.
1. Touch the [PROGRAM NAME] key.
Program
No.1
Program Name
Address
Settings
The "No." that automatically appears is the lowest number from 1 to 8 that has not yet been programmed.
When the [PROGRAM NAME] key is touched, the letterentry screen appears. Enter up to 18 characters for the
name.
Resolution
Special
Modes
5-78
Refer to page 5-90 for the procedure for entering letters.
Xerox WorkCentre C226 User Guide
Storing, Editing, and Deleting Auto Dial Keys and Programs
2. Touch the [SETTINGS] key.
No.1
Program Name
Program For Xerox
Address
Settings
Resolution
Special
Modes
3. Touch the keys as appropriate to store the frequently used settings.
Enter Program You Require.
Cancel
Ok
Address
Directory
Auto
Exposure
Standard
Resolution
Special Modes
Address Review
For the detailed procedures for each of the settings, refer to the explanations of
those features on the following pages.
•
•
•
•
•
•
NOTE:
[RESOLUTION](page 5-14)
[EXPOSURE](page 5-16)
[ADDRESS DIRECTORY] (page 5-30)
[SPECIAL MODES]
POLLING (page 5-36)
DUAL PAGE SCAN (page 5-44)
Up to 100 destinations can be stored in a program. However, you cannot directly enter
fax numbers with the numeric keys. A destination must be programmed in an auto dial
key (one-touch key or group key) before it can be stored in a program.
4. Touch the [OK] key.
Your settings are displayed. Make sure they are correct.
Program
No.1
Next
Exit
Registration Is Completed.
Program Name
Settings
Program For Xerox
Address
2 Addresses
Resolution
Fine
Dual Page
Scan
Special
Modes
Exposure
Dark
Original
5. When you are finished, touch the [EXIT] key.
If you wish to store another program, touch the [NEXT] key.
Touching the [EXIT] key returns you to the screen of step 4 on page 5-67.
Touching the [NEXT] key returns you to the screen of step 1.
Xerox WorkCentre C226 User Guide
5-79
Fax Unit
Editing and Deleting Programs
To edit or delete a previously stored program, follow steps 1 to 3 beginning on page 566, touch the [AMEND/DELETE] key in the screen of step 4, and then follow these
steps.
1. Touch the [PROGRAM] key.
Exit
Program
2. Touch the program you wish to edit or delete.
Exit
Direct Address / Amend/Delete
Select Program To Amend/Delete.
Program
Address
Directory
Program For Xerox
Email News Group
Abys Fax Format A
•
•
When you touch the program name, the edit/delete screen for the selected
program appears.
Touching the [ADDRESS DIRECTORY] key returns you to the screen of step
1.
3. To edit the program, follow the same procedure as for storing the program. To
delete the program, touch the [DELETE] key and then touch the [YES] key in the
confirmation screen that appears.
Storing a Group Index
Auto dial keys (one-touch keys and group keys) are normally stored in the ABC index.
To make auto dial keys more convenient to use, you can store a group of auto dial
keys in a group index and assign a name to that index. When you switch to the group
indexes, [USER 1], [USER 2], [USER 3], [USER 4], [USER 5], and [USER 6] appear.
You can assign any name up to 6 characters long to each of the USER indexes.
The procedure for storing auto dial numbers in a group index is explained in step 6 on
page 5-69, and the procedure for switching between the ABC index and the group
indexes is explained on page 5-9.
5-80
Xerox WorkCentre C226 User Guide
Programming, Editing, and Deleting F-Code Memory Boxes
1. Press the [CUSTOM SETTINGS] key, and then touch the [ADDRESS CONTROL]
key (refer to steps 1 and 2 on page 5-67).
2. Touch the [CUSTOM INDEX] key.
Direct Address / Program
Custom Index
F-Code Memory Box
3. Touch an index key ([USER 1] to [USER 6]).
You can enter a name for the selected index.
Custom Settings
Custom Index
Ok
Select The Key To Be Custom Named.
User 1
User 2
User 3
User 4
User 5
User 6
When touched, the letter entry screen appears.
4. Enter a maximum of 6 characters for the index name.
Use the
key to clear the displayed name and then enter the desired name.
Refer to page 5-90 for the procedure for entering letters.
When finished, touch the [OK] key. The new name appears in the screen of step 3.
5. If you wish to program another index name, repeat steps 3 and 4.
When finished, touch the [OK] key.
To change a user index name, re-enter the name as explained in steps 3 and 4.
Programming, Editing, and Deleting F-Code Memory Boxes
The procedure for programming a memory box for F-code transmission is explained
here. There are three types of F-code memory boxes: F-code polling memory (page 552), F-code confidential transmission (page 5-56), and F-code relay broadcast
(page 5-59). Memory boxes are programmed, edited, and deleted as follows.
Xerox WorkCentre C226 User Guide
5-81
Fax Unit
Programming an F-Code Memory Box
A box name, sub-address/passcode, and function must be programmed in a memory
box.
NOTES:
•
•
•
When programming a new memory box, a sub-address that is being used for
another box cannot be used. The passcode, however, can be the same as a
passcode used in another box.
A passcode can be omitted.
Up to 50 F-code memory boxes can be programmed. If 50 F-code memory boxes
have already been programmed, a warning message will appear and you will not
be able to program a new box. First delete an unused F-code memory box
(page 5-88) and then program the new box.
1. Press the [CUSTOM SETTINGS] key and then touch the [ADDRESS CONTROL]
key (refer to steps 1 and 2 on page 5-67).
2. Touch the [F-CODE MEMORY BOX] key.
Custom Index
F-Code Memory Box
3. Touch one of the memory box keys ([POLLING MEMORY], [CONFIDENTIAL], or
[RELAY BROADCAST] ) on the store (upper) line.
Custom Settings
F-Code Memory Box
Ok
Store
Polling Memory
Confidential
Relay
Broadcast
Amend/Delete
Polling Memory
Confidential
Relay
Broadcast
([POLLING MEMORY] is touched in the example here.)
The F-code memory box programming screen appears.
4. Touch the [BOX NAME] key.
F-Code Memory Box / Polling Memory
No.001
Box Name
Sub Address
The "No." that automatically appears is the lowest number from 001 to 050 that has not yet been programmed.
When the [BOX NAME] key is touched, the letter-entry
screen appears. Enter up to 18 characters for the name.
Refer to page 5-90 for the procedure for entering letters.
POLLING TIMES
5-82
Xerox WorkCentre C226 User Guide
Programming, Editing, and Deleting F-Code Memory Boxes
5. Touch the [SUB ADDRESS] key.
F-Code Memory Box / Polling Memory
The sub-address/passcode entry screen appears.
No.001
Box Name
Marketing Group
Sub Address
Polling Times
6. Use the numeric keys (0 through 9) to enter a sub-address (max. 20 digits).
F-Code Memory Box / Polling Memory
Next
Exit
Cancel
Ok
No.001
Sub Address / Pass Code
Enter The Sub Address / Pass Code Via The 10-Key Pad,Then Press [Ok].
214341434
Pass Code
•
•
•
The characters " " and "#" cannot be used in a sub-address.
If you enter an incorrect digit, press the [C] key and re-enter the correct digit.
If you do not wish to enter a passcode, proceed to step 9.
7. To set a passcode, touch the [PASS CODE] key.
A slash (/) appears after the sub-address.
Cancel
e 10-Key Pad,Then Press [Ok].
Ok
If you enter an incorrect digit, press the [C] key and reenter the correct digit.
Pass Code
8. Use the numeric keys to enter a passcode (max. 20 digits).
F-Code Memory Box / Polling Memory
Next
Exit
Cancel
Ok
No.001
Sub Address / Pass CodE
Enter The Sub Address / Pass Code Via The 10-Key Pad,Then Press [Ok].
214341434/351212
Pass Code
•
•
In addition to numbers, the characters "
" and "#" can be used in a passcode.
If you make a mistake, press the [C] key to clear the mistake and re-enter the
correct digits.
Xerox WorkCentre C226 User Guide
5-83
Fax Unit
9. Touch the [OK] key.
Cancel
Ok
-Key Pad,Then Press [Ok].
You will return to the memory box programming screen.
The entered sub-address and passcode are displayed.
"REGISTRATION IS COMPLETED." appears to the right
of the box number. (Only for F-Code polling memory.)
Pass Code
Continue programming the settings that are particular to each type of memory box. Go
to the appropriate page below:
•
•
•
F-code polling memory (Polling times: page 5-84)
F-code confidential transmission (Print PIN: page 5-85)
F-code relay broadcast transmission (Recipient: page 5-86)
Setting for F-Code Polling Memory Boxes (Polling Times)
You can select whether to have document data that was scanned into an F-code polling memory box automatically cleared after one transmission, or to leave the document data in the box and allow an unlimited number of transmissions when polled.
(The initial setting is "ONCE". Change the setting as needed.)
1. Touch the [POLLING MEMORY] key in step 3 of “Programming an F-Code
Memory Box” on page 5-82 and store a box name, sub-address, and passcode.
2. Touch the [POLLING TIMES] key.
Box Name
Marketing Group
Sub Address
214341434/351212
Polling Times
Once
3. Touch the key for the desired polling times.
If you do not wish to erase the document after polling takes place, touch the
[UNLIMITED] key so that it is highlighted.
F-Code Memory Box / Polling Memory
Next
Exit
No.001
Ok
Polling Times
Once
Unlimited
5-84
Xerox WorkCentre C226 User Guide
Programming, Editing, and Deleting F-Code Memory Boxes
4. Touch the [OK] key.
You will return to the screen of step 2 and the selected polling times will appear.
5. To exit, touch the [EXIT] key.
To program another memory box, touch the [NEXT] key.
Next
Exit
Touching the [EXIT] key returns you to the screen of
step 3 on page 5-82.
Touching the [NEXT] key returns you to the screen for
programming a new memory box (the screen of step 4
on page 5-82).
Setting for F-Code Confidential Transmission Memory Boxes
(Print PIN)
Program the print PIN (Personal Identification Number) that is used to print a document that has been received to an F-code confidential memory box. For information on
using a print PIN, refer to“Printing a Document Received to an F-Code Confidential
Memory Box” on page 5-57.
NOTES:
•
•
•
Program a 4-digit number for the print PIN. The characters "" and "#" cannot be
used.
The print PIN can not be omitted.
Take care not to forget the print PIN that you have programmed. If you forget the
passcode, consult your dealer.
1. Touch the [CONFIDENTIAL] key in step 3 of “Programming an F-Code Memory
Box” on page 5-82 and store a box name, sub-address, and passcode.
2. Touch the [PRINT PIN] key.
Box Name
Fax Information
Sub Address
55112233/481221
Print Pin
Xerox WorkCentre C226 User Guide
5-85
Fax Unit
3. Use the numeric keys to enter a 4-digit number.
F-Code Memory Box / Confidential
Next
Exit
Cancel
Ok
No.003
Print Pin
Enter The Print Pin Via The 10-Key Pad,Then Press [Ok].
•
•
If you make a mistake, press the [C] key. All digits will be cleared, so you will
need to re-enter the number from the first digit.
To cancel entry of the print PIN, touch the [CANCEL] key. You will return to the
screen of step 2 without programming a print PIN.
4. Touch the [OK] key.
You will return to screen of step 2 and the entered print PIN will appear.
5. To exit, touch the [EXIT] key.
To program another memory box, touch the [NEXT] key.
Next
Exit
Touching the [EXIT] key returns you to the screen of
step 3 on page 5-82.
Touching the [NEXT] key returns you to the screen for
programming a new memory box (the screen of step 4
on page 5-82).
Setting for F-Code Relay Broadcast Memory Boxes (Recipient)
Program the end receiving machines to which document data received in the F-code
relay broadcast memory box will be transmitted when your machine is a relay
machine.
NOTES:
•
•
5-86
Up to 30 end receiving machines (30 one-touch keys or group keys) can be
programmed. If you attempt to program more than this number, a message will
appear and programming will not be possible.
Only destinations that have been programmed in auto dial keys (one-touch keys
or group keys) can be selected. If you need to include a destination that has not
been programmed in an auto dial key, first program it in a one-touch key (page 568) and then program the destination as an end receiving machine.
Xerox WorkCentre C226 User Guide
Programming, Editing, and Deleting F-Code Memory Boxes
1. Touch the [RELAY BROADCAST] key in step 3 of “Programming an F-Code
Memory Box” on page 5-82 and store a box name, sub-address, and passcode.
2. Touch the [RECIPIENT] key.
Box Name
Sub Address
The address selection screen appears.
Fax Information
123456/987654
Recipient
3. Touch the one-touch keys you wish to include as end receiving machines.
Touch indexes and the
keys as needed.
Direct Address / Group
Select Address.
A
B
C Group
Xerox Corporation
Corpo.Tps
Address Review
Frequent Use
•
•
ABCD
EFGHI
JKLMN
OPQRST
UVWXYZ
ABC
Group
The selected one-touch keys are highlighted and programmed as end receiving machines.
If you touch an incorrect key, touch the key again to remove the highlighting
and delete the destination.
4. To check the destinations that have been selected as end receiving machines,
touch the [ADDRESS REVIEW] key.
You can delete a destination from the list of end receiving machines by touching it. When the confirmation message appears, touch the [YES] key to confirm the
deletion.
N
Address Review
OPQRST
UVWXYZ
ABC
Group
5. Touch the [OK] key in the screen of step 3.
You will return to the screen of step 2 and the number of stored as end receiving
machines will appear.
6. To exit, touch the [EXIT] key. To program another memory box, touch the [NEXT]
key.
Touching the [EXIT] key returns you to the screen of step 3 on page 5-82.
Touching the [NEXT] key returns you to the screen for programming a new
memory box (the screen of step 4 on page 5-82).
Xerox WorkCentre C226 User Guide
5-87
Fax Unit
Editing and Deleting a Memory Box
1. Press the [CUSTOM SETTINGS] key and then touch the [ADDRESS CONTROL]
key (refer to steps 1 and 2 on page 5-67).
2. Touch the [F-CODE MEMORY BOX] key (refer to step 2 on page 5-82).
3. Touch one of the memory box keys ([POLLING MEMORY], [CONFIDENTIAL], or
[RELAY BROADCAST]) on the amend/delete line (lower line) (see step 3 on
page 5-82).
4. Touch the memory box key that you wish to edit or delete.
Memory Box / Amend/Delete
Exit
Select Memory Box To Amend/Delete.
Polling Memory
Marketing Group
Fax Information
•
The memory box edit/delete screen appears.
•
•
(
) mark indicates that data has been stored.
A memory box cannot be edited or deleted when data is stored in the box.
5. Touch the keys as needed to edit or delete the information.
F-Code Memory Box / Polling Memory
Delete
Exit
No.005
Box Name
Marketing Group
Sub Address
22233311/351212
Polling Times
Unlimited
•
•
•
•
5-88
Edit a memory box in the same way as you programmed it.
To delete a memory box, touch the [DELETE] key at the upper right of the
screen (a message will appear asking you to confirm the deletion).
The print PIN must be entered to edit or delete a confidential memory box.
A memory box cannot be edited or cleared while it is being used for transmission.
Xerox WorkCentre C226 User Guide
Printing Programmed Information
Printing Programmed Information
You can print out lists of the One-touch keys, Group keys, Programs, Memory boxes
that have been stored in the machine.
/
1. Press the [CUSTOM SETTINGS] key.
2. Touch the [LIST PRINT] key.
y
st
List Print
s
l
Receive Mode
3. Touch the [SENDING ADDRESS LIST (FAX)] key.
Printer Test Page
Sending Address List(Fax)
4. Touch the key of the list you wish to print.
Printing begins.
gs
s List(Fax)
Individual
List
To cancel printing after it has begun, touch the [CANCEL] key in the message screen.
Group List
Program List
Memory Box
List
NOTE:
If you attempt to print a list when no data exists, a warning message will appear.
Xerox WorkCentre C226 User Guide
5-89
Fax Unit
Entering Characters
To enter or edit characters in setting screens such as auto dial key programming
screens, follow the steps below. Characters that can be entered are alphabetical characters, special characters, numbers, and symbols.
Entering alphabetical characters
(Example: Xerox äÄ)
1. Touch the [X] key.
Characters cannot be
entered beyond the " " mark.
S
To switch between upper case and lower case, touch the [ABC
ABC is highlighted, upper case letters are entered.
2. Touch the [ABC
abc] key. When
abc] key.
Address Name
Cancel
Sharp
X
S
ä
Space
3. Touch the [e] key, [r] key, [o] key, and [x] key.
Address Name
Cancel
Xero
Sharp
Shar ä
Space
If you make a mistake, touch the
key to move the cursor ( ) back one space
and then enter the correct character. You can also touch the [AB/ab
12#$%]
key during entry to enter a number or symbol.
5-90
Xerox WorkCentre C226 User Guide
Entering Characters
4. Touch the [SPACE] key.
Address Name
Cancel
Xerox ä
Sharp
Space
The cursor ( ) moves forward and a space is entered.
5. Touch the [
ÃÄÂ/ãäâ] key.
Address Name
Cancel
Xerox ä
Sharp
Space
6. Touch the [ä] key.
Address Name
Cancel
Xerox ä
Sharp
Space
To switch between upper case and lower case, touch the [ÃÄÂ
ãäâ is highlighted, lower case letters are entered.
7. Touch the [ÃÄÂ
ãäâ] key. When
ãäâ] key.
Address Name
Cancel
Xerox ä
Sharp
Space
Xerox WorkCentre C226 User Guide
5-91
Fax Unit
8. Touch the [Ä] key.
Address Name
Cancel
Xerox ä
Sharp
Space
You can touch the [ABC/abc] key during entry to return to alphabetical character
entry. You can also enter numbers and symbols.
9. When finished, touch the [OK] key.
Address Name
Cancel
Xerox äÄ
Sharp
Space
You will exit the character entry screen and return to the programming screen. If
you touch the [CANCEL] key, you will return to the programming screen without
storing the entered characters.
5-92
Xerox WorkCentre C226 User Guide
Entering Characters
Entering numbers and symbols
1. Touch the [AB/ab
12#$%] key.
When the characters "12#$%" are highlighted, number/symbol entry mode is
selected.
2. Enter the desired number or symbol.
Numbers and symbols that can be entered are as follows:
Screen 1/2
Screen 2/2
* Change screens by touching the
key or
key displayed in the screen. If
you make a mistake, touch the
key to move the cursor ( ) back one space and
then enter the correct character.
You can continue touching keys to enter characters. You can also touch another
character type selection key ([ ÃÄÂ/ãäâ] key or [AB/ab
12#$%] key) to enter
characters other than numbers and symbols.
Xerox WorkCentre C226 User Guide
5-93
Fax Unit
3. When you have finished entering characters, touch the [OK] key.
1&1
You will exit the character entry screen and return to the programming screen. If
you touch the [CANCEL] key, you will return to the programming screen without
storing the entered characters.
5-94
Xerox WorkCentre C226 User Guide
When a Transaction Report Is Printed
Troubleshooting
This section contains information to help you make efficient use of the fax features of
the machine, including solutions to common problems.
When a Transaction Report Is Printed
The machine has been set to automatically print a Transaction Report when a transmission is not successful or when the Broadcast transmission function is used. The
Transaction Report informs you of the result of the operation. When the machine prints
a Transaction Report, be sure to check the contents.
The initial settings (factory settings) for printing Transaction Reports are indicated by
shading
below. You can use the key operator program to change the settings
(See “Transaction report print select setting” in the “Fax Unit” section of the WorkCentre C226 System Administration Guide).
•
Single sending: Print out all report / Print out error report only / No printed
report
•
Broadcasting: Print out all report / Print out error report only / No printed
report
•
Receiving: Print out all report / Print out error report only / No printed report
•
Confidential reception: Print out notice page / Not print out notice page
The Transaction Report shows the date of transmission, the time transmission began,
the other party's name, the duration of the operation, the number of pages, and the
result.
NOTES:
•
•
The list count appears in the "#" column of the Transaction Report and a serial
number appears in the FILE column. (These numbers are not related to the
transaction.)
If desired, you can have part of the document printed on the transaction report.
This setting is enabled in the key operator programs. (See “Original print on
transaction report” in the “Fax Unit” section of the WorkCentre C226 System
Administration Guide.)
Xerox WorkCentre C226 User Guide
5-95
Fax Unit
Information appearing in the TYPE/NOTE column
Information such as the type of transmission and type of error appears in the TYPE/
NOTE column of the Transaction Report or Activity Report. The following notes may
appear.
Note
Explanation
OK
The transaction was completed normally.
G3
Communication took place in G3 mode.
ECM
Communication took place in G3 ECM mode.
SG3
Communication took place in Super G3 mode.
FW.
The received data was forwarded.
NO RESPONSE
No response from the receiving party.
BUSY
Transmission was not possible because the other party was already using the
line.
CANCEL
A transmission was cancelled while in progress, or a stored transmission job was
cancelled.
MEMORY OVER
The memory became full during quick on-line transmission.
MEM. FULL
The memory became full during reception.
LENGTH OVER
The transmitted document was over 1500 mm (59") long and therefore could not
be received.
ORIGINAL ERROR
Manual transmission was not successful because a jam occurred.
PASS# NG
The connection was broken because the polling passcode was not correct.
NO RX POLL
The machine that was polled does not have a polling function.
RX POLL FAIL
The other machine refused the polling operation, or your machine broke the connection when polled because no data was in memory.
NO F-CODE POLL
The other machine refused an F-code polling operation, or your machine broke
the connection when polled because no data was in its F-code memory polling
box.
RX POLL# NG
Your machine broke the connection because the other machine specified an Fcode polling sub-address that does not exist in your machine.
F PASS# NG
Your machine broke the connection because an incorrect passcode was sent for
an F-code transmission.
BOX NO. NG
Your machine broke the connection because the specified sub-address for an Fcode memory box does not exist.
F POLL PASS# NG
Your machine broke the connection because the other machine sent an incorrect
passcode for F-code polling.
RX NO F-CODE POLL
F-code polling was attempted, however, the other machine did not have an Fcode polling memory box.
5-96
Xerox WorkCentre C226 User Guide
When a Transaction Report Is Printed
Note
Explanation
NO F FUNC
F-code transmission was attempted, however, the other machine does not support F-code communication.
NO F-CODE
An F-code transmission was refused by the other machine because of an incorrect sub-address or other reason.
M. BOX: [xxxxxx]
Data was received to a confidential or relay broadcast memory box, or data was
sent from a memory polling box.
The name of the memory box appears in [xxxxxx], and the type of F-code operation (relay request reception, polling memory transmission, or confidential reception) appears in
.
FAIL xx(xxxx)
The communication handshake signals or image signals were distorted due to
line conditions or other reasons, and communication was not successful.
First two digits of communication error number: Error code from 00 to 31
appears.
Last four digits of communication error number: Codes for use by service technicians.
REJECTED
A fax was sent from a party that has been blocked by the anti junk fax function.
Xerox WorkCentre C226 User Guide
5-97
Fax Unit
Viewing the Communication Activity Report
Your machine keeps a record of the most recent 50 transactions (both transmissions
and receptions) that were performed. The record includes the date of the transaction,
the other party's name, the duration, and result. You can have the report automatically
printed when the number of transactions exceeds 50, or at a specified time. This
allows you to check the machine's activity at regular intervals.
The machine is initially set (factory setting) to not print the report. To have the report
printed, change the setting with the key operator program (See “Activity report print
select setting” in the “Fax Unit” section of the WorkCentre C226 System Administration
Guide).
NOTES:
•
•
After printing, the data is cleared from memory, so the report cannot be printed a
second time.
Refer to the table in "When a Transaction Report is printed" on the previous page
for the notes that appear in the TYPE/NOTE column.
When an Alarm Sounds and a Warning Message Is Displayed
When an error occurs during a transaction, an alarm will sound and a message will
appear in the display. Take action as explained in the following table.
Message screen (Alarm)
Meaning of message
Action
Page/Guide
ADD xxxxxxxx PAPER.
A received fax cannot
be printed because
there is no suitable
paper.
Add the indicated
paper.
“Loading Paper” on
page 1-21
CHANGE THE TONER CARTRIDGE.
The machine is out of
toner and the received
document cannot be
printed.
Replace the toner
cartridge.
“Replacing the Toner
Cartridges” on
page 1-42
PLEASE RETURN xx ORIGINALS TO THE DADF,
THEN PRESS [START].
An original misfeed
occurred in the DADF
during scanning.
Reload the indicated original.
“Using the DADF” on
page 5-11
THE MEMORY BECOMES FULL.
SEND SCANNED DATA? OR CANCEL THE JOB?
The memory became
full while the original
was being scanned.
Send only the
pages that were
already scanned,
or cancel the
entire transmission.
“Storing transmission jobs (memory
transmission)” on
page 5-24
POLLING IS NOT POSSIBLE WITH
THE AVAILABLE MEMORY.
Polling is not possible
because there is not
enough space in memory.
Try polling again
after currently
stored jobs are
completed.
“Polling” on page 535
5-98
Xerox WorkCentre C226 User Guide
When an Alarm Sounds and a Warning Message Is Displayed
Message screen (Alarm)
Meaning of message
Action
Page/Guide
MANUAL RECEIVE IS DISABLED.
DUE TO OUT OF MEMORY.
Manual reception was
not possible because
there was not enough
free space in memory.
Try manual reception again after
currently stored
jobs have been
completed.
_
CLOSE THE xxxx COVER.
The indicated cover is
open.
Close the indicated cover.
_
The self-diagnosis function has activated and
automatically stopped
operation. An error code
appears in xx-xx.
Turn off the power
and then turn it
back on. If the
same message
still appears, contact your dealer.
_
CLOSE THE DADF.
CLOSE THE LOWER RIGHT SIDE COVER.
CALL FOR SERVICE. CODE:xx-xx
FAX FUNCTION TROUBLE.
Xerox WorkCentre C226 User Guide
5-99
Fax Unit
Problems and Solutions
If you experience a problem with the fax function, first check the following table. If you
cannot solve the problem using the following table, see your Xerox WorkCentre C226
System Administration Guide.
Problem
Check
Solution
Page
The machine does
not operate.
Is the fax power switch
turned on?
Turn on the fax power
switch.
“Fax power switch” on
page 5-2
Dialing is not possible.
Is the telephone line properly
connected?
Check the connections.
“Line connection” on
page 5-1
Is the machine power switch
turned on?
Turn the machine power
switch on.
Page 1-9
Is the machine in fax mode?
Press the [IMAGE
SEND] key to set the
machine to fax mode.
“Basic Procedure for
Sending Faxes” on
page 5-19
Does the receiving fax
machine have paper?
Check with the operator
of the receiving
machine.
_
Was the original size
detected correctly?
Check the transmittable
sizes.
“Checking the Size of a
Loaded Original” on
page 5-12
The transmitted
image prints out
blank at the receiving side.
Was the original placed so
that the correct side is
scanned?
Make sure the original is
placed so that the correct side is scanned.
“Loading a Document”
on page 5-11
If the receiving machine is
using thermal paper, was the
thermal paper loaded with
the wrong side out?
Check with the operator
of the other machine.
_
The transmitted
image is distorted.
Were line conditions poor
due to thunder or another
reason?
Try the transmission
again.
_
Were the resolution and
exposure settings suitable?
Check the resolution and
exposure settings.
“Selecting Resolution
and Exposure Settings”
on pages 5-14 and 516.
Is the machine's clock set to
the correct time?
Set the clock to the correct time.
“Operation procedure
common to all custom
settings” on page 1-39
The receiving
machine does not
receive your fax.
Does the receiving machine
support G3 transmission?
Are the sub-address and
passcode correct?
Is the receiving machine
ready to receive?
Transmission does
not take place at the
specified time.
5-100
Xerox WorkCentre C226 User Guide
Problems and Solutions
Check
Solution
Page
Printing does not take
place after reception.
Does a message appear in
the display instructing you to
add toner or paper? (Printing
is not possible.)
Restore printing capability as instructed by the
display message. Printing will begin
“When an Alarm
Sounds and a Warning
Message Is Displayed”
on page 5-98
A received image
prints out blank.
Was the wrong side of the
original scanned in the transmitting machine?
Check with the operator
of the transmitting
machine.
_
The received image
is faint.
Is the original faint?
Ask the other party to resend the document
using a suitable exposure setting.
_
The received image
is distorted.
Were line conditions poor
due to thunder or another
reason?
Ask the other party to
send the document
again.
_
White or black lines
appear in the transmitted image.
Is the document glass dirty?
Clean the document
glass .
Pages 2-81 and 2-82
A dial tone is not
heard through the
speaker.
Is the volume set to "low"?
Set the speaker volume
to "medium" or "high".
“Speaker volume setting” in the “Fax Unit”
section of the WorkCentre C226 System
Administration Guide
A ringing sound is
not made.
Has the ringer volume been
turned off?
Set the ringer volume to
"low", "medium", or
"high".
“Speaker volume setting” in the “Fax Unit”
section of the WorkCentre C226 System
Administration Guide
Telephone
Problem
Xerox WorkCentre C226 User Guide
5-101
Fax Unit
5-102
Xerox WorkCentre C226 User Guide
Index
Symbols / Numerics
#/P key 1-15
1-sided copies 2-13, 2-21
1-Tray Unit 1-12
loading paper 1-28
misfeed 1-52
specifications 1-29
256 MB Memory Kit 1-13
2-Sided Copy display 2-3, 2-20
2-Tray Unit
loading paper 1-29
misfeed 1-53
specifications 1-30
2-Up Pamphlet 3-17
3-Tray Unit 1-12
loading paper 1-28
misfeed 1-53
specifications 1-29
A
A3 full-bleed 2-59, 2-66
A4/letter size auto change 3-55
ABC GROUP key 4-22
ACC.#-C 1-15
acceptable originals 2-3
Account Number 3-25
account number 1-19
address control 1-38
address directory 5-22
ADDRESS DIRECTORY key 4-19, 4-21
address directory screen 4-21, 5-7, 5-9
address review 5-7, 5-31
ADDRESS REVIEW key 4-19
addresses
disabling direct entry 4-69
storing 4-42
Xerox WorkCentre C226 User Guide
Advanced tab
PCL5c 3-29
PostScript 3-31
alarm 5-98
alerts message 3-44
All Text to Black checkbox 3-38
Always Use This ID 3-26
AMEND/DELETE key. 4-46
applicable paper sizes 1-30
applicable paper types 1-30
auditing mode 1-18
Account Nunmber 3-25
auto colour calibration 3-58
auto image 2-28, 2-71
Auto Job Control review 3-19
auto paper select 2-14, 2-22
auto power shut-off mode 1-8
auto resolution 2-26
auto size detection 1-37
auto-dialing 5-17, 5-22
automatic copy image rotation 2-8
automatic image quality adjustment 2-25
automatic reception 5-28
automatic reduction 5-10
automatic selection (reduction/enlargement) 2-28
automatic switching (B/W and colour) 3-7
automatic two-sided copying
from DADF 2-19
from document glass 2-24
automatic two-sided printing 1-33
B
B/W reverse 2-50
B/W REVERSE key 2-38
BCC key 4-21
binding change 2-21, 2-24
Binding Edge 3-19
I-1
Index
Bitmap Compression 3-32
black and white printing 3-4
BLACK COPY START key 1-15, 5-6
Black Overprint 3-36
bleed 2-66
Blue Strength 3-39
book original 2-42
booklets and tablets 4-33
Border 3-18
brightness 2-52, 2-57
broadcast transmission 5-29–5-32
Scan to E-mail 4-25
Bypass Tray 1-10, 3-63
loading paper in 1-23
misfeed 1-48
C
C (CLEAR) key 1-15, 5-5
CALL FOR SERVICE. CODE:**-** 1-56
cancelling
dual page scan 5-44
fax transmission 5-27
F-code polling 5-55
polling 5-37
scan transmission 4-27, 5-22
scanning 5-39
transfer 5-48
transmission
e-mail or FTP 4-41
CC key 4-21
centre erase 2-41
centre tray 1-9
CENTRE TRAY key 1-60
centring 2-44
CENTRING key 2-37
cleaning the scanning area 2-82
CLEAR ALL key 1-15, 5-6
CLEAR key 1-15, 5-5
clock adjust 1-37, 1-41
collate 3-16
COLOR COPY START key 5-5
color mode 3-37
black and white printing 3-4
document type preview 3-36
color mode setting, selecting 3-2
Color tab 3-35
COLOUR ADJUSTMENTS key 2-38
I-2
Colour Adjustments menu 2-51
colour adjustments, auto colour calibration 3-58
colour balance 2-52, 2-55
COLOUR COPY START key 1-15
colour mode display 3-16
colour printing 3-10
colour rendering 3-35
colour settings, default document types 3-35
communication activity report 5-98
Compress Options
Bitmap Compression 3-32
Job Compression 3-32
compression mode at broadcasting 4-67
condition setting screen 4-18
condition settings
restore configuration 3-60
restore factory defaults 3-59
store current configuration 3-60
CONDITION SETTINGS key 3-45, 4-22
condition settings screen 5-6, 5-7
connecting an extension phone 5-4
copies (printing) 3-16
copy image rotation, automatic 2-8
COPY key 1-14
copy mode output restrictions 2-16
copy output 2-18
copy quantity display 2-3
copy ratio 2-64
automatic selection 2-28
manual selection 2-30
Copy Ratio display 2-3
copy run, interrupting 2-77
copying
copies 2-27
dual page 2-42
from document glass 2-21
transparency film 2-45
copying procedure 2-13
copying, automatic
from DADF 2-19
from document glass 2-24
covers 2-47
COVERS key 2-37
custom directory, storing (scanning) 4-17
custom paper size 3-27
custom settings
clock adjust 1-37, 1-41
display contrast 1-37, 1-41
key operator program 1-38
Xerox WorkCentre C226 User Guide
Index
list print 1-37, 1-41
total count 1-37, 1-40
tray settings 1-38, 1-41
CUSTOM SETTINGS key 1-15
D
DADF 1-9, 2-1, 2-3
automatic copying from 2-19
copying from 2-13
scanning 4-26
default display settings (scanner) 4-66
Default Job ID 3-25
Always Use This ID 3-26
Job Name 3-26
User Name 3-25
default paper type for Bypass Tray 3-56
default sender set 4-67
delete the print hold data 3-55
deleting
document data
from F-code polling memory box 5-54
from Public Box 5-41
F-code memory box 5-81
group keys 4-50, 5-77
job program 2-75
memory box 5-88
one-touch keys 4-46, 5-72
programmed transmission destinations 4-15
programs 5-80
sender information 4-53
deleting programmed sender information 4-17
destination address entry
manual 4-27
with global address search 4-30
destination information
setting up 4-10
destination input methods 4-27
destinations, storing
Scan to E-mail 4-11, 4-42
Scan to FTP 4-12
DETAIL key 1-18
Device Setup 3-43
Log 3-44
Password 3-43
Different Paper setting 3-28
direct address entry, disabling 4-69
DIRECT ADDRESS key. 4-42
Xerox WorkCentre C226 User Guide
display contrast 1-37, 1-41
display switching keys 5-9
DNS server settings 4-7
DNS setup 4-9
document glass 2-2, 5-11
automatic 2-sided copying from 2-24
copying from 2-21
scanning 4-26
document style 3-17
2-Up Pamphlet 3-17
N-Up 3-18
Tiled Pamphlet 3-17
document type preview, color mode 3-36
dual page copy 2-42
DUAL PAGE COPY key 2-37
dual page scan 5-43
Duplex Automatic Document Feeder. See DADF
Duplex Bypass/Inverter Unit 1-13
misfeed 1-53
Duplex Module/2-Tray Unit 1-12
loading paper 1-29
misfeed 1-53
specifications 1-30
E
edge erase 2-41
editing
F-code memory box 5-81
group keys 4-50, 5-76
memory box 5-88
one-touch keys 4-46, 5-72
programmed sender information 4-17
programmed transmission destinations 4-15
programs 5-80
sender information 4-53
E-MAIL ADDRESS key 4-20
e-mail server settings 4-7
e-mail subject 4-7
enable EtherTalk 3-58
enable NetBEUI 3-58
enable NetWare 3-57
enable network port 3-56
enable parallel port 3-56
enable TCP/IP 3-57
enable USB port 3-56
enlargement. See reduction/enlargement
envelopes
I-3
Index
loading 1-26
printing 1-27
erase
centre 2-41
edge 2-41
ERASE key 2-37
error code table (scanning) 4-59
exit area misfeed 1-50
exit tray 1-13, 3-28
exposure adjustment
copying 2-25
fax 5-8, 5-16, 5-17
scanning 4-36
EXPOSURE key 4-20
exposure settings, default (scanning) 4-68
Exposure tab 2-3, 2-25
extension phone
connecting 5-4
using 5-61
F
face-up and face-down output 1-13
fax data forward 1-38
Fax Expansion Memory 1-13
FAX JOB key 1-18
fax mode 5-6
fax transmission, cancelling 5-27
Fax Unit 1-13
faxing a two-sided original 5-23
F-code
confidential transmission 5-56
polling 5-54
polling memory 5-52
polling, cancelling 5-55
relay broadcast function 5-60
relay broadcast transmission 5-59
relay request function 5-61
transmission 5-49
F-code memory box
deleting 5-81
editing 5-81
file format
selecting (scanning)scanning
file format, selecting 4-38
FILE FORMAT key 4-20
file naming, scanned image 4-7
file size limit (Scan to E-mail) 4-68
I-4
FINISHER TRAY key 1-60
Finishing 3-19
Binding Edge 3-19
Staple 3-20
Fit To Page 3-27
font set, PCL 3-47
forwarding function 5-46
fusing area misfeed 1-50
fusing unit 1-11
fusing unit pressure adjusting levers 1-27
G
GLOBAL ADDRESS SEARCH key 4-22
Graphics Mode 3-30
gray scale printing 3-4
Green Strength 3-39
group (copy output) 2-18
group dialing 5-17, 5-22, 5-74
group index, storing 4-54, 5-80
GROUP key 1-60
group keys
deleting 5-77
editing 5-76
editing and deleting 4-50
programming 4-48
storing 5-74
groups, storing (Scan to E-mail) 4-14
H
halftone settings 3-36
High Capacity Feeder 1-12, 1-74, 3-14
loading paper 1-74
misfeed 1-75
Hold After Print 3-23
Hold Before Print 3-23
Hold Job List 3-48
hole punch scrap disposal 1-66
hole punching 3-22
settings for 3-22
host name 4-13
I
I/O timeout 3-57
IMAGE EDIT key 2-38
Xerox WorkCentre C226 User Guide
Index
Image Edit menu 2-59
image orientation (printing) 3-27
Image Quality
Graphics Mode 3-30
Resolution Settings 3-30
image quality
black and white, setting print contrast 3-6
colour, setting print contrast 3-9, 3-12
printing 3-29, 3-38
image quality adjustment 2-25
image rotation 5-25
IMAGE SEND key 1-14, 4-18, 5-5
Image Send Management 3-42
image sending (scanning) 4-23
index keys 4-22
initial file format setting 4-67
initial resolution (scanner) 4-66
initialize settings 3-59
insert sheets for transparencies 2-45
installation requirements 1-1
intensity 2-52, 2-58
interface settings
enable network port 3-56
enable parallel port 3-56
enable USB port 3-56
I/O timeout 3-57
port switching method 3-56
INTERRUPT key 2-2, 2-77
Inverter Unit 1-13
misfeed 1-53
IP address 3-64, 4-60
IP address setting 3-57
J
jam, staple 1-63
Job Compression 3-32
job list 1-17
Job Name 3-26
job program
deleting 2-75
recalling 2-74
storing 2-73
job program memory 2-73
job queuing 3-56
JOB STATUS key 1-15
job status screen 1-17
Xerox WorkCentre C226 User Guide
K
key operator programs
A4/letter size auto change 3-55
custom setting 1-38
default paper type for Bypass Tray 3-56
delete the print hold data 3-55
job queuing 3-56
output method when memory is full 3-55
printing 3-50
prohibit notice page printing 3-55
prohibit test page printing 3-55
restoring factory default settings 3-59
scanning 4-63, 4-65
keyboard select 1-38, 1-41
L
list print 1-37, 1-41
loaded original, checking size of 5-12
loading documents 5-11
loading envelopes 1-26
loading paper 1-21
1-Tray Unit 1-28
3-Tray Unit 1-28
Bypass Tray 1-23
Duplex Module/2-Tray Unit 1-29
Paper Tray 1 1-21
loading postcards 1-26
Log 3-44
lower tray, misfeed 1-55
M
machine maintenance (for copying) 2-79
machine part names 2-1
Main tab 3-16
manual reception 5-63, 5-64
manual transmission 5-62
margin shift 2-39, 3-30
MARGIN SHIFT key 2-37
margins, scanning 4-71
maximum file size (Scan to E-mail) 4-68
media, special 1-32
memory box 5-49
editing and deleting 5-88
memory transmission 5-24
message display 2-2
I-5
Index
scanning 4-19
mirror image 2-59, 2-61
misfeed
3-Tray Unit 1-53
Bypass Tray 1-48
Duplex Bypass/Inverter Unit 1-53
Duplex module/2-Tray Unit 1-53
exit area 1-50
fusing area 1-50
High Capacity Feeder 1-75
paper feed area 1-47
reversing tray 2-2
Saddle Stitch Finisher 1-67
stand/1-Tray Unit 1-52
transport area 1-49
Tray 1 1-47
upper or lower tray 1-55
misfeed removal 1-46
mode select key 1-18
multi shot 2-59, 2-64
multi-page enlargement 2-60, 2-68
N
network printer configuration 3-40
network scanner settings 4-65
Network Scanning Setup screen 4-6
network scanning. See also scanning
network settings
enable EtherTalk 3-58
enable NetBEUI 3-58
enable netware 3-57
enable TCP/IP 3-57
IP address setting 3-57
reset the NIC 3-58
network setup for Web page 3-44
No Offset 3-22
Normal Print 3-23
notice page 3-65
Notify Job End 3-24
number of direct address keys displayed 4-66
N-Up printing 3-18
Border 3-18
O
offset function 2-18
OFFSET key 1-60
I-6
offset mode 3-22
one-touch dialing 5-17, 5-22
one-touch key display 4-21, 5-9
one-touch keys
deleting 5-72
editing 5-72
editing and deleting 4-46
storing 5-68
storing (Scan to E-mail) 4-42
on-hook dialing 5-18
operation panel 1-14, 5-5
printing from 3-48
optional equipment 1-13
original
checking size of 5-12
minimum/maximum size 5-10
orientation 2-7
scanning area 5-10
original guides 2-2
ORIGINAL key 4-20
original size
deleting 2-10
selecting 2-8
storing 2-10
using stored 2-12
original size detection function 2-6
original sizes 1-6
Original tab 2-3, 2-8
originals, acceptable 2-3
originals, setting
using DADF 2-4
using document glass 2-5
output (printing) 3-28
Output display 2-3
output method when memory is full 3-55
output restrictions, copy mode 2-16
output tray, default (printing) 3-46
overlays 3-31
own number sending 5-42
P
Page Protection checkbox 3-31
pamphlet copy 2-60, 2-71
Paper Select display 2-3, 2-14, 2-22
paper select, auto 2-14, 2-22
paper settings 3-26
paper size settings 3-26
Xerox WorkCentre C226 User Guide
Index
custom 3-27
default 3-46
paper size, changing 1-22
paper sizes 1-6, 1-30
Paper tab 3-26
paper trays
selecting 3-28
specifications for 1-30
paper type 3-63
default 3-47
setting
(except Bypass Tray) 1-33
Bypass Tray 1-35
paper types 1-30
selecting 3-28
special 2-35
paper, loading 1-21
1-Tray Unit 1-28
3-Tray Unit 1-28
Bypass Tray 1-23
Duplex Module/2-Tray Unit 1-29
High Capacity Feeder 1-74
Paper Tray 1 1-21
passcodes 5-49–5-51
Password 3-43
passwords, protecting programmed information 418
pause 5-20
PCL settings
font set 3-47
symbol set 3-47
PCL symbol set 3-67
photo repeat 2-59, 2-62
PIN 3-24
polling function 5-34–5-42
F-code polling 5-54
F-code polling memory 5-52
manual polling 5-37
polling memory 5-38
polling security 5-42
polling times 5-84
polling, cancelling 5-37
port switching method 3-56
postcards
loading 1-26
printing 1-26
preheat mode 1-8
print
document data in Public Box 5-40
Xerox WorkCentre C226 User Guide
F-code confidential memory box 5-57
F-code polling memory box 5-54
programmed information 5-89
transaction report 5-95
print area 3-66
print contrast 3-6, 3-9, 3-12
PRINT JOB key 1-18
PRINT key 1-14
Print PIN 5-85
Print Priority 3-38
printer configuration settings 3-44
common operation procedure 3-45
default 3-46
PCL 3-47
printer driver settings, using Help file 3-3
printer drivers
Main tab 3-16
setting 3-1–3-2
setting properties 3-15
printer Web pages 3-40
printing
black and white 3-4
colour 3-10
fit to page 3-27
from operation panel 3-48
image orientation 3-27
image quality 3-38
rotate image 3-27
two-sided 3-14
using High Capacity Feeder 3-14
using optional peripheral equipment 3-12
using Saddle Stitch Finisher 3-14
printing functions
Auto Job Control review 3-19
collate 3-16
document style 3-17
Finishing 3-19
Main tab 3-16
Notify Job End 3-24
Retention 3-23
selecting 3-15–3-39
User Settings 3-18
PRIORITY key 1-18
priority transmission 5-26
programmed information, printing 4-55
programming
F-Code Confidential Transmission Memory Box
5-85
F-code polling memory box 5-84
I-7
Index
F-Code Relay Broadcast Memory Box 5-86
frequently used operations 5-44
group index 5-80
group keys 4-48
programs
deleting 5-80
editing 5-80
storing 5-78
prohibit notice page printing 3-55
prohibit test page printing 3-55
Proof Print 3-23
PS Kit 1-13
PS Pass-through 3-31
Public Box
deleting document data from 5-41
printing document data in 5-40
Punch 3-22
PUNCH key 1-60
Pure Black Text selection 3-36
Q
Quick On-line 5-24
R
READ-END key 5-21
receive mode 1-38
receiving party is busy 5-25
reception
automatic 5-28
manual 5-63
recipient 5-86
Red Strength 3-39
redialing 5-17
reduction/enlargement 2-28
reduction/enlargement, automatic selection 2-28
relay machine 5-59–5-60
replacing, staple cartridge 1-61
reset the NIC 3-58
RESOLUTION key 4-20, 5-8
resolution settings
copying 2-26
fax 5-14, 5-15
printing 3-30
scanning 4-37
restore configuration 3-60
restricting polling access 5-42
I-8
Retention 3-23
Hold After Print 3-23
Hold Before Print 3-23
Normal Print 3-23
PIN 3-24
Proof Print 3-23
returned e-mail 4-59
reversing single pass feeder 5-11
reversing tray 2-2
RGB adjust 2-51, 2-52
rotate image (printing) 3-27
rotation, automatic copy image 2-8
S
Saddle Stitch Finisher 1-12, 1-59, 3-14, 3-20
misfeed 1-67
pamphlet style 3-14
part names 1-59
staple jam removal 1-63
troubleshooting 1-70
SADDLE STITCH key 1-60
Saturation 3-39
scan complete sound setting 4-67
Scan Kit 1-13
Scan to E-mail 4-3, 4-62
default sender set 4-67
DNS setup 4-9
editing and deleting programmed sender information 4-17
e-mail server and DNS server settings 4-7
e-mail subject 4-7
file size limit 4-68
group keys
editing and deleting 4-50
programming 4-48
SMTP setup 4-8
sompression mode at broadcasting 4-67
storing one-touch keys 4-42
storing sender information 4-16
transmission 4-25
Scan to FTP 4-3
scanner function, requirements 4-1, 4-4
SCANNER JOB key 1-18
scanner mode timeout 4-68
scanner, transmission methods 4-3
scanning
basic settings 4-6
Xerox WorkCentre C226 User Guide
Index
broadcast transmission 4-25
cancelling 5-39
cancelling transmission (e-mail or FTP) 4-41
condition setting screen 4-18
error code table 4-59
sending an image 4-23
storing a custom directory 4-17
storing destinations 4-11, 4-12
storing groups 4-14
transmission method 4-23
using document glass 4-26
using the DADF 4-26
scanning area, cleaning 2-82
scanning margins 4-71
scanning size, setting manually 4-34, 5-13
Screening (halftone) 3-36
secure print (PIN) 3-24
sender information
editing and deleting 4-17, 4-53
storing 4-16, 4-52
SENDER LIST key 4-19, 4-24
sender’s name 5-3
sender’s number 5-3
sending
auto-dialing 5-22
cancelling 5-22
dual page scan 5-44
F-code transmission 5-49
image rotation 5-25
manual transmission 5-62
own number sending 5-42
priority transmission 5-26
Quick On-line 5-24
storing transmission jobs (memory transmission) 5-24
timer transmission 5-32
two-sided original 5-23
setting
destination information (Scan to E-mail) 4-10
paper type
(except Bypass Tray) 1-33
Bypass Tray 1-35
print contrast
black and white 3-6
colour 3-9, 3-12
printer drivers 3-1–3-2
scanning size manually 4-34, 5-13
settings
colour, default document types 3-35
Xerox WorkCentre C226 User Guide
e-mail server and DNS server 4-7
exposure default (scanning) 4-68
paper size 3-26
sharpness 2-51, 2-53
SHARPNESS key 2-53
single colour copying 2-59, 2-60
size of loaded original 5-12
SMTP setup 4-8
sort (copy output) 2-17, 2-18
SORT key 1-60
special media 1-32
Special Modes tab 2-3, 2-37
special papers 2-35
specifications
1-Tray Unit 1-29
3-Tray Unit 1-29
Duplex Module/2-Tray Unit 1-30
paper trays 1-30
stand/1-Tray Unit 1-12
Staple 3-20
staple cartridge, replacing 1-61
staple jam removal 1-63
STAPLE SORT key 1-60
staple sort mode 3-20
stapling position reference 1-72
stapling positions 3-21
stapling. See Saddle Stitch Finisher
status message 3-44
STOP/DELETE key 1-18
store current configuration 3-60
store settings 3-59
stored original size
deleting 2-10
using 2-12
storing
custom directory (scanning) 4-17
F-code confidential transmission memory box
5-85
F-code polling memory box 5-84
F-code relay broadcast memory box 5-86
group index 4-54, 5-80
group keys 5-74
job program 2-73
one-touch keys 5-68
one-touch keys (Scan to E-mail) 4-42
programs 5-78
sender information 4-16, 4-52
transmission jobs 5-24
storing destinations
I-9
Index
U
FTP 4-12
Scan to E-mail 4-11
storing groups, Scan to E-mail 4-14
sub address 5-7, 5-51
supplies, storing 1-45
suppress background 2-51, 2-54
symbol set
PCL 3-47, 3-67
UCR (Under Colour Removable) 3-35
upper tray, misfeed 1-55
user maintenance (for copying) 2-81
User Name 3-25
User Settings 3-18
Save 3-18
T
W
Tiled Pamphlet 3-17
timeout, scanner mode 4-68
timer transmission 5-32
TO key 4-21
toner cartridge 1-11
replacing 1-42
total count 1-37, 1-40
touch panel 1-14, 1-16, 2-2, 5-5
transaction report 5-95
transmission
cancelling (e-mail or FTP) 4-41
cancelling (Scan to E-mail) 4-27
Scan to E-mail 4-25
transmission destinations, editing and deleting 4-15
transmission error 4-59, 5-25
transmission method, scanner 4-23
transmission methods, scanner 4-3
transparency film, copying onto 2-45
transparency inserts 3-29
TRANSPARENCY INSERTS key 2-37
Transparency Text 3-34
transport area, misfeed 1-49
tray settings 1-38, 1-41
Tray Status button 3-28
troubleshooting 1-56
two-sided copying, automatic
from DADF 2-19
from document glass 2-24
two-sided original
booklets and tablets 4-33
faxing 5-23
scanning and transmitting 4-32
two-sided printing 3-14
two-sided scanning icon display 4-20
TYPE/NOTE column 5-96
warning message 5-98
Watermark
As Outline Only 3-34
On First Page Only 3-34
Transparency Text 3-34
watermark preview 3-33
Watermark tab 3-33
Web page passwords 4-18
Web pages
accessing 3-40
printer 3-40
required environment 3-40
I-10
X
XY Zoom 2-33
Xerox WorkCentre C226 User Guide