1
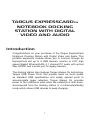
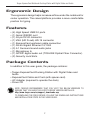
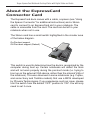
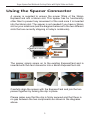
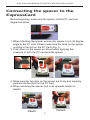
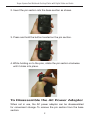
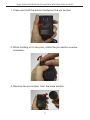
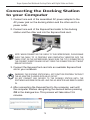
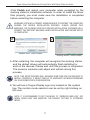
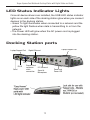
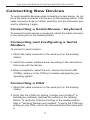
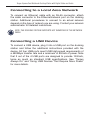
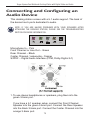
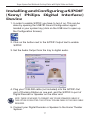
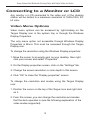
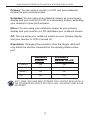
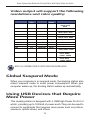
ExpressCardTM
Notebook
Docking Station
with Digital Video
and Audio
USER GUIDE
TARGUS EXPRESSCARDTM
NOTEBOOK DOCKING
STATION WITH DIGITAL
VIDEO AND AUDIO
Introduction
Congratulations on your purchase of the Targus ExpressCard
Notebook Docking Station with Digital Video and Audio. This
portable expansion module allows you to connect through an
ExpressCard slot up to 4 USB devices, monitor or LCD, high
speed Gigabit Ethernet/LAN, 5.1 channel PC audio with optical
fiber S/PDIF, and a serial port for legacy devices.
The docking station also features Targus Always On technology,
Targus USB Power Ports that provide twice as much power
as standard USB specification and widely spaced ports to
accommodate larger adapters. Targus Always On provides
power to the USB ports even when the notebook is shut down,
disconnected from the docking station or in hibernate/standby
mode which allows USB devices to keep charging.
Targus ExpressCard Notebook Docking Station with Digital Video and Audio
Ergonomic Design
The ergonomic design helps increase airflow under the notebook for
cooler operation. The raised platform provides a more comfortable
position for typing.
Features
• (4) High Speed USB 2.0 ports
• (1) Serial (RS232) port
• (1) 24 pin DVI-D connector
• (1) VGA (HD D-sub) HD-15 connector
• (1) ExpressCard upstream cable connection
• (1) RJ-45 Gigabit Ethernet 10/1000
• (3) 5.1 Surround sound audio jacks
• (1) Microphone In
• (1) S/PDIF digital audio out (TOSLINK Opitcal Fiber Connector)
• (2) Security Lock Slots
Package Contents
In addition to this user guide, the package contains:
• Targus ExpressCard Docking Station with Digital Video and
Audio
• ExpressCard Cable and Card (with spacer card)
• AC Adapter (required to operate the dock)
• Driver CD
NOTE: TARGUS RECOMMENDS THAT YOU VISIT THE BELOW WEBPAGE TO
ENSURE THAT YOU HAVE THE LATEST DRIVER VERSION INSTALLED:
http://www.targus.com/us/support_downloads.asp
TO DOWNLOAD THE FREE DRIVER, FOLLOW THE DOWNLOAD INSTRUCTIONS
AND INSTALLATION STEPS IN THIS USER GUIDE.
Targus ExpressCard Notebook Docking Station with Digital Video and Audio
System Requirements
Hardware
• PC with an Intel® Pentium® processor or equivalent
• CD-ROM drive
• ExpressCard 34mm or 54mm slot
Operating System
• Windows Vista® or
• Windows® XP Service Pack 2 or greater
NOTE: TO DOWNLOAD THE LATEST SERVICE PACKS, PLEASE VISIT YOUR
COMPUTER MANUFACTURER’S WEBSITE OR MICROSOFT’S DOWNLOAD
CENTER:
http://support.microsoft.com
Preparing the BIOS for the
ExpressCard
Before installing the ExpressCard Docking station, it is very
important that you make sure that your system BIOS has the latest
BIOS update available. A number of system vendors have released
updates that fix many issues related to the ExpressCard Slot.
Targus ExpressCard Notebook Docking Station with Digital Video and Audio
About the ExpressCard
Connector Card
The ExpressCard dock comes with a cable, a spacer (see “Using
the Spacer Connector” for additional instructions) and a 34mm
card to connect to an ExpressCard slot in your notebook. The
cable is removable from the card. The card can be left in your
notebook when not in use.
The 34mm card has a small switch highlighted in the circular area
of the below diagram.
On-Pre-boot support
Off-Post-boot support (Default)
This switch is used to determine how the dock is recognized by the
computer during boot up. Certain notebooks will detect the dock
and will not work properly during the pre-boot mode (i.e. trying to
boot up on the external VGA device, rather than the internal VGA of
the notebook). This was observed in some notebooks (e.g. Fujitsu,
and some Sony and Toshiba models) that use a BIOS developed
by Phoenix Technologies. If you experience such an issue, please
turn the switch from the default “OFF” position to “ON”. You will only
need to set it once.
Targus ExpressCard Notebook Docking Station with Digital Video and Audio
Using the Spacer Connector
A spacer is supplied to ensure the proper fitting of the 34mm
ExpressCard into a 54mm slot. This spacer has no functionality
other than to prevent any movement of the card once it is inserted
into the 54mm slot. The spacer is not needed if you have a 34mm
slot on your notebook (see the diagram below as to the two different
slots that are currently shipping in today’s notebooks).
The spacer simply snaps on to the existing ExpressCard and is
inserted with the card connector into a 54mm ExpressCard slot.
Carefully align the spacer with the ExpressCard and join the two
pieces together by locking the clip in place.
Please make sure that the clip is firmly secured and that there is
no gap between the two components as shown in the diagrams
above.
Targus ExpressCard Notebook Docking Station with Digital Video and Audio
Connecting the spacer to the
ExpressCard
Before beginning, make sure the spacer and the PC card are
aligned as below.
1. When attaching the spacer, ensure the spacer is at a 45 degree
angle to the PC card. Please make sure the hook on the spacer
is sitting in the slot on the PC Card (Fig. 1).
2. Push down on the spacer as shown while applying firm
pressure to both the PC card and the spacer.
Fig. 1
2
1
3. Make sure the two clips on the spacer are firmly and squarely
pushed into the slots on the PC card.
4. When removing the spacer, pull in an upwards motion to
detach.
Detach
Attach
Targus ExpressCard Notebook Docking Station with Digital Video and Audio
Installing the Docking Station
Driver
Installing the docking station driver enables your operating system
to recognize the docking station and its ports once it’s connected.
To install the docking station driver:
1. Turn on your computer.
2. Insert the driver software CD into your computer’s CD-ROM
drive.
If setup does not begin automatically, click Start, Run, and enter
D:\Setup.exe (where D: is the path of your CD-ROM drive) and
then click OK.
3. The Installation Wizard window of the docking station will pop
up. Follow any on-screen instructions to complete the
installation. Then connect the ExpressCard into the slot when
prompted.
Assembling the AC Power
Adapter
The AC Power Adapter comes in two parts: the base section and
the pin section. These need to be assembled before you can use
the adapter with the docking station.
To Assemble the AC Power Adapter
1. Align the teeth on the back of the pin section with the
corresponding markings on the base section.
Targus ExpressCard Notebook Docking Station with Digital Video and Audio
2. Insert the pin section into the base section as shown.
3. Press and hold the button located on the pin section.
4. While holding on to the pins, rotate the pin section clockwise
until it clicks into place.
To Disassemble the AC Power Adapter
When not in use, the AC power adapter can be disassembled
for convenient storage. To remove the pin section from the base
section:
Targus ExpressCard Notebook Docking Station with Digital Video and Audio
1. Press and hold the button located on the pin section.
2. While holding on to the pins, rotate the pin section counter clockwise.
3. Remove the pin section from the base section.
Targus ExpressCard Notebook Docking Station with Digital Video and Audio
Connecting the Docking Station
to your Computer
1. Connect one end of the assembled AC power adapter to the
AC power jack on the docking station and the other end to a
power outlet.
2. Connect one end of the ExpressCard cable to the docking
station and the other end into the ExpressCard card.
NOTE: When connecting the cable to the ExpressCard, Please make
sure the cable tip is properly and completely inserted into the
cable port on the ExpressCard. Make sure the tip is connected in
the correct direction and do not force the connection or it might
break the device.
3. Connect the ExpressCard card into an available ExpressCard
slot in your notebook.
WARNING: THE DOCKING STATION WILL NOT FUNCTION PROPERLY WITHOUT
THE AC ADAPTER PLUGGED INTO AN AC OUTLET.
DO NOT CONNECT ANY DEVICES TO THE DOCKING STATION UNTIL THE
SOFTWARE HAS BEEN INSTALLED AND THE AC ADAPTER HAS BEEN PLUGGED
IN.
4. After connecting the ExpressCard to the computer, wait until
the computer finishes recognizing the devices before pressing
OK in the dialogue box. This process will take about 3-5
minutes.
Windows XP - dailogue box
Windows Vista - dailogue box
10
Targus ExpressCard Notebook Docking Station with Digital Video and Audio
Click Finish and restart your computer when prompted by the
docking station’s installation software. In order to install the driver
files properly, you must make sure the installation is completed
before restarting the computer.
WINDOWS VISTA WILL PROMPT A MESSAGE BOX TO RESTART THE COMPUTER
DURING THE DRIVER INSTALLATION PROCESS. PLEASE IGNORE THIS
MESSAGE. THE DOCKING STATION’S DRIVER INSTALLATION SOFTWARE WILL
PROMPT THE RESTART MESSAGE WHEN INSTALLATION AND DRIVER SETUP
IS COMPLETED.
Window Vista - restart screen
Docking station - restart screen
5. After restarting, the computer will recognize the docking station
and the default drivers will automatically finish installing for
each of the devices. Please wait until this process is completed.
The screen’s resolution will adjust and refresh during this
process.
NOTE: THIS SETUP PROCESS WILL REQUIRE SOME TIME FOR THE DRIVERS TO
INSTALL PROPERLY. IT MIGHT TAKE UP TO 5 MINUTES OR MORE DEPENDING
ON YOUR COMPUTER’S CONFIGURATION.
6. You will see a Targus Display logo icon located on the system
tray. The monitor mode selection can be set by right clicking on
this icon.
NOTE: IT IS RECOMMEND TO SET THE MODE TO “EXPRESS CARD VGA” OFF
WHEN USING ONLY ONE MONITOR. THE DEFAULT SETTING IS “EXTENDED
MODE”.
11
Targus ExpressCard Notebook Docking Station with Digital Video and Audio
LED Status Indicator Lights
Once all device drivers are installed, the USB LED status indicator
lights on on each side of the docking station glow when you connect
devices to the docking station.
• Green Tx light illuminates when connected to a network and the
yellow Rx light flashes when data is transmitting to or from the
network.
• The Power LED will glow when the AC power cord is plugged
into the docking station.
Docking Station ports
Laptop Support Pad
Laptop Support Pad
Gigabit Ethernet
VGA
DVI-D
Serial
ExpressCard
upstream
cable
connection
S/PDIF
5.1 Surround
Sound &
Microphone
12
DC 5V
Power and
Power LED
Targus ExpressCard Notebook Docking Station with Digital Video and Audio
Connecting New Devices
To avoid possible damage when connecting a new device, do not
force the cable connector into the port on the docking station. If the
cable connector does not attach smoothly, turn the connector over
and try attaching it again.
Connecting a Serial Mouse / Keyboard
To connect a serial mouse or keyboard, attach the cable connector
to the serial port on the docking station.
Connecting and Configuring a Serial
Modem
To connect a serial modem:
1. Attach the cable connector to the serial port on the docking
station.
2. Install the modem software driver according to the instructions
that come with the device.
3. When prompted to select the port, choose the Serial USB
(COMx), where x is the COM port number assigned by your
operating system.
Connecting a PDA
1. Attach the cable connector to the serial port on the docking
station.
2. Verify that the COM port setting, in either your HotSync® or
ActiveSync® software, matches the setting on the docking
station. To verify the COM port setting on the docking station,
refer to “Verifying Devices are Installed”. To verify the COM port
setting on your PDA, refer to the documentation that came with
it.
13
Targus ExpressCard Notebook Docking Station with Digital Video and Audio
Connecting to a Local Area Network
To connect an Ethernet cable with an RJ-45 connector, attach
the cable connector to the Ethernet/network port on the docking
station. Additional procedures to connect to an actual network
depend on the type of network you are using. Contact your network
administrator for detailed instructions.
NOTE: THE DOCKING STATION SUPPORTS HOT SWAPPING OF THE NETWORK
CABLE.
Connecting a USB Device
To connect a USB device, plug it into a USB port on the docking
station and follow the additional instructions provided with the
device. All four USB ports meet USB High-speed requirements of
a 480Mbps transfer rate and a minimum of 500mA of power. Note
that 2 out of the 4 USB ports are designed to provide 1000mA,
twice as much as standard USB specifications. See “Targus
Always On” and “Using USB Devices That Require More Power”
for more details.
14
Targus ExpressCard Notebook Docking Station with Digital Video and Audio
Connecting and Configuring an
Audio Device
This docking station comes with a 5.1 audio support. The back of
the device has 5 ports dedicated to audio.
NOTE: IF YOU ARE HAVING PROBLEMS WITH YOUR SPEAKERS AFTER
ATTACHING THE DOCKING STATION, PLEASE SEE THE TROUBLESHOOTING
SECTION FOR MORE INFORMATION.
MIC
FRONT
REAR
CENTER
S/PDIF
Microphone In – Pink
Front Channel or Line Out – Green
Rear Channel – Black
Center Channel / subwoofer– Orange
S/PDIF – Digital Audio Interface (PCM, Dolby Digital 5.1)
1. To use stereo headphones or speakers, plug them into the
green 3.5mm port.
If you have a 5.1 speaker setup, connect the Front Channel
Speaker into the green 3.5mm port. Connect the Rear Speaker
into the black 3.5mm port. Connect the Center Channel into the
orange 3.5mm port.
15
Targus ExpressCard Notebook Docking Station with Digital Video and Audio
2. To connect a microphone, plug it into the pink 3.5mm port.
3. To enable your headphones or speakers, you must first choose
C-Media USB Sound Device in the Properties Settings.
4. For Windows XP, go to the Control Panel and choose Sound
and Audio. Select the Audio tab. Under Sound Playback,
change Preferred Device to C-Media USB Sound Device from
the drop down list.
Click Apply, then click OK.
5. Make sure the volume is not set to MUTE.
NOTE: AUDIO DEVICES WILL NOT WORK SIMULTANEOUSLY ON THE DOCKING
STATION AND THE HOST COMPUTER.
CAUTION: ALL AUDIO OR MULTIMEDIA APPLICATIONS MUST BE TERMINATED
BEFORE SWITCHING BETWEEN THE PORT STATION AUDIO OUTPUT AND THE
HOST COMPUTER AUDIO OUTPUT.
16
Targus ExpressCard Notebook Docking Station with Digital Video and Audio
Installing and Configuring a S/PDIF
(Sony/ Philips Digital Interface)
Device
1. In order to enable S/PDIF, you have to turn it on. This can be
done by opening the USB 3D Sound Configuration applet
located in your system tray (click on the USB icon to open up
the Configuration Screen).
2. Click on the button next to the S/PDIF Output text to enable
S/PDIF.
3. Set the Audio Output from the tray to digital audio.
4. Plug your TOSLINK cable (not included) into the S/PDIF-Out
port of Docking Station on one end, and the S/PDIF-In port of
Digital Decoder or Speaker on the other end.
NOTE: THERE IS NO NEED TO CONNECT ANY OTHER SPEAKERS CABLES IF
THIS OPTION IS SELECTED. THE OPTICAL TOSLINK CABLE IS THE ONLY CABLE
REQUIRED.
5. Connect your Digital Decoder or Speaker to the Home Theater
System.
17
Targus ExpressCard Notebook Docking Station with Digital Video and Audio
Connecting to a Monitor or LCD
Any monitor or LCD connected to the video port of the docking
station will be limited to a maximum resolution of 1600x1200, 32bit color.
Video Menu Options
Video menu options can be accessed by right-clicking on the
Targus Display icon in the system tray or through the Windows
Display Properties.
The only menu option not accessible through Windows Display
Properties is Mirror. This must be accessed through the Targus
Display icon.
To change the resolution using the Windows Display properties:
1. Move the cursor to an empty spot on your desktop, then right
click your mouse and select “Properties”.
2. On the Display properties screen, click on the “Settings” tab.
3. Change the screen resolution or color depth in this screen.
4. Click “OK” to close the “Display properties” screen
To change the resolution and modes using the Targus Display
icon:
1. Position the cursor on the top of the Targus Icon and right click
on it.
2. From this screen, you can change the resolution and modes
that the dock operates in (see the following explanation of the
video modes supported).
18
Targus ExpressCard Notebook Docking Station with Digital Video and Audio
Primary: You are using a monitor or LCD (not your notebook
screen) as your primary screen.
Extended: You are using your notebook screen as your primary
display and your monitor or LCD is a secondary screen, extending
your desktop to span both screens.
Mirror: You are using your notebook screen as your primary
display and your monitor or LCD replicates your notebook screen.
Off: You are using your notebook screen as your primary display
and your monitor or LCD is turned off.
Resolution: Changing the resolution from the Targus utility will
only affect the monitor connected to the docking station video
port.
Notebook
Screen
Secondary
Monitor or LCD
Primary:
On
On
Extended:
On
On
Mirror:
On
On
Off:
On
Off
NOTE: SOME LCDS HAVE BEEN OPTIMIZED FOR A SPECIFIC RESOLUTION. IF
THE OPTIMUM RESOLUTION IS NOT 1280 X 1024, THE RESULTS MAY NOT BE
AS DESIRED.
19
Targus ExpressCard Notebook Docking Station with Digital Video and Audio
Video output will support the following
resolutions and color quality:
Mode
Aspect
ratio
Resolution
Color
Depth
Refresh Rate
UXGA
4:3
1600x1200
16
60HZ, 65HZ,
70HZ, 75HZ,
85HZ
UXGA
4:3
1600x1200
32
16:10
1680x1050
32
SXGA+
SXGA
4:3
5:4
1400x1050
1280x1024
16
16,32
QVGA
4:3
1280x960
16,32
16:10
15:9
16:10
4:3
1440x900
1280x768
1280x800
1024x768
32
16,32
16,32
16,32
SVGA
4:3
800x600
16,32
VGA
4:3
640x480
16,32
WSXGA+
WXGA+
WGA
WXGA
XGA
60HZ, 65HZ, 70HZ
60HZ, 65HZ, 70HZ
60Hz
60HZ, 75HZ , 80HZ
60HZ, 75HZ, 85HZ
60Hz
60Hz
60Hz
60HZ, 70HZ,
75HZ, 85HZ, 120HZ
60HZ , 72HZ,
75HZ , 85HZ,
120HZ , 160HZ
60HZ, 72HZ,
75HZ, 85HZ,
120HZ, 160HZ
NOTE: ALL REFRESH RATES LISTED ARE NON-INTERLACED.
Global Suspend Mode
When your computer is in suspend mode, the docking station also
enters suspend mode to avoid power consumption. When your
computer wakes up, the docking station wakes up automatically.
Using USB Devices that Require
More Power
This docking station is designed with 4 USB High Power Ports 2 of
which, providing up to 1000mA of power each. They can be used to
connect to peripherals that requires more power such as printers,
scanners, optical drives, and others.
20
Targus ExpressCard Notebook Docking Station with Digital Video and Audio
Troubleshooting
Device Not Working
• Make sure that the device is fully inserted into the correct port
on the docking station.
• Plug the device into a different port on the docking station. If it
still doesn’t work, test the device by connecting it directly to your
computer.
• Verify that you ran the Setup or Install program for the device.
• Make sure that the device appears in Device Manager. For more
information refer to “Verifying Devices are Installed”.
• Disconnect all devices from the docking station and reconnect
them, one at a time. Check that each device works before
plugging in the next one.
• Each USB port is equipped with over-current protection. Should
a USB device draw more current than the USB port can supply,
the port will shut down. To re-enable the port, unplug the device
and go to Device Manager or to the message in the system
tray and choose the Reset option. You can then plug the device
back into the USB port. If a shut down reoccurs, check the
power requirements of the device.
21
Targus ExpressCard Notebook Docking Station with Digital Video and Audio
Verifying Devices are Installed
You can view the devices installed on the docking station from the
Device Manager window in System Properties.
Right-click My Computer, Properties, then click the Hardware
tab, and then the Device Manager button.
From the Device Manager window, expand the following:
• Display Adapters — Targus ExpressCard w/ video
• Human Interface Devices — displays keyboards and pointing
devices: mice, trackballs, and joysticks
• Network Adapters — Realtek RTL 8110SC Ethernet Adaptor
• Ports (COM & LPT) — Serial on USB [COM x]
• Sound, Video and Game Controllers — displays USB audio
device
• Universal Serial Bus controllers — displays the other devices
installed for the docking station and generic hub
Verifying a Serial Modem Connection
When attaching a modem to the serial (RS232) port, verify that
the port assigned to your modem is Serial USB (COMx), where x
is the number of the COM port.
If the operating system does not automatically detect that your
modem is assigned to Serial USB (COMx), run the Hardware
Wizard again and choose Select from the list instead of
Autodetect. Then, select Serial USB (COMx) as the COM port.
Error Message on Your PDA
If the error message “Connection Not Established” appears on
your PDA, check that the COM port setting in either your HotSync
or ActiveSync software matches the setting on the docking
station. See “Verifying Devices are Installed” to verify the COM
port setting on the docking station.
Some older versions of the Palm® Desktop software are not
compatible with the USB to Serial conversion. Please contact your
PDA vendor for software updates.
22
Targus ExpressCard Notebook Docking Station with Digital Video and Audio
Video
Can I get a higher resolution on my monitor?
• The highest resolution is 1600 x 1200, 32-bit color.
Movie playback is not smooth when played at 1600x1200x32
bit resolution. It is worse when playing a media clip in full
screen.
The Targus ExpressCard Docking station is not primarily designed
for playing back movie content at maximum resolution and color
depth. The best mode for displaying video content is at 1280x1024
(SXGA) resolution or lower.
The reason for this is the large amount of display data being
transferred during movie playback. Standard DVD movies are
encoded at a resolution of 720x480 (NTSC), and 720x576 for PAL
discs. Higher resolution display of the video will result in upscaling
the display to the higher resolution, which does not gain any net
affect on the playback of the movie.
Ways to improve the smoothness of the movie playback are:
• Reduce the resolution of the display to 1280x1024 with lower
color depth (16 Bit Color)
• Terminate any other CPU intensive applications running on the
computer.
Why can’t I play a DVD using the docking station?
DVD playback is controlled by the DVD playback software and
thehardware on your notebook. Many DVD playback software
programs are not capable of supporting DVD playback on an
external or secondary monitor. If you encounter problems playing
back videos in Extended mode, try switching the Video mode on
the docking station to Primary or Mirror mode.
Why are there unexpected crashes or power state issues?
Please make sure you have upgraded your system BIOS on your
notebook. Several popular notebook vendors, such as Lenovo and
Fujitsu, have released BIOS upgrades that resolve a number of
ExpressCard related issues.
23
Targus ExpressCard Notebook Docking Station with Digital Video and Audio
Why does my system crash during boot up with the Card
connector installed?
Try switching the Pre-boot switch to the “on” position and boot
again.
Can two separate displays be connected to the ExpressCard
Docking station (VGA and DVI-D) and display two separate
images or work to extend the display across three screens
(including the notebook’s screen)?
No. The output from the VGA port and the DVI port are the same.
My screen becomes blank (black) when I connect the
ExpressCard to my computer.
Make sure the ExpressCard is properly connected and check the
display mode in the system tray so that the setting is correct.
Audio
I cannot hear anything through my notebook’s speakers.
Some notebooks default to the ExpressCard docking station’s
onboard USB Audio device when the docking station is connected,
disabling your notebook’s built in speakers. To enable your
notebook’s speakers, do the following:
1. Open the Control Panel, and select “Sounds and Audio
Devices”.
2. On the “Audio” tab under the “Sound Playback” section, select
your notebook’s internal audio device (will be a device other
than the USB audio device of the docking station).
If you still cannot get the audio device to play from your
speakers:
1. Open the Control Panel, and select “Sounds and Audio
Devices”.
2. On the “Audio” tab under the “Device Volume” section, click
“Advanced”.
3. Uncheck the “Mute All” box.
NOTE: YOU WILL NEED TO CLOSE ANY APPLICATIONS THAT ARE
USING AUDIO AND RESTART THEM IN ORDER TO ENABLE THIS
CHANGE.
24
Targus ExpressCard Notebook Docking Station with Digital Video and Audio
Technical Support
For technical questions, please visit:
US
Internet: www.targus.com/support.asp
Australia
Internet: www.targus.com/au
Email: [email protected]
Telephone: 1800-641-645
New Zealand
Telephone: 0800-633-222
Product Registration
Targus recommends that you register your Targus accessory
shortly after purchasing it. To register your Targus accessory, go
to:
http://www.targus.com/registration.asp
You will need to provide your full name, email address, country of
residence and product information.
Warranty
Targus warrants this product to be free from defects in materials
and workmanship for one year. If your Targus accessory is found
to be defective within that time, we will promptly repair or replace
it. This warranty does not cover accidental damage, wear and tear,
or consequential or incidental loss. Under no conditions is Targus
liable for loss of, or damage to a devices nor loss of, or damage
to, programs, records, or data; nor any consequential or incidental
damages, even if Targus has been informed of their possibility. This
warranty does not affect your statutory rights.
25
Targus ExpressCard Notebook Docking Station with Digital Video and Audio
Regulatory Compliance
This device complies with Part 15 of the FCC Rules. Operation is subject
to the following two conditions: (1) This device may not cause harmful
interference, and (2) This device must accept any interference received,
including interference that may cause undesired operation.
FCC Statement
Tested to Comply
This equipment has been tested and found to comply with the limits of
a Class B digital device, pursuant to Part 15 of the FCC Rules. These
limits are designed to provide reasonable protection against harmful
interference in a residential installation. This equipment generates, uses,
and can radiate radio frequency energy and if not installed and used
in accordance with the instructions, may cause harmful interference to
radio communications. However, there is no guarantee that interference
will not occur in a particular installation. If this equipment does cause
harmful interference to radio or television reception, which can be
determined by turning the equipment off and on, the user is encouraged
to try to correct the interference by one or more of the following
measures:
• Reorient or relocate the receiving antenna;
• Increase the separation between the equipment and receiver;
• Connect the equipment into an outlet on a circuit different from that to
which the receiver is connected;
• Consult the dealer or an experienced radio/TV technician for help.
Changes or modifications not authorized by the party responsible for
compliance could void the user’s authority to operate this product.
Windows and ActiveSync are registered trademarks of Microsoft Corporation. Palm and
HotSync are registered trademarks of Palm, Inc. Microsoft, Windows, and Windows Vista
are either registered trademarks or trademarks of Microsoft Corporation in the United States
and/or other countries. All trademarks and registered trademarks are the properties of their
respective owners. All rights reserved. © 2008, Targus Group International, Inc. and Targus,
Inc., Anaheim, CA 92806 USA.
26
Visit our website at www.targus.com
Features and specifications are subject to change without notice.
© 2008 Targus Group International, Inc. and Targus, Inc.
ACP60US / 410-0493-001D