1
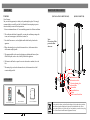
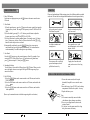
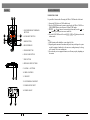
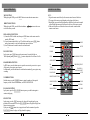
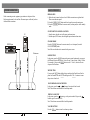
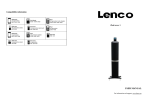
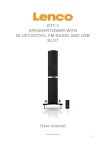
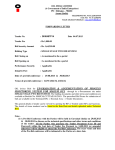
iPod tower 1
USER MANUAL
For information and support, www.lenco.eu
FOREWORD
BASE PLATE INSTALLATION
(INSTALLATION SKETCH MAP)
THANKS
(DESIGN SKETCH)
Dear Customer,
May we take this opportunity to thank you for purchasing this player. We strongly
recommend that you carefully read the User Manual before attempting to operate
the unit and that you note the listed precautions.
1. Ensure a minimum distance of 5 cm around the apparatus for sufficient ventilation.
2. The ventilation should not be impeded by covering the ventilation openings with
items, such as newspapers, table-clothes, curtains, etc.
3. No naked flame sources, such as lighted candles should not be placed on the
apparatus.
4. Where the mains plug is used as the disconnect device, the disconnect device
shall remain readily operable.
Note:
Please tear off the
protective film
when use
5. The apparatus shall not be exposed to dripping or splashing and that no objects
filled with liquids, such as vases, shall be placed on the apparatus.
6. The batteries shall not be exposed to excessive heat such as sunshine, fire or the
like.
7. The mains plug is used as the disconnect device, the disconnect device shall
remain readily operable.
Case
Base Plate
Chassis Screw Cap
ACCESSORIES
USER MANUAL
Part 1: Remote Control
Part 2: Audio Wire
Chassis Screw Pole
Chassis Adjusting Nut
Chassis Pillar
Chassis Mat
Chassis Mat Screw
EV Mat
Fixed Screw of Base Plate
Part 3: User Manual
If at any time in the future you should need to dispose of this product please note that:
Waste electrical products should not be disposed of with household waste. Please
recycle where facilities exist. Check with your Local Authority or retailer for recycling
advice. (Waste Electrical and Electronic Equipment Directive)
1
RADIO OPERATION
WARNING
1. Enter FM Function
In the turn-on or playing status, press the FM button on the remote control to enter
FM mode.
Please read and understand all the warnings given in the following and those marked
on the unit. This unit has been designed and manufactured to assure personal safety.
2. Select Bands
1) Directly input frequency: press the T/F button on the remote control, then input the
frequency that you want. The range of FM frequency is from 87.50MHz to 108.00
MHz.
2) Select the band by pressing TU- or TU+ button: press this button to adjust the
frequency up or down a step. The step of FM is 0.05 MHz.
3) Select saved stations by pressing number buttons. For example: press 10+ button
twice, 5 button once, you may select the 25th saved station. Press the CH- or CH+
button to switch the previous or next band.
4) Automatically search bands: press the SEARCH button, this system starts to
search bands from low to high frequency automatically. The searched band are
saved automatically. Press this button again to stop searching.
3. Save Bands
Press the SAVE button to save the current frequency of band. For example: if you
want to save 99.3 MHz in 28th cell, press 10+ button twice and 8 button once,
press T/F button to input 9 9 3, then press SAVE button.
4. Soundtrack Selection
To select Mono or Stereo while in FM mode, press MO/ST button. When you select
stereo, the display shows a stereo signal. If the signal is not strong enough, you
cannot select Stereo.
Only use the power by sign on
User Manual or system.
Keep the unit and power plug
away from water.
Avoid direct sunshine and
nearing heater.
Never open the cover, avoid
metals dropping in, such as needle,
hairpin, coin etc.
Protect power cable: avoid high
pressure and stamp on; do not
pull & bend excessively.
Unplug the set from the outlet
when you do not use it for a long
time.
INSTALL THE REMOTE CONTROL BATTERY
5. Exit FM Mode
1) Press the USB/SD button on the remote control to exit FM status, and switch to
USB/CARD mode.
2) Press the IPOD button on the remote control to exit FM status, and switch to the
IPOD mode.
3) Press the AUDIO button on the remote control to exit FM status, and switch to
Audio input mode.
(Please vary the antenna direction to find the strongest signal for each station.)
1. Reverse the remote control, and clasp the
buttonhole, then pull the cover out at the same
time.
2. Insert the battery of type CR 2025 into the battery
compartment. Make sure the symbol + faces up.
3. Replace the battery cover.
1
2
9
Note:
1) If the remote control only can work within
short distance, please change a new battery.
2) Never try to recharge batteries, short-circuit,
cutting or buried.
3) If you won`t use the remote control for a long
time, please remove the battery.
2
BASIC OPERATION
PANELS
USB/DIGITAL CARD
5
4
It is possible to listen to audio files using the USB or CARD interface of this unit.
1. FAST REWIND/FAST FORWARD
BUTTONS
1
8
2
3
9
2. AUDIO INPUT BUTTON
3. SLEEP BUTTON
10
4. IPOD INTERFACE
6 7
5. STANDBY BUTTON
6. PLAY/PAUSE BUTTON
1. Connect the USB device or CARD with this unit.
2. Press the USB/SD button on the remote control to play the USB or CARD. Press
USB/SD button again to switch between USB and CARD modes.
3. Press the
or
button to fast rewind or fast forward; Press the
or
button to go to the previous or next audio files.
4. To exit the USB/CARD mode: Press the IPOD, AUDIO or FM button, and switch
to other modes.
Note:
1) USB-Extension cable should have a max. length of 0.5m.
2) Depending on the amount of data and media speed, it may take longer for system
to read the contents of media device. In some cases, reading time may be as long
as 60 seconds. This is not a malfunction.
3) Even when they are in a supported format, some files may not play depending on
the content.
7. STOP BUTTON
8. PREVIOUS/NEXT BUTTONS
9. VOLUME -/+ BUTTONS
10. DISPLAY SCREEN
11
11. USB PORT
12
12. MULTI-MEDIA CARD PORT
13. POWER SUPPLY INPUT
14. POWER ON/OFF
13
14
3
8
BASIC OPERATION
REMOTE CONTROL
MENU BUTTON
While playing the IPOD, press the MENU button to return the main menu status.
DIRECTION BUTTONS
While playing the IPOD, press the Direction buttons
to select the item you want.
to move the cursor
IPOD, AUDIO, FM BUTTONS
1) Connect the IPOD with this unit, then press IPOD button on the remote control to
enter the IPOD mode.
2) Correctly connect audio facility (eg. PC) with this unit, then press AUDIO button
on the remote control to enjoy outer audio input sources function.
3) Press FM button on the remote control to enter radio mode.
TONE FUNCTION
In play status, press TONE button on the remote control to switch the Bass or
Treble adjusting mode; press the VOL.+/- button to adjust the effect of Bass or Treble.
NOTE:
1. Align the remote control directly at the remote control sensor of the device.
2. The range of the remote control depends on the charge of the battery.
3. Bright light (sun or artificial light) should not fall directly at the remote control
sensor. Bright light can negative influence the efficacy of the remote control.
4. Make sure that there are no obstacles between the remote control and the
remote control sensor.
MENU
SLEEP
STANDBY
MUTE
USB/SD
NUMBER BUTTONS
IPOD
AUDIO INPUT
SEARCH/REPEAT BUTTON
In IPOD status, press this button once to repeat the current track; press twice to repeat
all the tracks; press again to cancel repeat.
In Radio mode, press the this button to search bands automatically; press again to stop
searching.
TIME/FREQUENCY
FM
TUNE-/+
F.RWD/F.FWD
CHANNEL-/+
PREVIOUS/NEXT
STOP
PLAY/PAUSE
DIRECTION BUTTONS
NUMBER BUTTONS
In Radio status, press the NUMBER buttons to input the number of the required
frequency or band. For more information, see RADIO OPERATION.
PLAY/PAUSE BUTTON
In play status, press the PLAY/PAUSE button to pause, press this button again to
continue the playing.
SEARCH/REPEAT
TONE
SAVE
VOLUME+
MONO/STEREO
VOLUME-
STOP BUTTON
In play status, press the STOP button once, the player will stop playing; the stop
position will be memorized. Press the PLAY/PAUSE button, the player will play from
the previous stop position.
If you press the STOP button twice, stop position will not be memorised, press the
PLAY/PAUSE button, the player will play from the beginning.
7
4
SYSTEM CONNECTION
BASIC OPERATION
Before connecting acoustic equipment, pay attention to the picture below.
Each connection must be safe and firm. Disconnect power cable until you have
finished all the connections.
PREPARATION
1) Before the unit is turned on, please check if all the connections are right and safe.
Then connect the main power.
2) Press the POWER ON/OFF button on the back panel to turn on the main power.
3) Press the STANDBY button on the remote control (or front panel) to exit the standby
mode.
STATE INDICTION OF DISPLAY SCREEN
1. In radio status, show the received frequency and mono/stereo.
2. In Audio-input, IPOD status, show the signal input and main volume status.
PC
STANDBY MODE
Press the STANDBY button on the remote control (or on front panel) to switch
ON/OFF the Standby mode.
Note: Make sure that the unit is connected to the power source.
DVD Player
FM antenna
SLEEP BUTTON
In play status, press the SLEEP button on the remote control continuously, you can get
the different sleep time for this unit: 10 min, 20 min, 30 min, 60 min, 90 min, 120 min.
For example, if you press the SLEEP button to select ``10 min``, the unit will enter
sleep mode in 10 minutes.
MUTE BUTTON
If you press the MUTE button while playing, sound signal will not be heard, but the
picture will remain. Press the MUTE button again or the VOL+/- buttons to resume
the previous volume level.
FAST FORWARD AND FAST REWIND
In play status, press the
or
button to fast rewind or fast forward.
Note: These buttons are unavailable in Audio Input mode.
PREVIOUS AND NEXT
In play status, press the
button to go to the previous audio file; press the
button to go to the next audio file.
Note: These buttons are unavailable in Audio Input mode.
VOLUME SETTING
Press the VOL.+/- buttons to turn the volume up or down.
5
6