1
Instruction
Anleitung
Instrucciones
Mode d’emploi
Instructies
L-69
ST
OP
UP
33
WN
DO
45
B
RE
C
N
SE
D
P/S
STO
AU
Y/P
PLA
IP-D
SK
P
F-U
OG
P
/PR
IP-U
SK
ID3
SD
DE
MO
C
RE
US
PH
F
OF
B
US
Direct encoding turntable
Plattenspieler mit Direktaufnahmefunktion
Giradiscos de codificación directa
Tourne-disque à encodage direct
Direct encoding draaitafel
For information and supports: www.lenco.eu
Zur Information und Unterstützung, www.lenco.eu
Para obtener información y apoyo, www.lenco.eu
Pour information & support technique, www.lenco.eu
Voor informatie en ondersteuning, www.lenco.eu
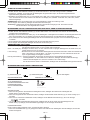
CAUTION:
Usage of controls or adjustments or performance of procedures other than those specified herein may resulte in hazardous
radiation exposure.
This unit should not be adjusted or repaired by anyone except qualified service personnel.
PRECAUTIONS FOR USE
Installation
• Unpack all parts and remove protective material.
• Do not connect the unit to the mains before checking the mains voltage and before all other connections have been made.
• Do not cover any vents and make sure that there is a space of several centimeters around the unit for ventilation.
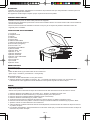
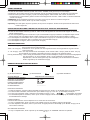
LOCATION OF CONTROLS
1
2
3
4
ST
OP
5
6
UP
33
N
DOW
7
45
US
RE
SKIP-
SD
E
MOD
C
REC
B
PLAY
DN
STOP
E
/PAUS
SKIP-
F-UP
ROG
/SD
9
UP
ID3/P
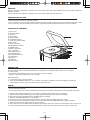
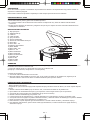
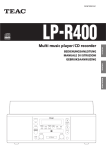
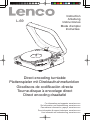
1) Dust cover
2) Spindle adaptor
3) AC cord
4) Audio cable
5) Pick-up holder
6) UP/DOWN selector
7) 33/45 rpm speed selector
8) REC button
9) SKIP - UP button
10) OFF/USB/PH selector
11) MODE button
12) SKIP - DN button
13) F - UP button
14) ID3/PROG button
15) STOP/SD button
16) PLAY/PAUSE button
17) LCD display
18) SD slot
19) USB slot
20) STOP button
PH
OFF
14
16
20
19
18
8
USB
13
11
12
10
15
17
CONNECTION
Audio connection
The record player has an inbuilt preamplifier and can therefore be connected directly to the Line In / Aux input
on a hi-fi system.
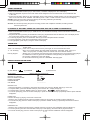
• Connect the audio cable(4) to the Line In / Aux input on your hi-fi system
(red plug = right channel; white plug = left channel).
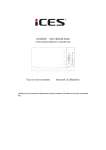
Mains connection
1. Connect the power cord to AC outlet
2. switch the OFF/USB/PH Selector to “ PH “ function. if ”PHONO” is displayed on the LCD display, it’s mean the
power supply is normal. now your system is ready to play the music.
PHONO
NOTED:
- remove the stylus protector.
- be sure that the tone arm is being detached from the tone arm rest before operating and re-secured again afterwards.
1.
2.
3.
4.
5.
6.
7.
8.
9.
Slide the OFF/USB/PH selector(13) to “PH” function, “PHONO” is displayed on the LCD display
Set the 33/45 rpm speed selector(7) to the proper position depending on the record to be played.
Place the record on the platter (use the spindle adaptor if required).
Slide the UP/DOWN selector(6) to “UP” position
Lift the tone arm from the rest and slowly move it to the record side. the platter will start to rotate.
Place the tone arm to the desired position of the record, Slide the UP/DOWN selector(6) to “DOWN” position
Adjust the volume to the desired level on your hi-fi system.
At the end of record, the platter will automatically stop rotating, lift the tone arm from the record and return it to the rest.
To stop manually, press the STOP Button(20) directly, or lift the tone arm from the record and return it to the rest
E-1
PHONO ENCODING
1. Insert the USB flash disk or SD card into appropriate slot(18)/(19).
2. Slide the OFF/USB/PH selector(13) to “PH” function, “PHONO” is displayed on the LCD display
3. select and playback at phono for the track which will be assigned to the encoded sounds on the USB flash disk
or SD card.
4. Press once the “REC” button(10), the LCD display shows “USB” flashing/ “CARD” flashing. The encoding will starting
after 10 seconds and shows “PHONO” with flashing words “USB” / “CARD” lower left corner of the LCD display.
NOTED: Press twice the “REC” button(10) directly, the encoding will starting immediately.
5. To stop encoding, press “STOP” button(20).
Re-mark: Do not interrupt during the phono recording process until completed. Otherwise,recording function
cannot be performed.
PLAYBACK OF MP3/WMA SONGS VIA USB FLASH DISK OR SD CARD STORAGE MEDIA
1. Insert the USB flash disk or SD card into appropriate slot(18)/(19).
2. Slide the OFF/USB/PH selector(13) to “USB” function, the unit will automatically read the total folders and the number
of the total tracks.
3. Playback will start by pressing “PLAY/PAUSE” button(16). playback starts with the first track, the LCD display shows
the current track number and the song “WMA” or “MP3” format .
4. To interrupt playback, press “PLAY/PAUSE” button(16). the time elapsed indicator will flash.
5. To resume playback, press the “PLAY/PAUSE” button(16) again.
6. To stop playback, press stop by using the “STOP” button(20).
TRACK SKIP
“SKIP - DN” button(14) - press once to return to the beginning of the current track. press again quickly to back up
another track.
“SKIP - UP” button(12) - press once to skip to the next track. press again to move forward another track.
“F - UP” button(9)
- allow you to switch between the folder while the playback, hold either “SKIP - DN”(14) or
“SKIP - UP”(12) button to audibly search the current track in the desired direction.
ID3 Tag Support
- allowing you to conveniently view the artist name and the title of the track currently being played.
To enable ID3 functions by press the “ID3/PROG” button(8) during the playback mode,
the “ID3 ON” is displayed on the LCD display.
To cancel ID3 functions by press the “ID3/PROG” button(8) again.
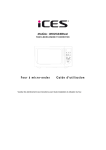
REPEAT/INTRO/RANDOM MODE
(1) REPEAT 1
(2) REPEAT ALL TRACKS
(3) REPEAT 1 FOLDER
(6) OFF MODE
(4) INTRO PLAY
(5) RANDOM
PLAY MODE
REPEAT SINGLE TRACK
REPEAT ALL TRACKS
RELEAT SINGLE FOLDER
INTRO PLAY MODE
RANDON MODE
OFF MODE
INDICATOR ON LCD DISPLAY
ALL
INTRO
RANDOM
-------------------
REPEAT PLAY
1. When the playback, if you desire to repeat the same track only, press the “MODE” button(11) on the unit .
2. To repeat all disc, press the “MODE” button(11) twice and the “ALL” display will light up.
3. To repeat folder, press the “MODE” button(11) thrice and the “
”display will light up.
4. To cancel repeat play, press the “STOP” button(20) or press the “MODE” button(11) repeatedly until the repeat indicator
disappears.
INTRO PLAY
Introduce all songs by playing 10 seconds of each track.
1. Either in stop or playback mode, press the “MODE” button(11) four times, the “INTRO” indicator will light up..
2. To cancel intro play, press the “STOP” button(20) or press the “MODE” button(11) repeatedly until the intro indicator
disappears.
RANDOM PLAY
1. Either in stop or playback mode press the “MODE” button(11) five times, the “RANDOM” indicator will light up.
2. In the stop mode, press the “PLAY/PAUSE” button(16) to start playing. the tracks will be played randomly.
3. To cancel random play, press the “STOP” button(20) once again until the “RANDOM” indicator disappears.
E-2
PROGRAM PLAY
Allow you to program up to 32 tracks to play in any order, including repeating tracks.
1. When the playback is stopped, press the “ID3/PROG” button(8), the “PROG” indicator will flash.
2. Select a desired track by pressing “SKIP - DN”(14) or “SKIP - UP”(12) button. or by pressing “F - UP” button(9) to switch
between the folder.
3. Press the “ID3/PROG” button(8) to store the track into memory.
4. Repeat the steps 3 and 4 for additional tracks into the memory if necessary.
5. To play the programmed of desired tracked, press the “PLAY/PAUSE” button(16).
6. To cancel the program memory, press “STOP” button(20) until the “PROG” indicator disappears.
Model: L-69
Mains Voltage: 220 / 240 v ~ 50hz
Power Consumption: 14 w max.
Outputs: Audio output (cinch)
WARNING
To prevent fire or shock hazard, do not expose this appliance to rain or moisture.
Mains plug is used as the disconnect device and it shall remain readily operable. To be completely disconnected
the power input, the mains plug of the apparatus shall be disconnected from the mains completely.
Dripping warning : " The product shall not be exposed to dripping or splashing and that no objects filled with liquids,
such as vases, shall be placed on the product."
Ventilation warning : " The normal ventilation of the product shall not be impeded for intended use."
- minimum distance 50mm around the apparatus for sufficient ventilations;
- no naked flame sources such as lighted candles should be placed on the apparatus;
- attention should be drawn to the envirnmental aspects of battery disposal;
- the use of apparatus in moderate climates
The marking is located at the bottom of the apparatus.
Mains plug is used as the disconnect device and it shall remain readily operable. To be completely disconnected
the power input, the mains plug of the apparatus shall be disconnected from the mains completely. The mains plug
should not be obstructed OR should be easily accessed during intended use.
The apparatus shall not be exposed to dripping or splashing and that no objects filled with liquids, such as vases,
shall be placed on apparatus.
IF AT ANY TIME IN THE FUTURE YOU SHOULD NEED TO DISPOSE OF THIS PRODUCT PLEASE
NOTE THAT: WASTE ELECTRICAL PRODUCTS SHOULD NOT BE DISPOSED OF WITH HOUSEHOLD
WASTE. PLEASE RECYCLE WHERE FACILITIES EXIST. CHECK WITH YOUR LOCAL AUTHORITY
OR RETAILER FOR RECYCLING ADVICE. (WASTE ELECTRICAL AND ELECTRONIC EQUIPMENT
DIRECTIVE)
E-3
ACHTUNG:
Die Verwendung von Bedienungsweisen, die nicht in dieser Anleitung beschrieben werden, kann zudem zur Aussetzung
von gefährlicher Strahlung führen.
Dieses Gerät sollte nur durch ausgebildetes Fachpersonal justiert oder repariert werden.
VORSICHTSMASSNAHMEN ZUR BENUTZUNG
Aufstellung
• Nehmen Sie sämtliche Teile aus der Verpackung heraus und entfernen Sie sämtliche Schutzmaterialien.
• Schließen Sie das Gerät nicht an den Strom an, bevor Sie die Netzspannung überprüft habe und alle anderen
Verbindungen fertiggestellt wurden
• Bedecken Sie keine der Ventilationsöffnungen und vergewissern Sie sich, dass um das Gerät herum mehrere Zentimeter
Platz zur Belüftung bleiben.
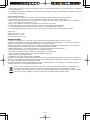
BEDIENELEMENTE
1
2
3
4
ST
OP
5
6
UP
33
N
DOW
7
45
US
RE
SKIP-
SD
E
MOD
C
REC
B
PLAY
DN
STOP
E
/PAUS
SKIP-
F-UP
ROG
/SD
9
UP
ID3/P
1) Staubschutz
2) Plattenadapter
3) Netzkabel
4) Audiokabel
5) Tonarmhalter
6) Tonarmsteuerung HOCH/RUNTER
7) 33/45 Rpm Geschwindigkeitsregler
8) Aufnahme (REC)
9) Suchen hoch (SKIP UP)
10) OFF/USB/PH-Auswahlschalter
11) Modustaste
12) Suchen runter (SKIP DN)
13) F - UP-Taste
14) ID3/PROG-Taste
15) STOP/SD-Taste
16) PLAY/PAUSE-Taste
17) LCD-Display
18) SD-Kartenslot
19) USB-Port
20) STOP-Taste
PH
OFF
USB
14
16
20
19
18
8
13
11
12
10
15
17
ANSCHLUSS
Audioanschluss
Der Plattenspieler verfügt über einen eingebauten Vorverstärker und kann deshalb direkt an den Line-In/Aux-Eingang
eines HiFi-System angeschlossen werden.
• Schließen Sie das Audiokabel (4) an den Line-In/Aux-Eingang Ihres HiFi-Systems an
(roter Stecker = rechter Kanal; weißer Stecker = linker Kanal).
Netzanschluss
1. Schließen Sie das Netzkabel an einer Steckdose an.
2. Stellen Sie den OFF/USB/PH-Schalter auf die PH-Funktion. Wenn die „PHONO“ in der Anzeige erscheint, bedeutet das,
dass die Stromversorgung einwandfrei ist. Ihr System ist dann bereit zur Musikwiedergabe.
PHONO
ANMERKUNGEN:
- Entfernen Sie die Nadelschutzkappe.
- Vergewissern Sie sich, dass der Tonarm nicht am Tonarmhalter befestigt ist, bevor Sie den Schallplattenspieler benutzen.
Nach der Benutzung sollte der Tonarm wieder am Tonarmhalter verankert werden.
1. Stellen Sie den OFF/USB/PH-Schalter (13) auf die PH-Funktion. In der LCD-Anzeige erscheint „PHONO“.
2. Stellen Sie den Geschwindigkeitsschalter (7) in die von Ihnen benötigte Position.
3. Legen Sie die Schallplatte auf den Plattenteller (benutzen Sie den Plattenadapter falls nötig).
4. Stellen Sie die Tonarmsteuerung (6) auf „UP“.
5. Heben Sie den Tonarm vom Tonarmhalter herunter und bewegen Sie ihn vorsichtig zum Rand der Schallplatte. Der
Plattenteller beginnt sich zu drehen.
6. Bewegen Sie den Tonarm auf die gewünschte Position der Schallplatte. Stellen Sie die Tonarmsteuerung (6) auf
„DOWN“.
7. Stellen Sie die Lautstärke Ihres HiFi-Systems auf ein angenehmes Maß.
8. Wenn das Ende der Schallplatte erreicht wird, hört der Plattenteller automatisch auf sich zu drehen. Heben Sie den
Tonarm an und bewegen Sie ihn vorsichtig zurück zum Tonarmhalter.
9. Um den Plattenspieler zu stoppen, betätigen Sie die direkt STOP-Taste (20) oder heben Sie den Tonarm von der Platte
herunter und setzen Sie ihn vorsichtig zurück auf den Tonarmhalter.
DE - 1
SCHALLPLATTEN-CODIERUNG
1. Verbinden Sie Ihre USB-Flashdisc oder SD-Speicherkarte mit dem entsprechenden Port bzw. Slot (18)/(19).
2. Stellen Sie den OFF/USB/PH-Schalter (13) auf die PH-Funktion. In der LCD-Anzeige erscheint „PHONO“.
3. Wählen Sie „PHONO“ und starten Sie die Wiedergabe der gewünschten Spur, die auf dem angeschlossenen
Speichermedium gespeichert werden soll.
4. Betätigen Sie die REC-Taste (10). Im LCD-Display wird „USB“ oder „CARD“ blinkend angezeigt. Die Codierung startet
nach 10 Sekunden und in der unteren Ecke links im LCD-Display wird „PHONO“ zusammen mit „USB“ oder „CARD“
blinkend angezeigt.
ANMERKUNG: Wenn Sie die REC-Taste (10) zweimal betätigen, startet die Codierung sofort.
5. Zum Stoppen der Codierung betätigen Sie bitte die STOP-Taste (20).
Anmerkung: Unterbrechen Sie die Wiedergabe während des Aufnahmevorgangs nicht. Ansonsten kann die
Aufnahmefunktion nicht abgeschlossen werden.
WIEDERGABE VON MP3-/WMA-DATEIEN ÜBER USB-DISCS ODER SD-SPEICHERKARTEN
1. Verbinden Sie Ihre USB-Flashdisc oder SD-Speicherkarte mit dem entsprechenden Port bzw. Slot (18)/(19).
2. Stellen Sie den OFF/USB/PH-Schalter (13) auf die USB-Funktion. Das Gerät liest automatisch die Gesamtzahl der
Verzeichnisse und Musiktitel ein.
3. Betätigen Sie die PLAY/PAUSE-Taste (16), um die Wiedergabe vorübergehend anzuhalten. Die Wiedergabe startet mit
dem ersten Musiktitel. Im LCD-Display erscheint die aktuelle Titelnummer und das Dateiformat (WMA/MP3).
4. Zum Unterbrechen der Wiedergabe betätigen Sie die PLAY/PAUSE-Taste (16) bitte erneut. Die Zeitanzeige fängt an
zu blinken.
5. Zum Fortfahren der Wiedergabe betätigen Sie die PLAY/PAUSE-Taste (16) erneut.
6. Zum Stoppen der Wiedergabe betätigen Sie bitte die STOP-Taste (20).
ÜBERSPRINGEN VON TITELN
SKIP – DN-Taste (14) – Betätigen Sie diese Taste, um zum Beginn des momentanen Titels zurückzugehen. Betätigen Sie
die Taste kurz darauf erneut, um zum vorigen Titel zu springen.
SKIP – UP-Taste (12) – Betätigen Sie diese Taste, um zum nächsten Titel zu springen. Betätigen Sie die Taste erneut, um
weitere Titel nach vorne zu springen.
F-UP-Taste (9)
– Mit dieser können Sie während der Wiedergabe das Verzeichnis wechseln. Halten Sie entweder die
SKIP – DN-Taste (14) oder die SKIP – UP-Taste (12) gedrückt, um eine Schnellsuche durch die
Spur mit gleichzeitiger Tonausgabe zu starten.
ID3-Tag-Unterstützung – ID3-Tag ermöglichen die Anzeige des Interprets und des Musiktitels der aktuellen
Wiedergabedatei. Um ID3-Funktionen zu aktivieren, betätigen Sie die ID3/PROG-Taste (8)
während der Wiedergabe und „ID3 ON“ erscheint in der LCD-Anzeige.
Um die ID3-Funktion wieder zu deaktivieren, betätigen Sie die ID3/PROG-Taste (8) einfach erneut.
WIEDERHOLUNG/INTRO/ZUFALLSWIEDERGABE
(1) Einzelwiederholung
(2) Alle Titel Wiederholen
(6) Wiederholung aus
WIEDERGABEMODUS
EINZELWIEDERHOLUNG
ALLE WIEDERHOLEN
VERZEICHNISWIEDERHOLUNG
INTROWIEDERGABE
ZUFALLSWIEDERGABE
AUS
(3) Verzeichniswiederholung
(5) Zufallswiedergabe
(4) Intro-Wiedergabe
ANZEIGE IM LCD-DISPLAY
ALL
INTRO
RANDOM
-------------------
WIEDERHOLUNG
1. Wenn Sie den gleichen Titel wiederholt wiedergeben wollen, betätigen Sie während der Wiedergabe die
MODE-Taste (11) auf dem Gerät.
2. Wenn Sie die gesamte Disc wiederholen wollen, betätigen Sie die MODE-Taste zweimal (11), bis in der Anzeige „ALL“
erscheint.
3. Wenn Sie ein Verzeichnis wiederholen wollen, betätigen Sie die MODE-Taste dreimal (11), bis in der Anzeige
„
“ erscheint.
4. Um die Wiederholungswiedergabe abzubrechen, betätigen Sie die STOP-Taste (20) oder betätigen Sie die
MODE-Taste (11) solange, bis die Wiederholungsanzeige von der Anzeige verschwindet
INTROWIEDERGABE
Diese Funktion spielt jeweils die ersten 10 Sekunden jedes Titels ab.
1. Wenn Sie die MODE-Taste (11) im gestoppten Zustand oder während der Wiedergabe viermal betätigen, leuchtet die
INTRO-Anzeige auf.
DE - 2
2. Um die INTRO-Wiedergabe abzubrechen, betätigen Sie die STOP-Taste (20) oder betätigen Sie die MODE-Taste (11)
solange, bis die INTRO-Anzeige von der Anzeige verschwindet.
ZUFALLSWIEDERGABE
1. Wenn Sie die MODE-Taste (11) im gestoppten Zustand oder während der Wiedergabe fünfmal betätigen, leuchtet die
RANDOM-Anzeige auf.
2. Im gestopptem Zustand können Sie dann durch Betätigung der PLAY/PAUSE-Taste (16) die Zufallswiedergabe starten.
3. Wenn Sie die Zufallswiedergabe wieder abschalten möchten, betätigen Sie einfach die STOP-Taste (20) und „RANDOM“
verschwindet von der Anzeige
PROGRAMMWIEDERGABE
Diese Funktion ermöglicht Ihnen bis zu 32 in einer beliebigen Reihenfolge wiederzugeben, inklusive Titelwiederholungen.
1. Um diese Funktion zu aktivieren, betätigen Sie im gestoppten Zustand die ID3/PROG-Taste (8) und die PROG-Anzeige
fängt an zu blinken.
2. Wählen Sie einen Titel, indem Sie entweder die SKIP – DN-Taste (14) oder die SKIP – UP-Taste (12) gedrückt halten
oder mit der F-UP-Taste (9) das Verzeichnis wechseln.
3. Betätigen Sie die ID3/PROG-Taste (8) zum Speichern des Programmtitels.
4. Wiederholen Sie die Schritte 3 und 4, um bei Bedarf weitere Titel zu programmieren.
5. Starten Sie die Programmwiedergabe, indem Sie die PLAY/PAUSE-Taste (16) betätigen.
6. Wenn Sie die Programmwiedergabe abbrechen möchten, betätigen Sie einfach die STOP-Taste (20) und „PROG“
verschwindet von der Anzeige.
Modell: L-69
Netzspannung: 220/240 V ~ 50 Hz
Stromverbrauch: 14 W (max)
Ausgänge: Audioausgang (Cinch)
WARNUNG
Um Feuer und Stromschlägen vorzubeugen, vermeiden Sie es das Gerät Regen oder Feuchtigkeit auszusetzen.
Der Netzstecker dient dazu das Gerät vom Strom zu trennen und sollte deshalb immer leicht zugänglich bleiben. Wenn Sie
das Gerät vollständig vom Strom trennen wollen, ziehen Sie bitte den Stecker vollständig aus der Steckdose heraus.
Warnhinweis zu Flüssigkeiten: Dieses Gerät sollte keinen Wassertropfen und -spritzern ausgesetzt werden. Gegenstände,
die mit Flüssigkeiten gefüllt sind, sollten nicht auf das Gerät gestellt werden.
Warnhinweis zur Ventilation: Die normale Ventilation des Geräts darf nicht behindert werden.
- Vergewissern Sie sich, dass ein Minimalabstand (50 mm) um den Apparat herum eingehalten wird, um ausreichende
Ventilation zu gewährleisten.
- Gegenstände mit offenen Flammen wie z. B. Kerzen sollten niemals auf das Gerät gestellt werden.
- Achten Sie beim Entsorgen von Batterien auf die Umwelt.
- Das Gerät sollte nur unter moderaten klimatischen Bedingungen benutzt werden.
Das Typenschild ist auf der Unterseite des Geräts angebracht.
Der Netzstecker dient dazu das Gerät vom Strom zu trennen und sollte deshalb immer leicht zugänglich bleiben. Wenn Sie
das Gerät vollständig vom Strom trennen wollen, ziehen Sie bitte den Stecker vollständig aus der Steckdose heraus. Der
Netzstecker sollte während der Benutzung immer zugänglich bleiben.
Dieses Gerät sollte keinen Wassertropfen und -spritzern ausgesetzt werden. Gegenstände die mit Flüssigkeiten gefüllt sind
sollten nicht auf das Gerät gestellt werden.
Sollten Sie irgendwann zu späterer Zeit dieses Produkt entsorgen wollen, beachten Sie bitte Folgendes:
Elektroschrott sollte nicht mit dem Haushaltsmüll entsorgt werden. Bitte recyceln Sie ihn, sofern Ihnen
Entsprechende Möglichkeiten zur Verfügung stehen. Setzen Sie sich mit Ihren kommunalen Behörden oder
Ihrem Einzelhändler in Verbindung und fragen Sie diese um Rat bezüglich der Wiederverwertung.
(Elektro- und Elektronik-Altgeräte-Richtlinie (WEEE))
DE - 3
PRECAUCIÓN:
El uso de controles o ajustes o la realización de procedimientos distintos a los especificados aquí podrían resultar en
exposición a radiación peligrosa.
Esta unidad no deberá ser ajustada ni reparada por nadie excepto personal de servicio calificado.
PRECAUCIONES AL USAR
Instalación
• Desembale todas las piezas y quite todo el material protector.
• No conecte la unidad a la red eléctrica sin antes revisar el voltaje de la red y antes de realizar todas las demás
conexiones.
• No tape ninguna abertura de ventilación y asegúrese de que haya un espacio de varios centímetros alrededor de la
unidad para su ventilación.
1
2
3
4
ST
OP
5
6
UP
33
N
DOW
7
45
US
RE
E
SD
SKIP-
MOD
C
REC
B
PLAY
DN
STOP
E
/PAUS
SKIP-
F-UP
ROG
/SD
9
UP
ID3/P
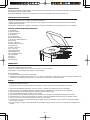
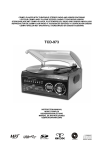
UBICACIÓN DE CONTROLES
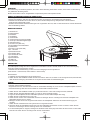
1) Tapa para polvo
2) Adaptador del eje
3) Cable AC
4) Cable de audio
5) Apoyo del brazo
6) Selector UP/DOWN
7) Selector de velocidades 33/45 rpm
8) Botón REC
9) Botón SKIP - UP
10) Selector OFF/USB/PH
11) Botón MODE
12) Botón SKIP - DN
13) Botón F - UP
14) Botón ID3/PROG
15) Botón STOP/SD
16) Botón PLAY/PAUSE
17) Pantalla LCD
18) Ranura SD
19) Ranura USB
20) Botón STOP
PH
OFF
14
16
20
19
18
8
USB
13
11
12
10
15
17
CONEXIÓN
Conexión de audioEl tocadiscos tiene un preamplificador integrado y puede en consecuencia conectarse directamente a
la entrada Line In/Aux de un sistema Hi-Fi.
• Conecte el cable de audio (4) a la entrada Line In/Aux de su sistema Hi-Fi
(clavija roja = canal derecho; clavija blanca = canal izquierdo).
Conexión del suministro
1. Conecte el cable de alimentación a la toma AC2. Mueva el selector OFF/USB/PH a la función “PH”. Si se muestra ”PHONO” en la pantalla LCD, significa que el
suministro eléctrico está normal. Ahora su sistema estará listo para reproducir música.
FUNCIÓN PHONO (GIRADISCOS)
NOTAS:
- Quite el protector de la aguja.
- Asegúrese de que el brazo de la aguja esté separado del apoyo del brazo antes de utilizar y de volver a fijarlo después
del uso.
1. Deslice el selector OFF/USB/PH (13) a la función “PH”, se mostrará “PHONO” en la pantalla LCD.
2. Fije el selector de velocidades 33/45 rpm (7) en la posición correcta según el disco que se reproducirá.
3. Coloque el disco sobre el plato (use el adaptador de eje de ser necesario).
4. Deslice el selector UP/DOWN (6) a la posición “UP”.
5. Levante el brazo de la aguja del apoyo y muévalo lentamente a un lado del disco. El disco comenzará a girar.
6. Coloque el brazo de la aguja en la posición deseada del disco y deslice el selector UP/DOWN (6) a la posición “DOWN”.
7. Ajuste el volumen hasta el nivel deseado en su sistema Hi-Fi.
8. Al final del disco, el plato dejará de girar automáticamente. Levante el brazo del disco y devuélvalo al apoyo.
9. Para detenerlo manualmente, pulse el botón STOP (20) directamente, o levante el brazo de la aguja del disco y
devuélvalo al apoyo.
ES - 1
CODIFICACIÓN PHONO
1. Inserte el disco flash USB o la tarjeta SD en la ranura apropiada (18)/(19).
2. Deslice el selector OFF/USB/PH (13) a la función “PH”; se mostrará “PHONO” en la pantalla LCD.
3. Seleccione y reproduzca la pista del giradiscos que quiera codificar en el disco flash USB o la tarjeta SD.
4. Pulse el botón “REC” (10) una vez y la pantalla LCD mostrará “USB” parpadeando/“CARD” parpadeando.
La codificación iniciará después de 10 segundos y se mostrará “PHONO” con letras parpadeantes “USB”/“CARD” en la
esquina inferior izquierda de la pantalla LCD.
NOTA: Pulse el botón “REC” (10) dos veces directamente y la codificación se iniciará inmediatamente.
5. Para detener la codificación, pulse el botón “STOP” (20).
Nota: No interrumpa el proceso de grabación del giradiscos hasta que se haya completado. De lo contrario la función de
grabación no podrá realizarse.
REPRODUCCIÓN DE CANCIONES MP3/WMA VÍA DISCO FLASH USB O TARJETA SD
1. Inserte el disco flash USB o la tarjeta SD en la ranura apropiada (18)/(19).
2. Deslice el selector OFF/USB/PH (13) a la función “USB”; la unidad leerá automáticamente el número total de carpetas
y de pistas.
3. La reproducción se inicia pulsando el botón “PLAY/PAUSE” (16). La reproducción iniciará con la primera pista;
la pantalla LCD mostrará el número de pista actual y el formato “WMA” o “MP3” de la canción.
4. Para interrumpir la reproducción pulse el botón “PLAY/PAUSE” (16). El indicador de tiempo transcurrido parpadeará.
5. Para reanudar la reproducción, pulse el botón “PLAY/PAUSE” (16) de nuevo.
6. Para detener la reproducción, pulse el botón “STOP” (20).
SALTO DE PISTAS
Botón “SKIP - DN” (14) – Pulse una vez para volver al principio de la pista actual. Pulse rápidamente de nuevo para volver
a la pista anterior.
Botón“SKIP - UP” (12) – Pulse una vez para saltar a la siguiente pista. Pulse de nuevo para ir una pista más hacia
adelante.
Botón “F - UP” (9)
– Le permite elegir carpetas durante la reproducción. Sostenga ya sea el botón “SKIP - DN” (14) ó
el botón “SKIP - UP” (12) para explorar la canción actual en la dirección deseada.
Admite etiquetas ID3 – Le permitirá ver de manera práctica el nombre del intérprete y el título de la pista actualmente
reproducida. Para habilitar las funciones ID3, pulse el botón “ID3/PROG” (8) durante la
reproducción y se mostrará “ID3 ON” en la pantalla LCD. Para cancelar las funciones ID3,
pulse el botón “ID3/PROG” (8) nuevamente.
REPRODUCCIÓN REPETIDA/INTRO/ALEATORIA
(1) REPETIR 1
(2) REPETIR TODAS LAS PISTAS
(6) DESACT.
(5) ALEATORIA
MODO DE REPRODUCCIÓN
REPETIR UNA PISTA
REPETIR TODAS LAS PISTAS
REPETIR UNA CARPETA
REPRODUCCIÓN INTRO
MODO ALEATORIO
DESACTIVADO
(3) REPETIR 1 CARPETA
(4) REPRODUCCIÓN INTRO
INDICADOR EN LA PANTALLA LCD
ALL
INTRO
RANDOM
-------------------
REPRODUCCIÓN REPETIDA
1. Durante la reproducción, si quiere repetir una sola pista, pulse el botón “MODE” (11) en la unidad.
2. Para repetir el disco entero, pulse el botón “MODE” (11) dos veces y se mostrará “ALL” en la pantalla.
3. Para repetir una carpeta, pulse el botón “MODE” (11) tres veces y se mostrará “
” en la pantalla.
4. Para cancelar la reproducción repetida, pulse el botón “STOP” (20) ó pulse el botón “MODE” (11) repetidamente hasta
que el indicador de repetición desaparezca
REPRODUCCIÓN INTRO
Presenta todas las canciones reproduciendo los primeros 10 segundos de cada pista.
1. Ya sea en el modo de detención o de reproducción, pulse el botón “MODE” (11) cuatro veces y el indicador “INTRO” se
iluminará.
2. Para cancelar la reproducción intro, pulse el botón “STOP” (20) ó pulse el botón “MODE” (11) repetidamente hasta que
el indicador de intro desaparezca.
REPRODUCCIÓN ALEATORIA
1. Ya sea en el modo de detención o de reproducción, pulse el botón “MODE” (11) cinco veces y el indicador “RANDOM”
ES - 2
se iluminará.
2. En el modo de detención, pulse el botón “PLAY/PAUSE” (16) para iniciar la reproducción. Las pistas se reproducirán
aleatoriamente.
3. Para cancelar la reproducción aleatoria, pulse el botón “STOP” (20) una vez más hasta que el indicador “RANDOM”
desaparezca.
REPRODUCCIÓN PROGRAMADA
Le permite programar hasta 32 pistas a reproducir en cualquier orden, incluyendo pistas repetidas.
1. Con la reproducción detenida, pulse el botón “ID3/PROG” (8); el indicador “PROG” parpadeará.
2. Seleccione la pista desead pulsando los botones “SKIP - DN” (14) y “SKIP - UP” (12) y pulsando el botón “F - UP” (9)
para cambiar de carpeta.
3. Pulse el botón “ID3/PROG” (8) para guardar la pista en la memoria.
4. Repita los pasos 3 y 4 para agregar pistas en la memoria de requerirlo.
5. Para reproducir las pistas programadas, pulse el botón “PLAY/PAUSE” (16).
6. Para cancelar la memoria de programación, pulse el botón “STOP” (20) hasta que el indicador “PROG” desaparezca
Modelo: L-69
Suministro eléctrico: 220 / 240 v ~ 50hz
Consumo eléctrico: 14 W máx.
Salidas: Salida de audio (RCA)
ADVERTENCIAS
Para prevenir riesgos de incendio y descarga, no exponga este aparato a lluvia ni humedad.
El cable de alimentación se usa como mecanismo de desconexión y debe permanecer fácilmente accesible. Para
desconectar el aparato completamente del suministro eléctrico, el cable de alimentación deberá desenchufarse
completamente de la toma eléctrica.
Advertencia contra goteos: "El producto no debe exponerse a goteos ni salpicaduras y ningún objeto con líquido,
como un jarrón, debe colocarse sobre el aparato."
Advertencia de ventilación: "La ventilación normal del producto no debe impedirse durante el uso."
- debe haber una distancia mínima de 50 mm alrededor del aparato para una ventilación suficiente;
- no debe colocarse ninguna fuente de llama descubierta, como una vela encendida, sobre el aparato;
- debe prestarse atención a los aspectos ecológicos de la eliminación de baterías;
- el aparato debe usarse en climas templados.
La placa está localizada debajo del aparato.
El cable de alimentación se usa como mecanismo de desconexión y debe permanecer fácilmente accesible. Para
desconectar el aparato completamente del suministro eléctrico, el cable de alimentación deberá desenchufarse
completamente de la toma eléctrica. El cable de alimentación no debe obstruirse O deberá permanecer fácilmente
accesible durante el uso.
El producto no debe exponerse a goteos ni salpicaduras y ningún objeto con líquido, como un jarrón, debe colocarse
sobre el aparato.
Si en el futuro necesita deshacerse de este producto, tenga en cuenta lo siguiente: no debe deshacerse
de los residuos de productos eléctricos como si fueran residuos domésticos. Por favor, recicle en los sitios
en los que esto sea posible. Acuda a las autoridades locales o al vendedor en busca de asesoramiento
sobre reciclaje. (Directiva sobre residuos eléctricos y equipos electrónicos).
ES - 3
ATTENTION:
L'utilisation de commandes, d’ajustements ou l'exécution de procédures autre que celle présentée ci-dessous peut vous
exposer à de dangereuses radiations.
Cet appareil ne doit être réglé ou réparé que par un personnel de service qualifié.
PRECAUTIONS D’EMPLOI
Installation
• Déballez toutes les pièces et retirez le film protecteur de l’appareil.
• Ne branchez pas l’appareil à la prise secteur avant d’avoir vérifier la tension du courant secteur local et avant d’effectuer
tout autre branchement.
• Ne recouvrez aucune bouche d’aération et assurez-vous qu’il y ait un espace de plusieurs centimètres autour de
l’appareil pour la ventilation.
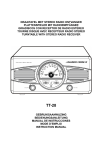
LOCALISATION DES COMMANDES
1
2
3
4
ST
OP
5
6
UP
33
N
DOW
7
45
US
RE
E
SD
UP
PLAY
DN
STOP
E
/PAUS
SKIP-
F-UP
ROG
9
SKIP-
MOD
C
REC
B
ID3/P
/SD
1) Couvercle
2) Adaptateur d’axe
3) Plateau
4) Câble audio
5) Repose-bras
6) Sélecteur HAUT/BAS
7) Sélecteur de vitesse 33/45 tour
8) Bouton REC (enregistrer)
9) Bouton SKIP - UP
10) Sélecteur OFF/USB/PH
11) Bouton MODE
12) Bouton SKIP - DN
13) Bouton F - UP
14) Bouton ID3/PROG
15) Bouton STOP/SD
16) Bouton LECTURE/PAUSE
17) Ecran LCD
18) Port carte SD
19) Port USB
20) Bouton STOP
PH
OFF
14
16
20
19
18
8
USB
13
11
12
10
15
17
BRANCHEMENTS
Branchement Audio
Le tourne-disque possède un préamplificateur incorporé et peut donc être relié directement à l’entrée Audio d’une chaîne
hi-fi.
• Reliez le câble audio (4) à l’entrée Audio de votre chaîne hi-fi
(prise rouge = canal droit ; prise blanche = canal gauche).
Branchement secteur
1. Branchez le câble d’alimentation sur une prise secteur.
2. Mettez le sélecteur OFF/USB/PH en position “ PH “. Si ”PHONO” est affiché sur l’écran LCD, cela signifie que
l’alimentation de votre appareil est normal. Maintenant votre système est prêt à lire de la musique.
PHONO
A NOTER:
- retirez le film protecteur.
- assurez-vous qu’aucun obstacle ne bloque le fonctionnement du bras de lecture avant de le mettre en marche.
1.
2.
3.
4.
5.
6.
7.
8.
Mettez le sélecteur OFF/USB/PH (13) en position “PH”, “PHONO” est affiché sur l’écran LCD
Placez le sélecteur de vitesse 33/45 tour (7) en position requise pour le disque à lire.
Placez le disque sur le plateau (utilisez l’adaptateur d’axe si nécessaire).
Mettez le sélecteur HAUT/BAS (6) en position “HAUT”.
Soulevez le bras de lecture et déplacez-le lentement à côté du disque. Le plateau se mettra à tourner.
Placez le bras de lecture à la position voulue sur le disque et mettez le sélecteur HAUT/BAS (6) en position “BAS”.
Ajustez le volume au niveau désiré sur votre chaîne hi-fi.
A la fin du disque, le plateau s’arrête de tourner automatiquement, le bras de lecture se soulève du disque et retourne
en position de repos.
9. Pour arrêter manuellement, appuyez directement sur le bouton STOP (20), ou soulevez le bras de lecture du disque et
ramenez-le en position de repos.
FR - 1
ENCODAGE AUDIO
1. Insérez une mémoire Flash USB ou une carte mémoire SD dans le port approprié (18)/(19).
2. Mettez le sélecteur OFF/USB/PH (13) en position “PH”, “PHONO” est affiché sur l’écran LCD.
3. Choisissez et lisez le morceau qui sera encodé sur la mémoire Flash USB ou la carte mémoire SD
4. Appuyez une fois sur le bouton “REC” (10), l’écran LCD affiche “USB” /“CARD” en clignotant. L’encodage commence
après 10 secondes et affiche “PHONO” avec les mots “USB”/“CARD” qui clignote au bas côté gauche de l’écran LCD.
A NOTER : Appuyez deux fois sur le bouton “REC” (10), l’encodage commence immédiatement.
5. Pour arrêter l’encodage, appuyez sur le bouton “STOP” (20).
Remarque : N'interrompez pas le processus d'enregistrement tant qu’il n’est pas terminé. Autrement, la fonction
d’enregistrement ne pourra être accomplie.
LECTURE DE MUSIQUES MP3/WMA SUR MEMOIRE FLASH USB OU CARTE MEMOIRE SD
1. Insérez la mémoire Flash USB ou la carte mémoire SD dans le port approprié (18)/(19).
2. Mettez le sélecteur OFF/USB/PH (13) en position “USB”, l’appareil lit automatiquement la totalité des albums et des
morceaux.
3. Appuyer sur le bouton “LECTURE/PAUSE” (16) pour commencer la lecture. La lecture commence avec la première
plage, l’écran LCD affiche le numéro du morceau joué et son format “WMA” ou “MP3”.
4. Pour interrompre la lecture, appuyer sur le bouton “LECTURE/PAUSE” (16). L’indicateur de la durée déjà jouée clignote.
5. Pour reprendre la lecture, appuyer de nouveau sur le bouton “LECTURE/PAUSE” (16).
6. Pour arrêter la lecture, appuyer sur le bouton “STOP” (20).
PASSER UN MORCEAU
Bouton “SKIP - DN” (14) – appuyez une fois pour retourner au début du morceau joué. Appuyez encore une fois
rapidement pour lire le morceau précédent.
Bouton“SKIP - UP” (12) - appuyez une fois pour passer le morceau joué. Appuyez encore une fois pour aller à morceau
suivant.
Bouton“F - UP” (9) – vous permet de naviguer dans l’album pendant la lecture, maintenez le bouton “SKIP - DN” (14)
ou“SKIP - UP” (12) pour rechercher en écoutant dans le morceau joué, la partie désiré.
ID3 Tag Support – vous permet de voir le nom de l’artiste et du titre du morceau qui est joué.
Pour activer la fonction ID3, appuyez sur le bouton “ID3/PROG” (8) pendant le mode lecture, “ID3 ON”
s’affiche sur l’écran LCD. Pour annuler les fonctions ID3, appuyez de nouveau sur le bouton
“ID3/PROG” (8).
REPETER/INTRO/MODE ALEATOIRE
(1) REPETER 1
(2) REPETER TOUS LES MORCEAUX
(6) MODE OFF
(5) ALEATOIRE
MODE DE LECTURE
REPETER LE MORCEAU
REPETER TOUS LES MORCEAUX
RELEAT SINGLE FOLDER
MODE LECTURE INTRO
MODE ALEATOIRE
MODE OFF
(3) REPETER 1 ALBUM
(4) LECTURE INTRO
INDICATIONS SUR L’ECRAN LCD
TOUT
ALBUM
INTRO
ALEATOIRE
-------------------
REPETER LA LECTURE
1. Pendant la lecture, si vous souhaitez répéter le même morceau, appuyez sur le bouton “MODE” (11) de l’appareil.
2. Pour répéter tout le disque, appuyez deux fois sur le bouton “MODE” (11) et “TOUT” s’allume sur l’écran LCD.
3. Pour répéter un album, appuyez trois fois sur le bouton “MODE” (11) et “
” s’allume sur l’écran LCD.
4. Pour annuler la répétition de la lecture, appuyez sur le bouton “STOP” (20) ou appuyez sur le bouton “MODE” (11)
successivement jusqu’à ce que l’indicateur de répétition disparaisse de l’écran.
LECTURE INTRO
La lecture en mode INTRO joue 10 secondes de chaque morceau.
1. En mode stop ou lecture, appuyez quatre fois sur le bouton “MODE” (11), l’indicateur “INTRO” s’allume.
2. Pour abandonner la lecture en mode intro, appuyez sur le bouton “STOP” (20) ou appuyez sur le bouton “MODE” (11)
successivement jusqu’à ce que l’indicateur de répétition disparaisse de l’écran.
LECTURE ALEATOIRE
1. En mode stop ou lecture, appuyez cinq fois sur le bouton “MODE” (11), l’indicateur “ALEATOIRE” s’allume.
2. Pendant le mode stop, appuyez sur le bouton “LECTURE/PAUSE” (16) pour commencer la lecture. Les morceaux sont
joués aléatoirement.
3. Pour annuler la lecture aléatoire, appuyez sur le bouton “STOP” (20) une fois de plus jusqu’à ce que l’indicateur
FR - 2
“ALEATOIRE” disparaisse de l’écran.
LECTURE PROGRAMMEE
Il vous permet de programmer jusqu’à 32 morceaux à jouer dans n’importe quel ordre, morceaux répétés inclus.
1. Quand la lecture est arrêtée, appuyez sur le bouton “ID3/PROG” (8), l’indicateur “PROG” clignote.
2. Sélectionnez le morceau désiré en appuyant sur les boutons “SKIP - DN”(14) ou “SKIP - UP”(12) . Ou appuyez sur le
bouton “F - UP” (9) pour changer d’album.
3. Appuyez sur le bouton “ID3/PROG” (8) pour enregistrer le morceau en mémoire.
4. Répétez l’étape 3 et 4 pour rajouter d’autres morceaux en mémoire.
5. Pour jouer les morceaux programmés en mémoire, appuyez sur le bouton “LECTURE/PAUSE” (16).
6. Pour annuler le programme mémorisé, appuyez sur le bouton “STOP” (20) jusqu’à ce que l’indicateur “PROG”
disparaisse de l’écran.
Modèle : L-69
Alimentation électrique : 220 / 240 v ~ 50hz
Consommation : 14 w max.
Sortie : sortie Audio
AVERTISSEMENT
Pour prévenir du risque d’incendie ou d’électrocution, éloignez cet appareil de la pluie ou de l'humidité.
La prise secteur est utilisée comme matériel déconnecté et doit rester aisément fonctionnelle. Pour être complètement
déconnecté du courant secteur, la prise secteur de l’appareil doit être déconnectée de la prise secteur.
Avertissement à propos de l’eau : " Le produit ne doit pas être exposé à l’eau ou aux éclaboussures et aucuns objets
contenant du liquide, tels que des vases, ne devront être placés sur l’appareil."
Avertissement à propos de la ventilation : " Vous ne devez pas empêcher la ventilation de l’appareil lors de son
fonctionnement."
- distance minimum de 50mm autour de l’appareil pour ventilation suffisante ;
- ne posez pas de flammes nues tel que des bougies allumées sur l’appareil ;
- l’attention devra être portée sur les aspects environnementaux de la destruction de la batterie ;
- l'utilisation de l'appareil dans des climats modérés
Le marquage est située au fond de l'appareil.
La prise secteur est utilisée comme matériel déconnecté et doit rester aisément fonctionnelle. Pour être complètement
déconnecté du courant secteur, la prise secteur de l’appareil doit être déconnectée de la prise secteur. La prise secteur
ne doit pas être obstruée OU doit être facile d’accès durant son fonctionnement.
Le produit ne doit pas être exposé à l’eau ou aux éclaboussures et aucuns objets contenant du liquide, tels que des vases,
ne devront être placés sur l’appareil.
Si vous souhaitez vous débarrasser ultérieurement du produit, veuillez noter que: les déchets électriques ne
doivent pas être jetés avec les déchets domestiques. Veuillez les faire déposer dans les centres de recyclage
existants. Contactez les autorités locales ou distributeurs pour obtenir de plus amples informations.
(Directive de l’équipement électronique et des déchets électriques).
FR - 3
VOORZICHTIG:
Gebruik van regelaars of aanpassingen of uitvoering van procedures die hierin niet gespecificeerd zijn, kunnen resulteren
in blootstelling aan gevaarlijke straling.
Dit apparaat alleen laten aanpassen of repareren worden door gekwalificeerd onderhoudspersoneel.
VOORZORGSMAATREGELEN
Installatie
• Pak alle onderdelen uit en verwijder het beschermmateriaal.
• Verbind het apparaat niet met het lichtnet voor u het voltage van het lichtnet heeft gecontroleerd en alle andere
verbindingen zijn gemaakt.
• Bedek geen openingen en zorg dat er een ruimte van enkele centimeters om het apparaat heen is voor ventilatie
1
2
3
4
ST
OP
5
6
UP
33
N
DOW
7
45
US
RE
E
SD
UP
PLAY
DN
STOP
E
/PAUS
SKIP-
F-UP
ROG
9
SKIP-
MOD
C
REC
B
ID3/P
/SD
LOCATIE VAN BEDIENINGSELEMENTEN
1) Stofdeksel
2) Spindle-adapter
3) AC Stroomsnoer
4) Audiokabel
5) Pick-up houder
6) UP/DOWN selector
7) 33/45 rpm snelheidsselector
8) REC knop
9) SKIP - UP knop
10) OFF/USB/PH selector
11) MODE knop
12) SKIP - DN knop
13) F - UP knop
14) ID3/PROG knop
15) STOP/SD knop
16) PLAY/PAUSE knop
17) LCD-display
18) SD slot
19) USB slot
20) STOP knop
PH
OFF
14
16
20
19
18
8
USB
13
11
12
10
15
17
VERBINDING
Audio verbindingDe platenspeler heeft een ingebouwde voorversterker en kan daarom direct met de Line In/ Aux invoer
van een hi-fi system verbonden worden.
• Verbind de audio kabel(4) met de Line In / Aux invoer op uw hi-fi systeem
(rode stekker = rechter kanaal; witte stekker = linker Kanaal).
Stroomverbinding
1. Verbind het stroomsnoer met het stopcontact.
2. schakel de OFF/USB/PH Selector naar de “ PH “ functie. Als ”PHONO” wordt getoond op het LCD-display, betekent dit
dat de stroomvoorziening normaal werkt. Uw systeem is nu gereed om muziek af te spelen
PHONO
OPMERKINGEN:
- verwijder de stylusbescherming.
- zorg dat de toonarm van de toonarmsteun ontkoppelt is voor het gebruik en weer bevestigd is na gebruik.
1.
2.
3.
4.
5.
6.
7.
8.
Schuif de OFF/USB/PH selector(13) naar “PH” functie, “PHONO” wordt getoond op het LCD-display
Stel de 33/45 rpm snelheidsselector(7) in de juiste positie, afhankelijk van de plaat die wordt afgespeeld.
Plaats de plaat op de draaitafel (gebruik de spindle-adapter indien nodig).
Schuif de UP/DOWN selector(6) naar de “UP” positie.
Haal de toonarm uit de steun en beweeg hem langzaam naar de plaat. De draaitafel zal beginnen te draaien.
Plaats de toonarm op de gewenste positie op de plaat, schuif de UP/DOWN selector(6) naar de “DOWN” positie
Pas het volume aan, naar het gewenste niveau op uw hi-fi systeem.
Op het einde van de plaat, zal de draaitafel automatisch stoppen met draaien, til de toonarm van de plaat en plaats
hem terug in de steun.
9. Om handmatig te stoppen, druk rechtstreeks op de STOP knop(20), of til de toonarm van de plaat af en plaats hem in
de steun
NL- 1
PHONO ENCODING
1. Plaats de USB-stick of SD-kaart in het bijbehorende slot(18)/(19).
2. Schuif de OFF/USB/PH selector(13) naar “PH” functie, “PHONO” wordt getoond op het LCD-display
3. Selecteer in phono welk nummer wordt toegewezen aan de gecodeerde geluiden op de USB-stick of de SD-kaart.
4. Druk één keer op de “REC” knop(10), op het LCD-display knippert “USB”/“CARD”. Het coderen zal starten na
10 seconden en er zal “PHONO” getoond worden met de knipperende woorden “USB”/“CARD” in de linkeronderhoek
van het LCD-display.
OPMERKING: Druk rechtstreeks twee keer op de “REC” knop (10) om direct met coderen te beginnen
5. Om te stoppen met coderen, drukt u op de “STOP” knop(20).
Opmerking:Stoor niet tijdens de phono-opname, tot het proces compleet is. Anders zal de opnamefunctie niet kunnen
worden uitgevoerd.
AFSPELEN VAN MP3/WMA LIEDJES VIA USB-STICK OF SD-KAART OPSLAGMEDIA
1. Plaats de USB-stick of SD-kaart in het bijbehorende slot(18)/(19).
2. Schuif de OFF/USB/PH selector(13) naar de “USB” functie, het apparaat zal automatisch alle mappen en het totaal
aantal nummers lezen .
3. Er kan met afspelen begonnen worden door op de “PLAY/PAUSE” knop(16) te drukken. Het afspelen begint met het
eerste nummer, het LCD-display zal het huidige nummer tonen en het formaat van het lied ("WMA" of "MP3”).
4. Om het afspelen te onderbreken, drukt u op de “PLAY/PAUSE” knop(16). De verstreken tijd indicator zal knipperen.
5. Om het afspelen te hervatten, drukt u nogmaals op de “PLAY/PAUSE” knop(16).
6. Om het afspelen te stoppen, drukt u op de “STOP” knop(20).
NUMMER OVERSLAAN
“SKIP - DN” knop(14) – druk één keer om terug te keren naar het begin van het huidige nummer, druk snel nogmaals om
terug te gaan naar het vorige nummer.
“SKIP - UP” knop(12) – druk één keer om te spoelen naar het volgende nummer. Druk nogmaals om nog een nummer
vooruit te spoelen.
“F - UP” knop(9) – laat u van map wisselen onder het afspelen, houd ofwel de “SKIP - DN”(14) ofwel de “SKIP - UP”(12)
knop ingedrukt om hoorbaar in het huidige nummer te spoelen in de gewenste richting.
ID3 Tag Ondersteuning – Laat u handig de artiestnaam en titel van het lied bekijken, terwijl het nummer wordt afgespeeld.
Om ID3 functies in- en uit te schakelen, drukt u op de “ID3/PROG” knop(8) tijdens de
afspeelmodus, “ID3 ON” wordt getoond op het LCD-display. Om de ID3 functies te annuleren
drukt u nogmaals op de “ID3/PROG” knop(8)
HERHAAL/INTRO/WILLEKEURIG MODUS
(1) HERHAAL 1
(2) HERHAAL ALLE NUMMERS
(6) UITGESCHAKELD
AFSPEELMODUS
HERHAAL ENKEL NUMMER
HERHAAL ALLE NUMMERS
HERHAAL ENKELE MAP
INTRO AFSPEELMODUS
WILLEKEURIG MODUS
UITGESCHAKELD
(3) HERHAAL 1 MAP
(5) WILLEKEURIG
(4) INTRO AFSPELEN
INDICATOR OP LCD-DISPLAY
ALL
INTRO
RANDOM
-------------------
HERHAALD AFSPELEN
1. Onder het afspelen, wanneer u telkens hetzelfde nummer wilt horen, drukt u op de “MODE” knop(11) op het apparaat.
2. Om de hele disk te herhalen, druk twee keer op de “MODE” knop(11), er zal “ALL” op het display verschijnen.
3. Om een map te herhalen, drukt u drie keer op de “MODE” knop(11), er zal “
”op het display verschijnen.
4. Om herhaald afspelen te annuleren, drukt u op de “STOP” knop(20) of drukt u herhaaldelijk op de “MODE” knop(11) tot
de herhaalindicator verdwijnt.
INTRO AFSPELEN
Introduceer alle nummers door het afspelen van 10 seconden van elk nummer.
1. In stop- of afspeelmodus, drukt u vier keer op de “MODE” knop(11), de “INTRO” indicator zal oplichten.
2. Om intro afspelen te annuleren, drukt u op de “STOP” knop(20) of drukt u herhaaldelijk op de “MODE” knop(11) tot de
intro-indicator verdwijnt.
WILLEKEURIG AFSPELEN
1. In stop- of afspeelmodus, drukt u vijf keer op de “MODE” knop(11), de “RANDOM” indicator zal oplichten.
NL - 2
2. In de stopmodus, drukt u op de “PLAY/PAUSE” knop(16) om het afspelen te beginnen. De nummers zullen nu willekeurig
worden afgespeeld.
3. Om willekeurig afspelen te annuleren, drukt u op de “STOP” knop(20) of drukt u herhaaldelijk op de “MODE” knop(11) tot
de intro-indicator verdwijnt.
PROGRAMMA AFSPELEN
Deze functie stelt u in staat tot 32 nummers in elke volgorde af te spelen, inclusief herhalen van nummers.
1. Als het afspelen gestopt is, drukt u op de “ID3/PROG” knop(8), de “PROG” indicator zal knipperen.
2. Selecteer een gewenst nummer door te drukken op de “SKIP - DN”(14) of “SKIP - UP”(12) knop, of door te drukken op
de “F - UP” knop(9) om te wisselen van map.
3. Druk op de “ID3/PROG” knop(8) om het nummer in het geheugen op te slaan.
4. Herhaal de stappen 3 en 4 tot u alle gewenste nummers in het geheugen heeft opgeslagen.
5. Om de geprogrammeerde nummers af te spelen, drukt u op de “PLAY/PAUSE” knop(16).
6. Om het programmageheugen te wissen, drukt u op de “STOP” knop(20) tot de “PROG” indicator verdwijnt.
Model: L-69
Voltage: 220 / 240 v ~ 50hz
Stroomverbruik: 14 w max.
Uitvoer: Audio uitvoer (cinch)
WAARSCHUWING
Om brand- of schokgevaar te voorkomen, mag dit apparaat niet blootgesteld worden aan regen of vocht.
De stekker wordt gebruikt als onderbrekingsapparaat en moet eenvoudig bedienbaar blijven. Om de stroom volledig af te
sluiten, moet de stekker van het apparaat uit het stopcontact gehaald worden.
Druppel waarschuwing: "Het apparaat mag niet worden blootgesteld aan druppend of spattend water en er mogen geen
voorwerpen gevuld met vloeistof, zoals vazen, op het apparaat geplaatst worden."
Ventilatie waarschuwing: " De normale ventilatie van het product moet niet belemmerd worden ."
- minimumafstand van 50mm rond het apparaat voor voldoende ventilatie;
- Plaats geen voorwerpen met een naakte vlam, zoals kaarsen, op het apparaat;
- Houdt u aan de milieuvoorschriften als u gebruikte batterijen weggooit;
- Alleen gebruiken in gematigde klimaten
De markering staat op de onderkant van het apparaat.
De stekker wordt gebruikt als onderbrekingsapparaat en moet eenvoudig bedienbaar blijven. Om de stroom volledig af te
sluiten, moet de stekker van het apparaat uit het stopcontact gehaald worden. Belemmer de stekker niet OF zorg dat deze
eenvoudig toegankelijk is tijdens het beoogde gebruik.
Het apparaat mag niet worden blootgesteld aan druppend of spattend water en er mogen geen voorwerpen gevuld met
vloeistof, zoals vazen, op het apparaat geplaatst worden..
Indien u zich in de toekomst van dit toestel wenst te ontdoen, let er dan op dat elektrisch afvalmateriaal niet
met huishoudelijk afval mag worden verwijderd. Breng het toestel naar een kringloopwinkel of andere
voorziening voor recycling. Neem contact op met uw plaatselijke aytoriteit of winkelier indien u meer informatie
wenst over recycling. (richtlijn voor afval van elektrische en elektronische apparaten, AEEA)
NL - 3