1
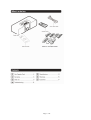
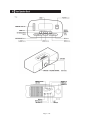
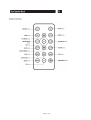
English
IPD-4100 Series iPod Speaker Dock with FM radio
User Guide
For information and support, www.lenco.eu
IMPORTANT: Please read all instructions carefully before use and keep for future reference
Page 1 of 16
Thank you for choosing this Lenco iPod Speaker Dock with FM Radio. Not only can it receive
radio stations, but you can also listen to your favourite tracks on your iPod and charge it up.
It’s really simple to use; you can fully operate your iPod from the control panel on the top or
from the remote control, and even connect another auxiliary device to it.
Throughout this User Guide, the iPod Speaker Dock with FM Radio will be referred to as the
Speaker Dock.
Safety is important
Use of any electrical equipment should be undertaken with care. Please read the safety section on Page 15
before using your iPod Speaker Dock. This appliance is for household use only.
Made for
iPod
An audio s ystem th at allows docking of
an iPod an d which fully sup ports the iPod
me nu system.
iPod Speaker Dock
Any iPod can be connected to the Speaker Dock, which allows all your songs to be played
through the speakers. The Speaker Dock features high quality speakers and a built in Subwoofer
to produce a high quality output. In addition, your iPod will charge while connected.
FM Radio
The Speaker Dock features an FM Radio allowing you to listen to all your favourite radio stations.
Up to 20 stations can be saved to memory for ease of use.
Page 2 of 16
Page 3 of 16
Page 4 of 16
Page 5 of 16
1.Setting up the iPod Speaker Dock
Insert the Mains Plug into a suitable wall socket and turn the socket on.Turn the ON/OFF Switch
at the rear of the Speaker Dock to the ON position.Press the STANDBY button to turn the Speaker
Dock on.
2.Using the Remote Control
The Remote Control can be used to operate the Speaker Dock. Before using the Remote Control,
the Safety Tab should be removed.
Simply pull out the Safety Tab from the remote control, as shown below.
To use the Remote Control, simply direct it towards the front of the Speaker Dock and press the
desired buttons.
DON’T FORGET! When replacing the battery make sure that you use the same size and type.
Page 6 of 16
3. iPod Docking
Any iPod can be connected to the Speaker Dock to allow all your songs
to be played through the speakers.
To connect an iPod to the Speaker Dock, select the compatible adaptor
from one of the 7 iPod Adaptors supplied. The iPod Adaptors have
markings on the bottom which clearly identify which iPod they should
be used with.
If your iPod is not compatible with any of the supplied iPod Adaptors,
use the adaptor supplied with your iPod.
Place the iPod Adaptor into the recess on the top of the Speaker Dock
and then insert your iPod into the Adaptor.
DON’T FORGET! Your iPod will charge while docked when the Speaker Dock is in Standby
mode.
Press the STANDBY button.
Press the MODE button repeatedly until iPod is displayed on the LCD Display.
To start playback, press the PLAY/PAUSE button.
4. Connecting to External Devices
Your Speaker Dock can be connected to a number of external devices using the supplied 3.5 mm
Stereo cable (supplied) or an RCA cable (not supplied).
Page 7 of 16
Switching On
1.To turn the Speaker Dock on, press the STANDBY button.
2.To turn the Speaker Dock off, press the STANDBY button again.
DON’T FORGET! Ensure the ON/OFF Switch is in the On position before turning the Speaker
Dock on.
Adjusting the Volume
1.To increase the volume, rotate the VOLUME CONTROL clockwise.
2. To decrease the volume, rotate the VOLUME CONTROL anti-clockwise.
3. You can also press the MUTE button to turn the sound off. To turn the sound back on, press the
MUTE button again, or rotate the VOLUME CONTROL clockwise.
Preset equaliser
The range of the sound can be adjusted to suit the different types of music that you are listening to,
by changing the preset equaliser settings. The available settings are:
• Jazz
• Pop
• Rock
• Classic
• Bass
1.Press the EQ button to select the setting which sounds best.
Modes
The iPod Speaker Dock has three modes of operation. These are:
• iPod
• Tuner
• Aux
Brightness
1.Press the BRIGHTNESS button on the remote control repeatedly to cycle through the 4 display
brightness settings.
Page 8 of 16
Memory Cards
You can play MP3 files stored on SD or MMC memory cards by inserting them into the Memory
Card Slot on the top of the Speaker Dock.
iPod
You can dock an iPod with the Speaker Dock and listen to all your favourite songs through the
Speaker Dock’s speakers. With the iPod docked, you can control all the basic functions of the iPod
using the Speaker Dock or Remote Control.
DON’T FORGET! The functions described in this User Guide can be performed using either the
Speaker Dock or the Remote Control.
Selecting iPod Mode
1.Press the STANDBY button.
2.Press the MODE button repeatedly until iPod is shown on the LCD Display.
3.Carefully inset your iPod into the iPod dock as described on page 7.
DON’T FORGET! Use the correct iPod adapter for your model, taking care not to damage the
connecting pins.
DON’T FORGET! The iPod battery is automatically charged when the Speaker Dock is in
standby mode.
4.To start playback, press the PLAY/PAUSE button.
Menu Navigation
You can access the menu system of your iPod using the Remote Control.
1.To access the iPod menu system, press the MENU button.
2.Use the UP and DOWN ARROW buttons to highlight the menu options.
3.Use the OK button to select a menu option.
Page 9 of 16
Radio
Tuning to a radio station
1.Press the STANDBY button.
2.Press the MODE button repeatedly until Tuner is shown on the LCD Display.
3.Press and hold either the FWD or RWD buttons to search for a station.
4.To fine tune a station briefly press either the FWD or RWD buttons.
DON’T FORGET! You may need to reposition the Speaker Dock to get the best reception.
Storing a radio station using the remote control
1.Tune to a radio station as described above.
2.Press the MEM button. MEM and a number will be shown on the LCD Display.
3.Press the UP or DOWN ARROW buttons to select the number you want to store the radio station
against.
4.Press the MEM button again to store the station.
5.Repeat this procedure to store other radio stations.
DON’T FORGET! You can store a maximum of 20 stations.
Moving a stored radio station to a new preset position
1.Tune the radio station as described above.
2.Press the MEM button on the Speaker Dock or the remote control once to show current preset.
3.Press the UP or DOWN ARROW buttons on the remote control to select the new preset number.
4.Press the MEM button to store the radio station in the new preset.
DON’T FORGET! This will overwrite any previous stored station on the selected preset
Listening to a stored station
1.Store a radio station as described previously.
2.Press the UP or DOWN ARROW buttons to cycle through the stored stations.
AUX in
Other audio devices, such as an MP3 player can be connected to the Speaker Dock. A 3.5 mm
stereo cable is supplied, and a pair of RCA phono sockets are located on the rear panel for this
purpose.
1.Connect your chosen audio device.
2.Press the MODE button repeatedly until AUX is shown on the LCD Display.
Page 10 of 16
3.Adjust the volume to the desired level. If the volume level seems low, try adjusting the volume
control of the connected audio device.
SUB OUT
A powered subwoofer (not supplied) can be connected to the SUB OUT socket on the rear panel of
the Speaker Dock to enhance the output.
Clock
Backup batteries
The Backup Battery is used to keep the correct time and alarm time in case of a power failure.
1.Switch off the Speaker Dock and remove the plug from the wall socket.
2.To replace the Backup Battery, open the Memory Battery Compartment on the rear of the
Speaker Dock.
3.Insert a button cell (type CR2032), ensuring the correct polarity is observed.
4.Close the Memory Battery Compartment.
Setting the clock
1.Make sure the Speaker Dock is powered on before setting the clock.
2.Press and hold the SLEEP/CLOCK button. SET will be shown in the LCD Display next to the
clock time.
3.Press the UP or DOWN ARROW buttons to change the minutes.
4.Rotate the VOLUME CONTROL to change the hour.
5.Press the SLEEP/CLOCK button to confirm the new clock time.
6.The Speaker Dock will automatically return to the last mode used prior to the clock setting being
changed.
Setting the alarm
1.Make sure the Speaker Dock is powered on before setting the alarm.
2.Press and hold the ALARM button. ALM and the alarm time will be shown on the LCD Display.
3.Press the UP or DOWN ARROW buttons to change the minutes.
4.Rotate the VOLUME CONTROL to change the hour.
5.Press the ALARM button to confirm the alarm settings.
6.Once the alarm setting has been confirmed, press the ALARM button, or wait for a few seconds
and the Speaker Dock will return to the previous mode.
7.The Speaker Dock will automatically return to the last mode used prior to the clock setting being
changed.
8.Press the ALARM button briefly to toggle the alarm mode on or off.
DON’T FORGET! The alarm will wake you to the sound of the last mode used, e.g. radio or
iPod. If the iPod is removed from the dock, a buzzer will sound.Always adjust the volume to a
comfortable waking level.
Page 11 of 16
Snooze mode
1.When the alarm sounds, you can press any of the buttons (except the POWER button) to activate
the snooze function.
2.‘OFF’ will show on the display and the alarm will turn off.
3.After approximately 6 minutes the alarm will sound again. You can activate the snooze function
again or press the POWER button to cancel the snooze function.
DON’T FORGET! This will turn off the Speaker Dock and you will need to press the POWER
button again to turn the Speaker Dock back on.
Sleep mode
The Speaker Dock can be programmed to switch off after a set time, in increments of 10 minutes,
up to 90 minutes.
1.Press the SLEEP button until the required minutes are shown.
Resetting the Speaker Dock
The Speaker Dock can be reset to return to the factory default settings.
1.Switch off the Speaker Dock and remove the plug from the wall socket.
2.To reset the Speaker Dock, remove the Backup Battery from the Memory Battery Compartment
as described in the previous sections.
3.Replace the Backup Battery after approximately 2 minutes. The Speaker Dock will be returned
to the factory default settings.
Page 12 of 16
Problem
Possible Cause
What to do
Radio sound distorted.
1.The station is not tuned in.
1.Fine tune the station.
2.There is a poor signal in the 2.Reposition
area.
Dock.
No radio sound.
the
Speaker
1.The Speaker Dock is not in 1.Press the MODE button until
tuner mode.
Tuner is selected.
2.The volume has been muted 2. Adjust the volume level.
or is on the minimum setting.
The iPod will not play
1.The Speaker Dock is not in 1.Press the MODE button until
iPod mode.
iPod is selected.
2.The iPod is not connected 2.Reconnect the iPod.
correctly.
No iPod sound.
1.The Speaker Dock is not in 1.Press the MODE button until
iPod mode.
iPod is selected.
2.The volume has been muted 2.Adjust the volume level.
or is on the minimum setting.
If none of the above solves your problem, perform a reset as described on page 11.
Model Number
• IPD-4100
Power Supply
• AC~220V 50Hz
Power Consumption
• 26 W
Power Output
• 5 W x 2 + 12 W (Subwoofer)
Radio Frequency Coverage
• FM: 87.5MHz - 108 MHz
Dimensions
• 402mm (L) x 265mm (W) x 140mm (H)
Page 13 of 16
IMPORTANT: Due to continual revision and improvements to our products design,
specifications are subject to change without notice.
Sound levels
Your hearing is very important to you and to us, so please take care when using this Speaker Dock.
It is strongly recommended that you follow the listed guidelines in order to prevent possible
damage or loss of hearing.
Establish a safe sound level
Over time your hearing will adapt to continuous loud sounds and will give the impression that the
volume has in fact been reduced. What seems normal to you may in fact be harmful. To guard
against this before your hearing adapts, set the volume to a low level.
Slowly increase the level until you can hear comfortably and clearly and without distortion.
Damage to your hearing is accumulative and is irreversible. Any ringing or discomfort in the ears
indicates that the volume is too loud.
Once you have established a comfortable listening level, do not increase the sound level.
General Safety
This Speaker Dock has been designed and manufactured to meet European safety standards, but
like any electrical equipment, care must be taken if you are to obtain the best results and safety is
to be assured.
Do read these operating instructions before you attempt to use the Speaker Dock.
Do ensure that all electrical connections (including the mains plug, extension leads and
interconnections between pieces of equipment) are properly made in accordance with the
manufacturer’s instructions.
Switch off and remove the mains plug when making or changing any connections.
Do consult your dealer if you are ever in doubt about the installation, operation or safety of your
Speaker Dock.
Don’t continue to operate the Speaker Dock if you are ever in doubt about it working normally, or
if it is damaged in any way. Switch it off withdraw the plug from the mains and consult your
dealer.
Don’t remove any fixed covers as this may expose you to dangerous voltages.
Don’t leave the Speaker Dock switched On when it is unattended for long periods of time, unless it
is specifically stated that it is designed for unattended operation or has a standby mode.
Page 14 of 16
Make sure that other people in your household are conversant with the Speaker Dock.
Don’t obstruct the ventilation vents on the Speaker Dock, for example with curtains or soft
furnishings.
Overheating will cause damage and shorten the life of the product.
Don’t allow electrical equipment to be exposed to rain or moisture.
Electrical Information
This Speaker Dock is fitted with a BS1363/A 13 amp plug. If it is not suitable for your supply
sockets it must be removed and replaced with an appropriate plug. If the plug becomes damaged
and/or needs to be replaced please follow the wiring instructions below.
The plug removed must be disposed of immediately. It must not be plugged into a supply socket as
this will be an electrical hazard. If the fuse needs to be replaced it must be of the same rating and
ASTA approved to BS1362. If the plug is changed, a fuse of the appropriate rating must be fitted
in the plug, adapter or at the distribution board. If the fuse in a moulded plug is replaced, the fuse
cover must be refitted before the appliance can be used.
Wiring Instructions
The supply cable will be either 2-core or 3-core. Follow the appropriate wiring instructions given
below. In both cases ensure that the outer sheath of the cable is firmly held by the cable clamp.
2-Core Plug
WARNING! Do not connect either wire to the earth terminal.
This symbol indicates that this 2-core appliance is Class II and does not require an earth
connection.
The iPod Speaker Dock is guaranteed for twelve months from the date of original purchase. If any
defect due to faulty materials or workmanship, contact the Goodmans Helpline. Have your receipt
of purchase on hand.
Page 15 of 16
The guarantee is subject to the following provisions:
• It is only valid within the boundaries of the country of purchase.
• The product must be correctly installed and operated in accordance with the instructions
contained in this User Guide.
• The Speaker Dock must be used solely for domestic purposes.
• The guarantee will be rendered invalid if the Speaker Dock is re-sold or has been damaged by
inexpert repair.
• The manufacturer disclaims any liability for incidental or consequential damages.
• The guarantee is in addition to, and does not diminish, your statutory or legal rights.
Page 16 of 16