1
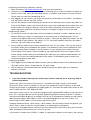
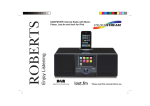
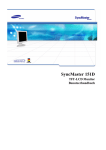
User Manual
Internet Radio
IR-1650
For information and support, www.lenco.eu
Please read this user manual carefully before using the receiver.
LOCATION OF CONTROLS
1.LCD Display
2.Play/Pause/Stop or
Preset I
3.Previous or Preset II
4.Next or Preset III
5.Dial/Volume
6.Alarm
7.Back
8.On/Off
9.Speaker
10.DC Socket
11.Line Out
12.Earphone jack
Key Functions:
ON/OFF:
Press to switch the internet radio Stand By on/off.
BACK:
Press to go back to the previous display.
ALARM:
Alarm Setting
I , II , III:
Use to
:
store and play up to the radios.
Press to pause or playback and hold to stop playback.
:
Press to start playback at the previous track.
:
Press to start playback at the next track.
Dial/Volume: Use to search for stations, use to change the option shown on the display,
Use to adjust the volume.
SETTING UP
Those steps for connecting your radio to your network
Step 1 Switching on the radio
Plug the cable from the AC adapter into the socket labeled 7.5V 1.2A DC on the back of the radio, then
switch on at the mains.
Caution: Use only the mains adapter supplied with the radio. Connecting a power supply with a different
rating will cause permanent damage to the radio and may be hazardous.
The display on the front of the radio will light up and say:
LENCO
Internet Radio
Then show
SP Radio
ARM Powered
After a few seconds, it will shows :
Initializing
WiFi Network
If it complete the initialing, it will auto scan the ESSID as
Scanning
…….
Then it will list all the ESSID names it can find, you can select one of you want to use, maybe it will
request you input the correct WEP(Wired Equivalent Privacy) or WPA(Wi-Fi Protected Access) code. If
your network is not configured to need a WEP or a WPA code, the unit will connect to the ESSID auto
and success as
Network OK
Or if you are requested to input the encryption, you can do as
1. Select the one you want to use
<your network>
2. Then it will show you
Enter WPA/WEP key
Note: The encryption code would have been set up by the person who set up and configured your
network.
After 3seconds the display goes into the code entry mode or press select.
If the display does not automatically go into code entry mode, press the SELECT button. To enter
the code, use the DAIL to select each character of the code in turn, pressing the SELECT button
after each character.
3. Make sure the character you want is shown in the centre of the display to be able to select it.
< END <>
0 1234 >
4.If you complete the key then you can use “END” to confirm. The display shows “Connect WiFI” as the
radio connects to the network.
Connect WiFi
Connecting /
5.If the connecting is OK, it will show you
Network OK
6.Now you can go to listen to the internet radio:
<Stations>
Media Player
Changing the volume:
You can change the volume by turning the TUNE clockwise to increase the volume and anticlockwise to
decrease the volume. The display shows the volume bar. You cannot change the volume when you are
in a menu or when the radio is connecting to a station.
Step 2 How to set your radio
In the main menu, you will see below the settings.
Stations
By Region
By Genre
User
Media
Player
UPNP Servers
Playback Mode
Repeat / Shuffle
Clear Queue
Configure
Network Config
Scan for Networks
Enter network Name
View Config
Edit Config
Signal Warning
Version
Upgrade Firmware
Language
English, Spanish, French, German, Dutch
and Hungarian
Factory Reset
Register
Clock
Set Time
Set Alarm
Sleep Timer
0-90 minutes
Backlight
Active/Inactive/Standby
Weather
RSS Feed
Signal strenght
Listen to your internet radio
When playing a stream, the Internet Radio, downloads a small amount of the stream before it starts
playing. This will occur before your selected station starts to play.
In the <Stations > menu, you can select one of them with highlighted then press the select button.
1. <By Region>enables
<By Region>
Genre
You need to choose a Continent and then a country from that continent. You can then select from a list
of radio stations from your chose country.
Caribbean
<Europe>
<UK>
Ukraine
2. < By Genre > enables
You need to choose radio stations according to their content, for example News, News, Oldies
or Rock etc.
Hard Rock
<Hip Hop>
5. < User >
You can find the radio stations which you have added to your internet radio station list in the website,
please refer to Configuring “My Stuff”.
6. Press the “Select” button to choose the station you want to listen
Internet Radio
Wait…
<BBC Radio 1>
BBS Radio 1Xtra
The if you select one of the stations, it prompt you loading station… the show you “BBC Radio 1
connecting… ” etc then you can enjoy your radio.
Set up the Configure of your internet radio
<Configure Menu>
In the upper main menu, you can find <Configure> then you can do your radio basic Configure as
Media Player
<Configure>
If you select <Configure> then please press “Select” button to start
For<Network configure>
Enables you to configure your radio’s network settings, scan again for a connection to another
wireless network , or to manually configure the network parameters. This is useful if you take the
Internet radio to another building where you want to use. It is possible to configure your radio to
connect to your network via an available
<Network Configure>
Version
Press “Select” to do the set, Turn the TUNE until your appropriate equipment; you can find some
sub-menu in it
1> For <Scan the networks> submenu, you will be guided to how to set the wireless application with the
wizards. please see the step 1
2> For <Enter network> submenu, you can enter the network which you want and it has been existed.
3> For <Network Select> submenu, you can select one more than network
4> For <View Config> submenu, you will see the network configure information
5> For <Edit Config> submenu, you can set the DHCP auto ON or OFF and if this DHCP on sets, this
device will auto set and get the IP address and gateway DNS etc settings, if you set the DHCP off,
you will be asked input these address or number for the network config.
6> For<Signal Warning>Submenu,when the WiFi network signal is very poor, it will show the low signal
warning.
TIPS: please use DHCP on as default sets, you can connect to network and get your internet radio
stations easy
For <Version>, you can check the unit information by turning the knob
For <Upgrade Firmware >, Use this option to download new firmware for the radio from the Radioslots
portal on the internet . if there is new firmware available, the radio will prompt you if you want to
download it or not.
For <Language>, you can select your mother language inner these 6 languages: English, Spanish,
French, German, Dutch and Hungarian.
For <Factory Reset>, you can do this factory reset to empty all of the settings and it come back to
default settings, please be advised if you confirm to do this, the Preset, language, ESSID, network
configure etc will be set to default.
For <Register>, you can use this key number to register you unit on Radioslots portal website.
For <Clock>, you can set the time and set alarm time, please be advised if you success to link the
network, the time and date will be set with Greenwich standard time, please see the “How to set your
time and date” chapter
For <Sleep Timer>, once you set the sleep time, when the time has gone, it will power off the radio and
go to standby.
For <Backlight>, you can set the LCD backlight level for Active mode, inactive mode and standby mode
as:
Selecting this option will alter the internet radio’s backlight values.
1. After select the ‘Backlight’ menu item, the radio will display its list of three menu modes:
‘Inactive’, ‘Active’ and ‘Standby’. These three states are explained below:
. The radio gets into its ‘inactive’ state when there is no user activity for 30 seconds.
. The ‘active’ state is when there is user activity.
. ‘Standby’ is the state when the radio has been turned off
2. Rotate the knob to highlight the desired menu mode and press SELECT.
3. The radio will now display the current backlight value for the menu mode. You can alter this value by
rotating the knob to increase or decrease it.
For<Weather>, you can enable it and set the city which you want to see the weather.
For<RSS Feed>, you can custom the information you like from the shown list
How to enjoy you Media stream
If you go to this <Media Player>, you can find “UPNP Servers”, “Playback mode” and “Clear Queue”
submenus.
In order to play the music files you have stored on your PC via the Media player you must ensure the
following:
1. Your PC has the correct type of music files saved on it which are explained in
the following paragraphs.
2. The music files on your PC are not 'protected';
3. Te music files are stored in the correct location on your PC.
4. The PC has file sharing turned on.
5. The music files can be 'shared' on the network.
6. You know the name of your PC
MUSIC CONTENT
The internet radio plays the most popular music types,
FLIE TYPE
MP3
Windows Media
itunes
Ogg Vorbis
FLIE EXTENSION SHOWN ON PC
.mp3
.wma
.aac
.ogg
(These are the letters that appear after the file name. e.g. MUSIC.mp3)
Stations
<Media Player>
1. Use select the <UPNP Servers> then press “Select” to enter your <UPNP Servers>
<UPNP Servers>
Playback Mode
2. The music in the local media can be sorted by Album and by Artist
Scanning…
…>….<….
<User: Admin:/>
Select and it will show
Loading…….
3. You can play music one by one track or you can add all folder music into your play queue
<---Add All --- >
Music one.mp3
1.
2.
3.
4.
5.
6.
7.
Turn the knob until ‘By Artist’ is displayed.
Press the SELECT button.
Turn the knob Until the required artist is displayed.
Press the SELECT button.
Turn the knob until the required album name is displayed.
Turn the knob until the required tack is displayed.
Press the SELECT button. The track will begin playing.
Queuing up tracks for playback later
1. Highlight the required track.
2. Press the SELECT button. ‘Track Added To Queue’ will be displayed.
Controlling playback
1. Use the PLAY/PAUSE/STOP button to either pause a currently playing track or to restart a
currently paused track or to restart a stopped track.
2. Use the PLAY/PAUSE/STOP button to stop a currently playing when you press and hold the button
for 2 seconds.
3. Use the PREVIOUS button to start playback of the previous track in the queue.
4. Use the NEXT button to start playback of the next track in the queue.
Browsing the list of tracks currently queued up for playback
1. Press the BROWSE button on remote. The currently playing track name will be displayed.
2. Turn the knob to see which tracks are queued up for playback.
3.
If you want to jump to a particular place in the queue the SELECT button when the required track is
displayed.
Playing tracks in random order
1.
2.
3.
4.
5.
6.
7.
8.
Select the individual tracks as described previously.
Navigate to top-level menu item ‘Media Player’ using the SELECT and BACK buttons.
Press the SELECT button.
Turn the knob until ‘Playback Mode’ is displayed.
Press the SELECT button.
Turn the knob until ‘SHUFFLE’ is displayed.
Press the SELECT button.
Turn the knob to select YES/NO the confirm that shuffle mode should be enabled.
Playing tracks in the queue repeatedly
1. Select the individual tracks as described previously.
2. Navigate to top-level menu item ‘Media Player’ using the SELECT and BACK buttons.
3. Press the SELECT button.
4. Turn the knob until ‘Playback Mode’ is displayed.
5. Press the SELECT button.
6. Turn the knob until ‘Repeat’ is displayed.
7. Press the SELECT button.
8. Turn the knob to select YES/NO the confirm that shuffle mode should be enabled.
Setup a Windows PC to allow the radio to access you audio files via a UPnP serves
1.
If your PC is running Microsoft Windows XP, then you can use Windows Media Player 11(WMP11)
to act as your UPnP( Universal Plug and Play) media server 1.0. Windows Media Player 11 may
be downloaded from Microsoft’s website and install by following the instructions detailed in its
installation wizard.
2. Once installed , Windows Media Player 11 will create a library from all the media files available to
it on your PC. To add new media files to the library,
select’ File > Add to Library…> Advanced Options’, Click ‘Add’ and choose the files you wish to
add and click’ OK’.
3. You will now need to connect your Internet radio to Windows Media Player 11
and configure it to allow the radio to access your media library. In order to this , you will need to do the
following:
a. Keep pressing BACK to get to the radio’s top-level menu and then turn the rotary knob to select
‘Media Player’.
b. Press SELECT and then turn the knob to highlight ‘ UPnP Serves’.
c. Press SELECT and the radio will scan for all available UPnP servers . Note, this may take a
few seconds for the radio to complete its scan and before the scan has completed , the radio will
display ‘[Empty]’. The radio will continue to display ‘[Empty]’ if no UPnP servers and found.
d. After a successful scan. Select your UPnP server, by rotating the knob if there is more than
one UPnP server, and then press SELECT (note, your radio will display’ Access Denied’ at this
stage)
4. Your PC will now prompt you that a device has attempted to connect to your
UPnP server. In order to allow the radio to have access to the media files, you will need to click the
‘Library’ tab from Windows Media Player 11 and select the ‘Media Sharing…’ item to open the ‘Media
Sharing’ window.
Selecting ‘Media Sharing…’ for Windows Media Player11 :
5. From the ‘Media Sharing’ windows , the radio will be listed as an unknown device. Click on the
unknown device listed, then click the ‘Allow’ button and then click ‘OK’ Allowing the Radio to
Connect:
Set up the Time/Alarm
In the <Configure> submenu <Clock>, you can set the <time/alarm> as:
Set Time
09:06
1. Please turn the knob to set the hours, then press the “Select” to confirm then the cursor will jump to
minute, so you can adjust the minute also. Press the “Select” to finish the time set.
2. You can select “Enable: off” to disable the alarm settings, or you can set to enable this alarm.
Enable: ON
Time: 00:00
You should adjust the time when you want to be alarm.
Noted: According to different time necessary, you can select your favorite setting for the alarm setting;
Daily \ Once\ Weekends \Weekdays / Weekly options are available;
3. And you can set the Alarm 'Buzzer' sound or ”station” which was preset for the alarm to alert the
customer when the Alarm expires;
Set up the Sleep Timer
1 In the <Configure> submenu <Sleep Timer>, you can set <Sleep Timer> from 1~ 90 minutes.
Sleep Timer
5 Min
When you set that the radio will continue to play as normal, but it will go into standby mode after the
sleep timer has expired. To turn the radio back on again, simply press the ON/OFF button.
Total 90 minutes you can set
Store and listen the Preset station
When a radio station ( internet radio) is being played, you can store it by press the “Preset1,Preset2,
Preset3” key and hold it , of course, you can load the preset stations from this list.
E.g. to store preset1: Hold “Preset1” button and it will show:
Assigned to
P01
If you need to recall the preset 1, you can press “Preset1” to recall the stored station.
Storing a radio station in a preset by the front remote control:
To store a preset, you must first be listening to the station that you would like to save, then press
STORE button. Then press the preset number you would like to save and allow 2 seconds to store the
station into the preset. The LCD will then show <Assigned to preset #>.
Once you have saved a station to one of the presets, you can recall it by pressing RECALL button. Then
press the preset number you would like to recall and the radio will connect to your station that you
recalled.
Switch the radio OFF and ON
To switch off, press ON/OFF once and the clock will be displayed. To switch on, press ON/OFF once
and the radio will take up to 60 seconds to start playing again, as it finds the radio station you were
last connected to and load it into the buffer.
Configuring “My Stuff”
Registering an account on Radioslots’s website
1. Open the website, http://www.radioslots.com, from your internet browser.
2. Click on the ‘Register’ link on the right top corner, and follow the on-screen instructions to register an
account. Please note, during the registration process, a validation code will be sent to you via email.
Please enter this code when prompted to do so.
3. After logging into your account, you will be able to edit your information for “My Profile”, “My Stations”
and “My Radios” from the “My stuff” section.
4. You can now add your Internet Radio to your account on the website by accessing the ‘My radios’ link.
From the ‘My Radios’ section, you will need to enter in your radio’s eight-digit serial number, which can
be found from the ‘Configure> Register’ menu on the radio, and you will also need to enter in your
radio’s registration code which can be found from the ‘Configure> Register’ menu on the radio.
Configuring ‘My stations’
1. It’s possible to search for radio stations that are available in Radioslots’s stations’ database from it’s
Website. Whenever stations are searched for on the website, then it will be displayed in a list of
search results together with a link to ‘Add to my stations’. Clicking on the ‘Add to my stations’ link, will
add the station to your account’s ‘My stations’ list. This list can be edited by clicking on ‘My stations’
under the ‘ My stuff’ section on the website.
2. You can add the station to your internet radio device or your “PC_My station”. Then you can listen to
the stations which you have added to the stations list on website by your internet radio device. Once
you have internet station available in you ‘My stations’ list, you may play these stations from your
Internet Radio. These stations will be available on your radio from the menu item: ’Stations>User> ’.
Please note the stations will only be available to your radio once your radio has downloaded a new
stations’ list. To cause the radio to download a new stations’ list immediately, please remove and
reconnect the power to your radio.
Configuring ‘My Radios’
1. Once logged into your Radioslots website account, you can add your own internet radio device to the
‘My Radio’ section, which is listed under the ‘ My Stuff’ section
2. You can add your internet radio device to the website by click the “Add a radio”, then follow the
website’s instruction.
TROUBLESHOOTING
1. If you have trouble connecting the radio to your wireless network, these steps may help to
resolve the problem:
Confirm that a Wi-Fi can access the internet (i.e. can browse the web) using the same network.
Check that a DHCP server is available, or that you have configured a static IP address on the radio.
Check that you firewall is not blocking any outgoing ports. As a minimum the radio needs access to UDP
and TCP ports 80, 554, 1755, 5000, and 7070.
Some access points may be set so that only equipment with registered MAC addresses can connect to
them. This is one possible cause of the Internet Radio being unable to connect to the Wi-Fi network,
and the Internet Radio display will show Bad ESSID or key. To overcome this problem you will need to
add the Internet Radio’s MAC address to the list of allowed equipment in your access point. The
Internet Radio’s MAC address can be found using the menu item
Configure->Network Config ->View Config -> MAC address. You will need to refer to the guide for you
Access Point in order to enter the Internet Radio as an allowed piece of equipment.
If you have an encrypted network, check that you have entered the correct key or pass phrase into the
radio. Remember that text-format keys are case sensitive.
If your wireless network name (ESSID) is ‘Hidden’ (a setting on the wireless access point), then you can
either turn on the name, or you can manually enter the name into the internet radio and media player,
Select Configure, Select network, Enter ESSID. Confirm if the Network is encrypted, e.g. requires a
WEP or WPA key. Then enter the network name.
2. If your radio can connect to the network successfully, but is unable to play particular
stations, it may be due to one of the following reasons:
The station is not broadcasting at this time of the day (remember it may be located in a different time
zone).
The station has too many people trying to attach to the radio station server and the server capacity is
not large enough.
The station has reached the maximum allowed number of simultaneous listeners. The station is not
broadcasting anymore.
The link on the radio is out of date. This is updated automatically every day, so the next time you turn on
the link will be recognized.
The internet connection between the server (often located in a different country) and you is slow. Some
internet service providers may fail to stream in certain geographical areas. Try using a PC to play back
the stream via the broadcaster’s web sit. If you can play back the station with a PC, use the form at
http://www.radioslots.com to inform us so that we can change the station data that is used by the radio.
If you have a laptop, try connecting it if your Internet Radio cannot find the station.
3. When you scan for PCS none can be found, or the PC you are looking for does not appear
in the list:
Global File sharing is not enabled on the PC.
The PC you are looking for is in another part of the network separated by a router.(This may happen if
you have two access points on the same network, and the Media source is on one Access Point and the
internet Radio is on another).
The PC with the Media content may not have the same workgroup as the server managing the network.
The easiest solution is to change the PC workgroup name to the same as that being supported by the
server.
You have not connected to the wireless Access point. On the internet radio , select ‘Configure’,
‘Network Configure’, ‘Select Network’, ‘Scan’ and then select your Wireless network. (You may need to
enter a security key to access the network wirelessly).
You have not enabled simple file sharing on Windows 2000. In Windows 200 the simple file sharing
can be turned on by going to the Control Pane, selecting Folder options, view Tab. The safest way for
users to enable the service is to run the ‘Set up a home or small office network’ wizard from Control
Panel, Network Connections.
You have a firewall set on your PC which is stopping you accessing shared files. Windows 2K doesn’t
come with a real firewall so unless you have installed one this should not be a problem.
You have a third party firewall in your network, which is preventing file sharing.
If you have a third party firewall (Like Norton, or Zone Alarm) that will have its own control panel and you
will need to consult the manual for your firewall.
If your PC is connected to a managed network, with a server sometimes the PC being searched for
needs to be server Workgroup.
4. If the Internet Radio keeps re-buffering radio station:
The Internet Radio is streaming the data from the radio station via your broadband connection, if there is
a high error rate on your broadband connection, or the connection is intermittent, then it will cause the
Internet Radio to pause until the connection is re-established and it has received enough data to start
playing
again.
If your Internet Radio keeps stopping, please check the DSL modem to ensure
that the Broadband line is not suffering a high error rate or disconnections. If you are experiencing
these problems, you will need to contact your broadband
supplier.
5.
What is Buffering?
When playing a stream, the Internet Radio/Media player, downloads a small amount of the stream
before it starts playing. This is used to fill in any gaps in the stream that may occur if the internet or the
wireless network is busy. The Internet Radio streams music data from the PC while you are listening. If
a stream gets blocked or experiences Internet congestion while transferring it may stop/interfere with
the quality of play. If this happens, check your internet connection speed- it must be faster than the
speed of the streams.
Warning
Any changes or modifications not expressly approved by the party responsible for compliancecould void
the user's authority to operate the equipment.
The apparatus shall not be exposed to dripping or splashing and that no objects filled with liquids,such as
vases.
Excessive sound pressure from earphones and headphones can cause hearing loss.
An appliance coupler is used as the disconnect device and it shall remain readily operable. To be
completely disconnected the power input, the appliance shall be disconnected from the mains completely.
The unit shall not be exposed to excessive heat such as sunshine, fire or the like; danger of explosion if
unit is incorrectly placed.
The plug portion of power supply is used as the disconnect device and it shall remain readily operable.
The power supply shall be disconnected completely, if any.
Remoter controller:
1.
2.
3.
4.
5.
6.
7.
8.
9
Power:
<Press to switch the internet radio ON/OFF>
Mute:
< Press to mute the voice>
Alarm:
<Press to set alarm>
0---9:
<Numeric buttons for Store and Recall functions>
Store:
<Use to store 99 radio stations>
Recall: <Use to Play up the pre-setting stations>
--/- :
<Select the numeric bits>
Select: <Press to select a displayed option>
Back: <Press to go back to the previous display>
10 + VOL -:
<Use to adjust the volume>
11
UP\DOWN Use to search for stations,and use to change the option show on the display>
:
12 Play/Pause:
13 Stop:
<Press to play/pause playback>
<Press to stop playback, with a track name displayed, press and hold to delete the
track>
14
<Press to start playback at the previous track>
15
<Press to start playback at the next track>
16 Browse: <Press to view the name of the track currently playing and then turn
the TUNE to see the list of tracks waiting in the play queue>
17 Repeat: for repeat the music play
18 Shuffle: to shuffle the music play order