1
42510_Dampfgarer_Manual_engl_okt07.qxp
18.12.2007
10:09
Seite 1
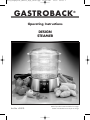
GASTROBACK
®
Operating Instructions
DESIGN
STEAMER
Art.-No. 42510
Read all provided instructions before first usage!
Model and attachments are subject to change
42510_Dampfgarer_Manual_engl_okt07.qxp
!
18.12.2007
10:09
Seite 2
Carefully read all provided instructions before you start running the
appliance and pay regard to the warnings mentioned in these
instructions.
42510_Dampfgarer_Manual_engl_okt07.qxp
18.12.2007
10:09
Seite 3
Important Safeguards
Carefully read all instructions before operating this appliance and save
for further reference. Do not attempt to use this appliance for any other than the
intended use, described in these instructions. Any other use, especially misuse, can
cause several injuries or damage by electric shock, heat or fire.
Any operation, repair and technical maintenance of the appliance or any part of it other
than described in these instructions may only be performed at an authorised service centre. Please contact your vendor.
• Do not attempt to operate the appliance if water leaks out of the steamer base or any
parts or accessories are likely to be damaged or subject to inadmissible strain (i.e.
mechanical or electric shock, overheating, moisture). Before use, always check the appliance and each part of it on impeccable operation. Any use of accessories, attachments
or spare parts not recommended by the manufacturer may result in fire, electrical shock
and injuries to persons. If the appliance or any part of it is likely to be defective or not
operating in the intended way, immediately unplug from power supply and return the
entire appliance to an authorised service centre for examination and repair.
• Any maintenance, repair and operation other than described in these instructions must
be performed at an authorised service centre to avoid risk of electrical shock, fire or
injuries to persons. Do not operate the appliance with any parts or accessories not recommended by the manufacturer.
• Close supervision is necessary when the appliance is used near young children. Do
not let young children play with any parts of the appliance. The appliance is not intended for use by children or infirm persons without supervision.
• Do not let the plug or power cord hang over the edge of the table or counter. Take
care that no one will pull the appliance by the power cord, especially when young children are near. For storage always keep the entire appliance dry and clean and where
young children cannot reach it. Do not place any hard and/or heavy objects on the
appliance or any part of it.
• Always place the appliance on a stable, even, dry and sufficiently large surface. Do
not place the appliance near the edge of the table or counter. Do not place any cloth or
tissue beneath the appliance to avoid any risk of fire and electric shock. Always keep
the table or counter clean and dry and immediately wipe off spilled liquids.
• During operation keep the appliance in an appropriate distance of at least 20 cm on
each side to furniture, walls, boards, curtains and other objects. Keep at least 1 m of
free space above the appliance. Do not operate the appliance near any heat-sensitive
or moisture-sensitive materials or under boards to avoid damage caused by steam and
condensate.
• The appliance or any part of it may never touch hot surfaces. Do not place the appliance and any part of it on or near hot surfaces, (i.e. burner, heater or oven).
3
42510_Dampfgarer_Manual_engl_okt07.qxp
18.12.2007
10:09
Seite 4
• Before use always make sure that the appliance is assembled properly and a sufficient
amount of water is filled in the water container (between water level mark 'min' and
'max'). Do not operate the appliance with the water level below the minimum water level
mark ('min'). Do not overfill the water container above the maximum water level mark.
• Do not move or tilt the appliance during operation to avoid overflowing of boiling
water. Immediately switch off and unplug the appliance, if water leaks out of the steamer base during operation.
• This appliance is for household use only and NOT intended for use in moving vehicles
or outdoors.
Important Safeguards for Electrical Appliances
Care must be taken when using any electrical appliance. Please adhere to the following
precautions.
• Ensure that the voltage rating of your mains power supply corresponds to the voltage
requirements of the appliance (230 V, 50 Hz, AC). Always connect the appliance directly to a mains power supply wall socket with protective conductor (earth/ground) connected properly. The installation of a current safety switch with a maximum rated operating of 30 mA in the electrical circuit is recommended. If in doubt, contact your electrician for further information.
• Do not use any extension cord or multiple socket to avoid risk of fire or electric shock.
• The appliance is designed for partly unattended operation. Nevertheless, during operation you should check regularly (every 1/2 hour) the water level in the water container (between water level mark 'min' and 'max') and ensure that the appliance is operating properly. Always switch off the appliance and unplug from the power outlet when
not in use and before moving or cleaning the appliance.
• Always handle the power cord with care. The power cord may never be knotted, twisted or squeezed. Do not pull or strain the power cord. Always grasp the plug to disconnect the power cord from the power outlet. Do not let the power cord hang over the edge
of the table or counter. Take care not to entangle in the power cord.
• Always use the handles on both sides of the steamer base for moving the appliance.
• Do not immerse the steamer base or power cord in water or any other liquid. Do not
spill or drip any liquids on the power cord or exterior of the steamer base. Never place
the steamer base or power cord in an automatic dishwasher or under a tap. When liquids are spilled on the exterior of the steamer base, immediately switch OFF and unplug
the appliance and dry it.
4
42510_Dampfgarer_Manual_engl_okt07.qxp
18.12.2007
10:09
Seite 5
Hot Surfaces – Risk of Burns
The Gastroback Design Steamer is designed for cooking a variety of foodstuffs and,
therefore, the exterior of the steamer will get hot during operation. In addition, there are
steam vents in the lid. Beware of steam and hot condensate during operation and even
some minutes after switching off the appliance, especially when removing the steamer
baskets and/or the lid.
• Do not touch hot surfaces (steamer base, steamer baskets and lid) while the appliance
is in use. Always use handles and knobs for moving and operating the appliance and
lifting the lid and steamer baskets. Additionally, we recommend to use a panholder or
ovenglove for removing the lid and/or steamer baskets.
The steamer base, steamer baskets and lid are still hot, even some minutes after switching off. Do not touch any heat-sensitive objects with the hot lid or steamer baskets. Do
not place any heat-sensitive objects in or on the steamer.
• Before assembling, always ensure that there are no objects in the water container.
• Close supervision is important, when moving any parts of the appliance (i.e. steamer
baskets or lid) during operation or immediately after switching off. Do not move or tilt
the steamer base during operation or when it is still hot, to avoid boiling water spilling
from the water container, causing injuries of persons or damage. Always unplug the
appliance and let it cool down to room temperature before moving it.
• For operation place the appliance on a dry, stable, heat-resistant and water-resistant,
even surface (i.e. glass, ceramics, stone). The appliance or any parts of it may never
touch hot surfaces. Do not place the appliance or any part of it on or near hot surfaces,
(i.e. burner, heater or oven). Never place the appliance on any power line cord to avoid
fire and electrical shock.
• Before use ensure that the appliance is completely and properly assembled, the steamer baskets do not tilt or wobble, and that there is a sufficient amount of water the water
container. On start up the water level should reach the maximum water level mark and
may never fall below the minimum water level mark during operation.
• Beware of steam and hot condensate, when operating the appliance and especially
when removing the lid or steamer baskets. Always keep the lid in place during operation. Otherwise power consumption increases significantly and the foods in the upper
steamer baskets will not be cooked sufficiently. Ensure all persons stay in sufficient distance to the appliance during operation.
• There are three steam vents in the lid. Especially when removing the lid during operation or immediately after switching off, always keep your hands and arm as well as
any clothing and other objects away from the steam vents to avoid scalds and damage.
• Do not place any heat-sensitive objects near the appliance during operation to avoid
damage caused by heat, condensate and splashes.
5
42510_Dampfgarer_Manual_engl_okt07.qxp
18.12.2007
10:09
Seite 6
Maintenance of Plastic Surfaces
Any plastic parts coming in contact with foods, including the container in the steamer
base, are manufactured of high-grade heat-resistant plastics. Do not use the appliance
with any cracks or distortions of the plastic parts. Replace any damaged parts by using
the recommended original spare parts.
• Do not use metal utensils or other hard and sharp objects with the steamer to avoid
scratching the plastic surfaces. Only use wooden or plastic utensils to stir and serve the
food. Never use hard and sharp utensils to cut or scratch in the steamer.
• Never use abrasive cleaners, cleaning pads or any sharp objects (i.e. metal scouring
pads) for cleaning. Carefully clean the appliance with a damped sponge or tissue and
warm washing-up liquid. Steamer baskets, lid, rice pan and separator may be cleaned
in an automatic dishwasher.
• Never place the steamer base or power cord in an automatic dishwasher.
• Depending on the local water hardness we recommend to decalcify the appliance regularly (after ca. 7-10 operations). Use citric acid or vinegar solutions for decalcifying.
Do not use abrasive cleaner or cleaning pads for removing any deposits. After decalcifying thoroughly rinse with water to completely remove the decalcifier from the container (the decalcifier could spoil your food).
• Do not use any parts or accessories of the steamer for any other purposes than the
intended use. Do not place the appliance or any parts of it in a microwave oven to avoid
distortions and other damages. Do not place the appliance in direct sunlight for a long
period of time.
6
42510_Dampfgarer_Manual_engl_okt07.qxp
18.12.2007
10:09
Seite 7
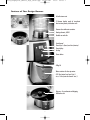
Features of Your Design Steamer
Lid with steam vents
3 Steamer baskets made of translucent
heat-resistant plastics; dishwasher safe
Steamer base with water container
Heating element; 650 W
Handles on each side
Control panel
Timer keys: h (hours) and min (minutes)
Timer display
Set key
Power button
Filling lid
Water container for clear tap water:
0.25 Litre (water level mark 'min')
to ca. 1 Litre (water level mark 'max').
Drip pan – for condensate and dripping;
dishwasher safe
7
42510_Dampfgarer_Manual_engl_okt07.qxp
18.12.2007
10:09
Seite 8
First use
Before first use, clean all removable parts of the steamer in warm soapy water (see Care
and Cleaning).
WARNING: Please handle all parts of the appliance with care. Switch off, unplug and
allow the appliance to cool down, before moving or cleaning the appliance.
Do not immerse the steamer base or power cord in any liquids or drip
any liquids on it. Do not place the steamer base or power cord in an
automatic dishwasher.
1. Wipe the container in the steamer base with a damp soft cloth or sponge.
Dry the outer surface of the steamer base thoroughly.
2. Clean the removable parts (drip pan, steamer baskets, rice pan, separator, lid) in
warm soapy water or an automatic dishwasher.
Operating Your Steamer
CAUTION! Only fill up with clear drinking-water. Do not fill any other liquids into the
water container and do not fill in any additional ingredients, such as spices or flavours.
Do not use decalcifier when cooking any food, because the decalcifier could spoil your
food. Do not drip or spill any liquids on the exterior of the steamer base.
Ensure the steamer is assembled properly and you filled up the water container with an
appropriate amount of water (water level between 'min' and 'max'; see Features of Your
Design Steamer) before connecting the appliance to the power supply.
WARNING! Beware of hot surfaces! Steamer base, steamer baskets, and lid get very
hot during operation. Only use handles and knobs for handling the appliance. During
operation always use panholders or ovengloves to remove the steamer baskets and lid.
Beware of hot condensate and steam, when removing lid or steamer baskets.
Immediately switch OFF (push the power button) and unplug the appliance, if water
leaks out of the steamer base or overflows the brim of the steamer base.
1. Prepare the appliance for use.
Before first use or after a longer period of storage you should clean the appliance (see
First Use).
If necessary, pour out any remaining water. Always use fresh tap water for your steamer.
Place the steamer base on an appropriate surface (level, dry, water-resistant and heatresistant). During operation, always keep the appliance away from other objects: leave
at least 20 cm of free space on each side and 1 m of free space above the appliance.
2. Fill up the water container in the steamer base with clear tap water.
Pour in ca. 1 Litre water. The water level should reach the maximum water level mark
'max' on the filling lid. If required, open the filling lid and slowly pour in another little
8
42510_Dampfgarer_Manual_engl_okt07.qxp
18.12.2007
10:09
Seite 9
amount of water to reach the maximum water level mark 'max'. Shut the filling lid.
CAUTION! Do not overfill the water container beyond the maximum water level mark
'max'. Otherwise the water could overflow the brim of the water container during operation. Only use clear water without any ingredients. Dry spilled water immediately.
3. Insert the drip pan in the steamer base (see Features of Your Design Steamer). The
drip pan will only fit in the right orientation. The rim of the drip pan must seat on the rim
of the steamer base.
4. Prepare your food and fill the steamer baskets.
There are marks on the handles of each steamer basket. Always begin with steamer basket I (bottom), then fit steamer basket II (middle) and place steamer basket III always on
the top. On occasion you may leave out the steamer baskets II and/or III.
For large pieces of food you may combine the steamer baskets. Just remove a basket
bottom to build a larger basket from 2 steamer baskets (see Dismounting the Basket
Bottom).
NOTE: Always use the lower steamer basket with the basket bottom.
5. Place the prepared steamer baskets in the correct sequence on the drip pan: I first,
II in the middle, III on top.
The baskets must fit without any gaps and may not move about or tilt.
6. Put on the lid. Do not operate the steamer without the lid. Otherwise the upper foods
will not be cooked sufficiently.
7. Wipe off any spilled water.
8. Start operation.
Plug in the power connector in an appropriate power outlet (see Important Safeguards
for Electrical Appliances).
Press the power button. The symbol 00:00 appears on the display.
Tip: A beep sounds every time you hit a key.
9. Set up the cooking time:
Press the set key ().
The default cooking time is displayed (00:20; 20 minutes). In addition, the word STEAMER flashes to indicate, that the steamer is ready for adjustment of the cooking time.
Tip: if you do not press any keys, the word STEAMER flashes for a period of ca.
5 seconds. Then the appliance starts heating automatically. You can set up a time delay
for the cooking process (see Programming the Time Lag Function).
By pressing the set key while STEAMER is flashing on the display, you toggle to programming the time delay and TIMER flashes on the display. By pressing the set key
while TIMER is flashing on the display, you switch back to programming the cooking
time.
9
42510_Dampfgarer_Manual_engl_okt07.qxp
18.12.2007
10:09
Seite 10
Adjust the desired cooking time by pressing the keys h and min. The maximum cooking time is 1 hour 59 minutes (1:59). By exceeding the maximum cooking time, the
cooking time is automatically set back to zero (00:00).
• Pressing the key h (hours, left hand to the display) increases the cooking time by one hour.
• Pressing the key min (minutes, right hand to the display) increases the cooking time
by one minute.
Tip:
holding the 'min' key automatically increases the cooking time until you release the key.
With the intended cooking time shown on the display, just wait ca. 5 seconds. If no further indication is given for ca. 5 seconds, the appliance starts heating automatically and
the word STEAMER stops flashing on the display. Additionally the red heater indicator
lights up.
Steam begins to flow after ca. 3 minutes of heating. Depending on the type and amount
of food in the steamer baskets, it will take some minutes for the steam to reach the upper
steamer basket, lid and steam vent.
WARNING!
Hot condensate may build up in the steamer baskets and on the interior of the lid.
Beware of hot condensate and steam when removing the steamer baskets or lid.
Do not hold your hand, arm or face over the steam vents in the lid. Ensure that persons
stay in sufficient distance to the appliance, when removing the lid or steamer baskets.
Place the steamer baskets and/or lid on a water-resistant and heat-resistant surface
where other persons will not touch it unintentionally.
CAUTION!
Ensure that the condensate will not drip on the steamer base. Immediately wipe off any
spilled liquids.
Ensure that the water level in the water container will never fall below the minimum water
level mark 'min' during operation. If the steamer base boils dry, the dry-out protection
switches off the heater automatically, the timer stops and an acoustic signal continuously sounds (see Dry-out Protection).
Do not overfill the water container. Only fill up the water container to the maximum water
level mark.
10. With extensive cooking times regularly check the water level (ca. 1/2 hour) and, if
required, fill up with a sufficient amount of clear water.
To fill up the water container: open the filling lid and slowly fill in the required amount
of water. Take care that the water will not spill out of the filling lid. Immediately wipe off
spilled water. After filling the water container close the filling lid.
11. If necessary, check the doneness of your food. Beware of hot steam and condensate when lifting off the lid.
10
42510_Dampfgarer_Manual_engl_okt07.qxp
18.12.2007
10:09
Seite 11
12. You can increase the cooking time at any time of the process:
To increase the cooking time during operation: press the set key . The word STEAMER flashes. Set up the desired cooking time, using the keys h and min. If no further indication is given for ca. 5 seconds, the appliance starts the count-down of the newly set
cooking time automatically.
Tip: After expiration of the cooking time an acoustic signal sounds (five beeps) and the
appliance starts the keep-warm function. KEEP WARM and the already expired keepwarm time is displayed. This procedure can last up to 12 hours. Afterwards another
acoustic signal sounds (three beeps) and the appliance switches off automatically.
If you do not want to eat your meal directly after the expiration of the cooking time, we
recommend to use the time lag function (TIMER), to avoid loss of flavour and vitamin
content (see Programming the Time Lag Function).
13. After cooking, shut down the steamer:
Press the power button. The red heater indicator and the display go out.
Unplug the power cord and make sure the appliance has cooled to room temperature
before moving or cleaning it.
14. Always clean the appliance immediately after use.
CAUTION: Never leave any food dry up on the appliance or any parts of it. Always
empty the water container after use. See Care and Cleaning.
Programming the Time Lag Function
You can set up a time lag (TIMER) for the beginning of the cooking procedure. In this
case the cooking process will not start until expiration of the delay time.
To adjust the time lag function:
1. Prepare the appliance for cooking and switch on (see Operating Your Steamer).
2. Toggle to the adjustment of the time lag function (TIMER).
To activate the time lag function: with STEAMER flashing on the display, press the set
key . The word TIMER flashes and 00:00 is displayed.
To switch back to the cooking time: with TIMER flashing on the display, press the set key
again. If you did not set up any cooking time, the appliance will use the default cooking time (20 minutes; 00:20).
3. Set up the desired delay time by pressing the keys h and min.
The maximum delay time is 12 hours 59 minutes (1:59).
If no further indication is given for ca. 5 seconds, the appliance starts the count-down of
the delay time automatically. After expiration of the delay time, the heating process and
count-down of the cooking time starts.
11
42510_Dampfgarer_Manual_engl_okt07.qxp
18.12.2007
10:09
Seite 12
Dry-out Protection
If you forgot to refill the water container in time or accidentally switch on the steamer
with an empty water container, the boil dry out protection switches off the heater automatically. In this case a continuous acoustic signal sounds, the heater indicator flashes
and the timer stops.
To reset the appliance:
1. Open the filling lid and slowly fill in water at least up to the minimum water level
mark ('min'). Always keep the water level between the minimum and maximum water
level mark during operation. Close the filling lid.
2. To reset the appliance and continue the count-down, press the set key .
Tip: The dry-out protection interrupts the cooking process and, therefore, the adjusted
cooking time could become unsuitable. Hence, you should check your food for the
desired doneness.
Dismounting the Basket Bottom
In the steamer baskets there are 4 clamps holding the basket bottom in place. You can
remove the basket bottoms of the steamer baskets II or III to build a larger steamer basket using the frame of two steamer baskets.
NOTE: Always use steamer basket I with bottom.
1.. Place the steamer basket (II or III) upside down on a stable surface.
2. Near one of the clamps, carefully push down the bottom without violation to loosen
the bottom.
To re-install the basket bottom simply insert the bottom in the correct orientation in the
frame of the steamer basket and push down the bottom until it seats in the clamps. Ensure
that the openings of the wells in the basket bottom face upwards.
Care and Cleaning
WARNING! Always unplug and let the appliance cool down before moving or cleaning it.
Do not place or immerse the steamer base or power cord in any liquids.
Do not place the steamer base or power cord in an automatic dishwasher or under a tap. Do not spill any liquids on it.
Because your food will not touch heated surfaces, the ingredients will not stick to the surfaces of the steamer and cleaning is quite easy. Discolouration of any plastic parts may
occur with some strongly coloured food but will not affect the cooking performance in
any way.
However, you should decalcify the water container regularly to avoid any loss of performance as well as avoid excessive energy loss. See Decalcifying the Water Container.
12
42510_Dampfgarer_Manual_engl_okt07.qxp
18.12.2007
10:09
Seite 13
CAUTION! Do not leave any food dry on the surfaces of the appliance. Do not use any
abrasive cleaners or cleaning pads to avoid damage especially of the plastic parts. To
soak dried food, just place the removable parts of the steamer in warm washing-up liquid for about ten minutes.
1. To switch off the appliance press the power button. The display and heater indicator
switch off. Unplug the appliance and leave it cool down to room temperature.
2. Wash the drip pan, steamer baskets, lid, rice pan and separator in warm soapy
water using a soft cloth or sponge.
Alternatively you may wash these removable parts in an automatic dishwasher.
3. Empty the water container:
Open the filling lid, grasp the steamer base by the handles on each side and pour away
the water through the filling lid. Close the filling lid.
4. Wipe the steamer base with a clean damp cloth. If necessary, damp the cloth with
soapy water first and then wipe with clear water. Make sure not to spill or drip any liquids on the exterior of the steamer base.
5. Dry the appliance and all parts of it. Possibly leave the parts of the appliance dry
naturally for some minutes.
Decalcifying the Water Container
Dependent on the local water hardness, lime collects on the heating element and in the
water container, decreasing the steamer performance and increasing energy loss.
Therefore we recommend to decalcify the water container regularly (after 7 – 10 operations).
WARNING! Do not aspirate the fumes of boiling decalcifier solution.
Make sure, the room is well ventilated. To decalcify, only insert the drip pan and keep
the drip pan in place, while the appliance is still hot.
1. If necessary, empty the water container. Then fill in a solution of 1/2 litre vinegar and
1/2 litre water.
2. Insert the drip pan.
3. Plug in the appliance and set up a cooking time of ca. 10 minutes (see Operating Your
Steamer).
WARNING! Hot fumes of acetic acid vent from the centre of the drip pan and the solution could spit. Keep your hands and face away from the unit during operation.
CAUTION! Immediately switch off and unplug the appliance if the decalcifier solution
overflows the steamer base.
4. Leave the decalcifier boiling for ca. 5 minutes, then switch off and unplug and let the
appliance cool down to room temperature.
13
42510_Dampfgarer_Manual_engl_okt07.qxp
18.12.2007
10:09
Seite 14
5. Empty the water container.
6. Thoroughly rinse the water container several times with clear water.
7. Rinse the drip pan under running water.
8. Dry drip pan and steamer base thoroughly.
Storage of the Steamer
Always clean the appliance before storing (see Care and Cleaning). Store the entire
appliance (including the operating instructions) on a clean and dry surface, where it is
safe from frost and inadmissible strain (mechanical or electric shock, heat, moisture,
direct sunlight) and where it is out of reach of young children.
Do not place any hard or heavy objects on the appliance or any parts of it.
CAUTION: Ensure the power cord will not become knotted, twisted or squeezed.
Place the drip pan in the water container and nest the steamer baskets in reverse
sequence (III at the bottom, I on top). Place the steamer baskets on the steamer base.
Place the rice pan and separator in steamer basket I and put the lid on it.
Place the appliance on an even, stable surface, where it may not tilt or fall and no other
objects could fall on it.
Notes for disposal
Dispose of the appliance must be effected in accordance with the corresponding local
regulations and requirements for electrical appliances. Please contact your local disposal company.
Warranty
We guarantee that all our products are free of defects at the time of purchase. Any
demonstrable manufacturing or material defects will be to the exclusion of any further claim
and within 2 years after purchasing the appliance free of charge repaired or substituted.
There is no Warranty claim of the purchaser if the damage or defect of the appliance is caused by inappropriate treatment, over loading or installation mistakes. The
Warranty claim expires if there is any technical interference of a third party without an
written agreement. The purchaser has to present the sales slip in assertion-of-claims and
has to bear all charges of costs and risk of the transport.
14
42510_Dampfgarer_Manual_engl_okt07.qxp
18.12.2007
10:09
Seite 15
Useful tips
The actual cooking time depends on several components: the sort of food, pre-treatment
(fresh, tinned or frozen), as well as the amount and consistency of the food. Big chunks of
food, waxy potatoes or brown rice for example need longer cooking times.
Wild rice and lentils have to soak in water for 30 minutes before cooking.
•
Nutrients and vitamins remain best if cutting the food shortly before consumption.
•
Keeping the food warm or warming it up damages the quality of the food.
•
When preparing different food place bigger chunks with longer cooking time into the
lowest steamer basket I (i.e. potatoes or carrots).
•
Place finer vegetables in the middle steamer basket II for example: cauliflower or
brokkoli.
•
Leafy vegetables need a short cooking time and should be placed into the top
steamer basket III.
•
Do not overload the steamer baskets. The steam needs to be able to rise through the
different steamer baskets all the way up.
•
Season to taste food after cooking.
•
When you plan to cook food with different cooking times you can start with the bottom
steamer basket I. Place food with long cooking times into the bottom steamer basket
and add the other levels later. Do not forget to close the lid and pay attention to the
cooking times shown on the display.
•
Use the provided separator when you steam two different foods in one steamer basket
and do not want the food to influence on the taste of each other.
•
Some taste and flavour of food gets carried forward by the steam and condensate. Pay
attention that the food you cook match in flavour.
•
There are 6 indents in the base of each steamer basket which can be used for placing
eggs. The cooking time of eggs depends on the amount of food cooked together with
the eggs, the steamer basket you use (I, II or III), the size and freshness of the eggs.
•
Place rice, peas, beans or ingredients alike in the rice pan for cooking. On the base
of each steamer basket you find matching cut-outs for the feet of the rice pan.
•
Cook fish or sausage in the bottom steamer basket. Run out liquids could otherwise
influence the taste of the other food.
•
You can use the juice of the drip pan for soups or sauces.
15
42510_Dampfgarer_Manual_engl_okt07.qxp
18.12.2007
10:09
Seite 16
Fresh vegetables
Vegetable
Preparation
Cooking time
in minutes
aubergine
2 cm thick slices
20 to 25
cauliflower,brokkoli
separated in floweret
20 to 30
fennel
cut big pieces of fennel once
20 to 25
capsicum
quartered
up to 20
greens beans
whole, without stems
15 to 20
carrots
whole, without stems
25 to 35
potatoes
small potatoes on the whole with peel,
30 to 50
big potatoes peeled and cut lengthwise
kohlrabi
1 to 2 cm thick slices
25 to 35
leek
cut in adequate size
20 to 25
corn cob,
on the whole
50 to 60
brussels sprouts
single floweret
30 to 40
zucchini
1 to 2 cm thick slices,
10 to 15
artichoke (medium size)
small zucchinis on the whole
Fruit
Using the steamer you can make beautiful compote or cook fruit for side dishes. You can
prevent fruit from turning brown by sprinkling with lemon juice before cooking. Cooking
pears develop the full flavour when sprinkled with vinegar.
When preparing fruit for compote you can use the juice of the drip pan for making sauce.
Fruit
apple
Preparation
Cooking time
in minutes
quartered, pitted,
15 to 20
sprinkled with lemon juice
pears
quartered, pitted
15 to 25
banana
peeled, whole fruit
approx. 15
plum
pitted
approx. 10
16
42510_Dampfgarer_Manual_engl_okt07.qxp
18.12.2007
10:09
Seite 17
Rice
Fill the needed amount of water straight into the rice pan. Use 350 ml water for 250g of
rice. Season to taste.
cooking time (parboiled rice):
30 to 45 minutes
Brown rice needs 5 minutes longer and/or should soak for 30 in water before cooking.
Do not forget to fill the watertank with water as well.
Eggs
Place eggs in the indents of the steamer basket. The less pointy side of the egg (air chamber
of the egg) has to face upwards. Use steamer basket I. Get a pin and make a small shallow
(just through the shell) hole at the less pointy end of each egg. This allows air to escape so
that the shell won't crack from the sudden heat and subsequent gas expansion.
cooking time (soft):
cooking time (hard):
approx. 15 minutes
20 to 25 minutes
Cooking time depends on size and freshness of eggs.
Sausage
The steamer is suited perfectly for cooking sausages (i.e. wiener). Use a fork to make small
shallows into the peel of the sausage to prevent sausages from dehiscing. Use steamer basket I.
cooking time:
10 to 15 minutes
The intense flavour of the sausage carries forward to other foods which is getting cooked
at the same time.
Fish and Seafood
Use steamer basket I for cooking fish and seafood. Fish will be especially digestible when steamed.
The taste and flavour of fish gets carried forward by the steam and condensate. Pay attention that
the food you cook together with the fish match in flavour with the fish. Sprinkle the fish with lemon
juice before cooking. Frozen fish needs (depending on the size) 5 to 10 minutes longer cooking time.
Tip: Use the juice of the drip pan for making sauce.
Fish,
seafood
Cooking time
time in minutes
coalfish, red fish, trout
20 to 25
tuna
30 to 35
prawn (depending on size)
10 to 15
oyster
10 to 15
mussel
15 to 25
calamari
20 to 30
17
42510_Dampfgarer_Manual_engl_okt07.qxp
18.12.2007
10:09
Seite 18
Recipes
Vegetable Mozzarella Casserole
For 4 to 6 persons
Ingredients
250 g carrots, trimmed
250 g medium size potatoes, trimmed and halved
250 g brokkoli, only the flowret
250 g cauliflower,only the flowret
250 g green beans, without stems
1 big zucchini
400 g Mozzarella cheese
1 teaspoon instant vegetable stock
1/2 teaspoon nutmeg, ground
1/2 teaspoon fresh pepper
150 g cream
1 point of a knife of mustard
Preparation
1. Place separator into steamer basket I and fill in the carrots and potatoes separated in
both sections.
2. Place beans in steamer basket II.
3. Place cauliflower and brokkoli in steamer basket III. Place the prepared steamer baskets
in the correct sequence on the drip pan: I first, II in the middle, III on top. The baskets
must fit without any gaps and may not move about or tilt. Put on the lid. Do not operate
the steamer without the lid. Otherwise the upper foods will not be cooked sufficiently.
4. Set up cooking time from 25 to 30 minutes.
5. After cooking cut carrots, potatoes and raw zucchini in 1 cm thick slices. Cut beans
in 5 cm long pieces and break floweret of brokkoli and cauliflower in bite-size.
6. Place vegetable in big casserole with lid.
7. Combine cream, pepper, nutmeg, mustard and instant vegetable stock in a bowl,
pour sauce over vegetables and cover with thin mozzarella slices.
8. Place casserole with lid in 180 °C hot oven and bake for 10 to 15 minutes.
9. Serve immediately.
18
42510_Dampfgarer_Manual_engl_okt07.qxp
18.12.2007
10:09
Seite 19
Recipes
Chicken breast with asparagus
For 4 persons
Ingredients
4 chicken breast filets
300 g rice
250 g fresh asparagus, peeled
1 small cup of sour cream
approx. 10 g butter
1 teaspoon lemon juice
1 tablespoon watercress, minced
1 small leek, fine diced
pinch of salt, pepper and mild curry
Preparation
1. Fill rice with 400ml salt water into rice pan and place rice pan into steamer basket I.
2. Place asparagus in steamer basket II.
3. Steam rice for 20 minutes.
4. In mean time season chicken breasts with curry and fry with butter in sauce pan.
Keep chicken warm afterwards.
5. After 20 minutes take lid of steamer basket 1 and place steamer basket II with the asparagus
on top of steamer basket I. Cover with lid again and steam for another 10 minutes.
6. Mix sour cream, leek, watercress and 1/2 cup of the juice of the drip pan and heat on
stove. Pay attention that it does not boil. Season to taste with salt, pepper and lemon juice.
7. Arrange chicken and asparagus on 4 plates. Place butter flakes on top of the asparagus
and serve with rice and sauce immediately.
Tip: Add safran to the rice to give the rice a nice golden colour.
19
42510_Dampfgarer_Manual_engl_okt07.qxp
18.12.2007
10:09
Seite 20
GASTROBACK GmbH
Gewerbestraße 20 • D-21279 Hollenstedt/Germany
http://www.gastroback.de • E-Mail: [email protected]