1
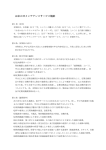
TRUST SOUND EXPERT DIGITAL SURROUND 5.1
1
Introduction
This instruction manual is for users of the ‘TRUST SOUND EXPERT DIGITAL
SURROUND 5.1’. The TRUST SOUND EXPERT DIGITAL SURROUND 5.1 is a
digital sound card for 5.1 loudspeakers. This card includes digital inputs and outputs,
which makes it ideal for reproducing sound from your DVD films. This instruction
manual gives an explanation of how to install the device and how to solve any
problems which may be encountered during the installation.
2
Safety
Carefully read the following instructions before use:
1.
Computer components may contain static electricity. You may receive an
electric shock if you touch the computer casing.
2.
Turn the computer off and remove the plug from the plug socket before
opening the computer.
3.
Make sure the components you wish to add are compatible with your
computer system.
4.
Always hold the sound card on the edges to prevent damage caused by
static electricity.
3
Installation
The drivers will be installed automatically after the sound card has been installed.
3.1
Connections
Follow the instructions below and refer to table 1 and figure 1.
Connection
Function
J1
Analogue CD/IN connection (Signal: L-G-R-G)
J2
Analogue CD/IN connection (Signal: R-G-G-L)
J3
AUX-IN connection (Signal: L-G-G-R )
J4
SPDIF connection (Signal: O-G-I-G)
CN1
OPTICAL SPDIF- I/O
Line-IN
LINE-IN – Input for the audio output of your stereo
Mic-IN
Microphone connection (Mono)
Front
speaker
Output for a loudspeaker set with amplifier, headphones or
audio input for your stereo
Rear
speaker
Output for the rear loudspeakers. 4-channel loudspeaker mode
is selected.
Center/Subwoofer
speaker
Output for centre and sub-woofer speaker. 5.1-channel
loudspeaker mode is selected.
SPDIF-OUT
Digital output connection for MiniDisc or AC3 amplifier.
GAME/MIDI
Connection for game controllers or devices with a MIDI interface.
Table 1: Sound card connections
1
UK
TRUST SOUND EXPERT DIGITAL SURROUND 5.1
3.2
Installing the sound card
1.
Close Windows and turn off the computer.
2.
Remove the power cable from the mains supply.
3.
Open the computer casing as described in the instruction manual provided
with your computer.
4.
Find a free PCI slot (white slot) which has enough space next to it for an
extra module.
5.
Remove both slot plates.
6.
Remove the sound card and the module from the anti-static packaging.
7.
Connect the module to the sound card.
8.
Insert the sound card into the PCI slot. Press the card firmly into the slot so
that it makes a good contact. Screw the sound card into place.
9.
Position the extra module next to the sound card. Screw this module into
place.
10.
Connect the cables (loudspeakers, microphone, etc.) to the Trust sound card
and connect the power cable to the computer and the wall socket.
11.
Close the computer casing.
12.
Turn the computer on and install the drivers and the applications for the Trust
sound card.
3.3
Installation in Windows 95 / 98
Note:
First remove the drivers for your old sound card.
Note:
If you have a sound card integrated into your motherboard, this must
be turned off. See the instruction manual for your computer/motherboard for
instructions.
Note:
1.
The latest drivers can be downloaded from the Trust website.
Start Windows.
2.
Windows will detect new hardware.
3.
Insert the CD-ROM containing the drivers into your CD-ROM drive. Click on
‘Next’ to continue.
4.
Select “Search for the best driver” and click on ‘Next’.
5.
Give the location as [D:\Win95] for Windows 95 and [D:\Win98] for Windows
98.
6.
Click on ‘Next’ to continue with the installation. Follow the on-screen
instructions.
7.
Restart your computer if requested to do so.
3.4
Installation in Windows ME
Note:
First remove the drivers for your old sound card.
Note:
If you have a sound card integrated into your motherboard, this must
be turned off. See the instruction manual for your computer/motherboard for
instructions.
Note:
1.
2
The latest drivers can be downloaded from the Trust website.
Start Windows.
TRUST SOUND EXPERT DIGITAL SURROUND 5.1
2.
Windows will detect new hardware.
3.
Insert the CD-ROM containing the drivers into your CD-ROM drive. Click on
‘Next’ to continue.
4.
Select “Search for the best driver” and click on ‘Next’.
5.
Give the location as [D:\Winme].
6.
Click on ‘Next’ to continue with the installation. Follow the on-screen
instructions.
7.
Restart your computer if requested to do so.
3.5
Installation in Windows 2000
1.
Start Windows 2000.
2.
Windows will detect new hardware.
3.
Insert the CD-ROM containing the drivers into your CD-ROM drive. Click on
‘Next’ to continue.
4.
Select “Search for a suitable driver…” and click on ‘Next’ to continue.
5.
Select “Specify a location” and click on ‘Next’ to continue.
6.
Give the location as [D:\Win2000] and click on ‘OK’.
7.
Click on 'Next' to install the driver. Follow the on-screen instructions.
3.6
Installation in Windows XP
UK
Note: The final release version of Windows XP was not available during the
development of this product. As a result, the installation procedure may be slightly
different.
1.
Start Widows XP and log in.
2.
Windows XP will detect new hardware.
3.
Insert the CD-ROM containing the drivers into your CD-ROM drive.
4.
Select “Install from a list or specific location (advanced)”. Click on ‘Next’ to
continue.
5.
Select “Search for the best driver in these locations”.
Only select the option “Include this location in the search”.
6.
Give the location as [D:\Winxp] and click on ‘Next’ to continue.
7.
A window displaying the message “Software has not passed Windows Logo
testing” will appear. Click on “Continue Anyway” to install the driver.
8.
Click on ‘Finish’ to complete the installation.
9.
The other components (game port and MPU 401) will be installed in the
background.
3
TRUST SOUND EXPERT DIGITAL SURROUND 5.1
4
Installing the software
The software for the Trust Sound Expert Digital Surround 5.1 should be installed for
optimal use of the sound card.
1.
Click on 'Start' and select 'Run'.
2.
Type [D:\SETUP.EXE] and click on ‘OK’.
3.
The Trust Software Installer will appear (see figure 2).
4.
The language for this program can be selected on the left-hand side. The
buttons on the right-hand side can be used to install the software, read the
comprehensive instruction manual or to register the product at the Trust
website.
4.1
Audio Rack
Audio Rack is a user-friendly interface which gives you control over the various PC
Audio functions.
1.
Click on ‘Audio Rack’.
2.
Follow the on-screen instructions to install the program.
3.
When the installation has been completed, you will be asked, “Do you want
to use Audio Rack CD Player as the default CD player?”.
4.
Click on “Yes” if you wish the Audio Rack CD player to be your default player.
Click on “No” to keep your current CD player as your default player.
4.2
Removing applications/drivers
1.
Click on ‘Start’.
2.
Select ‘Programs’.
3.
Select ‘PCI Audio Applications’.
4.
Click on “Uninstall device drivers and applications:”. Follow the on-screen
instructions to remove the applications and/or drivers.
4
TRUST SOUND EXPERT DIGITAL SURROUND 5.1
5
Using the software
UK
A number of applications will be installed whilst installing the driver.
5.1
Demo program – Multi Channel Audio Demo
Click on ‘Start’, ‘Programs’, ‘PCI Audio Applications’ and select ‘Multi-Channel Audio
Demo’ (figure 3 will appear).
This demo program can be used to listen to the sound card’s options. All of the
demos can be listened to separately. The connected speakers can be checked by
clicking on a speaker.
5.2
Audio Rack
Click on ‘Start’, ‘Programs’, ‘PCI Audio Applications’, ’Audio Rack’ and select ‘Audio
Rack’ (see figure 4).
A type of stereo unit will appear on the monitor. This can be used to play audio CD’s
in your CD-ROM drive, to play MIDI files with the MIDI player or to play WAV and
MP3 files with the WAV/MP3 player.
The volume can be controlled using the mixer.
Each component has its own help file that explains the functions.
Refer to the comprehensive English instruction manual included on the CD-ROM for
more information.
5.3
Hints
Below are a number of hints and tips for optimal use of the sound card.
Speaker settings
-
Start Mixer (from the taskbar of the menu).
-
Click on the ‘Advanced’ button.
-
Click on the ‘Speakers’ tab (see figure 5).
Select ‘Headphone’ if you wish to use headphones.
Select ‘2 speakers’ if you have a loudspeaker set with 2 speakers.
Select ‘4 speakers’ if you have a loudspeaker set with 4 speakers.
Select ‘5.1 speaker set’ if you have a 5.1 loudspeaker set.
-
Select ‘Headphone’ or ‘2 speakers’ if you wish to use the SPDIF output.
Sound reproduction for SPDIF in
-
Start Audio Rack.
-
Go to the ‘Settings’ for the WAV/MP3 player (see figure 6).
-
Select the option “Monitor SPDIF IN (Digital SPDIF IN signal pass to analog
LINE Out)”.
Digital recordings from digital sources (DVD, CD player)
-
Start Audio Rack.
-
Go to the ‘Settings’ for the WAV/MP3 player (see figure 6).
5
TRUST SOUND EXPERT DIGITAL SURROUND 5.1
-
6
Select the option “SPDIF IN loopback to SPDIF OUT (bypass)”.
Extra possibilities
This sound card allows you to connect various digital audio sources, such as highend stereos, DVD players, MiniDisc players, etc.
Audio CD’s
You can save your audio CD’s as WAV files. If your computer has a CD-Writer, you
can burn these files onto a CD. Examples of software which you can use to do this
are Nero or Adaptec CD-Creator.
The optical output also allows you to record onto MiniDiscs.
Note: The sound card’s digital output may be turned off or may no longer be
supported in newer versions of operating systems as a consequence of new
copyright restrictions.
MP3
A program such as MusicMatch (www.musicmatch.com) allows you to convert your
CD’s into MP3 files. You can play MP3 files using the WAV/MP3 player in Audio
Rack. You can also upload them onto your MP3 player or your mobile telephone (if
your mobile phone supports this – see the instruction manual provided with your
mobile telephone), or burn them onto a CD.
DVD
Connect your external DVD player via your sound card’s optical input. A 5.1 speaker
set will allow you to experience real cinema sound.
If you have a DVD player in your computer, you will also be able to use 5.1 Audio.
The program used to play DVD films must, however, support the 5.1 Audio function.
A number of DVD software suppliers support 5.1 Audio:
•
CoolDVD
•
PowerDVD (pro version)
www.cyberlink.com.tw
•
WinDVD
www.intervideo.com
www.cooldvdonline.com
Let op: This does not apply to trial versions, etc.
6
TRUST SOUND EXPERT DIGITAL SURROUND 5.1
7
Troubleshooting
UK
Problem
Cause
Possible solution
The sound card is
not detected
during installation.
The sound card has not been
inserted into the slot correctly.
Check whether the
sound card has been
inserted into the slot
correctly.
No noise.
The driver has not been installed or
has not been installed correctly.
Install the driver again.
The speakers have not been
connected.
Connect the speakers
as described in
chapter 3.
IRQ conflict.
Restart the computer.
If the IRQ conflict is
not solved, solve it in
the Device Manager.
SPDIF Out cannot
be turned on.
No sound when
playing an audio
CD.
No sound comes
from the digital
source.
The volume has not been turned
on.
Adjust the volume in
the mixer settings.
The wrong speaker output has
been selected.
Change the speaker
output to 2 speakers or
headphones.
New Windows version.
It is possible that the
digital output will not
work in newer versions
of Windows due to
copyright restrictions.
The audio cable has not been
connected.
Connect the audio
cable between the CDROM or DVD player
and the sound card.
The volume setting for Audio CD
has not been turned on.
Check the mixer
settings.
The incorrect source/device has
been selected.
Select the correct
source (WAV/MP3
player, setting, SPDIF
IN Device) (see figure
6).
Register your product at www.trust.com so that you are able to receive optimal
guarantee and service support, such as up-to-date FAQ’s and the latest drivers. You
will be automatically informed of developments to your product and other Trust
products. You will also have the chance of winning some spectacular prizes.
Use the link: www.trust.com/12667 for direct access to the product.
If you still have problems after trying these solutions, please contact one of the Trust
Customer Care Centers. You can find more information at the back of this instruction
manual. Please have the following information available:
•
The article number. This is 12667;
•
A good description of what does not work.
7
TRUST SOUND EXPERT DIGITAL SURROUND 5.1
•
8
A good description of when the problem occurs.