Download Severin AH 7909
Transcript
11
1
2
3
12
4
13
5
15
6
14
16
7
8
9
17
18
10
19
Rechargeable Vacuum
● Never use the appliance to pick up hot or
Cleaner
●
Dear Customer,
Before using the appliance, the user should
read the following instructions carefully.
Connection to the mains supply
Make sure that the supply voltage
corresponds with the voltage marked on the
rating label of the adapter. This product
complies with all binding CE labelling
directives.
●
●
Familiarisation
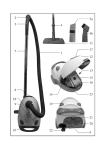
1. On/Off switch
2. Release button
3. Inner suction tube
4. Suction aperture
5. Dust container
6. Charging plug
7. Filter
8. Crevice tool
9. Crevice brush
10. Rubber nozzle
11. Charge indicator
12. Air outlet openings
13. Charging jack
14. Rating label (vacuum cleaner)
15. Battery compartment cover
16. Wall bracket
17. Adapter
18. Rating label (adapter)
19. Holder for crevice tool and rubber
nozzle
●
●
smouldering material, nor acid or
inflammable liquids.
This appliance is not intended for use by
any person (including children) with
reduced physical, sensory or mental
capabilities, or lacking experience and
knowledge, unless they have been given
supervision or instruction concerning the
use of the appliance by a person
responsible for their safety.
Children should be supervised to ensure
that they do not play with the appliance.
No responsibility will be accepted if
damage results from improper use, or if
these instructions are not complied with.
This appliance is only intended for
domestic use and not for commercial
applications.
In order to comply with safety
regulations and to avoid hazards, repairs
of electrical appliances must be carried
out by qualified personnel, including the
replacement of the power cord. If repairs
are needed, please send the appliance to
one of our customer service departments.
The address can be found in the
appendix to this manual.
Wall mounting
The wall bracket is designed for storing the
appliance and also serves as a charging unit.
Mount the wall bracket vertically, near a
wall socket, using the screws provided with
the appliance. The two lugs on the bracket
must face upwards.
When mounting the bracket, ensure that the
power cord leads through the opening on
the lower bracket rim, and that it is not
jammed at any point.
The crevice tool and the rubber nozzle can
be stored on the left side of the bracket.
Important safety instructions
● Do not operate the vacuum cleaner
without its filter.
● Before the appliance is used, the main
body as well as any attachments should
be checked thoroughly for any defects. If
the appliance, for instance, has been
dropped onto a hard surface, it must no
longer be used: even invisible damage
may have adverse effects on the
operational safety of the appliance.
Charging process
Before using the vacuum cleaner for the first
time, the battery must be charged for a
period of approximately 15 hours.
- Insert the adapter into a wall socket.
4
- Place the vacuum cleaner in the wall
bracket. The charging process begins
automatically and is shown by the charge
indicator.
- This appliance can remain on charge
indefinitely without damage or danger
and is therefore fully charged and ready
for use at all times.
- Whilst charging, the adapter will become
warm. This is perfectly normal and safe
and does not indicate a malfunction of
any kind.
- If the vacuum cleaner is not being used
for a long period of time, the capacity of
the battery may decrease by a certain
amount. However, full capacity will be
restored after several charge/discharge
cycles.
Cleaning
General
● Before cleaning the appliance, remove
the vacuum cleaner from the wall
bracket.
● To avoid the risk of electric shock, do not
clean the appliance nor the adapter with
water and do not immerse them in water.
- If necessary, the housing may be wiped
with a damp cloth. Wipe dry afterwards.
To empty the dust container
Reduced vacuuming power despite a fully
charged battery pack indicates that the dust
container and filter inlay must be emptied.
- Hold the vacuum cleaner with the dust
container facing downwards.
- Push the release button, open the dust
container in a downward and forward
direction, remove the filter and empty it.
- The filter can be cleaned by slightly
tapping it or by using a brush. The filter
can be separated from its holder by
simply pulling it out of its guide.
Should the filter be visibly dirty, it should
be thoroughly cleaned with soapy water;
make sure to let it dry completely
afterwards.
- The filter holder, dust container and
attachment tools may be cleaned the
same way.
Picking up liquid matter
Before picking up liquid matter, ensure that
the rubber nozzle is fully inserted in the
suction aperture.
Crevice tool
The crevice tool can be inserted into the
suction aperture to clean crevices, corners
and other areas difficult to reach.
Crevice brush
The crevice brush can be fitted to the crevice
tool and is suitable for cleaning uneven
surfaces such as computer keyboards etc.
Battery pack
● This appliance contains a nickelcadmium (Ni-Cd) rechargeable battery
pack, which may be removed for
replacement or disposal. When replacing
the battery pack, ensure that only an
original battery pack is used.
Operation
- Remove the vacuum cleaner from its
wall bracket.
- If required, fit any of the nozzle
attachments to the suction aperture.
- Switch on the appliance using the On/Off
switch.
● Always ensure that the dust container is
emptied in good time, before the dust or
liquid matter collected reaches the level
of the inner suction tube.
- Should you experience a decrease in
vacuuming power during operation,
switch off the appliance and recharge.
Ni-Cd
- The battery compartment is located on
5
the underside of the appliance. Open the
compartment by removing the screw in
the compartment cover. Detach the two
wires from their respective terminals by
slightly opening the fixing screws. If a
new battery pack is installed, insert the
wires into their respective terminals and
tighten the screws again. When
connecting the wires, ensure that the
colours match the colour-coding on the
terminals (red to red).
● Remember to protect the environment.
Never dispose of old battery packs in
domestic garbage.
Old battery packs must be disposed of
through the proper public collection
points. This also applies to the battery
packs of defective appliances.
Disposal
Do not dispose of old or defective
appliances in domestic garbage;
this should only be done through
public collection points.
Guarantee
This product is guaranteed against defects in
materials and workmanship for a period of
two years from the date of purchase. Under
this guarantee the manufacturer undertakes
to repair or replace any parts found to be
defective, providing the product is returned
to one of our authorised service centres. This
guarantee is only valid if the appliance has
been used in accordance with the
instructions, and provided that it has not
been modified, repaired or interfered with
by any unauthorised person, or damaged
through misuse.
This guarantee naturally does not cover
wear and tear, nor breakables such as glass
and ceramic items, bulbs etc. If the product
fails to operate and needs to be returned,
pack it carefully, enclosing your name and
address and the reason for return. If within
the guarantee period, please also provide the
guarantee card and proof of purchase.
6


