1
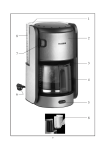
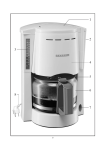
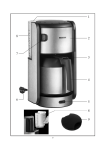
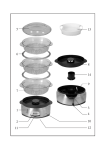
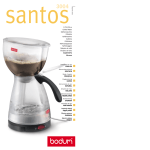
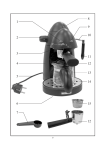
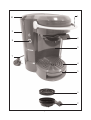
1
10
9
2
8
3
7
4
5
6
2
3
Pad coffee-maker
●
Dear Customer,
Before using the appliance, the user should
read the following instructions carefully.
Connection to the mains supply
The appliance should only be connected to
an earthed socket installed in accordance
with the regulations.
Make sure that the supply voltage
corresponds with the voltage marked on the
rating label of the appliance. This product
complies with all binding CE labelling
directives.
●
●
●
Familiarisation
1. Locking ring
2. removable coffee outlet
3. Housing
4. Drainer
5. Drip tray
6. Pad holder
7. Power cord with plug
8. Start button with indicator light
9. Water container
10. Water container lid
●
●
●
Important safety instructions
● Before the appliance is used, the main
body as well as any fitted attachments
should be checked thoroughly for any
defects. If the appliance, for instance,
has been dropped onto a hard surface, it
must no longer be used: even invisible
damage may have adverse effects on its
operational safety.
● The power cord should be regularly
examined for any signs of damage. In
the event of such damage being found,
the appliance must no longer be used.
● Fill the container with fresh, clean water
only. Do not, under any circumstances,
fill the container with milk, coffee or hot
water.
● As the appliance is pressurised, do not
●
●
●
●
9
attempt to open the locking ring while
the pump is still running, or while coffee
is still coming out. Once the brewing
cycle has finished, wait until the
indicator light stops flashing.
Caution: do not touch any hot parts of
the appliance after brewing. The coffee
outlet and the inserts, as well as the
coffee pad itself, are very hot. There is
therefore a danger of scalding.
To prevent damage to the heating
element, do not remove the water
container while brewing is in progress.
During operation, the coffee maker
should be placed on a level, non-slip
surface, impervious to splashes and
stains.
Always remove the plug from the wall
socket
- during periods of non-use,
- in case of any malfunction, and
- before cleaning.
When removing the plug from the wall
socket, never pull on the power cord;
always grip the plug itself.
For reasons of hygiene, coffee pads
should be removed immediately after
brewing; leave the locking ring in its
open position.
This appliance is not intended for use by
any person (including children) with
reduced physical, sensory or mental
capabilities, or lacking experience and
knowledge, unless they have been given
supervision or instruction concerning
the use of the appliance by a person
responsible for their safety.
Children should be supervised to ensure
that they do not play with the appliance.
No responsibility will be accepted if
damage results from improper use, or if
these instructions are not complied with.
This appliance is intended for domestic
use only and not for commercial
applications.
In order to comply with safety
regulations and to avoid hazards, repairs
of electrical appliances must be carried
out by qualified personnel, including the
replacement of the power cord. If
repairs are needed, please send the
appliance to one of our customer service
departments. The address can be found
in the appendix to this manual.
- Remove the lid.
- Fill to the maximum-level mark
(approx. 750ml) with clean, cold water
(use fresh water each day).
- Replace the lid.
- Replace the container in the appliance
and push it down to open the valve in
the bottom of the container.
Deposits of dirt and lime may cause the
seals in the outlet at the bottom of the
water container and the seals around the
valves to leak. Check the seals carefully
each time the water container is inserted
and, if necessary, carefully remove any
deposits.
After extended periods of non-use, we
recommend that you let the appliance run
through at least two brewing cycles without
a coffee pad inserted; this will help to flush
and clean out the system.
Before using the appliance for the first time
Before initial use, the appliance should be
thoroughly cleaned as described in the
section General care and cleaning. In
addition, let the appliance run through two
brewing cycles without a pad inserted.
Water container
Fill the water container as follows:
- Grip the recess on the water container
with your thumb on the container lid,
and lift the container out of the
appliance.
10
Indicator light
Flash sequence
Significance
Remedy
light permanently on
(=operation)
The appliance pre-heats and the
pump is active.
-
rapid flashing (=error)
The coffee outlet has not been
fitted.
Fit the coffee outlet.
The locking ring is not closed
properly.
Push the ring down to
ensure the unit is properly
closed.
The water level is below the
minimum-level mark.
Replenish.
The magnet in the water
container has become stuck.
Try to free the magnet by
gently
shaking
the
container.
The water container has not been
inserted correctly.
Remove and
correctly.
The system pre-heats before the
actual brewing cycle.
-
slow flashing
replace
The brewing cycle is coming to
an end, and the system indicates
a necessary waiting period during
which the pressure is reduced.
Warning: wait for the flashing to
stop before pushing the ring up.
double flashing
If the appliance is not used for a
period of around 5 minutes with
the locking ring in its down
position, the indicator light starts
flashing.
11
Push the ring up and
remove the pad. For
reasons of hygiene, leave
the ring in its open
position.
Pad holder
To prepare coffee, a pad must be placed
inside the pad holder. When positioning the
pad, take care to place it right in the centre
of the holder. This ensures that the pad’s
paper rim is not caught underneath the seal
when the lid is closed. If a pad is not equally
thick on all sides, the pad should be inserted
with the thicker part facing down. Do not
use any pads other than the round soft
coffee-pads commercially available.
Do not fill the pad holder with ground
coffee.
Fit the pad holder in the coffee outlet and
lock it by turning clockwise. To remove the
pad holder again, turn anti-clockwise.
Possible discolouring of the pad holder is
production-related, and is not in any way
detrimental to its quality or function.
- Fit the pad holder into the coffee outlet
and lock it by turning clockwise.
- Place the pad right in the centre of the
pad holder.
- Push the locking ring up.
- Slide the coffee outlet with the loaded
pad holder all the way into the
corresponding guide track on the
appliance.
- Push the locking ring down to close the
appliance properly.
- Place a cup of around 140 ml capacity
below the coffee outlet.
- Press the start button. The brewing
cycle starts and is indicated by the slowflashing light.
- Once pre-heating is complete, the coffee
is released straight into the cup. After
brewing, always wait until the
subsequent pressure-release phase
(indicated by the slow-flashing light) has
completely finished.
- Remove the cup from below the coffee
outlet.
- Push the locking ring up.
- Caution: the coffee outlet and the
inserts as well as the coffee pad are very
hot after brewing; to prevent burns,
only the handle of the coffee outlet must
be used when it is removed from the
appliance Remove and dispose of the
used pad.
● For reasons of hygiene, coffee pads
should be removed immediately after
each brewing cycle.
● The brewing cycle can be interrupted at
any time by pressing the start button
again.
Drip tray and drainer
Ensure that the drip tray and drainer are
correctly fitted before each use.
Drip tray
The drip tray can be removed by pulling it
out from the front. To replace the tray,
simply slide it back into place.
Drainer:
When inserting the drainer, ensure that
both the arresting hooks on the housing
properly engage in the two corresponding
openings on the rear part of the drainer.
Then push the drainer down so that the two
locating pins on the underside of the
drainer slide home into the corresponding
openings in the housing. When removing
the drainer, slightly lift up the front part
and pull it out from the appliance.
General care and cleaning
Coffee preparation
● Before cleaning the appliance, ensure it
- Fill the water container up to its
maximum-level mark with fresh, clean
water.
- Insert the plug into a suitable wall
outlet.
is disconnected from the power supply
and has cooled down completely.
● To avoid the risk of electric shock, do
not clean the appliance with water and
do not immerse it in water.
● Do not use abrasives or harsh cleaning
12
● Do not pour descalers down enamelled
solutions.
- The exterior housing may be wiped
clean with a damp cloth and a mild
detergent.
- Unlock the pad holder from the coffee
outlet by turning the pad holder anticlockwise, and take out the pad. The
coffee outlet and the water container
may be cleaned with hot soapy water.
Ensure that all parts are thoroughly
rinsed and dried afterwards.
- During use, ensure that the drip tray is
emptied in good time. The drip tray,
drainer and pad holder may be cleaned
with hot soapy water or in a dishwasher.
sinks.
Disposal
Do not dispose of old or defective
appliances in domestic garbage; this
should only be done through public
collection points.
Guarantee
This product is guaranteed against defects
in materials and workmanship for a period
of two years from the date of purchase.
Under this guarantee the manufacturer
undertakes to repair or replace any parts
found to be defective, providing the product
is returned to one of our authorised service
centres. This guarantee is only valid if the
appliance has been used in accordance with
the instructions, and provided that it has not
been modified, repaired or interfered with
by any unauthorised person, or damaged
through misuse.
This guarantee naturally does not cover
wear and tear, nor breakables such as glass
and ceramic items, bulbs etc. If the product
fails to operate and needs to be returned,
pack it carefully, enclosing your name and
address and the reason for return. If within
the guarantee period, please also provide
the guarantee card and proof of purchase.
Descaling
Depending on the water quality (the lime
content) in your area as well as frequency of
use, all household appliances using hot
water need descaling (i.e. the removal of
lime deposits) on a regular basis to ensure
proper functioning.
Any commercially available descaling agent
suitable for coffee makers may be used for
this purpose. Prepare around 750 ml of
descaling solution in accordance with the
manufacturer’s instructions. Do not use
vinegar.
- Fill the water container up to its
maximum-level mark with the descaling
solution.
- Place a suitable container, with a
minimum capacity of 750ml, below the
coffee outlet.
- As described in the section Coffee
preparation, but without the pad holder
and pad inserted, switch the appliance
on and let the descaling agent pass
through the system in successive cycles.
Allow 5 minutes between cycles for the
descaling agent to take effect.
- To flush out any residues of the agent
after descaling, let the appliance run
through at least one additional cycle
with fresh water as described in the
section Coffee preparation (but without
the pad holder or pad inserted).
13