1
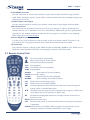
Picture similar
Digital Satellite Receiver with
Digital Recorder SRT 6365 PDR
User Manual
PART 1 • English
1.0 INTRODUCTION
1.1 Safety Instructions
1.2 Storage
1.3 Equipment Set-up
1.4 Features & Accessories
2.0 YOUR RECEIVER
2.1 Front Panel
2.2 Rear Panel
2.3 Remote Control Unit
3.0 CONNECTIONS
3.1 Connecting to TV & VCR
3.2 Connecting to Digital Audio Amplifier
3.3 Connecting to Satellite Dish
3.4 Connecting to computer via serial cable for downloading software
4.0 STARTING UP FOR THE FIRST TIME
4.1 Language Selection
4.2 Select connection type
4.3 Select Satellite
5.0 MAIN MENU
5.1 Channel Organiser
5.2 Installation
5.3 Timer
5.4 Games
5.5 Common Interface
6.0 RECORDER
6.1 Records Organiser
6.2 HDD Information
6.3 HDD Format
6.4 Recorder Settings
7.0 WATCHING TV AND LISTENING TO THE RADIO
7.1 Program Guide (EPG)
7.2 Zapping and information banners
7.3 Channel list
7.4 Selection of Audio Language
7.5 TELETEXT function
7.6 Subtitles function
8.0 RECORDING AND PLAYBACK
8.1 Start a record
8.2 Stop a record
8.3 TimeShift and Instant recoding
8.4 Playback
A.1 TROUBLESHOOTING
A.2 SPECIFICATIONS
A.3 TYPICAL INSTALLATIONS AND CONFIGURATIONS
2
2
2
3
3
5
5
5
6
7
7
8
8
9
9
9
9
10
11
11
12
17
18
18
19
19
20
20
21
21
21
21
22
22
22
22
22
22
23
23
24
26
26
28
1
English
TABLE OF CONTENTS
PART 1 • English
1.0 INTRODUCTION
1.1 Safety Instructions
DO NOT INSTALL YOUR RECEIVER:
n In a closed or poorly ventilated cabinet; directly on top of or under any another equipment; on
a surface which might obstruct the ventilation slots.
DO NOT EXPOSE THE RECEIVER OR ITS ACCESSORIES:
n To direct sunlight or near any other equipment that generates heat; to rain or intense moisture;
to intense vibration or to any shock which may cause permanent damage to your receiver or to
any magnetic objects, such as loudspeakers, transformers, etc.
n Do not use a damaged power cord. It may cause a fire or an electrical shock. Do not touch the
power cord with wet hands. It may cause an electric shock.
n Never open the cover. It is dangerous to touch the inside of the receiver due to high voltage,
currents and possible electrical hazards. Your warranty will be void if the receiver has been opened.
n When the receiver is not used for a long period of time, you should switch OFF the receiver
(Power Switch) and unplug the power cord from the wall socket.
n Do not use alcohol or ammonia based liquids to clean the receiver. If you wish, you may clean
your receiver with a soft lint-free cloth slightly made damp with a mild soap solution, only
after disconnecting from the main power supply. Make sure no foreign objects fall through the
ventilation slots because this could cause fire or an electric shock.
n Do not place any objects on top of the receiver because this might prevent proper cooling of
the components inside.
Safety Precautions
n Do not open the receiver cover, as you will be exposed to a shock hazard. It will also void your
warranty. Refer all maintenance or servicing to suitably qualified personnel
n When you are connecting the cables, be sure that the receiver is disconnected from the mains
supply voltage. Wait a few seconds after switching off the receiver before you move the receiver
or disconnect any equipment.
n It is a necessity that you only use an approved extension and compatible wiring that is suitable
for the electrical power consumption of the installed equipment. Please ensure that the
electrical power supply corresponds with the voltage on the electrical identification plate at the
back of the receiver.
If the receiver does not operate normally even after strictly following the instructions in this user manual,
it is recommended to consult your dealer.
1.2 Storage
Your receiver and its accessories are stored and delivered in a packaging designed to protect against
electric shocks and moisture. When unpacking it, make sure that all the parts are included and keep the
packaging away from children. When transporting the receiver from one place to another or if you are
returning it under warranty make sure to repack the receiver in its original packaging with its accessories.
Failing to comply with such packaging procedures could void your warranty.
2
PART 1 • English
We recommend you consult a professional installer to set up your equipment. Otherwise, please follow
the instructions below:
n Refer to the user manual of your TV and your antenna.
n Make sure that the SCART cable and outdoor components are in a good condition and the
SCART connections are well shielded
This manual provides complete instructions for installing and using this receiver. The following symbols
will serve as follow.
WARNING:
Indicates warning information.
TIPS
MENU
Move to
Indicates any other additional important or helpful information.
Represents a button on the remote control or the receiver (Bold Character)
Represents a menu item within a window. (Italic Character)
1.4 Features & Accessories
For all digital Free-To-Air TV and Radio programmes via satellite
Recording without external video recorder – integrated 160 GB hard disk for up to 120 hours
(approx. 80 films)
n 2 Common Interface slots compatible to most common Conditional Access Modules
(Cryptoworks, Viaccess, Conax, etc.)
n Twin Tuner Technology: Watch one TV programme, keep an eye on another channel (with PIP
function), record up to three TV programmes at the same time!
n PIP (Picture In Picture) function supported
n Time shift and Instant recording supported
n USB port* – play video and music from your USB stick, digital camera or camcorder, record
and playback TV programmes to USB stick or external hard disk
n 4 000 channel memory capacity for 64 satellites
n 4 Favourite lists for TV and Radio
n Fast channel zapping: sorting by first letter of channel name
n VFD Display showing channel number and name or current time
n Audio and Video in DVD quality and Dolby Digital
n Mosaic – 4 or 9 TV channels in overview
n Zoom functions for TV pictures
n 8 Timers for recording with 3 modes (daily, weekly, once)
n Electronic TV Programme Guide for present/following event information and up to 7 days for
on screen programme information
n Teletext via VBI & OSD
n Multi-lingual subtitling and audio track support**
n Multi-lingual support on screen menu (OSD)
n Set-up support for first time installation and user-friendly menu
n Digital sound through coaxial output (S/PDIF)
n Integrated RF Modulator
n
n
3
English
1.3 Equipment Set-up
PART 1 • English
Parental lock function for menu and selectable per channel
Edit functions for TV or Radio programme name and satellite name
n Future-proof: Software update via satellite (OTA)
n Signal bars for satellite and digital transponders
n Automatic, network and manual channel scan options
n Power on with last viewed or preferred channel
n 3 Games (Boxman, Tetris, Snake)
n User-friendly remote control with coloured function buttons
n Separate power switch
n Supports DiSEqC 1.0, DiSEqC 1.2 and GOTO X
n Connections: 2 x SAT IN, 2 x SAT OUT, ANT IN, TO TV, 1 Scart TV (RGB/CVBS), 1 Scart VCR
(CVBS), 3 RCA (Audio L & R, Video), S/PDIF, Serial Port RS-232, USB, power switch
* Compatible to the most popular USB-Storage devices
** Availability dependant on broadcaster
Accessories:
n User Manual
n 1 Remote control unit
n 1 short Coax cable for loop-through
n 2x Batteries (AAA type)
Note: The batteries should not be recharged, disassembled, electrically short-circuited or be
mixed or used with other types of batteries.
n
n
4
PART 1 • English
2.0 YOUR RECEIVER
Figure 1
Power On/Standby button
Increase/decrease volume level
Channel Up/Down buttons
Displays Main menu
Confirm selection
Start record of current channel
RED light indicates that the receiver is in STAND-BY mode.
GREEN light indicates that the receiver is in AWAKE mode.
8. 4 digits display
In STAND-BY mode current time is indicated.
In AWAKE mode is current channel number or current time
(as selected in system set-up) indicated.
9. VFD display
In AWAKE mode is the current channel name displayed.
10. Common interface slots*
Insert your common interface modules to this slot in order to
have access to appropriate encrypted channels.
11. USB connector*
Use this connector to connect USB media storage device to
your receiver.
* Compatible to the most popular USB-Storage devices
1. STANDBY
2. VOL-/VOL+
3. CH -/CH+
4. MENU
5. OK
6. REC
7. MODE INDICATOR
2.2 Rear Panel
Figure 2
1. SAT IN (Tuner 1 & 2)
To connect the coaxial cable from your LNB on the satellite dish or one of the SAT OUT
connectors to this connector.
2. SAT OUT (Tuner 1 & 2)
To connect SAT IN from other Tuner with loop cable.
NOTE:
connection of SAT IN and SAT OUT depends from antenna installation and
described in details in part 3.3 of this manual.
3. ANT IN
To connect your aerial antenna or cable TV using coaxial cable.
4. TO TV
If you do not use a SCART cable to connect your receiver to your TV, or if you have connected
a cable to the ANT input, you will have to use this connector to connect the receiver to your TV
by using a coaxial cable. You have to setup channel and system of modulation as described in
part 5.2.5
5. TV SCART Connector
Use this connector to connect your receiver with your TV set using a SCART cable.
5
English
2.1 Front Panel
PART 1 • English
6. VCR SCART Connector
Use this connector to connect your receiver to your video or DVD recorder using a SCART
cable. Video and Audio signals of your video or DVD recorder will now be looped through your
receiver to your TV set.
7. S/PDIF Digital audio output
Use this optical output to connect your receiver to the input of your digital audio amplifier.
8. RS-232 Serial Port
This serial port can be used to connect your PC to your receiver in order to download new
software versions to it. Therefore use a cross cable RS232. Additionally you can up/download
channel lists. An update and channel edit tool for this purpose is available on our webpage.
More information on www.strong.tv
9. Power ON/OFF Switch
In order to use your receiver you have to switch on the main power switch. If you don’t use
your receiver for a long period of time than switch of the receiver with this switch.
10. Power Cord
Your receiver requires a voltage of 90 - 240 V AC (Auto-selectable), 50/60Hz ±5%. Make sure to
check the power specification before connecting your receiver to the wall outlet.
2.3 Remote Control Unit
Turns the receiver On/Standby.
Mutes audio output of the receiver.
REW Fast rewind of current playback
PLAY Start playback
FWD Fast forward of current playback
STOP Stop playback
R-SLOW
Slow rewind of current playback
PAUSE Pause Video output.
L-SLOW
Slow forward of current playback
RECORD
Start recording of current broadcast
FAV Shows the list of favourite groups.
SAT
Shows the list of installed satellites.
tu Increases/decreases the volume level in No-menu state. Change the
setting values in specific Menu item.
pq Change the current program to the next/previous program in NO-menu
state. Moves the cursor up/down in Menu state.
OK
Activates the highlighted menu item. Displays current channel list in
No-menu state.
MENU Shows the main menu
EXIT Exits from the menu or sub-menu and cancels the progressing function
if applicable.
AUDIO Shows the list of available audio languages for the channel you are
watching. Selection of audio mode Stereo, Left or Right.
6
TEXT
SUB
RECALL
TV/RADIO
INFO
VOL +/PAGE +/0~9
PDR
EPG
Shows Teletext page, if available. If more then one Teletext language available then shows
the list of Teletext languages the current channel supports.
Show the list of subtitled languages the current channel supports.
Switches back to previous channel.
Switch between TV and RADIO mode.
Shows information of the current channel or playback
Use to increase or decrease the receiver volume level.
Change the current program to the previous/next program in NO-menu state. In menu
state changes to next/previous page in the lists.
Controls the numerical operation and especially changes program directly.
Open records organizer
View the program guide in No-menu state.
Change position of PIP / Repeat function
Cut selected part of record into new record
Set bookmark at current playback position
Jump to bookmark
Display Picture in Picture (PIP)
Display PIP channel list
Exchange PIP and main picture
Zoom in 200% or 300%
3.0 CONNECTIONS
3.1 Connecting to TV & VCR
Basic connection with a SCART cable (Fig. 3)
1. Connect the satellite signal from the LNB to the SAT IN connector.
2. Connect the TV SCART connector at the back of the receiver to the SCART IN connector on
your TV set
Advanced connection of the receiver to the TV set and VCR/ DVD- Recorder (Fig. 4)
1. Connect the satellite signal from the LNB to the SAT IN connector.
2. Connect the TV SCART connector at the back of the receiver to the SCART-IN connector on
your TV set.
7
English
PART 1 • English
PART 1 • English
3. Connect the VCR SCART connector of the receiver to the SCART-IN connector on your video or
DVD- Recorder
Optional:
Connect a terrestrial antenna with an UHF coaxial lead or antenna cable to the ANT IN connector
at the back of the receiver.
n Connect a coaxial cable to the TO TV connector at the back of the receiver. Connect the other end
of this coaxial cable to the ANT IN connector of your VCR.
n Connect the TV OUT connector of your VCR to the ANT IN connector of your TV set with a
coaxial cable.
n
3.2 Connecting to Digital Audio Amplifier
Connect S/PDIF connector at the back of your receiver to appropriated input of your digital audio set (Fig. 5).
3.3 Connecting to Satellite Dish
It is important to decide which type of connection between receiver and LNB will be used.
The simplest connection type is LOOP THROUGH. It will require single coaxial cable between LNB and
receiver, but limit functionality of your receiver in term of simultaneously watching and recording. You will
be allowed to watch and record simultaneously channels from single frequency only.
Connection type TUNER 1 & 2 is more advanced. It will require installation of TWIN LNB and two cables
between LNB and receiver. This connection type will allow you to watch and record simultaneously
channels from different frequencies.
Connection type SEPARATED recommended to use if you have installed antennas for more than one
satellite. This connection type will allow you to watch channel from one satellite and simultaneously
record channel from another satellite. With this connection type you can use different antenna
connections: for example have fixed dish with single LNB connected to SAT IN of TUNER 1 and
motorised dish with single LNB connected to SAT IN of TUNER 2.
Connecting a fixed satellite dish with single LNB to your receiver (Fig. 6)
Make your choice of which satellite you want to receive your signals from, and have your dealer aim your dish at
the requested satellite. Connect a coaxial cable to your LNB and the other end directly to the SAT IN of TUNER
1 connector of your receiver. Connect one end of LOOP cable to the SAT OUT of TUNER 1 and another end of
LOOP cable to the SAT IN of TUNER 2. This connection type is called LOOP THROUGH.
Connecting a fixed satellite dish with twin LNB to your receiver (Fig. 7 )
Make your choice of which satellite you want to receive your signals from, and have your dealer aim your
dish at the requested satellite. Connect one end of coaxial cables to the outputs of your LNB and the
other ends directly to the SAT IN of TUNER 1 and SAT IN of TUNER 2.
This connection type is called TUNER 1&2.
Connecting multiple fixed dishes to your receiver using a DiSEqC 1.0 switch (Fig. 8)
If you want to watch programs from more than one satellite (For example from ASTRA and from HOT
BIRD) it is advisable to use fixed dishes and a DiSEqC 1.0 switch. Have your Dealer aim the dishes at the
8
requested satellites and connect the LNB’s with coaxial cables to the input connectors of the DiSEqC 1.0
switch. Connect the output connector of the DiSEqC 1.0 switch to the SAT IN of TUNER 1 connector at
the back of your receiver. Connect one end of LOOP cable to the SAT OUT of TUNER 1 and another end of
LOOP cable to the SAT IN of TUNER 2. Use connection type LOOP THROUGH.
NOTE: You can make duplicated installation of 2 or more satellites. Use for this purpose TWIN LNB on
the dishes and setup connection type TUNER 1&2. (Connection diagram shown on Fig. 9)
Connecting a dish on a motorized positioner to your receiver (Fig. 9)
Another possibility for watching programs from multiple satellites is by mounting a dish to a motorized
DiSEqC 1.2 Positioner. Have your dealer mount the dish to the Positioner, set the correct angle of the
elevation and let him set the centre point for your Positioner. Connect the LNB with a coaxial cable to the
LNB input connector of the Positioner, and connect the output of the Positioner to the SAT IN connector
of TUNER 1 at the back of your receiver. Connect one end of LOOP cable to the SAT OUT of TUNER 1
and the other end of LOOP cable to the SAT IN of TUNER 2. Use connection type LOOP THROUGH.
3.4 Connecting to computer via serial cable for downloading software
Connect the RS232 connector on the back of your receiver to the Serial port of your computer using a
serial cable (Fig. 10). Instructions how to download software can be found on our website
www.strong.tv (support > download). There you can find as well a nice channel edit tool for preparing
your own Favourite- and Channel lists. However, this receiver can download new system software
automatically by satellite.
4.0 STARTING UP FOR THE FIRST TIME
Ensure that your satellite receiver is correctly connected to your TV and Satellite dish. Make sure your satellite
signal has the best possible quality. If you are not sure about this then ask your local STRONG dealer to check your
installation or satellite signal. Confirm that the power plug of receiver is plugged into the wall outlet. Turn on the
receiver. The Installation Wizard will appear on screen when you power on the receiver for the first time.
It is recommended that you do first time installation by following the Installation Wizard step by step. It will help you
easily achieve system configuration and channel installation. . Advanced users can skip the wizard by pressing the
MENU button and set-up channels using the Installation menu.
4.1 Language Selection
Use pq buttons to select your preferred language and press OK to confirm. The SET-UP WIZARD menu
will appear. It describes functional buttons that should be used during installation. Once you’ve read the
information press OK to continue.
4.2 Select connection type
Use the tu buttons to select your connection type. Make sure to select connection type according to the
antenna installation. Please notice the help text on the screen.
9
English
PART 1 • English
PART 1 • English
4.3 Select Satellite
The Installation Wizard is preconfigured for easy installation of Astra 1 (19.2E) or Hotbird (13E). For
these satellites LNB configuration is predefined as Universal LNB connected to the receiver via DiSEqC
1.0 switch input 1. If your dish is aimed to Astra 1 (19.2E) or Hotbird (13E) then select corresponding
satellite from the list (future steps of installation are described in 4.3.1). If your dish is aimed to another
satellite or you have a multiple dish installation then select Other (future steps of installation are
described in 4.3.2).
4.3.1 After selection of ASTRA 1C, 1E (19E) or HOT BIRD (13E) menu WIZARD-ANTENNA ADJUSTMENT will
appear. Adjust your dish position in small steps until the signal strength and quality bars turn yellow or
better green.
Try to reach the maximum possible strength and quality level. Once you are sure the signal cannot be
improved, fix the dish on this position and press OK on your remote control to start the channel search.
After finished search, the first found channel will be displayed on screen. If you select “Deutsch” or
“Deutsch / Austria” together with ASTRA or HOT BIRD you will see first programmed channel.
4.3.2 If you select Other satellite then menu Channel set-up will be displayed on screen. Using pq
buttons select the Satellite item and press OK to display list of satellites. Use pq buttons to select
satellite of your choice and press OK. Using pq buttons select Dish number item and using tu
buttons select dish number. Press OK to setup dish parameters.
In Dish setup menu configure settings of the LNB, DiSEqC switch and Antenna mode. Please refer to
chapter “5.2.2 Dish set-up” for detailed information.
If you use a fixed dish, then press the RED (Auto Scan) button on your remote to start channel search. Once
the channel search process is finished the receiver will switch to the first found TV channel.
If you use dish mounted on DiSEqC 1.2 or GOTO X Positioner then select Dish position item and press OK.
If you use DiSEqC 1.2 Positioner then Positioner Set-up menu will be displayed. Please refer to Setup dish
position description in chapter 5.2.1.1
If you use GOTO X Positioner then GOTO X setup menu will be displayed. Please refer to GOTO X setup
description in chapter 5.2.4
After setting up dish position press RED (Autoscan) button on your remote control to start channel search. Once
the channel search process is finished the receiver will switch to the first found TV channel.
All other functions of the receiver can be controlled across the Main menu.
10
PART 1 • English
5.0 MAIN MENU
English
All the important settings and features of your receiver can be operated
through Main Menu. It consists of following sub-menus: “Channel Organiser”,
“Installation”, “Timer”, “Games”, “Common Interface” and “Recorder”.
If in TV mode, press the MENU button to open the main menu.
5.1 Channel Organiser
In MAIN MENU screen, press pq to select Channel Organiser, and then press OK or u to enter the
Channel Organiser menu, which consists of the following sub-menus “Sort Channels”, “Add to Favourites”
and “Edit Channels”.
5.1.1 Sort Channels
In this menu, you can sort channels by a specific order or move channels to particular position.
Note: Channels are sorted in the selected channel list only. Sorting of the channels in one list do not change
order of the channels in another list. I.e. sorting of the channels in list “All satellites” would not
change order of the channels in list of particular satellite and vice versa.
Sort (Red button)
Press RED button to select one of available sort options.
“Alphabet A-Z”
channels will be sorted in alphabet order.
“Frequency Low-High”
channels will be sorted from lowest to highest frequency.
“First FTA"
All Free-To-Air channels will be first placed in the list, Scrambled at the end.
“First scrambled”
All Scrambled channels will be first placed in the list, Free-To-Air at the end.
If you want to store the new order of channels press Yellow (Save) or Blue (Save & Exit) button. If you do
not want to store result of sorting press EXIT button. Message “Do you want to save data?” will appear
on screen. Press Exit to discard changes or OK to save new order.
Move (Green button)
Press the Green (Move) button to sort channels manually. Use tupq buttons to select the channel
which you want to move. You can also enter channel number by using the Numeric buttons on your remote
control. Press the OK button to confirm channel selection. Now, you can select the new position of the
channel using tupq buttons or enter position number using Numeric buttons. Press OK button to
confirm new position of the channel. Repeat these steps for all channels that you want to move.
To save new order of the channels press YELLOW (Save) or BLUE (Save&Exit) button.
5.1.2 Add to Favourites
Enter to this menu in order to prepare lists of your favourite channels.
Use pq buttons to select channels of your choice.
Use tu buttons to select favourite group where to add selected channel.
Press OK button to mark/unmark channel to selected favourite group. To rename Favourite group press
RED button, select group that you wish to rename and press OK. On screen will appear keyboard. To delete
current name of the group select Backspace (t) symbol and press OK. To enter new name use tupq
and OK buttons. Press RED button to save new name or press GREEN button to discard changes.
11
PART 1 • English
5.1.3 Edit Channels
In this menu you can edit channel name, lock and delete channels.
Edit
Press RED button to edit name of the channel. On screen will appear keyboard. To delete current name select
Backspace (t) symbol and press OK. To enter new name use tupq and OK buttons. Press RED button to
save new name or press GREEN button to discard changes.
Channel name will be changed in all channel lists.
Lock
Lock function can be used in order to block access to some channels. Press GREEN button to lock/
unlock channel of your choice. Locked channel will be marked by “Lock” symbol. In order to watch locked
channel you will need to enter PIN code. (Default PIN: 0000)
Channel will be locked in all channel lists.
Delete
Pressing Yellow button will mark selected channel to delete. To unmark channel select it and press Yellow
button again. Channel(s) will be deleted after you press Blue button. Be aware: after pressing Blue button
channel(s) will be deleted from all channel lists. To cancel delete operation you can press Exit button.
Message “Do you want to save data?” will appear on screen. Press Exit to cancel data save or OK to
confirm data save. Press EXIT to discard changes or OK to confirm.
5.2 Installation
The Installation menu contains following sub-menus:
“Channel set-up”
Setup channels from selected satellite(s)
“Dish Set-up”
Setup configuration of your dish(es),
“Edit satellites”
Edit predefined satellites, their transponders or add new satellite(s),
“GOTO X setup”
Setup your location in order to use GOTO X function of Positioner
“System setup”
Configure system settings- more in chapter 5.2.5
“Parental lock”
Define new PIN code or lock access for the menu
5.2.1 Channel set-up
From this menu you can setup channels from satellite(s) in several modes, access to Dish setup menu,
Positioner setup (if used).
Satellite:
Move focus of the menu to this item. Press OK to display list of available satellites.
Select satellite of your choice and press OK. If satellite doesn’t exist in the list you
should add it first using “Edit satellites” menu.
Dish number:
Move focus of the menu to this item. Use tu buttons to select dish number to which
above selected satellite belongs to. Press OK button to enter to Dish setup menu (see 5.2.2).
Dish number “--” means that selected satellite do not belongs to any dish.
12
PART 1 • English
This item value depends from the mode of the Dish.
If mode of selected dish is “Fixed” then this item is not selectable
If mode of selected dish is “DiSEqC 1.2” then value can be “Not stored” (in case
dish position for selected satellite was not stored”) or in range from 1 to 64 if
position has been stored. Select item and press OK to setup Positioner. For more
information about Positioner setup see chapter 5.2.1.1.
If mode of selected dish is “GOTO X” then value is “GOTO X”. Select item and
press OK to setup
GOTO X function: more details read in chapter 5.2.4.
Transponder:
Move focus of the menu to this item and press OK. List of transponders of
selected satellite will appear at right side of the screen. You can select transponder
in order to check signal strength and quality of reception. Transponder list contains
predefined transponders. If you need to modify transponder list please use
menu “Edit satellites” as described in chapter 5.2.3. If you need to scan specific
transponder then use Manual scan as described in this chapter below.
Network search: If this item is set to “OFF” then the receiver will search for the channels that are
available in the preset transponder list of the selected satellite. If this item is set
to “ON” then the receiver will search for additional information about available
transponders from the satellite. This option is useful to get new channels from
transponders which were added to the satellite later.
NOTE: ASTRA and HOT BIRD (partially) provide a NIT (network information table), but this
service is not available at every satellite.
Search for:
You can select type of the channels that will be installed to your receiver.
If “All channels” is selected, then the receiver will install Free-To-Air and Scrambled channels.
If “Scrambled” is selected, then the receiver will install only Scrambled channels.
If “FTA” is selected, then the receiver will install only Free-To-Air channels.
Once you’ve completed all settings you can start the channel search process.
Press the RED button to setup channels from all transponders of the satellite;
Press the GREEN button to setup channels from the selected transponder;
Press the YELLOW button to enter the “Manual channel search” menu to search manually for
channels on a specific transponder or to setup a single channel with known Video and Audio PIDs.
Manual setup of channels
In Manual channel search menu you can setup all channels from specific transponder or single channel.
To setup all channels from specific transponder:
Satellite:
Indicates name of the satellite where channels will be searched
Frequency:
Use Numeric buttons to enter the frequency of a transponder
Polarisation control:
Use tu buttons to select polarisation of transponder
Symbol rate:
Use Numeric buttons to enter symbol rate value
Network search:
Use tu buttons to select ON or OFF
Search for:
Use tu buttons to select type of channels to be installed
Press RED (Search) button to start channel search.
13
English
Dish position:
PART 1 • English
To setup single channel:
Press GREEN (PID) button on the remote control.
Satellite:
Indicate name of the satellite where channels will be searched
Frequency:
Use Numeric buttons to enter frequency of transponder
Polarisation control:
Use tu buttons to select polarisation of transponder
Symbol rate:
Use Numeric buttons to enter symbol rate value
Video PID:
Use Numeric buttons to enter value of Video PID in decimal
Audio PID:
Use Numeric buttons to enter value of Audio PID in decimal
PCR PID:
Use Numeric buttons to enter value of PCR PID in decimal
Press RED (Search) button to start channel search.
NOTE: At www.lyngsat.com, for example you can find detailed channel data.
5.2.1.1 Positioner setup
If in Dish setup menu you have configured Dish mode as “DiSEqC 1.2” then you have to setup
position of the dish to each satellite that you want to install.
In Channel setup menu move menu focus to Dish position item and press OK button on remote
control. The menu Positioner setup will appear on screen.
Satellite:
Displays the satellite name.
Transponder:
Use tu buttons to select reference transponder, receivable in your
location, to see the current signal parameters.
Movement speed:
Use tu buttons to select between Slow and Fast. Slow speed allows you
to fine adjust position of the dish. Fast speed can be used to adjust dish
position roughly.
Move:
Use tu buttons to move dish to the East/West direction
Centre position:
If you press OK button while menu focus is on this item then dish will be
turned to centre position, which corresponds to true South direction.
Limits:
Use tu buttons to Enable or Disable software limits of your positioner.
Set limit:
Use tu buttons to select East or West limit of dish movement range.
Step by step recommendations of position setup.
1. Select reference transponder in order to check signal strength and quality during position setup.
2. If you do not know current direction of your dish then move menu focus to Centre
position item and press OK. Dish will be turned to true South. Knowing your location
longitude you may understand direction where necessary to move dish in order to reach
position of selected satellite. For example: your longitude is 5° East and you want to
setup dish position for ASTRA 1C, 1E (19° East). Then, from centre position, you need to
move dish to East direction by pressing to t button. If your longitude is 25° East then, in
order to setup dish position for ASTRA 1C, 1E (19° East), you need to move dish in West
direction (from centre position) by pressing to u button.
3. To setup roughly position of the dish set Movement speed to Fast. Then move menu focus
to Move item of the menu and by short presses to t or u buttons move dish to necessary
direction. Check signal strength and quality indicators. Once levels start increasing - set
Movement speed to Slow and keep adjusting dish position until get best possible values.
14
PART 1 • English
5.2.2 Dish set-up
In this menu you can setup parameters of your dish(es).
Dish number:
Use tu buttons to select number of the dish. This number used in Channel
setup menu to create a link between satellite and corresponded dish
configuration.
Connection type:
Use tu buttons to select connection type. It is advisable to not change this
value in case you have installed channels. Before change the value please
careful read chapter 3.3 of this manual.
Tuner:
This option is available to select in case if Connection type is “Separated”. Use
tu buttons to select tuner number which corresponds to the selected dish
number.
LNB type:
Use tu buttons to select type of LNB. If you set type to “CUSTOM” then you should
enter values of Local Oscillator Frequencies in LO frequencies menu item.
LO frequencies:
This menu item selectable only in case LNB type is “CUSTOM”. Press OK button
and using Numeric buttons enter values in appeared dialog box.
Band control:
Use tu buttons to select value. Set to Auto in order receiver automatically select
band by sending 22 kHz control signal. Set to ON in order receiver generate 22
kHz control signal continuously, or set to OFF in order to disable 22 kHz control
signal.
Polarisation control:
Use tu buttons to select value. Set to Auto in order receiver automatically control
polarisation. Set to 13V or 18V in order receiver supply LNB with selected power, or
set to OFF in order to disable LNB power.
Switch type:
If you use DiSEqC switch the select appropriated type.
Switch input:
Select input number to which the LNB is connected.
Dish mode:
Use tu buttons to select mode between Fixed, DiSEqC 1.2 and GOTO X.
5.2.3 Edit satellites
In this menu you can edit satellite’s name, angle, location and transponder, as well as add new satellite.
Press RED button to edit satellite’s properties.
Press GREEN to add new satellite.
Edit existing satellite and add new satellite functions are identical.
Name:
Press OK button to edit name of the satellite. On screen will appear keyboard.
To delete current name select Backspace (t) symbol and press OK. To enter
new name use pqtu and OK buttons. Press RED button to save new name
or press GREEN button to discard changes.
Angle:
Use Numeric buttons to enter value of orbital position of the satellite.
Location:
Use tu buttons to select East or West location of the satellite.
Transponder table:
Press OK button to enter to edit transponder table menu. In this menu use RED
button to edit parameters of selected transponder, GREEN button to add new
transponder or YELLOW to delete selected transponder.
15
English
4. Once you are sure that dish is fine adjusted press YELLOW (Store) or BLUE (Store&Exit)
button. Dish position for selected satellite will be stored.
PART 1 • English
To save changes press the YELLOW (Save) or BLUE (Save & Exit) button.
5.2.4 GOTO X set-up
In this menu you should set your geographical location, if your use positioner and it supports GOTO X.
Use pq buttons to navigate in the menu.
Use Numeric buttons to enter values. Use tu buttons to select an option.
To save changes you have made press YELLOW (Save) or BLUE (Save&Exit) button.
5.2.5 System set-up
In this menu, you can configure the system such as Language select, TV/VCR settings, OSD settings, Time
settings. As well from this menu you can define Power On channel, update software using Software Update
menu, get Information about software version installed in your receiver and do a Factory reset.
Language select
Select Menu language, preferred Audio and Subtitle languages.
Use pqtu buttons to move the menu focus and select an item. Use OK button to confirm selection.
TV/VCR settings
To set TV standard (PAL, SECAM, NTSC or Auto), Aspect conversion (Letter Box or Pan&Scan), TV format
(4:3 or 16:9), Scart mode (RGB or CVBS), UHF standard (NTSC, PAL BG, PAL I, PAL DK) and UHF channel
(21 ~ 69), press pqtu buttons to move the cursor and OK to confirm selection.
OSD settings
To set Banner duration (how long information banner will be displayed on screen), Transparency level
of the menu. Select Zapping mode in order to change appearance of picture during channel change. For
CAM messages appearance (On or OFF), use pqtu buttons to move the cursor and OK to confirm
selection. If CAM messages set to OFF then information messages generated by Conditional Access
Module would not be displayed on TV set screen. If set to ON then all information messages from CAM
will be displayed on TV set screen.
It is advisable to set CAM messages to OFF in order to avoid messages appearing during navigation
between channels.
Time settings
If a broadcaster provides GMT, you can set the time using GMT, or set the time by yourself. If the GMT
usage is ON then current time is set automatically. If your broadcaster provides correct time offset your
receiver will change summer/winter time automatically.
If GMT Usage is set to OFF, Set Data and Set Time item are displayed.
Time display: select “Stand-by only” to display time on front panel indicator only while receiver is in stand-by
mode. Select “Always” to display time on front panel indicator not depending from receiver mode. In this case
channel number on front panel indicator would not be displayed.
Power On channel
Use pq and OK buttons to select “Last viewed” to awake receiver with the last watched channel or to
16
PART 1 • English
Software update
Select this option in order to update your receiver with the latest software version. Software update service
is available from satellites ASTRA 1C, 1E, 1F at 19E and HOT BIRD 1, 2, 3, 4 at 13E.
If your antenna is aligned to ASTRA 1C, 1E, 1F at 19E then enter following parameters:
Frequency: 12603; Polarity: H (Horizontal); Symbol rate: 22000
If your antenna is aligned to HOT BIRD 1, 2, 3, 4 at 13E then enter following parameters:
Frequency: 12476; Polarity: H (Horizontal); Symbol rate: 27500
Press RED (Start). The receiver will check availability of software update and propose to update software
if new version is available. Follow future instructions displayed on screen. After software update process
receiver will switch on a last watched channel automatically.
Note: During software download process video output of the receiver will be turned off. Progress of
software download will be displayed on front panel indicator.
Availability of the software update is subject of local broadcast condition and may not work in all
countries. Contact your vendor to find out more about this function.
Warning:
Never switch off power or disconnect the receiver from the antenna/main
power during update process!
Information
Display the information about software version installed in the receiver.
Factory reset
This will delete all user settings and installed channels. Receiver will restart with Installation Wizard menu.
Note:
Information stored on your hard disk would not be deleted if your reset your receiver to the
factory default. Use “Format HDD” option from “Recorder” menu if you wish to erase all data
from the hard disk.
5.2.6 Parental lock
In this menu, you can set menu lock status (Disabled or Enabled) and change the PIN code.
To change PIN code you will have to enter current PIN code. Use [0..9] buttons to enter new PIN code
and confirm it. If Menu lock is enabled then PIN code will be required in order to access receiver settings.
The default PIN code is 0000.
5.3 Timer
You can set timer functions for designated actions, such as timer based recording, wake up or switch to
Standby.
Timer number: Use the tu buttons to select.
Timer status:
Use tu buttons to Enable or Disable selected timer.
If selected timer status is Enabled the additional items are available to select.
17
English
select “Fixed channel” and define channel which should be displayed first every time when receiver awake
from stand-by.
PART 1 • English
Action:
Cycle:
Start Date/Day of Week:
Start Time:
Duration:
Channel name:
You can select between “PDR Record” (recording on HDD);
“Power On” (receiver powers on at the designated date and time);
“Duration” (receiver switches on, at the designated date and time,
displays the channel and then switches off after a designated duration)
and “Power Off” (receiver switch to Standby). at the designated date
and time. For every action you select you can program designated date
and time
You can set the cycle of the selected action in the timer mode (Once,
Every day or Weekly).
You can set the starting date or days of the week for the timer action.
Press OK to display calendar or list of the week days.
Use Numeric buttons to enter the start time, which should be at least
3 minutes later than the current time.
Use Numeric buttons to enter the duration, which should be at least 5
minutes, the timer should be active.
Press the OK button to display the current channel list and use the
pqtu buttons to select a channel which should be shown/recorded.
In the timer menu the receiver displays “All channel list”. You can use
the TV/RADIO button to select between TV and Radio channels.
5.4 Games
There are three games: Tetris, Box and Snake.
5.4.1 Tetris
tu: Move block to left or right.
q: drop block.
p/OK: Rotate block.
5.4.2 Box
pqtu: Move the boxman and push the box.
5.4.3 Snake
pqtu: Change direction of snake movement.
5.5 Common Interface
When Conditional Access Module is inserted you can enter this menu and get information about your CAM,
smart card subscription status, manage maturity rating and PIN codes of the smart card. Content of the menu
depends on module type. Please refer to the user manual of your module.
18
5.5.1 Dual Descramble
With this function you can configure the settings of scrambling capacity from smart card and
Conditional Access Module. Some smart cards and CAM’s allow to open more then only one
scrambled channel from same transponder. Please, ask your dealer for details and possibilities.
If your module and card allow to descramble two channels then you can watch one scrambled
channel on TV screen and another scrambled channel on PIP, or watch one scrambled channel on
TV screen and record another scrambled channel as FTA.
Use the pq cursor buttons to select Dual Descramble and press OK. Use the tu cursor buttons
to select Enabled or Disabled for the settings of scrambling capacity.
To save changes press the YELLOW (Save) or BLUE (Save & Exit) button.
6.0 RECORDER
6.1 Records Organiser
The Records Organiser lets you manage your TV records, MP3 Files or JPG pictures.
You can copy them onto an USB device or into another folder, or copy new ones from USB to your
receiver hard disk. You can create or delete folders, rename or delete files.
6.1.1 Digital Video Record (DVR)
The PDR view of the Records Organiser shows all your recorded TV broadcasts. If you want you can
rename, delete, copy (to another folder or USB device) or lock them. If you lock a record, than you
will need to enter the PIN code each time you want to playback this record.
Use the tupq buttons to navigate. Press OK to open a folder or start playback, press PDR to
switch between PDR, MP3 or JPG mode. Press EXIT to leave the menu.
Use the coloured buttons to perform the associated action.
To enter to an upper folder move menu focus to folder name “..” and press OK. If you have inserted
an USB media (such as USB storage, digital camera) and wish to play files from this media – select
folder “..”, then in the list of folders select your external media (the will be USB1 or USB2).
Play selected record – simply press OK button.
Rename record or folder: Press RED button. A keyboard will appear on screen. To delete current
name select Backspace (t) symbol and press OK. To enter new name
use tupq and OK buttons. Press the RED button to save new name or
press the GREEN button to discard changes.
Delete record or folder:
Press GREEN button. Dialog to confirm delete operation will appear on screen.
Please note, if you delete a folder then this will delete all files in a folder.
Lock record:
Press YELLOW button. A PIN code will be required to play locked record.
Create a folder:
Press BLUE button (Option) then press RED button (Create folder).
Copy file or folder:
Move menu focus to a record or folder that you wish to copy. Press BLUE
button (Option) then press GREEN button (Copy to folder). In appeared
dialog select folder of destination and press RED button.
19
English
PART 1 • English
PART 1 • English
6.1.2 MP3 Player
The MP3 view of the Records Organiser is divided into two separate parts. The folder and file view on the
left side and the MP3 Player on the right side of the screen.
Use the tupq cursor buttons to navigate. Press OK to open a folder or add a file to the play list, press
PDR to switch between PDR, MP3 or JPG mode. Press EXIT to exit the menu.
Use the pq buttons to navigate between records and tu buttons to change between list of records
and play list.
Use the coloured buttons to perform the associated action.
If the cursor is in the play list (right side of the screen) than the function of the coloured buttons are
different than if the cursor would be in the folder view.
Playback:
To start playback, move the cursor into the play list and select a file you want to listen to.
Then press OK to start the playback. Below the play list some additional information will be
displayed. That information is read from the ID3 Tag of the mp3 file.
Stop:
To stop the playback press the GREEN button.
Shuffle:
To activate the shuffle function press the YELLOW button. If shuffle is activated then the
receiver will playback all files from the play list in random order but each file will only be
played once.
Repeat:
To activate the repeat function press the BLUE button. If repeat is activated then
the receiver will not stop playback at the end of the play list, but will start from the
beginning again.
You can turn on shuffle and repeat at the same time. In that case playback will go on in random order till
it is stopped or repeat is deactivated.
6.1.3 JPEG Picture Viewer
The JPG view of the Records Organiser shows your collection of jpg pictures on hard disk or on an
external USB device. You can rename, copy (to another folder or USB device) and delete them. Use the
tupq buttons to navigate. Press OK once on a file to display the picture in the preview window, press
OK a second time to display the picture in full screen view. Press PDR to switch between PDR, MP3 or
JPG mode. Press EXIT to exit the menu.
Use the coloured buttons to perform the associated action.
Slide Show:
To start a slide show of all files in the current folder press the YELLOW button. Screen
will appear to select time interval. To exit the slide show mode press EXIT.
6.2 HDD Information
Displays information about currently installed hard disk drive such as model name (Vendor defined),
serial number and HDD status.
HDD Status:
Shows total and remaining free disk space and approximated remaining record time
(calculated with average broadcast bit rate).
6.3 HDD Format
Formats the hard disk drive. Attention, all files will be deleted!
WARNING:
20
All files will be deleted!
PART 1 • English
Enable or disable instant recording and HDD power save features.
HDD power save feature allows you to save energy. The HDD power will be turned off after defined
time interval of HDD is not in use. For example you define HDD power save is set to 10 minutes. This
means that HDD power will be turned off after 10 minutes from the moment of last use of the HDD.
If Instant recording is enabled then HDD power save option is not available because receiver does a
record in background of every channel you are watching.
7.0 WATCHING TV AND LISTENING TO THE RADIO
7.1 Program Guide (EPG)
EPG shows the program schedule for the current channel. Availability of EPG depends from
broadcaster and may not be available for all channels.
In TV mode, press EPG button, the EPG Menu will appear. Screen divided to 3 main parts: at the left
channel list, at the right program schedule list and bottom part provide short program description
with program start-end time.
In channel list use pq buttons to choose the channel.
Use tu to switch between channel list and program schedule.
In program schedule list:
Use pq buttons to choose program.
Use RED/GREEN buttons to select previous/next day of schedule.
Use tu to switch between channel list and program schedule.
Use YELLOW button to display detailed program information.
Use BLUE button to programme timer for selected program.
In program details:
Use pq to scroll information in the window.
Use Exit to return to the list of programs.
7.2 Zapping and information banners
The zapping banner is displayed automatically every time when you change channel in TV mode. It
provides information about current channel, list type, satellite name, time and date.
Information banner can be called up by pressing INFO button.
In addition to zapping banner it provides information about next program, availability of subtitles
and Teletext on current channel.
The information banner can be toggled to Extended and Signal modes by pressing RED (Extended)
and GREEN (Signal) buttons. In Extended mode a short description of current program (if
available) is displayed. In Signal mode technical information such as transponder parameters, audio
and video PIDs of current channel, signal strength and quality is displayed.
21
English
6.4 Recorder Settings
PART 1 • English
7.3 Channel list
To open the current channel list press the OK button in TV mode.
Use pqtu buttons to select channel and press OK to switch to this channel. For full screen TV
mode press OK once more.
To change satellite press SAT button and select satellite from the list.
For displaying favourite channel list press FAV button and select favourite list. To exit from favourite
mode press TV/RADIO button.
7.3.1 Fast alphabet filtering
Press RED (Filter) button to filter channels in alphabet order. At the right side alphabet will be
displayed. Select first letter of the channel name that you need to find in the list and press OK.
7.3.2 Multi Pictures
Press GREEN button to choose between 4 pictures or 9 pictures. Press OK to confirm.
7.4 Selection of Audio Language
Press the AUDIO button on your remote control. Use pq buttons to select the audio language
from the list of available tracks. Use tu buttons to select between Left, Right and Stereo audio.
Press OK to confirm your selection. On the information banner you will see section of audio choice
as a symbol. Left as ((• , Right as •)) and Stereo ((•)).
7.5 TELETEXT function
In channel TV mode press TEXT button. If Teletext is available in several languages, then select
language from the list.
7.6 Subtitles function
In channel TV mode press SUB button. List of available subtitles languages will be displayed on the screen.
Use pq buttons to select language and OK to confirm. To disable subtitles select OFF from the list.
8.0 RECORDING AND PLAYBACK
8.1 Start a record
To start a record of current channel press RECORD button on remote control or REC button on
front panel of the receiver. You will be prompted to select device where to record (\PDR – is internal
HDD, name of external storage media can be selected if it is connected) and duration of record.
Continuously duration means that recording will be performed until you stop the record. If you
agree with recording settings – press RECORD again.
During a record you can change channel to another one – recording will be continued on previous
channel. You can also start a record on a second channel.
NOTE: While record is in progress the channel list and zapping possibilities are limited according
to connection type. If your connection type is “LOOP THROUGH” and you have one
record in progress then channel list will be limited to the one satellite/one polarization/
22
one bandwidth, i.e. if you are recording channel from ASTRA 19.2E and channel is from
transponder in Horizontal polarization High band (frequency above 11700 MHz) – the
channel list will displays the channels located on transponders with Horizontal polarization
High band on ASTRA 19.2 satellite.
Recording of scrambled channels: there is possible limitation to record one scrambled channel
and watch another one. If you are recording one scrambled channel and start to watch another
channel from same operator then record will became scrambled. Later to watch record you will
need to make sure that CA module with appropriated smart card are inserted to CI slot.
8.2 Stop a record
To stop a record press STOP button on remote control. You will be prompted to select (mark)
record(s) that you wish to stop. By default all records in progress are selected. To you confirm
selected record(s) to stop – press OK button. If you wish to continue some records – move menu
focus to the list of records in progress and deselect record that you wish to continue, and then
move focus to “Stop selected records” button and press OK.
NOTE: Alternatively you can press STAND-BY button on front panel.
8.3 TimeShift and Instant recoding
TimeShift and Instant recording are both features that are activated during you watch a TV
broadcast. To use Instant recording you have to first turn this feature on in the recorder settings
menu. You only can use Timeshift if Instant recording is turned off.
TimeShift:
To activate TimeShift press the PAUSE button during you watch a
broadcast. As soon as you pressed the button, the picture will be paused
and the receiver starts recording the broadcast in the background and in
the display the TimeShift icon will be lit. If you press the PLAY button or
PAUSE again the video will be resumed from the moment where you have
paused it. At the same time recorder will continue record of current live
broadcast. This function allows you to watch content of the program in
case you have to pay attention to something else then TV (telephone call,
needs of other members of your family). You now can watch the broadcast
as you would watch a video record. You can also use the REW, FWD, RSLOW, F-SLOW buttons. If you press STOP the TimeShift will be stopped
and you will see the actual broadcast.
Instant recording:
This mode is basically the same as TimeShift, but with the exception that
you don’t need to press PAUSE to use the feature. As soon as Instant
recording is activated through the menu, the receiver will start recording
any broadcast you watch. This is especially useful if you missed something
interesting. With Instant recording it’s possible to simply rewind the
broadcast and watch the scene again.
NOTE: Both TimeShift and Instant recording create temporary records on the HDD. After STOP
(in case of TimeShift) or zapping to another channel (in case of Instant recording) this
temporary record is removed from HDD.
23
English
PART 1 • English
PART 1 • English
8.4 Playback
There are two ways to access to your records:
n Press PDR button on remote control once.
n Press MENU, select Recorder, select Records Organiser
NOTE: If you have enabled HDD power save and did not use HDD (did not playback or record)
for a time set in HDD power save then appearing of the record list may take a while due to
receiver need to re-activate HDD.
Select a record you wish to playback and press OK button on remote control.
During a playback you can use following functions.
8.4.1 Information
Press INFO button in order to display information about record and playback progress. Information
banner provides you following details about playback: media name (/PDR or /USB), play mode,
current time and date, record’s number and name, date when record has been made, record duration,
audio mode, availability of subtitles and teletext, graphical interpretation of playback progress and
passed playback time. As well while information banner displayed on screen you will have access to
the extra functions. To remove playback information banner press INFO again or EXIT.
8.4.2 Fast forward and Fast rewind
Press
button for Fast Forward or
button for Fast Rewind. Every time when you presses these
buttons playback speed increased 2 times. Available options are x2, x4, x8, x16. Indication of play
speed is shown at the right upper corner of the screen. If you wish to return to normal playback
speed press u button.
8.4.3 Slow motion
Press
(L-SLOW) button for forward slow motion or
(R-SLOW) for backward slow motion.
Every time when you presses these buttons playback speed reduced 2 times. Available options are
x1/2, x1/4, x1/8. Indication of play speed is shown at the right upper corner of the screen. If you
wish to return to the normal playback speed then press u button.
8.4.4 Pause
To pause current playback simply press
button. To continue playback simply press u button.
8.4.5 Repeat
If you would like to play current playback in a loop then press button during playback. Appropriated
symbol will be displayed on front panel indicator. To stop play in the loop press q button again.
8.4.6 Copy into file
This function allows you to copy a part of the recorded file into new file. During playback press
INFO button. The playback information banner will appear on screen. Use tu buttons to scroll in
the record to the point where you want to start copy and press & button. Use tu buttons to scroll
in the record to the point where you want to end copy and press & button. Confirm copy operation
with OK button or cancel with EXIT.
24
8.4.7 Place a bookmark
This function allows you to place a bookmark at the most interesting moments of a record. During
playback press INFO button. The playback information banner will appear on screen. Use tu
buttons to scroll in the record to the point where you want to place a bookmark and press &
button. You will see a red dot appearing on the playback progress indicator. You can place up to 32
bookmarks in one record.
8.4.8 Jump to
This function allows you to jump to a designated moment in the record or jump between
bookmarks in the record.
To jump to designated moment: start playback of selected record and press & button. You will be
prompted to enter time in the record where to continue playback. Enter time in the format HH:MM:
SS (HH – hours, MM – minutes, SS – seconds).
To jump between bookmarks: start playback of selected record, press INFO and press & button.
The playback will continue from first available bookmark. If you wish to continue from another
bookmark then press & again.
25
English
PART 1 • English
PART 1 • English
A.1 TROUBLESHOOTING
There may be various reasons for the abnormal operation of the receiver. Check the receiver
according to the procedures shown below. If the receiver does not work properly after checking it,
please contact the dealer. Don’t open the receiver cover. This may cause a dangerous situation.
Symptom
Cause
Remedy
The LED display on
front panel does
not light up.
The power cord is not plugged
in.
Check that the power cord is plugged in to
the wall outlet.
No picture
sound
Wrong connection of the Audio/
Video output of the receiver to
TV.
Connect the Audio/ Video output of the
receiver to TV correctly.
or
Press the MUTE button
Audio muting.
Turn TV on.
TV power off.
No picture
The remote control
does not work
The receiver can’t receive
the signal
Check the antenna cable, replace the cable,
or connect the cable to the receiver tightly
Incorrect values of some
tuner parameters
Set the values of the tuner parameters
correctly in the installation menu.
Wrong direction of the dish
Check the signal strength with a spectrum
analyzer and adjust your dish correctly.
The batteries of the remote
control are not inserted or
exhausted
Check whether the batteries are inserted
correctly in your remote control. Check
the batteries, and if exhausted replace the
batteries in the remote control
A.2 SPECIFICATIONS
Demodulator
Modulation:
QPSK
Input Symbol Rate:
2 ~ 45 Ms/s
SCPC & MCPC signals from C & KU band satellites
Video Decoder
Profile level:
Input Rate:
Video Resolution:
Aspect Ratio:
26
MPEG-2 MP@ML
Max. 100 Mbits/s
720 x 576 (PAL), 720 x 480 (NTSC) pixels
4:3, 16:9
PART 1 • English
Tuner
Front-End:
Input Frequency Range:
RF Input Level:
LNB Power:
DiSEqC Versions:
DVB-S
950 ~ 2150 MHz
-25 ~ -65 dBm
13.5/18 V DC (± 5%), Max. 400 mA, Overload protected
1.0, 1.1 & 1.2 and GOTO X
System and Memory
CPU:
Flash Memory:
DDR SRAM:
HDD:
STi5100 @ 243MHz
4 MBytes
64 MBytes
160 GBytes
UHF Modulator
Standards:
Channel:
NTSC, PAL BG/I/DK
21 ~ 69 selectable via OSD
English
Audio Decoder
ISO/IEC 11172 LAYER I&II and MP3
Sampling rate:
32, 44.1, 48 kHz
Audio modes:
Stereo, Mono
Connectors
2 x SAT IN; 2 x SAT OUT
ANT IN; TO TV
2 SCARTS TV (RGB, CVBS) / VCR (CVBS)
S/PDIF: optical output
Data Interface – serial port: RS-232, 9-Pin D-Sub Male type
Separate power switch
General Data
Input Voltage Range:
Power consumption:
Operating Temperature:
Storage Temperature:
Operating Humidity Range:
Size (W x D x H) in mm:
Weight:
90 - 240 V AC, 50/60 Hz
max 50 W
0 ~ +40 °C
-30 ~ +80 °C
10% ~ 85%, RH, Non-condensing
340 x 280 x 70
3 kg (with HDD)
27
PART 1 • English
A.3 TYPICAL INSTALLATIONS AND CONFIGURATIONS
Single Universal LNB on fixed dish aligned to ASTRA 19.2E
Channel setup menu settings
Satellite: ASTRA 19.2E
Dish number: 1
Dish Setup menu settings
Dish number: 1
Connection: Loop through
LNB type: UNIVERSAL
Switch type: None
Dish mode: Fixed
Mono block Universal LNB on fixed dish aligned for reception of ASTRA 19.2E and HOT BIRD satellites
Channel setup menu settings
Satellite: ASTRA 19.2E
Dish number: 1
Dish Setup menu settings
Dish number: 1
Connection: Loop through
LNB type: UNIVERSAL
Switch type: DiSEqC 1.0
DiSEqC input: 1
Dish mode: Fixed
Twin Universal LNB on fixed dish aligned to ASTRA 19.2E
Channel setup menu settings
Satellite: ASTRA 19.2E
Dish number: 1
Dish Setup menu settings
Dish number: 1
Connection: Tuner 1&2
LNB type: UNIVERSAL
Switch type: None
Dish mode: Fixed
28
Channel setup menu settings
Satellite: HOT BIRD
Dish number: 2
Dish Setup menu settings
Dish number: 2
Connection: Loop through
LNB type: UNIVERSAL
Switch type: DiSEqC 1.0
DiSEqC input: 2
Dish mode: Fixed
PART 1 • English
Channel setup menu settings
Satellite: ASTRA 19.2E
Dish number: 1
Dish Setup menu settings
Dish number: 1
Connection: Tuner 1&2
LNB type: UNIVERSAL
Switch type: DiSEqC 1.0
DiSEqC input: 1
Dish mode: Fixed
Channel setup menu settings
Satellite: HOT BIRD
Dish number: 2
Dish Setup menu settings
Dish number: 2
Connection: Tuner 1&2
LNB type: UNIVERSAL
Switch type: DiSEqC 1.0
DiSEqC input: 2
Dish mode: Fixed
Single Universal LNB on dish aligned to ASTRA 19.2E and single Universal LNB on motorized dish
(GOTO X) to receive signals from HOT BIRD, ASTRA 23.5E…
Channel setup menu settings
Satellite: ASTRA 19.2E
Dish number: 1
Dish Setup menu settings
Dish number: 1
Connection: Separated
Tuner: Tuner1
LNB type: UNIVERSAL
Switch type: None
Dish mode: Fixed
Channel setup menu settings
Satellite: HOT BIRD
Dish number: 2
Dish Setup menu settings
Dish number: 2
Connection: Separated
Tuner: Tuner2
LNB type: UNIVERSAL
Switch type: None
Dish mode: GOTO X
Channel setup menu settings
Satellite: ASTRA 23.5E
Dish number: 2
Dish Setup menu settings
Dish number: 2
Connection: Separated
Tuner: Tuner2
LNB type: UNIVERSAL
Switch type: None
Dish mode: GOTO X
29
English
Twin mono block Universal LNB on dish aligned for reception of ASTRA 19.2E and HOT BIRD
Environmental Issues
ENVIRONMENTAL ISSUES
STRONG is committed to reducing the impact of its products on the environment.
To maximise the benefits of our design enhancements, your co-operation is required.
Electronic product recycling
Do not dispose of this product with your
domestic rubbish.
At the end of its useful life, this product
contains materials which when processed
correctly can be recovered and recycled. By
participating in the responsible recycling
of this product you will be reducing the
requirement for new raw materials and
reducing the amount of material that
would otherwise end up in landfill.
When you purchase a new, similar product
your retailer may offer to take this old one
off you. Alternatively, you can take it to
your local recycling centre. Your retailer or
local municipal authority will advise you of
the collection facilities available for waste
electronically products in your area. User
of this service will be free to you.
Within the scope of the European
legislation on Waste Electrical and
Electronic Equipment (Directive 2002/96/
EC valid as of August 2005) STRONG
provides a recycling system free of charge
for consumers to returning products after
end of life. For more information about
STRONG’s environmental policy to you:
www.strong.tv - select “About us” and
“Environmental Policy“ from
the submenu.
Packaging
When disposing of this
product packaging, please
ensure that it is recycled.
Packaging material is to be
depolluted in waste
separation.
Power Saving
To save power and money,
please put the product into
standby mode when not in
use. We also recommend
disconnection from mains
supply when not in use for longer
periods of time.
Batteries
Do not dispose of the batteries
from your handset with your
domestic waste.
Where they are available,
participate in your local municipal
or retailer collection schemes
for spent batteries. Batteries
discarded in landfill sites or
incinerated increases the chances
of pollutants being dispersed into
the atmosphere.
Alternations reserved 01/2008