1
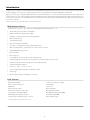
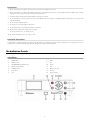
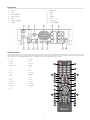
MediaStation HD DVR
Network Multimedia Recorder / Wireless Network Multimedia Recorder
User Guide
English
1
Contents
Introduction
4
MediaStation Features
4
Pack Contents
4
Precautions
5
Hard Disk Precautions
5
MediaStation Details
5
Front Panel
5
Rear Panel
6
Remote Control
6
Connecting the Device
9
Getting Started
9
TV In
10
File Copy
10
Browser
10
Setup
11
Time REC
11
Setup
p Menu
12
Setting up your System
12
Setting the Video Settings
13
Setting the Audio Settings
13
TV Tuning and Setup (DTV / CTV / Video In)
13
TV Region
13
TV Input
14
Channel Scan
14
Manual Scan
14
Channel Set
15
Record Settings
15
Network Settings
15
Wired LAN Setup
15
DHCP (Auto)
15
Fixed IP (Manual)
16
Wireless LAN Setup
16
MISC Setup
17
Recording
g and Playback
y
17
RECORDED Media List
17
Timer Record Menu
18
Creating a New Schedule
18
EPG Recording (Electronic Program Guide
19
Editing Schedules
19
Deleting Schedules
20
Viewing Schedule Status
20
Viewing Recorded History
21
One Touch Record
21
Time Shift Recording
21
2
Browser Menu
22
Creating a Playlist
22
Browsing ALL
22
Browsing Music
22
Browsing Photos
22
One Touch Copy button
22
Browsing Movies
23
Browsing content via the Network (NET)
23
My Short Cuts
23
Connecting to a Network Device
23
File Edit Menu
25
File Copy
py Menu
26
Utilities
29
Transcode Server
29
Step 1:
29
Step 2: Next
30
Step 3: Browser folder
30
Step 4: Install
31
Step 5: Copying new files
31
Step 6: Finish. You can start use the software.
32
Run the software
32
Step 1: Double click to run the program.
32
Step 2: Transcode Status: Transcode information
32
Step 3: Net Share Dialog.
33
Setting: Auto Run System Start-up Yes or No
33
Nero Move it Essentials Software
33
Specifi
p
cation / Video Recording
g Time and Capacity
p
y
34
Formatting
g the hard disk
35
Step 1: Adjust the capacity for time shift buffer accordingly
35
Step 2: hard disk format
36
Step 3: Congratulation page
36
Technical Support
pp
36
Limited Warranty
y Terms
37
WEEE Notice
37
CE Declaration - EC DECLARATION OF CONFORMITY
37
RoHS Compliance
p
37
3
Introduction
Thank you for choosing the new Verbatim MediaStation HD DVR Network Multimedia Recorder. This device is an all round home entertainment
system enabling you to record, store, and play directly from the TV, cable/satellite set top box, DVD player or VHS player.
Enjoy your videos, music, and photographs directly from the built in hard drive, or connect any external storage device that contains you’re
media collection via one of the two USB Host ports. The MediaStation has network streaming functionality provided by the Ethernet port on
the rear panel of the device, or alternatively make it a true wireless home theatre system via the USB Wireless Dongle * and connect wirelessly
to your home network.
* Wireless LAN (USB Dongle) available with Verbatim model numbers 47541/47543
MediaStation Features
Listed below are just some of the functions the Verbatim MediaStation HD DVR has to offer:
•
Digital Analogue Tuner built in for TV (DVB-T)
•
High Definition video playback up to 1080i
•
Digitally record TV and upscale to HD during playback
•
One Touch Recording
•
Scheduled Recording
•
Electronic Program Guide (EPG)
•
Time Shift – record/play/pause/fast forward/rewind live TV
•
One Touch Copy button for photo back up from the memory card slot
•
SD/SDHC/MS Memory Card slot
•
Movie play back
•
Music play back
•
Photo Playback – slide show options with or without music
•
H.264 file playback via network or wireless network in conjunction with Transcode Server
•
Play back media from external storage devices (via USB Host ports)
•
Supports multilingual subtitles
•
Network and Wireless Network functions
•
Stream media playback via Ethernet and Wireless LAN
•
Data storage
•
External data storage via the USB Host connections
Pack Contents
MediaStation HD DVR
F connector – belling lee adaptor
Remote control (+ batteries)
Power adaptor
HDMI cable
Power cord
Component video cable
Quick Start Guide
Composite video/stereo audio cable
Quick Installation Guide
Scart adaptor – switchable IN/OUT
Nero MOVE IT software (CD ROM)
USB Mini type B to USB type A cable
User Manuals (CD ROM)
TV cable F type to Belling Lee type connector
Wireless USB Dongle *
*Contained with Verbatim model numbers 47541/47543
4
Precautions
1.
We recommend you use all the cables and accessories that are supplied in the pack
2.
We recommend you use the power adaptor and power cord supplied with is device. Using a different power adaptor and cord may
damage the device and make void the warranty on this product.
3.
Keep this equipment away from high humidity or any type of moisture.
4.
Do not let water or any other liquid come into contact with the device. If liquid is accidentally spilled on the product use a dry cloth to
soak up the liquid.
5.
Do not drop or shake the device.
6.
Do not press or put any weight on the device.
7.
Do not clean the device with alcohol, thinner or benzene.
8.
Do not power off the device while a file is playing.
9.
Do not use the device if your hands are wet
10. Do not disassemble as the user’s own accord.
Hard Disk Precautions
It is important to regularly backup the content of any hard drive to an alternative storage medium. Verbatim is not responsible for any loss
of data. If you encounter problems with the hard drive please contact technical support.
MediaStation Details
Front Panel
1.
LCD Display
8.
2.
IrDA Receiver
9.
Up
3.
SD/SDHC/MS Card Reader slot
10.
Down
4.
USB host port (USB 1)
11.
Stop
5.
Standby button
12.
One touch copy
6.
Play / Pause
13.
Record
7.
Left
14.
Return / Home
5
Right
Rear Panel
1.
TV out
8.
Mini B USB
2.
TV In
9.
YPbPr
3.
Co-axial Output
10.
DC-In
4.
Optical output
11.
AV Out
5.
LAN
12.
AV In
6.
USB Host (USB 2)
13.
Cooling Fan
7.
HDMI
14.
Power ON/OFF
Remote Control
All procedures in this manual can be carried out using the remote control buttons. Certain functions can also be carried out using the control
panel on the front of the MediaStation. See the following for details on each button and its function:
1. POWER
18. HOME
2. Display
19. REC
3. Audio
20. SUBTITLE
4. Number Buttons
21. TIMER
5. GOTO
22. VOL + / -
6. Setup
23. MUTE
7. Enter
24. EDIT
8. Browser
25. Navigation
9. STOP
26. RETURN
10. PLAY
27. PAUSE
11. PREV
28. NEXT
12. SLOW
29. FF / FR
13. Timeshift
30. REPLAY
14. REPEAT
31. CM SKIP
15. ZOOM
32. TV SYSTEM
16. SOURCE
33. COPY
17. EPG
6
No.
Button
Function
1
POWER button:
Press to POWER on or off.
2
DISPLAY button:
Press to display current status.
Press during playback and an on screen display appears showing track number and time elapsed.
Press during recording and an on screen display appears showing the recording quality setting and time elapsed.
3
AUDIO button:
Press to select an audio track on a HDD or USB file.
4
Numeric buttons:
Press to enter channel numbers or numeric input when changing settings.
5
GOTO button:
Press to jump to a specific point on the disc or title. Specify the point using Title, Chapter and Time.
6
SETUP button:
Press to access the Setup Menu directly to change system settings.
7
ENTER button:
Press to select confirm in the menus.
8
BROWSER button:
Press to browse music, photo, and movie files on the HDD and external devices
9
STOP button:
Press to stop playback.
10
PLAY button:
Press to begin playback of movie files or start a slide show.
11
PREVIOUS button:
Press to page up the File list under the Browser menu
12
SLOW MOTION button:
Press to play back in slow motion. Three motion settings are available.
Five slow motion levels (3/4, 1/2, 1/4, 1/8, 1/16x) are available.
Press
to resume regular playback.
TIME SHIFT button:
Press to activate the timeshift function, which allows you to pause live TV and resume the program from the point you
left it. While paused, the program is recorded to the HDD, as long as the space is available.
Press to activate TIME SHIFT function and wait for the PLAY arrow to appear on the screen.
13
Press
and the program is paused.
Press
to resume viewing the program.
Timeshift mode remains active until you press the
button.
14
REPEAT buttons:
Press REPEAT 1 / ALL to set repeat option: Chapter, Title or Off
15
ZOOM button:
Press to zoom in/out when playing back photos or Video programs.
Photo zoom levels: 2X,4X,8X,16X;
Video zoom levels: 2X, 3X, 4X, 8X.
7
16
SOURCE button:
Press Source to switch the TV source between AV-In / Digital TV / Analog TV
17
EPG button:
Press EPG to show the Electronic Program Guide. Press PREV or NEXT for switching channels, and press PLAY to
confirm
18
HOME button:
Press to view the main menu
19
RECORD button:
Press to begin recording or to resume when recording has been paused.
Press repeatedly to set OTR length (30 minutes / 60 minutes / 90 minutes / 120 minutes / 180 minutes / 240 minutes
/ Off).
20
SUBTITLE button:
Press to activate available subtitles when play the DIVX file. DivX subtitle supported: SRT,SMI ,SUB,SSA format file.
21
TIMER button:
Press to enter the Timer Menu directly to add, edit and delete recording schedules
22
VOL + / - buttons:
Press to increase or decrease the volume.
23
MUTE button:
Press to mute audio output, and press again to resume.
24
EDIT button:
Press to edit file name or delete the file. In EPG mode, press EDIT button to add a program to the scheduled record
list
25
Navigational buttons:
Press the arrow buttons to navigate the menus.
26
RETURN button:
Press to return to the previous screen when navigating the menus.
27
PAUSE button:
Press to pause current playback.
Press again to step to the next frame.
Press
to resume playback.
28
NEXT button:
Press to page down the File list under the Browser menu.
29
FAST REWIND / FAST FORWARD buttons:
Press to fast rewind or fast forward the current playback. Press repeatedly to select faster rewind or fast forward
speeds.
30
INSTANT REPLAY button.
Press to rewind 10 seconds of the current playback. Suitable for sport programs.
8
31
CM SKIP button:
Press to advance 30 seconds when in playback or record mode.
32
TV SYSTEM button:
Press to switch between NTSC Interlaced, NTSC Progressive, PAL Interlaced, and PAL Progressive.
33
COPY button:
Press to enter the Copy File menu
Connecting the Device
To switch on the MediaStation press the rocker switch on the back of the device to On.
Inside the box you will find an Installation Guide that will help you connect the MediaStation to your television, other AV devices, and your
PC or Notebook.
Getting Started
This section gives a short summary of the main menu options once you’ve connected the MediaStation to your television.
When you first connect the MediaStation to the TV and switch it on the initial start up page will appear on screen:
Within a few seconds the main menu of the User Interface will appear. There are 5 options to select from on the main menu as follows:
1. TV In
2. File Copy
3. Browser
4. Setup
5. Timer REC
These are highlighted below.
9
TV In
To select an input source (e.g. DTV, ATV or AV-In), select TV in from the main menu from where you will enter the AV-in Page.
Press Source on Remote Control for selecting DTV, ATV or AV-in.
File Copy
File copy lets you copy and paste files and folders between USB/Card/HDD/NET. For example you can copy data between a storage device
plugged into the USB port and a memory card that’s been added into the memory card slot.
Browser
Select Browser from the main menu page to browse the content on the hard drive, or any other storage device connected to the MediaStation.
You can browse by Movie, Photo, Music or All files stored on either a USB Device, Card Reader, HDD, or NET.
10
Setup
To enter the setup menu, press Setup on the remote control or select Setup from the main menu. Enter the Setup menu for setting TV, Audio,
Video, REC, Network, System and MISC settings
Timer REC
To enter the Time Recording functions select Timer REC from the main menu or select Timer on the remote control. The Time REC menu
allows you to create, edit, and delete recording schedules and view all schedule status and history.
11
Setup Menu
The Setup Menu allows you to set up the system to your local requirements and tune in the TV channels that available in your region.
Select Setup from the main menu or press the Setup button on the remote control.
Setting up your System
1. Select the System tab from the menu using the arrow buttons (Navigation buttons)
2. Use the arrow buttons to move between the sub menus, as listed below. Press the Enter button once the sub menu is highlighted
The sub menu details are as follows
Menu Language
Select your OSD (On Screen Display) language. There are 12 languages for you to choose from: English,
French, Italian, German, Spanish, Portuguese, Polish, Swedish, Danish, Russian, Czech, and Hungarian
Text Encoding
Select to choose the text encoding languages between Unicode (UTF8), Western, Turkish, Central Europe,
Greek, Cyrillic, Hebrew, SE Europe
Time
Select to set the system time between manual, Auto (via TV) or Auto (DTV)
Manual: Press the Left and Right buttons to select each field and then Up and Down to adjust each setting.
Auto (via TV): Select the time adjustment by TV
Auto (via DTV): Select the time adjustment by DTV.
Press “Enter” when finish the setting.
Parental Control
Select to set the parental control between Lock system, Region, Password, Block Unrated TV and TV Rating. This
function is for DTV only.
The default password is 0000
HDD Format
Select to Format HDD. The hard drive is preformatted NTFS. Note: Please back up your HDD content before
re-formatting
SW Upgrade from HDD
Press to upgrade firmware.
Please store the *.img file in root directory first.
(Firmware upgrades may be available from time to time from Verbatim Technical Support)
Restore Default
Select to restore to factory defaults.
Only the Time & Date, Language and Parental Control in the System setup page will not be restored
12
Setting the Video Settings
1. Select the Video tab from the menu using the arrow buttons (Navigation buttons). Use the arrow buttons to move between the sub
menus, as listed below. Press the Enter button once the sub menu is highlighted
Aspect Ratio
Select to set aspect ratio.
Pan Scan 4:3: Display a wide picture on the entire screen and cuts off the redundant portions. Select
when a standard 4:3 TV is connected.
Letter Box 4:3: Display a wide picture with two black borders on the top and bottom of 4:3 screen.
Select when a standard 4:3 TV is connected.
16:9: Compress the image to convert the whole image. Select when a 16:9 TV is connected.
Brightness
Select to set brightness levels.
1. Press W and X to adjust brightness.
Press ENTER to confirm.
Contrast
Select to set contrast levels.
1. Press W and X to adjust contrast.
Press ENTER to confirm.
DNR
(Digital Noise Reduction)
Select DNR and press Enter.
Select OFF or Auto and press Enter
TV System
Select to adjust TV system.
With an HDMI cable connected the TV System will only choose HDMI Auto
There are other options for 480P, 576P, 720P 50HZ, 720P 60HZ, 1080i 50Hz, 1080i 60HZ.
1080P 24HZ
Select to turn on/off for 1080P 24Hz output.
Please note that if your TV system doesn’t support 1080P 24Hz, you will not be able to see anything
when you turn on the device.
Setting the Audio Settings
1. Select the Audio tab from the menu using the arrow buttons (Navigation buttons). Use the arrow buttons to move between the sub
menus, as listed below. Press the Enter button once the sub menu is highlighted
Night Mode
Select to choose Night Mode on or off. This function reduces the maximum dynamic audio range.
Select ON/OFF/Comfort.
Press Enter to confirm.
Digital Output
Select to set Digital output types of HDMI LPCM, HDMI RAW, SPDIF LPAM, and SPDIF RAW.
RAW data is the original bit stream and will provide a better audio output quality.
LPCM is the default setting, and provides 2 channels audio output.
TV Tuning and Setup (DTV/CTV/Video In)
Before tuning in the device, make sure you have followed the procedure in the Setting up Your System section earlier in the User Manual.
Select Setup from the main menu or press the Setup button on the remote control.
Select the TV
V tab from the menu using the arrow buttons (Navigation buttons). Use the arrow buttons to move between the sub menus, as
listed below. Press the Enter button once the sub menu is highlighted
TV Region
Select TV Region using the navigation buttons on the remote control and press enter. Select your TV region from the list and press Enter
13
TV Input
Select TV Input using the navigation buttons on the remote control and press enter. There are two types of TV input in the list, Antenna
(Digital TV), and CATV (Analog TV). Choose Antenna to tune in DTV (Digital TV) and ATV (Analogue TV).
Channel Scan
After setting up the TV region and the TV input type you are now ready to tune in the TV channels
Select Channel Scan using the navigation buttons on the remote control and press enter. You can activate either an Auto Scan or a Manual
Scan.
Selecting Auto Scan will scan the ATV and DTV channels. The ATV channels were scan first followed by the DTV channels
Once scanning has finished the screen will show how many TV and DTV channels were found. The OK option on the screen will be highlighted,
press Enter to complete the process.
Manual Scanning
This function is generally for advanced users only who have access to the frequency data for certain channels.
Select the channel number you want to scan using the arrow buttons W X on the remote control. (The Bandwidth and Frequency will be
selected automatically once the channel number is entered. You can manually adjust both fields if required)
The system will scan for the frequency for the channel.
14
Channel Set
The MediaStation lets you rename all TV program names as your wish. Please note that you can only rename in English.
Select Channel Set and press Enter. Using the arrow buttons select Cancel, TV, or DTV and press Enter
Press S or T to choose the channel and then press Enter. This will take you the Channel Edit window. Use the ST buttons to tab between
the options.
Name: Highlight Name and press Enter.
Use the remote control to key in the characters or numerals. Move to OK
K and press Enter to complete. The program name will have
changed.
Delete: Press X or W to choose Yes or No to hide the channel when you are switching different channels. Please note that it will not actually
delete the channel.
Swap With: Press X or W to change the channel sequence.
Record Settings
1. Select the REC tab from the menu using the arrow buttons (Navigation buttons). Use the arrow buttons to move between the sub menus,
as listed below. Press the Enter button once the sub menu is highlighted
Quality
Select to set the default recording quality between HQ/SP/LP/EP/SLP.
HQ: High Quality with 720x480 resolution
SP: Stand Play 640x470 resolution
LP: Long Play 352x480 resolution
EP: Extended Play: 352x480 resolution
SLP: Super Long Play: 352x240 resolution
Permanent Time shift
Select to set the permanent time shift On or Off. This function is only for Video-In/DTV/CTV.
The length of Time Shift function has been preset to 1 hour.
Record Device
Select to choose the device to store the recorded files to: HDD, USB, and Memory Card
Network Settings
Select the NETWORK
K tab from the menu using the arrow buttons (Navigation buttons). Use the arrow buttons to move between the sub
menus to select either Wired LAN Setup or Wireless Setup as listed below.
Press the Enter button once the sub menu is highlighted
Wired LAN Setup
1. Select Wired Lan Setup and press Enter
2. Select either DHCP (AUTO) or Fixed IP (Manual) and press Enter
DHCP (AUTO)
3. Press OK
K to get the IP from your AP automatically. Please leave the DNS IP address as default if you have no alternative
15
Fixed IP (Manual)
4. If using a Fixed IP you need to enter the IP address, Subnet Mask, Default Gateway. For further assistant to the above settings you may
need to contact your network administrator
Wireless LAN Setup
Note: Wireless LAN is only available with Verbatim model No’s 47541/47543
1. Plug-in the Wi-Fi USB Dongle into either of the 2 USB ports. The player will detect the dongle automatically
2. Select Wireless Setup and press Enter
3. Choose a profile name. For example: Connection 1, press Enter
4. Connection mode: select either Infrastructure (AP) or Peer to Peer (Ad Hoc) and press Enter. Infrastructure (AP) will detect any wireless
networks available.
5. The available networks will appear in a list. Select your network and press Enter to proceed.
6. Enter the WEP key or WPA key for the network
7. Press OK to finish the setting. The Wi-Fi signal strength is shown on the right hand side.
Note: The player with Wi-Fi dongle will only be able to recognise the WEP with Open system, and only the Key 1 will be recognisable. Also, only WPA-Personal, WPA2-Personal and WPAAUTO Personal are recognisable for the player.
16
MISC Settings
1. Select the MISCE tab from the menu using the arrow buttons (Navigation buttons). Use the arrow buttons to move between the sub
menus, as listed below. Press the Enter button once the sub menu is highlighted
Slide Show Timing
Select to set the frequency of changes between photos for a slide show between 2, 5, 10, 30
seconds or 1 or 2 minutes.
Transition Effect
Select to set the transition effect of photos.
1. Cross Fade - fade in and fade out
2. Left to Right- from left to right
3. Top to Bottom- from top to bottom
4. Waterfall - like a steep descent of water from a height
5. Snake – like snake motion
6. Dissolve – like water dissolve
7. Strip Left Down – like strip cover from top of left to bottom of right
All Effect Shuffle – shuffle in and out
Background Music
To play a slide show with music the music files have to be located in either the same folder as the
photo files, or as a playlist.
The following options are available for Background music
Off: Music will not be played during a slide show.
Folder: Select if your photos and music files are in the same folder.
Playlist: Select if you want to play the music from the Playlist. (To create a Playlist please refer to the
Browser Menu section)
Screen Saver
Select to enable or disable the Screen Saver.
Screen Saver will activate if there is no action for 5 minutes.
Movie Preview
Select to turn ON/OFF Movie Preview.
Resume Play
Select to turn ON/OFF to resume playback of the video once you STOP the movie
Recording and Playback
RECORDED Media List
When you record something for the first time a recorded media list is created on the storage device that you are recording to.
The system will automatically create a folder called REC on the HDD or the USB device. The recorded media list is saved in this folder and
can be entered by selecting the BROWSER option in the main menu or pressing the BROWSER button the remote control. The file names
are automatically allocated according to the system time.
17
Timer Record Menu
The Timer REC menu allows you to create, edit and delete recording schedules and view all schedule status and history. Select the Timer
REC option from the main menu or press the TIMER button on the remote control.
Creating a New Schedule
1. Select Edit from the menu bar to Add a New Schedule and press Enter. The schedule setting page will appear.
2. Press W and X to move the between fields and press S and T to adjust each settings.
18
Source
Press the arrow buttons to select sources. Video-IN/DTV/ATV
Start Time
Enter the date and time of the recording.
Length
Enter the length of the recording
Repeat
Select how often you want the schedule to record. Choose from
Once, Everyday, Mon-Fri, Mon-Sat or for an individual day of the week.
Device
Choose the device that you want to record to. HDD/USB/USB1/USB2/CARD
Quality
Select the recording quality. Choose from HQ, SLP, EP, LP and SP.
The higher the quality the more storage space is used on the hard drive.
See HDD/USB Free Space on the left of the screen giving details of how long you can record for using
each setting.
Nicam
Near Instantaneous Companded Audio Multiplex. Select this function on/off for multiplex audio
channels.
Note: the highest quality recording option for DVT is SP. DVT signal are MPEG-2 format which have a quality of SP. The highest quality is available via ATV and Video Modes
EPG Recording (Electronic Program Guide)
You can set programs to record through the EPG (Electronic Program Guide). Enter DTV and press the EPG button on the remote control.
On screen you will see the EPG. The Channel Listing and Date/Time listing will appear across the top section of the screen. The program
and time listing will appear below this.
Select the channel by using the NEXT / BACK
K buttons on the remote control. The preview screen will show the current program showing
on that channel.
Select the date/day and the program you want to record using the NAVIGATION buttons on the remote control.
Once you have highlighted the correct program press the EDIT button on the remote control
After pressing the EDIT button the following message will appear on screen Add a new Schedule. This shows that the program has been set
for recording. The program will automatically record to the hard drive however you can change the destination by using the Edit Schedules
option under the Time REC menu (See details below)
Note: If you switch the MediaStation off via the rocker switch on the back of the device programmed recordings will not work
Editing Schedules
1. Select Edit from the menu bar and then select the schedule from the list which you want to change. Press ENTER on the remote
control
2. Modify the schedule as described in Creating a New Schedule in the section above.
19
Deleting Schedules
1. Select the Delete tab from the menu bar
2. Select the schedule which you want to delete and press Enter on remote control. A confirmation message appears
3. Select CANCEL or Delete the selected schedule or Delete all schedules
4. Press Enter to confirm
Viewing Schedule Status
1. Select the Status tab from the menu bar. The schedule list is displayed
2. Select a schedule from the list and press Enter
3. Select Enable the selected schedule or Pause the selected schedule
4. Press Enter to confirm.
20
Viewing Recorded History
1. Select the History tab from the menu bar.
You can view your recorded history in this menu
One Touch Record
You can start recording a program at any time by using the RECORD button on the remote control or the front of the MediaStation.
Press to begin recording or to resume when recording has been paused.
Press repeatedly to set OTR (One Touch Record) length (30 minutes / 60 minutes / 90 minutes / 120 minutes / 180 minutes / 240 minutes /
Off)
Time Shift Recording
Press the TIME SHIFT button on the remote control to activate the Time Shift function. This allows you to pause live TV and resume the
program from the point you left it. While paused, the program is recorded to the HDD, as long as the space is available.
Press to activate TIME SHIFT function and wait for the PLAY arrow to appear on the screen.
Press
and the program will be paused.
Press
to resume viewing the program.
Time Shift mode remains active until you press the
button.
21
Browser Menu
Select Browser from the main menu or press the Browser button on the remote control to browse the content on the hard drive, or any other
storage device connected to the MediaStation. You can browse by Movie, Photo, Music or All files stored on a USB Device, Card Reader, HDD,
and NET.
There are 2 USB host connections on the MediaStation; one on the front of the device and one on the back. Plug in any USB Drive directly into
the port, or external storage device (Verbatim Portable Hard Drive) using a USB2.0 cable.
Creating a Playlist
Playlist’s can only be created with music files from the built in hard drive. In Browser select the Music tab and choose the folder where your
music files are stored. Highlight each file you want adding to the playlist by pressing the REC button on the remote control. A red ‘tick’ will
appear at the side of the file name indicating that the file has been selected. Once you have selected all the files you want in the playlist press
Enter. The files are now copied into the Playlist folder. Select the folder to playback the play list.
Browsing All
Select the All tab by using the left/right buttons on the remote control. All directories and supported content will be displayed from the
storage device you have selected.
Press S and T to select the folder or files you want to play and press Enter
Browsing Music
Select the Music tab by using the left/right buttons on the remote control. All directories and supported audio files will be displayed from
the storage device you have selected.
Press S and T to select the file you want to play and press Enter
Browsing Photos
Select the Photo tab by using the left/right buttons on the remote control. All directories and supported image files will be displayed from
the storage device you have selected.
Press S and T to select the photo you want to display and press Enter
While browsing a photo you can press W or X to rotate a photo. You can also use the Zoom function to zoom in and out on the photo. Use
the Zoom button the remote control. Three zoom levels are available.
One Touch Copy button
On the front of the MediaStation is a One Touch Copy button to enable fast copy of photos from the SD/SDHC/MS memory card to the hard
drive.
Insert the card into the memory card slot and press the button. Photo’s are copied across and automatically saved in a folder called
PHOTOBANK.
22
Browsing Movies
Select the Movies tab by using the left/right buttons on the remote control. All directories and supported video files will be displayed from
the storage device you have selected.
Press S and T to select the movie files you want to play. When you highlight the video file the movie will start to play in the preview pane.
Press Enter to play the movie in full screen mode.
This browsing movies function supports High Definition Video (720P, 1080i) Playback
For example: MPEG1 (DAT, MPG), MPEG2 (VOB, MPG, TS), and MPEG4 (AVI, DIVX, XVID)
Browsing content via the Network (NET)
To browse content via the network make sure you have set up a network connection. Details on how to do this can be found in Changing
Network Settings section.
My Short Cuts
Links that you set up to networked devices can be stored as shortcuts. These links are saved in My Shortcuts folder. Use the links to get
quicker access to LAN (local area network) devices.
Connecting to a Network Device
The devices that are connected to the network will appear in a range of folders under the NET menu option. See the example below. The
names of the folders will depend on the network(s) you are connected to.
Please note: Depending on the network environment you are working in, the location of the devices that you have access to may vary. For
example your PC/Notebook may be located in My Neighbors or in WORKGROUP
Select the folder and press enter
Select the path (Device name) for the device and press Enter. Following this you will be prompted for the Net User ID and Net Password
23
Enter the User ID and the Net Password by highlighting each field and pressing enter. This will bring up keypad menu.
The Net User ID and password are typically your OS (Operating System) login name and password. If you’re shared PC doesn’t have a
password please leave it blank.
After typing in Net User ID press OK on the key pad. Follow the same procedure for the Net Password.
Finally, scroll to OK and press Enter to finish the setting.
You can save to My Shortcuts by selecting OK & Save to My Shortcuts, and pressing Enter
24
You will now be able to see all the folders files on the device. Select the file you want to play and press Enter
File Edit Menu
You can delete and change the name of folders and files under the Browser Menu to suit your requirements. When navigating folders and
files highlight the folder or file and press the Edit button on the remote control. A sub menu will pop up with three options: Return, Rename,
and Delete.
Return
Select to return to the main screen.
To rename a file do the following:
1. Press S and T on the remote control to select the Rename tab and press Enter. This will bring up
key pad menu.
Rename
2. Use the navigation buttons and type in the name you require. Press Enter after each letter or
number is selected.
3. Once you have entered the new name, select OK and press Enter to confirm all changes.
If you want to cancel during the process press the Return button on the remote control
25
To delete a title, do the following:
1. Press S and T on the remote control to select the Delete tab and press Enter.
2. Select OK and press Enter to confirm deletion.
Delete
File Copy Menu
You can copy or move files from different storage locations (USB / CARD / HDD / NET) to each other. For example you can copy a file that is
located on your USB device to the hard drive of the MediaStation.
Select File Copy from the main menu or press the Copy button on the remote control
Follow the procedure below to copy or move a file from one location to another.
1. Select the Source device: Press S and T to select the device from which you want to copy from
2. Press X to select Destination Device. (Press W to return)
26
3. Select the Destination device: Press S and T to select the device you want to copy too
4. Press X to next step. (press W to return)
5. At the Source sector, press S and T to highlight the folder or files that you want to copy. Then press the record button on the remote
control
. The following symbol
will appear at the side of your selection. (see example below)
6. Then press X to next step. (press W to return)
27
7. At the Destination sector, press S and T to select the folder of destination.
Note: If you are copying or moving a file to a location other than the internal hard drive you will need to press Enter at the route to enter the folder structure
8. Then press X to next step. (press W to return) The following popup menu will appear:
28
9. Select Copy or Move to copy/move the file. Select Cancel to exit
The screen will show the file being copied or moved. Once completed the system will display; File Copy Completed. If the file did not copy
successfully the system will display File Copy failed
Once the file copy has been completed select OK to browse files or select No
Utilities
Transcode Server
Hi definition files such as H.264 files can be played back using Transcode Server on your PC or Notebook via your network or wireless
network
Other file types can also be played in the same way including RM, RMVB, and WMV
Please follow the instructions to install the software.
Step 1:
Insert the CD and copy the Transcode Server to the designated directory.
Double click to run the program. Transcode Server will then automatically install.
➟
➟
29
Step 2: Next
Step 3: Browser folder
30
Step 4: Install
Step 5: Copying new files
31
Step 6: Finish. You can start use the software.
Run the software
Step 1: Double click to run the program.
Step 2: Transcode Status: Transcoding information.
32
Step 3: Net Share Dialog:
Add your files on your PC or Notebook (RM, RMVB, WMV, H.264...) to enable real-time streaming playback via the network or wireless
network.
To add files you will need to set the Sharing Properties of the folder that contains your files to Share this Folder.Once this is completed you
can add the files to the Transcode Server.
The files will now be visable on the MediaStation via the Net option under the Browser menu
Setting: Auto Run System Starup Yes or No
Nero Move it Essentials Software
The MediaStation HD DVR comes with Nero Move it Essentials software providing automatic file conversion. Transfer media files from one
device to another using Move It and get instant playback compatibility.
33
Specification / Video Recording Time and Capacity
Product Specification
HDD Type
3.5” SATA
Capacity
Available: 500GB / 640GB / 1TB
HDD Format
NTFS
Product Dimensions
210 x 64.5 x 162mm (WxHxD)
Output
HDMI
Component Video Output
Composite (AV)
Optical
Coaxial Digital Audio
DVB-T/Analogue (TV Out)
Input
Composite (AV)
DVB-T/Analogue (TV In)
Interfaces
SD/SDHC/MS Memory Card Slot
USB Host (Type A) x 2
LAN x 1 (Ethernet)
USB Device (Type C)
LCD Display
60 x 32.6mm. White text on blue background
Power
12V DC On/Off Rocker Switch. Stand by button
User Interface Language Set
English, French, Italian, German, Spanish, Polish, Portuguese,
Bulgarian, Croatian, Russian, Danish, Swedish
TV System
Standard: NTSC & PAL
Resolution: up to 1080i
File Format
Media Play Back Support
Recording Features
Network Feature
Audio
MP3, WMA, WAV7/8, OGG, AAC
Video
MPEG-1 (.dat.mpg.mpeg.iso.vob),
MPEG-2 (.mpg.mpeg.ifo.vob.iso.
ts), MPEG-4 (.avi.mkv.XviD.)
DIVX 3/4/5/6/ (.avi.mkv)
MP 4 AVC (H.264) via supplied
Transcode Server
Photo
JPG. JPEG, BMP
One Touch Record
Record to HDD only
Recording
HDD/USB Host/Memory Card
Time Shift
HDD only
Schedule Recording
Create, Edit, Delete recording
schedules
Recording Quality
HQ / SP / LP / EP / SLP
Ethernet
10/100Mbps
Wireless LAN
IEEE 802.11 b/g, up to 54Mbps
VIDEO RECORDING MODE
Mode
DVD
80 GB HDD
120 GB HDD
160 GB HDD
HQ
1hr
16hrs
24hrs
33hrs
SP
2hrs
32hrs
48hrs
66hrs
LP
3hrs
48hrs
72hrs
99hrs
EP
4hrs
64hrs
96hrs
132hrs
SLP
6hrs
96hrs
144hrs
198hrs
34
Formatting the hard disk
The hard drive inside the MediaStation comes preformatted NTFS format.
You can re-format the hard drive by selecting Setup from the main menu, or pressing the Setup button on the remote control. Select System
from the sub menu and then scroll down to HDD Format.
The following Warning window will appear.
Highlight the OK
K tab and press Enter to go to the next step. Alternatively select Cancel to return.
If you have selected OK please follow the format procedure accordingly.
Step 1: Adjust the capacity for time shift buffer accordingly
1. Press S and T to increase or decrease the size of buffer. The maximum buffer is 4 hours.
2. Select Next for the next step or Back to return.
35
Step 2: Hard disk format
1. Select Format to format the hard drive or Back to return.
2. Press Enter to confirm
Step 3: Congratulation page
Once formatting is completed the system will display the congratulation page. Select OK
K to confirm and exit
Technical Support
If you are experiencing difficulty installing or using your Verbatim product, please visit the main Verbatim Technical Support website at www.
verbatim-europe.com. From this page you can access our library of user documentation, read answers to frequently asked questions, and
download available software updates. Although most of our customers find this content sufficient to put them back on the right track, this
page also lists ways in which you can contact the Verbatim Technical Support Team directly.
Europe: For technical support in Europe e-mail [email protected] or call 00 800 3883 2222 in the following countries:
Austria, Belgium, Denmark, Finland, France, Germany, Hungary, Italy, Luxemburg, Monaco, Netherlands, Norway, Poland, Portugal, Republic
36
of Ireland, Spain, Sweden, Switzerland and the United Kingdom. All other countries call +353 61 226586.
Limited Warranty Terms
Verbatim Limited warrants this product to be free from defects in material and workmanship for a period of 2 years from date of purchase.
This warranty excludes batteries. If this product is found to be defective within the warranty period, it will be replaced at no cost to you. You
may return it with your original cash register receipt to the place of purchase or contact Verbatim.
In the following European countries, Austria, Belgium, Denmark, Finland, France, Germany, Greece, Hungary, Italy, Luxembourg, Monaco,
Netherlands, Norway, Poland, Portugal, Republic of Ireland, Spain, Sweden, Switzerland, and the United Kingdom call 00 800 3883 2222. All
other European countries call +353 61 226586. You can email [email protected].
Product replacement is your sole remedy under this warranty, and this warranty does not apply to normal wear or to damage resulting from
abnormal use, misuse, abuse, neglect or accident, or to any incompatibility or poor performance due to the specific computer software
or hardware used. VERBATIM WILL NOT BE LIABLE FOR DATA LOSS OR ANY INCIDENTAL, CONSEQUENTIAL OR SPECIAL DAMAGES,
HOWEVER CAUSED, FOR BREACH OF WARRANTIES OR OTHERWISE. This warranty gives you specific legal rights and you may also have
other rights which vary from state to state or country to country
WEEE Notice
The Directive on Waste Electrical and Electronic Equipment (WEEE), which entered into force as European law on 13th February 2003,
resulted in a major change in the treatment of electrical equipment at end-of-life.
The WEEE logo (shown at the left) on the product or on its box indicates that this product must not be disposed of or
dumped with your other household waste. For more information about electronic and electrical waste equipment disposal,
recovery, and collection points, please contact your local municipal household waste disposal service or shop from where
you purchased the equipment.
CE Declaration
EC DECLARATION OF CONFORMITY
It is hereby declared that this product complied with the essential protection requirements of Council Directive 89/336/EEC and its
amendments on the approximation of the laws of the Member States relating to electromagnetic compatibility.
This declaration applies to all specimens manufactured identical to the model submitted for testing/evaluation.
EN 55022: 1998 + A1: 2000 +A2: 2003
EN 61000-3-3:1995 + A1: 2001
EN 55024: 1998 + A1: 2001 + A2: 2003
IEC 61000-4-2: 1995 + A1: 1998 + A2: 2000
IEC 61000-4-3: 2002 + A1: 2002
IEC 61000-4-4: 1995 + A1: 2000 + A2: 2001
IEC 61000-4-5: 1995 + A1: 2000
IEC 61000-4-6: 1996 + A1: 2000
IEC 61000-4-8: 1993 + A1: 2000
IEC 61000-4-11: 1994 + A1: 2000
RoHS Compliance
This product is in compliance with Directive 2002/95/EC of the European Parliament and of the Council of 27 January 2003, on the restriction
of the use of certain hazardous substances in electrical and electronic equipment (RoHS) and its amendments.
THIS DEVICE COMPLIES WITH PART 15 OF THE FCC RULES. OPERATION IS SUBJECT TO THE FOLLOWING TWO CONDITIONS:
(1) THIS DEVICE MAY NOT CAUSE HARMFUL INTERFERENCE, AND
(2) THIS DEVICE MUST ACCEPT ANY INTERFERENCE RECEIVED, INCLUDING INTERFERENCE THAT MAY CAUSE UNDESIRED OPERATION.
37